Building a rocking chair out of 2x4s is a rewarding DIY project that combines functionality with rustic charm, and here at rockscapes.net, we’re all about blending practicality with aesthetic appeal. With the right plans, tools, and a little elbow grease, you can create a comfortable and stylish rocking chair for your porch, patio, or living room using readily available lumber and turning your outdoor space into a stunning landscape. This guide offers a comprehensive approach to crafting your own rocking chair, ensuring a durable and attractive piece of furniture that will last for years to come, enhancing the visual appeal of your rock garden and landscape design.
1. Why Build a Rocking Chair Out of 2x4s?
Building a rocking chair from 2x4s presents numerous advantages:
- Cost-Effectiveness: 2×4 lumber is widely accessible and relatively inexpensive compared to hardwoods.
- Durability: When properly constructed, a 2×4 rocking chair can withstand significant weight and resist wear and tear.
- Customization: You can easily modify the design to fit your specific needs and preferences.
- DIY Satisfaction: Building your own furniture provides a sense of accomplishment and pride.
- Rustic Aesthetic: The natural look of 2x4s lends itself well to a rustic or farmhouse-style décor.
 Rocking Chair Made from 2x4s
Alt Text: A beautifully crafted rocking chair constructed entirely from standard 2×4 lumber, showcasing the potential for creating stylish and comfortable outdoor furniture from affordable materials.
2. Essential Tools and Materials
Before starting your project, gather the necessary tools and materials.
Tools:
- Safety Glasses Always wear safety glasses when operating power tools.
- Measuring Tape For accurate measurements and layout.
- Pencil For marking cut lines and assembly points.
- Circular Saw or Table Saw For cutting 2x4s to length.
- Miter Saw For making precise angle cuts.
- Jigsaw For cutting curved shapes.
- Drill/Driver With drill bits and driver bits for screws.
- Sander To smooth rough edges and surfaces.
- Clamps To hold pieces together during glue-up.
- Carpenter’s Square To ensure right angles.
- Level To ensure a level seat and rockers.
- Router with Roundover Bit For softening edges and creating a professional finish.
Materials:
- 2×4 Lumber (Quantity depends on the design, but approximately 80-100 linear feet is typical.)
- Wood Glue Exterior-grade wood glue for durability.
- Screws Exterior-grade screws (various lengths).
- Sandpaper Various grits (80, 120, 220).
- Wood Finish (Paint, stain, or sealant) to protect the wood.
- Wood Putty To fill nail holes and imperfections.
- Rocking Chair Plans (Numerous free and paid options are available online.)
3. Selecting the Right 2×4 Lumber
Choosing the appropriate 2×4 lumber is crucial for the longevity and aesthetic appeal of your rocking chair. Here’s what to consider:
- Wood Type:
- Pine: A budget-friendly option, easy to work with but less resistant to rot and insects.
- Cedar: Naturally resistant to rot and insects, making it ideal for outdoor use.
- Redwood: Similar to cedar in terms of durability but often more expensive.
- Pressure-Treated Lumber: Designed for ground contact, offering excellent protection against decay and pests.
- Quality: Select straight, knot-free boards. Avoid lumber with excessive warping, twisting, or cracks.
- Moisture Content: Ensure the lumber is properly dried to prevent warping and cracking after assembly.
4. Finding Rocking Chair Plans
Numerous resources provide rocking chair plans suitable for 2×4 construction. Consider these options:
- Online DIY Websites: Websites like Rockscapes.net, Ana White, and Instructables offer free plans and tutorials.
- Woodworking Magazines: Publications like “Popular Woodworking” and “Fine Woodworking” often feature furniture plans.
- Online Marketplaces: Etsy and other online marketplaces sell downloadable rocking chair plans.
- Books: Libraries and bookstores carry woodworking books with detailed furniture plans.
When selecting plans, consider your skill level, the complexity of the design, and the desired style of the rocking chair.
5. Understanding Rocking Chair Design Principles
Before diving into the construction process, it’s helpful to understand the basic design principles of a rocking chair.
- Seat Height and Angle: The seat should be at a comfortable height for sitting and getting up. A slight backward tilt enhances comfort.
- Backrest Angle: The backrest should provide adequate support and promote relaxation.
- Rocker Shape and Length: The shape and length of the rockers determine the smoothness of the rocking motion. A longer rocker provides a gentler motion, while a shorter rocker offers a more pronounced rocking action.
- Center of Gravity: The center of gravity should be positioned to prevent the chair from tipping forward or backward excessively.
- Armrest Height and Placement: Armrests should be at a comfortable height and positioned to support the arms naturally.
6. Step-by-Step Construction Guide
This guide provides a general overview of the construction process. Always refer to your chosen plans for specific measurements and instructions.
Step 1: Cut the Lumber
Using your plans as a guide, cut the 2x4s to the required lengths for the various components:
- Seat Supports: Cut the front, back, and side supports.
- Seat Slats: Cut the slats that will form the seat.
- Backrest Supports: Cut the vertical and horizontal supports.
- Backrest Slats: Cut the slats for the backrest.
- Legs: Cut the front and back legs.
- Stretchers: Cut the stretchers that connect the legs.
- Rockers: Cut the rocker blanks according to the plan’s dimensions.
- Armrests: Cut the armrest blanks.
Step 2: Assemble the Seat Frame
- Join the front, back, and side seat supports using wood glue and screws. Ensure the frame is square using a carpenter’s square.
- Attach the seat slats to the frame using wood glue and screws, spacing them evenly.
 Assembling the Seat Frame
Alt Text: Close-up view of the seat frame assembly, showing the attachment of individual 2×4 slats to the frame using screws and wood glue, ensuring a sturdy and comfortable seating surface.
Step 3: Assemble the Backrest
- Join the vertical and horizontal backrest supports using wood glue and screws.
- Attach the backrest slats to the frame, spacing them evenly.
Step 4: Shape the Rockers
- Trace the rocker pattern onto the rocker blanks.
- Cut out the rockers using a jigsaw, following the traced lines.
- Smooth the edges of the rockers using a sander.
- Use a router with a roundover bit to soften the edges of the rockers.
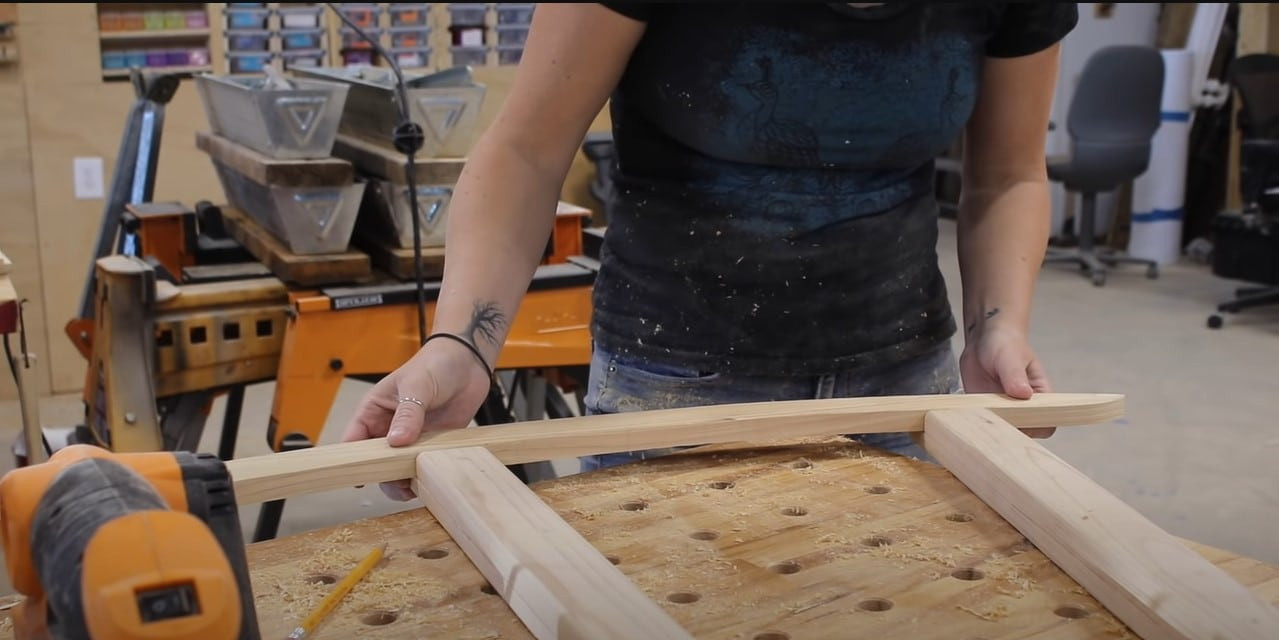 Creating Rocking Chair Rockers
Alt Text: The process of shaping the rocking chair’s curved base, highlighting the use of a template and jigsaw to create the smooth, consistent curves necessary for a comfortable rocking motion.
Step 5: Assemble the Legs and Stretchers
- Connect the front and back legs with the stretchers using wood glue and screws.
- Ensure the legs are square and level.
Step 6: Attach the Seat to the Legs
- Position the seat frame on top of the legs.
- Attach the seat frame to the legs using wood glue and screws.
Step 7: Attach the Backrest to the Seat
- Position the backrest on the back of the seat.
- Attach the backrest to the seat using wood glue and screws.
- Ensure the backrest is at the correct angle for comfortable support.
Step 8: Attach the Rockers to the Legs
- Position the rockers under the legs, ensuring they are aligned properly.
- Attach the rockers to the legs using wood glue and screws.
- Reinforce the connection with additional screws or bolts if necessary.
Step 9: Add the Armrests
- Position the armrests on top of the legs and backrest supports.
- Attach the armrests using wood glue and screws.
- Ensure the armrests are at a comfortable height and angle.
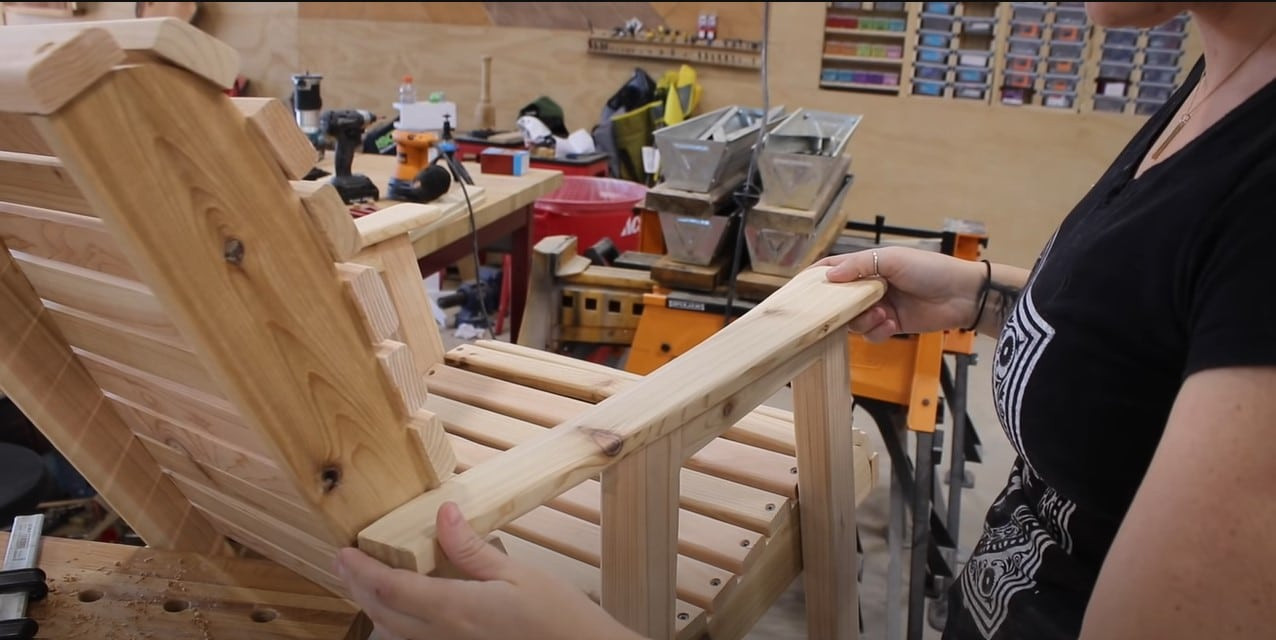 Adding Arms to the Rocking Chair
Alt Text: The final stage of assembly, where the armrests are carefully attached to the chair frame, enhancing both the comfort and aesthetic appeal of the finished rocking chair.
Step 10: Sand and Finish
- Sand all surfaces of the rocking chair using progressively finer grits of sandpaper (80, 120, 220).
- Fill any nail holes or imperfections with wood putty.
- Apply a wood finish of your choice (paint, stain, or sealant) to protect the wood and enhance its appearance.
- Allow the finish to dry completely before using the rocking chair.
7. Tips for a Successful Rocking Chair Build
- Accurate Measurements: Precise measurements are crucial for a well-fitting and functional rocking chair. Double-check all measurements before cutting.
- Strong Joints: Use high-quality wood glue and screws to ensure strong, durable joints.
- Proper Alignment: Ensure all components are properly aligned before fastening.
- Smooth Surfaces: Sand all surfaces thoroughly to eliminate splinters and create a comfortable feel.
- Durable Finish: Apply a durable finish to protect the wood from the elements and extend the life of the rocking chair.
- Test the Rocking Motion: Before applying the final finish, test the rocking motion to ensure it is smooth and comfortable.
8. Customizing Your Rocking Chair
One of the great advantages of building your own rocking chair is the ability to customize it to your specific tastes and needs. Consider these options:
- Paint or Stain: Choose a paint or stain color that complements your décor.
- Cushions: Add cushions for extra comfort.
- Engraving: Engrave your name or a special message on the backrest or armrests.
- Decorative Details: Add decorative details such as carved accents or metal hardware.
- Vary Slat Design: Alternate the spacing and thickness of the 2×4 slats on the back.
9. Maintaining Your 2×4 Rocking Chair
To keep your 2×4 rocking chair looking its best and functioning properly, follow these maintenance tips:
- Regular Cleaning: Clean the chair regularly with a damp cloth to remove dirt and grime.
- Re-Finishing: Re-apply the finish every few years to protect the wood from the elements.
- Tighten Screws: Check and tighten screws periodically to prevent loosening.
- Store Indoors: Store the rocking chair indoors during harsh weather to prolong its life.
- Inspect for Damage: Regularly inspect the chair for signs of damage, such as cracks or rot, and repair as needed.
10. Troubleshooting Common Issues
- Wobbly Rocking Chair: Check the rockers for unevenness or loose connections. Shim or re-attach as needed.
- Rough Rocking Motion: Sand the rockers to smooth out any imperfections.
- Cracking Wood: Ensure the wood is properly dried and protected with a durable finish.
- Loose Joints: Re-glue and screw any loose joints.
11. The Environmental Benefits of DIY Furniture
Building your own furniture offers several environmental benefits:
- Reduced Consumption: By building your own furniture, you reduce your consumption of mass-produced items.
- Sustainable Materials: You can choose to use sustainably sourced lumber.
- Reduced Transportation: DIY furniture eliminates the need for transportation of finished products, reducing carbon emissions.
- Longer Lifespan: DIY furniture is often built to last longer than mass-produced items, reducing waste.
12. Rocking Chair Variations and Design Ideas
Expand your creativity with these rocking chair variations and design ideas:
- Adirondack Rocking Chair: Combine the classic Adirondack chair design with a rocking base.
- Porch Rocker: A traditional design with a high back and wide seat, perfect for relaxing on the porch.
- Modern Rocking Chair: A sleek and minimalist design with clean lines and simple curves.
- Children’s Rocking Chair: A smaller version of a rocking chair designed for children.
- Glider Rocking Chair: A rocking chair with a gliding motion instead of a traditional rocking motion.
13. Turning Your Rocking Chair into a Landscape Feature
A rocking chair can be more than just a piece of furniture, it can be an integral part of your landscape design. Here are some ideas:
- Focal Point: Place the rocking chair in a prominent location to create a focal point in your garden or on your porch.
- Seating Area: Create a cozy seating area around the rocking chair with other chairs, a small table, and potted plants.
- Rock Garden Integration: Position the rocking chair within a rock garden, surrounded by natural stones and drought-tolerant plants.
- Pathway Destination: Place the rocking chair at the end of a winding pathway, inviting visitors to relax and enjoy the view.
- Themed Garden: Incorporate the rocking chair into a themed garden, such as a cottage garden or a Zen garden.
14. Why Rockscapes.net is Your Go-To Resource for Outdoor Living
At rockscapes.net, we’re passionate about helping you create beautiful and functional outdoor spaces. Whether you’re looking for inspiration for your next landscaping project or need expert advice on selecting the right materials, we’ve got you covered.
Explore our website for:
- Extensive galleries of landscape design ideas.
- Detailed information on various types of natural stone.
- Step-by-step guides for DIY landscaping projects.
- A directory of trusted landscaping professionals in your area.
- A wealth of resources for creating the outdoor oasis of your dreams.
15. Rocking Chair Safety Considerations
Safety should always be a top priority when building and using a rocking chair. Keep these considerations in mind:
- Stability: Ensure the rocking chair is stable and does not tip easily.
- Weight Capacity: Do not exceed the weight capacity of the chair.
- Child Safety: Supervise children when they are using the rocking chair.
- Placement: Place the rocking chair on a level surface, away from hazards such as stairs or edges.
- Maintenance: Regularly inspect the chair for signs of damage and repair as needed.
16. The Psychology of Rocking: Why We Find it So Relaxing
The gentle, rhythmic motion of a rocking chair has a calming effect on the mind and body. Here’s why:
- Vestibular System: Rocking stimulates the vestibular system, which is responsible for balance and spatial orientation. This stimulation can reduce anxiety and promote relaxation.
- Endorphin Release: Rocking can trigger the release of endorphins, which have mood-boosting and pain-relieving effects.
- Mimicking Infancy: The rocking motion mimics the feeling of being cradled as an infant, providing a sense of comfort and security.
- Stress Reduction: Rocking can lower heart rate and blood pressure, reducing stress and promoting a sense of well-being.
17. The History of the Rocking Chair
The rocking chair has a rich history, dating back to the early 18th century. Here are some key milestones:
- Early Origins: The earliest rocking chairs were likely created by adding rockers to existing chairs.
- Benjamin Franklin: Benjamin Franklin is often credited with popularizing the rocking chair in America.
- Thonet Rocking Chair: Michael Thonet’s bentwood rocking chair, introduced in the mid-19th century, became a design icon.
- Modern Rocking Chairs: Today, rocking chairs are available in a wide range of styles and materials, from traditional wooden designs to contemporary metal and plastic models.
18. Sourcing Sustainable Materials for Your Rocking Chair
To minimize the environmental impact of your rocking chair project, consider sourcing sustainable materials:
- FSC-Certified Lumber: Look for lumber that is certified by the Forest Stewardship Council (FSC), ensuring it comes from responsibly managed forests.
- Reclaimed Wood: Use reclaimed wood from old buildings or furniture.
- Recycled Materials: Incorporate recycled materials such as plastic lumber or metal components.
- Low-VOC Finishes: Choose low-VOC (volatile organic compound) paints, stains, and sealants to reduce air pollution.
19. Adding Comfort: Cushions, Pillows, and Throws
Enhance the comfort of your 2×4 rocking chair with cushions, pillows, and throws:
- Seat Cushion: A seat cushion provides extra padding and support for the seat.
- Backrest Pillow: A backrest pillow offers additional lumbar support.
- Armrest Pads: Armrest pads cushion the armrests and prevent discomfort.
- Throw Blanket: A throw blanket adds warmth and coziness.
- Outdoor Fabrics: Choose outdoor fabrics that are water-resistant and fade-resistant for long-lasting durability.
20. Rocking Chair Placement: Maximizing Comfort and Aesthetics
Consider these placement tips to maximize the comfort and aesthetics of your rocking chair:
- Shady Spot: Place the rocking chair in a shady spot to avoid direct sunlight.
- Scenic View: Position the chair to take advantage of a scenic view.
- Protected Area: Place the chair in a protected area, away from wind and rain.
- Conversation Area: Create a conversation area by grouping the rocking chair with other seating options.
- Landscape Integration: Integrate the rocking chair into the surrounding landscape by adding plants, rocks, and other natural elements.
21. Incorporating the Rocking Chair into Different Landscaping Styles
The versatility of a 2×4 rocking chair allows it to seamlessly integrate into various landscaping styles:
- Rustic Landscape: Pair the rocking chair with natural stone pathways, native plants, and weathered wood accents.
- Cottage Garden: Surround the rocking chair with colorful flowers, climbing vines, and whimsical garden ornaments.
- Modern Landscape: Combine the rocking chair with sleek concrete pavers, minimalist plantings, and geometric design elements.
- Coastal Landscape: Place the rocking chair on a sandy patio, surrounded by beach grasses, driftwood, and nautical décor.
- Desert Landscape: Integrate the rocking chair into a rock garden, surrounded by cacti, succulents, and drought-tolerant shrubs.
22. Addressing Common Concerns About 2×4 Furniture
Some people may have concerns about the appearance and durability of 2×4 furniture. Here’s how to address those concerns:
- Appearance: Choose high-quality lumber, sand surfaces thoroughly, and apply a professional finish to enhance the appearance of the 2x4s.
- Durability: Use exterior-grade wood glue and screws, reinforce joints as needed, and apply a durable finish to protect the wood from the elements.
- Comfort: Add cushions, pillows, and throws to enhance the comfort of the rocking chair.
- Design: Choose a design that complements your style and décor.
23. Essential Safety Gear and Practices
Prioritize safety when constructing your 2×4 rocking chair. Here’s a checklist:
- Safety Glasses: Always wear safety glasses to protect your eyes from flying debris.
- Hearing Protection: Use earplugs or earmuffs to protect your hearing from loud noises.
- Dust Mask: Wear a dust mask to prevent inhalation of sawdust and other particles.
- Gloves: Wear gloves to protect your hands from splinters and chemicals.
- Proper Clothing: Wear appropriate clothing, avoiding loose garments that could get caught in machinery.
- Tool Safety: Follow all safety guidelines provided by the manufacturers of your power tools.
- Work Area: Keep your work area clean and organized.
- Ventilation: Ensure adequate ventilation when working with paints, stains, and sealants.
24. Rocking Chair as a Gift: Personalizing Your Creation
A handmade rocking chair makes a thoughtful and personalized gift. Consider these ideas:
- Engrave a Message: Engrave a special message or the recipient’s name on the backrest or armrests.
- Choose Custom Fabric: Select fabric for cushions and pillows that reflects the recipient’s style and preferences.
- Add a Handmade Quilt: Include a handmade quilt or throw blanket to complete the gift.
- Personalize the Finish: Choose a paint or stain color that matches the recipient’s décor.
- Include a Gift Basket: Add a gift basket filled with items such as books, candles, or snacks.
25. The Future of DIY Furniture and Sustainable Living
The DIY furniture movement is growing in popularity as people seek more sustainable and personalized ways to furnish their homes. Here are some trends to watch:
- Upcycling and Repurposing: More people are upcycling and repurposing old materials to create unique and eco-friendly furniture.
- Community Workshops: Community workshops and maker spaces are providing access to tools and resources for DIY furniture projects.
- Online Tutorials and Plans: Online tutorials and plans are making it easier than ever to learn how to build your own furniture.
- Sustainable Materials: The demand for sustainable materials is driving innovation in the lumber and finishing industries.
- Minimalist Design: A growing trend towards minimalist design is encouraging people to create simple, functional furniture that lasts.
26. Why Choose a Rocking Chair for Your Outdoor Space?
Rocking chairs are the perfect addition to any outdoor space, offering a combination of comfort, style, and relaxation.
- Comfort: Rocking chairs provide a gentle, rhythmic motion that is soothing and relaxing.
- Style: Rocking chairs come in a wide range of styles to complement any décor.
- Versatility: Rocking chairs can be used on porches, patios, decks, and in gardens.
- Socializing: Rocking chairs create a welcoming and inviting atmosphere for socializing with friends and family.
- Stress Relief: Rocking chairs can help to reduce stress and promote a sense of well-being.
27. The Art of Rocking: Finding Your Perfect Rhythm
Finding the perfect rocking rhythm is an art form. Here are some tips:
- Start Slow: Begin with a slow, gentle rocking motion.
- Find Your Pace: Gradually increase the pace until you find a comfortable rhythm.
- Use Your Core: Engage your core muscles to maintain a smooth and consistent motion.
- Relax Your Body: Relax your body and allow the rocking motion to soothe you.
- Enjoy the Moment: Take a deep breath and enjoy the moment.
28. Addressing Specific Regional Considerations in the USA
When building a 2×4 rocking chair in the USA, consider these regional factors:
- Climate: Choose lumber and finishes that are appropriate for your local climate. In humid regions, use rot-resistant lumber and waterproof finishes. In dry regions, use lumber that is less prone to cracking.
- Pests: Protect your rocking chair from pests by using treated lumber or applying pest-resistant finishes.
- Local Materials: Support local businesses by sourcing materials from nearby suppliers.
- Building Codes: Check local building codes to ensure your rocking chair meets all requirements.
29. The Importance of Proper Ergonomics in Rocking Chair Design
Ergonomics plays a crucial role in the comfort and functionality of a rocking chair. Consider these factors:
- Seat Height: The seat height should be appropriate for your height, allowing your feet to rest comfortably on the ground.
- Backrest Angle: The backrest angle should provide adequate lumbar support.
- Armrest Height: The armrest height should allow your arms to rest comfortably at your sides.
- Seat Depth: The seat depth should be appropriate for your leg length.
- Rocker Shape: The rocker shape should provide a smooth and comfortable rocking motion.
30. Maximizing the Lifespan of Your 2×4 Rocking Chair
To ensure your 2×4 rocking chair lasts for many years, follow these tips:
- Proper Construction: Use high-quality materials and construction techniques.
- Protective Finish: Apply a durable finish to protect the wood from the elements.
- Regular Maintenance: Clean and re-finish the chair as needed.
- Proper Storage: Store the chair indoors during harsh weather.
- Careful Use: Avoid overloading the chair or using it in a way that could cause damage.
31. Integrating Your Rocking Chair with Other Outdoor Elements
A rocking chair can be beautifully integrated with other outdoor elements to create a cohesive and inviting space. Consider these ideas:
- Fire Pit: Place the rocking chair near a fire pit for cozy evenings outdoors.
- Water Feature: Position the chair near a water feature, such as a fountain or pond, for a relaxing ambiance.
- Pergola or Arbor: Place the rocking chair under a pergola or arbor for shade and shelter.
- Outdoor Lighting: Add outdoor lighting to create a warm and inviting atmosphere.
- Planters and Flowers: Surround the rocking chair with planters and flowers to add color and beauty.
32. Expanding Your DIY Skills: Other Projects to Try
Once you’ve built your 2×4 rocking chair, consider expanding your DIY skills with these projects:
- Outdoor Bench: Build a matching outdoor bench to create a complete seating area.
- Coffee Table: Construct a simple coffee table to place in front of the rocking chair.
- Planter Boxes: Build planter boxes to add greenery and color to your outdoor space.
- Birdhouse: Create a birdhouse to attract birds to your garden.
- Garden Gate: Build a garden gate to add charm and security to your property.
33. The Therapeutic Benefits of Rocking: A Deeper Dive
Beyond mere relaxation, rocking offers profound therapeutic benefits:
- Improved Circulation: The gentle motion can improve blood circulation.
- Pain Relief: Rocking can alleviate chronic pain, especially back pain.
- Cognitive Function: Studies suggest rocking can improve cognitive function and memory.
- Mental Health: Rocking can reduce symptoms of anxiety, depression, and insomnia.
- Rehabilitation: Rocking is used in rehabilitation programs to improve balance and coordination.
- Alzheimer’s Disease: For individuals with Alzheimer’s, rocking can provide comfort and reduce agitation.
34. Rocking Chair Etiquette: A Guide to Gracious Rocking
Even rocking has its etiquette! Here are a few tips:
- Respect Others: Avoid rocking too vigorously, especially in close proximity to others.
- Be Mindful of Noise: Be aware of the noise your rocking chair may be making, especially indoors.
- Offer a Rock: If someone looks tired or stressed, offer them a seat in your rocking chair.
- Share the Space: If you’re in a public space, be mindful of others and share the rocking chair if possible.
35. Elevating Your Rocking Chair with Artistic Touches
Unleash your creativity by adding artistic touches to your rocking chair:
- Hand-Painted Designs: Paint intricate designs or patterns on the backrest or armrests.
- Wood Burning: Use a wood-burning tool to create unique designs or personalized messages.
- Mosaic Accents: Add mosaic accents to the seat or backrest using colorful tiles or glass.
- Carved Details: Carve intricate details into the wood to add texture and visual interest.
- Metal Inlays: Incorporate metal inlays into the wood for a touch of elegance.
36. The Art of Rocking Chair Photography: Capturing the Perfect Image
Capture the beauty of your rocking chair with these photography tips:
- Golden Hour Lighting: Shoot during the golden hour (early morning or late afternoon) for soft, warm lighting.
- Natural Setting: Photograph the rocking chair in a natural setting, such as a garden or porch.
- Focus on Details: Capture close-up shots of the chair’s details, such as the wood grain or carved accents.
- Composition: Use the rule of thirds to create a balanced and visually appealing composition.
- Add a Human Element: Include a person in the photo to add scale and interest.
37. Engaging Children in the Rocking Chair Project
Make building a rocking chair a family affair! Here’s how to involve children:
- Supervised Assistance: Allow children to help with simple tasks, such as sanding or painting, under close supervision.
- Design Input: Encourage children to share their design ideas and preferences.
- Safety Education: Teach children about tool safety and proper work habits.
- Pride and Ownership: Let children take pride in their contributions to the project.
- Rocking Chair Stories: Share stories about rocking chairs and their history.
38. Fostering Community Through Rocking Chair Projects
Rocking chair projects can be a powerful way to build community:
- Group Builds: Organize group rocking chair builds with friends, neighbors, or community organizations.
- Charitable Donations: Donate rocking chairs to local charities, nursing homes, or hospitals.
- Workshops: Host workshops to teach others how to build their own rocking chairs.
- Online Forums: Participate in online forums and share your experiences with other DIY enthusiasts.
- Community Gardens: Place rocking chairs in community gardens to create a welcoming space for relaxation and socializing.
39. Maximizing Your Investment: Rocking Chair Maintenance and Care
Treat your rocking chair well, and it will reward you for years to come.
- Regular Cleaning: Wipe down your rocking chair regularly with a damp cloth to remove dirt and dust.
- Protective Covers: Use protective covers during inclement weather.
- Sun Protection: Apply a UV-resistant finish to prevent fading and damage from the sun.
- Winter Storage: Store your rocking chair indoors during the winter months to protect it from the elements.
- Prompt Repairs: Repair any damage promptly to prevent further deterioration.
40. Rockscapes.net: Your Partner in Creating Stunning Outdoor Spaces
At rockscapes.net, we’re committed to providing you with the inspiration, information, and resources you need to create the outdoor space of your dreams. From selecting the perfect rocks and stones to building your own furniture and accessories, we’re here to help you every step of the way.
Visit our website today to:
- Explore our extensive gallery of landscape design ideas.
- Learn about the different types of natural stone and their applications.
- Find step-by-step guides for DIY landscaping projects.
- Connect with trusted landscaping professionals in your area.
- Discover the beauty and versatility of rockscapes.
Address: 1151 S Forest Ave, Tempe, AZ 85281, United States
Phone: +1 (480) 965-9011
Website: rockscapes.net
Ready to transform your outdoor space? Visit rockscapes.net today and let us help you create the landscape of your dreams! Discover inspiration, detailed information, and expert advice – all in one place. Start your journey to a beautiful and functional outdoor oasis now!
FAQ: Building a Rocking Chair Out of 2x4s
1. Is it difficult to build a rocking chair out of 2x4s?
No, building a rocking chair out of 2x4s isn’t overly difficult; however, it does require basic woodworking skills, patience, and attention to detail. With the right plans and tools, even a beginner can complete this project successfully.
2. What type of wood is best for a 2×4 rocking chair?
Cedar is often considered best for a 2×4 rocking chair, due to its natural resistance to rot and insects, making it ideal for outdoor use and long-term durability. Pine is a more affordable alternative, but requires additional protection.
3. How much does it cost to build a rocking chair out of 2x4s?
The cost to build a rocking chair out of 2x4s typically ranges from $50 to $150, depending on the type of wood, hardware, and finishing materials used. This is significantly less than buying a pre-made rocking chair.
4. What are the essential tools for building a rocking chair?
Essential tools for building a rocking chair include a circular saw or table saw, miter saw, jigsaw, drill/driver, sander, clamps, carpenter’s square, and a level.
5. Can I customize the design of my 2×4 rocking chair?
Yes, you can easily customize the design of your 2×4 rocking chair. Modify the seat height, backrest angle, rocker shape, and armrest placement to fit your specific needs and preferences.
6. How do I ensure the rockers are properly aligned?
To ensure proper alignment of the rockers, use a template and carefully measure and mark the attachment points on the legs. Use clamps to hold the rockers in place while the glue dries.
7. What type of finish should I use on my rocking chair?
Use an exterior-grade paint, stain, or sealant to protect the wood from the elements and extend the life of the rocking chair. Choose a finish that is water-resistant, UV-resistant, and mildew-resistant.
8. How do I maintain my 2×4 rocking chair?
Maintain your 2×4 rocking chair by cleaning it regularly with a damp cloth, re-applying the finish every few years, and tightening any loose screws. Store the chair indoors during harsh weather.
9. How do I make the rocking chair more comfortable?
Add cushions, pillows, and throws to enhance the comfort of the rocking chair. Choose outdoor fabrics that are water-resistant and fade-resistant.
10. Where can I find plans for a 2×4 rocking chair?
Plans for a 2×4 rocking chair can be found on online DIY websites like rockscapes.net, woodworking magazines, online marketplaces like Etsy, and woodworking books. Select plans that match your skill level and desired style.