Building a rocking horse is a rewarding project that combines craftsmanship with the joy of creating a timeless heirloom. At rockscapes.net, we provide inspiration and resources for all types of creative projects. This comprehensive guide will provide you with detailed instructions and tips for constructing your own rocking horse, perfect for passing down through generations. Discover woodworking techniques and project inspiration at rockscapes.net.
1. What is a Rocking Horse and Why Build One?
A rocking horse is more than just a toy; it’s a symbol of childhood nostalgia and timeless fun. It provides children with exercise, imaginative play, and a sense of adventure. Building your own rocking horse offers numerous benefits:
- Personalization: Customize the design, size, and materials to create a unique piece.
- Quality Control: Choose high-quality materials for durability and safety.
- Cost Savings: Potentially save money compared to purchasing a store-bought rocking horse.
- Sentimental Value: Create a cherished family heirloom that can be passed down through generations.
- Skill Development: Enhance your woodworking skills and learn new techniques.
2. Planning Your Rocking Horse Project
Before diving into the construction process, careful planning is essential.
2.1. Choosing a Design and Style
Rocking horses come in various styles, from classic to contemporary. Consider the following factors when selecting a design:
- Traditional: Features a realistic horse shape with intricate details.
- Modern: Simplistic design with clean lines and abstract shapes.
- Character-Based: Inspired by popular cartoon or storybook characters.
- Size: Determine the appropriate size based on the age and size of the child.
2.2. Selecting Materials
The choice of wood is crucial for the rocking horse’s durability and appearance.
- Hardwoods: Ash, maple, oak, and cherry are excellent choices due to their strength and beautiful grain patterns.
- Softwoods: Pine and cedar can be used, but they are less durable and may require more frequent maintenance.
- Plywood: High-quality plywood can be used for certain components, such as the base or seat.
- Other Materials: Leather or fabric for the saddle and bridle, non-toxic paint or finish, and hardware (screws, bolts, etc.).
2.3. Gathering Tools and Equipment
Having the right tools will make the construction process smoother and more efficient.
-
Essential Tools:
- Saw (Band saw, jig saw, or hand saw)
- Drill with various drill bits
- Sander (Belt sander, palm sander, or orbital sander)
- Wood chisels
- Clamps
- Measuring tape and ruler
- Pencil
- Safety glasses and dust mask
-
Optional Tools (but recommended):
- Disk Sander
- Drill Press
- Doweling Jig
- Cordless Drill (with drum sander attachment)
- Rotary Tool
- Angle Grinder (with sanding disc attachment)
- Plug Cutter Bit Set
- Rubber Mallet
2.4 Finding the Right Pattern
Many patterns are available online and from woodworking retailers. These patterns typically include detailed instructions, templates, and material lists. This rocking horse pattern is available on Amazon for around $14.00!
3. Step-by-Step Guide to Building a Rocking Horse
3.1. Preparing the Wood
- Cut the Wood: Using the pattern templates, cut the wood pieces according to the specified dimensions. This typically includes the horse body, head, legs, rockers, and supporting structures.
- Smooth the Edges: Use a sander to smooth all the edges and surfaces of the wood pieces. This will prevent splinters and create a more refined finish.
3.2. Assembling the Horse Body
- Attach the Legs: Use wood glue and screws to attach the legs to the horse body. Ensure the legs are securely fastened and properly aligned.
- Reinforce the Joints: Add additional support blocks or dowels to reinforce the joints between the legs and the body. This will enhance the stability and durability of the rocking horse.
3.3. Shaping the Head and Neck
- Carve the Head: Use a wood chisel or rotary tool to shape the horse’s head and neck. Refer to the pattern templates and photographs for guidance.
- Sand the Head: Smooth the carved surfaces with sandpaper to create a refined and realistic appearance.
3.4. Constructing the Rockers
- Cut the Rockers: Cut the rocker pieces according to the pattern templates. Ensure the rockers are identical in shape and size.
- Attach the Supports: Use wood glue and screws to attach the rocker supports to the horse body. The supports should be evenly spaced and securely fastened.
3.5. Attaching the Rockers to the Horse Body
- Align the Rockers: Position the rockers underneath the horse body, ensuring they are properly aligned and centered.
- Secure the Rockers: Use wood glue and bolts to attach the rockers to the rocker supports. Tighten the bolts securely to ensure the rockers are firmly in place.
3.6. Adding Finishing Touches
- Fill Imperfections: Use wood filler to fill any gaps, cracks, or imperfections in the wood.
- Sand Smooth: Sand the filled areas smooth with fine-grit sandpaper.
- Paint or Stain: Apply a non-toxic paint or stain to the rocking horse. Choose colors that complement the wood and create an appealing aesthetic.
- Seal the Finish: Apply a clear sealant to protect the paint or stain and enhance the durability of the finish.
3.7 Adding Additional Accents
Here are a few ways to add to your rocking horse to make it more unique.
 Rocking Horse Hair Accent Pieces
- Hair Accent Pieces: Use a band saw, to split the 5/8″ thick board in half leaving about 1/4″ thick boards for the accent pieces.
- Leather accents: Use scraps of leftover leather for the ears and straps.
4. Safety Considerations
Safety should be a top priority when building a rocking horse.
- Use Non-Toxic Materials: Ensure all paints, stains, and sealants are non-toxic and safe for children.
- Smooth Surfaces: Sand all surfaces to eliminate sharp edges and splinters.
- Secure Fastenings: Use screws, bolts, and glue to securely fasten all components.
- Stable Rockers: Ensure the rockers are properly aligned and securely attached to prevent tipping.
- Weight Capacity: Consider the weight capacity of the rocking horse and ensure it is appropriate for the child using it.
- Supervision: Always supervise children while they are using the rocking horse.
5. Design Ideas and Inspiration
5.1. Classic Rocking Horse with Intricate Carvings
This design features a traditional horse shape with detailed carvings on the head, neck, and legs. It is finished with a rich stain and a leather saddle.
5.2. Modern Rocking Horse with Geometric Shapes
This design incorporates clean lines and geometric shapes for a contemporary look. It is painted in bold colors and features a minimalist saddle.
5.3. Character-Based Rocking Horse
Inspired by popular cartoon characters, this design is whimsical and playful. It is painted in bright colors and features a custom-designed saddle.
5.4. Rocking Horse with Natural Wood Finish
This design showcases the natural beauty of the wood with a clear sealant. It features a simple, elegant design and a comfortable fabric saddle.
5.5. Convertible Rocking Horse
This innovative design can be converted from a rocking horse to a stationary horse. It features a detachable rocker base and a sturdy frame.
6. Maintaining Your Rocking Horse
Proper maintenance will ensure your rocking horse lasts for generations.
- Regular Cleaning: Wipe down the rocking horse with a damp cloth to remove dust and dirt.
- Check Fastenings: Periodically check the screws, bolts, and glue joints to ensure they are secure.
- Repair Damage: Repair any cracks, splinters, or damage promptly to prevent further deterioration.
- Reapply Finish: Reapply paint, stain, or sealant as needed to protect the wood and maintain the appearance.
- Store Properly: Store the rocking horse indoors in a dry, stable environment to prevent damage from moisture and temperature fluctuations.
7. The Joy of Passing Down an Heirloom
Building a rocking horse is not just a woodworking project; it’s an investment in creating a cherished family heirloom. The rocking horse will be used and loved for generations to come because, the reality is, it will most likely outlive you. The joy of seeing children and grandchildren ride the rocking horse, knowing that you created it with your own hands, is a reward in itself.
 Handcrafted Rocking Horse
8. Rocking Horse Wood Choice
Different types of wood have different qualities that lend them to different strengths. Here is a list of different types of wood and what they bring to the table.
8.1. Ash Wood
Ash wood is strong, durable, and has a beautiful grain pattern. It is easy to work with and takes finishes well.
8.2. Maple Wood
Maple is a hard, dense wood that is resistant to wear and tear. It has a smooth texture and a light color.
8.3. Oak Wood
Oak is a strong, durable wood that is known for its distinctive grain patterns. It is resistant to moisture and decay.
8.4. Cherry Wood
Cherry is a reddish-brown wood that is prized for its beauty and workability. It has a smooth texture and takes finishes well.
8.5. Pine Wood
Pine is a softwood that is easy to work with and relatively inexpensive. It has a light color and a knotty grain pattern.
8.6. Cedar Wood
Cedar is a softwood that is known for its aromatic properties and resistance to insects and decay. It has a reddish-brown color and a straight grain pattern.
9. Adding Different Protective Layers
There are many things to consider when trying to protect your wooden rocking horse, here are a few of the best choices.
9.1. Polyurethane
Polyurethane is a synthetic resin that forms a tough, durable, and water-resistant finish. It is available in both oil-based and water-based formulations. It also comes in spray form which makes application much easier.
9.2. Varnish
Varnish is a transparent, hard, and glossy finish that is made from resins, oils, and solvents. It provides excellent protection against moisture, scratches, and wear.
9.3. Lacquer
Lacquer is a fast-drying finish that is made from cellulose esters and solvents. It provides a smooth, durable, and glossy finish.
9.4. Paint
Paint is a pigmented coating that provides color, protection, and decoration. It is available in a wide range of colors, finishes, and formulations.
9.5. Stain
Stain is a transparent or semi-transparent coating that penetrates the wood and adds color without obscuring the grain. It is available in a wide range of colors and formulations.
10. Where To Start
Starting can be the hardest part, but with the right guidance you can be on your way today.
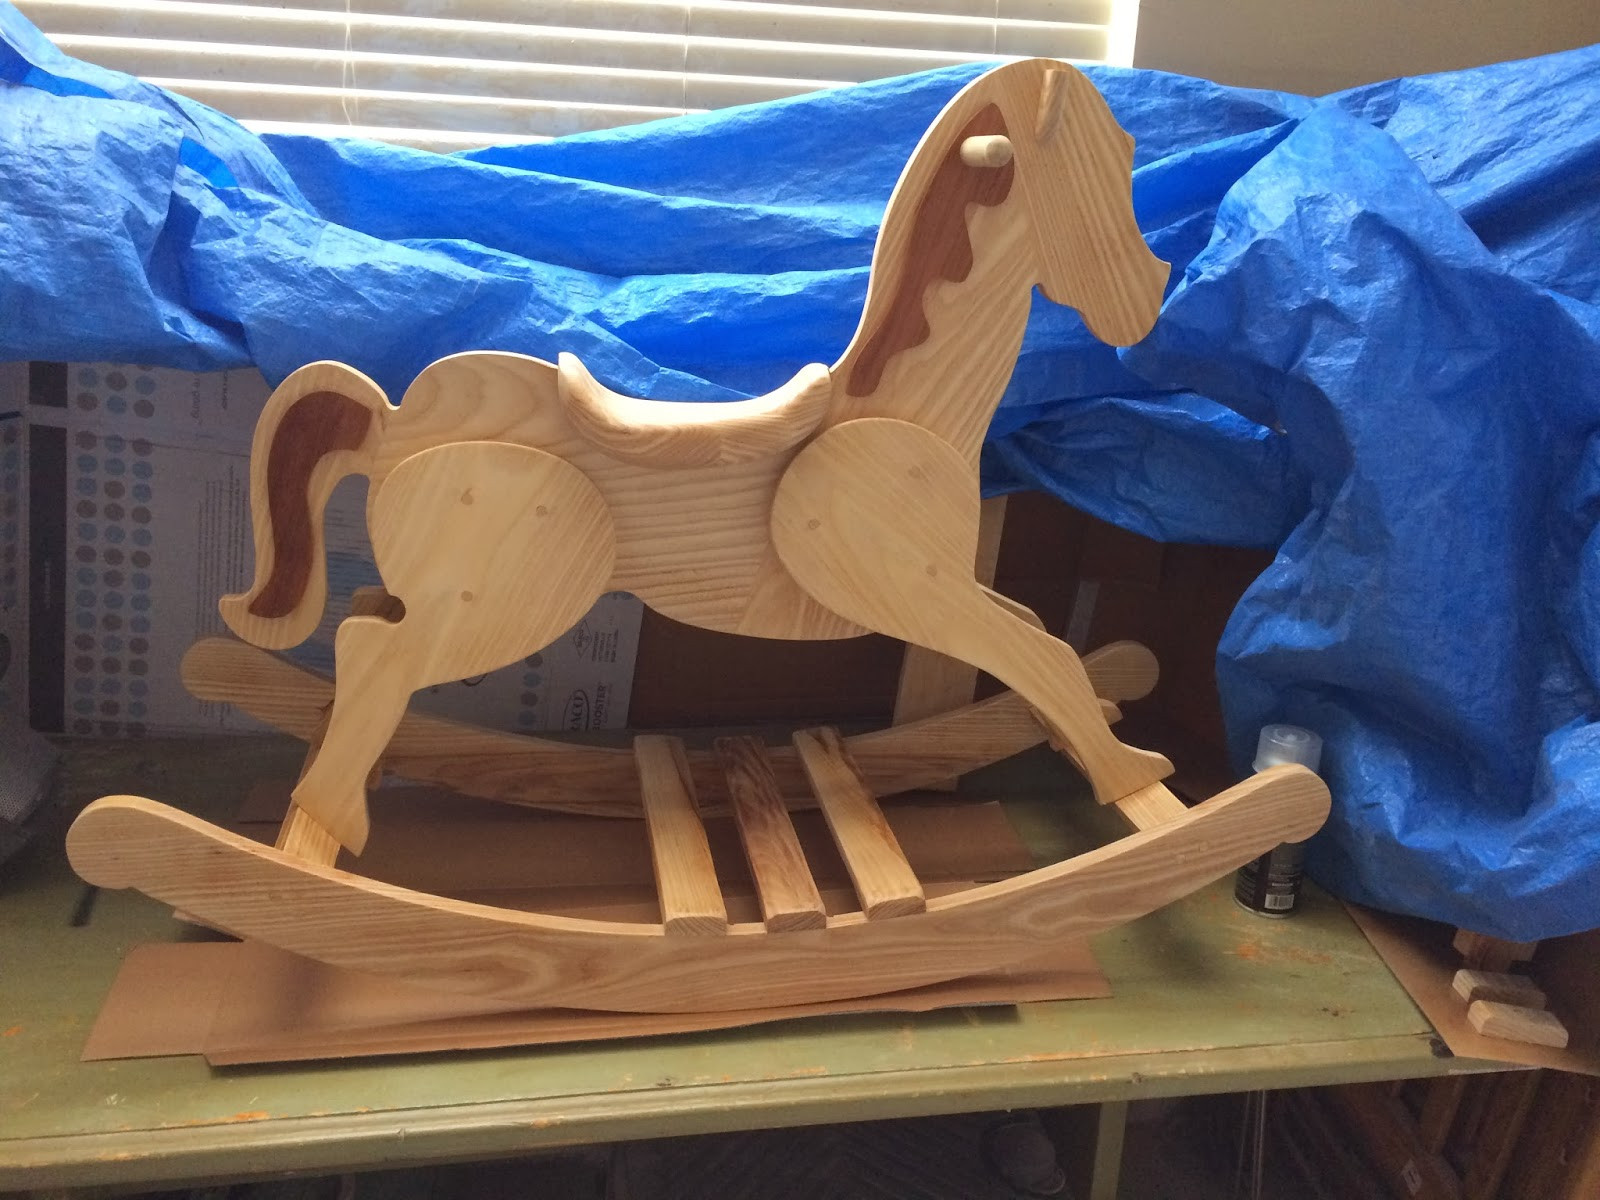
 Rocking Horse Build in Progress
10.1. Research
Research different rocking horse designs, materials, and construction techniques. Rockscapes.net is a great source for woodworking projects. This will give you a better understanding of the project and help you make informed decisions.
10.2. Planning
Create a detailed plan that includes the design, materials, tools, and steps involved in building the rocking horse. This will help you stay organized and on track.
10.3. Start Small
Begin with a simple design and gradually progress to more complex projects as you gain experience. This will help you build your skills and confidence.
10.4. Don’t Be Afraid To Ask
Don’t be afraid to ask for help from experienced woodworkers or online communities. There are many resources available to assist you with your project.
10.5. Be Patient
Building a rocking horse takes time and effort. Be patient and don’t get discouraged if you encounter challenges. The end result will be worth the effort.
11. FAQs About Building A Rocking Horse
11.1. What type of wood is best for building a rocking horse?
Hardwoods like ash, maple, oak, and cherry are excellent choices due to their strength and durability.
11.2. How do I choose the right size rocking horse for my child?
Consider the age and size of the child when determining the appropriate size. A general rule is to choose a rocking horse that allows the child to comfortably reach the ground while seated.
11.3. What tools do I need to build a rocking horse?
Essential tools include a saw, drill, sander, wood chisels, clamps, measuring tape, and safety glasses. Optional tools include a band saw, drill press, and rotary tool.
11.4. How do I ensure the rocking horse is safe for my child?
Use non-toxic materials, smooth all surfaces, secure all fastenings, ensure the rockers are stable, and always supervise children while they are using the rocking horse.
11.5. How do I finish the rocking horse?
Apply a non-toxic paint or stain to the rocking horse and seal the finish with a clear sealant.
11.6. Where can I find rocking horse patterns?
Rocking horse patterns are available online and from woodworking retailers.
11.7. How do I maintain my rocking horse?
Regularly clean the rocking horse, check the fastenings, repair any damage, reapply the finish as needed, and store it properly.
11.8. Can I customize the design of my rocking horse?
Yes, you can customize the design, size, and materials to create a unique piece.
11.9. How long does it take to build a rocking horse?
The time it takes to build a rocking horse depends on the complexity of the design and your skill level. It can range from a few days to several weeks.
11.10. Is it cheaper to build a rocking horse than to buy one?
It can be cheaper to build a rocking horse, especially if you have some of the materials and tools already. However, the cost will depend on the materials you choose and the complexity of the design.
Building a rocking horse is a fulfilling project that combines woodworking skills with the joy of creating a timeless heirloom. Whether you choose a classic design or a modern style, the end result will be a cherished piece that can be passed down through generations. For more inspiration and resources, visit rockscapes.net today and discover the endless possibilities of creative projects.
Ready to start your rocking horse project? Visit rockscapes.net for design ideas, detailed information on materials, and expert advice. Let’s create something beautiful together Address: 1151 S Forest Ave, Tempe, AZ 85281, United States. Phone: +1 (480) 965-9011. Visit our Website: rockscapes.net.