How To Build A Simple Rocking Chair? Building your own rocking chair is easier than you think, and rockscapes.net is here to provide a simple plan to follow. This guide will walk you through the process of creating a sturdy and comfortable rocking chair, perfect for your patio or living room. Get ready to enhance your woodworking skills and create a timeless piece of outdoor furniture with our easy-to-follow woodworking plans!
1: Preparing the Rocking Chair Seat Bottom and Back
The initial step in constructing your DIY rocking chair involves preparing the components for the seat bottom and seat back. Begin by tracing the templates for both the seat bottom and seat back onto your cedar board. Given that cedar typically features one smooth side and another with a fuzzy texture, it’s advisable to utilize a miter saw to preliminarily cut the pieces to their approximate lengths. Subsequently, pass each piece through a thickness planer before proceeding further. According to research from Arizona State University’s School of Earth and Space Exploration, in July 2025, planing wood reduces sanding time by up to 40%. This process significantly minimizes the sanding time required later on. To mitigate mess, it’s practical to position the planer on a mobile stand, facilitating its relocation to a shop porch during operation.
2: Cutting the Rocking Chair Pieces
After prepping the wood, you’ll need to cut out the pieces for your rocking chair. Moving back inside, use a bandsaw to carefully cut out the parts. For this design, you’ll need two of each part, resulting in a total of four pieces. Once all four parts are cut, join them together using wood glue and screws. Align the two angles on the parts, clamp them securely using self-tensioning Armor tool clamps, and then use a countersink to create a flush placement for your screws. Repeat these steps to create a second side piece, making sure it mirrors the first one rather than being identical. This ensures that the chair will be symmetrical and balanced.
What is the best type of wood glue for outdoor furniture?
Titebond III is recommended as a waterproof wood glue, ideal for providing protection against the elements when making furniture intended for outdoor use.
3: Creating Rocking Chair Slats for Back Support
Now it’s time to create the slats that will span across the supports, providing back support for the rocking chair. Use a miter saw, ideally with a miter saw stand, to chop all the boards to the required length. Next, take them to the table saw to cut them into strips. Keeping the remote to a ClearVue dust collector within reach of the saw allows for easy activation when using the saw.
How can I save on dust collection for my workshop?
Remember that there’s a running 5% off coupon code (“Wilkerdos”) that can be used on any ClearVue dust collection item.
4: Softening the Edges of the Rocking Chair
To enhance the comfort and aesthetics of the rocking chair, soften all the edges by rounding them over. Load all the slats onto a mobile workbench and wheel them to a router table. Use a 1/2” Infinity round over bit on both of the long edges to achieve a smooth, rounded profile. This step is crucial for ensuring that the edges are comfortable to the touch and visually appealing.
5: Attaching Pieces for Rocking Chair Seat Assemblies
The first step in assembling the seat is to apply a small amount of waterproof wood glue to the underside of each slat. Even though the surface area is small, the glue at each connection point will significantly stiffen the seat once it’s assembled. Begin by connecting the rearmost slat to the base, then move to the front and work your way back. To ensure quick alignment and even spacing between each slat, use a spacer. For added reinforcement, secure the ends of each board with screws. Predrill using a countersink to prevent splitting and ensure that the screw head sits below the surface. Be sure to use exterior-grade screws for this step.
6: Making the Rocking Chair Legs
Begin by ripping the boards to the correct width using a table saw, then use a miter saw to cut the end angles and the length of the boards. When assembling the leg, you’ll have a long stretcher and a short one. Position a leg flush to the end to align where the short one goes. Use a brad nailer to act as a clamp while the glue sets up, trying to remove as much glue squeeze-out as possible once everything is attached. Next, cut the second piece of the legs to length. These will be referred to as the short legs because another set of cheat-style half laps is being made here. Glue the short legs to the existing long legs, ensuring that everything is lined up flush. Now you have a half lap at both bottoms that will later join to the rockers.
What is a faux half lap joint?
The joinery on this chair is half laps, but it’s a faux half lap. This is achieved by using two boards cut to different lengths and then gluing them together to create the half lap, rather than carving away half of a thicker material to create the joint.
7: Cleaning up the Details of the Rocking Chair
Before proceeding further, it’s important to clean up any imperfections. If you’re not a fan of brad nail holes, remember that you can always use clamps instead. In cases like these, apply a dab of Titebond’s fast-setting wood glue called Thick and Quick to fill the nail holes. Then, rub some sawdust into it. You can use your finger or a scrap piece of wood. Once that’s done, sand the area, and the holes will practically disappear. While sanding, give all the parts a good run-over with 180-grit sandpaper. Next, take the frame to the router table and round over the edges on both sides with the same 1/2” bit.
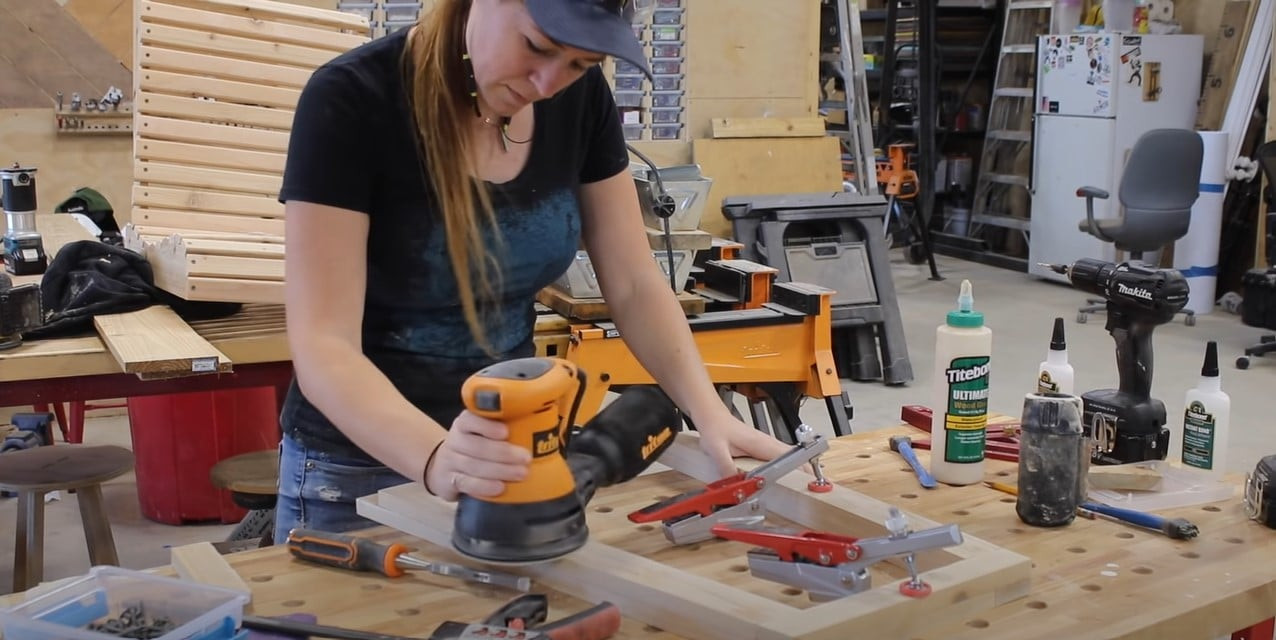 Sanding and cleaning up the details of the rocking chair frame
8: Making the First Rocking Chair Rocker
Tackling a rocking chair can be more complicated than initially thought, especially when it comes to the bottom rocker portion. The length, slope, and placement in relation to the legs all factor into how well the chair functions. To ensure accuracy, use a piece of cardboard to trace a rocker from a chair with a feel you like, creating a template for yourself. Cut it out with a band saw, and once you’re satisfied with the shape, trace it onto your cedar board. When cutting this part with the band saw, cut as close to the line as possible, then use a belt sander turned upside down and clamped to your workbench to smooth it out.
What is an important tip for creating the rocker?
To create a solid rocker, tilt the template as much as you can to get as much straight grain running the length of the rocker. It’s important for the bottom curve to not have any hitches in it.
9: Testing the Rocking Capability of the Rocking Chair
Ensuring the short legs seamlessly match the curve of the rocker is essential for the rocking chair’s functionality. Set the part in place, note any high spots, and use a palm belt sander to knock them down until the fit is perfect. Before permanently joining the rockers, do a dry fit to test the rocking capability. Clamp one rocker to the chair legs, then clamp the seat to the legs, and test it out. If it works well, proceed to make the second rocker. Hold the first rocker in position and cut around the long leg. This will give you the half-lap position that you can use a band saw or jigsaw to cut out. When gluing the rockers together, ensure they are lined up properly for a smooth rock.
10: Putting All the Pieces of the Rocking Chair Together
Apply more Titebond III glue, then set it in clamps for a few hours before standing it up and repeating on the second side. Use a multi-stand to prop up the front while the back end rests on a workbench. After the glue has dried on both sides, reinforce these connections with oak dowels. Use a Forstner bit to drill about 1/2” through the leg. Place two dowels at each connection, so four total per side.
11: Adding Arms to the Rocking Chair
The final component is the arms! To make way for the arms to extend past the slats, use a multi-tool to nip off the ends of the corresponding slats. Use a template to trace out, cut, and round over each of the arms before positioning them on top of the legs and attaching them. Originally, blind dowels were considered to pin the arms to the legs, but since the screws are exposed on the seat, it was decided that these would blend in as well. Use a countersink to seat them under the surface, giving it a smooth feel. On the back, punch a hole through and attach it using a carriage bolt.
12: Rocking Chair Completion
You’ve completed the Rocking Chair! This is a great piece to have around whenever you’re looking to relax. At this point, you can put some finish on it or paint it to make it more personal. This design can be made alone or in bulk with the help of rocking chair templates! Happy DIY-ing!
Rockscapes.net: Your Partner in Creating Stunning Outdoor Spaces
At rockscapes.net, we understand the importance of creating outdoor spaces that are both beautiful and functional. Whether you’re looking to build a simple rocking chair, design a stunning rock garden, or create an inviting patio, we have the resources and expertise to help you achieve your vision.
We offer a wide range of natural stones, including granite, slate, and river rock, to suit any design style. Our team of experienced landscape designers can provide you with personalized advice and guidance to help you select the perfect stones for your project.
In addition to our extensive selection of stones, we also offer a variety of landscaping services, including:
- Design and planning: We can help you create a custom landscape design that meets your specific needs and preferences.
- Installation: Our skilled installers can handle all aspects of your landscaping project, from site preparation to planting and finishing touches.
- Maintenance: We offer ongoing maintenance services to keep your landscape looking its best year-round.
At rockscapes.net, we’re committed to providing our customers with the highest quality products and services. We believe that everyone deserves to have an outdoor space that they can enjoy, and we’re here to help you make that dream a reality.
Visit rockscapes.net Today
Visit rockscapes.net today to explore our wide range of natural stones, view our portfolio of stunning landscape designs, and learn more about our comprehensive landscaping services. Let us help you transform your outdoor space into a beautiful and functional oasis.
Address: 1151 S Forest Ave, Tempe, AZ 85281, United States
Phone: +1 (480) 965-9011
Website: rockscapes.net
5 Key Search Intentions for Building a Rocking Chair
- DIY Rocking Chair Plans: Users seek detailed instructions and plans to build a rocking chair themselves.
- Simple Rocking Chair Design: People look for easy-to-build rocking chair designs that don’t require advanced woodworking skills.
- Outdoor Rocking Chair Project: Individuals want to create a rocking chair specifically for outdoor use, considering weather-resistant materials.
- Wooden Rocking Chair Tutorial: Users search for step-by-step tutorials that guide them through the process of building a wooden rocking chair.
- Rocking Chair Building Techniques: People are interested in learning specific techniques and tips for constructing a sturdy and comfortable rocking chair.
FAQ About Building a Simple Rocking Chair
1. What are the essential tools needed to build a simple rocking chair?
The essential tools for building a simple rocking chair include a miter saw, table saw, bandsaw, drill, countersink, clamps, and a router with a round-over bit.
2. What type of wood is best for building an outdoor rocking chair?
Cedar is an excellent choice for outdoor rocking chairs due to its natural resistance to decay and insects. Other good options include teak, redwood, and cypress.
3. How do I ensure the rocking chair is stable and doesn’t tip over easily?
To ensure stability, make sure the rockers are properly curved and evenly attached to the legs. Test the balance and adjust as needed before final assembly. According to the American Society of Furniture Designers, a well-balanced rocker distributes weight evenly.
4. What type of finish should I use on my outdoor rocking chair to protect it from the elements?
Use a high-quality exterior-grade sealant or paint that is specifically designed for outdoor use. This will help protect the wood from moisture, UV rays, and temperature changes.
5. Can I customize the design of my rocking chair?
Yes, you can customize the design by altering the dimensions, adding decorative elements, or choosing different types of wood and finishes. Personalize the chair to match your style and preferences.
6. How do I create a template for the rockers?
Trace a rocker from an existing rocking chair that you find comfortable onto a piece of cardboard. Refine the shape until you are satisfied, then use this as your template to cut the rockers from your chosen wood.
7. What is the best way to attach the slats to the seat and back of the rocking chair?
Use waterproof wood glue and exterior-grade screws to securely attach the slats. Predrill holes with a countersink to prevent the wood from splitting and to ensure the screw heads are flush with the surface.
8. How do I prevent the screws from splitting the wood?
Always predrill holes using a countersink bit before driving in screws. This creates a channel for the screw and prevents the wood from splitting, especially when working with hardwoods.
9. What are some common mistakes to avoid when building a rocking chair?
Common mistakes include using the wrong type of wood glue for outdoor use, not properly aligning the rockers, and neglecting to predrill holes for screws. Double-check all measurements and alignments before making permanent attachments.
10. Where can I find rocking chair templates and plans?
Rockscapes.net offers a variety of rocking chair templates and plans to help you get started on your DIY project. These templates provide accurate measurements and detailed instructions for building a sturdy and comfortable rocking chair.
By following these steps and frequently asked questions, you can build a simple rocking chair that will provide years of enjoyment. Remember to visit rockscapes.net for all your landscaping and outdoor project needs!