Are you looking to enhance your outdoor space with a comfortable and stylish addition? Building a wooden rocking chair is a rewarding DIY project that adds character and relaxation to your patio or garden. At rockscapes.net, we’re excited to guide you through each step, providing tips and inspiration to craft your own unique rocking chair. Let’s explore the world of woodworking and create a stunning outdoor furniture piece that reflects your personal style with our landscape and design ideas.
1. Identifying Your Rocking Chair Style and Gathering Materials
Before diving into the construction, take some time to consider the style of rocking chair you want to build. There are various designs, from classic to modern, each requiring different materials and skill levels.
Why is this step important? Defining your style helps you select the right wood, tools, and hardware, ensuring a cohesive and satisfying result.
Here are a few popular rocking chair styles to inspire you:
- Classic Rocking Chair: Traditional design with curved back slats and a contoured seat.
- Adirondack Rocking Chair: A variation of the classic Adirondack chair with added rockers for gentle motion.
- Modern Rocking Chair: Sleek lines, minimalist design, and often made with a combination of wood and metal.
Once you’ve chosen your style, gather the necessary materials. Here’s a general list, but adjust based on your specific design:
- Wood: Cedar, pine, oak, or redwood are excellent choices for outdoor furniture due to their durability and resistance to rot.
- Fasteners: Screws, nails, and wood glue designed for outdoor use. Titebond III is a reliable choice.
- Sandpaper: Various grits for smoothing surfaces.
- Finish: Paint, stain, or sealant to protect the wood from the elements.
Material Tip: According to the USDA Forest Products Laboratory, using wood preservatives and sealants can significantly extend the lifespan of outdoor wood furniture, especially in regions with harsh weather conditions.
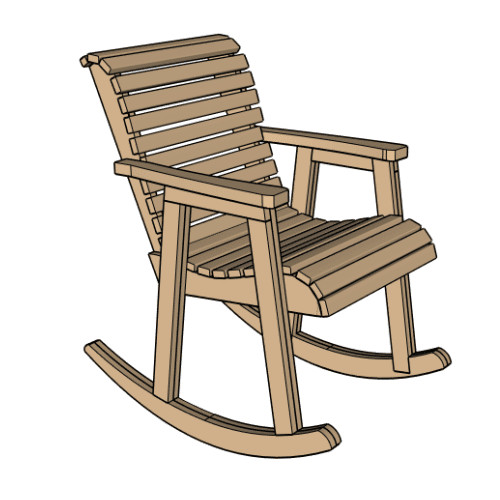 Rocking Chair Templates & Plans
Alt text: Rocking chair templates and plans available for purchase, showing a classic wooden rocking chair design.
2. Preparing Your Workspace and Tools
A well-organized workspace is crucial for a successful woodworking project. Clear a spacious area, preferably in a garage or workshop, and ensure you have adequate lighting and ventilation.
Why is this step important? A clean and organized workspace minimizes distractions, reduces the risk of accidents, and allows for efficient workflow.
Essential tools for building a wooden rocking chair include:
- Saw: Miter saw, table saw, band saw, or jigsaw for cutting wood to size and shape.
- Drill: For drilling pilot holes and driving screws.
- Sander: For smoothing surfaces and rounding edges.
- Router: With various bits for creating decorative edges and joinery.
- Clamps: To hold pieces together while glue dries.
- Measuring Tools: Tape measure, square, and level for accurate measurements.
- Safety Gear: Safety glasses, ear protection, and a dust mask to protect yourself from potential hazards.
Safety Tip: Always wear safety glasses and a dust mask when cutting and sanding wood to prevent eye and respiratory irritation.
3. Cutting the Rocking Chair Components
With your materials and tools ready, it’s time to cut the individual components of your rocking chair. Use your chosen design plans or templates to accurately measure and mark the wood.
Why is this step important? Precise cutting ensures that all the pieces fit together correctly, resulting in a sturdy and well-proportioned rocking chair.
Follow these tips for accurate cutting:
- Use Templates: Templates provide a precise outline for cutting curved or intricate shapes.
- Cut Slightly Over: It’s better to cut slightly larger than needed and then sand or plane down to the final dimension.
- Label Pieces: Label each piece as you cut it to avoid confusion during assembly.
The primary components of a rocking chair include:
- Seat: The main seating surface.
- Back: Provides support for your back.
- Legs: Supports the seat and connects to the rockers.
- Rockers: The curved pieces that allow the chair to rock.
- Arms (Optional): Provides armrests for added comfort.
- Slats/Spindles: Decorative pieces for the back and seat.
Cutting Technique Tip: When cutting curved pieces like rockers, use a band saw or jigsaw and cut just outside the marked line. Then, use a belt sander or sanding drum to smooth the curve to the exact shape.
4. Assembling the Rocking Chair Frame
Once all the components are cut, it’s time to assemble the main frame of the rocking chair. Start by joining the seat and back supports to the legs.
Why is this step important? A strong and stable frame is essential for the overall durability and safety of the rocking chair.
Follow these steps for assembling the frame:
- Apply Wood Glue: Use waterproof wood glue on all joints for maximum strength.
- Secure with Screws: Reinforce the joints with screws, making sure to pre-drill pilot holes to prevent splitting the wood.
- Use Clamps: Clamp the pieces together while the glue dries to ensure a tight bond.
- Check for Square: Use a square to ensure that the frame is square and aligned correctly.
Joinery Technique Tip: Half-lap joints provide a strong and visually appealing connection between the legs and rockers.
 build a rocking chair 100 00 26 15still002
Alt text: Close-up of the wooden rocking chair parts, showing the seat and back supports.
5. Creating and Attaching the Rockers
The rockers are the defining feature of a rocking chair, providing the gentle rocking motion. Creating the rockers requires precision and attention to detail.
Why is this step important? The shape and placement of the rockers determine the smoothness and comfort of the rocking motion.
Follow these steps for creating and attaching the rockers:
- Use a Template: Create a template for the rockers using cardboard or thin plywood. Trace a rocker that you know you like the feel of to create a template for yourself.
- Cut the Rockers: Cut the rockers from a solid piece of wood, ensuring that the grain runs lengthwise for maximum strength.
- Smooth the Curves: Use a belt sander or sanding drum to smooth the curves of the rockers.
- Attach to Legs: Attach the rockers to the legs using wood glue and screws. Ensure that the rockers are aligned correctly and securely fastened.
Rocker Tip: When tracing this, tilt the template as much as you can to get as much straight grain running the length of the rocker. It’s really important to get the bottom curve to not have any hitches in it.
6. Adding the Seat and Back Slats
With the frame and rockers assembled, it’s time to add the seat and back slats, providing a comfortable and supportive seating surface.
Why is this step important? The slats determine the comfort and aesthetic appeal of the rocking chair.
Follow these steps for adding the slats:
- Cut Slats to Size: Cut the slats to the appropriate length and width.
- Sand Edges: Sand the edges of the slats to create a smooth and comfortable surface.
- Space Evenly: Space the slats evenly across the seat and back supports.
- Attach with Screws: Attach the slats to the frame using screws, pre-drilling pilot holes to prevent splitting the wood.
Design Tip: Consider adding a slight curve to the seat slats for added comfort.
 Screenshot 2023 02 07 154124
Alt text: A person cutting pieces for the rocking chair at his workstation.
7. Installing the Armrests (Optional)
Armrests add extra comfort and support to your rocking chair. If your design includes armrests, follow these steps to install them.
Why is this step important? Armrests enhance the overall comfort and ergonomic design of the rocking chair.
Follow these steps for installing the armrests:
- Cut Armrests to Shape: Cut the armrests to the desired shape and size, using a template or freehand design.
- Sand Edges: Sand the edges of the armrests to create a smooth and comfortable surface.
- Position Armrests: Position the armrests on top of the legs and attach them with screws.
Ergonomic Tip: Angle the armrests slightly inward for a more natural and comfortable arm position.
8. Sanding and Finishing
With the rocking chair fully assembled, it’s time to sand and finish the wood, protecting it from the elements and enhancing its natural beauty.
Why is this step important? Sanding and finishing protect the wood from moisture, UV rays, and wear and tear, extending its lifespan and preserving its appearance.
Follow these steps for sanding and finishing:
- Sand All Surfaces: Sand all surfaces of the rocking chair with progressively finer grits of sandpaper, starting with 80-grit and finishing with 220-grit.
- Apply Wood Conditioner (Optional): Apply a wood conditioner to help the finish penetrate evenly.
- Apply Finish: Apply a coat of paint, stain, or sealant according to the manufacturer’s instructions.
- Apply Additional Coats: Apply additional coats of finish as needed, sanding lightly between coats.
Finishing Tip: Choose a finish that is specifically designed for outdoor use and provides UV protection.
9. Testing and Adjusting
Before settling in to enjoy your new rocking chair, take some time to test its rocking motion and make any necessary adjustments.
Why is this step important? Testing and adjusting ensures that the rocking chair is safe, comfortable, and rocks smoothly.
Follow these steps for testing and adjusting:
- Test Rocking Motion: Sit in the chair and test its rocking motion.
- Check for Stability: Ensure that the chair is stable and doesn’t tip over easily.
- Adjust Rockers: If the rocking motion is too fast or too slow, adjust the shape of the rockers accordingly.
- Tighten Screws: Tighten all screws to ensure that the chair is securely assembled.
Adjustment Tip: Experiment with different rocker shapes to find the perfect rocking motion for your preferences.
10. Enjoying Your Handcrafted Rocking Chair
Congratulations! You’ve successfully built your own wooden rocking chair. Now it’s time to relax and enjoy the fruits of your labor.
Why is this step important? After all the hard work, you deserve to sit back, relax, and appreciate the comfort and beauty of your handcrafted rocking chair.
Place your rocking chair on your porch, patio, or in your garden, and enjoy the gentle rocking motion as you unwind and take in the scenery.
Enhancement Tip: Add a comfortable cushion and throw pillow to your rocking chair for added comfort and style.
At rockscapes.net, we believe that creating beautiful outdoor spaces is within everyone’s reach. Building a wooden rocking chair is a rewarding DIY project that adds character and relaxation to your home. With the right tools, materials, and guidance, you can create a stunning piece of outdoor furniture that will be enjoyed for years to come.
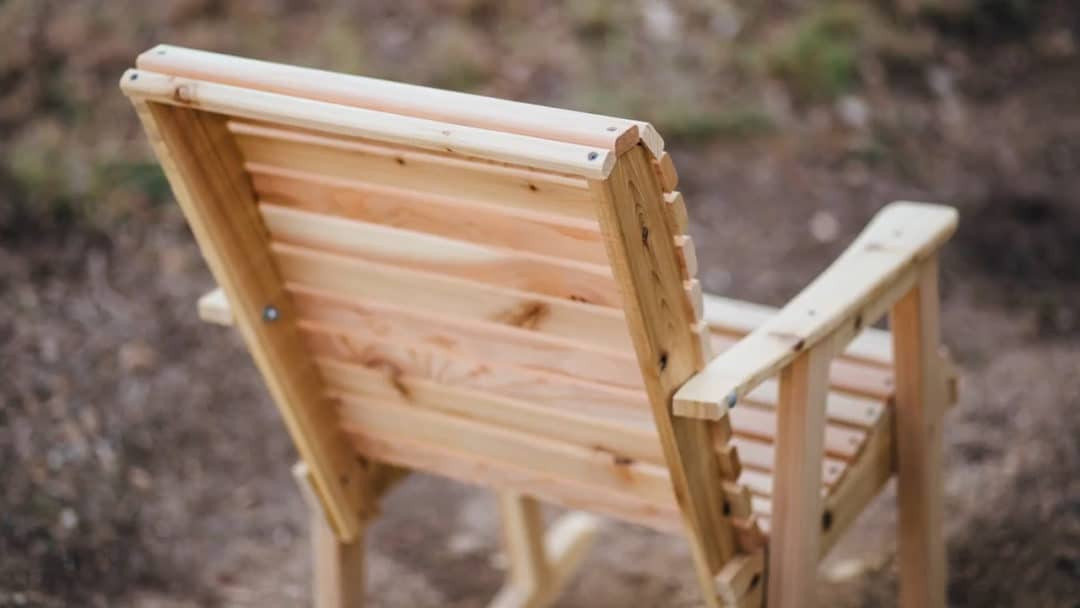
 2
2
Alt text: A side view of the rocking chair parts which consist of two angles on the parts.
Additional Tips for Building a Wooden Rocking Chair
- Choose the Right Wood: Select a wood that is durable, weather-resistant, and aesthetically pleasing. Cedar, redwood, oak, and teak are excellent choices for outdoor furniture.
- Use Waterproof Glue: Always use waterproof wood glue on all joints to protect against moisture damage.
- Pre-Drill Pilot Holes: Pre-drilling pilot holes before driving screws prevents splitting the wood.
- Sand Thoroughly: Sand all surfaces of the rocking chair to create a smooth and comfortable finish.
- Apply a Protective Finish: Apply a protective finish, such as paint, stain, or sealant, to protect the wood from the elements.
- Consider Ergonomics: Design your rocking chair with ergonomics in mind, ensuring that it is comfortable and supportive.
Maintaining Your Wooden Rocking Chair
To keep your wooden rocking chair looking its best, follow these maintenance tips:
- Clean Regularly: Clean your rocking chair regularly with a mild soap and water solution.
- Re-Apply Finish: Re-apply the finish every few years to protect the wood from the elements.
- Store Indoors: Store your rocking chair indoors during the off-season to protect it from harsh weather conditions.
- Inspect for Damage: Inspect your rocking chair regularly for signs of damage, such as cracks, splits, or rot. Repair any damage promptly to prevent further deterioration.
Integrating Rockscapes into Your Outdoor Design
Now that you have your beautiful rocking chair, consider how to integrate it with other elements from rockscapes.net to create a cohesive and stunning outdoor space.
- Stone Pathways: Complement your rocking chair with a natural stone pathway leading to your patio or garden.
- Rock Gardens: Create a rock garden nearby to add texture and visual interest.
- Water Features: Incorporate a water feature, such as a small fountain or pond, to create a relaxing and tranquil atmosphere.
- Outdoor Lighting: Add outdoor lighting to illuminate your rocking chair and surrounding landscape, creating a warm and inviting ambiance.
- Stone Benches: Place stone benches around your outdoor space to provide additional seating and complement your rocking chair.
5 Key Search Intentions of “How to Build a Wooden Rocking Chair”
Understanding the search intent behind the query “How To Build A Wooden Rocking Chair” helps tailor content to meet user needs. Here are five key search intentions:
- Informational: Users want a comprehensive guide on the process of building a wooden rocking chair, including step-by-step instructions, material lists, and tool requirements.
- DIY Instructions: Users are seeking detailed DIY instructions to build a wooden rocking chair from scratch, often looking for easy-to-follow plans and templates.
- Troubleshooting: Users are looking for solutions to common problems encountered during the construction process, such as wobbly rockers or splitting wood.
- Material Selection: Users want to know the best types of wood and materials to use for building a durable and weather-resistant rocking chair.
- Design Inspiration: Users are seeking design ideas and styles for wooden rocking chairs, ranging from classic to modern designs.
Leveraging rockscapes.net for Your Landscaping Needs
At rockscapes.net, we offer a wide range of resources to help you create the perfect outdoor space, including:
- Inspiration Galleries: Browse our inspiration galleries for stunning landscape designs featuring rocks, stones, and water features.
- Product Catalogs: Explore our product catalogs for a wide selection of natural stones, pavers, and landscaping materials.
- Expert Advice: Get expert advice from our team of landscape designers and contractors.
- DIY Guides: Access our library of DIY guides for step-by-step instructions on various landscaping projects.
- Contact Information: Reach out to us at Address: 1151 S Forest Ave, Tempe, AZ 85281, United States. Phone: +1 (480) 965-9011 or visit our Website: rockscapes.net.
Wooden Rocking Chair Project: FAQs
1. What type of wood is best for building a wooden rocking chair?
Durable hardwoods like oak, maple, or cherry are excellent for a long-lasting chair, while cedar or redwood are great for weather resistance in outdoor chairs.
2. How do I ensure the rockers are perfectly symmetrical?
Create a template from cardboard and trace it onto both rockers before cutting. Use a belt sander to refine the shape.
3. What tools are essential for this project?
A miter saw, drill, sander, router, clamps, and measuring tools are key for cutting, shaping, and assembling the chair.
4. Should I use screws or nails for assembly?
Screws provide a stronger hold, especially when combined with waterproof wood glue. Pre-drill pilot holes to prevent splitting.
5. How do I prevent the wood from splitting when screwing it together?
Always pre-drill pilot holes slightly smaller than the screw size to guide the screw and prevent splitting.
6. What type of finish should I use for an outdoor rocking chair?
Use a finish specifically designed for outdoor use, such as marine-grade varnish or exterior paint, to protect against moisture and UV damage.
7. How can I make the chair more comfortable?
Consider adding contoured seat slats, ergonomic armrests, and a comfortable cushion for extra support.
8. What’s the best way to attach the rockers to the legs?
Use half-lap joints for a strong connection. Apply waterproof wood glue and secure with screws.
9. How do I maintain the rocking chair to ensure it lasts longer?
Clean regularly with mild soap and water, re-apply finish every few years, and store indoors during the off-season.
10. Where can I find rocking chair templates for sale?
Many woodworking websites and online stores offer rocking chair templates for various designs.
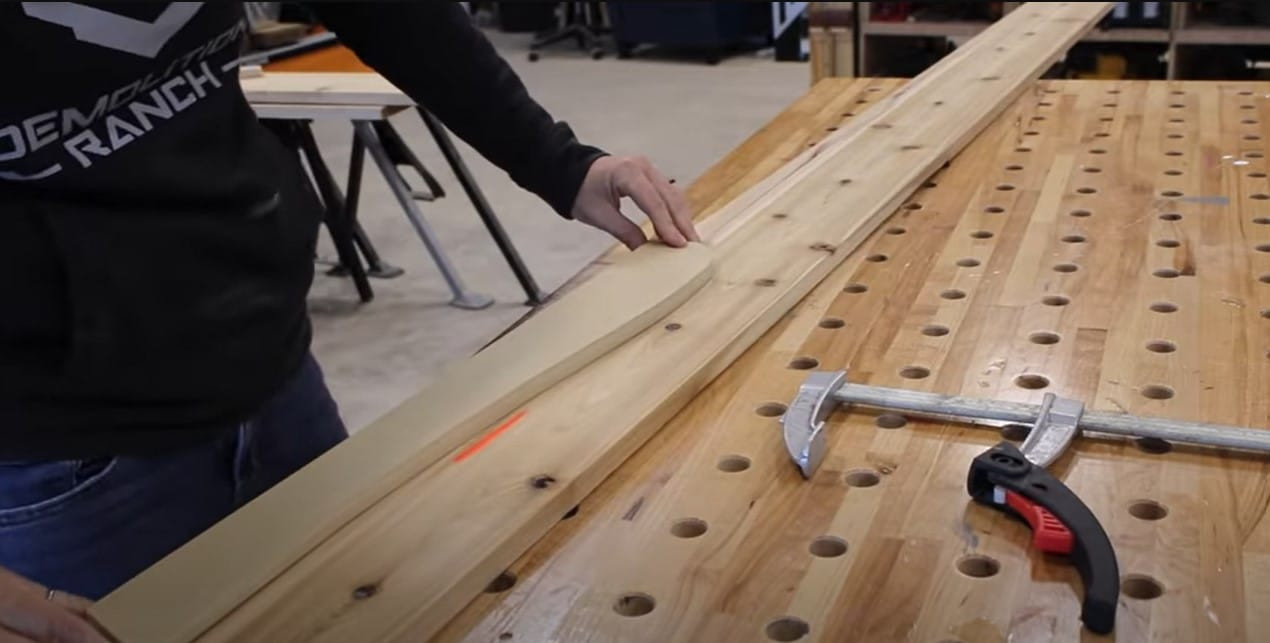
 5
5
Alt text: A workstation with the rocking chair parts being cut.
Call to Action: Start Your Rocking Chair Project Today!
Ready to bring your dream outdoor space to life? Visit rockscapes.net today for inspiration, expert advice, and premium landscaping materials. Explore our stunning design ideas, discover the perfect stones for your project, and get step-by-step guidance from our team of experts. Transform your backyard into a haven of beauty and tranquility with rockscapes.net!
Whether you’re looking to create a serene rock garden, a captivating water feature, or a cozy seating area, we have everything you need to make your vision a reality. Contact us today and let’s embark on this exciting journey together!
Remember, creating a beautiful and functional outdoor space is an investment in your home and your well-being. With rockscapes.net, you can achieve stunning results that will be enjoyed for years to come.
Contact us today and let’s create something extraordinary together!
Address: 1151 S Forest Ave, Tempe, AZ 85281, United States
Phone: +1 (480) 965-9011
Website: rockscapes.net