Building rock stairs on a hill can dramatically enhance your outdoor space, adding both functionality and natural beauty. At rockscapes.net, we provide the expertise and resources you need to create stunning and durable rock stairs. This comprehensive guide will walk you through every step, ensuring your project is a success, transforming your sloped landscape into an accessible and visually appealing masterpiece.
1. Why Choose Rock Stairs for Your Hillside Landscape?
Rock stairs offer a unique blend of practicality and aesthetic appeal, making them an excellent choice for hillside landscapes. Here’s why:
- Natural Integration: Rock stairs blend seamlessly with the natural environment, enhancing the rustic charm of your landscape.
- Durability: Natural stone is incredibly durable and can withstand harsh weather conditions, ensuring your stairs last for years.
- Erosion Control: Properly installed rock stairs help prevent soil erosion on slopes, protecting your landscape.
- Unique Aesthetic: The texture and color variations in natural stone create a visually appealing and unique pathway.
- Increased Property Value: Well-designed and constructed rock stairs can increase the overall value of your property.
2. Understanding the Challenges of Building on a Hill
Building rock stairs on a hill presents unique challenges that require careful planning and execution. Some common challenges include:
- Slope Stability: Ensuring the slope is stable enough to support the stairs is crucial for safety.
- Erosion Control: Implementing measures to prevent soil erosion during and after construction is essential.
- Drainage: Proper drainage is necessary to prevent water from damaging the stairs and surrounding landscape.
- Accessibility: Transporting materials to the construction site can be difficult on a steep slope.
- Leveling: Creating level steps on a hillside requires precise measurements and adjustments.
3. Essential Considerations Before You Begin Construction
Before starting your rock stair project, several crucial factors must be considered to ensure success and safety:
- Local Regulations: Check local building codes and regulations to ensure your project complies with all requirements.
- Slope Assessment: Evaluate the slope’s stability and soil type to determine the best construction methods.
- Drainage Plan: Develop a comprehensive drainage plan to prevent water damage and erosion.
- Material Selection: Choose the right type of stone and base materials for durability and aesthetic appeal.
- Safety Measures: Implement safety measures to protect yourself and others during construction.
4. Designing Your Rock Stairs: Blending Functionality with Aesthetics
Designing rock stairs involves balancing functionality with the natural aesthetics of your landscape. Here are key considerations:
- Step Dimensions: Aim for a comfortable rise (vertical height) of 4-7 inches and a tread (horizontal depth) of 12-18 inches.
- Consistent Rise: Maintain a consistent rise for each step to ensure safe and comfortable use.
- Stair Width: Determine the appropriate width based on the intended use and traffic flow.
- Landing Areas: Incorporate landing areas for resting and enjoying the view, especially on long staircases.
- Stone Arrangement: Arrange the stones in a natural and visually appealing pattern that complements the landscape.
5. Selecting the Right Type of Stone for Your Project
Choosing the right type of stone is crucial for both the aesthetics and durability of your rock stairs. Here are some popular options:
- Flagstone: Known for its flat, even surface, flagstone is easy to work with and provides a natural, rustic look.
- Limestone: Limestone offers a classic, elegant appearance and is available in various colors and textures.
- Sandstone: Sandstone is relatively affordable and comes in a wide range of colors, making it a versatile choice.
- Granite: Granite is extremely durable and resistant to weathering, ideal for high-traffic areas.
- Bluestone: Thermal Bluestone is popular for garden steps because of its natural beauty and durable nature. It has a blue-gray hue that can complement a variety of design styles. According to research from Arizona State University’s School of Earth and Space Exploration, bluestone is a type of sandstone that’s been heated to high temperatures, giving it a unique, textured surface that provides excellent traction.
- Fieldstone: Fieldstone offers a natural, rugged look and is often locally sourced, making it an environmentally friendly option.
- Buff Sandstone Rockface Treads: Made from high-quality sandstone and have a naturally rough texture that provides excellent traction. As the name suggests, they have a warm, buff color that works well in many landscaping designs and raised garden beds.
When choosing your stone, consider the following:
- Climate: Select a stone that can withstand the climate in your area, including freeze-thaw cycles and moisture levels.
- Color and Texture: Choose a stone that complements the surrounding landscape and your personal aesthetic preferences.
- Availability: Consider the availability and cost of the stone in your local area.
- Slip Resistance: Ensure the stone has a natural texture to provide adequate slip resistance, especially in wet conditions.
6. Tools and Materials You’ll Need for the Job
Having the right tools and materials on hand will make your rock stair project easier and more efficient. Here’s a comprehensive list:
- Stones: Choose stones that are thick enough to handle foot traffic and the elements.
- Shovel: For digging and moving soil.
- Pickaxe: For breaking up hard soil and rocks.
- Level: To ensure each step is level and stable.
- Tape Measure: For accurate measurements.
- Safety Glasses and Gloves: To protect your eyes and hands.
- Rubber Mallet: For gently adjusting the stones.
- Plate Compactor: Optional, but helpful for compacting the base material on larger projects.
- Chisel and Hammer: For shaping stones, if needed.
- Stone Chips or Gravel: For creating a stable base.
- Bedding Sand: For providing a level surface for the stones.
- Masonry Saw or Angle Grinder: For cutting stones, if needed.
- Sealant: Optional, depending on the type of stone used. Choose one based on your type of stone.
- Mortar or Concrete: For securing the stones in place.
- Wheelbarrow: For transporting materials.
- Landscape Fabric: To prevent weed growth.
- Drainage Pipe: For managing water runoff.
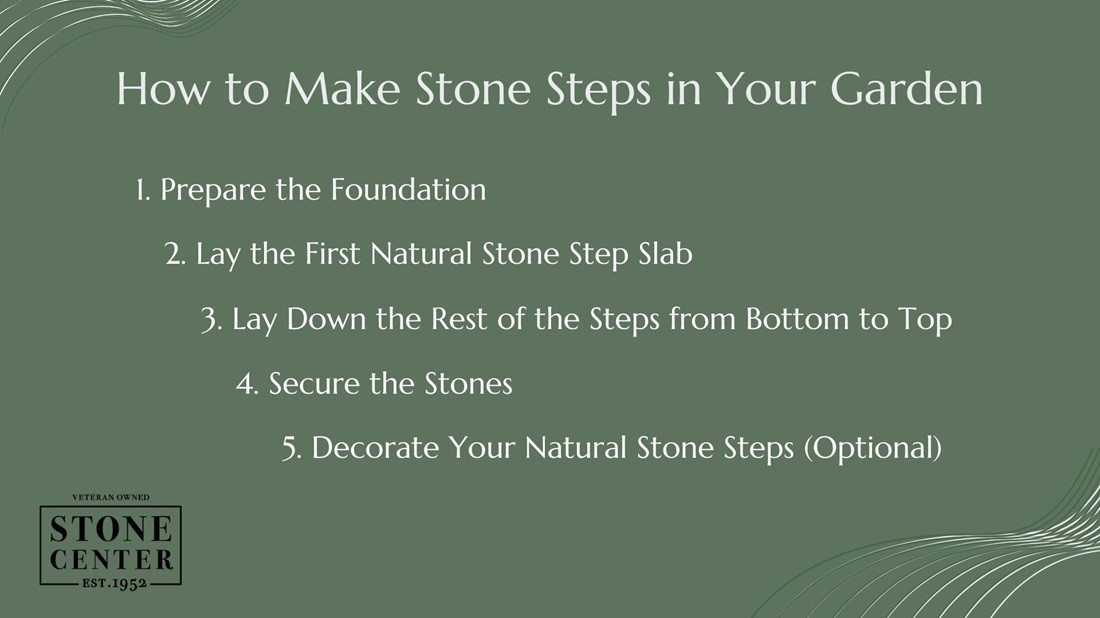
7. Step-by-Step Guide: How to Build Rock Stairs on a Hill
Follow these steps to build durable and aesthetically pleasing rock stairs on your hill:
7.1. Planning and Preparation
- Measure the Slope: Determine the total rise (vertical height) and run (horizontal distance) of the slope.
- Calculate the Number of Steps: Divide the total rise by the desired rise per step (4-7 inches) to determine the number of steps needed. Next, divide the total run measurement by the number of steps calculated above to determine if the step depth falls within the recommended range of 12-18 inches.
- Mark the Stairway Path: Use stakes and string to mark the desired path of the stairs.
- Gather Materials: Collect all necessary tools and materials before starting construction.
7.2. Excavation and Foundation
- Excavate the First Step: Dig out the area for the first step, ensuring it is wide and deep enough to accommodate the stone and base material. Remove all grass, plants, and debris that might interfere with the foundation.
- Create a Level Base: Compact the soil at the base of the excavated area.
- Add Base Material: Pour a layer of gravel or crushed stone (4-6 inches) into the excavated area and compact it using a plate compactor.
- Lay Landscape Fabric: Cover the base material with landscape fabric to prevent weed growth.
- Add Bedding Sand: Pour a layer of bedding sand (1-2 inches) over the landscape fabric and level it.
7.3. Laying the First Stone
- Position the First Stone: Carefully place the first stone on the prepared base, ensuring it is level and stable.
- Adjust as Needed: Use a rubber mallet to gently adjust the stone until it is perfectly level.
- Secure the Stone: If desired, use mortar or concrete to secure the stone in place, especially on steep slopes.
7.4. Building Subsequent Steps
- Repeat the Process: Repeat the excavation, base preparation, and stone placement process for each subsequent step, working your way up the hill.
- Overlap Stones (Optional): Overlapping stones can add stability and a natural look to the stairs.
- Ensure Proper Drainage: Slightly tilt each step forward to help the water to flow down the stairway instead of pooling on each step.
7.5. Backfilling and Finishing
- Backfill with Soil: Backfill the sides of the stairs with soil, compacting it as you go.
- Add Decorative Elements: Incorporate decorative rock steps into your landscape design to enhance the aesthetic appeal of your outdoor space.
- Plant Vegetation: Plant vegetation along the sides of the stairs to add beauty and help prevent erosion.
8. Addressing Drainage Issues: Keeping Your Stairs Dry and Stable
Proper drainage is crucial for the longevity and stability of your rock stairs. Here are some strategies to address drainage issues:
- Surface Drainage: Ensure each step is slightly sloped to allow water to run off.
- Subsurface Drainage: Install drainage pipes beneath the stairs to redirect water away from the base.
- French Drains: Create French drains along the sides of the stairs to capture and redirect runoff water.
- Permeable Materials: Use permeable base materials, such as gravel or crushed stone, to allow water to drain freely.
9. Landscaping Around Your Rock Stairs: Enhancing the Natural Beauty
Landscaping around your rock stairs can enhance their natural beauty and create a cohesive outdoor space. Consider these ideas:
- Native Plants: Plant native plants that thrive in your local climate and soil conditions.
- Ground Cover: Use ground cover plants to prevent soil erosion and add texture to the landscape.
- Ornamental Grasses: Incorporate ornamental grasses for movement and visual interest.
- Flowering Shrubs: Add flowering shrubs for pops of color and seasonal interest.
- Mulch: Apply mulch to retain moisture, suppress weeds, and enhance the appearance of the landscape.
- Flower Beds: Enhance the aesthetic appeal of your outdoor space by planting vibrant and fragrant flowers on both sides of the stairway, adding a captivating touch of nature’s beauty to your surroundings.
10. Maintenance and Care: Ensuring Longevity and Safety
Regular maintenance is essential to keep your rock stairs in top condition. Follow these tips:
- Regular Sweeping: Regularly sweep away dirt, leaves, and other debris to keep your steps looking clean.
- Weed Control: Remove any weeds or grass growing between your stones to maintain a polished look.
- Inspect for Damage: Inspect for loose or damaged stones and make repairs promptly to prevent further issues.
- Cleaning: Use a hose or pressure washer to remove stubborn dirt and prevent stains.
- Sealing: If recommended for your stone type, apply a sealant periodically to help repel stains and weather damage.
- Winter Preparation: In colder climates, remove snow and ice promptly to prevent slips and falls.
11. Safety Considerations: Protecting Yourself and Others
Safety should always be a top priority when building and maintaining rock stairs. Here are some essential safety measures:
- Wear Protective Gear: Always wear safety glasses, gloves, and sturdy footwear during construction.
- Use Proper Lifting Techniques: Lift heavy stones with your legs, not your back, to prevent injury.
- Secure the Work Area: Keep children and pets away from the construction site.
- Provide Adequate Lighting: Ensure the stairs are well-lit, especially at night, to prevent accidents.
- Install Handrails: Consider installing handrails for added safety, particularly on steep or long staircases.
12. Cost Considerations: Budgeting for Your Rock Stair Project
The cost of building rock stairs can vary depending on several factors, including the type of stone, the size of the staircase, and the complexity of the design. Here are some cost considerations:
- Stone Costs: Natural stones like Bluestone, Flagstone, and Limestone provide a high-end look but can cost you more.
- Base Material Costs: Gravel, crushed stone, and bedding sand can add to the overall cost.
- Tool and Equipment Costs: Factor in the cost of tools and equipment, such as shovels, pickaxes, levels, and compactors.
- Labor Costs: If you hire a contractor, be sure to factor in labor costs.
- Permit Costs: Check local building codes for permit requirements and associated fees.
13. Common Mistakes to Avoid: Ensuring a Successful Project
Avoiding common mistakes can save you time, money, and frustration. Here are some pitfalls to watch out for:
- Inadequate Planning: Failing to plan properly can lead to costly errors and delays.
- Poor Drainage: Neglecting drainage can result in water damage and instability.
- Improper Base Preparation: An unstable base can cause the stairs to shift and settle over time.
- Incorrect Stone Placement: Incorrect stone placement can compromise the stability and safety of the stairs.
- Ignoring Local Regulations: Failing to comply with local building codes can result in fines and project delays.
14. Getting Professional Help: When to Hire a Landscaping Expert
While building rock stairs can be a rewarding DIY project, there are times when it’s best to seek professional help. Consider hiring a landscaping expert if:
- You Lack Experience: If you have little or no experience with landscaping or construction, a professional can ensure the project is done correctly.
- The Project Is Complex: Complex projects involving steep slopes, extensive excavation, or intricate designs may require professional expertise.
- You’re Short on Time: A professional can complete the project more quickly and efficiently.
- You Need Specialized Equipment: Some projects may require specialized equipment, such as excavators or grading machines.
- You Want Peace of Mind: Hiring a professional can give you peace of mind knowing the project is in capable hands.
15. Finding Inspiration: Rock Stair Design Ideas for Every Landscape
Looking for inspiration for your rock stair project? Here are some design ideas to spark your creativity:
- Rustic Stone Stairs: Use natural, irregular stones to create a rustic, natural-looking staircase.
- Formal Stone Stairs: Use precisely cut stones and a symmetrical design to create a formal, elegant staircase.
- Terraced Stone Stairs: Create terraced steps with retaining walls to add visual interest and prevent erosion.
- Curving Stone Stairs: Design a curving staircase to follow the natural contours of the landscape.
- Stone Stairs with Landings: Incorporate landing areas with benches or seating to create a relaxing outdoor space.
- Arches: Consider constructing arches that frame the stone steps leading to the entryway, thereby enhancing its inviting and cozy atmosphere.
- Natural Transition: Design your stone steps to blend beautifully with your landscape – try adding a border of mulch or low-growing plants for a natural transition.
 Rock Stairs Design Ideas
FAQ: Your Questions Answered About Building Rock Stairs
- What is the best type of stone for rock stairs?
The best type of stone depends on your budget, aesthetic preferences, and climate. Flagstone, limestone, sandstone, and granite are all popular choices. - How do I ensure proper drainage for my rock stairs?
Ensure each step is slightly sloped, install drainage pipes beneath the stairs, and use permeable base materials. - Do I need a permit to build rock stairs?
Check with your local building department to determine if a permit is required. - How do I prevent weeds from growing between the stones?
Use landscape fabric beneath the stones and apply a weed killer as needed. - How do I maintain my rock stairs?
Regularly sweep away debris, remove weeds, inspect for damage, and clean the stones as needed. - What is the ideal rise and tread for rock stairs?
Aim for a rise of 4-7 inches and a tread of 12-18 inches. - How do I secure the stones in place?
Use mortar or concrete to secure the stones, especially on steep slopes. - How do I choose the right size stones for my project?
Choose stones that are thick enough to handle foot traffic and large enough to create a stable step. - Can I build rock stairs on a steep slope?
Yes, but it may require additional support and stabilization measures. - What safety measures should I take when building rock stairs?
Wear protective gear, use proper lifting techniques, secure the work area, and provide adequate lighting.
Transform Your Hillside with Rockscapes.net
Building rock stairs on a hill is a challenging but rewarding project that can transform your outdoor space. At rockscapes.net, we offer a wide selection of high-quality stones, expert advice, and helpful resources to guide you through every step of the process. Whether you’re a seasoned DIYer or new to landscaping, we have everything you need to create stunning and durable rock stairs that enhance the beauty and functionality of your home.
Ready to start your rock stair project? Explore our website for design ideas, material selection tips, and step-by-step guides. Contact us today to speak with a landscaping expert and begin planning your dream outdoor space.
Address: 1151 S Forest Ave, Tempe, AZ 85281, United States
Phone: +1 (480) 965-9011
Website: rockscapes.net
Let rockscapes.net help you make your landscape dreams a reality, one beautiful stone step at a time!
