Carving a rock opens up a world of artistic possibilities, transforming ordinary stones into personalized masterpieces. At rockscapes.net, we provide you with the knowledge and inspiration to embark on this creative journey, whether you’re aiming to craft unique garden decor, personalized gifts, or eye-catching rock art. Discover the art of rock carving, explore the best tools, techniques, and design ideas for your next project.
1. Why Carve Rocks? Unveiling the Allure of Stone Art
Why should you consider carving rocks? Carving rocks offers a unique blend of artistic expression and connection with nature. It’s a meditative process that transforms ordinary stones into personalized art pieces. The natural texture and colors of the rock provide a unique canvas for your creativity, allowing you to create lasting pieces of art that resonate with the earth’s inherent beauty.
What are the Benefits of Carving Rocks?
Rock carving is more than just a hobby; it’s a fulfilling activity with many benefits.
- Stress Relief: The repetitive and focused nature of carving can be incredibly relaxing, helping to reduce stress and promote mindfulness.
- Creative Expression: Carving allows you to express your artistic vision in a unique and tangible way, turning ordinary stones into personalized works of art.
- Unique Decor: Carved rocks can add a distinctive touch to your home or garden, serving as eye-catching decor that reflects your personal style.
- Personalized Gifts: Hand-carved rocks make thoughtful and unique gifts for friends and family, showcasing your creativity and care.
- Connection with Nature: Working with natural materials like stone fosters a deeper appreciation for the earth and its beauty.
- Therapeutic: Rock carving can be a therapeutic activity, promoting relaxation and mental well-being through the focused and repetitive motions.
- Mindfulness: The concentration required for carving encourages mindfulness, allowing you to be present in the moment and disconnect from daily worries.
- Skill Development: As you practice, you’ll develop your carving skills, learning new techniques and refining your artistic abilities.
- Customization: Carving allows you to customize rocks with meaningful symbols, words, or designs, creating pieces that hold personal significance.
- Sustainability: Using natural rocks for art is an eco-friendly practice, repurposing materials and reducing waste.
What are the Applications of Carved Rocks?
Carved rocks can be used in various ways, adding a touch of nature and artistry to your surroundings.
- Garden Decor: Enhance your garden with carved rocks featuring intricate designs, inspiring quotes, or whimsical patterns.
- Home Accents: Use carved rocks as unique home accents, such as paperweights, bookends, or decorative centerpieces.
- Personalized Gifts: Create personalized gifts by carving names, dates, or special messages into rocks for loved ones.
- Memorial Stones: Honor loved ones with carved memorial stones placed in gardens or other meaningful locations.
- Inspirational Art: Carve inspirational words or symbols into rocks to create pocket-sized pieces of art that uplift and inspire.
- Landscaping: Incorporate carved rocks into landscaping projects to add texture, visual interest, and a touch of natural beauty.
- Meditation Aids: Use carved rocks with calming symbols or mantras as aids for meditation and relaxation.
- Educational Tools: Engage children in learning about geology and art by carving rocks together as an educational activity.
- Signage: Create unique signage for gardens or homes by carving names, addresses, or welcoming messages into rocks.
- Functional Art: Design functional art pieces such as carved rock bowls, candle holders, or coasters that combine beauty and utility.
2. Essential Tools and Materials for Rock Carving
What tools and materials are required for carving rocks? To carve rocks effectively, you’ll need a few essential tools and materials, including a rotary tool, carving bits, safety glasses, a dust mask, water, and a selection of rocks. Each tool serves a specific purpose in shaping and refining your design.
 Materials needed to carve rocks with a Dremel via lilblueboo.com
What are the Basic Tools for Carving Rocks?
Here’s a list of the basic tools you’ll need to get started with rock carving:
- Rotary Tool (Dremel): A versatile power tool that spins at high speeds, used for grinding, carving, and polishing rocks. Look for a cordless Dremel 8220 for optimal flexibility.
- Carving Bits: Various attachments for the rotary tool, each designed for different carving tasks. Diamond bits are ideal for harder stones, while silicon carbide grinding stones work well for softer rocks.
- Safety Glasses: Essential for protecting your eyes from flying debris during the carving process.
- Dust Mask: Prevents inhalation of rock dust, which can be harmful to your lungs.
- Water: Used to cool the rock and carving bits, preventing overheating and reducing dust.
- Selection of Rocks: Choose rocks with smooth surfaces and interesting shapes to carve. River rocks are particularly suitable due to their rounded forms.
- Pencil: For sketching your design onto the rock before carving.
- Soft Cloth: Used for polishing the carved rock to bring out the design.
- Beeswax: Enhances the design and gives the rock a polished look.
What are the Best Types of Rocks for Carving?
The type of rock you choose can significantly impact the carving process. Here are some of the best types of rocks for carving, along with their characteristics:
| Rock Type | Characteristics | Carving Ease | Best Uses |
|---|---|---|---|
| Soapstone | Soft and easy to carve, with a smooth, waxy feel. | Very Easy | Intricate designs, small sculptures, beginner projects. |
| Alabaster | Fine-grained and relatively soft, allowing for detailed carving. | Easy | Decorative items, sculptures, fine art. |
| Limestone | Sedimentary rock that varies in hardness; some types are easy to carve. | Moderate | Architectural details, garden ornaments, lettering. |
| Sandstone | Composed of sand grains cemented together; can be carved but requires more effort. | Moderate | Rustic designs, garden features, textured surfaces. |
| Marble | Metamorphic rock known for its beauty and durability; more challenging to carve. | Difficult | High-end sculptures, decorative pieces, fine art. |
| River Rocks | Smooth, rounded rocks found in riverbeds; vary in hardness but generally suitable for carving with proper tools. | Moderate | Garden decor, personalized stones, inspirational messages. |
| Serpentine | Relatively soft and comes in various colors, often with a waxy or silky feel. | Easy | Small carvings, jewelry components, ornamental pieces. |
| Steatite | A type of soapstone that is particularly heat-resistant, making it ideal for functional items. | Very Easy | Cookware, heat-retaining stones, small sculptures. |
| Slate | Fine-grained metamorphic rock that splits into thin layers; can be carved or etched. | Moderate | Plaques, garden markers, decorative tiles. |
| Fieldstone | Naturally occurring rocks found in fields; vary widely in hardness and texture, offering unique carving opportunities. | Varies | Rustic garden features, naturalistic sculptures, landscape accents. |
What are the Different Types of Carving Bits?
Choosing the right carving bit is essential for achieving the desired effect. Here are some common types of carving bits and their uses:
- Diamond Bits: Best for hard stones like marble and granite. They can withstand high temperatures and maintain their shape, ensuring precise cuts and intricate details.
- Silicon Carbide Grinding Stones: Ideal for softer stones like soapstone and alabaster. These bits are less aggressive than diamond bits, allowing for smoother carving and shaping.
- Engraving Cutters: Perfect for creating fine lines and detailed designs. They come in various shapes, such as pointed, round, and flat, allowing for versatility in your carving work.
- Grinding Stones: Used for removing larger amounts of material and shaping the overall form of the rock. They are available in different grits, allowing you to refine the surface as you work.
- Polishing Wheels: Used for smoothing and polishing the carved surface, bringing out the natural beauty of the stone. Applying beeswax with a polishing wheel can enhance the design and give the rock a professional finish.
3. Step-by-Step Guide: How to Carve a Rock
How do you carve a rock? Carving a rock involves a series of steps, from preparing the rock to refining the finished design. Follow this step-by-step guide to create your own rock art:
Step 1: Preparation
Start by cleaning the rock thoroughly to remove any dirt or debris. This will help you see the surface clearly and ensure better adhesion for your design.
Step 2: Sketching Your Design
Use a pencil to sketch your design onto the rock. Keep it simple if you’re a beginner. Consider the shape and natural features of the rock when creating your design.
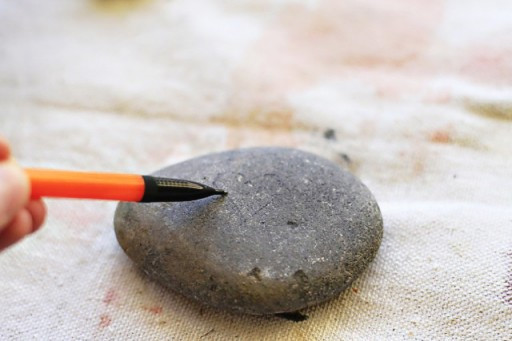 Carving River Rocks with a Dremel (Step 1) via lilblueboo.com
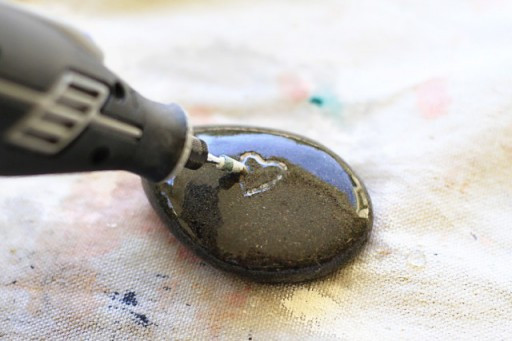
Step 3: Carving the Rock
Using a rotary tool with the appropriate carving bit, begin to carefully etch your design into the rock. Work slowly and steadily, following the lines of your sketch.
Step 4: Cooling and Cleaning
Every few seconds, dip the rock in water to cool it off and remove dust. This will help prevent overheating and make it easier to see your progress.
 Carving River Rocks with a Dremel (Step 2) via lilblueboo.com
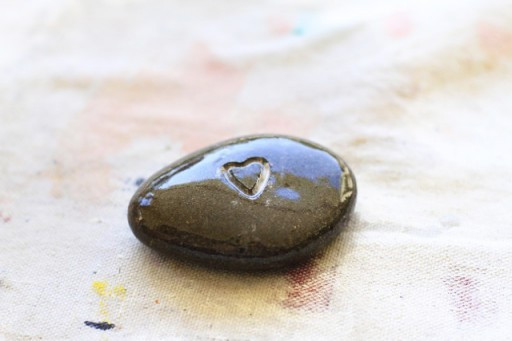
Step 5: Refining the Design
Once you’ve etched the basic design, go over it again, carving a little deeper each time. Pay attention to the details and refine the lines as needed.
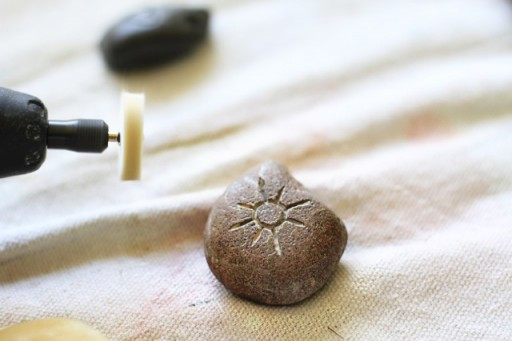
Step 6: Polishing
After completing the carving, use a polishing wheel to smooth the surface and bring out the design. Apply a small amount of beeswax to a soft cloth and buff the rock to a shine.
 Engraving River Rocks with a Dremel (Step 3) via lilblueboo.com
Step 7: Final Touches
Inspect the carved rock for any rough edges or imperfections. Use the rotary tool to smooth these out and add any final touches to your design.
 DIY Carved Rock / Pebble via lilblueboo.com
Step 8: Finishing
Apply beeswax to enhance the design and give the rock a polished look. Buff the rock with a soft cloth to bring out the shine and reveal the finished carving.
 Use Beeswax to polish rock via lilblueboo.com
4. Creative Ideas for Rock Carving Designs
What kind of designs can you carve into rocks? The possibilities are endless when it comes to rock carving designs. From simple patterns to intricate scenes, let your imagination guide you.
What are Simple Carving Ideas for Beginners?
If you’re new to rock carving, start with simple designs that are easy to execute.
- Geometric Patterns: Carve basic shapes like circles, squares, and triangles into the rock.
- Letters and Initials: Personalize rocks with carved letters or initials.
- Simple Flowers: Create stylized flower designs with just a few lines.
- Stars: Carve simple star shapes for a celestial-themed design.
- Hearts: Carve heart shapes as a symbol of love or affection.
- Dots and Dashes: Create patterns using a series of dots and dashes.
- Spirals: Carve spiral patterns for a visually appealing design.
- Waves: Carve simple wave patterns for a nautical theme.
- Arrows: Carve arrow shapes to indicate direction or movement.
- Abstract Lines: Create unique designs using a combination of abstract lines.
What are Advanced Carving Ideas for Experienced Artists?
For experienced artists, try more complex designs that showcase your skills.
- Detailed Landscapes: Carve intricate landscape scenes with mountains, trees, and rivers.
- Animals: Carve realistic animal figures, such as birds, cats, or dogs.
- Portraits: Carve portraits of people or pets for a personalized touch.
- Mythological Creatures: Carve mythical creatures like dragons, unicorns, or griffins.
- Floral Arrangements: Carve detailed floral arrangements with various types of flowers and leaves.
- Celtic Knots: Carve intricate Celtic knot designs for a touch of ancient artistry.
- Mandalas: Carve mandala patterns for a meditative and visually stunning design.
- Religious Symbols: Carve religious symbols for spiritual expression.
- Abstract Sculptures: Create abstract sculptures with complex shapes and textures.
- Historical Figures: Carve portraits of historical figures for an educational and artistic project.
What are Thematic Carving Ideas to Add Personality?
Add personality to your rock carvings by choosing themes that reflect your interests and style.
- Nature Themes: Carve designs inspired by nature, such as leaves, trees, and animals.
- Inspirational Quotes: Carve inspirational quotes to uplift and motivate.
- Zodiac Signs: Carve zodiac signs to represent your astrological identity.
- Hobbies: Carve symbols related to your hobbies, such as musical instruments, sports equipment, or art supplies.
- Travel Destinations: Carve landmarks or symbols from your favorite travel destinations.
- Family Names: Carve family names for a personalized touch.
- Pet Names: Carve pet names to honor your furry friends.
- Gardening Themes: Carve garden-related designs, such as flowers, vegetables, or gardening tools.
- Holiday Themes: Carve holiday-themed designs, such as Christmas trees, pumpkins, or Easter eggs.
- Spiritual Themes: Carve spiritual symbols for personal reflection and mindfulness.
5. Safety Tips for Rock Carving
What safety measures should you take while carving rocks? Safety should always be your top priority when carving rocks. Follow these safety tips to protect yourself from injury.
What are The Important Safety Precautions?
Here are some essential safety precautions to take when carving rocks:
- Wear Safety Glasses: Always wear safety glasses to protect your eyes from flying debris.
- Use a Dust Mask: Wear a dust mask to prevent inhalation of rock dust, which can be harmful.
- Work in a Well-Ventilated Area: Ensure good ventilation to minimize exposure to dust and fumes.
- Use Water to Cool the Rock: Keep the rock and carving bits cool by frequently dipping them in water.
- Secure the Rock: Secure the rock in a vise or clamp to prevent it from moving during carving.
- Use Proper Lighting: Ensure adequate lighting to see your work clearly and avoid mistakes.
- Take Breaks: Take frequent breaks to avoid fatigue, which can lead to accidents.
- Keep Your Workspace Clean: Keep your workspace clean and organized to prevent tripping hazards.
- Unplug Tools When Not in Use: Always unplug power tools when changing bits or taking a break.
- Store Tools Safely: Store tools in a safe place, out of reach of children and pets.
What are The Safety Tips for Using a Rotary Tool?
Using a rotary tool requires extra caution. Follow these safety tips to minimize the risk of injury:
- Read the Manual: Read the tool’s manual carefully before use and follow all safety instructions.
- Use the Right Bit: Use the appropriate carving bit for the type of rock you’re working with.
- Secure the Bit: Ensure the carving bit is securely attached to the rotary tool.
- Start at a Low Speed: Begin carving at a low speed and gradually increase as needed.
- Use a Light Touch: Apply gentle pressure when carving, letting the tool do the work.
- Avoid Overheating: Prevent the tool from overheating by taking frequent breaks and using water to cool the bit.
- Keep Hands Away from the Bit: Keep your hands away from the carving bit at all times.
- Don’t Force the Tool: Don’t force the tool if it gets stuck; instead, try a different bit or technique.
- Inspect the Tool Regularly: Inspect the tool regularly for any signs of damage or wear.
- Wear Appropriate Clothing: Wear appropriate clothing, such as long sleeves and closed-toe shoes, to protect your skin.
6. How to Drill Holes in Rocks for Jewelry and Crafts
How can you drill holes in rocks? Drilling holes in rocks opens up new possibilities for creating jewelry, crafts, and decorative items.
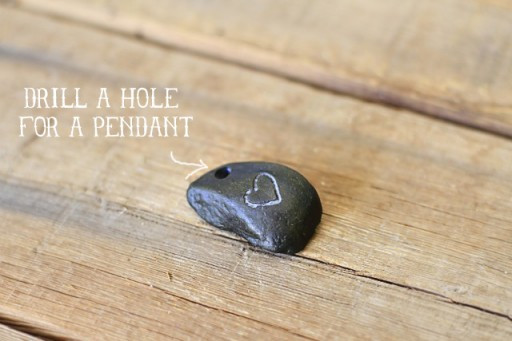 How To Drill a Hole in a Rock via lilblueboo.com
What are The Steps for Drilling Holes in Rocks?
Follow these steps to drill holes in rocks safely and effectively:
- Choose the Right Drill Bit: Use a diamond-tipped drill bit designed for drilling through stone.
- Mark the Spot: Use a pencil to mark the exact spot where you want to drill the hole.
- Create a Pilot Hole: Start by creating a small pilot hole to guide the drill bit.
- Apply Water: Continuously apply water to the drilling area to cool the bit and reduce dust.
- Drill Slowly: Drill slowly and steadily, applying gentle pressure.
- Clean the Hole: Periodically clean the hole to remove debris and ensure smooth drilling.
- Drill Through: Continue drilling until you have drilled completely through the rock.
- Smooth the Edges: Use a small grinding bit to smooth any rough edges around the hole.
- Rinse and Dry: Rinse the rock with water to remove any remaining debris and allow it to dry completely.
What are The Tips for Drilling Rocks?
Here are some additional tips for drilling holes in rocks:
- Use a Drill Press: If possible, use a drill press to ensure a straight and accurate hole.
- Secure the Rock: Secure the rock in a vise or clamp to prevent it from moving during drilling.
- Drill in Intervals: Drill in short intervals, allowing the drill bit to cool down.
- Apply Consistent Pressure: Apply consistent pressure while drilling, avoiding sudden movements.
- Use Lubricant: Use a lubricant, such as mineral oil, to reduce friction and extend the life of the drill bit.
- Check the Hole: Check the hole frequently to ensure it is straight and properly aligned.
- Wear Safety Glasses: Always wear safety glasses to protect your eyes from flying debris.
- Use a Dust Mask: Wear a dust mask to prevent inhalation of rock dust.
- Be Patient: Drilling through rock can take time, so be patient and avoid rushing the process.
- Practice on Scrap Rocks: Practice drilling on scrap rocks before working on your final project.
7. Enhancing Your Carved Rocks: Finishing and Polishing Techniques
How can you enhance the look of carved rocks? Enhance the beauty and durability of your carved rocks with these finishing and polishing techniques.
 Dremel Polishing Wheel Attachment via lilblueboo.com
What are The Best Polishing Methods?
Here are some effective polishing methods to bring out the natural shine of your carved rocks:
- Hand Polishing: Use a soft cloth and polishing compound to hand-polish the rock’s surface.
- Rotary Tool Polishing: Use a rotary tool with a polishing wheel attachment to polish the rock’s surface.
- Tumbling: Use a rock tumbler to polish multiple rocks at once.
- Applying Beeswax: Apply beeswax to the carved rock and buff it with a soft cloth to enhance the design and add shine.
What are The Types of Finishes for Carved Rocks?
Explore different types of finishes to achieve the desired look for your carved rocks:
- Matte Finish: Achieve a matte finish by lightly sanding the surface with fine-grit sandpaper.
- Satin Finish: Achieve a satin finish by polishing the surface with a polishing compound and a soft cloth.
- Glossy Finish: Achieve a glossy finish by polishing the surface with a polishing wheel and applying a sealant.
- Antiqued Finish: Achieve an antiqued finish by applying a dark stain and then wiping it off to leave residue in the carved areas.
- Natural Finish: Leave the rock with its natural finish to showcase its raw beauty.
8. Rock Carving for Landscaping: Creating Stunning Stone Features
How can you use carved rocks in landscaping? Incorporate carved rocks into your landscaping to create stunning stone features that add character and charm to your outdoor space.
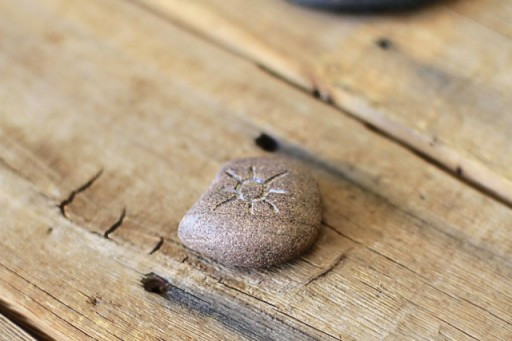 Finished Etched Rock via lilblueboo.com
What are The Ways to Incorporate Carved Rocks into Your Landscape?
Here are some creative ways to use carved rocks in your landscaping:
- Garden Markers: Carve the names of plants or herbs into rocks and use them as garden markers.
- Pathway Stones: Carve decorative designs into rocks and use them as pathway stones.
- Water Features: Carve intricate designs into rocks and incorporate them into water features, such as fountains or ponds.
- Retaining Walls: Use carved rocks to create retaining walls that add beauty and functionality to your landscape.
- Sculptural Elements: Create stand-alone sculptural elements by carving rocks into unique shapes and designs.
- Seating: Carve rocks into comfortable seating areas for your garden or patio.
- Fire Pits: Use carved rocks to create decorative fire pits that add warmth and ambiance to your outdoor space.
- Edging: Use carved rocks as edging for garden beds or pathways, providing a natural and elegant border.
- Rock Gardens: Create rock gardens featuring a variety of carved rocks and drought-tolerant plants.
- Memorial Stones: Carve memorial stones to honor loved ones and create a peaceful and reflective space in your garden.
What are The Design Ideas for Rock Features?
Get inspired with these design ideas for rock features in your landscape:
- Zen Garden: Create a Zen garden with carefully placed carved rocks, sand, and minimalist plants.
- Fairy Garden: Create a whimsical fairy garden with tiny carved rocks, miniature plants, and fairy figurines.
- Natural Waterfall: Create a natural waterfall using carved rocks to guide the flow of water.
- Stone Circle: Create a stone circle with carved rocks arranged in a circular pattern.
- Spiral Garden: Create a spiral garden with carved rocks forming the edges of a spiraling path.
- Sculptural Rock Pile: Create a sculptural rock pile with various sizes and shapes of carved rocks.
- Dry Creek Bed: Create a dry creek bed using carved rocks to simulate the look of a natural stream.
- Terraced Garden: Create a terraced garden with carved rocks forming the retaining walls of each level.
- Rock Bench: Create a rock bench with a smooth, carved surface for comfortable seating.
- Meditation Space: Create a peaceful meditation space with carved rocks, soft lighting, and calming plants.
9. Maintaining Your Carved Rocks: Ensuring Longevity and Beauty
How should you maintain carved rocks? Proper maintenance ensures the longevity and beauty of your carved rocks, keeping them looking their best for years to come.
What are The Cleaning Tips for Carved Rocks?
Follow these cleaning tips to keep your carved rocks looking pristine:
- Regular Cleaning: Clean your carved rocks regularly to remove dirt, dust, and debris.
- Mild Soap and Water: Use mild soap and water to gently clean the surface of the rocks.
- Soft Brush: Use a soft brush to scrub away any stubborn dirt or stains.
- Rinse Thoroughly: Rinse the rocks thoroughly with clean water to remove any soap residue.
- Dry Completely: Allow the rocks to dry completely before placing them back in your garden or home.
- Avoid Harsh Chemicals: Avoid using harsh chemicals or abrasive cleaners, which can damage the surface of the rocks.
- Pressure Washing: Use a pressure washer on a low setting to clean larger rocks or rock features.
- Remove Moss and Algae: Remove moss and algae growth with a solution of bleach and water.
- Protect from the Elements: Protect your carved rocks from harsh weather conditions, such as extreme heat or cold.
- Reapply Sealant: Reapply sealant periodically to protect the rocks from moisture and UV damage.
What are The Preservation Tips for Outdoor Carved Rocks?
Preserve the beauty of your outdoor carved rocks with these tips:
- Seal the Rocks: Seal the rocks with a stone sealant to protect them from moisture and UV damage.
- Elevate the Rocks: Elevate the rocks slightly to prevent them from sitting in standing water.
- Provide Shade: Provide shade for the rocks to protect them from fading and cracking in the sun.
- Winter Protection: Cover the rocks with a tarp or blanket during the winter to protect them from freezing temperatures.
- Monitor for Cracks: Monitor the rocks for cracks or damage and repair them promptly.
- Apply Algaecide: Apply algaecide to prevent algae growth on the rocks.
- Control Vegetation: Control vegetation around the rocks to prevent them from being overgrown.
- Inspect Regularly: Inspect the rocks regularly for any signs of wear or damage.
- Reapply Finish: Reapply the finish or sealant as needed to maintain the rocks’ appearance.
- Consider Location: Consider the location of the rocks, placing them in areas with good drainage and minimal exposure to harsh weather.
10. Where to Find Inspiration and Resources for Rock Carving
Where can you find ideas and resources? Find inspiration and resources for your rock carving projects from various sources.
What are The Best Sources of Inspiration for Rock Carving?
Explore these sources for rock carving inspiration:
- Online Galleries: Browse online galleries and websites featuring rock carving art.
- Art Books: Look through art books showcasing rock carving techniques and designs.
- Museums: Visit museums with collections of stone art and sculptures.
- Nature: Draw inspiration from nature, observing the shapes, textures, and patterns of rocks and landscapes.
- Social Media: Follow rock carving artists on social media platforms like Instagram and Pinterest.
- Art Fairs: Attend art fairs and craft shows to see rock carvings in person and meet artists.
- Local Artists: Seek out local rock carving artists and learn from their expertise.
- Gardens: Visit gardens and parks to see how carved rocks are used in landscaping.
- Travel: Travel to places with unique rock formations and stone art.
- Workshops: Attend rock carving workshops to learn new techniques and gain inspiration from other artists.
What are The Online Resources for Rock Carving?
Access these online resources to enhance your rock carving knowledge and skills:
- rockscapes.net: Visit rockscapes.net for a wealth of information, inspiration, and resources for rock carving.
- Online Forums: Join online forums and communities dedicated to rock carving.
- YouTube Tutorials: Watch YouTube tutorials to learn rock carving techniques and tips.
- Online Courses: Take online courses to deepen your knowledge of rock carving and related art forms.
- Artist Websites: Visit the websites of rock carving artists to see their work and learn about their processes.
- Supply Stores: Browse online supply stores for rock carving tools, materials, and resources.
- Geological Surveys: Consult geological surveys for information about different types of rocks and their properties.
- Landscaping Websites: Visit landscaping websites for ideas on incorporating carved rocks into outdoor spaces.
- DIY Blogs: Read DIY blogs for step-by-step instructions and project ideas for rock carving.
- E-books: Download e-books and guides on rock carving techniques and designs.
Ready to transform ordinary stones into extraordinary art? Visit rockscapes.net today for inspiration, expert tips, and a wide selection of rocks and carving tools to get you started. Let your creativity flow and bring your rock carving visions to life. Contact us at 1151 S Forest Ave, Tempe, AZ 85281, United States or call +1 (480) 965-9011 for personalized advice and support.
Frequently Asked Questions (FAQ)
What kind of rocks are easiest to carve?
Softer stones like soapstone and alabaster are the easiest to carve due to their lower density and smooth texture. These rocks allow for detailed work with minimal effort, making them ideal for beginners.
What tools do I need to start carving rocks?
To begin rock carving, you’ll need a rotary tool (such as a Dremel), a selection of carving bits (diamond bits for harder stones, silicon carbide grinding stones for softer ones), safety glasses, a dust mask, water, and a variety of rocks.
How do I protect myself while carving rocks?
Protect yourself by wearing safety glasses and a dust mask to prevent eye and lung irritation from flying debris and rock dust. Work in a well-ventilated area and use water to keep the rock and bits cool.
What are some simple carving designs for beginners?
Beginners can start with simple geometric patterns, letters, stars, or hearts. These designs are easy to sketch and carve, providing a good foundation for more complex projects.
How do I drill a hole in a rock without breaking it?
To drill a hole without breaking the rock, use a diamond-tipped drill bit, apply water continuously to cool the bit, drill slowly with steady pressure, and clear debris frequently. Securing the rock in a vise is also helpful.
Can I use carved rocks in my garden?
Yes, carved rocks can be used in many ways in your garden, such as garden markers, pathway stones, water features, or sculptural elements. They add a personalized and artistic touch to your outdoor space.
How do I clean carved rocks?
Clean carved rocks with mild soap and water, using a soft brush to remove dirt and debris. Rinse thoroughly and allow to dry completely. Avoid harsh chemicals that could damage the surface.
How can I make my carved rocks last longer outdoors?
To prolong the life of your outdoor carved rocks, seal them with a stone sealant to protect against moisture and UV damage. Elevate the rocks to prevent them from sitting in standing water, and provide shade to minimize fading.
Where can I find inspiration for rock carving designs?
Inspiration can be found in online galleries, art books, museums, and nature itself. Social media platforms like Instagram and Pinterest also offer a wealth of ideas from fellow rock carving enthusiasts.
Is rock carving a good hobby for stress relief?
Yes, the focused and repetitive nature of rock carving can be very relaxing and therapeutic. It allows you to express creativity while promoting mindfulness and stress reduction.