Carving into rocks opens a world of artistic expression, turning natural stones into personalized masterpieces; rockscapes.net is your go-to resource for inspiration and guidance. Whether you’re aiming to create unique garden décor, personalized gifts, or striking landscape features, understanding the right techniques and tools is crucial. Discover the art of stone carving and bring your creative vision to life with rock engraving, stone etching, and rock sculpting techniques.
1. What Tools Do I Need to Start Carving Into Rocks?
The essential tools for carving into rocks include a rotary tool (like a Dremel), various attachments (grinding stones, diamond bits, polishing wheels), safety glasses, a bowl of water, and of course, your chosen rocks. Depending on the rock’s hardness, you might need different types of bits. For softer stones, silicon carbide grinding stones work well, while harder rocks require diamond bits.
- Rotary Tool (Dremel): A versatile tool that powers various attachments for carving, grinding, and polishing.
- Silicon Carbide Grinding Stones: Ideal for softer rocks, these attachments allow for smooth and controlled carving.
- Diamond Bits: Essential for carving harder rocks like granite or quartz, providing durability and precision.
- Polishing Wheels: Used to apply beeswax or other polishing compounds, enhancing the carved design’s visibility.
- Safety Glasses: Protect your eyes from flying debris during the carving process.
- Water Bowl: Keeps the rock and the bit cool, preventing overheating and reducing dust.
2. What Types of Rocks Are Best for Carving?
Softer sedimentary rocks like sandstone and soapstone are excellent for beginners due to their ease of carving, while harder metamorphic and igneous rocks such as granite and marble offer more durability but require more advanced tools and techniques. River rocks are also a popular choice for their smooth surfaces and unique shapes.
- Sandstone: A soft, sedimentary rock composed of sand grains, making it easy to carve and shape.
- Soapstone: Known for its smooth, waxy feel, soapstone is a metamorphic rock that is exceptionally soft and ideal for intricate carvings.
- River Rocks: These rocks have been naturally smoothed by water, providing an excellent canvas for carving.
- Granite: A hard, igneous rock known for its durability and resistance to weathering, suitable for detailed and lasting carvings.
- Marble: A metamorphic rock prized for its beauty and workability, often used in sculptures and decorative carvings.
3. How Do I Prepare a Rock for Carving?
Begin by thoroughly cleaning the rock to remove any dirt or debris. Inspect the rock for cracks or weak spots that could cause it to break during carving. If desired, sketch your design onto the rock using a pencil or marker. Stabilizing the rock with clamps or a vise can also aid in the carving process, ensuring it doesn’t move unexpectedly.
- Cleaning: Wash the rock with soap and water to remove any dirt, moss, or debris.
- Inspection: Check for cracks, fractures, or weak spots that could cause the rock to break during carving.
- Sketching: Lightly draw your design onto the rock’s surface with a pencil or marker.
- Stabilizing: Use clamps or a vise to hold the rock securely in place during carving, reducing the risk of movement and improving control.
4. What Are the Basic Techniques for Carving Into Rocks?
Start with light, shallow cuts to outline your design, gradually deepening the cuts as you progress. Use a variety of bit shapes and sizes to achieve different effects, such as fine lines, broad curves, and textured surfaces. Regularly dip the rock and the bit in water to keep them cool and prevent dust buildup. Experiment with different speeds on your rotary tool to find what works best for the rock you’re carving.
- Outlining: Begin by lightly tracing your design onto the rock’s surface with shallow cuts, gradually deepening the lines as you go.
- Shaping: Use various bit shapes and sizes to create different effects, such as fine lines, broad curves, and textured surfaces.
- Cooling: Regularly dip the rock and the bit in water to keep them cool and prevent overheating.
- Speed Control: Adjust the speed of your rotary tool to match the rock’s hardness and the carving technique you’re using.
5. How Can I Add Detail to My Rock Carvings?
To add intricate details, use smaller, finer bits and work at a slower speed. Practice on scrap rocks to get a feel for how the different bits and speeds affect the carving. Consider using stencils or templates for precise designs. After carving, use polishing compounds and a polishing wheel to smooth and refine the surface, bringing out the details in your design.
- Fine Bits: Use smaller, finer bits to create delicate lines and intricate details.
- Slow Speed: Reduce the speed of your rotary tool to maintain control and precision when carving fine details.
- Practice: Experiment on scrap rocks to get a feel for how different bits and speeds affect the carving.
- Stencils: Use stencils or templates for precise designs and consistent results.
- Polishing: Apply polishing compounds with a polishing wheel to smooth the surface and enhance the carved details.
6. What Safety Precautions Should I Take When Carving Rocks?
Always wear safety glasses to protect your eyes from flying debris. Use a dust mask to avoid inhaling rock dust, which can be harmful to your lungs. Work in a well-ventilated area to further reduce dust exposure. Wear gloves to protect your hands from sharp edges and vibration. If using power tools, be aware of the risk of electric shock and follow all safety guidelines provided by the tool manufacturer.
- Eye Protection: Wear safety glasses or goggles to protect your eyes from flying debris.
- Respiratory Protection: Use a dust mask or respirator to avoid inhaling rock dust, which can cause respiratory irritation and long-term health problems.
- Ventilation: Work in a well-ventilated area to minimize dust exposure.
- Hand Protection: Wear gloves to protect your hands from sharp edges, vibrations, and potential cuts.
- Tool Safety: Follow all safety guidelines provided by the tool manufacturer, including proper grounding and avoiding wet conditions to prevent electric shock.
7. How Do I Finish and Protect My Rock Carvings?
After carving, clean the rock thoroughly to remove any remaining dust or debris. Apply a sealant or finish to protect the carving from weathering and enhance its appearance. Beeswax can be used to polish the rock and bring out the details in the carving. Consider using a UV-resistant sealant if the carving will be displayed outdoors to prevent fading and discoloration.
- Cleaning: Use a soft brush and water to remove any remaining dust or debris from the carved surface.
- Sealing: Apply a sealant or finish to protect the carving from weathering, moisture, and UV damage.
- Polishing: Use beeswax or a similar polishing compound to enhance the carving’s appearance and bring out the details.
- UV Protection: If the carving will be displayed outdoors, use a UV-resistant sealant to prevent fading and discoloration.
8. Can I Use Rock Carvings in Landscaping?
Yes, rock carvings can add a unique and personalized touch to your landscape. Use them as focal points in garden beds, incorporate them into water features, or create stepping stones with carved designs. Ensure the carvings are securely placed and won’t pose a safety hazard. Consider the overall aesthetic of your landscape and choose carvings that complement the existing design.
- Focal Points: Place carved rocks strategically in garden beds to draw the eye and add visual interest.
- Water Features: Incorporate carved rocks into ponds, fountains, or waterfalls to create a natural and artistic element.
- Stepping Stones: Use carved rocks as stepping stones to add a unique and personalized touch to pathways.
- Safety: Ensure that all carvings are securely placed and won’t pose a tripping hazard or other safety risk.
- Aesthetics: Choose carvings that complement the existing landscape design and enhance the overall aesthetic appeal.
9. What Are Some Creative Ideas for Rock Carving Projects?
The possibilities are endless. Consider carving inspirational words or quotes, creating pet memorials, designing unique garden markers, or crafting personalized gifts. You can also carve abstract designs, geometric patterns, or natural motifs like leaves and flowers. Let your imagination guide you and experiment with different styles and techniques to create truly unique pieces.
- Inspirational Words: Carve inspirational words or quotes to create uplifting and meaningful pieces.
- Pet Memorials: Design personalized pet memorials with carved names, dates, or paw prints.
- Garden Markers: Craft unique garden markers with carved names of plants or herbs.
- Personalized Gifts: Create heartfelt gifts with carved messages, initials, or special dates.
- Abstract Designs: Experiment with abstract designs, geometric patterns, or natural motifs to create visually striking pieces.
10. How Do I Find Inspiration for My Rock Carving Designs?
Look to nature for inspiration, observing the shapes, textures, and patterns of rocks, plants, and animals. Browse online galleries and design websites for ideas and inspiration. Visit local art museums and craft fairs to see examples of rock carvings and other stone art. Don’t be afraid to experiment and develop your own unique style.
- Nature: Observe the shapes, textures, and patterns of rocks, plants, and animals for design inspiration.
- Online Galleries: Browse online galleries, design websites, and social media platforms for ideas and inspiration.
- Art Museums: Visit local art museums and craft fairs to see examples of rock carvings and other stone art.
- Experimentation: Don’t be afraid to experiment with different styles, techniques, and materials to develop your own unique carving style.
11. Understanding Rock Types for Carving
Choosing the right rock is crucial for a successful carving project. The Mohs Hardness Scale is a valuable tool for determining a rock’s suitability for carving. Rocks with a lower Mohs hardness are easier to carve but may be less durable, while harder rocks require more effort and specialized tools.
- Sedimentary Rocks: These rocks, like sandstone and limestone, are often softer and easier to carve, making them ideal for beginners.
- Metamorphic Rocks: Marble and soapstone are metamorphic rocks that offer a good balance of workability and durability.
- Igneous Rocks: Granite and basalt are igneous rocks known for their hardness and durability, requiring diamond-tipped tools for carving.
Arizona State University’s School of Earth and Space Exploration provides extensive resources on rock identification and properties, aiding carvers in making informed decisions.
12. Essential Carving Tools and Their Uses
Selecting the right tools is essential for efficient and precise rock carving. Rotary tools, such as Dremels, are versatile and can be used with various attachments for different carving tasks.
- Diamond-Tipped Bits: These bits are designed for carving hard rocks like granite and provide excellent precision and durability.
- Carbide Burrs: Ideal for softer stones, carbide burrs can quickly remove material and create various textures.
- Grinding Stones: These attachments are used to smooth and shape the rock’s surface, preparing it for more detailed carving.
- Polishing Wheels: Used with polishing compounds, these wheels create a smooth, glossy finish on the carved surface.
- Safety Gear: Always wear safety glasses, gloves, and a dust mask to protect yourself from flying debris and harmful dust particles.
13. Basic Carving Techniques for Beginners
Mastering basic carving techniques is essential for creating beautiful rock art. Start with simple designs and gradually progress to more complex projects as your skills improve.
- Outlining: Use a pencil to draw your design on the rock’s surface, then carefully trace the outline with a rotary tool.
- Relief Carving: Remove material around the design to create a raised effect, adding depth and dimension to your carving.
- Engraving: Use a fine-tipped bit to etch detailed lines and patterns into the rock’s surface.
- Smoothing and Polishing: After carving, use grinding stones and polishing wheels to smooth the surface and enhance the details of your design.
14. Advanced Carving Techniques and Tips
For those looking to take their rock carving skills to the next level, mastering advanced techniques can open up new creative possibilities.
- Undercutting: This technique involves carving beneath the surface to create shadows and add depth to your design.
- Texturing: Use various bits and techniques to create different textures on the rock’s surface, adding visual interest and tactile appeal.
- Combining Techniques: Experiment with combining different carving techniques to create unique and intricate designs.
- Working with Hard Stones: Carving hard stones like granite requires patience, precision, and specialized tools.
15. Designing Your Rock Carving Projects
A well-thought-out design is essential for a successful rock carving project. Consider the rock’s shape, size, and texture when developing your design.
- Sketching: Start by sketching your design on paper, experimenting with different ideas and compositions.
- Transferring the Design: Use carbon paper or a stencil to transfer your design onto the rock’s surface.
- Adapting to the Stone: Be prepared to adapt your design to the unique characteristics of the rock you’re working with.
- Considering the Environment: Think about how your finished carving will be displayed and how it will interact with its surroundings.
16. Incorporating Rock Carvings into Your Garden
Rock carvings can add a unique and artistic touch to your garden, creating focal points and enhancing the overall aesthetic.
- Focal Points: Place carved rocks strategically in your garden to draw the eye and create visual interest.
- Pathways: Use carved stones as stepping stones or border edging to add character to your garden paths.
- Water Features: Incorporate carved rocks into ponds, fountains, or waterfalls to create a natural and artistic element.
- Plant Markers: Carve the names of your plants or herbs onto small stones to create unique and personalized garden markers.
17. Maintaining and Protecting Your Rock Carvings
Proper maintenance is essential for preserving the beauty and longevity of your rock carvings.
- Cleaning: Regularly clean your rock carvings with a soft brush and mild soap to remove dirt and debris.
- Sealing: Apply a sealant to protect the carving from weathering, moisture, and UV damage.
- Repairing Damage: If your rock carving becomes damaged, repair it promptly to prevent further deterioration.
- Winter Protection: In cold climates, protect your rock carvings from freezing temperatures and ice damage by covering them with a tarp or bringing them indoors.
18. Rock Carving for Jewelry and Accessories
Creating jewelry and accessories from carved rocks is a fun and rewarding way to express your creativity.
- Drilling Holes: Use a diamond-tipped drill bit to create holes for attaching findings, such as bails, jump rings, and earring hooks.
- Polishing: Polish the carved rocks to a high shine to enhance their natural beauty.
- Designing Unique Pieces: Experiment with different designs and materials to create one-of-a-kind jewelry and accessories.
- Adding Embellishments: Incorporate beads, wire, and other embellishments to add interest and texture to your designs.
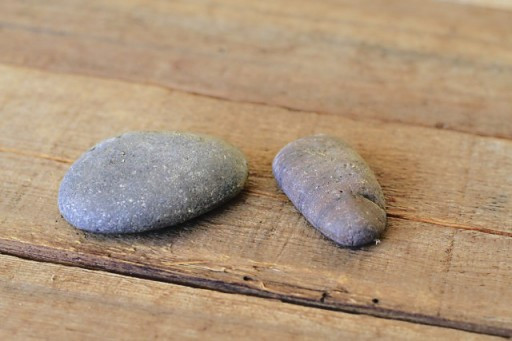 Carving River Rocks with a Dremel via lilblueboo.com
19. Rock Carving as a Therapeutic Activity
Engaging in rock carving can be a relaxing and therapeutic activity, allowing you to connect with nature and express your creativity.
- Mindfulness: Focus on the present moment and let go of distractions as you carve, promoting a sense of calm and well-being.
- Stress Relief: The repetitive motions of carving can help to reduce stress and anxiety.
- Creative Expression: Rock carving provides a creative outlet for expressing your emotions and ideas.
- Connection with Nature: Working with natural materials like rocks can foster a deeper connection with the natural world.
20. Rock Carving: A Guide to Stone Etching Techniques
Stone etching, a refined subset of rock carving, involves using acids or abrasive tools to create designs on the surface of rocks. This technique is favored for producing intricate and delicate patterns.
- Acid Etching: Involves applying acid-resistant material to the rock, then using acid to etch away the exposed areas.
- Sandblasting: Employs pressurized abrasive particles to carve designs into the rock’s surface.
- Laser Etching: Utilizes a laser beam to vaporize the rock’s surface, creating precise and detailed etchings.
21. Exploring Rock Sculpting: Creating 3D Art from Stone
Rock sculpting takes rock carving to another level by creating three-dimensional forms from stone. This art form requires advanced skills and specialized tools.
- Direct Carving: The sculptor directly shapes the stone using chisels, hammers, and other hand tools.
- Indirect Carving: A model is created first, and then the sculptor uses it as a guide to carve the final sculpture.
- Stone Selection: Choosing the right stone is crucial for sculpting, with considerations for hardness, grain, and color.
22. The Art of Rock Engraving: Adding Intricate Details
Rock engraving is a technique used to add fine details and embellishments to rock surfaces. It’s often used in conjunction with other carving techniques.
- Hand Engraving: Involves using hand-held tools to create intricate lines and patterns.
- Rotary Engraving: Employs a rotary tool with fine bits to engrave details with precision.
- Calligraphy on Stone: A specialized form of engraving that involves carving letters and words onto stone surfaces.
23. Where to Find High-Quality Rocks for Carving in the USA
Sourcing high-quality rocks is essential for successful carving projects. Here are some top locations in the USA known for their diverse rock formations:
- Arizona: Renowned for its sedimentary rocks like sandstone and limestone, ideal for beginners.
- Address: 1151 S Forest Ave, Tempe, AZ 85281, United States
- Phone: +1 (480) 965-9011
- Website: rockscapes.net
- Vermont: Famous for its marble and granite quarries, offering a range of metamorphic and igneous rocks.
- California: Known for its variety of rocks, including soapstone, granite, and river rocks.
- Montana: Rich in sedimentary rocks and unique formations like the agate and petrified wood.
24. Rock Carving Safety: Protecting Yourself from Hazards
Safety is paramount when engaging in rock carving. Here are essential safety measures to follow:
- Eye Protection: Wear safety glasses or goggles to protect your eyes from flying debris.
- Respiratory Protection: Use a dust mask or respirator to avoid inhaling harmful dust particles.
- Hand Protection: Wear gloves to protect your hands from sharp edges and vibrations.
- Hearing Protection: Use earplugs or earmuffs to protect your hearing from loud noises.
- Ventilation: Work in a well-ventilated area to minimize dust exposure.
25. The Business of Rock Carving: Selling Your Creations
Turning your rock carving hobby into a business can be a rewarding venture. Here are some tips for selling your creations:
- Online Marketplaces: Platforms like Etsy and eBay provide a wide audience for selling your rock carvings.
- Local Craft Fairs: Participating in local craft fairs allows you to showcase your work and connect with potential customers.
- Art Galleries: Partnering with art galleries can provide exposure to a curated audience.
- Custom Orders: Offering custom rock carving services can attract customers seeking personalized creations.
26. Inspiration from Rock Carving Masters
Learning from the masters can inspire and guide your own rock carving journey.
- Michelangelo: The Renaissance master known for his iconic marble sculptures.
- Auguste Rodin: A renowned sculptor who pushed the boundaries of stone carving.
- Constantin Brâncuși: A pioneer of modern sculpture who simplified forms and emphasized the essence of the material.
27. Understanding Stone Weathering and Preservation
Protecting your rock carvings from the elements is essential for their longevity. Understanding stone weathering processes is key to effective preservation.
- Physical Weathering: Includes processes like freeze-thaw cycles and abrasion.
- Chemical Weathering: Involves chemical reactions that alter the stone’s composition.
- Biological Weathering: Results from the activity of organisms like lichens and mosses.
- Preservation Techniques: Include cleaning, sealing, and stabilizing the stone.
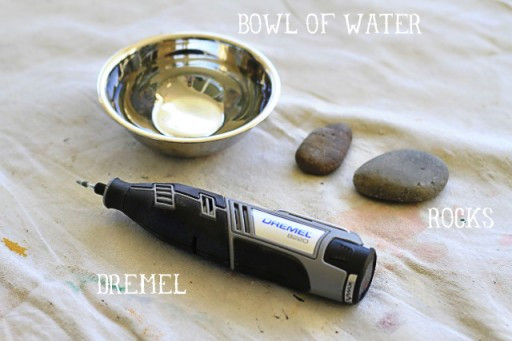 Materials needed to carve rocks with a Dremel via lilblueboo.com
28. The Role of Geology in Rock Carving
Geology plays a crucial role in rock carving, informing the selection of materials and understanding their properties.
- Rock Identification: Knowing how to identify different types of rocks is essential for choosing the right material for your project.
- Mineral Composition: The mineral composition of a rock affects its hardness, color, and texture.
- Rock Formation: Understanding how rocks are formed provides insights into their structure and potential weaknesses.
29. Ethical Considerations in Rock Carving
Practicing ethical sourcing and carving is essential for responsible rock art.
- Sustainable Sourcing: Obtain rocks from sustainable sources that minimize environmental impact.
- Respect for Natural Formations: Avoid damaging or defacing natural rock formations.
- Cultural Sensitivity: Be mindful of cultural and historical significance when carving rocks in certain areas.
30. Rock Carving as a Form of Environmental Art
Rock carving can be used as a form of environmental art, creating installations that interact with and enhance the natural landscape.
- Land Art: Creating large-scale rock carvings that integrate with the environment.
- Ephemeral Art: Designing temporary rock carvings that change over time with natural processes.
- Sustainable Art: Using rock carving to promote environmental awareness and sustainability.
31. Innovating with Rock and Light
Exploring how light interacts with carved rock surfaces can add another dimension to your art.
- Backlighting: Illuminating carved rocks from behind to create dramatic effects.
- Shadow Play: Designing carvings that cast interesting shadows in different lighting conditions.
- Fiber Optics: Integrating fiber optic lighting into rock carvings to create illuminated designs.
32. Rock Carving and Mental Health
The meditative and creative process of rock carving can have significant benefits for mental health.
- Stress Reduction: The repetitive motions of carving can help to reduce stress and anxiety.
- Mindfulness: Focusing on the present moment during carving promotes mindfulness and relaxation.
- Creative Expression: Rock carving provides a creative outlet for expressing emotions and ideas.
- Sense of Accomplishment: Completing a rock carving project can provide a sense of accomplishment and boost self-esteem.
33. Rock Carving for Team Building
Rock carving can be a unique and engaging team-building activity, fostering collaboration and creativity.
- Collaborative Projects: Working together on a large-scale rock carving project.
- Individual Challenges: Competing to create the most creative or technically impressive carving.
- Communication Skills: Improving communication and problem-solving skills through carving.
34. Preserving Cultural Heritage through Rock Carving
Rock carving has been used for centuries to preserve cultural heritage, with examples found in ancient petroglyphs and monuments.
- Petroglyphs: Ancient rock carvings created by indigenous cultures around the world.
- Monuments: Using rock carving to create lasting memorials and monuments.
- Restoration: Preserving and restoring historical rock carvings.
35. Using Rock Carving in Educational Settings
Rock carving can be integrated into educational settings to teach geology, art, and history.
- Geology Lessons: Teaching students about rock types, formations, and properties.
- Art Classes: Exploring carving techniques, design principles, and creative expression.
- History Lessons: Studying ancient rock carvings and their cultural significance.
36. The Future of Rock Carving
As technology advances and new materials emerge, the future of rock carving is full of exciting possibilities.
- 3D Printing: Using 3D printing to create molds for rock carving.
- Robotic Carving: Employing robots to automate the carving process.
- New Materials: Experimenting with new types of stone and synthetic materials.
Rockscapes.net is dedicated to staying at the forefront of these innovations, providing you with the latest techniques, tools, and inspiration for your rock carving journey.
Ready to start your rock carving adventure?
Explore rockscapes.net for a wealth of resources, including:
- Detailed guides on selecting the right rocks and tools.
- Step-by-step tutorials on basic and advanced carving techniques.
- A gallery of inspiring rock carving projects from around the world.
- Expert advice from experienced rock carvers.
Contact us today to learn more and unleash your creativity with the art of rock carving!
FAQ: Rock Carving
1. Is rock carving difficult for beginners?
No, carving softer rocks like sandstone or soapstone is quite accessible for beginners with the right tools and guidance. Start with simple designs and gradually increase complexity.
2. What is the best tool for carving rocks?
A rotary tool, such as a Dremel, is versatile and effective. Pair it with various attachments like diamond bits and grinding stones depending on the rock’s hardness.
3. How do I protect my eyes when carving rocks?
Always wear safety glasses or goggles to shield your eyes from flying debris, ensuring your safety during the carving process.
4. Can I carve rocks without power tools?
Yes, hand tools like chisels and gouges can be used, particularly for softer stones. This method requires more time and physical effort but offers greater control.
5. What kind of finish should I use on my rock carvings?
Apply a sealant or beeswax to protect the carving from weathering and enhance its appearance, preserving the details.
6. How do I clean rock carvings?
Use a soft brush and mild soap to gently clean the surface, removing any dirt or debris without damaging the carving.
7. Can I sell my rock carvings?
Yes, platforms like Etsy or local craft fairs are great venues. Offering custom designs can also attract customers.
8. How do I find inspiration for rock carving designs?
Look to nature, browse online galleries, visit art museums, and experiment with different styles to develop your unique artistic vision.
9. Is rock dust harmful?
Yes, inhaling rock dust can be harmful. Wear a dust mask or respirator and work in a well-ventilated area to minimize exposure.
10. How do I drill a hole in a rock for jewelry making?
Use a diamond-tipped drill bit, apply consistent pressure, and keep the rock and bit cool with water to prevent overheating and ensure a clean hole.