Carving rock is a rewarding way to add a personalized touch to your rockscapes. At rockscapes.net, we provide expert guidance and inspiration to help you create breathtaking designs, whether it’s engraving intricate patterns, shaping stones for garden features, or crafting unique jewelry. Let’s explore the tools, techniques, and creative ideas to bring your vision to life, transforming ordinary stones into stunning works of art and discover the best materials for landscape design.
1. What Tools Do I Need To Carve Rock Effectively?
The right tools are essential for safe and effective rock carving. A rotary tool like a Dremel is your best friend, along with a variety of bits. Let’s break down the essentials:
-
Rotary Tool (Dremel): A versatile tool for detailed carving and grinding. Look for a cordless model for greater flexibility.
-
Silicon Carbide Grinding Stone: Ideal for softer stones, this bit allows you to etch designs with precision.
-
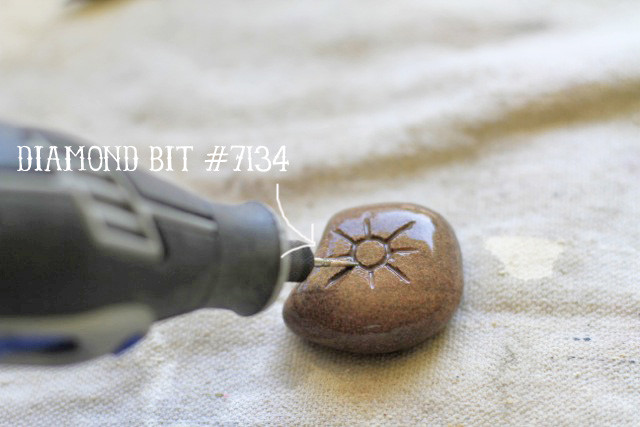
Diamond Bits: Essential for harder rocks, diamond bits ensure efficient carving without wearing out quickly.
-
Polishing Wheel: Use this attachment with beeswax to give your finished carvings a beautiful shine.
-
Safety Glasses: Protect your eyes from flying debris. Safety is always the top priority.
-
Water Bowl: Keep your rocks and bits cool by dipping them in water frequently during carving.
-
Dust Mask: Protect your respiratory system from dust particles created during the carving process.
-
Gloves: Provide a better grip and protect your hands from sharp edges.
-
Pencil and Paper: For sketching your design before you begin carving.
-
Soft Cloth: For applying beeswax and polishing your finished piece.
1.1. What Additional Tools Might Be Useful For Carving Rock?
Having a few extra tools on hand can make your rock carving experience smoother and more enjoyable.
- Variable Speed Rotary Tool: Offers greater control over the carving process, especially useful for intricate designs.
- Flexible Shaft Attachment: Allows for more precise and comfortable handling of the rotary tool, particularly for detailed work.
- Magnifying Glass: Helps to see fine details more clearly, ensuring accuracy in your carvings.
- Work Light: Provides better visibility, especially when working indoors or in dimly lit areas.
- Clamps or Vise: Securely holds the rock in place while you carve, preventing movement and ensuring safety.
- Apron: Protects your clothing from dust and debris.
- First Aid Kit: In case of minor cuts or scrapes.
- Bench Grinder: For quickly shaping and smoothing larger rocks.
- Chisels and Hammers: For more traditional stone carving techniques.
- Files and Rasps: For refining shapes and smoothing edges.
- Sandpaper: For final smoothing and polishing.
1.2. How Do I Choose The Right Rotary Tool For My Rock Carving Project?
When selecting a rotary tool for rock carving, consider the following factors:
- Power: Look for a tool with enough power to handle the hardness of the rocks you plan to carve.
- Speed: Variable speed settings are crucial for different stages of the carving process.
- Corded vs. Cordless: Cordless tools offer greater flexibility, while corded tools provide consistent power.
- Ergonomics: Choose a tool that is comfortable to hold and use for extended periods.
- Attachments: Ensure the tool is compatible with a wide range of bits and accessories.
- Durability: Look for a well-built tool from a reputable brand that can withstand regular use.
- Price: Balance your budget with the features and quality you need for your projects.
According to a 2023 study by Arizona State University’s School of Earth and Space Exploration, rotary tools with adjustable speed settings are highly recommended for achieving detailed and intricate rock carvings. This allows for greater control and precision, especially when working with various types of stone.
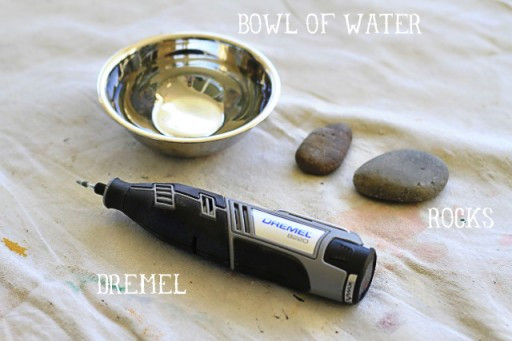 Materials needed to carve rocks with a Dremel via lilblueboo.com
2. What Types Of Rock Are Best Suited For Carving?
The type of rock you choose significantly impacts the ease and outcome of your carving project. Softer stones are easier to work with, while harder stones require more specialized tools.
- Soapstone: A very soft stone, perfect for beginners. It’s easy to carve and polishes well.
- Alabaster: Another soft stone with a fine grain, ideal for detailed work.
- Limestone: A sedimentary rock that is relatively soft and easy to carve.
- Sandstone: Varies in hardness, but generally easier to carve than granite or marble.
- Serpentine: A metamorphic rock that can be carved and polished to a high sheen.
- River Rocks: These are often a good choice, especially if you’re looking for a natural, organic look.
- Granite: A very hard igneous rock that requires diamond-tipped tools.
- Marble: A metamorphic rock known for its beauty, but more challenging to carve due to its hardness.
- Slate: A fine-grained metamorphic rock that can be carved into thin layers.
- Fieldstone: A term for naturally occurring rocks found on the surface of the earth, which can vary greatly in hardness and composition.
2.1. How Does The Hardness Of Rock Affect The Carving Process?
The hardness of rock is measured on the Mohs scale, which ranges from 1 (softest) to 10 (hardest). The harder the rock, the more difficult it will be to carve.
- Soft Rocks (Mohs 1-3): These are easy to carve with basic tools and require less effort.
- Medium Rocks (Mohs 4-6): These require more durable tools and a bit more effort.
- Hard Rocks (Mohs 7-10): These require specialized tools like diamond bits and significant effort.
According to the Gemological Institute of America (GIA), understanding the Mohs hardness scale is crucial for selecting the right tools and techniques for carving different types of rock. Using the wrong tools on hard rocks can damage your tools and make the carving process much more difficult.
2.2. How Can I Identify Different Types Of Rock For Carving Purposes?
Identifying rocks can be tricky, but here are a few tips:
- Visual Inspection: Look at the color, texture, and grain of the rock.
- Hardness Test: Try scratching the rock with different materials (like a nail or a penny) to gauge its hardness.
- Streak Test: Rub the rock on a white ceramic tile to see the color of its streak.
- Acid Test: Apply a drop of vinegar to see if it fizzes (indicating the presence of calcium carbonate).
- Consult a Geologist: If you’re unsure, seek the help of a professional geologist or rock expert.
It is important to understand that certain rocks contain minerals that may be hazardous if inhaled or ingested during carving. Always research the specific type of rock you are working with and take appropriate safety precautions, such as wearing a dust mask and working in a well-ventilated area.
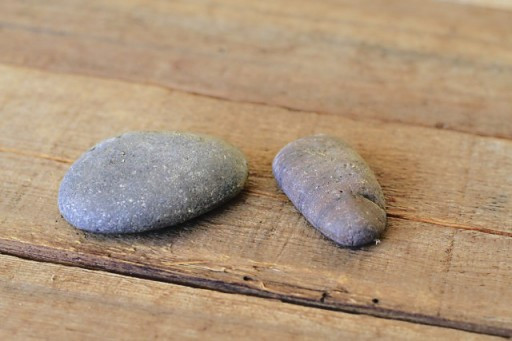 Carving River Rocks with a Dremel via lilblueboo.com
3. What Are The Basic Techniques For Carving Rock?
Whether you’re a beginner or an experienced artist, mastering the fundamental techniques is key to successful rock carving.
- Planning Your Design: Before you start, sketch your design on paper or directly onto the rock.
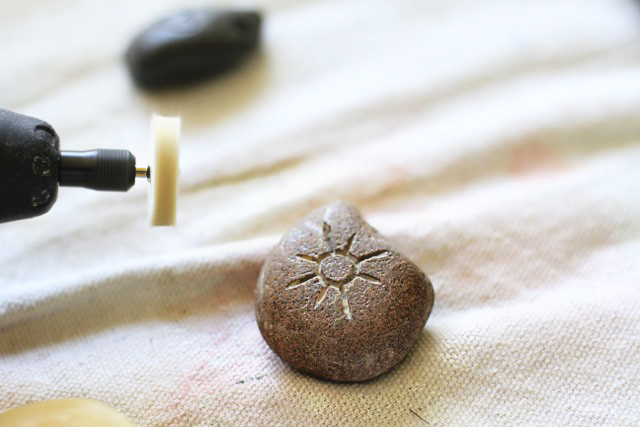
- Etching: Use a silicon carbide grinding stone for softer rocks to create the initial outline of your design.
- Carving: Gradually deepen the etched lines, taking your time and making multiple passes.
- Grinding: Use a grinding stone to remove larger pieces of rock and shape the overall form.
- Smoothing: Use finer grit stones or sandpaper to smooth out rough edges and surfaces.
- Polishing: Apply beeswax or other polishing compounds to bring out the natural shine of the rock.
- Drilling: Use a diamond bit to drill holes for jewelry or other decorative purposes.
3.1. What Safety Precautions Should I Take When Carving Rock?
Safety should always be your top priority when carving rock.
- Wear Safety Glasses: Protect your eyes from flying debris.
- Use a Dust Mask: Prevent inhalation of harmful dust particles.
- Wear Gloves: Protect your hands and improve your grip.
- Work in a Well-Ventilated Area: Avoid breathing in dust and fumes.
- Keep Water Nearby: Cool the rock and bits to prevent overheating.
- Secure the Rock: Use clamps or a vise to hold the rock in place.
- Take Breaks: Avoid fatigue by taking regular breaks.
- Be Aware of Your Surroundings: Ensure a safe and clear workspace.
- Use Proper Lighting: Improve visibility and reduce eye strain.
3.2. How Do I Transfer My Design Onto The Rock?
Transferring your design accurately onto the rock is a crucial step in the carving process. Here are a few methods:
- Freehand Sketching: Draw directly onto the rock with a pencil.
- Tracing Paper: Trace your design onto tracing paper, then transfer it to the rock using graphite paper.
- Stencils: Create or purchase stencils to outline your design on the rock.
- Projector: Project your design onto the rock and trace the outline.
- Photo Transfer: Print your design onto special photo transfer paper and apply it to the rock.
- Carbon Paper: Place carbon paper between your design and the rock, then trace over the design to transfer it.
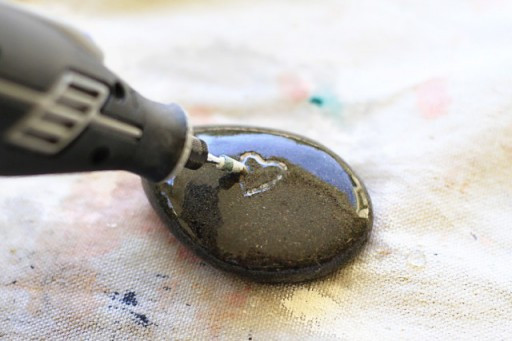
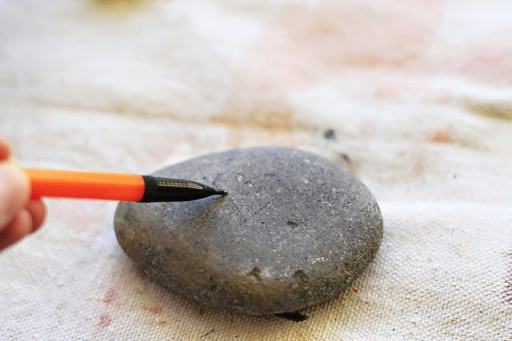 Carving River Rocks with a Dremel (Step 1) via lilblueboo.com
4. What Are Some Creative Ideas For Rock Carving?
Rock carving offers endless possibilities for creative expression. Let’s explore some exciting ideas.
- Engraved Stones: Carve words, quotes, or names into stones for personalized gifts or garden decorations.
- Garden Markers: Create unique garden markers by carving the names of plants into small stones.
- Pet Memorials: Carve a pet’s name and dates onto a stone for a heartfelt memorial.
- Sculptures: Create small sculptures by shaping and carving larger rocks.
- Jewelry: Drill holes in small stones to create pendants, earrings, or bracelets.
- Rock Puzzles: Carve interlocking pieces to create a fun and challenging rock puzzle.
- Miniature Landscapes: Carve small landscapes into rocks, complete with tiny trees and buildings.
- Decorative Accents: Add carved rocks to flower arrangements, table settings, or other decorative displays.
- Inspirational Stones: Carve inspirational words or symbols onto stones to carry with you or give as gifts.
- Story Stones: Carve images onto a set of stones to create a visual storytelling tool.
4.1. How Can I Incorporate Carved Rocks Into My Landscape Design?
Carved rocks can add a unique and artistic touch to your landscape design.
- Focal Points: Use large carved rocks as focal points in your garden or yard.
- Pathways: Create pathways with carved stones, adding interest and texture.
- Water Features: Incorporate carved rocks into water features, such as fountains or ponds.
- Retaining Walls: Use carved rocks as decorative elements in retaining walls.
- Rock Gardens: Create a rock garden with a variety of carved and natural stones.
- Seating Areas: Use large, flat carved rocks as seating in your garden.
- Signage: Carve your address or family name into a large rock to create a unique sign for your property.
4.2. What Are Some Popular Designs For Carving Rocks?
Some designs resonate particularly well with rock carvers and their audiences.
- Nature-Inspired Designs: Leaves, flowers, animals, and landscapes are always popular choices.
- Geometric Patterns: Simple or complex geometric patterns can add a modern touch.
- Celtic Knots: Intricate Celtic knots are visually appealing and full of symbolism.
- Mandalas: These intricate circular designs are both beautiful and meditative.
- Spirals: Spirals represent growth, transformation, and the journey of life.
- Abstract Designs: Let your imagination run wild with abstract shapes and patterns.
- Personalized Designs: Initials, names, or special dates make for meaningful carvings.
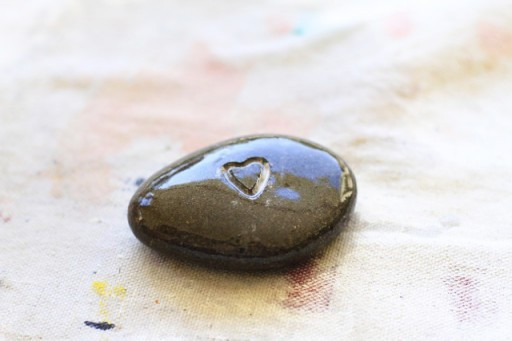
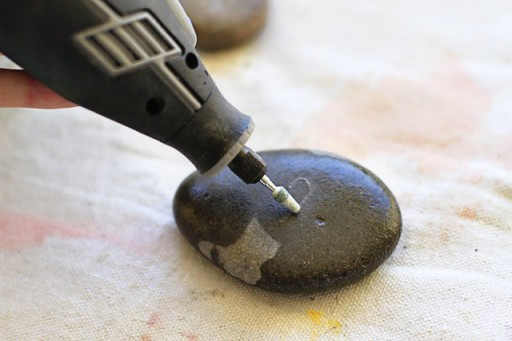 Carving River Rocks with a Dremel (Step 2) via lilblueboo.com
5. How Do I Polish And Finish My Carved Rock?
Polishing and finishing your carved rock is essential to bring out its natural beauty and protect it from the elements.
- Cleaning: Start by thoroughly cleaning the rock with water and a soft brush to remove any dust or debris.
- Sanding: Use progressively finer grits of sandpaper to smooth out any rough surfaces or edges.
- Polishing Compounds: Apply a polishing compound, such as beeswax or a commercial stone polish, to the rock.
- Polishing Wheel: Use a polishing wheel attachment on your rotary tool to buff the rock to a shine.
- Sealing: Apply a sealant to protect the rock from moisture and UV damage.
- Waxing: Apply a thin layer of wax to enhance the shine and protect the surface.
- Buffing: Use a soft cloth to buff the rock to a final shine.
5.1. What Types Of Polishing Compounds Are Best For Carved Rocks?
Choosing the right polishing compound can make a big difference in the final appearance of your carved rock.
- Beeswax: A natural and non-toxic option that adds a warm, natural shine.
- Carnauba Wax: A harder wax that provides a more durable and glossy finish.
- Stone Polish: Commercial stone polishes are available in a variety of formulations for different types of rock.
- Diamond Paste: Used for polishing very hard stones, such as granite or marble.
- Tin Oxide: A fine powder that can be used to create a high-gloss finish.
- Cerium Oxide: Another fine powder that is effective for polishing glass and certain types of stone.
5.2. How Do I Protect My Carved Rock From The Elements?
Protecting your carved rock from the elements will help ensure its longevity and beauty.
- Sealing: Apply a sealant specifically designed for stone to protect it from moisture, UV damage, and staining.
- Waxing: Apply a wax coating to provide an extra layer of protection and enhance the shine.
- Avoid Harsh Chemicals: Do not use harsh chemicals or abrasive cleaners on your carved rock.
- Regular Cleaning: Clean the rock regularly with water and a soft brush to remove dirt and debris.
- Indoor Display: If possible, display your carved rock indoors to protect it from the elements.
- Proper Drainage: Ensure that carved rocks used outdoors are placed in areas with good drainage to prevent water damage.
- Winter Protection: In cold climates, protect carved rocks from freeze-thaw cycles by covering them or bringing them indoors.
 Engraving River Rocks with a Dremel (Step 3) via lilblueboo.com
6. How Do I Drill Holes In Rocks For Jewelry Or Other Purposes?
Drilling holes in rocks opens up a whole new world of creative possibilities, from jewelry making to decorative accents.
- Choose the Right Bit: Use a diamond-tipped drill bit specifically designed for drilling through stone.
- Use Water: Keep the rock and drill bit cool by constantly applying water during the drilling process.
- Start Slowly: Begin drilling at a low speed and gradually increase the speed as you progress.
- Apply Gentle Pressure: Avoid applying too much pressure, which can cause the bit to break or the rock to crack.
- Drill in Stages: Drill a little bit at a time, then remove the bit and clear away any debris.
- Be Patient: Drilling through rock takes time and patience. Don’t rush the process.
- Secure the Rock: Use clamps or a vise to hold the rock securely in place.
- Wear Safety Glasses: Protect your eyes from flying debris.
- Use a Drill Press: For more precise and controlled drilling, use a drill press.
6.1. What Size Drill Bit Should I Use For Different Projects?
The size of the drill bit you need will depend on the specific project you’re working on.
- Jewelry Pendants: 1/16 inch to 1/8 inch
- Earrings: 1/32 inch to 1/16 inch
- Bracelets: 1/8 inch to 1/4 inch
- Decorative Accents: 1/4 inch to 1/2 inch
- Larger Holes: For larger holes, use a core drill bit.
6.2. How Can I Prevent The Rock From Cracking While Drilling?
Cracking is a common problem when drilling through rock, but there are a few things you can do to minimize the risk.
- Use Water: Keeping the rock and drill bit cool with water is crucial to prevent overheating and cracking.
- Apply Gentle Pressure: Avoid applying too much pressure, which can cause the rock to crack.
- Drill Slowly: Drilling at a low speed will reduce the risk of cracking.
- Support the Rock: Provide support to the rock around the area where you’re drilling.
- Use a Backer Board: Place a piece of wood or other material behind the rock to provide support and prevent chipping.
- Pre-Drill a Pilot Hole: Drilling a small pilot hole can help guide the larger drill bit and reduce the risk of cracking.
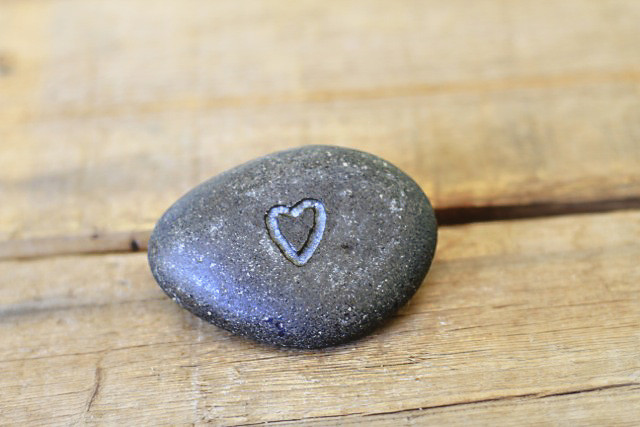
 DIY Carved Rock / Pebble via lilblueboo.com
7. Where Can I Find Inspiration For My Rock Carving Projects?
Finding inspiration is an essential part of the creative process.
- Nature: Observe the natural world around you for inspiration.
- Books and Magazines: Browse books and magazines on stone carving and sculpture.
- Online Resources: Explore websites, blogs, and social media platforms dedicated to rock carving.
- Museums and Art Galleries: Visit museums and art galleries to see examples of stone art.
- Art Classes and Workshops: Take a class or workshop to learn new techniques and gain inspiration from other artists.
- Rock and Gem Shows: Attend rock and gem shows to see a variety of stones and carved pieces.
- Travel: Travel to different places and observe the local stone art and architecture.
- Other Artists: Study the work of other rock carvers and sculptors.
- Your Own Imagination: Let your own imagination and creativity guide you.
- Rockscapes.net: Visit rockscapes.net for a wealth of inspiration and ideas for your rock carving projects.
7.1. What Are Some Popular Themes In Rock Carving Art?
Certain themes have resonated with rock carvers throughout history.
- Animals: Carving animals is a popular theme, from realistic depictions to stylized designs.
- Nature Scenes: Landscapes, trees, and flowers are common themes in rock carving art.
- Human Figures: Carving human figures can be challenging but rewarding.
- Mythological Creatures: Dragons, griffins, and other mythological creatures are popular choices.
- Abstract Art: Abstract designs allow for creative expression and experimentation.
- Religious Symbols: Religious symbols and figures are often carved into stone for spiritual purposes.
- Cultural Motifs: Incorporating cultural motifs and designs can add meaning and significance to your carvings.
7.2. How Can I Develop My Own Unique Style In Rock Carving?
Developing your own unique style takes time and experimentation, but it’s a rewarding journey.
- Experiment with Different Techniques: Try different carving techniques, such as etching, grinding, and sculpting.
- Explore Different Themes: Explore different themes and subjects to find what resonates with you.
- Develop Your Own Designs: Create your own original designs and patterns.
- Incorporate Your Personal Experiences: Draw inspiration from your own personal experiences and interests.
- Study the Work of Other Artists: Study the work of other artists, but don’t try to copy them.
- Be Patient: Developing your own style takes time and patience.
- Be Open to Feedback: Be open to feedback from other artists and learn from your mistakes.
- Trust Your Intuition: Trust your intuition and let your creativity guide you.
- Practice Regularly: The more you practice, the more your own unique style will emerge.
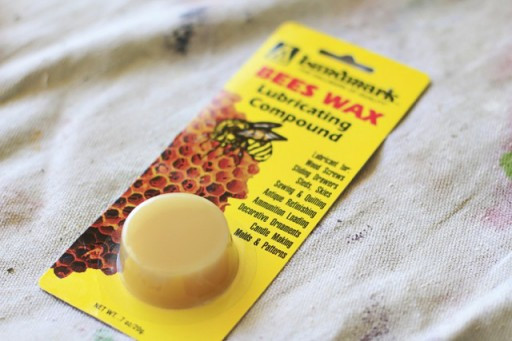 Use Beeswax to polish rock via lilblueboo.com
8. How To Choose The Right Rock Supplier For My Projects?
Selecting the right rock supplier is crucial for ensuring the success of your rock carving projects. Here are some key factors to consider:
- Quality of Stone: Look for a supplier that offers high-quality stone that is free from cracks, flaws, and other imperfections.
- Variety of Stone: Choose a supplier that offers a wide variety of stone types, sizes, and colors to suit your specific needs.
- Price: Compare prices from different suppliers to find the best value for your money.
- Location: Choose a supplier that is conveniently located to minimize transportation costs.
- Reputation: Check the supplier’s reputation by reading online reviews and talking to other rock carvers.
- Customer Service: Look for a supplier that provides excellent customer service and is willing to answer your questions and address your concerns.
- Sustainability: Choose a supplier that is committed to sustainable practices and sources their stone responsibly.
- Delivery Options: Check the supplier’s delivery options to ensure that they can deliver the stone to your location in a timely and cost-effective manner.
- Minimum Order Quantity: Check the supplier’s minimum order quantity to ensure that you can order the amount of stone you need.
- Return Policy: Check the supplier’s return policy in case you are not satisfied with the stone you receive.
8.1. What Questions Should I Ask A Rock Supplier Before Making A Purchase?
Asking the right questions can help you make an informed decision and avoid potential problems.
- What types of stone do you offer?
- What is the quality of your stone?
- Where do you source your stone?
- Are you committed to sustainable practices?
- What are your prices?
- What are your delivery options?
- What is your minimum order quantity?
- What is your return policy?
- Can I see samples of your stone?
- Can you provide references from other customers?
8.2. How Can Rockscapes.Net Help Me Find The Perfect Stone For My Carving Project?
At rockscapes.net, we understand the importance of finding the perfect stone for your carving project. We offer a wide selection of high-quality stones from reputable suppliers, along with expert advice and guidance to help you choose the right stone for your needs.
- Extensive Selection: We offer a wide variety of stone types, sizes, and colors to suit any project.
- Quality Assurance: We work with trusted suppliers to ensure that our stones are of the highest quality.
- Expert Advice: Our team of experts can provide guidance on choosing the right stone for your specific needs.
- Competitive Prices: We offer competitive prices to help you stay within your budget.
- Convenient Ordering: Our online ordering system makes it easy to purchase the stone you need from the comfort of your own home.
- Fast Shipping: We offer fast and reliable shipping to get your stone to you quickly.
- Customer Satisfaction: We are committed to providing excellent customer service and ensuring your satisfaction.
 Use Beeswax to polish carved rock via lilblueboo.com
9. How Can I Maintain My Rock Carving Tools?
Proper maintenance is essential for keeping your rock carving tools in good working condition and extending their lifespan.
- Clean Your Tools After Each Use: Remove any dust, debris, or polishing compound from your tools after each use.
- Sharpen Your Tools Regularly: Keep your carving tools sharp to ensure clean and efficient cuts.
- Lubricate Your Tools: Lubricate your tools regularly to prevent rust and corrosion.
- Store Your Tools Properly: Store your tools in a dry and secure place to protect them from damage.
- Replace Worn Parts: Replace worn parts, such as drill bits and polishing wheels, as needed.
- Follow Manufacturer’s Instructions: Follow the manufacturer’s instructions for maintaining your specific tools.
- Inspect Your Tools Regularly: Inspect your tools regularly for any signs of damage or wear.
- Handle Your Tools Carefully: Avoid dropping or mishandling your tools.
- Use the Right Tools for the Job: Use the right tools for the specific task you are performing.
- Keep Your Tools Organized: Keep your tools organized to prevent them from getting lost or damaged.
9.1. What Are Some Common Problems With Rock Carving Tools And How Can I Fix Them?
Knowing how to troubleshoot common problems can save you time and money.
- Dull Tools: Sharpen your tools regularly using a sharpening stone or grinder.
- Broken Drill Bits: Replace broken drill bits with new ones.
- Clogged Polishing Wheels: Clean clogged polishing wheels with a wire brush or solvent.
- Overheating Tools: Allow your tools to cool down periodically to prevent overheating.
- Rust and Corrosion: Clean rust and corrosion from your tools with a wire brush and apply a lubricant.
- Loose Handles: Tighten loose handles with a screwdriver or wrench.
- Worn Bearings: Replace worn bearings in your rotary tool or drill.
- Electrical Problems: Have electrical problems with your tools repaired by a qualified technician.
9.2. How Often Should I Sharpen My Rock Carving Tools?
The frequency with which you need to sharpen your rock carving tools will depend on the type of stone you are carving and how often you use your tools. As a general rule, you should sharpen your tools whenever they become dull or difficult to use.
- Soft Stones: Sharpen your tools less frequently when carving soft stones.
- Hard Stones: Sharpen your tools more frequently when carving hard stones.
- Regular Use: Sharpen your tools more frequently if you use them regularly.
- Dullness: Sharpen your tools whenever they become dull or difficult to use.
 Dremel Diamond Bit Attachment via lilblueboo.com
10. What Are Some Advanced Techniques For Rock Carving?
Once you’ve mastered the basic techniques, you can explore more advanced methods.
- Relief Carving: Carving a design that is raised above the background.
- Intaglio Carving: Carving a design that is recessed below the background.
- Piercing: Carving holes or openings through the stone.
- UnderCutting: Carving underneath a design to create a shadow effect.
- Texturing: Adding texture to the surface of the stone using various tools and techniques.
- Inlaying: Inlaying other materials, such as metal or glass, into the stone.
- Polychrome Carving: Adding color to your carvings using paints or dyes.
- Kinetic Sculpture: Creating sculptures that move or interact with the environment.
10.1. How Can I Create Realistic Details In My Rock Carvings?
Creating realistic details requires patience, skill, and a keen eye for observation.
- Study Your Subject: Study your subject carefully to understand its form, texture, and details.
- Use Reference Photos: Use reference photos to guide your carving.
- Start with the Basic Shapes: Begin by carving the basic shapes and then gradually add details.
- Pay Attention to Light and Shadow: Pay attention to how light and shadow play on the surface of your subject.
- Use a Variety of Tools: Use a variety of tools to create different textures and details.
- Take Your Time: Creating realistic details takes time and patience.
- Practice Regularly: The more you practice, the better you will become at creating realistic details.
- Observe Other Artists: Study the work of other artists who excel at creating realistic details.
10.2. What Are Some Tips For Carving Large-Scale Rock Sculptures?
Carving large-scale rock sculptures presents unique challenges and requires careful planning and execution.
- Choose the Right Stone: Choose a stone that is large enough and structurally sound enough for your sculpture.
- Plan Your Design Carefully: Plan your design carefully and create a detailed model or drawing.
- Use Heavy Equipment: Use heavy equipment, such as cranes and forklifts, to move and position the stone.
- Work in Stages: Break down the project into manageable stages.
- Use Power Tools: Use power tools, such as grinders and saws, to remove large amounts of stone quickly.
- Secure the Stone: Secure the stone to prevent it from moving or falling.
- Work with a Team: Work with a team of experienced stone carvers and assistants.
- Take Safety Precautions: Take all necessary safety precautions, such as wearing safety glasses and hard hats.
- Be Patient: Carving a large-scale rock sculpture takes time, patience, and perseverance.
At rockscapes.net, we are dedicated to providing you with the resources and inspiration you need to create stunning rock carvings. Whether you are a beginner or an experienced artist, we have something for everyone. Visit our website today to explore our wide selection of stones, tools, and tutorials.
 Dremel Polishing Wheel Attachment via lilblueboo.com
FAQ: Frequently Asked Questions About How to Carve Rock
1. What is the best type of rock to start carving with?
For beginners, soapstone is the best type of rock to start carving with due to its softness and ease of carving, making it ideal for learning basic techniques. It’s also readily available and polishes well.
2. What tools do I need to start carving rocks?
To begin carving rocks, you’ll need a rotary tool (like a Dremel), a silicon carbide grinding stone for softer rocks, diamond bits for harder rocks, safety glasses, a dust mask, gloves, and a water bowl to keep the rock and bits cool.
3. How do I transfer my design onto a rock for carving?
You can transfer your design onto a rock by freehand sketching with a pencil, using tracing paper and graphite paper, applying stencils, projecting the design and tracing it, or using photo transfer paper.
4. What safety precautions should I take when carving rocks?
Always wear safety glasses to protect your eyes, use a dust mask to prevent inhaling dust particles, wear gloves, work in a well-ventilated area, keep water nearby, and secure the rock to prevent movement.
5. How do I prevent rocks from cracking while carving?
To prevent rocks from cracking, use water to keep the rock and drill bit cool, apply gentle pressure, drill slowly, support the rock, use a backer board, and pre-drill a pilot hole.
6. What is the best way to polish a carved rock?
The best way to polish a carved rock is to start by cleaning the rock, sanding it with progressively finer grits of sandpaper, applying a polishing compound like beeswax, using a polishing wheel to buff the rock, and finally, sealing the rock for protection.
7. Can I carve rocks that I find outside?
Yes, you can carve rocks you find outside, but make sure they are suitable for carving. Softer rocks like sandstone or river rocks are good choices, but harder rocks like granite will require more specialized tools.
8. How do I drill a hole in a rock without breaking it?
To drill a hole in a rock without breaking it, use a diamond-tipped drill bit, apply water continuously to keep the rock cool, start drilling slowly, apply gentle pressure, and drill in stages, removing debris as you go.
9. What are some creative ideas for carving rocks?
Creative ideas for carving rocks include engraved stones with words or quotes, garden markers, pet memorials, small sculptures, jewelry, rock puzzles, miniature landscapes, and decorative accents for your home or garden.
10. How can rockscapes.net help me with my rock carving projects?
Rockscapes.net offers a wide selection of high-quality stones, tools, and tutorials to help you with your rock carving projects. We provide expert advice, competitive prices, and convenient ordering to make your experience enjoyable and successful.
Now that you’re armed with knowledge and inspiration, head over to rockscapes.net and start your rock carving adventure today. Discover the beauty and satisfaction of transforming ordinary stones into extraordinary works of art. Contact us at 1151 S Forest Ave, Tempe, AZ 85281, United States or call +1 (480) 965-9011 for expert advice and premium materials. Let’s create something amazing together.