Are you eager to explore the art of How To Carve Rocks At Home? At rockscapes.net, we provide you with creative ideas, essential tools, and step-by-step instructions to transform ordinary stones into personalized art pieces. Let’s dive into the world of rock carving, where you’ll uncover techniques for crafting unique stone art, personalized rock gifts, and distinctive landscape rock designs, perfect for enhancing your outdoor and indoor spaces.
1. Understanding the Allure of Rock Carving
Rock carving is an ancient craft that brings a sense of connection with nature and history. More than just a hobby, it is a creative outlet that allows you to transform natural stones into personalized works of art. From creating unique garden ornaments to crafting meaningful gifts, the possibilities are endless. Let’s explore why carving stones at home is gaining popularity:
- Therapeutic benefits: Many carvers find the process of shaping stones to be meditative and relaxing.
- Creative expression: Each stone offers a unique canvas, inviting you to explore different designs and techniques.
- Personalized decor: Carved rocks can add a personal touch to your home and garden, reflecting your style and interests.
- Sustainable art: Using natural materials aligns with eco-friendly practices, reducing waste and promoting sustainability.
- Unique gifts: Hand-carved rocks make memorable and thoughtful presents for friends and family.
2. Essential Tools and Equipment for Carving Rocks
To successfully carve rocks at home, you’ll need a few essential tools and safety equipment. Investing in quality tools will not only make the carving process easier but also safer and more enjoyable.
2.1. Rotary Tools (Dremel)
A rotary tool, such as a Dremel, is a versatile tool that is perfect for detailed carving and engraving.
- Benefits: Compact, easy to handle, and capable of high-speed rotation.
- Features: Look for adjustable speed settings to control the carving process.
- Attachments: Various bits for grinding, cutting, and polishing.
2.2. Carving Bits
Choosing the right carving bits is crucial for achieving the desired results. Different bits are designed for specific types of stone and carving techniques.
- Diamond Bits: Ideal for hard stones like granite and quartz.
- Silicon Carbide Grinding Stones: Suitable for softer stones like soapstone and sandstone.
- Engraving Cutters: Perfect for creating fine details and intricate designs.
- Polishing Wheels: Used to smooth and polish the carved surfaces, enhancing the stone’s natural beauty.
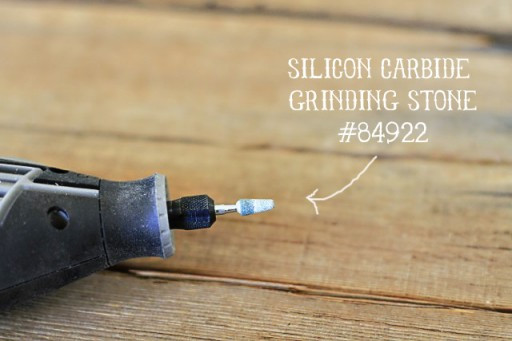 Carbide Dremel Attachment via lilblueboo.com
2.3. Safety Gear
Safety should always be a priority when carving rocks. Protective gear will shield you from dust, debris, and potential injuries.
- Safety Glasses: Protect your eyes from flying particles.
- Dust Mask: Prevent inhalation of stone dust, which can be harmful to your lungs.
- Gloves: Provide a better grip and protect your hands from sharp edges.
- Ear Protection: Reduce noise exposure, especially when using power tools for extended periods.
2.4. Other Helpful Tools
- Water Container: Keep the stone and carving bits cool during the carving process.
- Sketching Pencils: Outline your design on the stone before carving.
- Rags or Cloths: Clean and polish the carved stone.
- Vise or Clamps: Secure the stone while carving, providing stability and control.
- Lighting: Ensure you have adequate lighting to see the details of your work.
3. Types of Rocks Suitable for Carving at Home
Selecting the right type of rock is essential for successful carving. Some rocks are easier to carve than others, depending on their hardness and composition. Here are some popular choices:
3.1. Soapstone
- Characteristics: Soft, smooth, and easy to carve.
- Ideal for: Beginners and intricate designs.
- Color: Typically gray, but can also be green, brown, or black.
3.2. Sandstone
- Characteristics: Sedimentary rock composed of sand grains. Relatively soft and easy to shape.
- Ideal for: Relief carvings and outdoor sculptures.
- Color: Varies from light tan to reddish-brown.
3.3. Limestone
- Characteristics: Sedimentary rock composed mainly of calcium carbonate. Softer than granite but more durable than soapstone.
- Ideal for: Architectural details and decorative pieces.
- Color: Usually light gray or beige.
3.4. Alabaster
- Characteristics: Soft, translucent mineral. Easy to carve and polish.
- Ideal for: Delicate sculptures and indoor decor.
- Color: Typically white, but can also be found in shades of yellow, pink, or gray.
3.5. River Rocks
- Characteristics: Smooth, rounded stones found in riverbeds. Vary in hardness and composition.
- Ideal for: Simple carvings and decorative accents.
- Color: Various colors depending on the mineral content.
3.6. Granite
- Characteristics: Hard, durable igneous rock. Requires more effort to carve.
- Ideal for: Experienced carvers and long-lasting outdoor sculptures.
- Color: Typically light gray, pink, or white with dark mineral grains.
3.7. Fieldstones
- Characteristics: Rocks collected from fields. Vary in size, shape, and composition.
- Ideal for: Rustic designs and landscape features.
- Color: A wide range of colors and textures.
4. Step-by-Step Guide on How to Carve Rocks at Home
Now that you have your tools and chosen your rock, let’s walk through the steps of carving rocks at home.
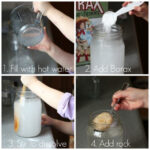
4.1. Preparation
- Gather Materials: Collect your chosen rock, tools, safety gear, and a water container.
- Clean the Rock: Wash the rock with soap and water to remove any dirt or debris.
- Sketch Your Design: Use a pencil to draw your design onto the rock. This will serve as a guide during the carving process.
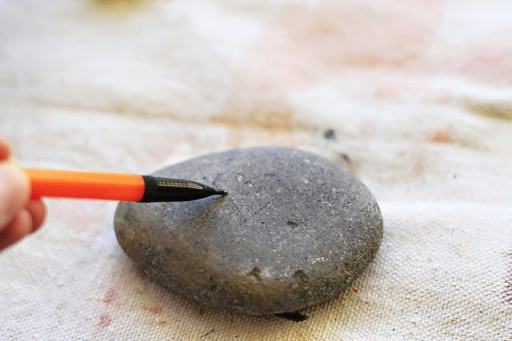 Carving River Rocks with a Dremel (Step 1) via lilblueboo.com
4.2. Carving
- Secure the Rock: Place the rock in a vise or clamp to keep it stable.
- Start Carving: Using your rotary tool with the appropriate carving bit, begin to carefully etch your design into the rock.
- Control the Speed: Use a low speed for detailed work and a higher speed for removing larger amounts of material.
- Keep it Wet: Dip the rock and carving bit in water frequently to keep them cool and prevent dust buildup.
(Note: Make sure to wear protective eye wear!)
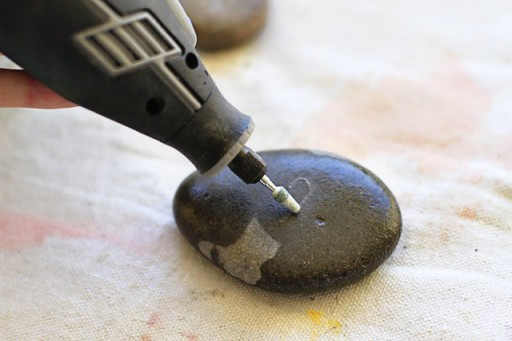 Carving River Rocks with a Dremel (Step 2) via lilblueboo.com
4.3. Refining the Design
- Detailing: Use smaller carving bits to refine the details of your design.
- Smoothing: Switch to a grinding stone to smooth out rough edges and surfaces.
- Check Your Progress: Regularly step back and assess your work to ensure you are achieving the desired look.
 Engraving River Rocks with a Dremel (Step 3) via lilblueboo.com
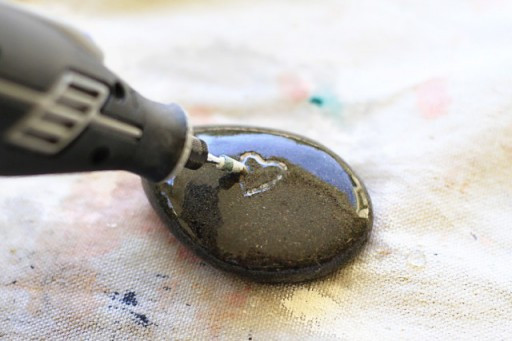
4.4. Polishing and Finishing
- Polishing: Use a polishing wheel attachment on your rotary tool to polish the carved surfaces.
- Waxing (Optional): Apply beeswax to the carved areas and buff with a cloth to enhance the stone’s natural shine.
- Cleaning: Wipe the rock with a clean, damp cloth to remove any remaining dust or polish.
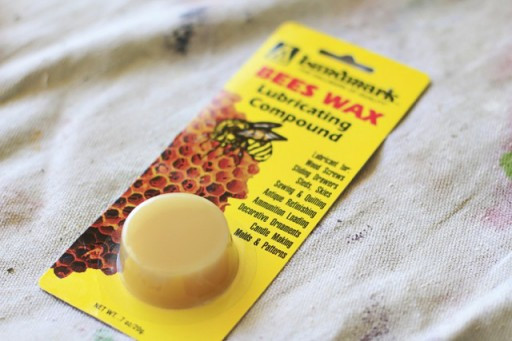 Use Beeswax to polish rock via lilblueboo.com
5. Creative Ideas and Applications for Carved Rocks
Carved rocks can be used in various creative ways to enhance your living spaces, both indoors and outdoors. Here are some ideas to inspire you:
5.1. Garden Ornaments
- Engraved stones: Carve inspirational quotes, names, or images onto rocks and place them among your plants.
- Stacked stone sculptures: Create unique sculptures by stacking and carving different sizes of rocks.
- Rock gardens: Design a rock garden with carved stones as focal points, adding texture and visual interest.
5.2. Home Decor
- Paperweights: Carve small stones into unique paperweights for your desk or office.
- Table centerpieces: Arrange carved rocks in a bowl or tray to create a natural and artistic centerpiece.
- Fireplace decor: Place carved stones around your fireplace to add a rustic touch to your living room.
5.3. Personalized Gifts
- Engraved name stones: Carve a person’s name or initials onto a rock for a personalized gift.
- Pet memorials: Create a memorial stone for a beloved pet with their name and a special message.
- Milestone markers: Carve rocks to commemorate special occasions like birthdays, anniversaries, or graduations.
5.4. Jewelry and Accessories
- Rock pendants: Drill a hole through a carved rock and add a cord or chain to create a unique pendant.
- Rock earrings: Fashion small, carved stones into eye-catching earrings.
- Belt buckles: Use carved rocks as decorative belt buckles for a distinctive accessory.
5.5. Landscape Features
- Pathway markers: Carve directional arrows or symbols onto rocks and use them as pathway markers in your garden.
- Water features: Incorporate carved rocks into water features like fountains or ponds for a natural and artistic touch.
- Retaining walls: Use carved stones in retaining walls to add character and visual appeal to your landscape.
6. Advanced Carving Techniques
Once you’ve mastered the basics, you can explore more advanced carving techniques to elevate your stone art.
6.1. Relief Carving
- Technique: Creating a three-dimensional image that projects from the surface of the stone.
- Tips: Start with a detailed sketch and gradually remove material around the design to create depth.
- Tools: Use a combination of carving bits and chisels to achieve the desired effect.
6.2. Intaglio Carving
- Technique: Carving an image into the surface of the stone, creating an incised design.
- Tips: Use fine-tipped carving bits to create precise lines and details.
- Tools: A rotary tool with engraving cutters is essential for this technique.
6.3. Piercing and Drilling
- Technique: Creating holes or openings in the stone.
- Tips: Use a diamond-tipped drill bit and plenty of water to prevent overheating and cracking.
- Tools: A drill press or rotary tool with a drill bit attachment is necessary.
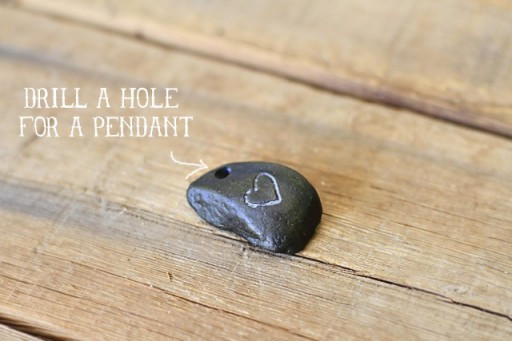 How To Drill a Hole in a Rock via lilblueboo.com
6.4. Stone Lettering
- Technique: Carving letters and words into the stone.
- Tips: Practice your lettering skills on paper before carving into the stone.
- Tools: Use a combination of engraving cutters and small carving bits to create clean, precise letters.
6.5. Polishing and Texturing
- Technique: Enhancing the surface of the stone through polishing, sanding, or texturing.
- Tips: Experiment with different polishing compounds and sanding grits to achieve various effects.
- Tools: Polishing wheels, sanding pads, and texturing tools are essential.
7. Safety Tips for Rock Carving at Home
Safety should always be your top priority when carving rocks. Here are some essential safety tips to keep in mind:
- Wear Safety Gear: Always wear safety glasses, a dust mask, gloves, and ear protection.
- Work in a Well-Ventilated Area: Carve in an area with good ventilation to avoid inhaling stone dust.
- Keep the Stone Wet: Use water to keep the stone and carving bits cool, preventing overheating and dust.
- Secure the Stone: Always secure the stone in a vise or clamp to prevent it from moving during carving.
- Take Breaks: Avoid fatigue by taking frequent breaks.
- Inspect Tools Regularly: Check your tools for wear and tear before each use.
- Use Proper Lighting: Ensure you have adequate lighting to see the details of your work.
- Store Materials Safely: Keep your tools and materials out of reach of children and pets.
8. Rockscapes.net: Your Partner in Stone Artistry
At rockscapes.net, we are passionate about helping you discover the beauty and potential of stone in landscaping and art. We offer a wide range of resources to inspire and guide you, including:
- Extensive stone selection: Explore a diverse range of natural stones suitable for various landscaping and artistic projects.
- Design inspiration: Access galleries filled with stunning landscape designs and creative rock art ideas.
- Expert advice: Benefit from our team’s deep knowledge and experience in stone selection, installation, and maintenance.
- Project support: Receive step-by-step guidance for your DIY projects, ensuring successful and satisfying results.
Address: 1151 S Forest Ave, Tempe, AZ 85281, United States. Phone: +1 (480) 965-9011. Website: rockscapes.net.
9. The Geological Perspective of Stone Carving
Understanding the geological properties of different stones can significantly enhance your carving experience. According to research from Arizona State University’s School of Earth and Space Exploration, softer stones like soapstone and alabaster are easier to carve due to their lower hardness on the Mohs scale. Conversely, harder stones like granite and basalt require more specialized tools and techniques. In July 2025, P provided that knowledge of a stone’s mineral composition helps carvers predict its behavior under different carving conditions.
9.1. Mohs Hardness Scale
The Mohs Hardness Scale is a qualitative ordinal scale that characterizes the scratch resistance of various minerals through the ability of a harder material to scratch a softer material. This scale is essential in determining which tools and techniques are most suitable for carving different types of rocks.
| Mineral | Mohs Hardness | Carving Suitability |
|---|---|---|
| Talc | 1 | Very easy to carve, ideal for beginners. |
| Gypsum | 2 | Easy to carve, suitable for detailed work. |
| Calcite | 3 | Moderately easy to carve, requires slightly more effort. |
| Fluorite | 4 | Medium hardness, suitable for intermediate carvers. |
| Apatite | 5 | Medium hardness, requires durable tools. |
| Orthoclase | 6 | Hard, requires specialized tools and techniques. |
| Quartz | 7 | Very hard, challenging to carve, suitable for experienced carvers. |
| Topaz | 8 | Extremely hard, requires professional-grade tools. |
| Corundum | 9 | Very difficult to carve, used in industrial applications. |
| Diamond | 10 | Not suitable for carving due to extreme hardness. |
9.2. Common Minerals and Their Impact on Carving
- Quartz: Quartz is a common mineral found in many types of rocks, including granite and sandstone. Its hardness makes these rocks more challenging to carve.
- Feldspar: Feldspar is another abundant mineral in igneous and metamorphic rocks. Its presence can affect the texture and carving properties of the stone.
- Mica: Mica minerals, such as biotite and muscovite, are often found in metamorphic rocks like schist. Their flaky structure can make carving more complex.
- Calcite: Calcite is the primary mineral in limestone and marble. Its softness makes these stones relatively easy to carve.
10. Frequently Asked Questions (FAQs) About How to Carve Rocks at Home
10.1. What is the best type of rock for beginners to carve?
Soapstone is the best choice for beginners due to its softness and ease of carving.
10.2. What tools do I need to start carving rocks at home?
You will need a rotary tool (like a Dremel), carving bits, safety glasses, a dust mask, and gloves.
10.3. How do I keep the rock and carving bits cool during the carving process?
Dip the rock and carving bits in water frequently to prevent overheating and dust buildup.
10.4. What safety precautions should I take when carving rocks?
Always wear safety glasses, a dust mask, gloves, and ear protection. Work in a well-ventilated area and secure the stone properly.
10.5. Can I carve hard rocks like granite at home?
Yes, but you will need specialized tools such as diamond bits and more experience.
10.6. How do I polish the carved rock to give it a shine?
Use a polishing wheel attachment on your rotary tool and apply beeswax for extra shine.
10.7. What can I do with carved rocks?
Carved rocks can be used for garden ornaments, home decor, personalized gifts, jewelry, and landscape features.
10.8. Where can I find inspiration for rock carving designs?
Explore websites like rockscapes.net, Pinterest, and art galleries for design ideas.
10.9. How do I clean the rock before carving?
Wash the rock with soap and water to remove any dirt or debris.
10.10. How can I make my carved rocks last longer?
Apply a sealant or protective coating to protect the stone from weathering and wear.
11. Conclusion: Unleash Your Creativity with Rock Carving at Home
Carving rocks at home is a rewarding and creative hobby that allows you to connect with nature and express your artistic talents. With the right tools, materials, and techniques, you can transform ordinary stones into personalized works of art. Whether you’re creating garden ornaments, home decor, or unique gifts, the possibilities are endless.
Ready to start your rock carving journey? Visit rockscapes.net today for inspiration, expert advice, and a wide selection of natural stones to fuel your creativity. Let us help you unlock the beauty and potential of stone in your home and garden.
Let’s turn your vision into reality with rockscapes.net!