Coating rocks with resin can transform ordinary stones into stunning pieces of art and decor. In this comprehensive guide from rockscapes.net, we’ll explore everything you need to know about using resin on rocks, from selecting the right type of resin to mastering the application process. Discover how to create durable, weather-resistant, and visually appealing rock art that will last for years to come by using this rock sealing method.
1. Why Coat Rocks With Resin?
Resin offers several advantages when used as a coating for rocks, making it a popular choice for artists, crafters, and homeowners. Here’s why you might want to consider coating rocks with resin:
- Enhanced Appearance: Resin provides a glossy, glass-like finish that enhances the natural colors and textures of the rocks, making them more vibrant and visually appealing.
- Protection: Resin acts as a protective layer, shielding the rocks from moisture, UV rays, and physical damage, which is especially important for outdoor use.
- Durability: A resin coating can significantly increase the lifespan of painted or decorated rocks, preventing chipping, fading, and wear over time. According to research from Arizona State University’s School of Earth and Space Exploration, resin coatings provide a durable barrier against environmental factors.
- Versatility: Resin can be used on a variety of rocks, from smooth river stones to textured garden rocks, and can be combined with other materials like glitter, dyes, and pigments for unique effects.
- Professional Finish: Whether you’re creating rock art, garden decorations, or personalized gifts, a resin coating gives your projects a professional, high-quality look.
2. Types of Resin for Coating Rocks
Choosing the right type of resin is crucial for achieving the desired results. Here are the most common types of resin used for coating rocks:
- Epoxy Resin: Epoxy resin is a two-part system consisting of a resin and a hardener. When mixed, it creates a strong, durable, and waterproof coating that is ideal for outdoor applications. Epoxy resin is known for its excellent clarity, chemical resistance, and ability to bond to various surfaces.
- UV Resin: UV resin cures rapidly when exposed to ultraviolet (UV) light, making it a convenient option for quick projects. It’s easy to apply and provides a glossy finish, but may be more expensive than epoxy resin. UV resin is best suited for smaller projects or when you need a fast curing time.
- Polyester Resin: Polyester resin is a cost-effective option that is commonly used in fiberglass applications. It offers good UV resistance and durability but may have a stronger odor than epoxy or UV resin. Polyester resin is a good choice for larger projects where cost is a concern.
| Resin Type | Pros | Cons | Best For |
|---|---|---|---|
| Epoxy Resin | Durable, waterproof, excellent clarity, chemical resistance | Longer curing time, requires precise mixing | Outdoor rock art, garden decorations, projects requiring high durability |
| UV Resin | Fast curing time, easy to apply, glossy finish | More expensive, may require UV lamp, best for smaller projects | Small rock art, quick projects, jewelry making |
| Polyester Resin | Cost-effective, good UV resistance, durable | Strong odor, may require ventilation, less clarity than epoxy | Larger projects, fiberglass applications, projects where cost is a concern |
3. Essential Supplies for Coating Rocks with Resin
Before you start your resin project, gather the necessary supplies to ensure a smooth and successful process. Here’s a checklist of essential items:
- Resin: Choose the type of resin that best suits your project needs (epoxy, UV, or polyester).
- Hardener (for epoxy and polyester resins): Use the correct hardener ratio as specified by the manufacturer.
- Rocks: Select clean, dry rocks of various sizes and shapes.
- Gloves: Wear disposable gloves to protect your hands from the resin.
- Mixing Cups and Stir Sticks: Use disposable cups and sticks for mixing the resin and hardener.
- Heat Gun or Torch: A heat gun or torch can help remove air bubbles from the resin.
- UV Lamp (for UV resin): A UV lamp is necessary for curing UV resin.
- Sandpaper: Use sandpaper to smooth any rough edges or imperfections on the rocks.
- Paint and Brushes (optional): If you plan to paint or decorate the rocks before applying the resin.
- Glitter, Dyes, and Pigments (optional): To add color and sparkle to the resin.
- Safety Glasses: Protect your eyes from splashes and fumes.
- Ventilation: Work in a well-ventilated area to avoid inhaling harmful fumes.
4. Preparing Rocks for Resin Coating
Proper preparation is essential for achieving a flawless resin finish. Follow these steps to prepare your rocks:
- Cleaning: Wash the rocks with soap and water to remove any dirt, dust, or debris. Rinse thoroughly and allow them to dry completely.
- Sanding: Use sandpaper to smooth any rough edges or imperfections on the rocks. This will help the resin adhere better and create a smoother surface.
- Sealing (optional): If you plan to paint or decorate the rocks, seal them with a clear acrylic sealer before applying the resin. This will prevent the paint from bleeding or reacting with the resin.
- Drying: Ensure the rocks are completely dry before proceeding with the resin coating. Moisture can interfere with the curing process and cause cloudiness or bubbling.
5. Step-by-Step Guide to Coating Rocks with Epoxy Resin
Epoxy resin is a popular choice for coating rocks due to its durability and clarity. Here’s a step-by-step guide to applying epoxy resin:
- Prepare Your Workspace: Set up your workspace in a well-ventilated area and cover your work surface with a protective layer, such as a plastic sheet or cardboard.
- Mix the Resin and Hardener: Carefully measure and mix the resin and hardener according to the manufacturer’s instructions. Use separate mixing cups and stir sticks to avoid contamination.
- Stir Thoroughly: Stir the mixture slowly and thoroughly for at least 2-3 minutes, making sure to scrape the sides and bottom of the cup. Avoid creating excessive bubbles during the mixing process.
- Pour the Resin: Slowly pour the resin over the rocks, ensuring that all surfaces are evenly coated. Use a stir stick or gloved finger to spread the resin into any crevices or uneven areas.
 Pouring Epoxy Resin
 - Remove Air Bubbles: Use a heat gun or torch to gently heat the surface of the resin. This will help release any trapped air bubbles and create a smoother finish. Hold the heat source a few inches away from the surface and move it in a sweeping motion.
- Allow to Cure: Let the resin cure for the recommended time (usually 24-72 hours) in a dust-free environment. Avoid touching or moving the rocks during the curing process.
- Apply Additional Coats (optional): If desired, apply additional coats of resin to achieve a thicker, more durable finish. Allow each coat to cure completely before applying the next.
6. Step-by-Step Guide to Coating Rocks with UV Resin
UV resin is a convenient option for quick projects due to its fast curing time. Here’s how to apply UV resin to rocks:
- Prepare Your Workspace: Set up your workspace in a well-ventilated area away from direct sunlight. Cover your work surface with a protective layer.
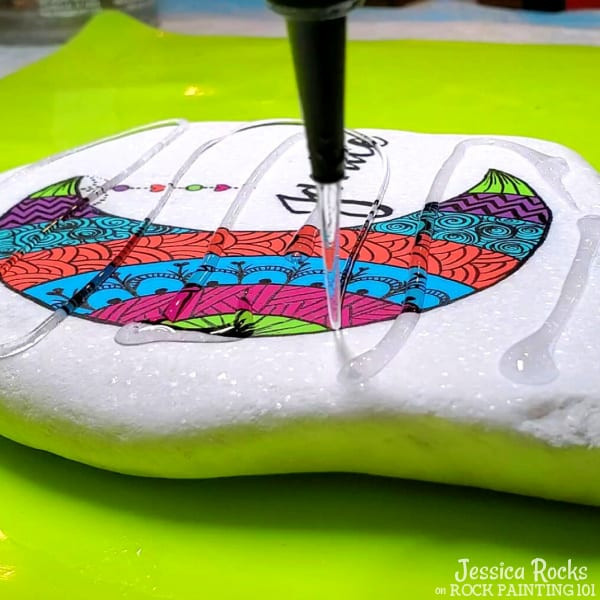
- Apply the Resin: Squeeze the UV resin directly onto the rocks, making sure to coat all surfaces evenly. Use a stir stick or gloved finger to spread the resin into any crevices or uneven areas.
 Applying UV Resin
 - Remove Air Bubbles: Use a heat gun or torch to gently heat the surface of the resin. This will help release any trapped air bubbles and create a smoother finish.
- Cure with UV Light: Place the rocks under a UV lamp and cure for the recommended time (usually 1-5 minutes), following the manufacturer’s instructions. Rotate the rocks periodically to ensure even curing.
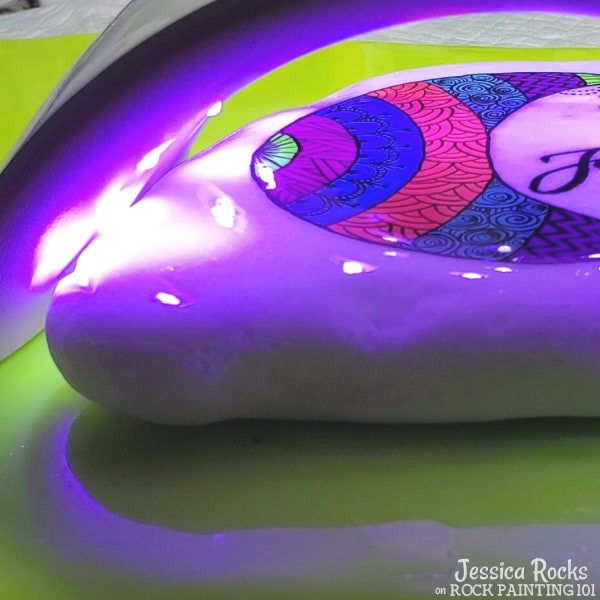 Cure with UV Light
 - Check for Tackiness: After curing, check the surface of the resin for any tackiness. If the resin is still tacky, continue curing for additional time until it is completely hard and smooth.
- Apply Additional Coats (optional): If desired, apply additional coats of resin to achieve a thicker, more durable finish. Cure each coat completely before applying the next.
7. Tips for a Perfect Resin Finish
Achieving a flawless resin finish requires attention to detail and practice. Here are some helpful tips to ensure your resin-coated rocks look their best:
- Work in a Clean Environment: Dust and debris can easily get trapped in the resin, so work in a clean, dust-free environment.
- Measure Accurately: Precise measurements are crucial for proper curing. Use measuring cups and scales to ensure accurate resin-to-hardener ratios.
- Mix Thoroughly: Mix the resin and hardener slowly and thoroughly to avoid creating excessive bubbles.
- Remove Air Bubbles: Use a heat gun or torch to gently heat the surface of the resin and release any trapped air bubbles.
- Avoid Overheating: Do not overheat the resin, as this can cause it to yellow or crack.
- Cure Properly: Allow the resin to cure for the recommended time in a dust-free environment. Avoid touching or moving the rocks during the curing process.
- Apply Thin Coats: Apply thin, even coats of resin to prevent drips and runs. Multiple thin coats are better than one thick coat.
- Sand Between Coats (optional): If desired, lightly sand the surface of the resin between coats to remove any imperfections and create a smoother finish.
- Protect Your Work Surface: Cover your work surface with a protective layer to prevent resin from sticking to it.
8. Creative Ideas for Resin-Coated Rocks
Resin-coated rocks offer endless possibilities for creative expression. Here are some ideas to inspire your next project:
- Rock Art: Paint intricate designs, landscapes, or portraits on rocks and seal them with resin for a durable and glossy finish.
- Garden Decorations: Create colorful and weather-resistant garden decorations by coating rocks with resin and embellishing them with glitter, beads, or other decorative elements.
- Personalized Gifts: Make personalized gifts for friends and family by painting or decorating rocks with their names, initials, or favorite quotes, and then sealing them with resin.
- Paperweights: Create unique and functional paperweights by coating interesting rocks with resin.
- Jewelry: Use small, resin-coated rocks to create eye-catching pendants, earrings, and other jewelry pieces.
- Home Decor: Add a touch of nature to your home decor by displaying resin-coated rocks in bowls, vases, or on shelves.
- Kindness Rocks: Paint inspirational messages on rocks and seal them with resin before hiding them in public places for others to find.
- Pet Rocks: Create adorable pet rocks by painting them with faces and sealing them with resin.
9. Common Issues and How to Solve Them
Even with careful preparation, you may encounter some common issues when coating rocks with resin. Here are some problems and their solutions:
- Bubbles: Air bubbles can form in the resin during mixing or application. Use a heat gun or torch to gently heat the surface of the resin and release the bubbles. Mix the resin slowly and thoroughly to minimize bubble formation.
- Tackiness: If the resin remains tacky after curing, it may be due to improper mixing, incorrect resin-to-hardener ratio, or insufficient UV exposure (for UV resin). Ensure you are using the correct mixing ratios and curing times. If using UV resin, make sure the UV lamp is functioning properly and providing adequate exposure.
- Yellowing: Some resins may yellow over time, especially when exposed to sunlight. Use a UV-resistant resin or add a UV stabilizer to the resin to prevent yellowing. Keep resin-coated rocks out of direct sunlight whenever possible. According to Jessica Rocks, UV Resin stands up to the sun without causing yellowing or fading of paint.
- Cloudiness: Cloudiness can occur if the rocks are not completely dry before applying the resin or if the resin is exposed to moisture during curing. Ensure the rocks are thoroughly dry before applying the resin. Work in a dry environment and avoid exposing the resin to moisture during curing.
- Drips and Runs: Drips and runs can occur if the resin is applied too thickly or if the rocks are not level during curing. Apply thin, even coats of resin and ensure the rocks are level during curing. If drips or runs occur, sand them down after the resin has fully cured and apply another thin coat.
- Uneven Finish: An uneven finish can result from improper mixing, uneven application, or variations in the rock’s surface. Mix the resin thoroughly and apply it evenly. Sand the rocks before applying the resin to create a smoother surface.
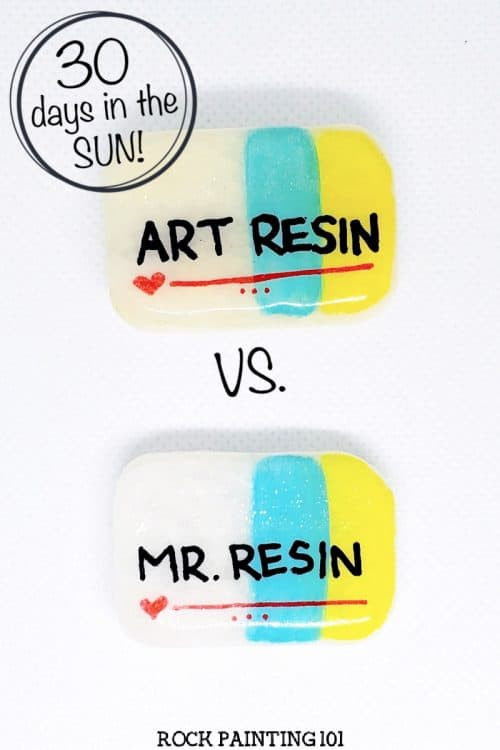 UV Resin vs. Art Resin
10. Safety Precautions When Working with Resin
Working with resin can be hazardous if proper safety precautions are not followed. Here are some important safety tips to keep in mind:
- Ventilation: Work in a well-ventilated area to avoid inhaling harmful fumes. Open windows and doors or use a fan to circulate air.
- Protective Gear: Wear disposable gloves, safety glasses, and a respirator or mask to protect your skin, eyes, and respiratory system from the resin and fumes.
- Skin Contact: Avoid getting resin on your skin. If contact occurs, wash immediately with soap and water.
- Eye Contact: If resin gets into your eyes, rinse immediately with plenty of water and seek medical attention.
- Ingestion: Do not ingest resin. If swallowed, seek medical attention immediately.
- Flammability: Keep resin away from open flames and heat sources, as it may be flammable.
- Storage: Store resin in a cool, dry place away from children and pets.
- Disposal: Dispose of resin waste properly according to local regulations. Do not pour resin down the drain.
11. Exploring Rockscapes.net for More Inspiration
Looking for more ideas on how to use rocks in your landscaping and home decor? Rockscapes.net is your ultimate resource for inspiration, information, and expert advice. Visit our website to discover:
- Design Ideas: Browse our extensive gallery of landscape designs featuring rocks, stones, and other natural elements.
- Rock Varieties: Learn about different types of rocks, their unique characteristics, and how to use them in your projects.
- DIY Tutorials: Find step-by-step tutorials on how to build rock gardens, pathways, water features, and other landscape elements.
- Expert Tips: Get expert advice on selecting the right rocks, preparing your site, and maintaining your rockscapes.
- Supplier Directory: Locate trusted suppliers of rocks, stones, and landscaping materials in your area.
At rockscapes.net, we’re passionate about helping you create beautiful and sustainable landscapes using natural materials. Whether you’re a homeowner, landscaper, or designer, we have the resources you need to bring your vision to life.
12. Maintaining Your Resin-Coated Rocks
To ensure your resin-coated rocks maintain their beauty and durability, follow these maintenance tips:
- Cleaning: Clean the rocks regularly with a soft cloth and mild soap and water. Avoid using harsh chemicals or abrasive cleaners, as they can damage the resin finish.
- UV Protection: While some resins offer UV resistance, prolonged exposure to direct sunlight can cause yellowing or fading over time. Keep resin-coated rocks out of direct sunlight whenever possible or apply a UV-protective coating.
- Storage: If you’re storing resin-coated rocks, keep them in a cool, dry place away from extreme temperatures and humidity.
- Inspection: Inspect the rocks periodically for any signs of damage, such as cracks, chips, or peeling. Repair any damage promptly to prevent further deterioration.
- Reapplication: Depending on the type of resin and the environmental conditions, you may need to reapply the resin coating every few years to maintain its protective properties and glossy finish.
By following these maintenance tips, you can keep your resin-coated rocks looking beautiful for years to come.
13. The Longevity of Resin-Coated Rocks
The longevity of resin-coated rocks depends on several factors, including the type of resin used, the environmental conditions, and the level of maintenance provided. Here’s what you can expect:
- Epoxy Resin: Epoxy resin coatings are known for their durability and can last for many years with proper care. Expect an epoxy resin coating to last 5-10 years or more, depending on the level of exposure to sunlight, moisture, and physical wear.
- UV Resin: UV resin coatings are less durable than epoxy resin coatings and may require more frequent reapplication. Expect a UV resin coating to last 1-3 years, depending on the level of exposure to sunlight and other environmental factors.
- Polyester Resin: Polyester resin coatings offer good UV resistance and durability but may be more prone to cracking or yellowing over time. Expect a polyester resin coating to last 3-7 years, depending on the environmental conditions and level of maintenance.
Regular cleaning, UV protection, and prompt repairs can extend the lifespan of your resin-coated rocks and keep them looking their best.
14. Where to Buy Rocks and Resin Supplies
Finding high-quality rocks and resin supplies is essential for creating beautiful and durable resin-coated rocks. Here are some recommended sources:
- Local Rock Yards: Visit local rock yards or landscaping suppliers to find a wide variety of rocks in different sizes, shapes, and colors.
- Craft Stores: Craft stores like Michaels, Hobby Lobby, and Joann Fabrics offer a selection of resin, hardeners, dyes, glitter, and other supplies for resin crafting.
- Online Retailers: Online retailers like Amazon, Etsy, and Alibaba offer a vast selection of rocks, resin, and crafting supplies at competitive prices.
- Specialty Resin Suppliers: Specialty resin suppliers like ArtResin, ProMarine Supplies, and Stone Coat Countertops offer high-quality resins specifically formulated for art and craft projects.
When choosing rocks, look for clean, dry rocks with smooth surfaces and interesting shapes. When selecting resin supplies, read reviews and choose products that are known for their clarity, durability, and ease of use.
15. The Environmental Impact of Using Resin
It’s important to consider the environmental impact of using resin and take steps to minimize your footprint. Here are some ways to use resin responsibly:
- Choose Eco-Friendly Resins: Look for eco-friendly resins that are made from sustainable or recycled materials. Some manufacturers offer bio-based resins that are derived from renewable resources.
- Minimize Waste: Use only the amount of resin you need for your project to minimize waste. Properly measure and mix the resin and hardener to avoid excess material.
- Dispose of Waste Properly: Dispose of resin waste properly according to local regulations. Do not pour resin down the drain or into the environment.
- Ventilation: Work in a well-ventilated area to minimize exposure to harmful fumes. Use a respirator or mask to protect your respiratory system.
- Recycle: Recycle any recyclable materials, such as plastic containers and cardboard boxes.
By taking these steps, you can reduce the environmental impact of using resin and create beautiful, sustainable rock art and decorations.
16. Advanced Techniques for Coating Rocks with Resin
Once you’ve mastered the basics of coating rocks with resin, you can explore some advanced techniques to create even more stunning effects:
- Layering: Create depth and dimension by layering different colors and textures of resin. Pour a layer of clear resin, add glitter or dyes, and then pour another layer of resin on top.
- Embedding: Embed objects like shells, beads, or dried flowers in the resin to create unique and personalized designs.
- Marbling: Create a marbled effect by swirling different colors of resin together. Pour the resin onto the rocks and then use a stir stick or toothpick to create swirls and patterns.
- Ombre: Create an ombre effect by gradually blending different colors of resin together. Pour the resin onto the rocks, starting with the darkest color at the bottom and gradually blending in lighter colors towards the top.
- Resin Pouring: Experiment with different pouring techniques to create unique and abstract designs. Try pouring the resin from different heights or angles, or using a heat gun to manipulate the resin as it cures.
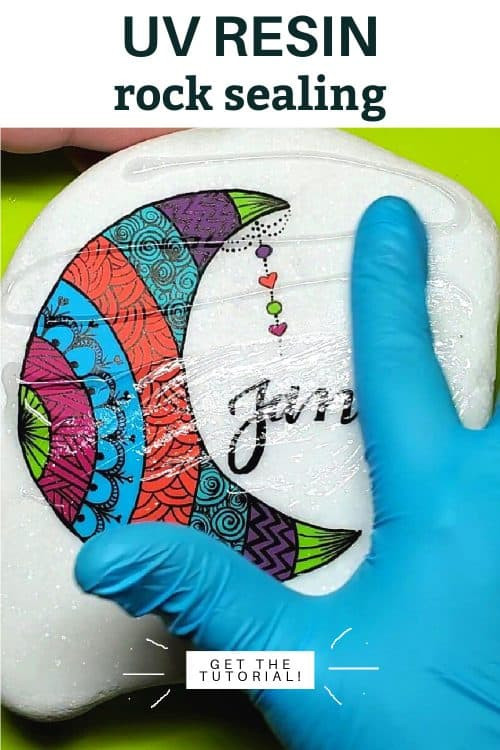 Step by step instructions to seal painted rocks with UV Resin
17. The Art of Rock Balancing with Resin
Rock balancing is an ancient art form that involves stacking rocks in precarious arrangements. Coating rock balances with resin can make them more durable and weather-resistant, allowing you to display them outdoors without fear of them toppling over. Here’s how to coat rock balances with resin:
- Create Your Rock Balance: Carefully stack the rocks to create a stable and visually appealing balance.
- Apply the Resin: Slowly pour the resin over the rock balance, ensuring that all surfaces are evenly coated. Use a stir stick or gloved finger to spread the resin into any crevices or uneven areas.
- Remove Air Bubbles: Use a heat gun or torch to gently heat the surface of the resin and release any trapped air bubbles.
- Allow to Cure: Let the resin cure for the recommended time in a dust-free environment. Avoid touching or moving the rock balance during the curing process.
- Apply Additional Coats (optional): If desired, apply additional coats of resin to achieve a thicker, more durable finish. Allow each coat to cure completely before applying the next.
With a resin coating, your rock balances will be able to withstand the elements and bring joy to all who see them.
18. Turning Your Rock Coating Hobby into a Business
If you enjoy coating rocks with resin, you can turn your hobby into a profitable business. Here are some ideas to get started:
- Sell Your Creations Online: Create an online store on platforms like Etsy, Shopify, or Squarespace to sell your resin-coated rocks.
- Attend Craft Fairs and Markets: Participate in local craft fairs and markets to showcase your creations and connect with potential customers.
- Wholesale to Retailers: Partner with local retailers to sell your resin-coated rocks in their stores.
- Offer Custom Orders: Offer custom orders to customers who want personalized resin-coated rocks for gifts or home decor.
- Teach Workshops: Teach workshops on How To Coat Rocks With Resin to share your knowledge and skills with others.
- Create a Social Media Presence: Create a strong social media presence on platforms like Instagram, Facebook, and Pinterest to showcase your work and attract customers.
- Build a Website or Blog: Create a website or blog to share your creations, tutorials, and tips for coating rocks with resin.
With creativity, hard work, and a passion for your craft, you can turn your rock coating hobby into a successful business.
19. The Versatility of Rock Sizes and Shapes
The size and shape of the rocks you use can greatly influence the final result of your resin-coated projects. Here’s how to choose the right rocks for different applications:
- Small Rocks: Small rocks are ideal for creating jewelry, magnets, and small decorative items. They are easy to handle and can be coated with resin quickly.
- Medium Rocks: Medium-sized rocks are perfect for painting, decorating, and creating garden art. They provide a larger canvas for your designs and are easy to display.
- Large Rocks: Large rocks are suitable for creating statement pieces in your garden or home. They can be used as focal points in rock gardens, water features, or as decorative accents in your landscape.
- Flat Rocks: Flat rocks are ideal for painting and creating intricate designs. Their smooth surface makes them easy to work with and provides a great base for resin coating.
- Round Rocks: Round rocks are perfect for creating smooth, glossy finishes. They can be used to make paperweights, decorative stones, or as accents in your garden.
- Textured Rocks: Textured rocks add visual interest and depth to your resin-coated projects. They can be used to create unique and tactile designs that stand out.
Experiment with different rock sizes and shapes to discover the endless possibilities of resin-coated rocks.
20. Frequently Asked Questions (FAQs) About Coating Rocks with Resin
Here are some frequently asked questions about coating rocks with resin:
- What is the best type of resin for coating rocks? The best type of resin for coating rocks depends on your project needs. Epoxy resin is durable and waterproof, UV resin cures quickly, and polyester resin is cost-effective.
- How do I prepare rocks for resin coating? Clean the rocks with soap and water, sand any rough edges, and seal them with a clear acrylic sealer (optional). Ensure the rocks are completely dry before applying the resin.
- How do I remove air bubbles from resin? Use a heat gun or torch to gently heat the surface of the resin and release any trapped air bubbles.
- How long does it take for resin to cure? Curing time depends on the type of resin. Epoxy resin typically cures in 24-72 hours, while UV resin cures in 1-5 minutes under a UV lamp.
- How do I prevent resin from yellowing? Use a UV-resistant resin or add a UV stabilizer to the resin. Keep resin-coated rocks out of direct sunlight.
- Is resin safe to use? Resin can be hazardous if proper safety precautions are not followed. Work in a well-ventilated area, wear protective gear, and avoid skin and eye contact.
- How do I dispose of resin waste? Dispose of resin waste properly according to local regulations. Do not pour resin down the drain.
- Can I paint rocks before coating them with resin? Yes, you can paint rocks before coating them with resin. Seal the painted rocks with a clear acrylic sealer before applying the resin.
- Can I use glitter in resin? Yes, you can use glitter in resin to add sparkle and shine to your creations.
- Where can I buy rocks and resin supplies? You can buy rocks at local rock yards or landscaping suppliers and resin supplies at craft stores, online retailers, or specialty resin suppliers.
Coating rocks with resin is a fun and rewarding way to create beautiful and durable art and decorations. With the right supplies, techniques, and safety precautions, you can transform ordinary rocks into stunning pieces of art that will last for years to come.
Ready to start your resin rock journey? Visit rockscapes.net today for even more inspiration and expert tips! You can find inspiration for unique landscape designs, and information about different rock types, or contact us at Address: 1151 S Forest Ave, Tempe, AZ 85281, United States. Phone: +1 (480) 965-9011.