Connecting your Rock Space WiFi extender to your router is a straightforward process that can significantly improve your home network’s coverage, and at rockscapes.net we are here to guide you. This article will guide you through the steps to extend your Wi-Fi network seamlessly. By understanding the setup process and optimizing your extender’s placement, you can enjoy a stronger, more reliable internet connection throughout your home and even into your beautifully designed rockscapes.
1. Understanding the Need for a WiFi Extender
WiFi extenders are essential for expanding your network’s reach, particularly in homes with thick walls, multiple floors, or large outdoor spaces. Let’s dive deeper into why you might need one and how it benefits your home network.
Why Use a WiFi Extender?
WiFi extenders, also known as repeaters, amplify your existing WiFi signal, broadcasting it further than your router can manage on its own. This is particularly useful for:
- Eliminating Dead Zones: WiFi dead zones are areas in your home where the WiFi signal is weak or non-existent. An extender can fill these gaps, ensuring consistent connectivity.
- Extending Coverage to Outdoor Spaces: If you enjoy spending time in your yard or garden, an extender can bring WiFi to these areas, allowing you to stream music, work, or browse the internet while enjoying your outdoor rockscapes.
- Supporting Multiple Devices: As the number of connected devices in our homes grows (smartphones, tablets, smart TVs, etc.), a single router may struggle to provide sufficient bandwidth. Extenders help distribute the load, improving overall network performance.
- Improving Signal Strength: Even if you have WiFi coverage in a particular area, the signal strength may be weak, leading to slow speeds and buffering. An extender can boost the signal strength, providing a more reliable connection.
Benefits of a Rock Space WiFi Extender
Rock Space WiFi extenders are designed to be user-friendly and efficient, offering several advantages:
- Easy Setup: Rock Space extenders are known for their simple setup process, which can be completed in minutes using either the WPS button or a web browser.
- Dual-Band Technology: Many Rock Space extenders support dual-band WiFi, which means they can operate on both 2.4 GHz and 5 GHz frequencies. This allows for faster speeds and less interference.
- Wide Compatibility: Rock Space extenders are compatible with most standard routers, making them a versatile solution for extending your network.
- Compact Design: The compact design of Rock Space extenders allows them to be placed discreetly in any room without taking up too much space.
- Reliable Performance: Rock Space extenders provide a stable and reliable connection, ensuring consistent performance for all your connected devices.
Consider a scenario where you’ve invested in beautiful rock features for your backyard, creating a serene outdoor oasis. With a Rock Space WiFi extender, you can seamlessly stream your favorite music or work remotely while enjoying the tranquility of your landscape.
2. Preparing for the Connection Process
Before diving into the setup, it’s important to lay the groundwork for a smooth and successful connection. Let’s go through the essential steps to prepare.
Unboxing and Initial Inspection
Start by carefully unboxing your Rock Space WiFi extender. Ensure that all components are present, including:
- The Rock Space WiFi extender unit
- A quick installation guide
- Any necessary cables (usually just a power cable)
Inspect the device for any physical damage. If you notice anything unusual, contact Rock Space customer support for assistance.
Placement Considerations
The placement of your WiFi extender is crucial for optimal performance. Here are some factors to consider:
- Proximity to the Router: Place the extender close enough to the router to receive a strong signal. A good rule of thumb is to position it halfway between your router and the area where you need better WiFi coverage.
- Avoid Obstructions: Walls, metal objects, and electronic devices can interfere with the WiFi signal. Place the extender in an open area, away from potential sources of interference.
- Power Outlet Availability: Ensure that there is a power outlet available in the desired location. The extender needs to be plugged in to operate.
- Signal Strength Monitoring: Some extenders have signal strength indicators that can help you determine the best placement. Use these indicators to find a location with a strong and stable signal from your router.
Understanding Your Router’s Credentials
Before you begin the setup process, make sure you have the following information about your router:
- WiFi Network Name (SSID): This is the name of your WiFi network that you see when you search for available networks.
- WiFi Password: This is the password required to connect to your WiFi network.
- Router’s WPS Button: Locate the WPS (WiFi Protected Setup) button on your router. This button is used for quick and easy connections.
Having this information readily available will streamline the setup process and prevent any unnecessary delays.
3. Step-by-Step Guide: Connecting Your Rock Space WiFi Extender
There are two primary methods for connecting your Rock Space WiFi extender to your router: using the WPS button and using a web browser. Let’s explore each method in detail.
Method 1: Using the WPS Button
The WPS button method is the simplest and quickest way to connect your extender.
- Plug in the Extender: Plug your Rock Space WiFi extender into a power outlet near your router. Wait for the Power LED to turn on, usually indicating that the device is ready.
- Press the Router’s WPS Button: Locate the WPS button on your router and press it. The WPS button is generally on the back of the router.
- Press the Extender’s WPS Button: Within two minutes of pressing the router’s WPS button, press the WPS button on the extender.
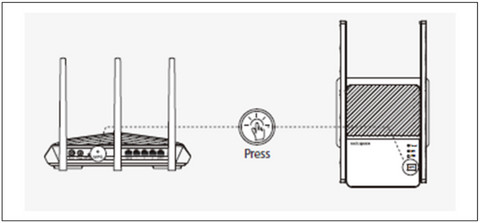 Press WPS buttons on both router and extender
 - Wait for the Connection: The extender will now attempt to connect to your router. Watch the Signal LED on the extender. If it turns blue, the connection was successful. If it doesn’t turn blue, try again or use Method 2.
- Relocate the Extender: Once the connection is successful, unplug the extender and move it to a location that is about halfway between your router and the area where you want to extend the WiFi signal.
- Verify the Connection: After relocating the extender, wait for a few minutes for it to reconnect to the router. Check the Signal LED to ensure it remains blue.
The WPS button method is ideal for users who want a quick and hassle-free setup process.
Method 2: Using a Web Browser
If the WPS button method doesn’t work, or if you prefer a more manual approach, you can use a web browser to connect your extender.
- Connect to the Extender’s Network: On your computer or smartphone, go to the WiFi settings and connect to the extender’s network. The network name is usually in the format “rockspace_EXT”. Ensure that you disable mobile data on your smartphone to avoid any conflicts.
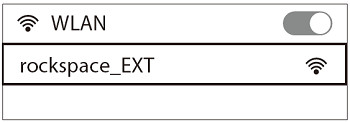 Connect to rockspace EXT network via WiFi settings
 - Access the Extender’s Web Interface: Open a web browser and enter http://re.rockspace.local or http://192.168.0.254 in the address bar. This will take you to the extender’s login page.
- Create an Admin Password: You will be prompted to create an admin password for the extender. Make sure to record this password for future use.
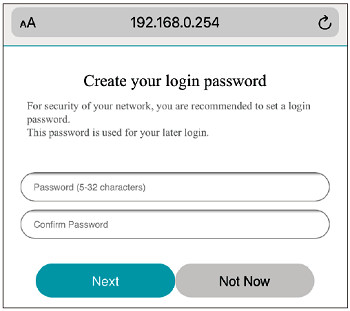 Create an admin password to protect your extender settings
 - Select Your WiFi Network: The extender will scan for available WiFi networks. Select the network you want to extend from the list.
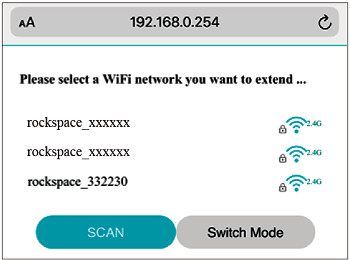 Choose the WiFi network you'd like to extend
 - Enter Your WiFi Password: Enter the password for your selected WiFi network.
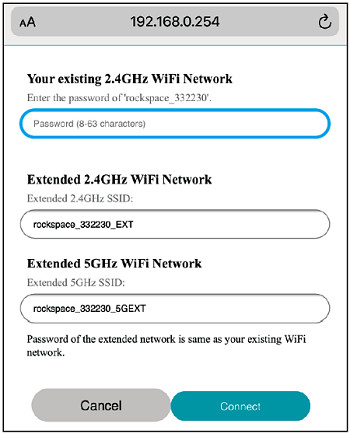 Enter your existing WiFi network password for the extender
 - Wait for Confirmation: The extender will now connect to your router. Wait until the page shows “Extended successfully”
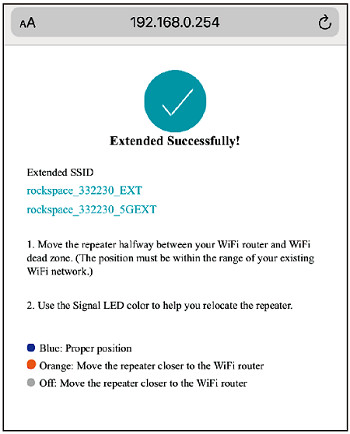 Confirmation Page
 - Relocate the Extender: Unplug the extender and move it to a location that is about halfway between your router and the area where you want to extend the WiFi signal.
- Verify the Connection: After relocating the extender, wait for a few minutes for it to reconnect to the router. Check the Signal LED to ensure it remains blue.
The web browser method offers more control and is useful if you encounter issues with the WPS button method.
4. Optimizing the Placement of Your Rock Space WiFi Extender
Placement is key to maximizing the effectiveness of your Rock Space WiFi extender. Here are some guidelines to help you find the optimal location.
Finding the Ideal Location
- Midway Point: The best location for your extender is typically halfway between your router and the WiFi dead zone. This ensures that the extender receives a strong signal from the router while also providing coverage to the desired area.
- Signal Strength: Use the signal strength indicators on the extender to gauge the strength of the signal it’s receiving from the router. Adjust the extender’s location until you find a spot with a strong and stable signal.
- Avoid Obstructions: Keep the extender away from walls, metal objects, and electronic devices that can interfere with the WiFi signal.
- Experiment: Don’t be afraid to experiment with different locations. Move the extender around and test the WiFi coverage in the desired area until you find the optimal spot.
Troubleshooting Placement Issues
If you’re experiencing issues with the extender’s performance, consider the following troubleshooting tips:
- Move Closer to the Router: If the extender is not receiving a strong enough signal from the router, move it closer.
- Check for Interference: Look for potential sources of interference, such as microwave ovens, Bluetooth devices, and other electronic devices. Move the extender away from these sources.
- Adjust the Antenna: If your extender has adjustable antennas, try repositioning them to improve the signal.
- Restart the Extender: Sometimes, simply restarting the extender can resolve connectivity issues. Unplug the extender, wait a few seconds, and then plug it back in.
Maximizing Coverage in Outdoor Spaces
If you want to extend your WiFi coverage to outdoor spaces like gardens or patios, consider the following:
- Weather Protection: Protect the extender from the elements by placing it in a weatherproof enclosure or under a covered area.
- Height: Elevate the extender to improve its range. Mount it on a wall or place it on a high shelf.
- Direction: Point the extender’s antenna towards the outdoor area you want to cover.
By carefully considering these factors, you can optimize the placement of your Rock Space WiFi extender and enjoy reliable WiFi coverage throughout your home and outdoor spaces. Think of relaxing by your custom-designed rockscapes, effortlessly streaming your favorite music.
5. Connecting Devices to the Extended Network
Once your Rock Space WiFi extender is successfully connected to your router, the next step is to connect your devices to the extended network.
Finding the Extended Network
The extended network will have a slightly different name than your original WiFi network. By default, Rock Space extenders add “_EXT” or “_5GEXT” to the end of your existing network name. For example, if your original network is named “MyWiFi,” the extended network will be “MyWiFi_EXT” or “MyWiFi_5GEXT”.
If you changed the network name during the setup process, look for the name you specified.
Connecting Your Devices
Connecting your devices to the extended network is the same as connecting to any other WiFi network.
- Go to WiFi Settings: On your device (smartphone, tablet, laptop, etc.), go to the WiFi settings.
- Select the Extended Network: Find the extended network name in the list of available networks and select it.
- Enter the Password: Enter the password for your original WiFi network. By default, the extended network uses the same password as your original network.
- Verify the Connection: Once you’ve entered the password, your device should connect to the extended network. Verify the connection by browsing the internet or using an app that requires an internet connection.
Troubleshooting Connection Issues
If you’re having trouble connecting your devices to the extended network, try the following troubleshooting tips:
- Check the Password: Make sure you’re entering the correct password. The extended network uses the same password as your original network by default.
- Restart Your Device: Sometimes, simply restarting your device can resolve connectivity issues.
- Move Closer to the Extender: If your device is too far from the extender, it may not be able to connect. Move closer to the extender and try again.
- Forget the Network: On your device, forget the extended network and then try connecting to it again. This can help clear any cached settings that may be causing issues.
By following these steps, you can easily connect your devices to the extended network and enjoy improved WiFi coverage throughout your home.
6. Common Issues and Troubleshooting
Even with careful setup, you might encounter some common issues when connecting your Rock Space WiFi extender. Here’s how to troubleshoot them effectively.
Extender Not Connecting to Router
Problem: The extender fails to connect to your router, even after following the setup steps.
Solutions:
- Verify Router Compatibility: Ensure your router is compatible with the Rock Space extender. Most modern routers are compatible, but older models might have issues.
- Check Router Settings: Make sure your router’s firmware is up to date. Outdated firmware can cause compatibility issues. Also, verify that the router’s firewall settings aren’t blocking the extender.
- WPS Issues: If using WPS, ensure the WPS function is enabled on your router. Some routers have a WPS setting that needs to be activated.
- Manual Setup: Try the web browser setup method instead of WPS. This allows for more control and can bypass potential WPS issues.
- Factory Reset: Reset the extender to its factory settings and try the setup process again. This can clear any conflicting configurations.
Slow Internet Speeds
Problem: The extended network provides slower internet speeds than the main router network.
Solutions:
- Placement: Adjust the extender’s location. It should be placed where it receives a strong signal from the router, typically halfway between the router and the dead zone.
- Interference: Reduce interference by moving the extender away from electronic devices, metal objects, and walls.
- Dual-Band Extender: If your extender supports dual-band, ensure it’s configured correctly. Connect devices that require higher speeds to the 5 GHz band.
- Firmware Update: Update the extender’s firmware to the latest version. Firmware updates often include performance improvements.
- Device Limit: Reduce the number of devices connected to the extender. Too many connected devices can strain the network and reduce speeds.
Intermittent Connectivity
Problem: Devices frequently disconnect from the extended network.
Solutions:
- Signal Stability: Ensure the extender is in a location with a stable signal from the router. Fluctuating signal strength can cause intermittent connectivity.
- Firmware Update: Update the extender’s firmware to the latest version. Firmware updates often address connectivity issues.
- Channel Interference: Use a WiFi analyzer app to identify less congested channels and configure your router and extender to use those channels.
- Power Cycle: Regularly power cycle the extender and router. This can help clear temporary glitches and improve stability.
Extender Not Appearing in Network List
Problem: The extender’s network name (SSID) doesn’t appear in the list of available networks.
Solutions:
- Extender Mode: Ensure the extender is in extender mode, not router mode. Some extenders have different operating modes that can be configured through the web interface.
- Proximity: Move closer to the extender to see if the network appears. The extender might be out of range.
- Reboot Extender: Reboot the extender. This can refresh the network settings and make the network visible.
- Factory Reset: Reset the extender to its factory settings and try the setup process again.
Login Issues
Problem: Unable to log in to the extender’s web interface.
Solutions:
- Correct Address: Ensure you are using the correct web address (http://re.rockspace.local or http://192.168.0.254).
- Admin Password: Use the admin password you created during the initial setup. If you forgot the password, you might need to reset the extender to its factory settings.
- Clear Cache: Clear your browser’s cache and cookies. Cached data can sometimes interfere with the login process.
- Different Browser: Try using a different web browser.
By addressing these common issues and following the troubleshooting steps, you can ensure your Rock Space WiFi extender provides reliable and consistent performance.
7. Advanced Configuration Options
For users who want more control over their network, Rock Space WiFi extenders offer several advanced configuration options. Let’s explore these options to optimize your network performance.
Changing the Extended Network Name (SSID)
By default, the extended network name includes “_EXT” or “_5GEXT”. You can customize this name to better identify your extended network.
Steps:
- Access Web Interface: Log in to the extender’s web interface using a web browser (http://re.rockspace.local or http://192.168.0.254).
- Wireless Settings: Navigate to the wireless settings section. The exact location may vary depending on the extender model.
- Change SSID: Find the option to change the SSID (network name) for the extended network.
- Enter New Name: Enter your desired network name.
- Save Settings: Save the changes. The extender will reboot, and your extended network will now have the new name.
Setting Up a Static IP Address
Assigning a static IP address to your extender can improve network stability and prevent IP address conflicts.
Steps:
- Access Web Interface: Log in to the extender’s web interface.
- LAN Settings: Navigate to the LAN settings section.
- Static IP: Select the option to use a static IP address.
- Enter IP Details: Enter the IP address, subnet mask, gateway, and DNS server information. You’ll need to ensure the IP address is within your router’s IP address range but not already assigned to another device.
- Save Settings: Save the changes. The extender will reboot with the new static IP address.
Configuring Parental Controls
Rock Space WiFi extenders often include parental control features to manage internet access for children.
Steps:
- Access Web Interface: Log in to the extender’s web interface.
- Parental Controls: Find the parental controls section.
- Enable Parental Controls: Enable the parental control feature.
- Add Devices: Add the devices you want to manage (e.g., children’s smartphones or tablets).
- Set Schedules: Set schedules for when the devices can access the internet.
- Block Websites: Block specific websites or categories of websites.
- Save Settings: Save the changes. The parental control settings will now be applied to the selected devices.
Guest Network Setup
Setting up a guest network allows visitors to access your WiFi without giving them access to your main network.
Steps:
- Access Web Interface: Log in to the extender’s web interface.
- Guest Network: Navigate to the guest network section.
- Enable Guest Network: Enable the guest network feature.
- Configure Settings: Configure the guest network name (SSID), password, and other settings.
- Save Settings: Save the changes. The guest network will now be available for visitors.
Upgrading Firmware
Keeping your extender’s firmware up to date is crucial for optimal performance and security.
Steps:
- Access Web Interface: Log in to the extender’s web interface.
- Firmware Update: Navigate to the firmware update section.
- Check for Updates: Click the button to check for available firmware updates.
- Install Update: If an update is available, follow the instructions to install it.
- Reboot Extender: After the update is complete, the extender will reboot.
By exploring these advanced configuration options, you can tailor your Rock Space WiFi extender to meet your specific network needs and enhance your overall WiFi experience.
8. Maintaining Your Rock Space WiFi Extender
To ensure your Rock Space WiFi extender continues to perform optimally, regular maintenance is essential. Here are some key maintenance tips.
Regular Firmware Updates
Why: Firmware updates provide bug fixes, performance improvements, and security patches.
How:
- Check Regularly: Periodically check for firmware updates via the extender’s web interface.
- Automatic Updates: If available, enable automatic firmware updates to ensure your extender is always running the latest version.
- Manual Updates: If automatic updates are not available, download the latest firmware from the Rock Space website and manually install it via the web interface.
Cleaning and Dust Removal
Why: Dust accumulation can cause overheating and reduce performance.
How:
- Unplug Extender: Before cleaning, unplug the extender from the power outlet.
- Soft Cloth: Use a soft, dry cloth to gently wipe the exterior of the extender.
- Compressed Air: Use compressed air to remove dust from vents and hard-to-reach areas.
- Avoid Liquids: Do not use liquids or cleaning solutions, as they can damage the extender.
Periodic Rebooting
Why: Rebooting can resolve minor glitches and improve performance.
How:
- Regular Reboot: Reboot the extender every few weeks or months.
- Unplug and Replug: Unplug the extender from the power outlet, wait a few seconds, and then plug it back in.
- Web Interface Reboot: Reboot the extender via the web interface.
Checking Signal Strength
Why: Monitoring signal strength ensures the extender is still in an optimal location.
How:
- Regular Checks: Periodically check the signal strength indicator on the extender.
- Adjust Placement: If the signal strength is weak, adjust the extender’s location.
- Test Coverage: Use a WiFi analyzer app to test the WiFi coverage in the areas you want to cover.
Reviewing Security Settings
Why: Ensuring your network is secure protects your data and privacy.
How:
- Strong Password: Use a strong, unique password for your WiFi network.
- WPA3 Encryption: If available, use WPA3 encryption for your WiFi network.
- Regular Review: Regularly review the security settings on your router and extender to ensure they are properly configured.
- Disable WPS: If you’re not using WPS, disable it to prevent unauthorized access.
Monitoring Network Usage
Why: Monitoring network usage helps identify potential issues and optimize performance.
How:
- Web Interface: Use the extender’s web interface to monitor network usage.
- Traffic Analysis: Analyze the traffic patterns to identify potential bottlenecks or security threats.
- QoS Settings: Use QoS (Quality of Service) settings to prioritize traffic for important applications.
By following these maintenance tips, you can ensure your Rock Space WiFi extender continues to provide reliable and consistent performance for years to come.
9. Integrating Rockscapes with Extended WiFi Coverage
Now that you have extended your WiFi coverage, let’s explore how you can integrate it with your outdoor rockscapes to enhance your outdoor living experience.
Outdoor Entertainment
- Streaming Music: Place a Bluetooth speaker in your rock garden and stream music from your smartphone or tablet.
- Outdoor Movie Nights: Set up a projector and screen in your backyard for outdoor movie nights with friends and family.
- Gaming: Enjoy online gaming in your outdoor space with a stable WiFi connection.
Smart Home Integration
- Smart Lighting: Install smart outdoor lighting that can be controlled via your smartphone or voice assistant.
- Security Cameras: Place security cameras in your rockscapes to monitor your property and deter intruders.
- Sprinkler Systems: Control your sprinkler system remotely to water your plants and lawn.
Remote Work and Relaxation
- Outdoor Office: Create a comfortable outdoor office space with a table, chair, and WiFi access.
- Relaxation Zone: Set up a hammock or lounge chair in your rock garden and enjoy streaming your favorite books, videos, or podcasts.
Educational Opportunities
- Nature Exploration: Use tablets or smartphones to identify plants, animals, and geological features in your rockscapes.
- Virtual Tours: Take virtual tours of famous rock formations and geological sites from around the world.
Creating a Connected Outdoor Space
- WiFi-Enabled Devices: Choose outdoor devices that are WiFi-enabled for seamless integration with your extended network.
- Weather Protection: Protect outdoor devices from the elements with weatherproof enclosures or covers.
- Power Solutions: Use outdoor power outlets or solar-powered charging stations to keep your devices powered up.
By integrating your extended WiFi coverage with your outdoor rockscapes, you can create a connected outdoor space that enhances your lifestyle and provides endless opportunities for entertainment, relaxation, and education. Imagine enjoying a warm evening in your beautifully lit rock garden, effortlessly streaming your favorite movie or show.
10. Frequently Asked Questions (FAQs)
Here are some frequently asked questions about connecting and using Rock Space WiFi extenders.
- What is a WiFi extender and why do I need one?
A WiFi extender amplifies your existing WiFi signal, extending its range to cover dead zones and areas where the signal is weak. It’s useful for homes with thick walls, multiple floors, or large outdoor spaces. - How do I set up my Rock Space WiFi extender?
You can set up your Rock Space WiFi extender using either the WPS button method or the web browser method. The WPS button method is quicker, while the web browser method offers more control. - What do I do if the WPS button method doesn’t work?
If the WPS button method doesn’t work, try the web browser method. Connect to the extender’s network, access the web interface, and follow the instructions to connect to your router. - How do I find the extended network name?
By default, Rock Space extenders add “_EXT” or “_5GEXT” to the end of your existing network name. If you changed the network name during setup, look for the name you specified. - What password do I use to connect to the extended network?
By default, the extended network uses the same password as your original WiFi network. - How do I change the extended network name?
Log in to the extender’s web interface, navigate to the wireless settings, and change the SSID (network name) for the extended network. - How do I update the firmware on my Rock Space WiFi extender?
Log in to the extender’s web interface, navigate to the firmware update section, and check for available updates. Follow the instructions to install the update. - What should I do if my internet speed is slow on the extended network?
Adjust the extender’s location to ensure it receives a strong signal from the router. Reduce interference by moving the extender away from electronic devices and metal objects. - Can I use a Rock Space WiFi extender with any router?
Rock Space WiFi extenders are compatible with most standard routers, but it’s always a good idea to check compatibility before purchasing. - How do I reset my Rock Space WiFi extender to factory settings?
Locate the reset button on the extender (usually a small pinhole) and press it with a paperclip or similar object for about 10 seconds. The extender will reboot and return to its factory settings.
By addressing these frequently asked questions, you can gain a better understanding of how to connect and use your Rock Space WiFi extender effectively.
Extending your WiFi network with a Rock Space WiFi extender is a game-changer, especially when you want to enjoy seamless connectivity in your beautifully designed outdoor spaces. Whether you’re streaming music by your rock garden, working remotely on your patio, or simply browsing the internet under the stars, a reliable WiFi connection enhances your outdoor living experience.
At rockscapes.net, we understand the importance of creating stunning outdoor environments that seamlessly blend with technology. That’s why we encourage you to explore our website for more innovative ideas, detailed information about various rock types, and expert tips on building your dream landscape. Don’t hesitate to contact our specialists in the USA for personalized advice and bring the beauty of rockscapes to your connected home.
Address: 1151 S Forest Ave, Tempe, AZ 85281, United States
Phone: +1 (480) 965-9011
Website: rockscapes.net
