Connecting a rocker switch might seem daunting, but it’s a straightforward process. At rockscapes.net, we simplify this task for you, providing clear guidance and resources to confidently wire your rocker switches and other electrical components. Rocker switches are great for many applications from your home to your garden, so be sure to keep our website bookmarked. Dive into our comprehensive guides, explore innovative rock landscape concepts, and learn about electrical wiring, toggle switches, and switch installations, all to beautify your surroundings.
1. What Is A Rocker Switch And How Does It Work?
A rocker switch is an electrical switch that is activated by rocking or pressing one end, which tips the other end up. A rocker switch works by bridging or breaking a circuit. When you press one side, it internally connects the circuit, allowing electricity to flow, hence turning the device on. Pressing the opposite side breaks the connection, stopping the current and turning the device off. This simple mechanism makes them a reliable and user-friendly choice for controlling electrical devices.
1.1 Why Are Rocker Switches Popular?
Rocker switches are popular due to their ease of use and clear indication of on or off status. Their design is visually intuitive, making it easy for users of all ages to operate them. Additionally, they are durable and can withstand frequent use, enhancing their appeal for both residential and commercial applications.
1.2 What Are The Common Applications Of Rocker Switches?
Rocker switches are commonly used in household appliances, power strips, and car dashboards. In homes, they control lighting, fans, and other electrical fixtures. In cars, they operate functions such as headlights, fog lights, and auxiliary devices. Their versatility makes them suitable for various applications, ensuring they are a staple in electrical control systems.
1.3 What Are The Benefits Of Using Rocker Switches In Landscape Lighting?
Using rocker switches in landscape lighting allows for easy control and enhances safety. They enable homeowners to effortlessly manage outdoor lighting systems, creating ambiance and improving security. The switches are weather-resistant and can withstand outdoor conditions, providing reliable performance. According to landscape lighting experts, rocker switches offer a practical and stylish solution for managing outdoor lighting, adding value to any landscape design.
2. What Are The Types Of Rocker Switches And Their Specific Uses?
Rocker switches come in various types, each designed for specific uses. These include standard on/off switches, momentary switches, and illuminated switches. Understanding the differences will help you choose the right switch for your project.
2.1 On/Off Rocker Switches
On/off rocker switches are the most common type, used to simply turn a device on or off. These switches are ideal for lighting fixtures, appliances, and other applications where a basic control is needed.
2.2 Momentary Rocker Switches
Momentary rocker switches only activate while pressed, returning to their original position when released. They are often used in applications such as power windows in cars or controlling automated gate systems, where continuous operation is not required.
2.3 Illuminated Rocker Switches
Illuminated rocker switches feature a built-in LED that lights up when the switch is on, providing visual confirmation of the switch’s status, or can be wired to constantly stay on. These are useful in dark environments or for devices that are not immediately visible, such as landscape lighting controls or power supplies.
2.4 SPST, SPDT, DPST, And DPDT Rocker Switches Explained
- SPST (Single Pole Single Throw): Controls a single circuit, turning it either on or off.
- SPDT (Single Pole Double Throw): Directs a single input to one of two outputs, often used in applications requiring alternative circuits.
- DPST (Double Pole Single Throw): Simultaneously controls two separate circuits, turning them both on or off together.
- DPDT (Double Pole Double Throw): Controls two separate circuits, each with two output options, providing versatile control over multiple devices.
2.5 How Do You Choose The Right Rocker Switch For Your Project?
Choosing the right rocker switch involves considering the application, voltage, current requirements, and environmental conditions. Ensure the switch is rated for the intended voltage and current to prevent electrical hazards. For outdoor applications, select a switch that is weather-resistant. At rockscapes.net, you’ll find detailed specifications and expert advice to guide your selection.
3. What Tools And Materials Are Needed To Connect A Rocker Switch?
Connecting a rocker switch requires specific tools and materials to ensure a safe and effective installation. Gathering these items beforehand will streamline the process.
3.1 Essential Tools For Rocker Switch Installation
- Screwdrivers: Both Phillips head and flathead screwdrivers are necessary for tightening and loosening screws.
- Wire Strippers: Used to remove insulation from wires without damaging the conductors.
- Pliers: Helpful for bending and manipulating wires.
- Voltage Tester: Essential for verifying that the power is off before starting any electrical work.
- Multimeter: Used to test the continuity and voltage of the circuit.
3.2 Necessary Materials For Wiring A Rocker Switch
- Rocker Switch: Choose the appropriate type of switch for your application.
- Wires: Use wires of the correct gauge for the circuit’s current rating.
- Wire Connectors: Such as wire nuts or crimp connectors, to securely join wires.
- Electrical Tape: To insulate and protect wire connections.
- Mounting Hardware: Screws or clips to secure the switch in place.
3.3 Safety Gear To Protect Yourself During Electrical Work
- Insulated Gloves: Protect hands from electrical shock.
- Safety Glasses: Shield eyes from debris and sparks.
- Proper Clothing: Avoid loose clothing that could get caught in equipment.
- Non-Conductive Shoes: To prevent electrical current from passing through your body.
4. How To Connect A Basic On/Off Rocker Switch: Step-By-Step Guide
Connecting a basic on/off rocker switch is a simple process that can be done safely with the right guidance. Follow these steps to ensure a successful installation.
4.1 Step 1: Turn Off The Power
Before starting any electrical work, turn off the power at the circuit breaker to prevent electrical shock. Verify that the power is off using a voltage tester.
4.2 Step 2: Identify The Wires
Identify the wires you will be working with: the power source wire (usually black), the wire leading to the device (also often black, or another color), and the ground wire (usually green or bare copper).
4.3 Step 3: Connect The Wires To The Rocker Switch
- Strip about ½ inch of insulation from the ends of the wires.
- Connect the power source wire to one terminal on the rocker switch.
- Connect the wire leading to the device to the other terminal on the switch.
- If there is a ground wire, connect it to the grounding screw or terminal in the electrical box.
4.4 Step 4: Secure The Switch And Test The Connection
- Carefully place the switch into the electrical box, ensuring the wires are neatly tucked away.
- Secure the switch with screws or clips.
- Turn the power back on at the circuit breaker.
- Test the switch to ensure it turns the device on and off correctly.
5. How To Wire An LED Rocker Switch: A Detailed Explanation
Wiring an LED rocker switch involves additional considerations due to the LED component, but it is manageable with a clear understanding of the wiring diagram.
5.1 Understanding The LED Rocker Switch Wiring Diagram
An LED rocker switch typically has three or more terminals: power, ground, and load. The LED requires a separate connection to illuminate when the switch is on. Review the wiring diagram provided with your switch to identify each terminal.
5.2 Connecting The Power, Ground, And Load Wires
- Power Wire: Connect the power source wire to the terminal designated for power input.
- Ground Wire: Connect the ground wire to the ground terminal. This is essential for the LED to function correctly.
- Load Wire: Connect the wire leading to the device to the load terminal.
5.3 Ensuring The LED Illuminates Correctly
- Double-check that the ground wire is securely connected to the ground terminal.
- Ensure the power wire is connected to the correct terminal, as some switches require specific polarity for the LED to work.
- Test the switch to confirm that the LED lights up when the switch is in the “on” position.
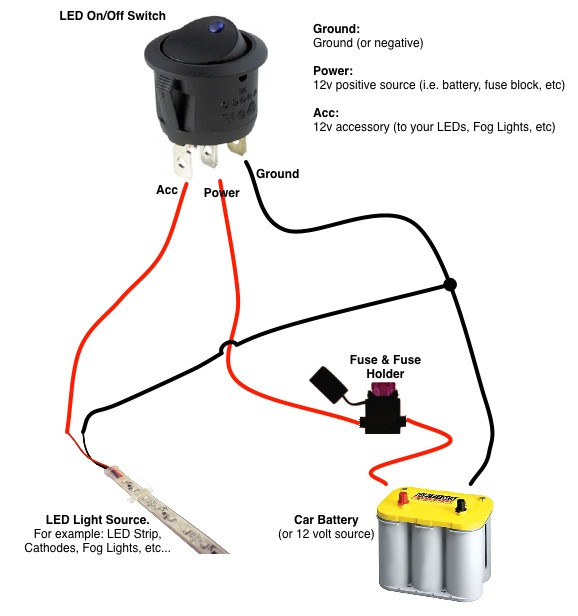 LED Rocker Switch Wiring Diagram
5.4 Troubleshooting Common LED Rocker Switch Issues
- LED Not Lighting Up: Check the ground connection and ensure the power wire is connected to the correct terminal.
- Switch Not Working: Verify that all wire connections are secure and that the switch is rated for the circuit’s voltage and current.
- Flickering LED: This could indicate a loose connection or a faulty LED. Check all connections and replace the switch if necessary.
6. How To Wire A 3-Way Rocker Switch: Comprehensive Instructions
Wiring a 3-way rocker switch allows you to control a light or device from two different locations. This setup is common in hallways, staircases, and large rooms.
6.1 Understanding 3-Way Switch Wiring
A 3-way switch has three terminals plus a ground. The terminals include a common terminal and two traveler terminals. The common terminal is connected to the power source or the light, while the traveler terminals connect to the other 3-way switch.
6.2 Step-By-Step Wiring Guide For A 3-Way Rocker Switch
- Turn Off The Power: As with any electrical work, turn off the power at the circuit breaker.
- Identify The Wires: Identify the power source wire, the wire leading to the light, the ground wire, and the traveler wires.
- Connect The First Switch:
- Connect the power source wire to the common terminal of the first 3-way switch.
- Connect two traveler wires to the traveler terminals of the first switch.
- Connect the ground wire to the ground terminal.
- Connect The Second Switch:
- Connect the wire leading to the light to the common terminal of the second 3-way switch.
- Connect the other ends of the traveler wires to the traveler terminals of the second switch.
- Connect the ground wire to the ground terminal.
- Secure The Switches And Test The Connection:
- Carefully place the switches into the electrical boxes, ensuring the wires are neatly tucked away.
- Secure the switches with screws or clips.
- Turn the power back on at the circuit breaker.
- Test the switches from both locations to ensure they control the light correctly.
6.3 Common Mistakes To Avoid When Wiring A 3-Way Switch
- Incorrectly Identifying Wires: Ensure you correctly identify the power source, load, and traveler wires.
- Loose Connections: Make sure all wire connections are secure to prevent malfunctions.
- Ignoring Ground Wire: Always connect the ground wire to ensure safety and prevent electrical hazards.
 3-way or 2-way switch wiring for RV
6.4 Troubleshooting 3-Way Switch Problems
- Light Not Turning On: Check that all wire connections are secure and that the switches are correctly wired.
- Light Only Working From One Switch: Verify that the traveler wires are correctly connected to both switches.
- Switches Not Functioning As Expected: Double-check the wiring diagram and ensure that all wires are connected to the correct terminals.
7. How To Replace A Rocker Switch: A Simple Guide
Replacing a rocker switch is a straightforward task that can improve the functionality and appearance of your electrical fixtures.
7.1 Preparing For The Replacement
- Turn Off The Power: Always turn off the power at the circuit breaker before starting any electrical work.
- Gather Your Tools: Ensure you have the necessary tools, including screwdrivers, wire strippers, and a voltage tester.
- Choose A Replacement Switch: Select a rocker switch that matches the existing one in terms of type, voltage, and current rating.
7.2 Removing The Old Rocker Switch
- Remove the faceplate covering the switch.
- Use a screwdriver to loosen the screws holding the switch in the electrical box.
- Carefully pull the switch out of the box.
- Use a voltage tester to ensure that the power is off.
- Disconnect the wires from the old switch.
7.3 Installing The New Rocker Switch
- Connect the wires to the new switch, matching the connections from the old switch.
- Secure the switch in the electrical box with screws.
- Replace the faceplate.
- Turn the power back on at the circuit breaker.
- Test the new switch to ensure it is working correctly.
7.4 Safety Tips For Replacing Electrical Switches
- Always turn off the power before starting any electrical work.
- Use insulated tools to prevent electrical shock.
- Follow the wiring diagram to ensure correct connections.
- If you are unsure about any step, consult a qualified electrician.
8. What Are The Safety Precautions When Working With Rocker Switches?
Working with electrical components like rocker switches requires strict adherence to safety precautions to prevent accidents and injuries.
8.1 General Safety Rules For Electrical Work
- Always Turn Off The Power: The most critical safety rule is to turn off the power at the circuit breaker before starting any electrical work.
- Use Insulated Tools: Use tools with insulated handles to protect against electrical shock.
- Wear Safety Gear: Wear safety glasses and gloves to protect your eyes and hands.
- Never Work In Wet Conditions: Avoid working with electricity in wet or damp environments.
- Inspect Equipment: Regularly inspect your tools and equipment for damage or wear.
8.2 How To Avoid Electrical Shock
- Turn Off The Power: Always verify that the power is off before touching any wires or terminals.
- Use A Voltage Tester: Use a voltage tester to confirm that the power is off.
- Avoid Contact With Bare Wires: Never touch bare wires or terminals with your bare hands.
- Keep Work Area Dry: Ensure your work area is dry to prevent electrical conductivity.
8.3 What To Do In Case Of An Electrical Accident
- Turn Off The Power: If someone is experiencing an electrical shock, immediately turn off the power at the circuit breaker.
- Call For Help: Call emergency services immediately.
- Do Not Touch The Person: Use a non-conductive object, such as a wooden broom handle, to separate the person from the electrical source.
- Administer First Aid: If the person is not breathing, administer CPR until medical help arrives.
9. How Can Rocker Switches Enhance Your Landscape Lighting Design?
Rocker switches can significantly enhance your landscape lighting design by providing convenient and reliable control over your outdoor lighting systems.
9.1 Convenient Control Of Landscape Lighting
Rocker switches allow you to easily turn on or off your landscape lights, providing convenient control from a central location. This is especially useful for controlling multiple lighting zones or individual fixtures.
9.2 Creating Different Lighting Zones
By using multiple rocker switches, you can create different lighting zones in your landscape. This allows you to customize the lighting to suit different occasions or moods. For example, you can have separate switches for pathway lights, garden lights, and accent lights.
9.3 Enhancing Security With Timers And Sensors
You can combine rocker switches with timers and sensors to automate your landscape lighting. Timers can be set to turn lights on and off at specific times, while sensors can detect motion or changes in light levels to automatically adjust the lighting. According to a study by the Illuminating Engineering Society, automated lighting systems can significantly improve security and energy efficiency.
9.4 Rocker Switches With Dimmers To Set The Mood
Another great way to set the mood using landscape lighting is with dimmer switches. With dimmer rocker switches you can adjust the brightness of your lighting to set a great mood for any occasion.
9.5 Weather-Resistant Options For Outdoor Use
When using rocker switches for landscape lighting, it is important to choose weather-resistant options that are designed to withstand outdoor conditions. These switches are typically made from durable materials and are sealed to protect against moisture and corrosion.
10. Rocker Switch Styles and Aesthetics for Rockscapes
Rocker switches offer a variety of styles and aesthetic options that can complement the design of rockscapes, blending functionality with visual appeal.
10.1 Matching Rocker Switches to Landscape Themes
Choosing rocker switches that match the landscape theme can enhance the overall aesthetic. For natural, rustic settings, consider switches with earthy tones and textured surfaces. Modern landscapes may benefit from sleek, minimalist designs in neutral colors.
10.2 Color and Finish Options
Rocker switches are available in a wide range of colors and finishes, allowing for seamless integration with existing landscape elements. Matte finishes can blend with natural materials, while metallic finishes can add a touch of elegance.
10.3 Integrating Switches Into Rock Features
Strategically integrating rocker switches into rock features can make them less obtrusive and more visually appealing. Consider recessing switches into rock walls or hiding them behind foliage to maintain the natural look of the landscape.
10.4 Custom Engraving and Labeling
Custom engraving and labeling can add a personalized touch to rocker switches. Engrave symbols or words that indicate the function of each switch, making them easier to use and more visually appealing.
 Oznium’s rocker switches
11. What Are The Latest Trends In Rocker Switch Technology?
The field of rocker switch technology is constantly evolving, with new innovations improving functionality, safety, and aesthetics.
11.1 Smart Rocker Switches With Remote Control
Smart rocker switches can be controlled remotely via smartphone apps or voice commands. These switches offer features such as scheduling, dimming, and energy monitoring, enhancing convenience and energy efficiency.
11.2 Touch-Sensitive Rocker Switches
Touch-sensitive rocker switches replace the traditional mechanical switch with a touch-sensitive surface. These switches offer a sleek, modern look and can be easily cleaned.
11.3 Energy-Efficient Rocker Switches
Energy-efficient rocker switches are designed to minimize power consumption. These switches often feature LED indicators that use very little energy and can help reduce your overall energy bill.
11.4 Wireless Rocker Switches
Wireless rocker switches allow you to control lights and devices without the need for traditional wiring. These switches use radio frequency (RF) or Bluetooth technology to communicate with a receiver, making them easy to install and use in existing homes.
12. Where Can You Find High-Quality Rocker Switches For Your Landscaping Needs?
Finding high-quality rocker switches is essential for ensuring the reliability and longevity of your landscape lighting system.
12.1 Trusted Suppliers And Brands
Look for trusted suppliers and brands that are known for producing high-quality electrical components. Some popular brands include Leviton, Lutron, and Eaton.
12.2 Online Retailers
Online retailers offer a wide selection of rocker switches from various brands and at competitive prices. Check customer reviews and ratings to ensure you are purchasing a reliable product.
12.3 Local Electrical Supply Stores
Local electrical supply stores offer the advantage of being able to physically inspect the switches before purchasing them. The staff can provide expert advice and answer any questions you may have.
12.4 Checking Certifications And Standards
When purchasing rocker switches, make sure they are certified by recognized standards organizations such as UL (Underwriters Laboratories) or CSA (Canadian Standards Association). These certifications ensure that the switches have been tested and meet safety and performance standards.
13. How To Maintain And Troubleshoot Rocker Switches?
Proper maintenance and troubleshooting can extend the lifespan of your rocker switches and ensure they continue to function correctly.
13.1 Regular Cleaning And Inspection
Regularly clean rocker switches with a soft, dry cloth to remove dust and dirt. Inspect the switches for signs of damage, such as cracks, loose connections, or discoloration.
13.2 Identifying Common Problems
Common problems with rocker switches include loose connections, broken switches, and malfunctioning LEDs. Identifying these problems early can prevent more serious issues.
13.3 Fixing Loose Connections
If you notice a loose connection, turn off the power and carefully tighten the screws on the terminals. If the wires are damaged, replace them with new ones.
13.4 Replacing A Broken Switch
If a switch is broken or malfunctioning, replace it with a new one. Follow the steps outlined in Section 7 for replacing a rocker switch.
13.5 When To Call A Professional Electrician
If you are not comfortable working with electricity or if you encounter a problem that you cannot resolve, call a professional electrician. It is always best to err on the side of caution when dealing with electrical issues.
14. How Do Rocker Switches Contribute to Energy Efficiency?
Rocker switches, when used effectively, can play a significant role in enhancing energy efficiency in both residential and commercial settings.
14.1 Smart Rocker Switches and Energy Monitoring
Smart rocker switches equipped with energy monitoring capabilities provide valuable insights into energy consumption patterns. By tracking usage, homeowners can identify areas where energy is being wasted and make informed decisions to reduce consumption.
14.2 Timers and Automated Lighting Control
Integrating timers with rocker switches allows for automated control of lighting systems. This ensures that lights are only on when needed, preventing unnecessary energy usage during daylight hours or when spaces are unoccupied.
14.3 LED-Compatible Switches
Using rocker switches that are specifically designed for LED lighting systems can further enhance energy efficiency. These switches are optimized to work with the low-voltage requirements of LEDs, minimizing energy waste and extending the lifespan of the bulbs.
14.4 Occupancy Sensors and Adaptive Lighting
Combining rocker switches with occupancy sensors allows for adaptive lighting control. Lights automatically turn on when someone enters a room and turn off when the space is vacated, optimizing energy usage in real-time.
15. What Are the Building Codes and Regulations for Rocker Switch Installations?
Adhering to building codes and regulations is essential for ensuring the safety and compliance of rocker switch installations.
15.1 Understanding National and Local Electrical Codes
Electrical codes, such as the National Electrical Code (NEC) in the United States, provide comprehensive guidelines for safe electrical installations. Familiarize yourself with the specific requirements for rocker switch installations in your area.
15.2 Ensuring Compliance with Safety Standards
Compliance with safety standards, such as those set by UL or CSA, is critical for ensuring the safety and reliability of rocker switches. Look for switches that are certified by these organizations.
15.3 Permit Requirements for Electrical Work
Depending on the scope of the electrical work, you may need to obtain a permit from your local building department. Check with your local authorities to determine whether a permit is required for your project.
15.4 Inspections and Approvals
After completing the electrical work, you may need to schedule an inspection to ensure that the installation meets all applicable codes and regulations. Be prepared to provide documentation and answer questions about the installation.
Wiring a rocker switch doesn’t have to be a headache. Armed with the proper knowledge and tools, you can confidently tackle this task. At rockscapes.net, we offer a wealth of information, from detailed guides to expert advice, making your landscaping projects easier and more enjoyable. Ready to bring your rock landscape visions to life?
Visit rockscapes.net today! Explore our extensive resources, discover inspiring design ideas, and connect with our team of experts. Let us help you create the stunning outdoor space you’ve always dreamed of. Contact us at 1151 S Forest Ave, Tempe, AZ 85281, United States, or call +1 (480) 965-9011.
FAQ About Rocker Switches
Q1: What is a rocker switch?
A rocker switch is an electrical switch that is activated by rocking or pressing one end, which tips the other end up. It’s a common type of switch used to control electrical devices.
Q2: How does a rocker switch work?
A rocker switch works by bridging or breaking a circuit. When you press one side, it internally connects the circuit, allowing electricity to flow, hence turning the device on. Pressing the opposite side breaks the connection, stopping the current and turning the device off.
Q3: What are the different types of rocker switches?
The different types of rocker switches include on/off switches, momentary switches, illuminated switches, SPST (Single Pole Single Throw), SPDT (Single Pole Double Throw), DPST (Double Pole Single Throw), and DPDT (Double Pole Double Throw) switches.
Q4: How do I choose the right rocker switch for my project?
Choosing the right rocker switch involves considering the application, voltage, current requirements, and environmental conditions. Ensure the switch is rated for the intended voltage and current to prevent electrical hazards.
Q5: What tools and materials are needed to connect a rocker switch?
The essential tools and materials include screwdrivers, wire strippers, pliers, a voltage tester, a multimeter, wires, wire connectors, electrical tape, and mounting hardware.
Q6: How do I wire an LED rocker switch?
Wiring an LED rocker switch involves connecting the power wire to the power terminal, the ground wire to the ground terminal, and the load wire to the load terminal. Ensure the LED illuminates correctly by checking the ground connection and power wire polarity.
Q7: How do I wire a 3-way rocker switch?
Wiring a 3-way rocker switch involves connecting the power source wire to the common terminal of the first switch, the wire leading to the light to the common terminal of the second switch, and using traveler wires to connect the traveler terminals of both switches.
Q8: What are the safety precautions when working with rocker switches?
Always turn off the power at the circuit breaker, use insulated tools, wear safety gear, and avoid working in wet conditions. Use a voltage tester to ensure that the power is off before touching any wires or terminals.
Q9: How can rocker switches enhance my landscape lighting design?
Rocker switches provide convenient control of landscape lighting, allowing you to create different lighting zones, enhance security with timers and sensors, and use weather-resistant options for outdoor use.
Q10: Where can I find high-quality rocker switches?
You can find high-quality rocker switches from trusted suppliers and brands, online retailers, and local electrical supply stores. Check certifications and standards to ensure you are purchasing a reliable product.