Crystallizing rocks is a fascinating way to transform ordinary stones into dazzling gems, and at rockscapes.net, we’re dedicated to helping you explore the beauty and potential of rock landscaping. This guide delves into the art and science of rock crystallization, providing detailed instructions, creative ideas, and expert tips to elevate your rock crafting projects. Discover the best methods for growing crystals on rocks, adding color, and incorporating these sparkling creations into your landscape design.
1. What is Rock Crystallization and Why Do It?
Rock crystallization is the process of growing crystals on the surface of rocks, transforming them into beautiful, sparkling specimens. This can be achieved through various methods, most commonly using solutions saturated with minerals like borax. But why should you crystallize rocks?
- Aesthetic Appeal: Crystallized rocks are visually stunning, adding a touch of elegance and wonder to any space.
- Educational Value: The process is a fantastic science experiment, teaching about saturation, crystal formation, and chemical reactions. According to research from Arizona State University’s School of Earth and Space Exploration, crystal growth demonstrates principles of mineralogy and chemistry engagingly.
- Creative Expression: You can customize the colors, shapes, and sizes of the crystals, allowing for unique artistic creations.
- Therapeutic Activity: Rock crystallization can be a relaxing and meditative activity, perfect for unwinding and focusing on a hands-on project.
2. What Are the Different Methods to Crystallize Rocks?
There are several methods to crystallize rocks, each offering unique results and requiring different materials. Here are three popular techniques:
2.1. Borax Crystallization
Borax crystallization is a simple and popular method, ideal for beginners. Borax, a common household cleaning agent, readily forms crystals when dissolved in hot water and allowed to cool.
Materials Needed:
- Smooth rocks
- Borax powder
- Hot water
- Glass jars or containers
- Spoon
- Liquid watercolors or food coloring (optional)
- Medicine droppers or small paintbrushes (optional)
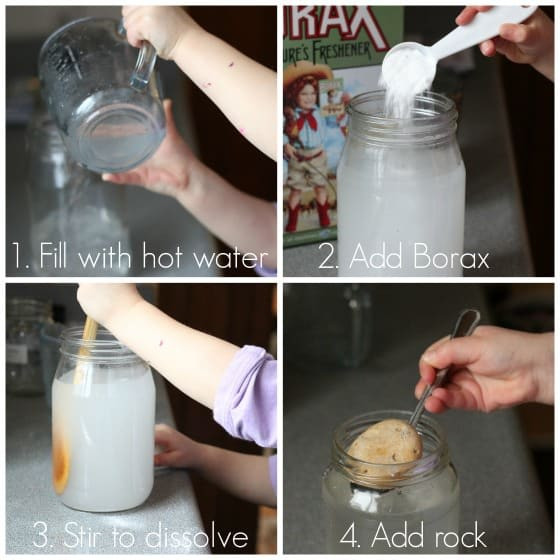
Step-by-Step Guide:
- Prepare the Borax Solution: Fill a jar with 3 cups of very hot tap water. Add 9 tablespoons of borax powder and stir until the borax is completely dissolved. The solution should be saturated, meaning no more borax can dissolve.
- Submerge the Rocks: Carefully place the rocks into the borax solution, ensuring they are fully submerged. If necessary, use a smaller container or adjust the amount of solution.
 Submerging rocks in borax solution for crystal growth
- Allow Crystals to Grow: Leave the rocks in the solution overnight or for at least 24 hours. The longer they sit, the larger and more abundant the crystals will be.
- Remove and Dry: Gently remove the rocks from the solution using a spoon. Place them on a paper towel to dry completely. Be careful not to dislodge the crystals, which can be fragile.
- Add Color (Optional): Once the crystals are dry, you can add color using liquid watercolors or food coloring. Dilute the colors slightly with water and use medicine droppers or small paintbrushes to apply the color to the crystals.
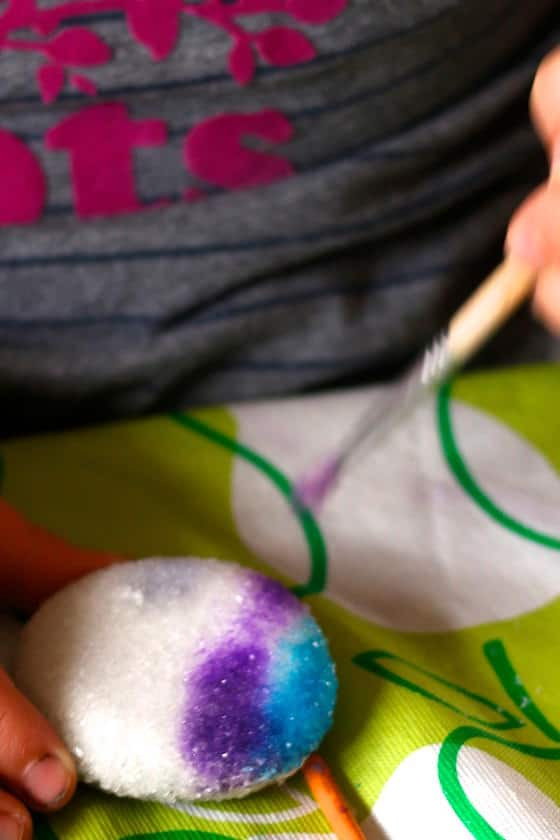 Painting borax crystals with liquid watercolors
2.2. Alum Crystallization
Alum, or potassium aluminum sulfate, is another excellent mineral for growing crystals. It produces clear, geometric crystals that are perfect for creating elegant rock displays.
Materials Needed:
- Smooth rocks
- Alum powder
- Hot water
- Glass jars or containers
- Spoon
- String or fishing line
- Pencil or stick
Step-by-Step Guide:
- Prepare the Alum Solution: Heat water in a saucepan until it is nearly boiling. Gradually add alum powder, stirring constantly until no more alum will dissolve. This creates a saturated solution.
- Cool the Solution: Allow the solution to cool slightly. Pour it into a clean glass jar, leaving any undissolved alum at the bottom of the saucepan.
- Create a Seed Crystal: Select a small, well-formed alum crystal to use as a seed. You can grow your own seed crystal by allowing a small amount of the alum solution to evaporate slowly in a shallow dish.
- Attach the Seed Crystal to a String: Tie the seed crystal to a length of string or fishing line. Tie the other end of the string to a pencil or stick, which will rest across the top of the jar.
- Suspend the Seed Crystal: Carefully lower the seed crystal into the alum solution, ensuring it is fully submerged but not touching the bottom of the jar.
- Allow Crystals to Grow: Cover the jar with a paper towel to prevent dust from entering. Place the jar in a cool, undisturbed location and allow the crystals to grow for several days or weeks. The longer you wait, the larger the crystals will become.
- Remove and Dry: Once the crystals have reached your desired size, carefully remove them from the solution. Place them on a paper towel to dry completely.
2.3. Sugar Crystallization
For a fun and edible twist, you can also crystallize rocks using sugar. This method is safe for children and produces sweet, colorful crystals.
Materials Needed:
- Smooth rocks
- Sugar
- Water
- Saucepan
- Glass jars or containers
- Spoon
- Food coloring (optional)
Step-by-Step Guide:
- Prepare the Sugar Syrup: In a saucepan, combine equal parts sugar and water. Heat the mixture over medium heat, stirring constantly until the sugar is completely dissolved and the syrup is clear.
- Add Color (Optional): If desired, add a few drops of food coloring to the sugar syrup to create colored crystals.
- Cool the Syrup: Allow the sugar syrup to cool slightly. Pour it into a clean glass jar.
- Submerge the Rocks: Carefully place the rocks into the sugar syrup, ensuring they are fully submerged.
- Allow Crystals to Grow: Cover the jar with a paper towel to prevent dust from entering. Place the jar in a cool, undisturbed location and allow the crystals to grow for several days or weeks.
- Remove and Dry: Once the crystals have reached your desired size, carefully remove them from the syrup. Place them on a wire rack to dry completely.
3. What Types of Rocks are Best for Crystallization?
The type of rock you choose can significantly impact the crystallization process and the final appearance of your crystallized rocks. Here are some of the best types of rocks for crystallization:
- Smooth Beach Rocks: These rocks have a smooth surface that allows crystals to adhere easily and evenly. Their neutral color also provides a good base for showcasing the crystals.
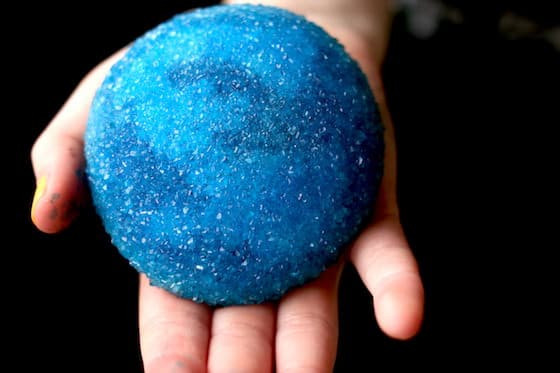 Large beach stone covered with blue borax crystals
- Quartz: Quartz is a popular choice due to its natural crystalline structure. It readily accepts new crystal growth and can create stunning, multifaceted specimens.
- Geodes: Geodes are hollow rocks with an inner lining of crystals. Breaking them open and adding more crystals can enhance their beauty and create unique displays.
- Pumice: Pumice is a lightweight, porous rock that allows for excellent crystal growth. Its rough surface provides plenty of anchor points for crystals to form.
- Basalt: Basalt is a dark-colored volcanic rock that offers a dramatic contrast to the crystals. Its hardness also makes it durable and long-lasting.
4. How to Choose the Right Crystals for Your Rocks?
Selecting the right crystals for your rocks involves considering several factors, including the type of rock, the desired aesthetic, and the intended use of the crystallized rocks. Here are some tips to help you choose the right crystals:
- Consider the Rock Type: Match the crystal type to the rock type for the best results. For example, clear alum crystals look stunning on dark basalt rocks, while colorful borax crystals complement smooth beach rocks.
- Think About Color: Choose colors that enhance the natural beauty of the rock. Contrasting colors can create a bold, eye-catching effect, while complementary colors can create a more harmonious look.
- Consider the Size and Shape: Experiment with different sizes and shapes of crystals to create unique textures and patterns. Larger crystals can create a dramatic statement, while smaller crystals can add a delicate sparkle.
- Consider the Intended Use: Think about how you plan to use the crystallized rocks. If you want to use them as paperweights, choose larger, heavier rocks with durable crystals. If you want to use them for decorative purposes, consider smaller, more delicate rocks with intricate crystal patterns.
5. What Are the Benefits of Using Rockscapes.net for Your Rock Crystallization Projects?
Rockscapes.net offers a wealth of resources to help you create stunning crystallized rocks and incorporate them into your landscape design. Here are some of the benefits of using our website:
- Inspiration and Ideas: Discover a wide range of design ideas and examples of crystallized rocks used in various landscape settings.
- Expert Advice: Get expert tips and advice from experienced rock crafters and landscape designers.
- Detailed Tutorials: Access step-by-step tutorials on various rock crystallization methods, complete with photos and videos.
- Product Recommendations: Find recommendations for the best rocks, crystals, and supplies for your projects.
- Community Support: Connect with a community of fellow rock enthusiasts to share ideas, ask questions, and get feedback on your projects.
6. What Safety Precautions Should You Take During Rock Crystallization?
Rock crystallization involves working with chemicals and hot liquids, so it’s essential to take proper safety precautions. Here are some important safety tips to keep in mind:
- Wear Protective Gear: Always wear gloves and safety glasses when working with chemicals like borax or alum.
- Work in a Well-Ventilated Area: Perform the crystallization process in a well-ventilated area to avoid inhaling any fumes or dust.
- Keep Chemicals Away from Children and Pets: Store chemicals and solutions out of reach of children and pets.
- Handle Hot Liquids with Care: Use caution when working with hot water or sugar syrup to avoid burns.
- Dispose of Chemicals Properly: Dispose of any leftover chemicals or solutions according to local regulations.
7. How to Incorporate Crystallized Rocks into Your Landscape Design?
Crystallized rocks can add a touch of magic and elegance to your landscape design. Here are some creative ways to incorporate them into your outdoor spaces:
- Garden Accents: Place crystallized rocks among your plants and flowers to add pops of color and sparkle.
- Pathways and Borders: Use crystallized rocks to line pathways or create decorative borders around flower beds.
- Water Features: Add crystallized rocks to your water features, such as fountains or ponds, to enhance their visual appeal.
- Rock Gardens: Create a stunning rock garden featuring a variety of crystallized rocks in different shapes, sizes, and colors.
- Outdoor Lighting: Use crystallized rocks to create unique outdoor lighting displays. Place them around LED lights to create a dazzling effect.
8. How to Maintain and Care for Your Crystallized Rocks?
To keep your crystallized rocks looking their best, it’s essential to maintain and care for them properly. Here are some tips for maintaining your crystallized rocks:
- Handle with Care: Crystals can be fragile, so handle your crystallized rocks with care to avoid chipping or breaking them.
- Clean Regularly: Clean your crystallized rocks regularly to remove any dust or dirt. Use a soft brush or cloth and mild soap and water.
- Avoid Harsh Chemicals: Avoid using harsh chemicals or abrasive cleaners, as they can damage the crystals.
- Protect from the Elements: Protect your crystallized rocks from extreme weather conditions, such as direct sunlight, rain, and snow, as these can cause the crystals to fade or dissolve.
- Store Properly: When not in use, store your crystallized rocks in a cool, dry place away from direct sunlight.
9. How to Troubleshoot Common Problems in Rock Crystallization?
Even with careful planning and execution, you may encounter some common problems during rock crystallization. Here are some tips for troubleshooting these issues:
- Crystals Not Forming: If crystals are not forming, make sure your solution is saturated and the rocks are clean. You may also need to increase the temperature of the solution or wait longer for the crystals to grow.
- Crystals Too Small: If the crystals are too small, try increasing the concentration of the solution or allowing the rocks to sit in the solution for a longer period.
- Crystals Falling Off: If the crystals are falling off, handle the rocks more gently and avoid exposing them to extreme temperatures or humidity.
- Discolored Crystals: If the crystals are discolored, make sure you are using clean containers and distilled water. You may also need to adjust the pH of the solution.
- Cloudy Solution: If the solution becomes cloudy, it may be contaminated. Try filtering the solution or starting with a fresh batch.
10. Frequently Asked Questions (FAQ) About How to Crystallize Rocks
10.1. What is the best mineral for growing crystals on rocks?
Borax and alum are both excellent minerals for growing crystals on rocks. Borax is easy to use and produces quick results, while alum creates clear, geometric crystals.
10.2. How long does it take for crystals to grow on rocks?
Crystals can start to form on rocks within a few hours, but it typically takes at least 24 hours for significant crystal growth. For larger, more well-formed crystals, allow the rocks to sit in the solution for several days or even weeks.
10.3. Can I use any type of rock for crystallization?
While you can use any type of rock for crystallization, smooth, non-porous rocks like beach rocks and quartz tend to produce the best results.
10.4. What temperature should the water be for crystal growth?
The water should be hot enough to dissolve the mineral completely. For borax and alum, very hot tap water is typically sufficient. For sugar, the mixture should be heated until the sugar is completely dissolved and the syrup is clear.
10.5. How do I add color to my crystallized rocks?
You can add color to your crystallized rocks by using liquid watercolors, food coloring, or powdered pigments. Add the color to the solution before adding the rocks, or apply it directly to the crystals after they have formed.
10.6. Are crystallized rocks safe for children?
Crystallized rocks made with borax or alum are not edible and should be kept away from young children. Sugar-crystallized rocks are edible but should be consumed in moderation.
10.7. How do I clean my crystallized rocks?
Clean your crystallized rocks with a soft brush or cloth and mild soap and water. Avoid using harsh chemicals or abrasive cleaners.
10.8. Can I display my crystallized rocks outdoors?
While you can display your crystallized rocks outdoors, they may be susceptible to damage from the elements. Protect them from direct sunlight, rain, and snow to prolong their lifespan.
10.9. What do I do with the leftover solution after crystallizing rocks?
Dispose of any leftover solution according to local regulations. Do not pour it down the drain, as it can clog pipes.
10.10. Where can I find more ideas for using crystallized rocks in my landscape?
Visit rockscapes.net for a wealth of design ideas, expert advice, and detailed tutorials on using crystallized rocks in your landscape design.
Ready to transform ordinary rocks into stunning crystallized gems? Visit rockscapes.net today to explore our extensive collection of rock landscaping ideas, discover the best rocks and crystals for your projects, and get expert advice from our team of experienced designers. Don’t miss out on the opportunity to create a landscape that truly sparkles! Contact us at 1151 S Forest Ave, Tempe, AZ 85281, United States or call +1 (480) 965-9011. Let rockscapes.net help you bring your rock crystallization dreams to life.