How To Cut And Polish Rocks With A Dremel? Rock polishing opens up a world of creative possibilities, from crafting unique jewelry to adding personalized touches to your landscape, and rockscapes.net provides expert guidance to help you master the art of stone enhancement. Discover how to transform rough stones into dazzling gems with the precision and versatility of a Dremel tool, unlocking the secrets to revealing the hidden beauty within each rock. With the right techniques, you can achieve professional-looking results right in your own home, transforming ordinary rocks into stunning works of art and this journey will elevate your rock cutting skills.
1. Understanding the Allure of Rock Polishing with a Dremel
Why should you consider using a Dremel for rock polishing? A Dremel tool offers a compact, versatile solution for cutting and polishing rocks, making it accessible to hobbyists and professionals alike. It allows for precise control and detailed work, enabling you to shape and polish stones of various sizes and hardness levels, and it opens up a world of creative possibilities, from crafting personalized jewelry to enhancing your home decor with unique, polished stones. A Dremel provides the ability to achieve professional-quality results without the need for expensive, bulky equipment.
The advantages of using a Dremel include its portability, ease of use, and the wide range of attachments available, making it suitable for various stages of the polishing process. However, it’s also important to acknowledge the limitations. Dremels are best suited for smaller rocks and detail work, while larger-scale projects may benefit from larger, more powerful equipment.
1.1. What Rocks Are Best Suited for Dremel Polishing?
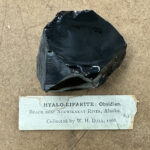
What types of rocks respond best to polishing with a Dremel? Softer stones like obsidian, turquoise, and malachite are ideal for beginners, as they are easier to shape and polish. These stones have a lower Mohs hardness scale rating, making them more forgiving to work with and less likely to cause excessive wear on your Dremel bits. For more experienced users, harder stones like agate, jasper, and quartz can also be polished with a Dremel, but they require more time, patience, and the use of diamond-impregnated bits.
The Mohs hardness scale is crucial in determining the suitability of a rock for polishing. Rocks with a lower Mohs hardness are softer and easier to polish, while those with a higher rating are more resistant and require more aggressive polishing techniques. According to research from Arizona State University’s School of Earth and Space Exploration, stones with a Mohs hardness of 6 or lower are generally recommended for Dremel polishing, as they strike a balance between workability and achievable shine.
1.2. The Essential Tools and Accessories for Rock Polishing with a Dremel
What do you need to get started with rock polishing using a Dremel? To begin, you’ll need a Dremel rotary tool, a selection of diamond-impregnated bits, polishing compounds, and safety gear. The Dremel tool itself should have variable speed settings to allow for optimal control during different stages of the polishing process.
Here’s a list of essential tools and accessories:
- Dremel Rotary Tool: A variable-speed model is recommended.
- Diamond-Impregnated Bits: Coarse, medium, and fine grits for cutting, grinding, and polishing.
- Felt Polishing Wheels: For applying polishing compounds.
- Polishing Compounds: Tripoli, alumina, cerium oxide, or diamond paste.
- Safety Glasses: To protect your eyes from flying debris.
- Dust Mask: To avoid inhaling rock dust.
- Water Container: For keeping the rock and bits cool.
- Soft Cloths: For cleaning and buffing the polished stone.
Choosing the right accessories is essential for achieving a professional-looking finish. Diamond-impregnated bits are particularly important, as they are designed to withstand the abrasive nature of rock polishing and provide consistent results. According to geological studies, diamond bits with a grit range of 100 to 3000 are ideal for achieving a smooth, polished surface on most types of rocks.
2. Step-by-Step Guide to Cutting and Polishing Rocks with a Dremel
How do you cut and polish rocks using a Dremel? This step-by-step guide will walk you through the process, from preparing your workspace to achieving a flawless finish.
2.1. Preparing Your Workspace and Materials
How should you set up your workspace for rock polishing? Start by creating a well-ventilated workspace with adequate lighting. Cover your work surface with a protective material, such as a rubber mat or plastic sheet, to prevent damage from flying debris and water splashes. Gather all your tools and materials within easy reach, including your Dremel tool, diamond bits, polishing compounds, safety glasses, dust mask, water container, and soft cloths.
Cleaning the rocks is very important before you start cutting or polishing. Remove any dirt, debris, or loose particles from the surface of the rocks using a brush and water. This will prevent contaminants from interfering with the polishing process and ensure a smoother, more consistent finish.
2.2. Cutting and Shaping the Rock
How do you use a Dremel to cut and shape rocks? Attach a coarse-grit diamond cutting wheel to your Dremel tool and set the speed to a medium setting. Carefully guide the cutting wheel along the desired cutting line, applying gentle pressure to avoid overheating the rock or damaging the bit. Keep the rock and cutting wheel lubricated with water to reduce friction and prevent dust formation.
Start by outlining the desired shape with the cutting wheel, then gradually remove excess material until you achieve the desired form. If you’re working with a particularly hard rock, you may need to make multiple passes with the cutting wheel, gradually deepening the cut with each pass.
2.3. Grinding and Smoothing the Surface
How do you smooth the surface of a rock after cutting it? Once you’ve cut the rock to the desired shape, switch to a coarse-grit diamond grinding bit to smooth out any rough edges or imperfections. Use a sweeping motion to grind the entire surface of the rock, paying particular attention to areas with sharp edges or uneven surfaces.
Reduce the speed as you switch to finer-grit grinding bits, gradually refining the surface until it is smooth and free of any visible scratches or imperfections. Regularly clean the rock and grinding bit with water to remove any accumulated debris and ensure optimal performance.
2.4. Polishing the Rock to a High Shine
How do you achieve a high-shine finish on a rock? Attach a felt polishing wheel to your Dremel tool and apply a small amount of polishing compound, such as Tripoli or alumina, to the wheel. Set the speed to a low setting and gently polish the surface of the rock, using a circular motion to distribute the polishing compound evenly.
Continue polishing until the surface of the rock becomes smooth and glossy. Depending on the type of rock and the desired level of shine, you may need to repeat this step with finer polishing compounds, such as cerium oxide or diamond paste.
2.5. Final Cleaning and Inspection
What should you do after polishing a rock? Once you’ve achieved the desired level of shine, thoroughly clean the rock with water and a soft cloth to remove any remaining polishing compound. Inspect the surface of the rock for any imperfections or areas that may require additional polishing.
If you notice any remaining scratches or dull spots, repeat the polishing process as needed until you achieve a flawless finish. Finally, dry the rock with a clean cloth and admire your handiwork.
3. Advanced Techniques and Tips for Rock Polishing
Want to take your rock polishing skills to the next level? Discover advanced techniques and expert tips for achieving professional-quality results.
3.1. Using Different Polishing Compounds for Specific Rocks
Which polishing compounds work best for different types of rocks? The choice of polishing compound can significantly impact the final result. Tripoli is a good general-purpose compound for softer stones, while alumina is better suited for harder materials. Cerium oxide is excellent for achieving a high-shine finish on glass and quartz, while diamond paste is the ultimate choice for polishing extremely hard stones like diamonds and sapphires.
Experiment with different polishing compounds to find the ones that work best for your specific rocks. Consider the hardness, composition, and desired level of shine when selecting a polishing compound. According to gemological studies, the particle size of the polishing compound also plays a crucial role, with finer particles producing a smoother, more reflective surface.
3.2. Creating Custom Shapes and Designs
How can you create unique shapes and designs with a Dremel? A Dremel tool is not only useful for polishing rocks, but also for creating custom shapes and designs. By using a combination of cutting wheels, grinding bits, and engraving tools, you can transform ordinary rocks into intricate works of art.
Start by sketching your desired design on the surface of the rock with a pencil or marker. Then, carefully use the Dremel tool to cut, grind, and engrave the design into the rock, taking your time and paying attention to detail. Practice on scrap rocks before attempting more complex designs.
3.3. Polishing Small or Intricate Areas
How do you polish hard-to-reach areas on a rock? Polishing small or intricate areas can be challenging, but with the right techniques and accessories, it is possible to achieve a flawless finish. Use small, pointed polishing bits and felt cones to access tight spaces and intricate details.
Apply a small amount of polishing compound to the bit or cone and gently polish the area, using a light touch and avoiding excessive pressure. Regularly clean the bit or cone to remove any accumulated debris and ensure optimal performance.
3.4. Achieving a Mirror-Like Finish
How do you get a mirror-like shine on a polished rock? Achieving a mirror-like finish requires patience, attention to detail, and the use of ultra-fine polishing compounds. Start by thoroughly polishing the rock with progressively finer grits of diamond paste, working your way up to the highest available grit.
After each polishing step, carefully clean the rock with water and a soft cloth to remove any remaining compound. Finally, buff the rock with a clean, dry felt wheel to further enhance the shine.
4. Safety Precautions and Best Practices
What safety measures should you take when polishing rocks with a Dremel? Rock polishing can be a rewarding hobby, but it’s essential to prioritize safety to prevent accidents and injuries. Always wear safety glasses and a dust mask to protect your eyes and respiratory system from flying debris and rock dust.
4.1. Protecting Yourself from Dust and Debris
How do you minimize exposure to harmful dust and debris? Rock dust can be harmful if inhaled, so it’s crucial to work in a well-ventilated area and wear a dust mask or respirator. Consider using a wet polishing technique to reduce dust formation.
Additionally, wear gloves to protect your hands from sharp edges and abrasive materials. Clean your workspace thoroughly after each polishing session to remove any accumulated dust and debris.
4.2. Preventing Overheating of the Rock and Dremel Bit
How do you prevent overheating during the polishing process? Overheating can damage the rock and the Dremel bit, so it’s essential to take steps to prevent it. Use a water container to keep the rock and bit cool during the polishing process.
Apply gentle pressure and avoid prolonged contact with the rock. If the rock or bit becomes too hot, stop polishing and allow them to cool down before continuing.
4.3. Maintaining Your Dremel Tool and Accessories
How do you properly care for your Dremel tool and accessories? Regular maintenance is essential for ensuring the longevity and optimal performance of your Dremel tool and accessories. Clean the tool after each use with a soft cloth to remove any accumulated dust and debris.
Inspect the bits regularly for wear and tear and replace them as needed. Store your Dremel tool and accessories in a dry, safe place to prevent damage.
4.4. Safe Storage of Polishing Compounds
What is the proper way to store polishing compounds? Store polishing compounds in tightly sealed containers in a cool, dry place. Keep them out of reach of children and pets.
Consult the manufacturer’s instructions for specific storage recommendations. Dispose of used polishing compounds properly according to local regulations.
5. Common Mistakes to Avoid
What are some common pitfalls to watch out for when polishing rocks with a Dremel? Avoiding these mistakes can save you time, money, and frustration, ensuring a smoother and more successful polishing experience.
5.1. Using the Wrong Dremel Bit for the Job
How do you select the correct Dremel bit for each polishing stage? Using the wrong Dremel bit can lead to poor results and potential damage to the rock or the tool. Make sure to select the appropriate bit for each polishing stage, starting with coarse grits for cutting and shaping, and gradually progressing to finer grits for polishing.
Consult the manufacturer’s recommendations for specific bit applications and avoid using excessive pressure, which can damage the bit and the rock.
5.2. Applying Too Much Pressure
How much pressure should you apply when polishing rocks with a Dremel? Applying too much pressure can cause overheating, scratching, and uneven polishing. Use a light touch and allow the Dremel bit to do the work, guiding it gently over the surface of the rock.
Avoid forcing the bit or pressing down too hard, as this can lead to poor results and potential damage to the rock or the tool.
5.3. Neglecting Safety Precautions
Why is it crucial to follow safety guidelines when polishing rocks? Neglecting safety precautions can lead to serious injuries, such as eye damage, respiratory problems, and skin irritation. Always wear safety glasses, a dust mask, and gloves when polishing rocks.
Work in a well-ventilated area and follow all safety guidelines provided by the manufacturer of your Dremel tool and polishing compounds.
5.4. Rushing the Polishing Process
Why is patience essential for achieving a high-quality polish? Rushing the polishing process can lead to uneven polishing, scratches, and a dull finish. Take your time and allow each polishing stage to work its magic, gradually refining the surface of the rock until you achieve the desired level of shine.
Be patient and persistent, and don’t be afraid to repeat polishing steps as needed to achieve a flawless finish.
6. Exploring the World of Rockscapes
Looking for inspiration and resources for your rock polishing projects? Rockscapes.net is your ultimate destination for discovering the beauty and versatility of natural stone in landscape design.
6.1. Discovering Unique Rock Types
What are some popular rock types used in landscaping? Rockscapes.net offers a comprehensive guide to various rock types, from the rugged beauty of granite to the earthy charm of slate. Explore the unique characteristics, colors, and textures of different stones to find the perfect match for your project.
Learn about the geological origins, properties, and applications of each rock type to make informed decisions about your landscape design. Rockscapes.net provides detailed information and stunning visuals to inspire your creativity and help you bring your vision to life.
6.2. Landscape Design Ideas
How can you incorporate polished rocks into your landscape design? Rockscapes.net showcases a wide range of landscape design ideas, featuring the creative use of polished rocks as focal points, accents, and functional elements. Discover how to transform your outdoor space into a stunning oasis with the beauty and versatility of natural stone.
From elegant rock gardens to rustic stone pathways, Rockscapes.net offers inspiration and guidance for creating breathtaking landscapes that reflect your personal style and enhance your property’s value.
6.3. DIY Rock Features
What are some easy DIY rock features you can create at home? Rockscapes.net provides step-by-step instructions and expert tips for creating your own DIY rock features, from simple rock borders to elaborate water features. Learn how to build retaining walls, pathways, and other landscape elements using natural stone.
With Rockscapes.net’s guidance, you can transform your outdoor space into a stunning showcase of your creativity and craftsmanship. Discover the satisfaction of creating your own unique rock features that will enhance your property’s beauty and value for years to come.
6.4. Expert Advice
Looking for personalized advice and guidance for your rock polishing or landscape design projects? Rockscapes.net connects you with experienced professionals who can provide expert advice and support.
7. Frequently Asked Questions (FAQs)
Do you have questions about cutting and polishing rocks with a Dremel? Here are some frequently asked questions to help you get started.
7.1. What is the Best Dremel Speed for Polishing Rocks?
What speed setting should you use on your Dremel for polishing? The ideal speed depends on the type of rock, the polishing compound, and the desired level of shine. Start with a low speed and gradually increase it as needed, paying attention to the heat and vibration.
7.2. Can I Polish Gemstones with a Dremel?
Is a Dremel suitable for polishing precious gemstones? Yes, a Dremel can be used to polish gemstones, but it requires specialized diamond bits and polishing compounds. Use a light touch and avoid excessive pressure to prevent damage to the gemstone.
7.3. How Do I Clean Polished Rocks?
What’s the best way to clean polished rocks? Clean polished rocks with water and a soft cloth. Avoid using harsh chemicals or abrasive cleaners, which can damage the polished surface.
7.4. What is the Mohs Hardness Scale?
What does the Mohs hardness scale measure? The Mohs hardness scale is a measure of a mineral’s resistance to scratching. It ranges from 1 (talc) to 10 (diamond).
7.5. Can I Use a Dremel to Cut Large Rocks?
Is a Dremel powerful enough to cut large rocks? A Dremel is best suited for cutting and shaping smaller rocks. Larger rocks require more powerful tools, such as a wet saw or a tile saw.
7.6. How Do I Prevent Scratches When Polishing?
What steps can you take to avoid scratches during polishing? Use progressively finer grits of diamond paste and avoid applying too much pressure. Regularly clean the rock and the polishing bit to remove any accumulated debris.
7.7. What is the Best Polishing Compound for Agate?
Which polishing compound works best for agate? Alumina and cerium oxide are both excellent polishing compounds for agate. Experiment with different compounds to find the one that works best for your specific agate sample.
7.8. How Often Should I Replace My Dremel Bits?
When should you replace worn-out Dremel bits? Replace your Dremel bits when they become dull or worn out. The frequency of replacement depends on the type of rock you’re polishing and the amount of use.
7.9. Can I Polish Rocks Without a Dremel?
Are there alternative methods for polishing rocks without a Dremel? Yes, you can polish rocks by hand using sandpaper and polishing cloths, or with a rock tumbler.
7.10. Where Can I Find More Information About Rock Polishing?
Where can you learn more about rock polishing techniques? Rockscapes.net is your ultimate resource for discovering the beauty and versatility of natural stone in landscape design.
8. Conclusion: Unleash Your Creativity with Rock Polishing
Ready to transform ordinary rocks into stunning works of art? With the right tools, techniques, and guidance, you can unlock the hidden beauty within each stone. Whether you’re a beginner or an experienced hobbyist, rock polishing offers a rewarding and creative outlet for expressing your personal style.
Visit rockscapes.net today to discover a wealth of information, inspiration, and resources for your rock polishing and landscape design projects. Let your creativity flow and transform your outdoor space into a breathtaking showcase of natural beauty and artistic expression. Contact us at Address: 1151 S Forest Ave, Tempe, AZ 85281, United States. Phone: +1 (480) 965-9011 or visit our Website: rockscapes.net.