Are you looking for creative and visually appealing ways to showcase your prized rock collection? Rockscapes.net offers a treasure trove of ideas and expert advice to transform your rocks and minerals into stunning displays. We’ll explore a variety of display methods, from simple arrangements to sophisticated presentations, ensuring your collection gets the attention it deserves. Discover innovative rock display ideas, rock garden designs, and mineral display cases that will elevate your space.
1. What are the Key Considerations When Deciding How to Display Rocks?
The key considerations include the size and type of your collection, available space, desired aesthetic, and level of protection needed. Consider the visual appeal, lighting, and accessibility for viewing. According to landscape design experts, the display should complement the rocks’ natural beauty and tell a story.
When deciding how to display your rocks, several factors come into play to ensure your collection is showcased effectively and beautifully:
-
Collection Size and Type: Take stock of the number of rocks you have and their individual characteristics. Are they small gemstones, large mineral specimens, or a mix of both? Different sizes and types of rocks will necessitate different display solutions. For instance, a few large, statement rocks might look stunning on individual pedestals, while a collection of smaller gemstones may be better suited for display in a case or shadow box.
-
Available Space: Assess the space you have available for your rock display. Do you have a dedicated room, a shelf, or just a small corner? Your available space will dictate the size and style of your display. If space is limited, consider vertical displays like shelves or wall-mounted cases. For larger spaces, you might consider creating a rock garden or a more elaborate display with multiple elements.
-
Desired Aesthetic: Think about the overall aesthetic you want to achieve with your display. Do you prefer a minimalist, modern look or a more rustic, natural style? The aesthetic should complement your existing décor and reflect your personal taste. For a modern look, consider clear acrylic display cases or simple geometric shelves. For a rustic style, use wooden crates, natural stone bases, or create a miniature landscape.
-
Level of Protection: Consider the environment where your rocks will be displayed and the level of protection they need. Are they delicate specimens that need to be protected from dust and handling, or are they more durable rocks that can be displayed openly? If you have valuable or fragile specimens, a display case with UV protection and controlled humidity may be necessary. More robust rocks can be displayed on open shelves or in a garden setting.
-
Visual Appeal: The display should enhance the rocks’ natural beauty and draw attention to their unique features. Consider using lighting to highlight the colors and textures of your specimens. Arrange the rocks in a visually pleasing way, paying attention to composition and balance. You might group rocks by type, color, or origin to create a cohesive and interesting display.
-
Accessibility: Think about how accessible you want your rocks to be. Do you want to be able to handle them and examine them closely, or do you prefer to keep them behind glass? If you want to be able to handle your rocks, consider displaying them in open trays or bowls. If you prefer to keep them protected, use a display case with a hinged lid or a removable panel.
2. What are Some Creative Ways to Display Rocks Indoors?
Creative indoor options include using glass jars, shadow boxes, floating shelves, and creating miniature rock gardens in terrariums. Another great rock display idea is incorporating rocks into bookshelves or using them as paperweights. Consider showcasing rocks in bowls, plates, and dishes.
Here are some additional ideas for displaying rocks indoors:
-
Glass Jars and Jugs: Displaying rocks in glass jars is a simple and classic way to showcase their natural beauty. You can use jars of different sizes and shapes to create an interesting visual effect. Fill the jars with rocks of varying colors and textures for a dynamic display. Place the jars on shelves, windowsills, or as centerpieces on tables. According to interior design blogs, glass jars allow the rocks to be easily seen and appreciated.
-
Shadow Boxes: Shadow boxes are an excellent way to create a framed display of your favorite rocks. Arrange the rocks in a shadow box and add other decorative elements like moss, sand, or small figurines to create a miniature scene. Hang the shadow box on a wall or display it on a shelf. Shadow boxes protect the rocks from dust and handling while providing an artistic presentation.
-
Floating Shelves: Floating shelves are a modern and minimalist way to display rocks. Mount the shelves on a wall and arrange your rocks in a visually appealing way. Use different sizes and shapes of rocks to create a dynamic display. Floating shelves are perfect for showcasing rocks in a living room, bedroom, or office.
-
Terrariums: Create a miniature rock garden inside a terrarium. Layer the bottom of the terrarium with gravel, soil, and moss. Arrange your rocks in the terrarium along with small plants like succulents or cacti. Terrariums are a great way to bring a touch of nature indoors and create a unique display of your rock collection.
-
Bookshelves: Integrate your rock collection into your bookshelves. Place rocks between books or on top of stacks of books to add a natural element to your bookshelf display. Choose rocks that complement the colors and textures of your books.
-
Bowls, Plates, and Dishes: Use decorative bowls, plates, and dishes to display your rocks. Arrange the rocks in a visually pleasing way and place the bowls on tables, shelves, or countertops. Bowls and dishes are a versatile way to display rocks and can be easily moved around as needed. You can use wooden, metallic, or glass bowls filled with gemstones and rocks of all shades and sizes.
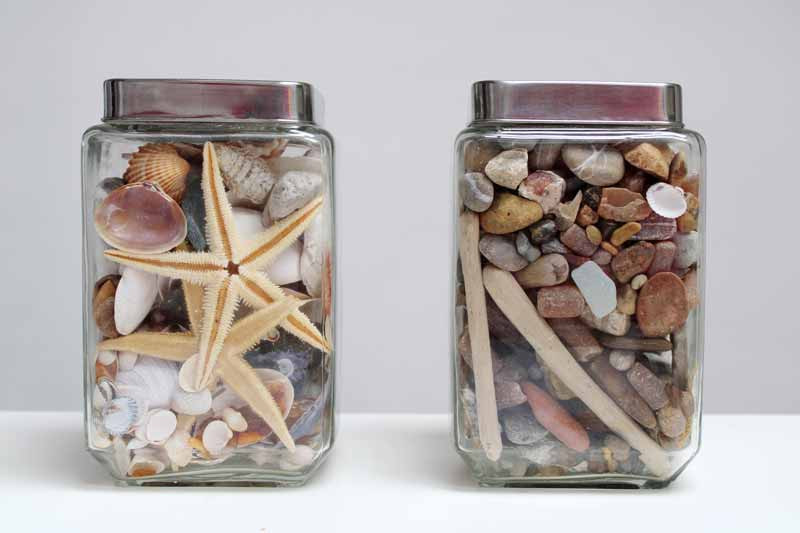 Variety of rocks displayed in a glass jar
3. How Can You Incorporate Rocks into Your Outdoor Landscaping?
For outdoor landscaping, use rocks to create rock gardens, pathways, retaining walls, and water features. Consider using larger rocks as focal points and smaller stones as ground cover. Landscape architects often recommend selecting rocks that complement the local environment.
Here are some specific ways to incorporate rocks into your outdoor landscaping:
-
Rock Gardens: Create a dedicated rock garden in your yard. Choose a sunny spot with well-draining soil. Arrange rocks of various sizes and shapes to create a natural-looking landscape. Add plants that thrive in rocky environments, such as succulents, sedums, and alpine plants. Rock gardens are a low-maintenance and visually appealing way to add texture and interest to your yard.
-
Pathways: Use rocks to create pathways through your garden. Choose flat, smooth stones that are easy to walk on. Arrange the stones in a pattern that complements the design of your garden. You can also use smaller gravel or pebbles to fill in the gaps between the stones. Stone pathways add a rustic and natural touch to your outdoor space.
-
Retaining Walls: Build retaining walls using large rocks to create terraces or prevent soil erosion. Retaining walls can add dimension to your yard and create level areas for planting. Choose rocks that are durable and weather-resistant. Stack the rocks in a stable and visually appealing way.
-
Water Features: Incorporate rocks into water features like ponds, streams, or waterfalls. Use rocks to create a natural-looking streambed or waterfall. Arrange the rocks around the edges of the pond to create a decorative border. Water features add a relaxing and tranquil element to your outdoor space.
-
Focal Points: Use large, striking rocks as focal points in your landscape. Place a large boulder in the middle of your lawn or garden bed to draw the eye. Choose rocks with interesting shapes, colors, or textures. Focal point rocks can add drama and character to your outdoor space.
-
Ground Cover: Use smaller stones as ground cover in your garden beds. Gravel, pebbles, or crushed stone can be used to suppress weeds, retain moisture, and add a decorative touch. Choose stones that complement the colors of your plants and other landscape elements.
4. What Types of Rocks are Best Suited for Display?
The best rocks for display are those with unique colors, textures, and shapes. Consider displaying gemstones, minerals, fossils, and rocks with interesting geological formations. According to geologists, the aesthetic value of a rock is often enhanced by its rarity and geological significance.
Here’s a more detailed look at types of rocks suited for display:
-
Gemstones: Gemstones are minerals that have been chosen for their beauty and rarity and then cut and polished for use in jewelry or other adornments. They come in a wide variety of colors, shapes, and sizes, making them ideal for display. Some popular gemstones for display include:
- Quartz: Quartz is one of the most abundant minerals on Earth and comes in a variety of colors, including clear (rock crystal), purple (amethyst), yellow (citrine), pink (rose quartz), and smoky brown (smoky quartz). Quartz crystals can be displayed individually or in clusters.
- Agate: Agate is a type of chalcedony characterized by its colorful bands. Agate slices can be displayed on stands or used as decorative accents in your home.
- Jasper: Jasper is another type of chalcedony that comes in a variety of colors and patterns. Jasper cabochons can be displayed in cases or used in jewelry making.
- Amethyst: Amethyst, a purple variety of quartz, is known for its vibrant color and sparkling crystals. It makes a stunning addition to any collection.
- Aquamarine: With its serene blue hues, aquamarine is a captivating gemstone that brings a touch of elegance to any display.
- Afghanite: Afghanite is a rare mineral known for its vibrant blue color and is highly sought after by collectors.
-
Minerals: Minerals are naturally occurring, inorganic solids with a definite chemical composition and crystalline structure. They come in a wide variety of shapes, sizes, and colors, making them ideal for display. Some popular minerals for display include:
- Pyrite: Pyrite, also known as “fool’s gold,” is a brass-yellow mineral with a metallic luster. Pyrite crystals can be displayed individually or in clusters.
- Galena: Galena is a lead sulfide mineral with a metallic gray color and cubic cleavage. Galena crystals can be displayed individually or in clusters.
- Fluorite: Fluorite is a calcium fluoride mineral that comes in a variety of colors, including purple, green, blue, and yellow. Fluorite crystals can be displayed individually or in clusters.
- Brookite: Brookite is a rare titanium oxide mineral that forms striking, complex crystals, adding a unique touch to any mineral collection.
-
Fossils: Fossils are the preserved remains or traces of ancient organisms. They can be displayed in cases or used as decorative accents in your home. Some popular fossils for display include:
- Ammonites: Ammonites are extinct marine cephalopods with coiled shells. Ammonite fossils can be displayed individually or in groups.
- Trilobites: Trilobites are extinct marine arthropods with three-lobed bodies. Trilobite fossils can be displayed individually or in groups.
- Fossilized Wood: Fossilized wood is wood that has been replaced by minerals over millions of years. Fossilized wood specimens can be displayed on stands or used as decorative accents in your home.
-
Rocks with Interesting Geological Formations: Rocks with unique geological formations can also be displayed. Some examples include:
- Geodes: Geodes are hollow rocks that are lined with crystals. Geodes can be displayed whole or broken open to reveal the crystals inside.
- Concretions: Concretions are rounded rocks that formed by the precipitation of minerals around a central nucleus. Concretions can be displayed whole or cut in half to reveal the internal structure.
- Septarian Nodules: Septarian nodules are concretions that contain cracks filled with calcite or other minerals. Septarian nodules can be displayed whole or cut in half to reveal the internal structure.
5. What Lighting Techniques Best Enhance a Rock Display?
Effective lighting techniques include using spotlights to highlight individual specimens, LED strip lights for general illumination, and backlighting for translucent rocks. According to museum curators, proper lighting can significantly enhance the color and texture of rocks, making them more visually appealing.
Here are some additional tips for using lighting to enhance your rock display:
- Spotlights: Use spotlights to highlight individual specimens and draw attention to their unique features. Position the spotlights so that they shine on the rocks at an angle, creating shadows and highlighting the texture.
- LED Strip Lights: Use LED strip lights to provide general illumination for your rock display. LED strip lights are energy-efficient and can be easily mounted under shelves or inside display cases. Choose LED strip lights with a color temperature that complements the colors of your rocks.
- Backlighting: Use backlighting to illuminate translucent rocks and highlight their internal structure. Place the rocks on a light box or behind a translucent panel with a light source behind it. Backlighting can create a dramatic and visually stunning effect.
- Natural Light: Take advantage of natural light whenever possible. Position your rock display near a window or skylight to allow natural light to illuminate the rocks. Be careful to avoid direct sunlight, which can fade the colors of some rocks.
- Color Temperature: Choose a color temperature for your lighting that complements the colors of your rocks. Warm white light (2700-3000K) is best for highlighting warm colors like red, orange, and yellow. Cool white light (4000-5000K) is best for highlighting cool colors like blue, green, and purple.
- Dimming: Use dimmers to control the intensity of your lighting. This will allow you to adjust the lighting to suit the ambient light in the room and highlight the rocks in the best possible way.
6. How Do You Clean and Maintain a Rock Collection Display?
To clean your collection, gently dust rocks with a soft brush or cloth. For tougher dirt, use mild soap and water. Avoid harsh chemicals that can damage certain rocks. Regular maintenance includes checking for stability and reorganizing the display as needed.
Here’s a detailed guide on how to clean and maintain your rock collection display:
-
Dusting: Dust is the most common enemy of rock displays. It can accumulate quickly and dull the appearance of your rocks. To dust your rocks, use a soft brush, such as a paintbrush or a microfiber cloth. Gently brush the dust away from the surface of the rocks. For rocks with intricate textures, you may need to use a small brush to reach into the crevices.
-
Washing: For rocks that are heavily soiled or have stubborn dirt, you may need to wash them with mild soap and water. Use a gentle dish soap and warm water. Soak the rocks in the soapy water for a few minutes, then scrub them gently with a soft brush or cloth. Rinse the rocks thoroughly with clean water and allow them to air dry.
-
Avoid Harsh Chemicals: Avoid using harsh chemicals or abrasive cleaners on your rocks. These chemicals can damage the surface of the rocks and fade their colors. Never use bleach, ammonia, or other strong chemicals on your rock collection.
-
Specific Cleaning for Certain Rocks: Some rocks require specific cleaning methods. For example, porous rocks like sandstone can absorb water and soap, so it’s best to clean them with a dry brush only. Delicate minerals like selenite can be scratched easily, so handle them with care and clean them with a soft cloth.
-
Checking for Stability: Regularly check your rock display for stability. Make sure that the rocks are securely placed on their stands or shelves. If any rocks are loose or wobbly, reposition them or use a small amount of museum wax to secure them in place.
-
Reorganizing the Display: As your rock collection grows, you may need to reorganize your display to accommodate new specimens. You can also reorganize your display to create a new look or to highlight different aspects of your collection. Experiment with different arrangements and groupings to find what works best for you.
-
Preventative Measures: Take preventative measures to keep your rock display clean and well-maintained. Keep the display area free from dust and debris. Avoid placing your rock display in direct sunlight or in areas with high humidity. Handle your rocks with care to avoid scratching or damaging them.
7. Where Can You Find Display Cases Specifically Designed for Rocks and Minerals?
Specialized display cases can be found at museum supply stores, online retailers specializing in mineral displays, and custom case manufacturers. According to display experts, choosing the right case can protect your collection and enhance its presentation.
Here’s a list of places where you can find display cases for rocks and minerals:
-
Museum Supply Stores: Museum supply stores offer a wide variety of display cases designed for museums and collectors. These cases are typically high-quality and offer excellent protection for your specimens. Some popular museum supply stores include:
- Gaylord Archival: Gaylord Archival offers a variety of display cases, including acrylic cases, shadow boxes, and display domes.
- University Products: University Products offers a wide range of archival supplies, including display cases for rocks and minerals.
-
Online Retailers: Many online retailers specialize in mineral displays and offer a variety of display cases to suit different needs and budgets. Some popular online retailers include:
- Amazon: Amazon offers a wide selection of display cases for rocks and minerals from various brands.
- eBay: eBay is a great place to find deals on display cases, both new and used.
- Alibaba: You can find any type of jar at any store. Everyone can afford the jars just because of its least expensive. In this case, if you are looking for some specific style and size then you can order it from online stores like (Alibaba, and Amazon).
-
Custom Case Manufacturers: If you have specific needs or a large collection, you may want to consider working with a custom case manufacturer. Custom case manufacturers can create display cases to your exact specifications, ensuring that your rocks and minerals are displayed in the best possible way.
-
Local Rock and Mineral Shows: Rock and mineral shows are a great place to find display cases and other supplies for your collection. Many vendors at these shows specialize in display cases and can offer expert advice on choosing the right case for your needs.
-
Furniture Stores: Sometimes, you can find suitable display cases at furniture stores, especially those that sell cabinets or display shelves. Look for cases with glass doors or adjustable shelves that can accommodate rocks of different sizes.
8. How Can You Label and Catalog Your Rock Collection for Display?
Labeling options include using small printed labels, handwritten tags, or QR codes linked to a database. Cataloging involves documenting each rock’s origin, composition, and any other relevant information. According to geological societies, accurate labeling and cataloging enhance the educational value of a rock display.
Here’s a step-by-step guide on how to label and catalog your rock collection for display:
-
Choose a Labeling Method: There are several ways to label your rocks, each with its own advantages and disadvantages:
- Printed Labels: Printed labels are the most professional-looking option. You can create printed labels using a computer and printer, or you can order pre-printed labels from a supplier. Printed labels are durable and easy to read, but they can be time-consuming to create.
- Handwritten Tags: Handwritten tags are a simple and inexpensive option. You can create handwritten tags using cardstock and a pen or marker. Handwritten tags are easy to create, but they may not be as durable as printed labels.
- QR Codes: QR codes are a modern and high-tech option. You can create QR codes that link to a database or website with information about each rock. QR codes are easy to scan with a smartphone or tablet, but they require a digital device to access the information.
-
Gather Information: Before you can label your rocks, you need to gather information about each specimen. This information may include:
- Rock Name: The common name of the rock (e.g., quartz, granite, limestone).
- Mineral Composition: The minerals that make up the rock (e.g., quartz, feldspar, mica).
- Origin: The location where the rock was found or purchased.
- Date Collected: The date the rock was collected or purchased.
- Other Information: Any other relevant information, such as the rock’s geological history or unique properties.
-
Create Labels: Once you have gathered the necessary information, you can create labels for your rocks. Include the rock name, origin, and any other relevant information on the label. Be sure to use a font size that is easy to read.
-
Attach Labels: Attach the labels to your rocks using a suitable adhesive. For small rocks, you can use a small dot of glue or museum wax. For larger rocks, you can use a label holder or a small stand with a label attached.
-
Create a Catalog: In addition to labeling your rocks, it’s also a good idea to create a catalog of your collection. The catalog can be a simple spreadsheet or a more elaborate database. Include the same information in the catalog as you included on the labels.
-
Keep the Catalog Up-to-Date: As you add new rocks to your collection, be sure to update your catalog with the new information. This will help you keep track of your collection and make it easier to find specific specimens.
9. How Can Children be Involved in Creating a Rock Display?
Involving children can be an educational and fun activity. Encourage them to help with cleaning, sorting, and arranging rocks. Consider letting them create themed displays or adding their own artwork. According to educational psychologists, hands-on activities like creating a rock display can enhance children’s learning and creativity.
Here are some specific ways to involve children in creating a rock display:
-
Cleaning and Sorting: Let children help with cleaning and sorting the rocks. This is a great way to teach them about different types of rocks and minerals. Provide them with a soft brush and a bowl of water and let them gently clean the rocks. They can also help sort the rocks by size, color, or type.
-
Arranging the Rocks: Let children help with arranging the rocks in the display. This is a great way to encourage their creativity and problem-solving skills. Provide them with a variety of display options, such as shelves, trays, or bowls, and let them arrange the rocks in a way that is visually appealing to them.
-
Creating Themed Displays: Encourage children to create themed displays. This is a great way to combine their love of rocks with other interests. For example, they could create a dinosaur-themed display with fossils and rocks that are similar to those found in dinosaur habitats. They could also create a space-themed display with meteorites and rocks that are similar to those found on other planets.
-
Adding Artwork: Let children add their own artwork to the rock display. This is a great way to personalize the display and make it more meaningful to them. They could create drawings or paintings of their favorite rocks or minerals. They could also create labels or signs for the display.
-
Educational Activities: Use the rock display as an opportunity to teach children about geology and earth science. You can teach them about different types of rocks and minerals, how they are formed, and where they can be found. You can also use the display to teach them about geological history and the formation of the Earth.
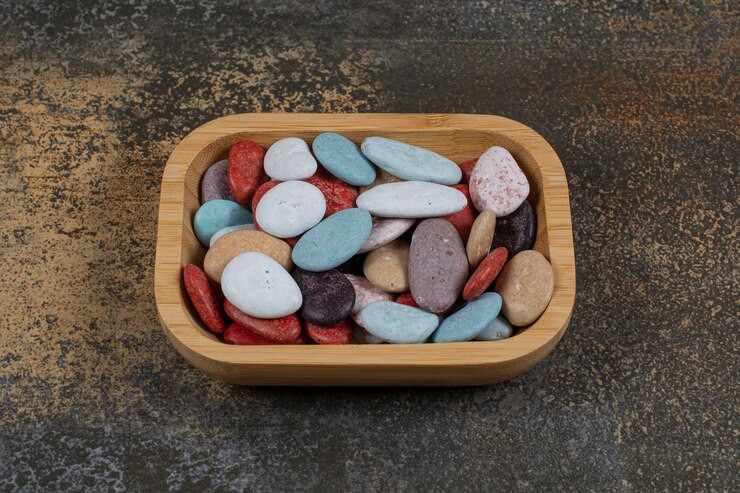 Rocks arranged in a bowl
10. What are Some Unique and Unusual Rock Display Ideas?
Think outside the box with ideas like creating a rock-filled coffee table, embedding rocks in resin, or using them to create a mosaic. Consider incorporating rocks into unexpected places like picture frames or wall art. Design blogs often feature innovative and unconventional rock display ideas.
Here are some unique and unusual rock display ideas to inspire you:
-
Rock-Filled Coffee Table: Create a unique coffee table by filling a glass-topped table with rocks. Choose rocks of varying sizes, colors, and textures to create a visually interesting display. The rocks can be arranged in a random pattern or in a more organized design. This is a great way to showcase your rock collection while adding a natural element to your living room.
-
Rocks Embedded in Resin: Embed rocks in resin to create unique decorative objects. You can use clear resin to showcase the natural beauty of the rocks, or you can use colored resin to create a more artistic effect. The resin can be poured into molds to create coasters, paperweights, or other small objects. You can also use resin to create larger pieces of art, such as wall hangings or sculptures.
-
Rock Mosaic: Create a mosaic using small rocks and pebbles. This is a great way to use up leftover rocks from other projects. The mosaic can be created on a variety of surfaces, such as a tabletop, a wall, or a garden path. The rocks can be arranged in a simple pattern or in a more complex design.
-
Rocks in Picture Frames: Incorporate rocks into picture frames to create unique and personalized artwork. Glue small rocks around the edges of a picture frame to add a natural element to your photos. You can also use rocks to create a collage inside the picture frame.
-
Rock Wall Art: Create a unique piece of wall art using rocks. Glue rocks to a canvas or piece of wood to create a textured and three-dimensional artwork. The rocks can be arranged in a simple pattern or in a more complex design. This is a great way to add a natural and rustic element to your home décor.
11. Freestanding Curio Cabinets
This display case for collectibles is actually two identical, stacked units even though it seems like one. So once you set up to cut the pieces for the bottom unit, simply cut the second set of identical pieces for the top unit.
Glass shelves, doors, and mirrors on the backs and bottoms give another display level for showcasing priceless items. Alternatively, you may replace the mirrors with stained plywood panels for a cozier look.
Curio cabinets are another great way to display any type of collectible item – whether it’s rocks or salt shakers or your favorite toys from when you were a kid.
Usually, curio cabinets are more traditional design-wise so I was really excited to see some sleek and contemporary designs that are out there now.
12. Rock Collection Boxes
This also makes them easy to transport – perfect if you’re going to a gem and mineral show or meeting with your local lapidary club!
While they do provide a very small number of alternatives expressly for rocks, if you look into other sorts of storage possibilities, you may also discover some intriguing items. The beauty of the natural bamboo would make a bamboo tea organizer box, for instance, a lovely place to show some of the smaller rocks in your collection.
FAQ: Frequently Asked Questions About Rock Displays
1. How do I prevent my rock display from becoming dusty?
Regular dusting with a soft brush or cloth is the best way to prevent dust buildup. Display cases can also help protect your rocks from dust.
2. Can I use household cleaners on my rocks?
Avoid harsh chemicals. Use mild soap and water for most rocks, but research specific cleaning methods for delicate specimens.
3. How do I display rocks of different sizes together?
Use tiered displays or varying heights of stands to create visual interest and ensure each rock is visible.
4. What’s the best way to display a geode?
Geodes can be displayed whole or broken open to reveal the crystals inside. Use a stand or display case to showcase the geode.
5. How do I display rocks outdoors in a way that protects them from the elements?
Choose durable rocks and consider using sealants to protect them from weathering. Arrange the rocks in a well-draining area to prevent water damage.
6. Where can I find information about the rocks in my collection?
Geological societies, books, and online resources can provide information about rock identification and geological history.
7. How do I transport my rock collection safely?
Use padded boxes or containers to protect the rocks from damage during transport. Wrap delicate specimens individually.
8. Can I display rocks in a fish tank?
Yes, but ensure the rocks are safe for aquatic life and won’t alter the water chemistry. Clean the rocks thoroughly before adding them to the tank.
9. How do I make a rock garden in my backyard?
Choose a sunny spot with well-draining soil. Arrange rocks of various sizes and shapes to create a natural-looking landscape. Add plants that thrive in rocky environments.
10. What are the best types of lighting for a rock display?
Spotlights, LED strip lights, and backlighting are all effective options. Choose lighting that highlights the colors and textures of your rocks.
Ready to transform your rock collection into a stunning display? Visit Rockscapes.net for more inspiration, detailed information on various rock types, and expert tips on creating the perfect arrangement. Explore our gallery of rock garden designs and find the resources you need to bring your vision to life.
Contact us today to learn more about how we can help you showcase the beauty of your rocks.
Address: 1151 S Forest Ave, Tempe, AZ 85281, United States. Phone: +1 (480) 965-9011. Website: rockscapes.net.