Rock engraving is a fantastic way to personalize your garden or create unique gifts. At rockscapes.net, we’ll guide you through the process with expert tips and inspiration. Discover How To Do Rock Engraving and unlock your creative potential with rocks and stones.
1. What Is Rock Engraving And Why Should You Try It?
Rock engraving is the art of carving designs, letters, or images onto the surface of rocks. This creative process transforms ordinary stones into personalized art pieces, adding character to gardens, homes, and special gifts. Rock engraving is popular because it’s a relatively simple and affordable craft that yields impressive results. It allows for a personal touch in landscaping or gift-giving. You can create unique garden markers, personalized stones for friends, or decorative pieces for your home.
1.1. The Enduring Appeal Of Stone Carving
The allure of stone carving lies in its timelessness and connection to nature. According to research from Arizona State University’s School of Earth and Space Exploration, the use of stone in art and architecture dates back millennia. Rock engraving allows you to tap into this ancient tradition, creating pieces that blend natural beauty with human artistry. The appeal comes from the permanence of the medium; engraved rocks can withstand the elements, making them ideal for outdoor display.
1.2. Benefits Of Rock Engraving
- Creative Expression: Rock engraving provides an outlet for artistic expression, allowing you to translate your ideas onto a natural canvas.
- Personalization: Engraved rocks make thoughtful, personalized gifts for loved ones.
- Garden Enhancement: Add unique character to your garden with engraved stones as plant markers, decorative accents, or focal points.
- Relaxation: The process of rock engraving can be meditative and relaxing, offering a break from the stresses of daily life.
- Affordability: Rock engraving is a cost-effective hobby, requiring minimal investment in tools and materials.
2. Essential Tools And Equipment For Rock Engraving
To begin your rock engraving journey, you’ll need a few essential tools and equipment. The right tools not only make the process easier but also ensure clean, professional-looking results.
2.1. Rotary Tools: Your Engraving Powerhouse
A rotary tool, such as a Dremel, is the workhorse of rock engraving. It’s a versatile power tool that spins at high speeds, allowing you to carve into the rock surface with precision.
- Dremel: A popular brand known for its quality and reliability. Look for a model with variable speed settings to control the engraving process.
- Alternatives: Other rotary tool brands like Proxxon and Ryobi also offer suitable options for rock engraving.
- Corded vs. Cordless: Corded rotary tools provide consistent power, while cordless models offer greater mobility. Choose the one that best suits your working style.
2.2. Diamond Bits: The Key To Clean Cuts
Diamond bits are small, abrasive attachments that fit onto your rotary tool. They’re specifically designed for engraving hard materials like stone.
- Variety Of Shapes: Diamond bits come in various shapes, including pointed, rounded, and flat, each serving a different purpose in the engraving process.
- Grit Size: The grit size of the diamond bit determines the coarseness of the cut. Finer grits are ideal for detail work, while coarser grits are better for removing material quickly.
- Quality Matters: Invest in high-quality diamond bits for clean, precise cuts and longer lifespan.
2.3. Safety Gear: Protecting Yourself During Engraving
Safety should always be a top priority when working with power tools. Protect yourself from flying debris and rock dust with the following safety gear:
- Safety Glasses: Wear safety glasses to shield your eyes from flying rock particles.
- Dust Mask: A dust mask prevents you from inhaling harmful rock dust, especially important when working indoors.
- Gloves: Gloves provide a better grip on the rock and protect your hands from abrasion.
- Ear Protection: Rotary tools can be noisy, so wear earplugs or earmuffs to protect your hearing.
2.4. Other Helpful Tools
- Pencils/Markers: Use pencils or markers to draw your design onto the rock before engraving.
- Water Source: Keep a container of water nearby to cool the rock and prevent dust buildup during engraving.
- Clamps/Vise: Secure the rock in place with clamps or a vise to prevent it from moving during engraving.
- Cleaning Brush: A small brush helps remove rock dust from the engraved areas, allowing you to see your progress.
3. Choosing The Right Rocks For Engraving
The type of rock you choose can significantly impact the ease and outcome of your engraving project. Consider the following factors when selecting rocks for engraving:
3.1. Rock Types And Their Engraving Properties
- Limestone: A soft, sedimentary rock that’s easy to engrave. Ideal for beginners.
- Sandstone: Another sedimentary rock with a slightly coarser texture than limestone.
- Slate: A fine-grained metamorphic rock that engraves smoothly and creates beautiful contrast.
- River Rock: Smooth, rounded stones found in riverbeds. Their hardness varies depending on the type of rock.
- Granite: A hard, igneous rock that requires more effort to engrave. Best for experienced engravers.
3.2. Size And Shape Considerations
- Size: Choose a rock size that’s comfortable to handle and fits your design. Smaller rocks are suitable for simple engravings, while larger rocks can accommodate more intricate designs.
- Shape: Select a rock with a smooth, relatively flat surface for easier engraving. Avoid rocks with excessive cracks or unevenness.
3.3. Sourcing Your Rocks
- Local Suppliers: Rockscapes.net is your best bet for sourcing your rocks. They offer a variety of rock types and sizes suitable for engraving.
- Landscaping Supply Stores: These stores often carry a selection of decorative rocks that are suitable for engraving.
- Nature: Collecting rocks from nature can be a fun and cost-effective way to source materials. However, be sure to check local regulations regarding rock removal before collecting rocks from public lands.
4. Step-By-Step Guide To Rock Engraving
Now that you have your tools, safety gear, and rocks, it’s time to start engraving. Follow these step-by-step instructions to create your own rock art:
4.1. Preparing Your Rock
- Clean The Rock: Wash the rock with soap and water to remove any dirt, debris, or loose particles.
- Dry The Rock: Allow the rock to dry completely before engraving.
- Plan Your Design: Sketch your design onto paper or directly onto the rock using a pencil or marker.
4.2. Setting Up Your Workstation
- Choose A Well-Ventilated Area: Work outdoors or in a well-ventilated area to avoid inhaling rock dust.
- Secure Your Rock: Clamp the rock in a vise or use clamps to hold it securely in place.
- Gather Your Tools: Have your rotary tool, diamond bits, water source, and cleaning brush within easy reach.
4.3. Engraving Your Design
- Insert The Diamond Bit: Attach the appropriate diamond bit to your rotary tool.
- Adjust The Speed: Start with a low speed and gradually increase it as needed.
- Engrave Lightly: Gently trace your design with the diamond bit, applying light pressure.
- Make Multiple Passes: Go over each line several times to create depth and smooth out any unevenness.
- Keep The Rock Wet: Periodically apply water to the rock to cool it down and prevent dust buildup.
- Clean As You Go: Use a cleaning brush to remove rock dust from the engraved areas, allowing you to see your progress.
4.4. Adding Depth And Detail
- Vary Bit Sizes: Use different sized diamond bits to create varying line widths and depths.
- Shading Techniques: Create shading effects by engraving closely spaced lines or dots.
- Experiment With Textures: Use different diamond bit shapes to create unique textures on the rock surface.
4.5. Finishing Touches
- Clean The Engraving: Thoroughly clean the engraved rock with water and a brush to remove any remaining rock dust.
- Seal The Engraving (Optional): Apply a sealant to protect the engraving from weathering and enhance its appearance.
- Display Your Creation: Showcase your engraved rock in your garden, home, or as a personalized gift.
5. Rock Engraving Ideas And Inspiration
Need some inspiration for your rock engraving projects? Here are a few ideas to get your creative juices flowing:
5.1. Garden Markers
Engrave the names of your plants onto rocks and place them in your garden beds. This is a practical and decorative way to identify your plants.
5.2. Inspirational Stones
Engrave uplifting words or phrases onto rocks and scatter them throughout your garden or home as reminders of positivity.
5.3. Pet Memorials
Create a personalized memorial for your beloved pet by engraving their name and dates onto a stone.
5.4. House Numbers
Engrave your house number onto a large rock and place it near your driveway or front door.
5.5. Mandala Stones
Engrave intricate mandala patterns onto smooth, flat stones for a calming and decorative art piece.
5.6. Personalized Gifts
Engrave a special message, name, or date onto a rock for a unique and thoughtful gift.
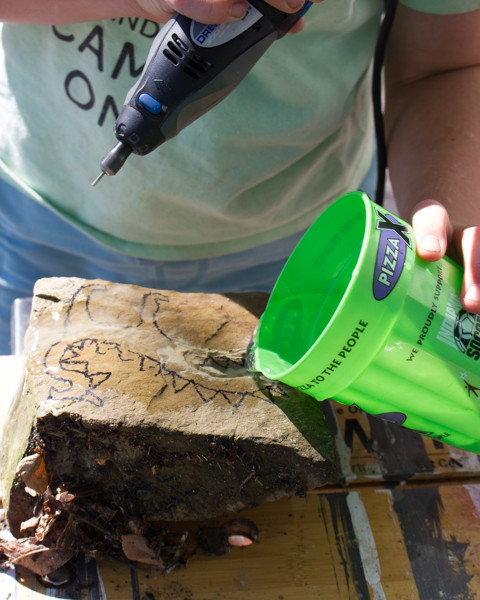 Engraving Rocks with a Dremel
6. Advanced Techniques And Tips For Rock Engraving
Once you’ve mastered the basics of rock engraving, you can explore more advanced techniques to elevate your skills:
6.1. Working With Stencils
- Creating Stencils: Design your stencil on paper or using a computer program and cut it out using a craft knife or die-cutting machine.
- Applying Stencils: Adhere the stencil to the rock surface using adhesive spray or tape.
- Engraving Through Stencils: Carefully engrave through the stencil, ensuring clean lines and sharp edges.
6.2. Using Different Diamond Bit Shapes
- Pointed Bits: Ideal for creating fine lines, details, and lettering.
- Rounded Bits: Perfect for creating smooth curves, shading, and rounded edges.
- Flat Bits: Useful for removing material quickly and creating flat surfaces.
- Cone-Shaped Bits: Great for creating tapered lines and V-shaped grooves.
6.3. Incorporating Color
- Painting Engraved Areas: After engraving, you can paint the engraved areas with acrylic paints or enamel paints to add color and contrast.
- Using Colored Pencils: Fill in the engraved lines with colored pencils for a subtle pop of color.
- Applying Patinas: Use patinas to create an aged or weathered look on your engraved rocks.
6.4. Layering Techniques
- Engraving Multiple Layers: Create depth and dimension by engraving multiple layers of your design.
- Combining Engraving With Other Art Forms: Combine rock engraving with painting, mosaic, or other art forms to create mixed-media masterpieces.
7. Maintaining And Preserving Your Rock Engravings
To ensure that your rock engravings last for years to come, it’s important to properly maintain and preserve them:
7.1. Cleaning Your Engravings
- Regular Cleaning: Clean your engraved rocks regularly with water and a soft brush to remove dirt, dust, and algae.
- Removing Stains: Use a mild detergent or vinegar solution to remove stubborn stains.
- Avoiding Harsh Chemicals: Avoid using harsh chemicals or abrasive cleaners, as they can damage the engraving.
7.2. Protecting From Weathering
- Sealing Your Engravings: Apply a sealant to protect your engraved rocks from weathering, UV damage, and moisture.
- Choosing The Right Sealant: Select a sealant that’s specifically designed for use on stone and is compatible with your chosen engraving techniques.
- Reapplying Sealant: Reapply sealant periodically, as needed, to maintain protection.
7.3. Storing Your Engravings
- Indoor Storage: Store your engraved rocks indoors in a cool, dry place away from direct sunlight.
- Outdoor Storage: If storing your engraved rocks outdoors, choose a location that’s protected from extreme weather conditions.
8. The Business Of Rock Engraving
If you enjoy rock engraving and want to turn your hobby into a business, here are a few tips to get you started:
8.1. Identifying Your Niche
- Target Market: Determine your target market, such as gardeners, pet owners, or gift-givers.
- Unique Selling Proposition: Identify what makes your rock engravings unique, such as your design style, engraving techniques, or personalization options.
- Specialization: Consider specializing in a particular type of rock engraving, such as garden markers, memorial stones, or house numbers.
8.2. Pricing Your Products
- Cost-Plus Pricing: Calculate the cost of your materials, labor, and overhead expenses and add a profit margin.
- Competitive Pricing: Research the prices of similar rock engravings in your market and price your products accordingly.
- Value-Based Pricing: Price your products based on the perceived value to the customer, such as the personalization, uniqueness, or artistic quality.
8.3. Marketing And Sales Strategies
- Online Presence: Create a website or online store to showcase your rock engravings and sell them to a wider audience.
- Social Media Marketing: Use social media platforms like Instagram, Facebook, and Pinterest to promote your rock engravings and connect with potential customers.
- Local Craft Fairs And Markets: Participate in local craft fairs and markets to showcase your rock engravings and sell them in person.
- Wholesale Opportunities: Partner with local garden centers, gift shops, or pet stores to sell your rock engravings on a wholesale basis.
9. Rockscapes.Net: Your Partner In Rock Engraving
At rockscapes.net, we’re passionate about all things rock and stone. We offer a wide selection of high-quality rocks suitable for engraving, along with expert advice and inspiration to help you create stunning rock art.
9.1. Our Rock Selection
We source our rocks from trusted suppliers and offer a variety of rock types, sizes, and shapes to suit your engraving needs. Whether you’re looking for smooth river rocks, rustic limestone, or elegant slate, we have the perfect rocks for your project.
9.2. Expert Advice And Inspiration
Our website features a wealth of information on rock engraving, including step-by-step tutorials, design ideas, and tips from experienced engravers. We also offer personalized consultations to help you choose the right rocks and techniques for your specific project.
9.3. Community Forum
Join our community forum to connect with other rock engraving enthusiasts, share your creations, ask questions, and get feedback from fellow artists.
10. Frequently Asked Questions (FAQs) About Rock Engraving
Here are some frequently asked questions about rock engraving:
10.1. What Is The Best Type Of Rock For Engraving?
The best type of rock for engraving depends on your skill level and desired aesthetic. Limestone and sandstone are good choices for beginners, while slate and granite offer more challenging but rewarding engraving experiences.
10.2. What Kind Of Tools Do I Need To Engrave Rocks?
You’ll need a rotary tool, diamond bits, safety glasses, a dust mask, gloves, and a water source. Other helpful tools include pencils/markers, clamps/vise, and a cleaning brush.
10.3. How Do I Transfer A Design Onto A Rock?
You can transfer a design onto a rock by sketching it directly onto the rock using a pencil or marker, using stencils, or using transfer paper.
10.4. How Do I Prevent The Rock From Cracking While Engraving?
To prevent the rock from cracking while engraving, use light pressure, keep the rock wet, and avoid engraving in areas with existing cracks or weaknesses.
10.5. How Do I Clean The Rock After Engraving?
Clean the rock after engraving with water and a brush to remove any remaining rock dust. You can also use a mild detergent or vinegar solution to remove stubborn stains.
10.6. How Do I Seal The Engraving To Protect It From Weathering?
Seal the engraving with a sealant specifically designed for use on stone. Apply the sealant according to the manufacturer’s instructions and reapply periodically, as needed.
10.7. Can I Engrave Rocks With A Laser Engraver?
Yes, you can engrave rocks with a laser engraver, but it requires a more powerful laser and specialized techniques.
10.8. How Do I Make My Engraved Rocks Look Professional?
To make your engraved rocks look professional, use high-quality tools, practice your engraving techniques, pay attention to detail, and finish your engravings with a sealant.
10.9. Is Rock Engraving Safe For Kids?
Rock engraving can be a fun and rewarding activity for kids, but it requires close supervision and proper safety precautions. Children should always wear safety glasses, a dust mask, and gloves when engraving rocks.
10.10. Where Can I Find Inspiration For Rock Engraving Designs?
You can find inspiration for rock engraving designs online, in books, in nature, or by attending rock engraving workshops or classes. Rockscapes.net is also a great resource for ideas and inspiration.
Ready to start your rock engraving adventure? Visit rockscapes.net today to explore our rock selection, get expert advice, and connect with a community of fellow rock art enthusiasts! Let us help you transform ordinary stones into extraordinary works of art.
(Address: 1151 S Forest Ave, Tempe, AZ 85281, United States. Phone: +1 (480) 965-9011)