Rock salt finish on concrete is a fantastic way to add texture and visual appeal to plain concrete surfaces, and here at rockscapes.net, we’re passionate about helping you achieve stunning results. This technique involves embedding rock salt into freshly poured concrete, creating a unique, pitted surface that resembles weathered stone. This guide provides a detailed walkthrough of the process, ensuring a beautiful and durable finish.
1. What is a Rock Salt Finish on Concrete?
A rock salt finish is a decorative concrete technique where rock salt is pressed into the surface of fresh concrete. Once the concrete has cured partially, the salt is washed away, leaving small indentations that create a textured, non-slip surface. This method is praised for its simplicity, affordability, and rustic aesthetic.
Expanding on Rock Salt Finish
The beauty of a rock salt finish lies in its ability to transform ordinary concrete into something visually interesting. It’s a simple yet effective way to add character and depth to any concrete surface. Here’s a closer look at what makes this finish so appealing:
- Aesthetic Appeal: The random pattern of indentations mimics the look of natural stone, providing a rustic and organic feel.
- Skid Resistance: The textured surface offers improved traction, making it a safe option for walkways, patios, and pool decks.
- Cost-Effectiveness: Compared to other decorative concrete finishes like stamping or staining, a rock salt finish is relatively inexpensive.
- Ease of Application: The process is straightforward and doesn’t require specialized equipment, making it accessible to both DIY enthusiasts and professionals.
- Versatility: It can be used on various concrete surfaces, including patios, walkways, driveways, and pool decks. It also pairs well with other decorative techniques like colored concrete and borders.
2. What Are the Key Advantages of Rock Salt Concrete?
Rock salt concrete offers several compelling advantages. Not only is it cost-effective and visually appealing, but it also provides enhanced slip resistance, making it a practical choice for outdoor surfaces. The unique texture adds character to any space, blending seamlessly with natural landscapes.
Expanding on the Advantages
To truly appreciate the benefits of a rock salt finish, let’s dive deeper into each advantage:
- Cost-Effectiveness: The primary materials needed are concrete and rock salt, both of which are readily available and relatively inexpensive. The labor costs are also lower compared to more complex decorative finishes.
- Enhanced Slip Resistance: The textured surface created by the indentations provides excellent grip, reducing the risk of slips and falls, especially in wet conditions.
- Visual Appeal: The finish offers a unique, natural look that complements various architectural styles. It adds depth and character to otherwise plain concrete surfaces.
- Durability: When properly sealed, a rock salt finish can withstand the elements and resist wear and tear, ensuring long-lasting beauty and functionality.
- Low Maintenance: The textured surface hides dirt and minor imperfections, making it easier to maintain than smooth concrete. Regular cleaning and occasional resealing are typically all that’s needed.
3. What Tools and Materials Do I Need for a Rock Salt Finish?
To achieve a successful rock salt finish, gather the following:
- Concrete mix
- Rock salt (coarse, water softener type)
- Water
- Mixing tools (wheelbarrow, shovel, or concrete mixer)
- Concrete finishing tools (float, trowel, edger)
- Roller or hand tamper
- Pressure washer
- Sealer (optional, but recommended)
- Safety glasses and gloves
Expanding on Tools and Materials
Let’s take a closer look at each item on the list to ensure you have everything you need:
- Concrete Mix: Choose a high-quality concrete mix suitable for your project. Consider factors like strength, setting time, and intended use.
- Rock Salt: Use coarse rock salt, the type used in water softeners or as a deicer. Avoid using table salt or fine salt, as they will dissolve too quickly and won’t create the desired texture.
- Mixing Tools: A wheelbarrow and shovel are sufficient for small projects, while a concrete mixer is recommended for larger areas.
- Concrete Finishing Tools: A float is used to smooth the surface of the concrete, while a trowel is used to create a smoother finish. An edger is used to create clean edges along the perimeter of the slab.
- Roller or Hand Tamper: A roller or hand tamper is used to press the rock salt into the surface of the wet concrete. A steel roller, like the one from Bon Tool, is effective for larger projects.
- Pressure Washer: A pressure washer is used to remove the rock salt after the concrete has partially cured.
- Sealer: A concrete sealer is recommended to protect the finish from water damage, stains, and wear and tear. Choose a sealer specifically designed for decorative concrete.
- Safety Gear: Always wear safety glasses and gloves when working with concrete to protect your eyes and skin.
4. What is the Step-by-Step Guide to Applying a Rock Salt Finish?
Follow these steps for a perfect rock salt finish:
- Prepare the Concrete: Pour and level the concrete as usual.
- Float the Surface: Once the concrete begins to set, use a float to create a smooth surface.
- Apply the Rock Salt: Evenly distribute rock salt over the surface. The amount depends on the desired texture, typically 3-12 pounds per 100 square feet.
- Press the Salt: Use a roller or hand tamper to gently press the salt into the concrete, about half its diameter.
- Cure the Concrete: Allow the concrete to cure for about 24 hours, or until it’s hard enough to walk on.
- Wash Away the Salt: Use a pressure washer to remove the salt, revealing the textured surface.
- Seal the Concrete: Once dry, apply a concrete sealer to protect the finish.
Expanding on the Application Process
Each step in the process is crucial for achieving the desired result. Here’s a more detailed breakdown:
-
Preparing the Concrete:
- Ensure the subgrade is properly compacted and leveled.
- Use appropriate formwork to contain the concrete.
- Pour the concrete to the desired thickness and level it with a screed board.
-
Floating the Surface:
- Wait until the bleed water has evaporated from the surface.
- Use a magnesium float to smooth out any imperfections and create a uniform surface.
- Avoid over-floating, as this can weaken the surface.
-
Applying the Rock Salt:
- Distribute the rock salt evenly over the surface by hand or with a seed spreader.
- For a lighter texture, use less salt; for a heavier texture, use more salt.
- Ensure the salt is evenly distributed to avoid inconsistent patterns.
-
Pressing the Salt:
- Use a roller or hand tamper to gently press the salt into the concrete.
- The goal is to embed the salt about half its diameter into the surface.
- Avoid pressing the salt too deeply, as this can make it difficult to remove.
-
Curing the Concrete:
- Allow the concrete to cure for at least 24 hours, or until it’s hard enough to walk on without damaging the surface.
- Keep the concrete moist during the curing process to prevent cracking.
-
Washing Away the Salt:
- Use a pressure washer to remove the rock salt.
- Start with a low-pressure setting and gradually increase the pressure as needed.
- Ensure all traces of salt are removed to prevent discoloration.
-
Sealing the Concrete:
- Allow the concrete to dry completely before applying a sealer.
- Choose a sealer specifically designed for decorative concrete.
- Apply the sealer according to the manufacturer’s instructions.
- Sealing will protect the finish from water damage, stains, and wear and tear.
5. How Much Does a Rock Salt Finish Cost?
The cost of a rock salt finish ranges from $3 to $7 per square foot, making it an affordable option. This includes materials and labor, but prices may vary based on location and project size. For DIY projects, the cost can be even lower, focusing mainly on the price of materials.
Expanding on the Cost
Understanding the cost breakdown can help you budget for your project effectively. Here’s a closer look at the factors influencing the cost:
- Materials: The cost of concrete and rock salt is relatively low. A bag of concrete mix typically costs between $5 and $10, while a bag of rock salt costs between $10 and $20.
- Labor: If you hire a professional contractor, labor costs will vary depending on their experience and location. Expect to pay between $2 and $5 per square foot for labor.
- Sealer: A good quality concrete sealer can cost between $30 and $50 per gallon, which is enough to cover approximately 200-400 square feet.
- Equipment Rental: If you don’t own a concrete mixer or pressure washer, you may need to rent them. Rental costs can range from $50 to $100 per day.
- Project Size: Larger projects may qualify for discounts on materials and labor, while smaller projects may have higher per-square-foot costs due to minimum charges.
6. What Are Some Design Ideas for Rock Salt Finish Concrete?
Rock salt finishes are versatile and can be incorporated into various design styles. Consider these ideas:
- Rustic Pathways: Create charming garden paths with a natural, weathered look.
- Pool Decks: Enhance safety with a non-slip surface that also looks great.
- Patios: Design inviting outdoor living spaces with a textured, comfortable feel.
- Driveways: Add curb appeal with a unique, durable surface that stands out.
- Decorative Borders: Use rock salt finishes as borders to complement other concrete designs.
Expanding on Design Ideas
Let’s explore these design ideas in more detail, providing inspiration for your next project:
-
Rustic Pathways:
- Use irregularly shaped concrete slabs with a rock salt finish to mimic natural stepping stones.
- Incorporate moss or groundcover between the slabs for a more organic look.
- Add edging with natural stone or wood to define the pathway.
-
Pool Decks:
- Choose a light-colored concrete mix to keep the surface cool in hot weather.
- Use a sealer with UV protection to prevent fading and discoloration.
- Incorporate decorative drains to efficiently remove water from the deck.
-
Patios:
- Create a seamless transition from indoor to outdoor spaces by matching the concrete finish to interior flooring.
- Incorporate fire pits or outdoor kitchens to create a cozy and functional outdoor living area.
- Add comfortable seating, outdoor lighting, and landscaping to complete the space.
-
Driveways:
- Use a dark-colored concrete mix to hide dirt and stains.
- Reinforce the concrete with steel mesh or rebar to withstand heavy traffic.
- Consider adding a decorative border or apron to enhance the driveway’s appearance.
-
Decorative Borders:
- Use a rock salt finish border to frame a stamped concrete patio or walkway.
- Create a contrasting texture by pairing a smooth concrete surface with a rock salt finish border.
- Incorporate colored concrete or exposed aggregate to add visual interest.
7. How Do I Maintain My Rock Salt Finish Concrete?
Maintaining a rock salt finish involves regular cleaning and occasional resealing. Sweep or hose down the surface regularly to remove dirt and debris. Use a mild detergent and scrub brush for deeper cleaning. Reseal every 1-2 years to protect the finish from damage.
Expanding on Maintenance
Proper maintenance is essential for preserving the beauty and longevity of your rock salt finish. Here’s a comprehensive guide:
-
Regular Cleaning:
- Sweep or hose down the surface regularly to remove dirt, leaves, and other debris.
- Use a broom or leaf blower for quick cleanups.
- For more thorough cleaning, use a garden hose with a spray nozzle.
-
Deep Cleaning:
- Use a mild detergent and scrub brush to remove stains and grime.
- Avoid using harsh chemicals or abrasive cleaners, as they can damage the finish.
- For stubborn stains, try a concrete cleaner specifically designed for decorative concrete.
-
Resealing:
- Reseal the concrete every 1-2 years to protect the finish from water damage, stains, and wear and tear.
- Choose a sealer specifically designed for decorative concrete.
- Follow the manufacturer’s instructions for application.
- Before resealing, clean the surface thoroughly and allow it to dry completely.
-
Winter Care:
- Avoid using deicing salts on your rock salt finish, as they can damage the concrete.
- Use sand or gravel for traction instead.
- Shovel snow promptly to prevent it from melting and refreezing, which can cause cracks.
-
Preventative Measures:
- Place mats or rugs at entrances to prevent dirt and debris from being tracked onto the concrete.
- Use furniture pads to protect the surface from scratches.
- Clean up spills immediately to prevent staining.
8. Can I Combine Rock Salt Finish with Other Concrete Techniques?
Yes, rock salt finishes pair beautifully with other concrete techniques. Consider combining it with colored concrete, stamped patterns, or exposed aggregates for a truly unique design. The contrast in textures and colors can create stunning visual effects.
Expanding on Combinations
The possibilities are endless when combining a rock salt finish with other concrete techniques. Here are some ideas to inspire your creativity:
-
Colored Concrete:
- Use integral color to create a uniform color throughout the concrete.
- Apply a stain or dye to add depth and variation to the color.
- Consider using contrasting colors for the base concrete and the rock salt finish border.
-
Stamped Patterns:
- Use a rock salt finish as a border to complement a stamped concrete patio or walkway.
- Create a custom stamp with a unique design and combine it with a rock salt finish.
- Use a combination of stamps and rock salt to create a textured, multi-dimensional surface.
-
Exposed Aggregates:
- Combine a rock salt finish with exposed aggregates to create a textured, natural look.
- Choose aggregates that complement the color of the concrete.
- Use a combination of different sizes and colors of aggregates to create a unique design.
-
Scored or Sawcut Joints:
- Use scored or sawcut joints to create a pattern in the concrete.
- Combine the joints with a rock salt finish to add texture and visual interest.
- Consider using different colors or textures for the joints to create a contrasting effect.
-
Overlays:
- Apply a concrete overlay over existing concrete to create a new surface with a rock salt finish.
- Use a microtopping overlay to create a smooth, seamless surface with a subtle rock salt texture.
- Consider using a self-leveling overlay to create a perfectly level surface for your rock salt finish.
9. What Are Common Mistakes to Avoid When Doing a Rock Salt Finish?
Avoid these common pitfalls:
- Uneven Salt Distribution: Ensure the salt is evenly spread for a consistent texture.
- Incorrect Timing: Apply the salt when the concrete is just beginning to set.
- Over-Pressing: Don’t press the salt too deeply, as it can be hard to remove.
- Insufficient Washing: Remove all traces of salt to prevent discoloration.
- Premature Sealing: Allow the concrete to dry completely before sealing.
Expanding on Mistakes to Avoid
Understanding these common mistakes can help you avoid costly errors and achieve a professional-looking result:
-
Uneven Salt Distribution:
- Use a seed spreader or carefully distribute the salt by hand to ensure even coverage.
- Avoid clumping the salt in certain areas, as this will create an uneven texture.
- If you notice any areas with too much or too little salt, adjust the distribution before pressing it into the concrete.
-
Incorrect Timing:
- The ideal time to apply the salt is when the concrete is just beginning to set.
- Test the concrete by pressing your finger into the surface. If it leaves an imprint about 1/4 inch deep, it’s ready for the salt.
- If you apply the salt too early, it will sink too deeply into the concrete. If you apply it too late, it won’t adhere properly.
-
Over-Pressing:
- Use a roller or hand tamper to gently press the salt into the concrete.
- Avoid pressing the salt too deeply, as this can make it difficult to remove and create overly large indentations.
- The goal is to embed the salt about half its diameter into the surface.
-
Insufficient Washing:
- Use a pressure washer to thoroughly remove all traces of salt.
- Pay close attention to the indentations, as salt can easily get trapped in them.
- If you leave any salt behind, it can cause discoloration and weaken the concrete.
-
Premature Sealing:
- Allow the concrete to dry completely before sealing.
- Sealing wet concrete can trap moisture and cause the sealer to fail.
- Check the manufacturer’s instructions for the recommended drying time.
10. What Are the Safety Precautions to Take When Working with Concrete?
Always wear safety glasses and gloves to protect your eyes and skin from concrete. Work in a well-ventilated area to avoid inhaling concrete dust. Follow all safety guidelines provided by the concrete mix manufacturer.
Expanding on Safety Precautions
Safety should always be a top priority when working with concrete. Here’s a detailed guide to safety precautions:
-
Eye Protection:
- Wear safety glasses or goggles to protect your eyes from concrete dust, splashes, and debris.
- Concrete is highly alkaline and can cause severe burns if it comes into contact with your eyes.
- If concrete gets into your eyes, flush them immediately with plenty of water and seek medical attention.
-
Skin Protection:
- Wear gloves to protect your hands from concrete.
- Concrete can cause skin irritation, dryness, and burns.
- If concrete gets on your skin, wash it off immediately with soap and water.
- Wear long sleeves and pants to protect your arms and legs from concrete dust and splashes.
-
Respiratory Protection:
- Work in a well-ventilated area to avoid inhaling concrete dust.
- Concrete dust can irritate your lungs and cause respiratory problems.
- If you’re working in a confined space, wear a dust mask or respirator.
-
Clothing:
- Wear old clothes that you don’t mind getting dirty.
- Concrete can stain clothing permanently.
- Wear sturdy shoes or boots to protect your feet.
-
Mixing Concrete:
- Follow the manufacturer’s instructions for mixing concrete.
- Add water gradually to avoid creating a slurry.
- Use a concrete mixer or wheelbarrow to mix the concrete thoroughly.
-
Lifting:
- Lift bags of concrete mix with your legs, not your back.
- Get help if you’re lifting heavy objects.
- Use a hand truck or dolly to move heavy bags of concrete mix.
-
First Aid:
- Keep a first aid kit on hand in case of accidents.
- Know how to treat concrete burns and other injuries.
- Seek medical attention if you experience any serious injuries.
Rockscapes.net: Your Partner in Concrete Design
At rockscapes.net, we’re dedicated to providing you with the inspiration, information, and resources you need to create stunning concrete landscapes. Whether you’re a homeowner embarking on a DIY project or a professional contractor looking for new ideas, we’re here to help.
Explore Our Resources
Visit our website to discover:
- Extensive Image Galleries: Browse hundreds of photos showcasing creative rock salt finish designs.
- Detailed Guides: Learn step-by-step techniques for various concrete applications.
- Product Recommendations: Find the best tools, materials, and sealers for your project.
- Expert Advice: Get tips and insights from experienced concrete professionals.
Need More Help?
Contact us today for personalized assistance with your concrete project. Our team of experts is ready to answer your questions and guide you every step of the way.
Address: 1151 S Forest Ave, Tempe, AZ 85281, United States.
Phone: +1 (480) 965-9011.
Website: rockscapes.net.
Let rockscapes.net be your partner in transforming ordinary concrete into extraordinary landscapes.
FAQ
Q: Can I use regular table salt for a rock salt finish?
A: No, use coarse rock salt, like water softener salt, for the best texture. Table salt dissolves too quickly.
Q: How long should I wait before washing off the salt?
A: Wait about 24 hours, or until the concrete is hard enough to walk on without damage.
Q: How much salt should I use per square foot?
A: Use 3-12 pounds per 100 square feet, depending on the desired texture.
Q: Can I do a rock salt finish in cold weather?
A: It’s best to avoid it in freezing weather, as water can collect in the indentations and cause spalling.
Q: Do I need to seal a rock salt finish?
A: Yes, sealing protects the finish from water damage, stains, and wear and tear.
Q: What kind of sealer should I use?
A: Use a concrete sealer specifically designed for decorative concrete.
Q: How often should I reseal my rock salt finish?
A: Reseal every 1-2 years, depending on wear and tear.
Q: Can I add color to a rock salt finish?
A: Yes, you can use colored concrete or apply a stain after the finish is complete.
Q: Can I use a rock salt finish on vertical surfaces?
A: It’s more commonly used on horizontal surfaces, but it can be adapted for vertical applications with proper techniques.
Q: How do I clean a rock salt finish?
A: Sweep or hose down the surface regularly. Use a mild detergent and scrub brush for deeper cleaning.
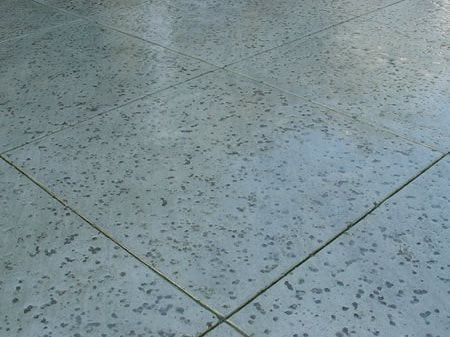 Rock Salt Finish with Scored Joints
Rock salt finish on concrete pathway with scored joints, showcasing the rustic texture and design integration by Lasting Impressions in Concrete in Petaluma, CA.
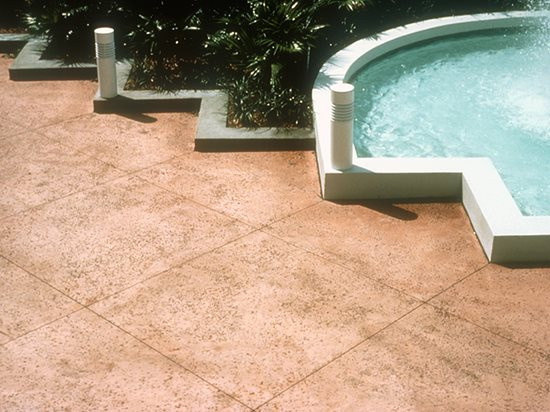 Natural Rock Salt Finish in Courtyard
Natural rock salt finish integrally colored with CHROMIX admixtures in a courtyard, highlighting the consistent texture achieved with quality materials by L.M. Scofield Company.
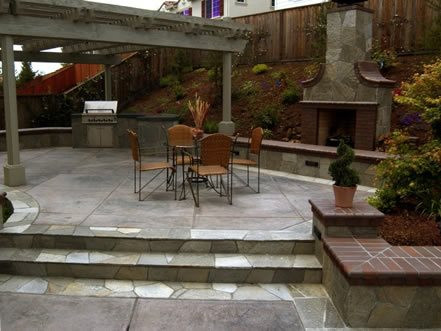 Colored Salt Finish with Flagstone Borders
Colored rock salt finish with flagstone borders, demonstrating the seamless integration of textures and materials in a patio design by BCP Concrete in Pleasanton, CA.
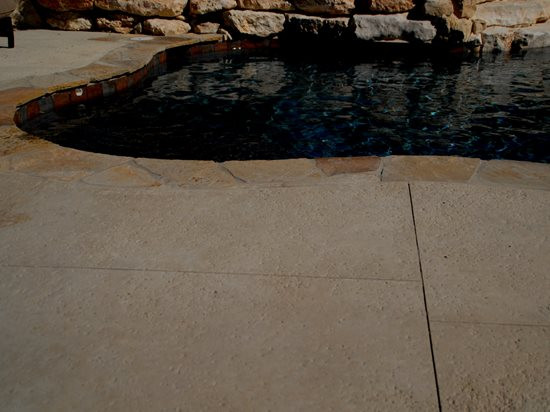 Natural Rock Salt Finish on Pool Deck
Natural rock salt finish used on a pool deck colored with a dry shake hardener, providing a non-slip surface with enhanced aesthetic appeal by Land Design in Boerne, TX.