Drawing a bee on a rock is a fun and creative way to decorate your garden or create unique gifts. At rockscapes.net, we provide all the inspiration and information you need to get started with rock painting, including tips on finding the perfect stones and selecting the right paints to make your art durable and beautiful. Discover fantastic garden stone art ideas, learn about the best rock painting supplies, and create stunning stone art with our comprehensive guide!
1. Why Draw a Bee on a Rock?
Drawing a bee on a rock is a delightful way to bring nature-inspired art into your home or garden. According to research from Arizona State University’s School of Earth and Space Exploration, integrating natural elements into art projects can foster creativity and mindfulness, making it a perfect activity for all ages.
1.1 Therapeutic Benefits of Rock Painting
Rock painting offers several therapeutic benefits:
- Stress Relief: The repetitive motions of painting can be calming.
- Mindfulness: Focusing on the details of the design can enhance mindfulness.
- Creativity: Rock painting encourages creative expression.
1.2 Educational Opportunities
Involving children in rock painting projects can be educational:
- Nature Awareness: It teaches them about insects and their habitats.
- Art Skills: It improves their fine motor skills and artistic abilities.
- Environmental Consciousness: It promotes appreciation for natural materials.
1.3 Decorative Purposes
Bee-painted rocks can serve various decorative purposes:
- Garden Decor: Adds a whimsical touch to your garden.
- Home Decor: Can be used as paperweights or shelf decorations.
- Gifts: Personalized, handmade gifts for friends and family.
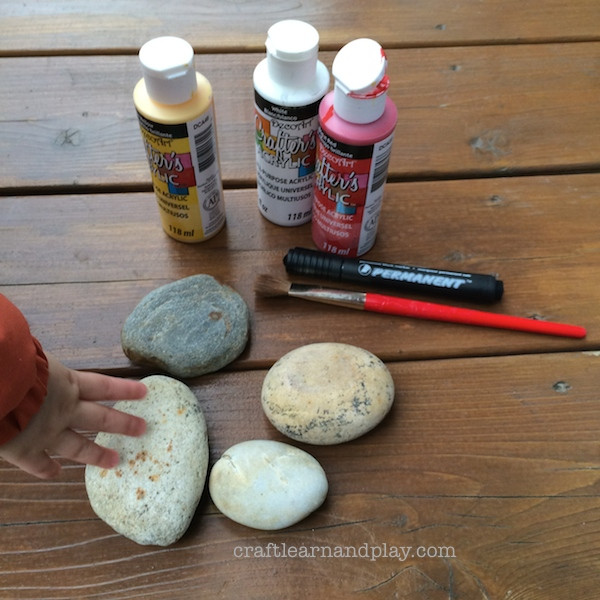
2. What Materials Do You Need to Draw a Bee on a Rock?
Gathering the right materials is crucial for a successful rock painting project. Below is a comprehensive list of everything you’ll need to create your bee-themed rock art, ensuring a smooth and enjoyable painting experience.
2.1 Essential Supplies
- Smooth Rocks: Seek out rocks with a smooth surface for easier painting.
- Acrylic Paints: Use high-quality acrylic paints for vibrant and lasting colors.
- Paintbrushes: A set of fine-tipped brushes will help with detailed work.
- Paint Markers: These are great for adding precise lines and details.
- Sealer: Apply a clear sealant to protect your painted rocks from the elements.
2.2 Detailed Breakdown
| Material | Description |
|---|---|
| Smooth Rocks | Look for rocks that are flat and smooth for easy painting. |
| Acrylic Paints | Use a variety of colors, including yellow, black, white, and blue. |
| Fine-Tipped Brushes | Essential for painting intricate details. |
| Paint Markers | Black paint markers are perfect for outlining and adding fine details. |
| Clear Sealer | Protects your painted rocks from weather damage. |
2.3 Where to Find Your Supplies
- Nature: Collect rocks from your backyard, local parks, or beaches.
- Craft Stores: Purchase acrylic paints, brushes, and sealers from craft stores like Michaels or Hobby Lobby.
- Online Retailers: Amazon and other online retailers offer a wide selection of art supplies.
3. How to Prepare Your Rocks for Painting
Preparing your rocks properly ensures that the paint adheres well and your design lasts longer. Cleaning and priming the rocks are essential steps that enhance the final look of your bee-themed artwork.
3.1 Cleaning the Rocks
- Wash the Rocks: Use soap and water to remove any dirt, debris, or algae from the rocks.
- Scrub Thoroughly: Use a scrub brush to ensure the surface is clean.
- Rinse and Dry: Rinse the rocks with clean water and allow them to dry completely before painting.
3.2 Priming the Rocks
- Apply Primer: Use a primer or base coat to create a smooth surface for the paint to adhere to.
- Let it Dry: Allow the primer to dry completely before moving on to the next step.
3.3 Sanding the rocks
- Use Sandpaper: If rocks are not smooth, gently sanding can improve the application of base paint.
- Wipe clean: After sanding, wipe rocks with a cloth to remove sanding residue.
4. Step-by-Step Guide: How to Draw a Bee on a Rock
Drawing a bee on a rock is a fun and straightforward process. Follow these steps to create your own adorable bee-themed rock art. With attention to detail and a bit of creativity, you’ll have a charming piece of art in no time.
4.1 Base Coat
- Paint the Rock Yellow: Apply a base coat of yellow acrylic paint to the entire rock.
- Allow to Dry: Let the yellow paint dry completely before adding any details.
4.2 Adding the Bee’s Body
- Draw Black Stripes: Use a black paint marker or a fine-tipped brush to draw horizontal stripes across the bee’s body.
- Create the Head: Paint a small black circle at the top of the bee’s body for the head.
4.3 Creating the Wings
- Paint White Wings: Use white acrylic paint to create two oval-shaped wings on either side of the bee’s body.
- Add Details: You can add small details to the wings, such as veins, with a fine-tipped brush or paint marker.
4.4 Adding the Face
- Paint Eyes: Use a fine-tipped brush or paint marker to add small white dots for the eyes.
- Add Pupils: Place a smaller black dot inside each white dot to create the pupils.
- Optional Details: You can add a small smile or antennae to give your bee more character.
4.5 Sealing the Rock
- Apply Sealer: Once the paint is completely dry, apply a clear acrylic sealer to protect your design.
- Let it Dry: Allow the sealer to dry completely before displaying your bee-painted rock.
5. Creative Variations: Different Bee Designs and Styles
While the basic steps provide a solid foundation, exploring different bee designs and styles can make your rock art even more unique. From realistic depictions to whimsical cartoons, the possibilities are endless.
5.1 Realistic Bee Design
- Detailed Stripes: Create more detailed and irregular stripes to mimic a real bee’s abdomen.
- Anatomical Accuracy: Pay attention to the bee’s body shape and wing structure for a more realistic look.
- Shading: Use shading techniques to add depth and dimension to the bee.
5.2 Cartoon Bee Design
- Exaggerated Features: Enlarge the eyes and make the body rounder for a cartoonish effect.
- Bright Colors: Use bright, vibrant colors to make the bee more cheerful and playful.
- Simple Shapes: Stick to simple shapes and lines for an easy-to-replicate design.
5.3 Abstract Bee Design
- Geometric Shapes: Use geometric shapes and patterns to represent the bee.
- Color Combinations: Experiment with different color combinations for a modern and artistic look.
- Texture: Add texture using different painting techniques or materials.
5.4 Bee with Flowers
- Floral Background: Paint colorful flowers around the bee to create a vibrant scene.
- Detailed Flowers: Use fine-tipped brushes to add intricate details to the petals and leaves.
- Complementary Colors: Choose colors that complement both the bee and the flowers for a harmonious design.
6. Tips for Achieving the Best Results
Achieving professional-looking results with your bee-painted rocks involves more than just following the steps; it requires attention to detail, patience, and the right techniques.
6.1 Choosing the Right Rocks
- Smooth Surface: A smooth surface is essential for detailed painting.
- Flat Base: A flat base will prevent the rock from rolling.
- Interesting Shapes: Look for rocks with unique shapes that complement your design.
6.2 Selecting High-Quality Paints
- Acrylic Paints: Acrylic paints are durable and water-resistant.
- UV Resistance: Choose paints that are UV resistant to prevent fading.
- Non-Toxic: Ensure the paints are non-toxic, especially if children are involved.
6.3 Using the Right Brushes
- Fine-Tipped Brushes: Fine-tipped brushes are essential for detailed work.
- Variety of Sizes: Keep a variety of brush sizes on hand for different tasks.
- Quality Bristles: Choose brushes with quality bristles that won’t shed easily.
6.4 Protecting Your Painted Rocks
- Clear Sealer: Apply a clear acrylic sealer to protect your design from the elements.
- Multiple Coats: Apply multiple coats of sealer for added protection.
- UV Protection: Choose a sealer with UV protection to prevent fading.
7. Displaying and Using Your Bee-Painted Rocks
Once you’ve created your beautiful bee-painted rocks, it’s time to display and use them in various creative ways. Whether you’re decorating your garden, adding a touch of whimsy to your home, or creating unique gifts, these rocks can add a special touch to any setting.
7.1 Garden Decorations
- Flower Beds: Place the rocks in flower beds to add a pop of color and charm.
- Pathways: Use the rocks to line pathways or create decorative borders.
- Fairy Gardens: Incorporate the rocks into fairy gardens for a magical touch.
7.2 Home Decor
- Paperweights: Use the rocks as paperweights on your desk or coffee table.
- Shelf Decorations: Display the rocks on shelves or mantels.
- Table Centerpieces: Create a unique table centerpiece using the rocks.
7.3 Gifts
- Personalized Gifts: Give the rocks as personalized gifts to friends and family.
- Themed Gift Baskets: Include the rocks in themed gift baskets for birthdays or holidays.
- Party Favors: Use the rocks as party favors for children’s parties.
7.4 Educational Tools
- Nature Education: Use bee painted rocks as part of a nature education program.
- Art Lessons: Integrate into art lessons to teach children about bees and art.
8. Safety Tips for Rock Painting
Ensuring a safe environment while rock painting is crucial, especially when children are involved. By following these safety tips, you can enjoy the creative process without worrying about potential hazards.
8.1 Using Non-Toxic Materials
- Non-Toxic Paints: Always use non-toxic paints and sealers.
- Check Labels: Read the labels carefully to ensure the materials are safe for use.
8.2 Proper Ventilation
- Well-Ventilated Area: Paint in a well-ventilated area to avoid inhaling fumes.
- Outdoor Painting: If possible, paint outdoors to ensure adequate ventilation.
8.3 Protecting Surfaces
- Cover Work Area: Cover your work area with a drop cloth or newspaper to protect it from paint spills.
- Wear Gloves: Wear gloves to protect your hands from paint.
8.4 Supervising Children
- Adult Supervision: Always supervise children when they are painting.
- Age-Appropriate Activities: Choose age-appropriate activities and materials.
9. Inspiring Ideas: Rock Painting for All Ages
Rock painting is a fun and engaging activity that can be enjoyed by people of all ages. From simple designs for young children to more intricate patterns for adults, there’s a rock painting project for everyone. These ideas will help you explore the many possibilities of rock art.
9.1 Rock Painting for Toddlers
- Simple Shapes: Focus on basic shapes like circles, squares, and triangles.
- Bright Colors: Use bright, cheerful colors to capture their attention.
- Easy-to-Grip Rocks: Choose rocks that are easy for small hands to hold.
9.2 Rock Painting for Kids
- Animals: Paint popular animals like cats, dogs, and fish.
- Cartoon Characters: Create rocks featuring their favorite cartoon characters.
- Nature Themes: Explore nature themes like flowers, trees, and butterflies.
9.3 Rock Painting for Teens
- Mandalas: Paint intricate mandala patterns for a relaxing and meditative activity.
- Abstract Designs: Experiment with abstract designs and color combinations.
- Inspirational Quotes: Write inspirational quotes on the rocks to share with others.
9.4 Rock Painting for Adults
- Realistic Landscapes: Create detailed landscape paintings on larger rocks.
- Botanical Art: Paint realistic depictions of flowers, leaves, and plants.
- Custom Designs: Design unique patterns and illustrations.
10. Common Mistakes to Avoid When Drawing a Bee on a Rock
Even with the best intentions, some common mistakes can hinder your rock painting efforts. Being aware of these pitfalls can help you avoid them and ensure a more successful and enjoyable experience.
10.1 Not Cleaning the Rocks
- Dirt and Debris: Painting on dirty rocks can prevent the paint from adhering properly.
- Proper Cleaning: Always wash and dry the rocks thoroughly before painting.
10.2 Using Low-Quality Paints
- Fading Colors: Low-quality paints can fade quickly, especially when exposed to sunlight.
- Durable Paints: Invest in high-quality acrylic paints for long-lasting color.
10.3 Skipping the Sealer
- Weather Damage: Without a sealer, your painted rocks are vulnerable to weather damage.
- Apply Sealer: Always apply a clear acrylic sealer to protect your design.
10.4 Rushing the Drying Process
- Smudging: Painting on wet paint can cause smudging and ruin your design.
- Allow Drying Time: Allow each layer of paint to dry completely before adding the next.
11. Advanced Techniques: Taking Your Rock Painting to the Next Level
For those who want to push their creative boundaries, exploring advanced rock painting techniques can lead to stunning and sophisticated results. These techniques require practice but can elevate your rock art to a whole new level.
11.1 Layering and Shading
- Creating Depth: Use layering and shading techniques to create depth and dimension in your paintings.
- Gradual Transitions: Blend colors gradually to achieve smooth transitions.
- Highlighting: Use highlights to add contrast and make your designs pop.
11.2 Dot Painting
- Intricate Patterns: Create intricate patterns using dot painting techniques.
- Varying Dot Sizes: Vary the size of the dots to add texture and interest.
- Tools: Use specialized dotting tools for precise placement.
11.3 Marbling Effects
- Unique Designs: Create unique marbled effects by swirling different colors of paint together.
- Water Marbling: Use water marbling techniques for a more fluid and organic look.
11.4 Using Stencils
- Precise Shapes: Use stencils to create precise shapes and patterns.
- Custom Stencils: Create your own custom stencils for personalized designs.
- Placement: Ensure the stencil is securely placed before painting.
12. Rock Painting Events and Communities
Joining rock painting events and communities can be a great way to connect with other enthusiasts, share your creations, and get inspired. These communities often organize events, workshops, and online groups where you can learn new techniques and showcase your art.
12.1 Local Rock Painting Groups
- Meetups: Look for local rock painting groups that organize meetups and workshops.
- Social Media: Find groups on social media platforms like Facebook and Instagram.
- Sharing: Share your creations and get feedback from other members.
12.2 Online Communities
- Forums: Join online forums dedicated to rock painting.
- Social Media: Participate in rock painting challenges and contests on social media.
- Inspiration: Get inspiration from other artists and their creations.
12.3 Rock Painting Events
- Workshops: Attend rock painting workshops to learn new techniques and skills.
- Art Fairs: Participate in art fairs and festivals to showcase your work.
- Community Events: Organize rock painting events in your community to promote creativity and art.
13. Environmentally Friendly Rock Painting
Being environmentally conscious while rock painting is essential for protecting our planet. By using eco-friendly materials and practices, you can enjoy your hobby while minimizing your impact on the environment.
13.1 Using Eco-Friendly Paints
- Water-Based Paints: Choose water-based acrylic paints that are low in VOCs (volatile organic compounds).
- Natural Pigments: Look for paints made with natural pigments.
- Recycled Materials: Support brands that use recycled materials in their packaging.
13.2 Sustainable Rock Collection
- Ethical Sourcing: Collect rocks from sustainable sources or use recycled rocks.
- Avoid Sensitive Areas: Avoid collecting rocks from protected areas or sensitive ecosystems.
13.3 Proper Disposal
- Paint Waste: Dispose of paint waste properly according to local regulations.
- Recycling: Recycle paint containers and other materials whenever possible.
- Reduce Waste: Use only the amount of paint you need to minimize waste.
14. The Future of Rock Painting: Trends and Innovations
As rock painting continues to grow in popularity, new trends and innovations are constantly emerging. Staying updated on these developments can help you stay inspired and discover new ways to express your creativity.
14.1 New Painting Techniques
- Mixed Media: Experiment with mixed media techniques by combining paint with other materials like glitter, beads, or fabric.
- Digital Integration: Use digital tools to create designs and transfer them onto rocks.
14.2 Sustainable Materials
- Eco-Friendly Paints: Increased availability of eco-friendly paints and materials.
- Recycled Rocks: Greater emphasis on using recycled rocks and sustainable sourcing practices.
14.3 Community Engagement
- Global Challenges: More global rock painting challenges and events.
- Collaborative Projects: Collaborative rock painting projects involving artists from around the world.
15. FAQ: Everything You Need to Know About Drawing a Bee on a Rock
15.1 What kind of paint should I use for rock painting?
Acrylic paints are the best choice because they are durable, water-resistant, and come in a wide range of colors. High-quality acrylic paints will ensure your designs last longer and withstand the elements.
15.2 How do I prepare the rocks before painting?
Wash the rocks with soap and water to remove any dirt, debris, or algae. Scrub thoroughly and allow them to dry completely before painting. You can also apply a primer for a smoother surface.
15.3 What tools do I need for detailed rock painting?
Fine-tipped brushes and paint markers are essential for adding detailed lines and small elements to your designs. A variety of brush sizes will also be helpful for different tasks.
15.4 How do I protect my painted rocks from the weather?
Apply a clear acrylic sealer to protect your painted rocks from the elements. Multiple coats of sealer will provide added protection against weather damage and fading.
15.5 Is rock painting safe for children?
Yes, rock painting is safe for children as long as you use non-toxic materials and provide proper supervision. Ensure they paint in a well-ventilated area and wear gloves to protect their hands.
15.6 Where can I find inspiration for rock painting designs?
You can find inspiration from nature, online communities, social media platforms like Pinterest and Instagram, and rock painting events. Joining a local rock painting group can also provide ideas and support.
15.7 How do I prevent the paint from smudging?
Allow each layer of paint to dry completely before adding the next. Avoid rushing the drying process, as this can lead to smudging and ruin your design.
15.8 Can I use rocks from my backyard for painting?
Yes, you can use rocks from your backyard as long as they have a smooth surface and are cleaned properly. Avoid collecting rocks from protected areas or sensitive ecosystems.
15.9 How do I create a realistic bee design on a rock?
Pay attention to anatomical details, use shading techniques to add depth, and create irregular stripes to mimic a real bee’s abdomen. Reference photos of real bees can be helpful.
15.10 What are some environmentally friendly practices for rock painting?
Use water-based acrylic paints with low VOCs, collect rocks from sustainable sources, dispose of paint waste properly, and recycle paint containers whenever possible.
Drawing a bee on a rock is a fun and rewarding project that brings creativity and nature together. Whether you’re a beginner or an experienced artist, these tips and techniques will help you create beautiful bee-themed rock art.
Are you ready to start your rock painting journey? Visit rockscapes.net for more inspiration, detailed guides, and expert advice on all things rock-related. Explore our vast collection of stunning rock designs and get personalized tips from our expert designers to bring your vision to life. Contact us at 1151 S Forest Ave, Tempe, AZ 85281, United States, or call us at +1 (480) 965-9011. Let rockscapes.net be your partner in creating breathtaking rockscapes and unique art pieces!
 painted rocks crafts
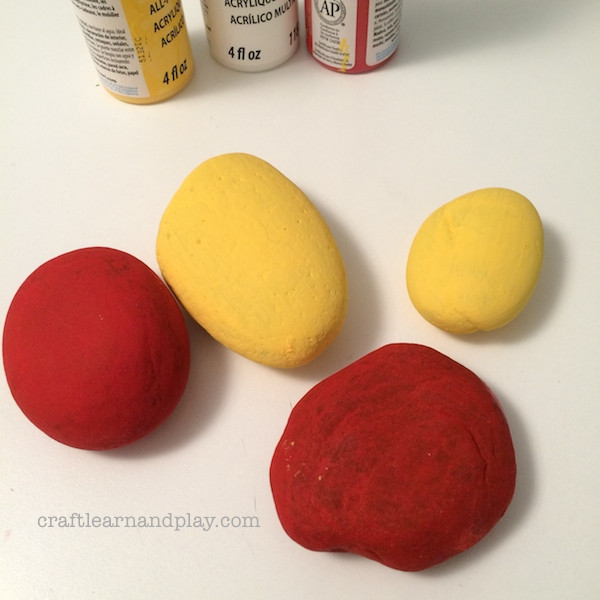 IMG_8113