How To Draw An Owl On A Rock? Rock painting is a fantastic way to connect with nature and unleash your creativity, and at rockscapes.net, we believe everyone can create stunning art on stone. This guide will provide you with simple, effective steps to transform ordinary rocks into charming owl masterpieces. By exploring various painting techniques and design options, you’ll discover how to personalize your rock art and incorporate it into your landscape, adding a touch of whimsy and artistry to your outdoor space.
1. Understanding the Appeal of Rock Painting
Rock painting has surged in popularity as a creative outlet and a way to bring personalized art to outdoor spaces. Why is it so appealing?
1.1. The Therapeutic Benefits of Rock Art
Engaging in artistic activities like rock painting can be incredibly therapeutic. According to research from Arizona State University’s School of Art, creating art reduces stress levels and promotes a sense of calm. The repetitive motions involved in painting, such as applying brushstrokes and blending colors, can have a meditative effect, helping to quiet the mind and ease anxiety. This makes rock painting not only a fun hobby but also a beneficial practice for mental well-being.
1.2. Connecting with Nature through Art
Rock painting provides a unique way to connect with nature. By transforming ordinary stones into works of art, individuals develop a deeper appreciation for the natural world. This activity encourages people to spend time outdoors, searching for the perfect rocks and observing the environment around them. Integrating these painted rocks into gardens or landscapes further enhances this connection, creating a harmonious blend of art and nature.
1.3. Adding Personalized Touches to Landscapes
One of the most attractive aspects of rock painting is the ability to add personalized touches to outdoor spaces. Whether it’s painting whimsical designs, inspirational messages, or miniature landscapes, these artistic creations reflect the individual’s style and personality. Painted rocks can be placed in gardens, along pathways, or near water features, serving as unique decorative elements that enhance the overall aesthetic appeal of the landscape.
2. Gathering the Right Materials for Your Owl Rock Painting
To ensure your owl rock painting project is a success, gathering the right materials is essential. Here’s a comprehensive list of what you’ll need:
2.1. Selecting the Perfect Rocks
The foundation of any rock painting project is, of course, the rocks themselves. Ideal rocks for painting are smooth, flat, and clean. These characteristics provide an optimal surface for applying paint and creating detailed designs.
- Smoothness: A smooth surface allows for easier and more even application of paint. Rough or porous rocks can cause the paint to bleed or create uneven textures, making it difficult to achieve the desired look.
- Flatness: Flat rocks are easier to work with, especially for intricate designs. They provide a stable canvas and prevent the paint from running or pooling.
- Cleanliness: Before painting, rocks should be thoroughly cleaned to remove any dirt, debris, or loose particles. Washing the rocks with water and a mild soap, then allowing them to dry completely, ensures that the paint adheres properly and the colors remain vibrant.
2.2. Choosing the Right Paints
Selecting the right paints is crucial for creating vibrant and long-lasting rock art. Acrylic paints are generally recommended due to their versatility, durability, and wide range of colors.
- Versatility: Acrylic paints can be used on various surfaces, including rocks, and are available in different finishes, such as matte, gloss, and metallic.
- Durability: Once dry, acrylic paints are water-resistant and fade-resistant, making them ideal for outdoor use. They can withstand exposure to sunlight, rain, and other environmental elements without losing their vibrancy.
- Color Range: Acrylic paints come in a vast array of colors, allowing artists to create detailed and colorful designs. They can be easily mixed to create custom shades and gradients, providing endless possibilities for artistic expression.
2.3. Essential Painting Tools
In addition to rocks and paints, having the right painting tools is essential for achieving professional-looking results. Here are some must-have tools for your rock painting kit:
- Paintbrushes: A variety of paintbrushes in different sizes and shapes is necessary for creating detailed designs and filling in larger areas. Fine-tipped brushes are ideal for intricate details, while larger, flat brushes are suitable for covering broad surfaces.
- Palette or Disposable Plate: A palette or disposable plate is used for mixing paints and keeping them organized. This prevents colors from becoming contaminated and allows for easy access while painting.
- Water and Paper Towels: Water is essential for cleaning brushes and thinning paints if necessary. Paper towels are useful for wiping excess paint and keeping the workspace clean.
- Pencils (Optional): Pencils can be used for sketching the design onto the rock before painting. This helps to ensure accuracy and allows for adjustments before committing to the final design.
- Sealant (Optional): A sealant, such as Mod Podge or a clear acrylic spray, can be applied to protect the finished painting from the elements. This helps to preserve the colors and prevent the paint from chipping or fading over time.
3. Step-by-Step Guide: How to Draw an Owl on a Rock
Now that you have gathered all the necessary materials, let’s dive into the step-by-step guide on how to draw an owl on a rock.
3.1. Preparing the Rock Surface
The first step in creating a beautiful owl rock painting is to prepare the rock surface. This involves cleaning the rock thoroughly and ensuring it is completely dry before you begin painting.
3.1.1. Cleaning the Rock
To clean the rock, use water and a mild soap to remove any dirt, debris, or loose particles. A soft brush can be used to scrub the surface gently. Once the rock is clean, rinse it thoroughly with water to remove any soap residue.
3.1.2. Drying the Rock
After cleaning the rock, allow it to dry completely before proceeding. This can be done by air-drying the rock in a well-ventilated area or by using a clean towel to pat it dry. Ensure that there is no moisture left on the surface, as this can interfere with the adhesion of the paint.
 A smooth rock with two large white circles painted on it, representing the owl's eyes, with small black pupils inside each circle.
3.2. Sketching the Basic Owl Shape (Optional)
Before you start painting, it can be helpful to sketch the basic owl shape onto the rock using a pencil. This allows you to plan the design and make any necessary adjustments before applying the paint.
3.2.1. Using a Pencil to Sketch
Lightly sketch the outline of the owl onto the rock, paying attention to the overall shape and proportions. You can refer to reference images or tutorials for guidance. If you make a mistake, simply erase the pencil marks and try again.
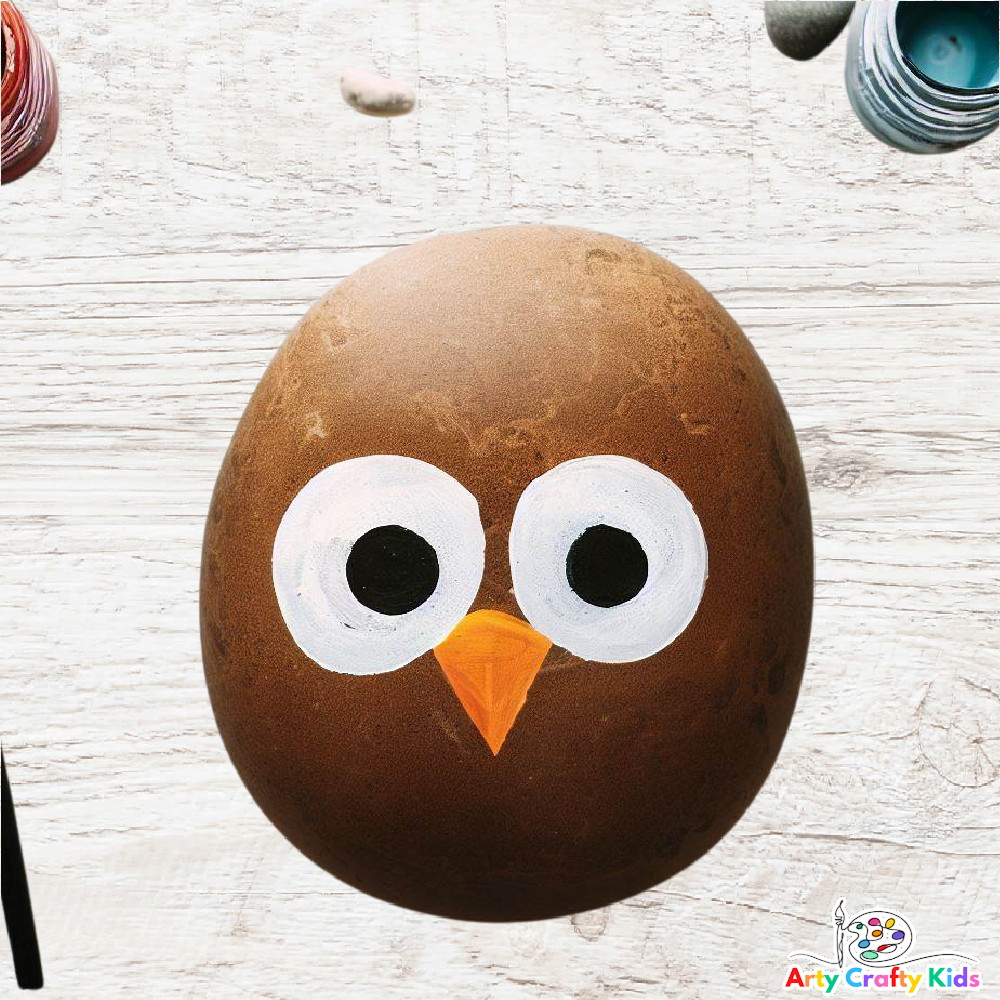
3.2.2. Creating Large White Eyes
Alternatively, you can skip the pencil sketch and go straight to painting the eyes. Start by creating two large white circles on the rock, which will serve as the base for the owl’s eyes. These circles should be evenly spaced and proportional to the size of the rock.
3.3. Painting the Owl’s Features
Once the basic shape is sketched or the eyes are painted, it’s time to add the owl’s distinctive features. This includes the eyes, beak, and any other details that will bring your owl to life.
3.3.1. Adding Pupils to the Eyes
After the white circles for the eyes have dried, paint a pair of smaller black circles inside the white ones to create the pupils. This will give the owl its characteristic wide-eyed expression. Make sure the pupils are centered within the white circles for a balanced look.
3.3.2. Painting the Beak
Next, use orange or yellow paint to add a small, triangular beak in between the two eyes. The beak can be either long and pointed or short and rounded, depending on your preference. Position the beak centrally between the eyes to maintain symmetry.
3.4. Decorating the Owl with Feathers and Details
Now comes the fun part – decorating the owl with feathers and other details. This is where you can get creative and personalize your owl rock painting.
3.4.1. Creating Feathery Strokes
Using a thin paintbrush, dip it into colored paint and create feathery strokes around the owl’s eyes to indicate its feathers. These strokes can go outward to give the impression of wings or follow the contours of the owl’s body. Experiment with different colors and patterns to create a unique look.
3.4.2. Painting Defined Wings
To create defined wings, use a thin paintbrush to paint a pair of slightly curved lines on either side of the rock. Add some small, feathery strokes along these lines to give the wings texture and fill them with small paint strokes. You can use multiple colors, a color gradient, or random, overlapping strokes to add visual interest.
 A collection of painted rock owls with various designs, including rainbow stripes, flowers on the wings, and different color schemes.
3.5. Adding Finishing Touches
The final step is to add any finishing touches that will enhance the overall look of your owl rock painting. This might include adding small details, boldening the eyes, or applying a sealant to protect the paint.
3.5.1. Enhancing with Small Details
With a thin brush, paint small black dots or short strokes around the owl’s eyes and body to add more feather details. You can also add additional rings of color around the eyes to make them stand out.
3.5.2. Applying a Sealant
Let the paint dry completely. If you’d like, apply a sealant to protect the paint on the rock. Mod Podge glue is a great option!
4. Creative Ideas for Owl Rock Painting Designs
Once you’ve mastered the basic techniques of owl rock painting, you can explore various creative ideas to make your designs even more unique and personalized.
4.1. Incorporating Different Color Schemes
Experiment with different color schemes to create owls that are vibrant, whimsical, or realistic.
- Rainbow Colors: Paint rainbow-colored stripes onto the owl’s body for a playful and cheerful look.
- Earthy Tones: Use earthy tones like browns, greens, and grays for a more natural and subdued appearance.
- Monochromatic: Create a sophisticated look by using different shades of a single color.
4.2. Adding Patterns and Textures
Add visual interest to your owl rock paintings by incorporating various patterns and textures.
- Polka Dots: Paint small polka dots onto the owl’s feathers for a whimsical touch.
- Stripes: Use stripes of different widths and colors to create a bold and eye-catching design.
- Swirls: Add swirls and curls to the feathers for a dynamic and textured look.
4.3. Using Stencils for Precise Designs
If you want to create precise designs, consider using stencils. Stencils can be used to create intricate patterns, shapes, and images on your owl rock paintings.
- Custom Stencils: Create your own custom stencils using cardboard or acetate sheets.
- Pre-Made Stencils: Purchase pre-made stencils from craft stores in a variety of designs.
4.4. Incorporating Natural Elements
Enhance your owl rock paintings by incorporating natural elements such as leaves, twigs, and flowers.
- Leaf Imprints: Press leaves onto the wet paint to create leaf imprints on the owl’s feathers.
- Twig Accents: Glue small twigs onto the rock to create realistic-looking branches or perches for the owl.
- Flower Details: Paint tiny flowers onto the owl’s wings or body for a touch of whimsy.
5. Incorporating Painted Rocks into Your Landscape
Once your owl rock paintings are complete, you can incorporate them into your landscape to add a touch of whimsy and artistry to your outdoor space.
5.1. Garden Decorations
Place your painted rocks in your garden to add pops of color and personality.
- Flower Beds: Scatter the rocks among your flower beds to create a playful and enchanting scene.
- Pathways: Line your garden pathways with painted rocks to create a whimsical and inviting entrance.
- Rock Gardens: Create a rock garden and incorporate your painted rocks for a cohesive and artistic display.
5.2. Water Features
Enhance your water features with painted rocks to add visual interest and charm.
- Ponds: Place the rocks around the edges of your pond to create a decorative border.
- Fountains: Arrange the rocks around your fountain to add color and texture to the water feature.
- Streams: Line the banks of your stream with painted rocks to create a whimsical and natural-looking landscape.
5.3. Outdoor Living Spaces
Decorate your outdoor living spaces with painted rocks to add a personal touch.
- Patios: Place the rocks on your patio tables or along the edges of your patio to create a welcoming and artistic atmosphere.
- Decks: Arrange the rocks on your deck railings or steps to add color and texture to your outdoor space.
- Porches: Decorate your porch with painted rocks to create a charming and inviting entrance to your home.
6. Maintaining and Protecting Your Rock Art
To ensure that your owl rock paintings remain vibrant and beautiful for years to come, it’s important to maintain and protect them properly.
6.1. Applying a Protective Sealant
Applying a protective sealant is essential for protecting your rock art from the elements. A sealant, such as Mod Podge or a clear acrylic spray, will help to preserve the colors and prevent the paint from chipping or fading over time.
6.1.1. Types of Sealants
There are several types of sealants available, each with its own advantages and disadvantages.
- Mod Podge: Mod Podge is a water-based sealant that is easy to apply and dries to a clear, matte finish. It is ideal for protecting rock art from light moisture and wear.
- Clear Acrylic Spray: Clear acrylic spray is a solvent-based sealant that provides a durable and water-resistant finish. It is ideal for protecting rock art from heavy rain, snow, and other harsh weather conditions.
6.1.2. Application Tips
When applying a sealant, it’s important to follow the manufacturer’s instructions carefully.
- Clean the Surface: Before applying the sealant, make sure the rock art is clean and dry.
- Apply Evenly: Apply the sealant in a thin, even layer to avoid drips and streaks.
- Allow to Dry: Allow the sealant to dry completely before handling or displaying the rock art.
6.2. Regular Cleaning
Regular cleaning is essential for keeping your rock art looking its best. Dust, dirt, and other debris can accumulate on the surface of the rocks, dulling the colors and obscuring the details.
6.2.1. Cleaning Methods
There are several methods you can use to clean your rock art.
- Soft Brush: Use a soft brush to gently remove dust and dirt from the surface of the rocks.
- Damp Cloth: Wipe the rocks with a damp cloth to remove stubborn dirt and grime.
- Mild Soap and Water: For heavily soiled rocks, use a mild soap and water solution to clean the surface. Rinse thoroughly with clean water and allow to dry completely.
6.2.2. Avoiding Harsh Chemicals
When cleaning your rock art, avoid using harsh chemicals or abrasive cleaners, as these can damage the paint and sealant. Stick to gentle cleaning methods and mild detergents to preserve the integrity of your artwork.
6.3. Storing Rock Art Properly
When not on display, it’s important to store your rock art properly to protect it from damage.
6.3.1. Indoor Storage
If storing your rock art indoors, keep it in a cool, dry place away from direct sunlight. Direct sunlight can cause the colors to fade over time.
6.3.2. Outdoor Storage
If storing your rock art outdoors, protect it from harsh weather conditions by covering it with a tarp or bringing it indoors during extreme weather events.
7. Addressing Common Challenges in Rock Painting
Even with careful planning and preparation, you may encounter some challenges when painting rocks. Here are some common issues and how to address them:
7.1. Paint Not Adhering Properly
One of the most common challenges is paint not adhering properly to the rock surface. This can be caused by a variety of factors, including:
- Dirty Rock Surface: If the rock surface is dirty or oily, the paint may not adhere properly. Make sure to clean the rock thoroughly before painting.
- Wet Rock Surface: If the rock surface is wet, the paint will not adhere properly. Make sure the rock is completely dry before painting.
- Incorrect Paint Type: Some types of paint are not suitable for use on rocks. Use acrylic paints for best results.
7.2. Paint Bleeding or Smearing
Another common issue is paint bleeding or smearing, which can ruin your design. This can be caused by:
- Too Much Paint: Applying too much paint can cause it to bleed or smear. Use thin, even layers of paint to avoid this issue.
- Wet Paint: If you touch the paint before it is completely dry, it can smear. Allow the paint to dry completely before handling the rock.
- Porous Rock Surface: Porous rocks can absorb the paint, causing it to bleed. Apply a sealant to the rock surface before painting to prevent this issue.
7.3. Paint Cracking or Chipping
Paint cracking or chipping can occur over time, especially if the rock art is exposed to harsh weather conditions. This can be prevented by:
- Applying a Sealant: Applying a protective sealant will help to prevent the paint from cracking or chipping.
- Storing Rock Art Properly: Store your rock art in a cool, dry place away from direct sunlight and harsh weather conditions.
8. Rockscapes.net: Your Partner in Landscape Artistry
At rockscapes.net, we understand the transformative power of incorporating natural elements into your landscape. Our mission is to provide you with the inspiration, information, and resources you need to create stunning outdoor spaces that reflect your unique style and personality.
8.1. Discover Design Ideas
Looking for inspiration for your next rock painting project or landscape design? rockscapes.net offers a wealth of design ideas, ranging from simple and elegant to bold and whimsical. Explore our gallery of images and articles to discover new and exciting ways to incorporate rocks into your outdoor spaces.
8.2. Learn About Different Types of Rocks
Choosing the right type of rock is essential for creating a successful landscape design. At rockscapes.net, we provide detailed information about a variety of rocks, including their characteristics, uses, and maintenance requirements. Whether you’re looking for granite, slate, river rock, or flagstone, we can help you find the perfect materials for your project.
8.3. Get Expert Advice
Need help with your landscape design or rock painting project? Our team of experts is here to provide you with personalized advice and guidance. From choosing the right materials to designing the perfect layout, we can help you bring your vision to life.
9. Frequently Asked Questions (FAQs) About How to Draw an Owl on a Rock
Here are some frequently asked questions about how to draw an owl on a rock, along with detailed answers to help you succeed in your rock painting endeavors:
9.1. What Type of Rock is Best for Painting Owls?
Smooth, flat rocks are best for painting owls. The smoother the surface, the easier it is to apply paint and create detailed designs. Flat rocks provide a stable canvas, preventing paint from running or pooling.
9.2. What Kind of Paint Should I Use for Rock Painting?
Acrylic paints are ideal for rock painting due to their versatility, durability, and wide range of colors. They adhere well to rock surfaces and are water-resistant once dry.
9.3. How Do I Prepare a Rock for Painting?
Wash the rock with water and a mild soap to remove any dirt, debris, or loose particles. Rinse thoroughly and allow to dry completely before painting.
9.4. Do I Need to Seal My Painted Rocks?
Yes, sealing your painted rocks with a sealant like Mod Podge or a clear acrylic spray is recommended. This protects the paint from the elements and prevents chipping or fading.
9.5. What Tools Do I Need for Rock Painting?
Essential tools include a variety of paintbrushes in different sizes, a palette or disposable plate for mixing paints, water for cleaning brushes, and paper towels for wiping excess paint. Pencils for sketching designs are optional but helpful.
9.6. How Can I Prevent Paint from Bleeding or Smearing?
Use thin, even layers of paint and allow each layer to dry completely before applying the next. Avoid touching the paint before it is dry and consider applying a sealant to the rock surface before painting to prevent absorption.
9.7. How Do I Store My Painted Rocks When Not in Use?
Store painted rocks in a cool, dry place away from direct sunlight to prevent fading. If storing outdoors, protect them from harsh weather by covering them or bringing them inside during extreme conditions.
9.8. Can I Use Stencils for Rock Painting?
Yes, stencils can be used to create precise designs on rocks. You can purchase pre-made stencils or create your own using cardboard or acetate sheets.
9.9. How Can I Make My Rock Art Last Longer?
Apply a protective sealant, clean your rock art regularly with gentle methods, and store it properly to protect it from damage and the elements.
9.10. Where Can I Find Inspiration for Rock Painting Designs?
Rockscapes.net offers a wealth of design ideas for rock painting and landscape design. Explore our gallery of images and articles to discover new and exciting ways to incorporate rocks into your outdoor spaces.
10. Conclusion: Unleash Your Creativity with Owl Rock Painting
Drawing an owl on a rock is a delightful and rewarding activity that allows you to express your creativity and connect with nature. By following the steps outlined in this guide and exploring the various design ideas and techniques, you can create stunning rock art that will add a touch of whimsy and artistry to your landscape. Remember to gather the right materials, prepare your rocks properly, and protect your finished artwork with a sealant.
Visit rockscapes.net today to discover a wealth of inspiration, information, and resources for all your landscape artistry needs. Whether you’re looking for design ideas, information about different types of rocks, or expert advice, we have everything you need to bring your vision to life. Let rockscapes.net be your partner in creating beautiful and unique outdoor spaces that reflect your personal style and passion for nature. Contact us at Address: 1151 S Forest Ave, Tempe, AZ 85281, United States. Phone: +1 (480) 965-9011.