Drawing rocks can seem daunting, but with the right techniques, you can master the art. Rockscapes.net is here to guide you through every step, transforming those geological giants into stunning artistic creations. Learn how to capture the essence of stone and elevate your artwork with realistic and captivating rock formations.
Table of Contents
- Why Learn How To Draw Rocks?
- Understanding Rock Composition for Accurate Drawings
- Essential Tools for Drawing Rocks
- Step-by-Step Guide: How to Draw Rocks
- Advanced Techniques for Realistic Rock Drawings
- Drawing Different Types of Rocks
- Common Mistakes to Avoid When Drawing Rocks
- Incorporating Rocks into Landscape Drawings
- Resources for Further Learning
- FAQ: How to Draw Rocks
1. Why Learn How to Draw Rocks?
Learning how to draw rocks is crucial for any artist aiming to create realistic and compelling landscapes. Rocks add texture, depth, and a sense of natural grandeur to your artwork. Whether you’re a landscape architect, a hobbyist, or a professional artist, mastering the art of rock depiction can significantly enhance your skills. The ability to draw rocks convincingly allows you to ground your scenes, providing a sense of stability and realism that can elevate your entire composition.
1.1. Enhancing Realism in Landscapes
Rocks are fundamental elements in almost every landscape. From the smallest pebbles to towering cliffs, they define the terrain and give character to the environment. By learning to draw rocks accurately, you can add a layer of realism to your landscapes that’s hard to achieve otherwise.
1.2. Adding Texture and Depth
Rocks are inherently textural. They have rough surfaces, cracks, and variations in color that can add visual interest to your drawings. Mastering the techniques to represent these textures can create depth and make your drawings more engaging.
1.3. Improving Composition Skills
The placement and depiction of rocks can greatly influence the composition of your artwork. Rocks can serve as focal points, guide the viewer’s eye, and create a sense of balance within the scene. Understanding how to arrange and draw rocks effectively can enhance your overall composition skills.
1.4. Versatility in Artistic Expression
The ability to draw rocks opens up a wide range of artistic possibilities. Whether you’re creating detailed geological illustrations or stylized landscape paintings, knowing how to draw rocks allows you to explore various artistic styles and themes.
1.5. Connecting with Nature
Drawing rocks encourages a deeper connection with nature. By closely observing rocks and trying to capture their unique qualities, you develop a greater appreciation for the natural world and the beauty of geological formations.
2. Understanding Rock Composition for Accurate Drawings
To draw rocks accurately, it’s essential to understand their composition. Rocks are not just random shapes; they have structures and forms that can be broken down into simpler elements. Understanding these elements will help you create more realistic and convincing rock drawings.
2.1. Basic Shapes and Forms
Rocks can be composed of various basic shapes, such as spheres, cubes, cylinders, and pyramids. Recognizing these shapes within the rock’s overall form can simplify the drawing process. Start by identifying the underlying shapes and then build upon them to create more complex structures.
2.2. Planes and Surfaces
Rocks often have distinct planes or flat surfaces that catch light and shadow in different ways. Identifying these planes is crucial for depicting the rock’s form and volume. Observe how light falls on the rock and how the planes interact with each other to create highlights and shadows.
2.3. Texture and Patterns
The texture of a rock is determined by its mineral composition and the weathering processes it has undergone. Rocks can have rough, smooth, jagged, or layered textures. Pay attention to the patterns and details on the rock’s surface, such as cracks, veins, and erosion marks.
2.4. Light and Shadow
Understanding how light and shadow interact with the rock’s surface is essential for creating a sense of depth and realism. Observe the direction of the light source and how it affects the rock’s planes and textures. Use shading techniques to emphasize the contrast between light and shadow.
2.5. Geological Factors
Different types of rocks have different compositions and structures. For example, sedimentary rocks often have layered structures, while igneous rocks can have more irregular forms. Understanding the geological factors that influence rock formation can help you draw different types of rocks more accurately. According to research from Arizona State University’s School of Earth and Space Exploration, sedimentary rocks like sandstone exhibit distinct layering due to sediment deposition, whereas igneous rocks such as granite have a more crystalline structure formed from cooled magma.
3. Essential Tools for Drawing Rocks
Having the right tools can make a significant difference in the quality of your rock drawings. Here’s a list of essential tools that every artist should have:
3.1. Pencils
A set of graphite pencils with varying hardness levels (e.g., HB, 2B, 4B, 6B) is essential for creating different values and textures. Harder pencils (HB) are suitable for light lines and details, while softer pencils (6B) are ideal for dark shadows and textures.
3.2. Erasers
A kneaded eraser is perfect for lifting graphite and creating subtle highlights, while a plastic or rubber eraser is useful for removing lines and correcting mistakes.
3.3. Sketchbook or Paper
Choose a sketchbook or paper with a smooth or slightly textured surface, depending on your preferred drawing style. Heavier paper is better for shading and blending.
3.4. Blending Stumps or Tortillons
Blending stumps or tortillons are useful for smoothing out graphite and creating soft transitions between values.
3.5. Sharpeners
A good pencil sharpener is essential for maintaining sharp points on your pencils, which are necessary for creating fine details and textures.
3.6. Reference Images
Having reference images of rocks is crucial for observing their forms, textures, and patterns. Use photographs or real-life rocks as references for your drawings. Rockscapes.net offers a wide range of reference images to inspire your artwork.
4. Step-by-Step Guide: How to Draw Rocks
Follow these steps to create realistic and compelling rock drawings:
4.1. Step 1: Sketch the Basic Shapes
Start by sketching the basic shapes of the rock using light, loose lines. Focus on capturing the overall form and proportions of the rock. Don’t worry about details at this stage.
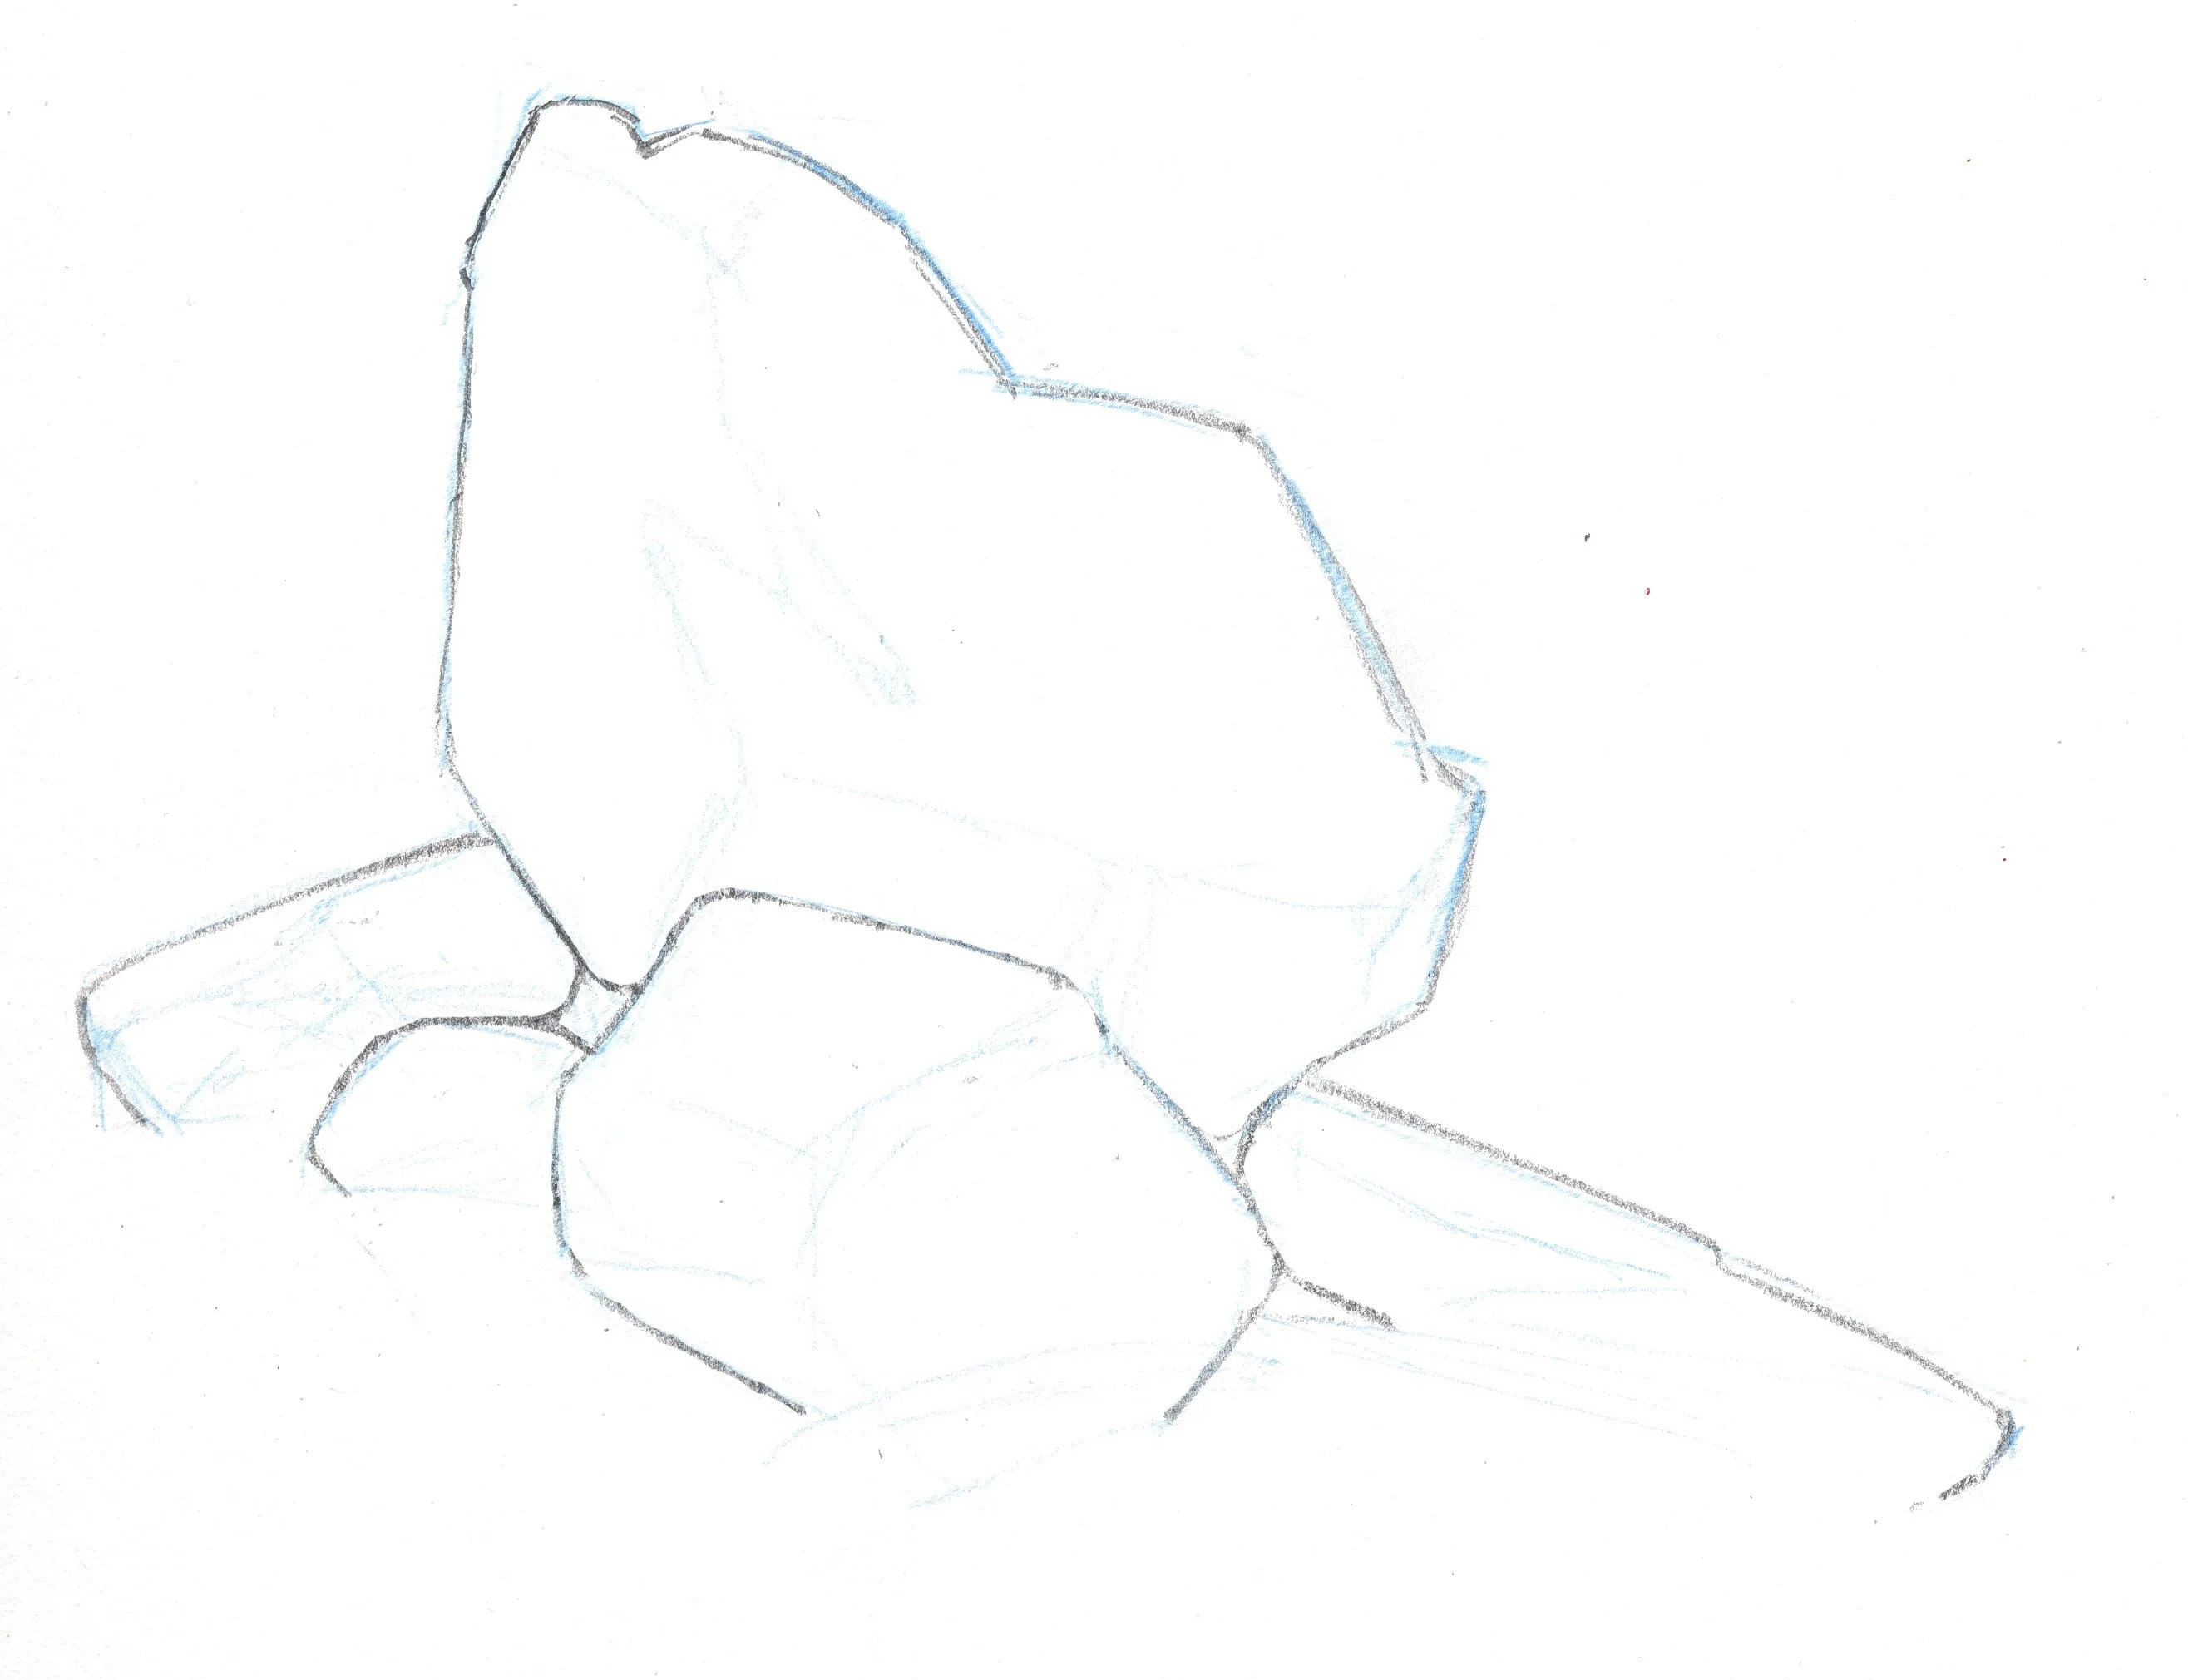 Basic shapes of a rock
4.2. Step 2: Define the Planes
Identify the major planes or flat surfaces on the rock. Use slightly darker lines to define these planes and indicate their angles. Pay attention to how the planes intersect and create edges.
 Defining planes on a rock drawing
4.3. Step 3: Add Initial Shading
Begin adding initial shading to the rock using a light pencil (e.g., HB or 2B). Focus on the areas that are in shadow and gradually build up the values. Use hatching or cross-hatching techniques to create texture.
4.4. Step 4: Develop the Values
Continue to develop the values by adding darker shades to the areas in shadow. Use a softer pencil (e.g., 4B or 6B) to create deeper shadows. Pay attention to the contrast between light and shadow to create a sense of depth.
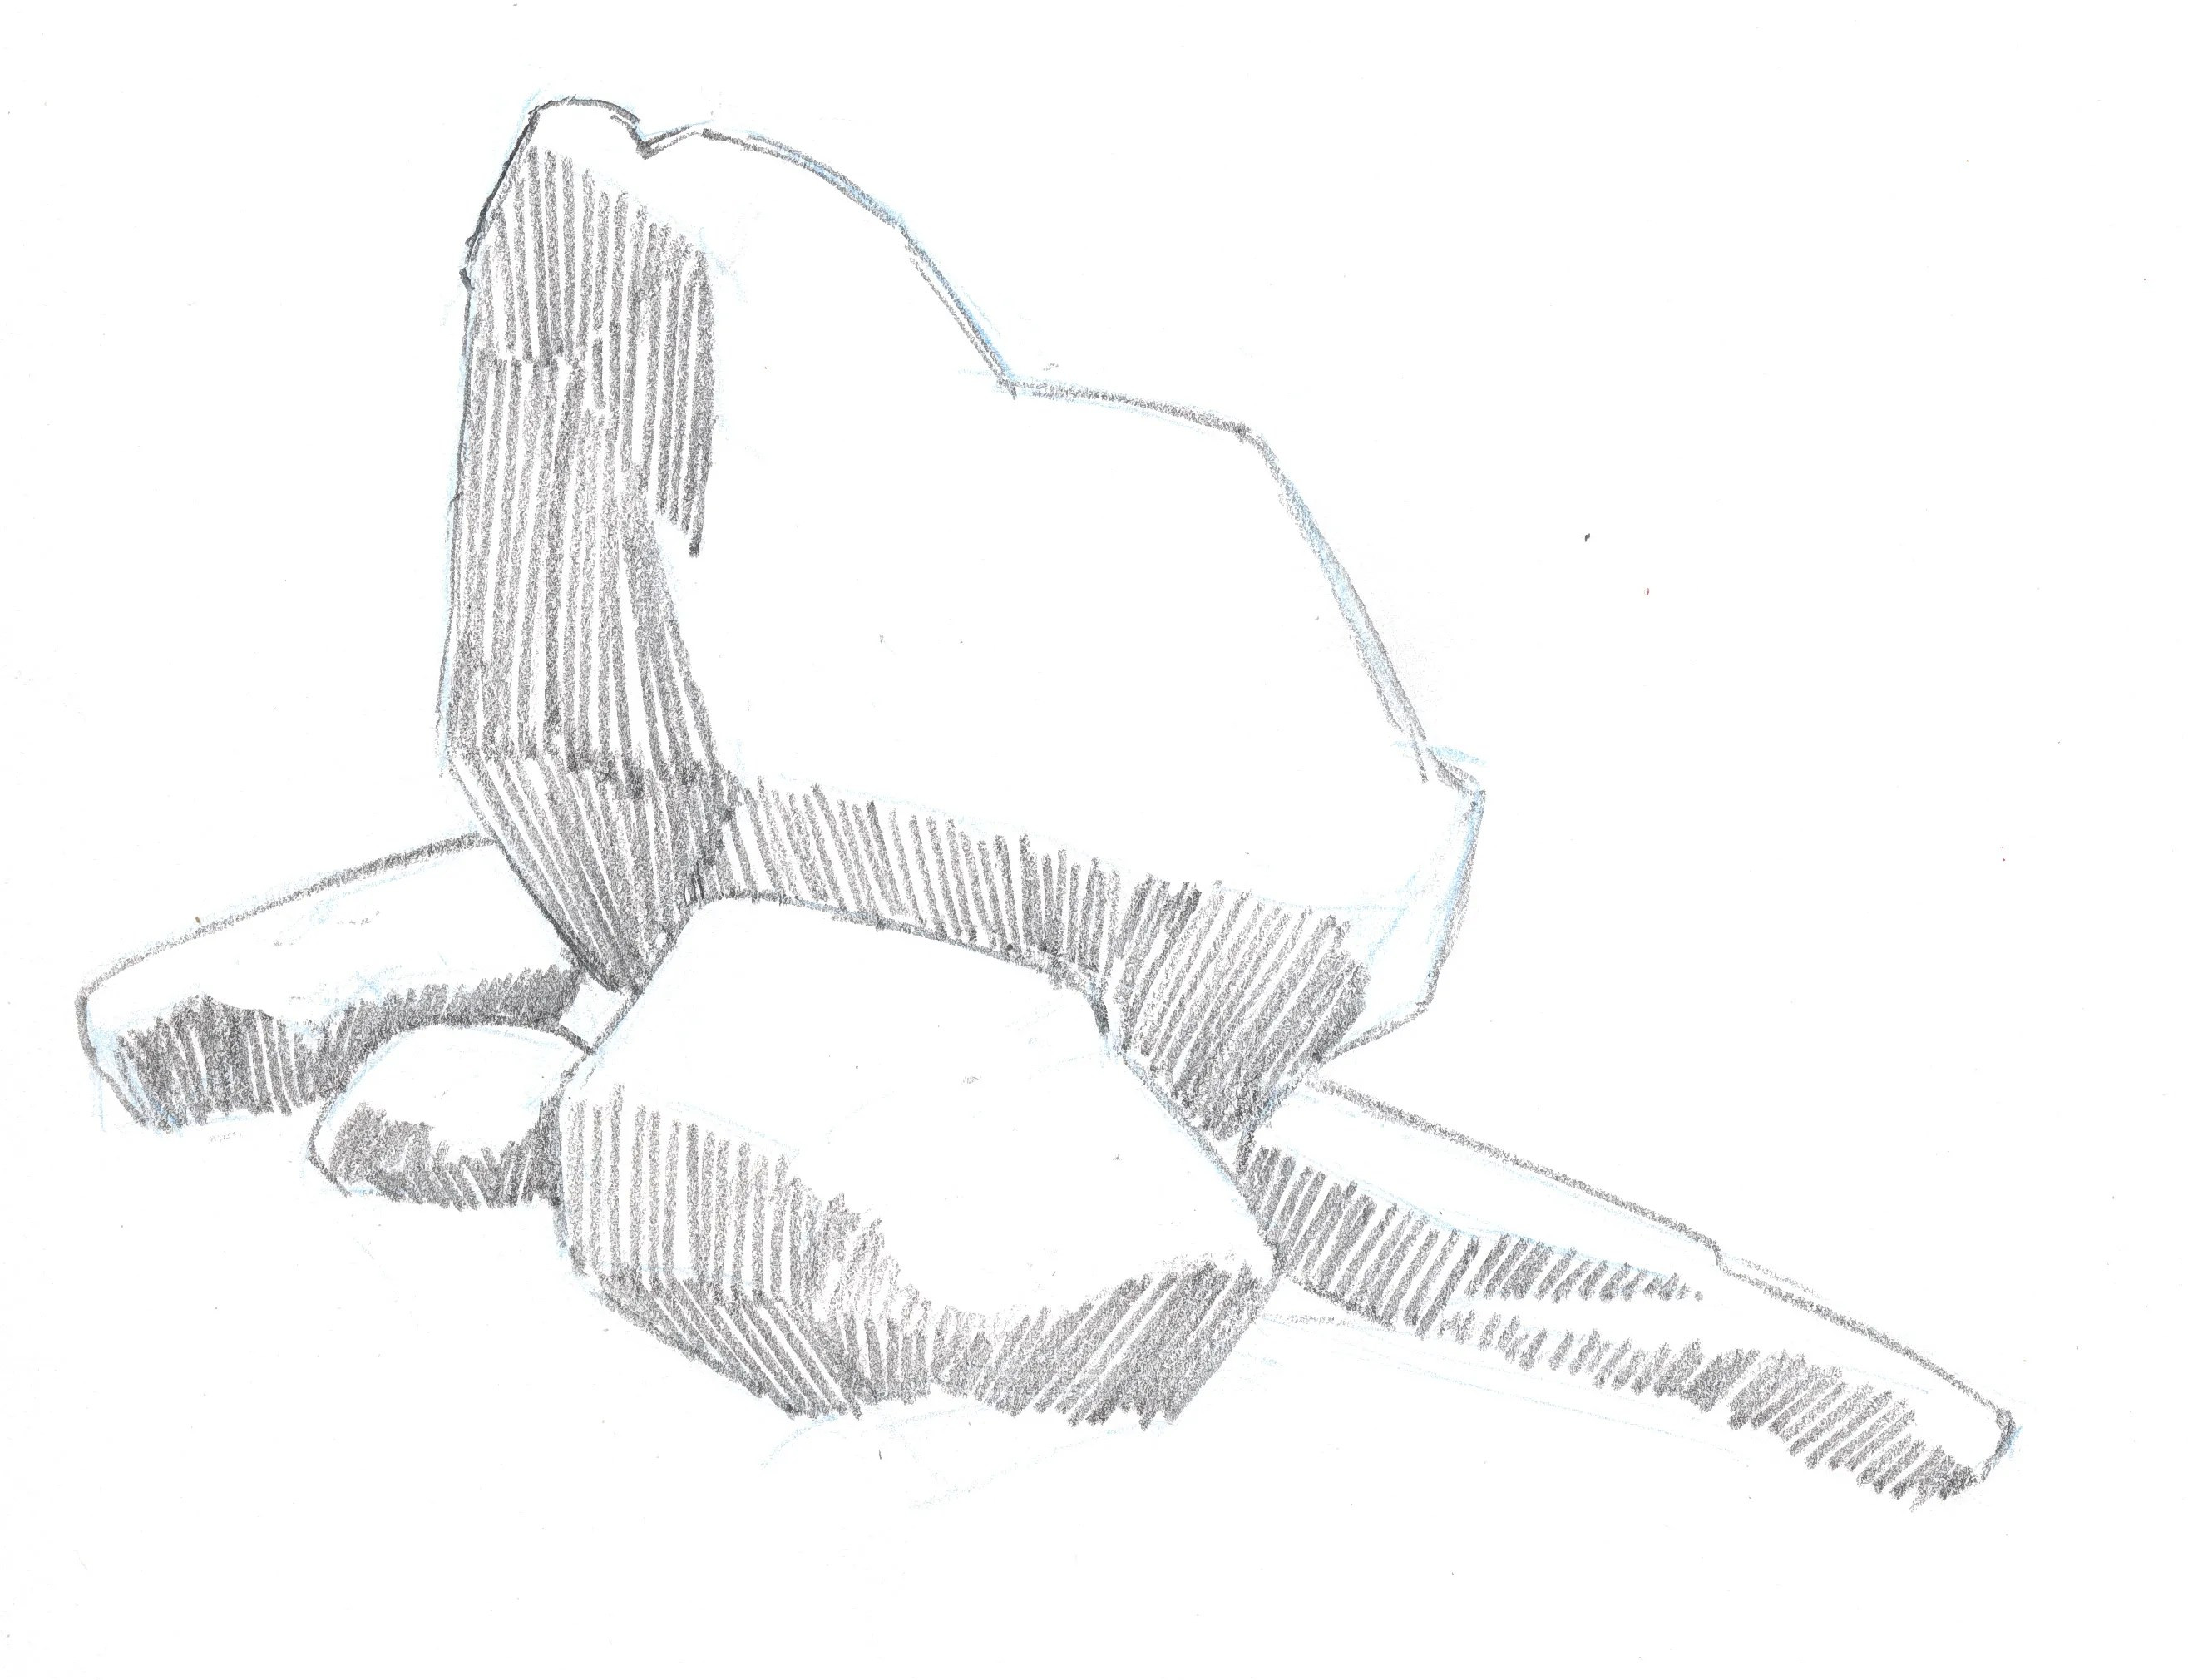 Adding shadows and values to rock illustration
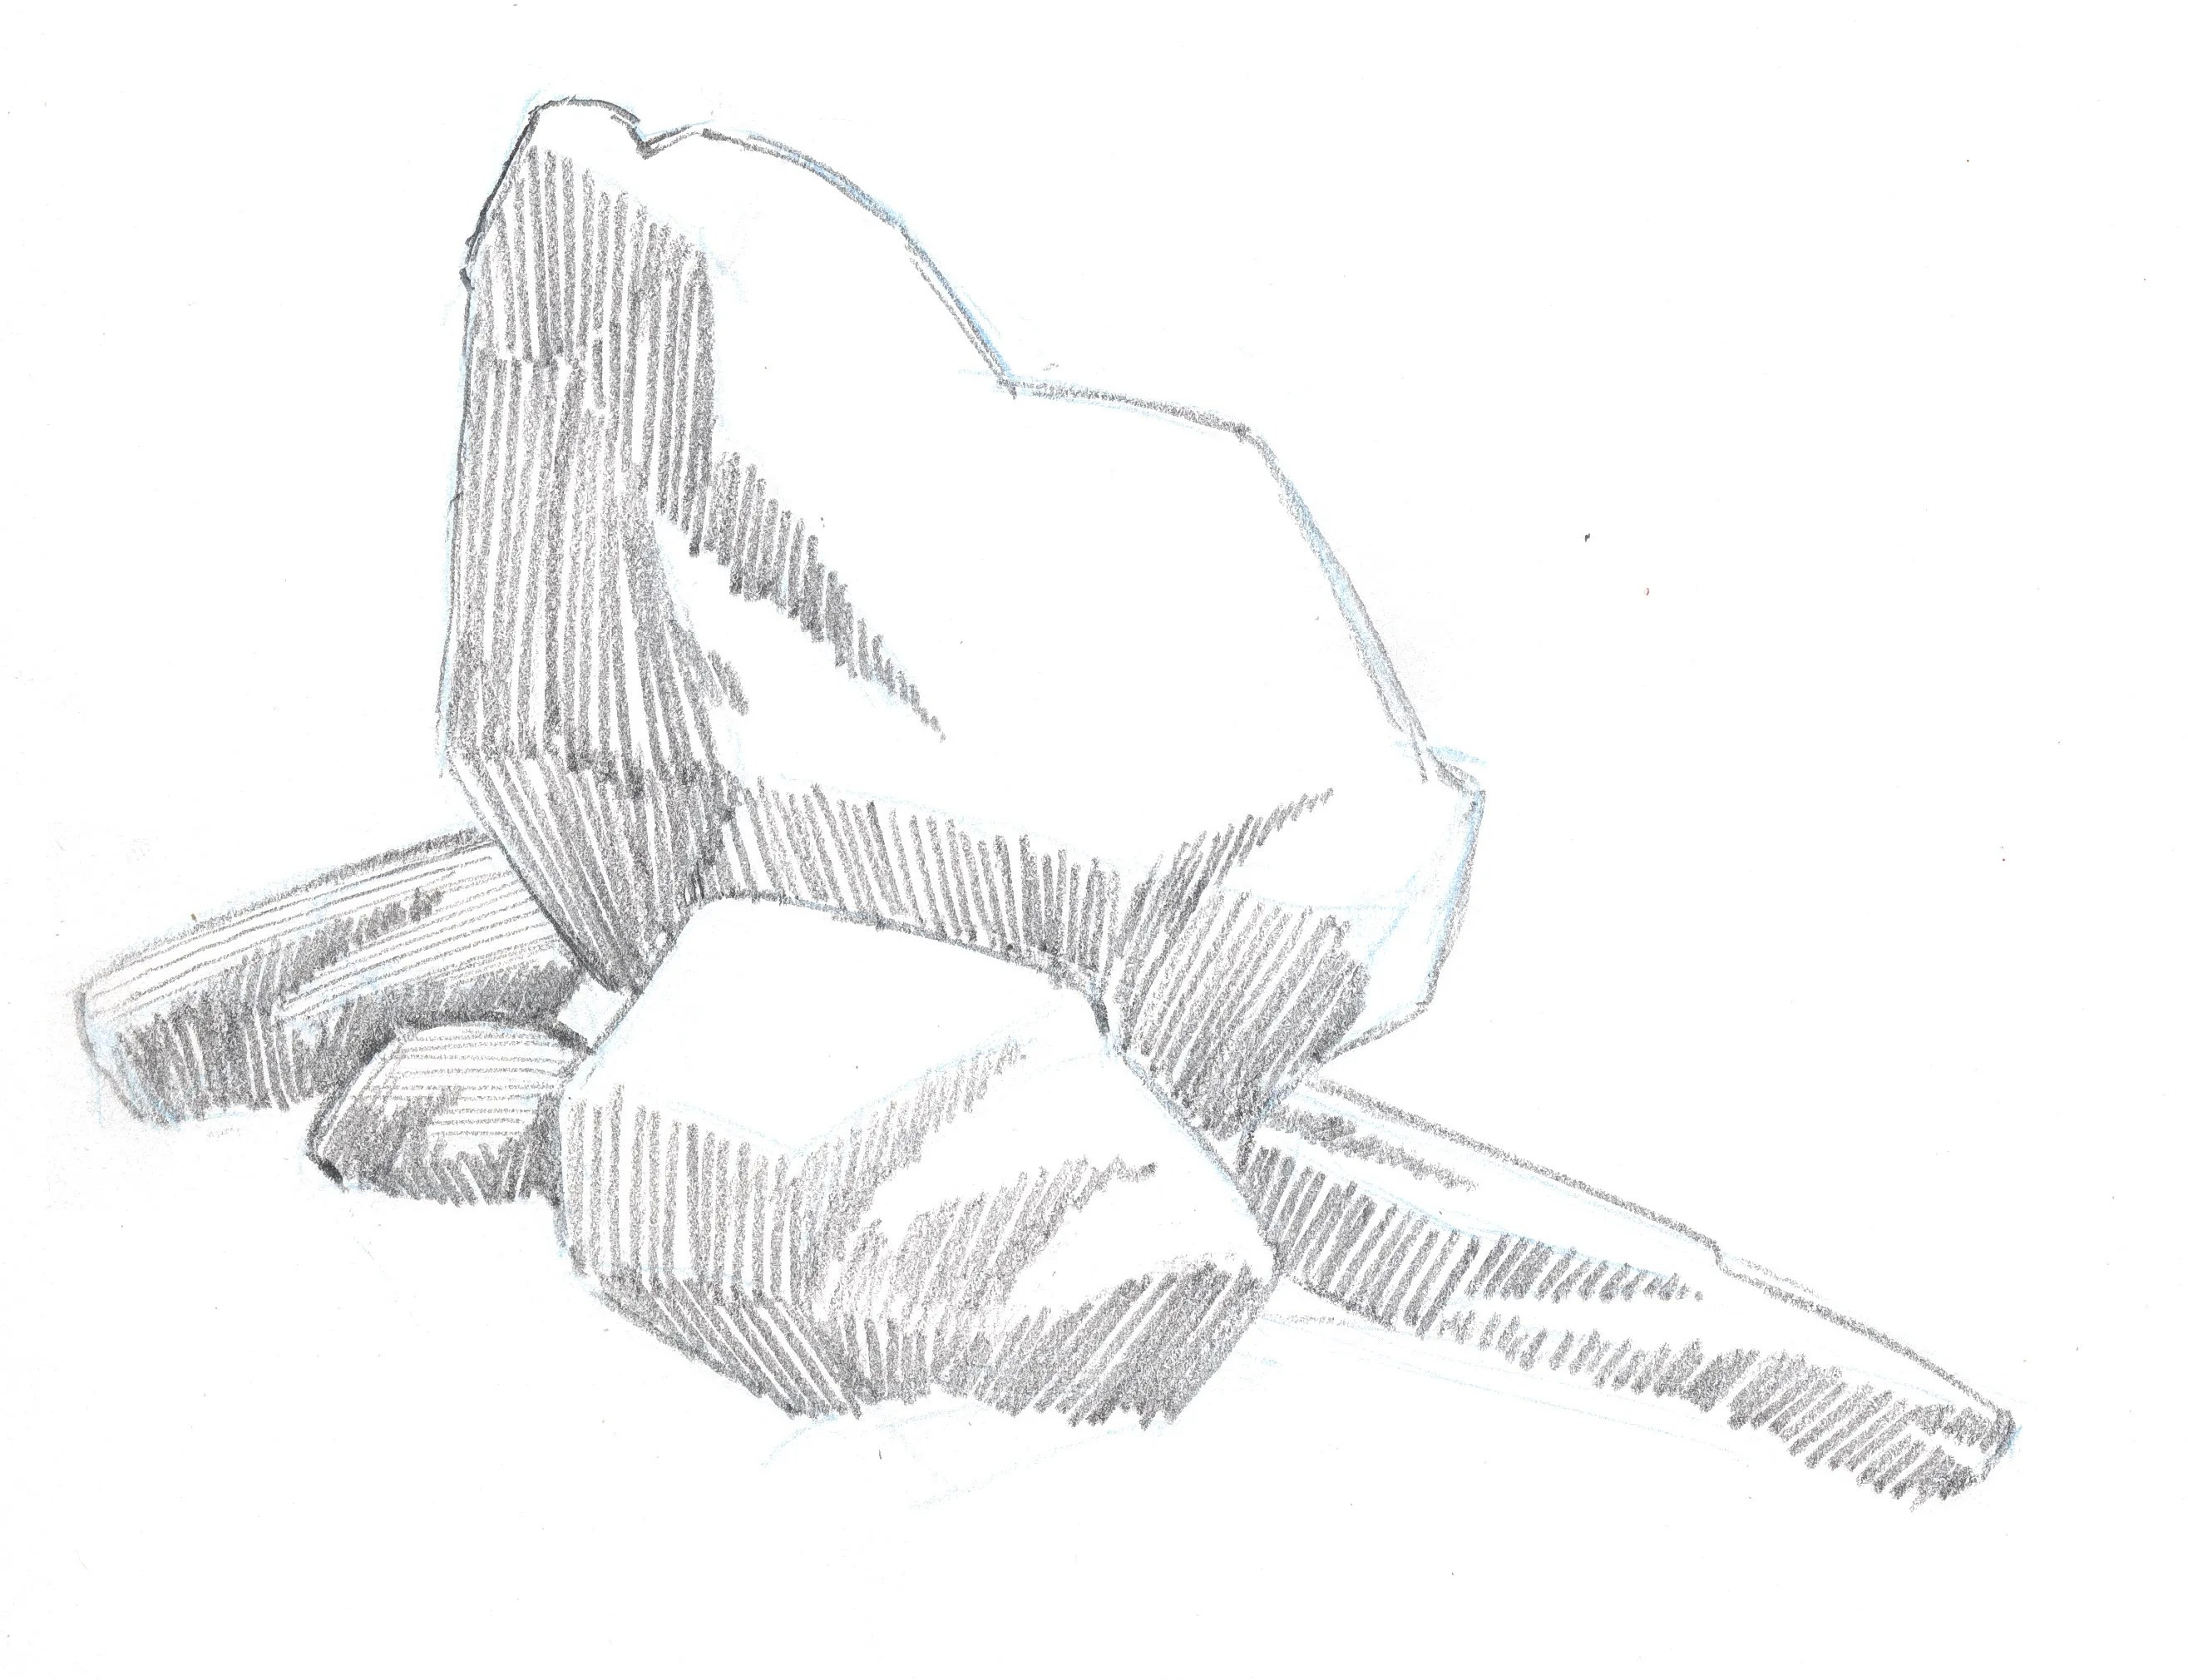
4.5. Step 5: Add Textures and Details
Add textures and details to the rock’s surface using a sharp pencil. Create cracks, veins, and erosion marks to enhance the realism. Use a kneaded eraser to lift graphite and create subtle highlights.
4.6. Step 6: Refine the Drawing
Refine the drawing by adjusting the values, adding more details, and smoothing out any harsh transitions. Use blending stumps or tortillons to blend the graphite and create soft, subtle shades.
4.7. Step 7: Ground the Rock
Add shadows at the base of the rock to ground it and give it weight. The shadows should be darker near the base and gradually fade out as they move away from the rock. This gives the rock a sense of belonging within the scenery.
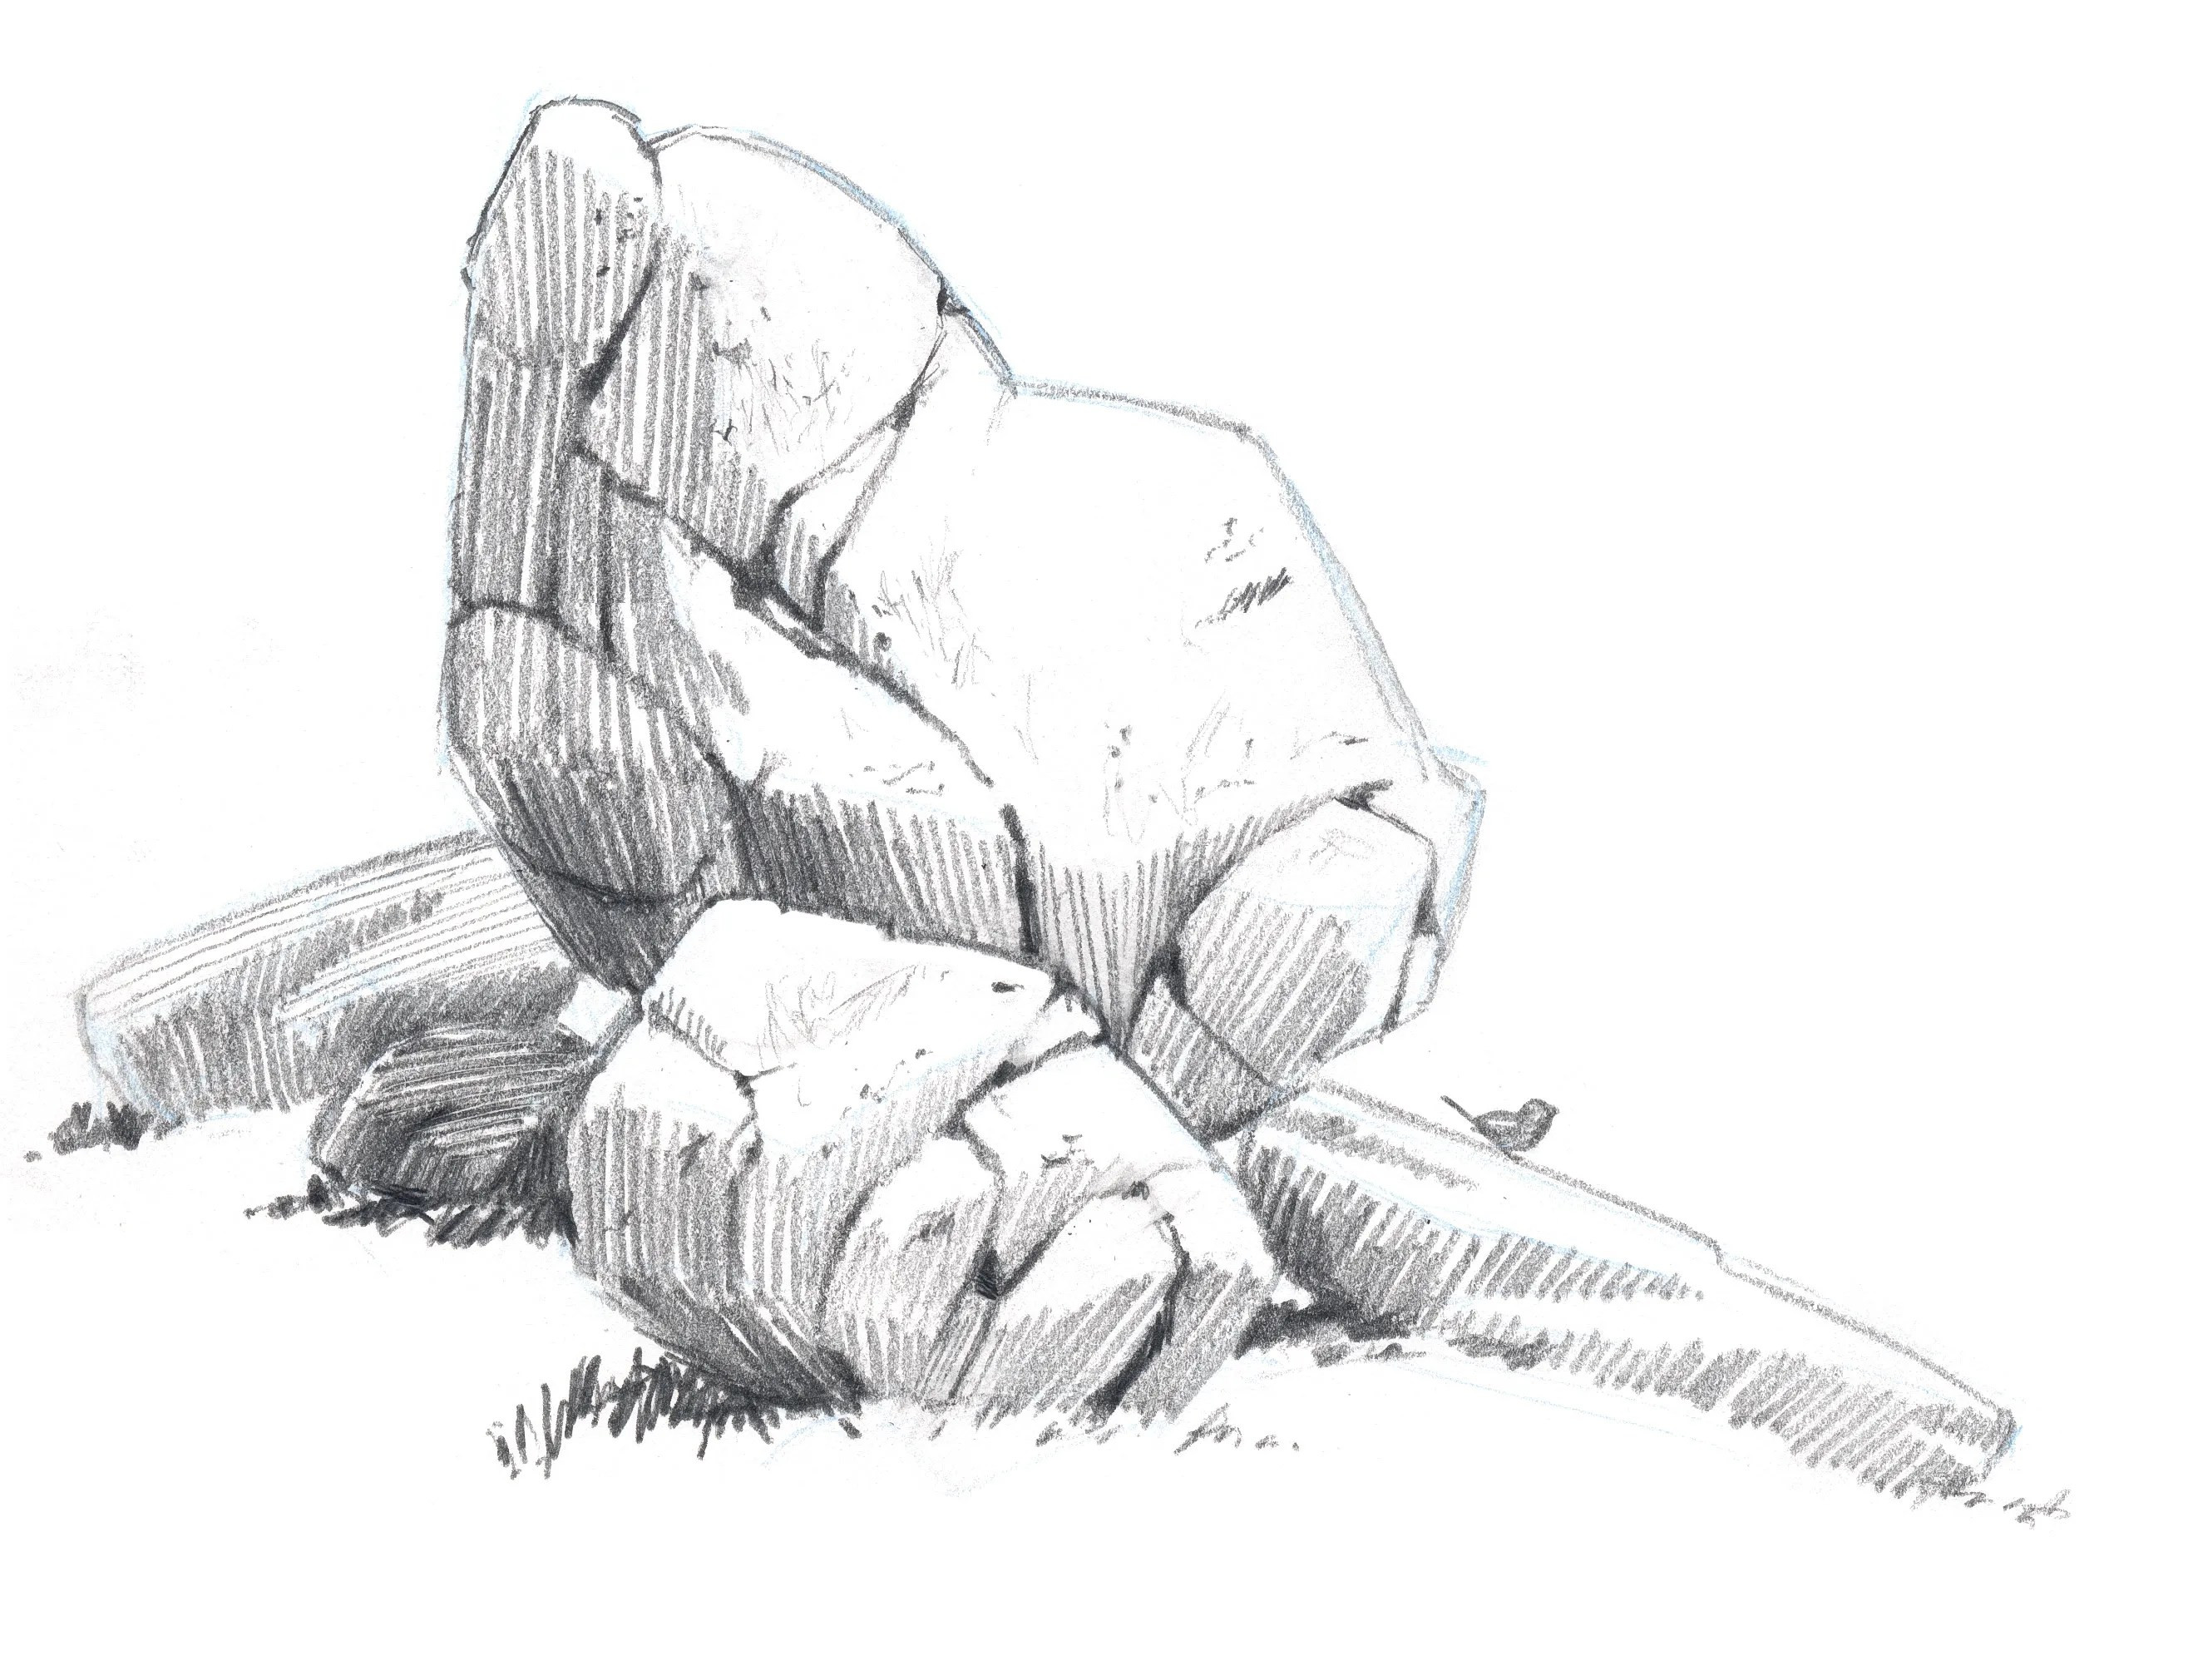 Grounding rocks with dark shadows
5. Advanced Techniques for Realistic Rock Drawings
Once you’ve mastered the basic techniques, you can explore more advanced techniques to create even more realistic rock drawings.
5.1. Using a Value Scale
A value scale is a range of tones from light to dark. Using a value scale can help you accurately represent the different shades and values on a rock’s surface. Create a value scale with at least five different tones and use it as a reference when shading your drawings.
5.2. Depicting Light and Dark Wedges
Look for and include the light and dark wedges. Along the edges of the shadows on real rocks, you will see places where wedges of shadow intrude into the highlight and wedges of light creek into the dark. Add these to your shadow edge, and the shape of the rock becomes much more interesting.
 Light and dark wedges on rock drawings
5.3. Hatching and Cross-Hatching
Hatching and cross-hatching are shading techniques that involve drawing parallel lines to create values. Hatching is used to create light shades, while cross-hatching is used to create darker shades. Experiment with different line densities and directions to create various textures and values.
5.4. Stippling
Stippling is a technique that involves creating values using dots. The closer the dots are together, the darker the value. Stippling is useful for creating rough, textured surfaces on rocks.
5.5. Blending
Blending involves smoothing out graphite to create soft transitions between values. Use blending stumps, tortillons, or your fingers to blend the graphite and create subtle shades. Be careful not to over-blend, as this can result in a flat, lifeless drawing.
5.6. Highlighting
Highlighting involves using an eraser to lift graphite and create bright areas on the rock’s surface. Use a kneaded eraser to gently lift graphite and create subtle highlights. Highlighting can add a sense of depth and realism to your drawings.
6. Drawing Different Types of Rocks
Different types of rocks have different characteristics and textures. Here are some tips for drawing different types of rocks:
6.1. Granite
Granite is an igneous rock with a coarse-grained texture. To draw granite, focus on depicting the individual mineral grains and their variations in color. Use stippling and hatching techniques to create the rough texture.
6.2. Sandstone
Sandstone is a sedimentary rock with a layered structure. To draw sandstone, emphasize the horizontal layers and the variations in color and texture. Use hatching and cross-hatching techniques to create the layered effect.
6.3. Limestone
Limestone is a sedimentary rock with a smooth, chalky texture. To draw limestone, focus on depicting the smooth surface and the subtle variations in color. Use blending techniques to create the soft, chalky texture.
6.4. Slate
Slate is a metamorphic rock with a layered, flaky structure. To draw slate, emphasize the thin layers and the variations in color and texture. Use hatching and cross-hatching techniques to create the flaky effect.
6.5. Basalt
Basalt is an extrusive igneous rock that forms after lava cools and solidifies. According to research from Arizona State University’s School of Earth and Space Exploration, Basalt rocks exhibit a fine-grained texture and often have a dark, almost black color. To draw basalt, focus on creating the irregular, geometric structure and the variations in color. Use stippling and hatching techniques to create the jagged texture.
7. Common Mistakes to Avoid When Drawing Rocks
Avoiding common mistakes can greatly improve the quality of your rock drawings. Here are some common mistakes to watch out for:
7.1. Ignoring the Basic Shapes
One of the most common mistakes is ignoring the basic shapes that make up the rock’s form. Always start by identifying the underlying shapes and then build upon them to create more complex structures.
7.2. Overlooking the Planes
Rocks often have distinct planes or flat surfaces that catch light and shadow in different ways. Overlooking these planes can result in a flat, lifeless drawing.
7.3. Neglecting the Texture
The texture of a rock is an important element that can add visual interest to your drawings. Neglecting the texture can result in a generic, unrealistic drawing.
7.4. Ignoring Light and Shadow
Understanding how light and shadow interact with the rock’s surface is essential for creating a sense of depth and realism. Ignoring light and shadow can result in a flat, two-dimensional drawing.
7.5. Over-Blending
Over-blending can result in a flat, lifeless drawing. Be careful not to over-blend the graphite, as this can remove the texture and detail from the rock’s surface.
8. Incorporating Rocks into Landscape Drawings
Incorporating rocks into landscape drawings can add depth, realism, and visual interest. Here are some tips for effectively incorporating rocks into your landscapes:
8.1. Create a Focal Point
Use rocks as focal points to draw the viewer’s eye and create a sense of visual hierarchy within the scene. Place larger, more detailed rocks in the foreground to create a strong focal point.
8.2. Add Depth and Perspective
Use rocks to create a sense of depth and perspective in your landscapes. Place smaller, less detailed rocks in the background to create a sense of distance. Overlapping rocks can also add depth to the scene.
8.3. Create Balance and Harmony
Use rocks to create balance and harmony in your landscapes. Arrange rocks in a way that balances the other elements in the scene, such as trees, water, and sky.
8.4. Tell a Story
Use rocks to tell a story about the landscape. Rocks can provide clues about the geological history of the area and the processes that have shaped it over time. Include details such as cracks, veins, and erosion marks to enhance the storytelling aspect of your drawings.
8.5. Ground the Scene
Use rocks to ground the scene and create a sense of stability. Place rocks at the base of hills, mountains, and other landscape features to give them a solid foundation.
 Rocks add texture, depth, and a sense of natural grandeur to landscape artwork
9. Resources for Further Learning
To continue improving your rock-drawing skills, here are some resources for further learning:
9.1. Online Tutorials
There are many online tutorials and video lessons that can teach you how to draw rocks. Websites like YouTube and Skillshare offer a wide range of tutorials for artists of all skill levels.
9.2. Art Books
Art books can provide valuable insights into drawing techniques, composition, and perspective. Look for books that focus on landscape drawing or geological illustration.
9.3. Art Classes
Taking art classes can provide you with personalized instruction and feedback from experienced artists. Look for classes that focus on drawing or landscape painting.
9.4. Museums and Galleries
Visiting museums and galleries can expose you to a wide range of artistic styles and techniques. Pay attention to how artists depict rocks and other natural elements in their artwork.
9.5. Rockscapes.net
Rockscapes.net is a comprehensive resource for artists and designers interested in incorporating rocks into their artwork and landscape designs. Our website offers a wealth of information, including reference images, tutorials, and expert advice.
Address: 1151 S Forest Ave, Tempe, AZ 85281, United States
Phone: +1 (480) 965-9011
Website: rockscapes.net
10. FAQ: How to Draw Rocks
10.1. What is the best way to start drawing a rock?
Start by sketching the basic shapes of the rock using light, loose lines. Focus on capturing the overall form and proportions of the rock before adding details.
10.2. How do I create realistic textures on rocks?
Use a combination of hatching, cross-hatching, stippling, and blending techniques to create realistic textures. Pay attention to the variations in color and texture on the rock’s surface.
10.3. What pencils should I use for drawing rocks?
Use a set of graphite pencils with varying hardness levels (e.g., HB, 2B, 4B, 6B) to create different values and textures. Harder pencils are suitable for light lines and details, while softer pencils are ideal for dark shadows.
10.4. How do I add depth to my rock drawings?
Add depth by paying attention to light and shadow. Use shading techniques to emphasize the contrast between light and shadow and create a sense of volume.
10.5. What is the value scale, and how can it help my drawings?
A value scale is a range of tones from light to dark. Using a value scale can help you accurately represent the different shades and values on a rock’s surface.
10.6. How do I draw different types of rocks?
Different types of rocks have different characteristics and textures. Study reference images of different types of rocks and pay attention to their unique features.
10.7. What are some common mistakes to avoid when drawing rocks?
Common mistakes include ignoring the basic shapes, overlooking the planes, neglecting the texture, ignoring light and shadow, and over-blending.
10.8. How can I incorporate rocks into my landscape drawings?
Incorporate rocks into your landscape drawings to add depth, realism, and visual interest. Use rocks as focal points, add depth and perspective, create balance and harmony, tell a story, and ground the scene.
10.9. Where can I find reference images of rocks?
You can find reference images of rocks online, in art books, or by taking photographs of real-life rocks. Rockscapes.net offers a wide range of reference images to inspire your artwork.
10.10. How can Rockscapes.net help me with my rock drawings?
Rockscapes.net offers a comprehensive resource for artists and designers interested in incorporating rocks into their artwork and landscape designs. Our website provides reference images, tutorials, and expert advice to help you improve your rock-drawing skills.
Ready to Rock Your Art?
Explore the stunning world of rock drawing with Rockscapes.net! Dive into our extensive collection of reference images, step-by-step tutorials, and expert tips to transform your artwork. Whether you’re aiming for realism or creative expression, we’ve got the resources to help you master the art of drawing rocks. Visit rockscapes.net today and unearth the beauty of geological art!