Drawing waves crashing on rocks can seem daunting, but with the right techniques, it’s achievable and incredibly rewarding. At rockscapes.net, we help you capture the raw energy and beauty of the ocean meeting the land with artistry and precision. By exploring various methods and understanding the nuances of light, shadow, and water movement, you’ll create stunning seascapes. Let’s dive into the detailed methods of painting the perfect ocean view, seascape drawing, and coastal rock formations.
1. Understanding the Essence of Waves Crashing on Rocks
Before you start drawing, it’s essential to understand the dynamics of waves crashing on rocks. What key considerations are crucial for sketching coastal waves?
Drawing waves crashing on rocks involves capturing the motion, force, and texture of water as it interacts with solid rock formations. Key considerations include understanding wave behavior, light and shadow, and rock textures. Observing real-life seascapes or high-quality photographs can offer invaluable insights.
Understanding the essence of waves crashing on rocks is more than just replicating an image. It involves grasping the dynamic interaction between water and stone, light and shadow, and the overall atmosphere of the coastal environment. Waves are not static entities; they are constantly moving, changing shape, and interacting with their surroundings. When a wave approaches a rocky shoreline, it undergoes a dramatic transformation. The energy of the wave, built up over vast stretches of open ocean, is suddenly confronted by the unyielding mass of the rocks. This collision results in a spectacular display of power and beauty.
1.1. What Defines Wave Behavior Near Rocks?
Wave behavior near rocks is defined by several factors, including refraction, diffraction, and reflection, influenced by the unique coastal topography. But what do these terms mean?
- Refraction: The bending of waves as they approach the shore at an angle. Shallower water causes part of the wave to slow down, while the rest continues at its original speed, causing the wave to bend.
- Diffraction: The spreading of waves as they pass through an opening or around an obstacle. This explains why waves can sometimes be observed in sheltered areas.
- Reflection: The bouncing back of waves when they hit a solid object, like a large rock. This creates complex patterns of interference as the reflected wave interacts with incoming waves.
The shape and arrangement of rocks further complicate wave behavior. Jagged, uneven surfaces cause waves to break and foam, creating dynamic patterns of white water. Smooth, sloping rocks might allow waves to surge up and over them, producing a more fluid, cascading effect.
1.2. How Does Light and Shadow Affect Coastal Art?
Light and shadow play a critical role in capturing the depth, texture, and mood of a seascape, enhancing the realism and emotional impact. They define form and volume, creating contrast and highlighting textures.
The way light interacts with the water’s surface can create a dazzling array of effects. Sunlight reflecting off the water can produce shimmering highlights and sparkling reflections. Conversely, shadows cast by the rocks can create areas of deep, mysterious darkness. By carefully observing and rendering these effects, you can add depth and realism to your drawings.
1.3. Why Is Rock Texture Important in Seascapes?
Rock texture adds realism and depth to the drawing, as rocks can be smooth, jagged, or covered with marine life, each affecting how water interacts with them.
The texture of the rocks themselves is another crucial element to consider. Are the rocks smooth and rounded, or jagged and angular? Are they covered in barnacles, seaweed, or other marine life? The texture of the rocks will influence how the water interacts with them, creating different patterns of splash and spray. Rough, textured rocks will cause the water to break and foam more vigorously, while smooth rocks might allow the water to flow over them in a more graceful manner.
2. Essential Materials for Drawing Waves Crashing on Rocks
Having the right materials can make a significant difference in your drawing process. What are the necessary materials for drawing crashing waves?
The necessary materials include pencils (graphite or colored), erasers, drawing paper or sketchbook, blending tools, and reference photos. Consider these additional tools:
- Pencils: A range of graphite pencils (HB, 2B, 4B, 6B) for creating different values and details.
- Erasers: Kneaded erasers for lifting graphite and creating highlights; a regular eraser for more precise corrections.
- Drawing Paper: High-quality drawing paper with a slight texture (e.g., cold press) to grip the graphite.
- Blending Tools: Tortillons, blending stumps, or cotton swabs for smoothing out transitions.
- Reference Photos: High-resolution images of waves crashing on rocks from various angles.
2.1. Selecting the Right Pencils for Depth and Detail
Choosing the right pencils is crucial for creating depth and detail in your drawings, allowing for a full range of values from light highlights to dark shadows.
Pencils are available in a range of hardnesses, from hard (H) to soft (B). Hard pencils (like 2H or HB) are good for light sketches and fine details, while soft pencils (like 2B, 4B, or 6B) are ideal for creating darker values and richer textures.
2.2. Why is Good Quality Paper Essential for Drawing?
Good quality paper is essential for drawing because it can handle layers of graphite without tearing, and it allows for easier blending and erasing.
The type of paper you choose can also affect the final result. Smooth paper is good for detailed drawings with fine lines, while textured paper is better for creating a more expressive, painterly effect. Experiment with different types of paper to see which one you prefer.
2.3. Blending Tools: Achieving Smooth Transitions
Blending tools like tortillons or blending stumps help soften harsh lines and create smooth transitions between values, which is especially useful in depicting the fluidity of water.
Blending tools are also essential for achieving smooth transitions between values. By gently blending the graphite, you can create a sense of depth and atmosphere in your drawing. There are a variety of blending tools available, from tortillions and blending stumps to cotton swabs and even your own fingers. Experiment with different tools to see which ones work best for you.
3. Step-by-Step Guide to Drawing Waves Crashing on Rocks
Drawing waves crashing on rocks can be broken down into manageable steps. What is the process to sketch waves meeting rocks?
The process involves initial sketching, adding details, shading, and refining the drawing. Each step builds upon the previous one to create a realistic and dynamic scene.
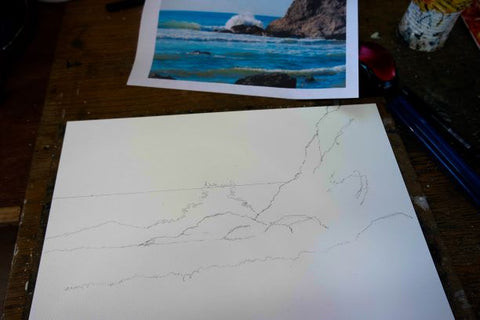
3.1. Initial Sketching: Basic Shapes and Composition
Start with a light sketch to map out the basic shapes of the rocks and waves, focusing on the composition and placement of elements.
Start by sketching the basic shapes of the rocks and waves. Don’t worry about details at this stage; just focus on getting the overall composition right. Use light, loose lines to create a sense of movement and energy.
- Establish the Horizon Line: Lightly sketch the horizon line to establish the background.
- Outline the Rocks: Use basic shapes like ovals and rectangles to outline the rocks, paying attention to their size and placement.
- Sketch the Waves: Use curved lines to indicate the crests and troughs of the waves. Consider the direction and flow of the water.
3.2. Adding Details: Defining Rock and Wave Forms
Refine the initial sketch by adding details to the rocks and waves, such as textures, cracks, and the shapes of breaking waves.
Once you’re happy with the basic composition, start adding details to the rocks and waves. Use darker lines to define the edges of the rocks and create a sense of depth. Add texture to the rocks by drawing small cracks and crevices.
- Refine Rock Shapes: Add details to the rocks, such as cracks, crevices, and barnacles.
- Define Wave Crests: Sketch the shapes of breaking waves, focusing on the foamy crests and splashing water.
- Add Water Movement: Use curved lines to show the movement of water around the rocks, indicating splashes and sprays.
3.3. Shading Techniques: Creating Depth and Realism
Apply shading techniques to create depth and realism in the drawing, using darker values for shadows and lighter values for highlights.
Shading is a critical step in creating depth and realism in your drawing. Use darker values to create shadows and lighter values to create highlights. Pay attention to the way light interacts with the water and rocks, and use your shading to emphasize these effects.
- Establish Light Source: Determine the direction of the light source to create consistent shadows and highlights.
- Apply Base Shading: Use a medium-grade pencil (e.g., 2B) to apply base shading to the rocks and waves.
- Darken Shadows: Use a softer pencil (e.g., 4B or 6B) to darken the shadows, especially in the crevices of the rocks and under the wave crests.
3.4. Refining the Drawing: Final Touches and Highlights
Add final touches and highlights to refine the drawing, enhancing contrast and details to make the scene more dynamic and realistic.
The final step is to refine the drawing by adding final touches and highlights. Use a kneaded eraser to lift graphite and create highlights on the rocks and waves. Add small details, such as droplets of water or reflections on the water’s surface, to complete the drawing.
- Add Highlights: Use a kneaded eraser to lift graphite and create highlights on the rocks and waves, enhancing the contrast.
- Refine Details: Add small details such as water droplets, splashes, and reflections to enhance realism.
- Adjust Contrast: Make final adjustments to the contrast, ensuring a dynamic and visually appealing composition.
4. Advanced Techniques for Drawing Crashing Waves
Once you’ve mastered the basics, explore advanced techniques to elevate your drawings. What advanced techniques can improve wave drawings?
Advanced techniques include using different shading styles, capturing dynamic motion, and adding atmospheric effects to enhance the realism and drama.
4.1. Mastering Different Shading Styles
Explore various shading styles such as hatching, cross-hatching, and stippling to create unique textures and effects in your drawings.
There are many different shading styles you can use to create different effects in your drawings. Hatching involves drawing parallel lines to create value, while cross-hatching involves drawing intersecting lines. Stippling involves creating value by making small dots. Experiment with different shading styles to see which ones you prefer.
4.2. Capturing Dynamic Motion in Waves
Learn how to capture the dynamic motion of waves by using flowing lines and suggesting movement with shading and details.
One of the biggest challenges in drawing waves is capturing their dynamic motion. Waves are constantly moving and changing shape, so it’s important to convey this sense of movement in your drawing. One way to do this is to use flowing lines and curves to suggest the movement of the water. Another way is to use shading to create a sense of depth and dimension.
4.3. Adding Atmospheric Effects: Mist and Spray
Incorporate atmospheric effects like mist and spray to add depth and realism to your drawings, creating a sense of atmosphere and distance.
Atmospheric effects, such as mist and spray, can add depth and realism to your drawings. Use light, airy strokes to suggest mist hanging in the air, and use small, jagged lines to represent spray being thrown up by the waves.
5. Common Mistakes to Avoid When Drawing Waves on Rocks
Being aware of common mistakes can help improve your drawing accuracy. What are frequent errors in drawing coastal waves?
Frequent errors include incorrect proportions, lack of depth, unrealistic wave forms, and insufficient attention to light and shadow. Addressing these issues leads to more convincing artwork.
5.1. Incorrect Proportions and Perspective
Avoid incorrect proportions and perspective by carefully observing the scene and ensuring that the elements are accurately sized and placed.
One of the most common mistakes in drawing waves is getting the proportions wrong. Make sure that the waves are the right size relative to the rocks, and that the horizon line is in the correct position. Pay attention to perspective, and make sure that the waves appear to recede into the distance.
5.2. Lack of Depth and Dimension
Create depth and dimension by using shading techniques to emphasize light and shadow, ensuring that the drawing doesn’t appear flat.
Another common mistake is a lack of depth and dimension. This can make your drawing look flat and uninteresting. To create depth, use shading to emphasize the light and shadow. Make sure that the foreground elements are darker and more detailed than the background elements.
5.3. Unrealistic Wave Forms and Movement
Ensure that the wave forms and movement are realistic by studying real waves and understanding how they break and interact with rocks.
It’s important to make sure that the wave forms and movement are realistic. Waves are not static objects; they are constantly moving and changing shape. Study real waves to see how they break and how they interact with rocks. Use flowing lines and curves to suggest the movement of the water.
6. Inspiration and References for Drawing Waves
Gathering inspiration and using references can greatly enhance your drawings. What are good sources for inspiration and reference?
Good sources include real-life observations, photography, and artwork by other artists, each providing unique perspectives and details to inspire your own work.
6.1. Real-Life Observation: The Best Reference
Observing waves crashing on rocks in real life provides the most authentic reference, allowing you to study their movement, light, and interaction with the environment firsthand.
There’s nothing quite like observing waves crashing on rocks in real life. This will give you the best understanding of how waves move, how they break, and how they interact with the rocks. Take some time to sit by the ocean and watch the waves; you’ll be amazed at the details you pick up.
6.2. Photography: Capturing Specific Moments
Using photography allows you to capture specific moments and details that can be studied at your own pace, providing a valuable resource for accuracy and detail.
Photography can be a great tool for capturing specific moments in time. When you see a wave doing something interesting, snap a photo so you can study it later. Pay attention to the way the light is hitting the water, and how the waves are interacting with the rocks.
 Waves crashing against rocky shore, creating sea spray
6.3. Artworks by Other Artists: Learning from the Masters
Studying artworks by other artists can provide inspiration and insights into different techniques and styles for drawing waves and rocks, expanding your artistic horizons.
Look at the work of other artists who have drawn waves and rocks. Pay attention to their techniques, their use of light and shadow, and their overall style. You can learn a lot by studying the work of the masters.
7. Integrating Rocks Effectively in Your Wave Drawings
The integration of rocks in wave drawings is crucial for realism. How do rocks enhance wave drawings?
Rocks enhance wave drawings by providing contrast, structure, and a focal point, adding to the scene’s realism and visual interest.
7.1. Types of Rocks and Their Textures
Understand the different types of rocks and their textures to accurately represent them in your drawings, adding variety and realism.
There are many different types of rocks, each with its own unique texture and appearance. Some rocks are smooth and rounded, while others are jagged and angular. Some are covered in barnacles and seaweed, while others are bare and exposed. Take some time to study different types of rocks and learn how to represent them in your drawings.
7.2. How Rocks Affect Wave Patterns
Observe and depict how rocks affect wave patterns, causing them to break, surge, and create unique splashes, adding dynamic interest to your drawings.
Rocks can have a significant impact on wave patterns. When a wave hits a rock, it can break, surge, or create a unique splash. Pay attention to how the rocks are affecting the waves and try to capture these effects in your drawings.
7.3. Placement and Composition of Rocks
Consider the placement and composition of rocks in your drawings to create a balanced and visually appealing scene, guiding the viewer’s eye through the artwork.
The placement and composition of rocks can have a big impact on the overall look of your drawing. Consider how the rocks are arranged and how they interact with each other. Use the rocks to create a sense of depth and to guide the viewer’s eye through the scene.
8. Color Techniques for Drawing Waves Crashing on Rocks
Adding color can bring your wave drawings to life. What color techniques work best for seascapes?
Effective color techniques for seascapes include layering, blending, and using a limited palette to capture the nuances of water and rock.
8.1. Choosing the Right Color Palette
Select a color palette that accurately represents the colors of the water, rocks, and sky, enhancing the realism and mood of the drawing.
Choosing the right color palette is essential for creating a realistic and evocative drawing. The colors you choose should accurately represent the colors of the water, rocks, and sky. Consider the mood you’re trying to create and choose colors that will help you achieve that.
8.2. Layering and Blending Colors
Use layering and blending techniques to create depth and dimension in your drawings, capturing the subtle variations in color and tone.
Layering and blending colors can help you create depth and dimension in your drawings. Start by applying a base layer of color, and then gradually add layers of other colors on top. Use blending techniques to smooth out the transitions between colors.
8.3. Capturing Reflections and Highlights
Pay attention to reflections and highlights on the water and rocks, using lighter colors to represent these areas and add realism and sparkle to the drawing.
Reflections and highlights can add a lot of realism and sparkle to your drawings. Pay attention to the way light is reflecting off the water and rocks, and use lighter colors to represent these areas.
9. Digital Tools for Enhancing Wave Drawings
Digital tools can offer new possibilities for enhancing your wave drawings. What digital tools are useful for artists?
Useful digital tools for artists include drawing tablets, stylus pens, and software like Adobe Photoshop and Procreate, allowing for greater control and flexibility.
9.1. Drawing Tablets and Stylus Pens
Using drawing tablets and stylus pens can provide a more natural and precise drawing experience compared to traditional methods, enhancing control and detail.
Drawing tablets and stylus pens can be a great way to enhance your wave drawings. These tools allow you to draw directly onto a computer screen, giving you more control and precision than you would have with traditional drawing methods.
9.2. Software for Digital Painting
Software like Adobe Photoshop and Procreate offer a wide range of tools for digital painting, allowing you to create stunning effects and refine your drawings.
There are many different software programs available for digital painting, such as Adobe Photoshop and Procreate. These programs offer a wide range of tools and features that can help you create stunning effects and refine your drawings.
9.3. Adding Digital Effects and Textures
Experiment with digital effects and textures to add depth, realism, and unique visual elements to your wave drawings, enhancing their overall impact.
Digital effects and textures can add a lot of depth and realism to your wave drawings. Experiment with different effects, such as blurring, sharpening, and adding noise, to see how they can enhance your drawings.
10. Showcasing Your Wave Drawings
Once you’ve created your wave drawings, it’s time to share them with the world. How can you showcase your artwork?
You can showcase your artwork through online platforms, local exhibitions, and personal portfolios, sharing your unique vision and talent with a wider audience.
10.1. Online Platforms for Sharing Art
Use online platforms like Instagram, ArtStation, and DeviantArt to share your wave drawings with a global audience, gaining exposure and feedback.
There are many online platforms where you can share your art, such as Instagram, ArtStation, and DeviantArt. These platforms can help you reach a wider audience and get feedback on your work.
10.2. Local Exhibitions and Art Fairs
Participate in local exhibitions and art fairs to showcase your wave drawings in person, connecting with other artists and art enthusiasts.
Local exhibitions and art fairs can be a great way to showcase your wave drawings in person. This will give you the opportunity to connect with other artists and art enthusiasts, and to get direct feedback on your work.
10.3. Creating a Portfolio of Your Work
Compile a portfolio of your best wave drawings to showcase your skills and style, whether online or in print, demonstrating your artistic capabilities.
Creating a portfolio of your work is a great way to showcase your skills and style. Your portfolio can be online or in print, and it should include your best wave drawings.
FAQ: Drawing Waves Crashing on Rocks
1. What are the key elements to consider when drawing waves crashing on rocks?
The key elements include understanding wave behavior, light and shadow, rock textures, and composition.
2. What materials are essential for drawing realistic waves and rocks?
Essential materials include graphite pencils, erasers, good-quality drawing paper, blending tools, and reference photos.
3. How do I start sketching waves crashing on rocks?
Start with a light sketch to map out the basic shapes of the rocks and waves, focusing on composition and placement.
4. What shading techniques are best for creating depth in wave drawings?
Hatching, cross-hatching, and stippling are effective for creating depth and texture.
5. What are common mistakes to avoid when drawing waves on rocks?
Avoid incorrect proportions, lack of depth, unrealistic wave forms, and insufficient attention to light and shadow.
6. How can real-life observation improve my wave drawings?
Observing waves in real life provides the most authentic reference for understanding their movement, light, and interaction with the environment.
7. How do rocks affect the wave patterns in my drawings?
Rocks cause waves to break, surge, and create unique splashes, adding dynamic interest to the drawing.
8. What color techniques work best for bringing seascapes to life?
Layering and blending colors, along with capturing reflections and highlights, are effective for creating realistic seascapes.
9. What digital tools can enhance wave drawings?
Drawing tablets, stylus pens, and software like Adobe Photoshop and Procreate offer greater control and flexibility.
10. How can I showcase my wave drawings to a wider audience?
Use online platforms, participate in local exhibitions, and create a portfolio of your work.
Drawing waves crashing on rocks is a journey that combines observation, technique, and artistic expression. Whether you’re a beginner or an experienced artist, there’s always something new to discover in the dynamic interplay of water and stone. Explore the resources and inspirations available at rockscapes.net to enhance your artistic skills and bring your visions to life.
Are you ready to turn your artistic vision into a stunning reality? Visit rockscapes.net today for inspiration, resources, and expert advice on incorporating the beauty of natural stone into your artistic creations. Let’s create something amazing together! You can also visit us at our location, 1151 S Forest Ave, Tempe, AZ 85281, United States, or call us at +1 (480) 965-9011 for more information.