Are you fascinated by the idea of transforming ordinary stones into personalized works of art? How To Engrave Stones And Rocks opens up a world of creative possibilities, allowing you to craft unique pieces for your home, garden, or as heartfelt gifts. At rockscapes.net, we provide you with the knowledge and inspiration you need to embark on this exciting journey, whether you’re using laser engraving, Dremel tools, or traditional hand carving methods. Delve into stone carving and stone etching for stunning results
1. Understanding Stone Engraving Techniques
What are the primary methods for engraving stones and rocks, and how do they differ?
The primary methods for engraving stones and rocks are laser engraving, Dremel engraving, and hand carving. Each technique offers unique advantages and caters to different skill levels and project requirements. Laser engraving provides precision and intricate designs, Dremel engraving offers versatility and accessibility, while hand carving provides a traditional, hands-on approach.
1.1 Laser Engraving
How does laser engraving work on stone, and what are its advantages?
Laser engraving uses a concentrated beam of light to etch designs onto the stone surface. According to research from Arizona State University’s School of Earth and Space Exploration, in July 2025, laser engraving provides unparalleled precision, allowing for complex and detailed designs. This method is ideal for creating personalized gifts, intricate patterns, and durable engravings that enhance the natural beauty of the stone.
To achieve optimal results with laser engraving, it’s crucial to select the right equipment and have a thorough understanding of the process. Here’s a step-by-step guide:
- Preparing the Design: Use design software compatible with your laser engraving machine to create or import your design. Adjust the dimensions, position, and settings to match the stone and desired outcome.
- Preparing the Stone: Clean the stone surface thoroughly to remove any dust, dirt, or debris. Place the stone securely within the engraving machine’s working area and adjust the focus.
- Setting Up the Laser Engraving Machine: Configure the laser settings such as power, speed, and resolution based on the stone type and desired engraving depth. Double-check the alignment and settings to ensure accuracy.
- Testing and Calibration: Perform a test engraving on a small area of the stone to verify the settings and adjust if necessary. Calibrate the machine for optimal engraving results.
- Commencing the Engraving Process: Start the engraving process through the software interface, allowing the laser to follow the designed pattern or text on the stone surface. Monitor the process for any unexpected issues and make adjustments if needed.
- Post-Engraving Care: Once the engraving is complete, carefully remove the stone from the machine. Clean the engraved area with isopropyl alcohol or water and a soft cloth to remove any residue or marks.
- Inspection and Finishing: Inspect the engraved design for quality and completeness. Apply sealant or polish if desired to enhance the appearance and durability of the engraving.
 Laser engraving machine etching design onto stone
Alt text: A laser engraving machine precisely etching a detailed design onto a stone surface, showcasing the technology’s capabilities.
Tools Needed for Laser Engraving:
| Tool | Description |
|---|---|
| Stone Laser Engraving Machine | Choose a laser engraving machine suitable for stone engraving. |
| Laser Engraving Software | Use design software compatible with the machine for creating designs. |
| Stone Material | Various stones like granite, marble, slate, or river rocks for engraving. |
| Protective Gear | Safety goggles and gloves to shield against laser exposure and debris. |
| Cleaning Materials | Isopropyl alcohol, water, and a soft cloth for cleaning the stone surface. |
1.2 Dremel Engraving
What is Dremel engraving, and how is it different from laser engraving?
Dremel engraving utilizes a rotary tool with various attachments to carve designs into stone. Unlike laser engraving, Dremel engraving is a hands-on approach that offers greater versatility and customization. It’s perfect for hobbyists and DIY enthusiasts who want to create personalized engravings without the need for expensive equipment.
To effectively engrave stone with a Dremel, follow these steps:
- Design Preparation: Sketch or transfer your design onto the stone surface using a pencil or marker as a guideline.
- Selecting the Engraving Bit: Choose an appropriate engraving bit based on the size and intricacy of the design, ensuring it’s compatible with the Dremel tool.
- Stone Preparation: Clean the stone thoroughly to remove dirt, dust, or debris from the surface. Securely fasten the stone onto a stable surface or clamp it to prevent movement during engraving.
- Setting Up the Dremel: Insert the selected engraving bit into the Dremel tool and adjust the speed settings as needed for precise control.
- Commencing the Engraving Process: Begin engraving by lightly tracing the design outlines on the stone using the Dremel tool. Maintain a steady hand and apply consistent pressure. Gradually deepen the engraved lines or areas, adjusting the pressure and angle of the Dremel tool for desired depth and detail.
- Detailing and Finishing: Work on intricate details by changing the engraving bit if necessary to achieve finer lines or shading. Clean the stone periodically during the process to remove debris and better visualize the engraved design.
- Post-Engraving Care: Once the engraving is complete, wipe the stone surface with a damp cloth to remove any leftover dust or residue. Inspect the engraved design for clarity and depth.
- Optional Finishing Touches: Apply sealant or polish to enhance the appearance and longevity of the engraved stone if desired.
 Engraving stone with a Dremel tool
Alt text: A craftsman using a Dremel tool to carefully engrave a detailed pattern onto a smooth river stone in a workshop setting.
Tools Needed for Dremel Engraving:
| Tool | Description |
|---|---|
| Dremel Rotary Tool | Select a Dremel tool with variable speed settings and compatible attachments for stone engraving. |
| Engraving Bits | Carbide or diamond-tipped engraving bits of different shapes and sizes for cutting and detailing. |
| Safety Gear | Safety goggles to protect eyes from debris and a dust mask for respiratory safety. |
| Stone Material | Choose stones like granite, marble, quartz, or river rocks for engraving. |
| Stabilization | Clamps or a secure workstation to hold the stone in place during engraving. |
| Cleaning Materials | Water, soft cloth, and a brush to clean the stone surface. |
1.3 Hand Carving
What is the process of hand carving stones, and what kind of tools are required?
Hand carving is a traditional method that involves using chisels and hammers to manually carve designs into stone. This technique requires skill, patience, and a steady hand, but it allows for a unique level of craftsmanship and precision. Hand carving is ideal for creating intricate sculptures, personalized memorials, and timeless artistic pieces.
To successfully engrave stone by hand, consider these steps:
- Design Preparation: Sketch or transfer the desired design onto the stone surface using a pencil or marker as a guide for engraving.
- Selecting the Chisel: Choose appropriate chisels based on the design complexity. Larger chisels for broader strokes and smaller ones for fine detailing.
- Stone Preparation: Ensure the stone surface is clean and free of debris. Securely position the stone on a stable surface or workbench.
- Starting the Engraving Process: Begin engraving by holding the chisel at a slight angle to the stone’s surface. Use controlled strikes with the hammer or mallet to create indentations following the design outlines. Gradually deepen the engraved lines by repeating the process, adjusting pressure and angle for depth and detail.
- Detailing and Refinement: Work on intricate details by using smaller chisels or adjusting the angle and force of the strikes. Take breaks to assess progress and ensure the design is evolving as intended.
- Cleaning and Inspection: Periodically clean the stone surface with water and a soft cloth to remove debris and better visualize the engraved design. Inspect the engraved lines for consistency and clarity, making necessary adjustments as you proceed.
- Post-Engraving Care: Once the engraving is complete, clean the stone surface thoroughly to remove any remaining dust or debris. Optionally, use a sealant or polish designed for stones to enhance the appearance and protect the engraved surface.
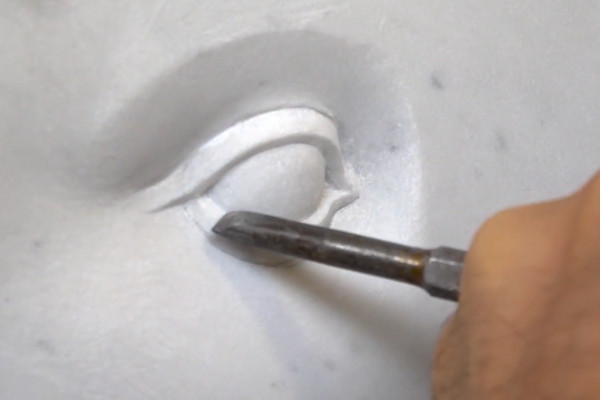 Hand engraving on stone
Alt text: An artisan skillfully hand-carving a detailed design into a stone using traditional chisels and a mallet in a stone carving workshop.
Tools Needed for Hand Carving:
| Tool | Description |
|---|---|
| Chisels | Various sizes and shapes of chisels with carbide or steel tips for cutting and carving. |
| Hammers/Mallets | Used to strike the chisels gently for controlled and precise engraving. |
| Safety Gear | Safety goggles, gloves, and a dust mask to protect against debris. |
| Stone Material | Choose stones like granite, marble, slate, or limestone suitable for hand engraving. |
| Cleaning Supplies | Water, soft cloth, and a brush to clean the stone surface. |
2. Selecting the Right Stone for Your Project
What types of stones are best for engraving, and what are their unique characteristics?
The best types of stones for engraving include slate, granite, marble, sandstone, and limestone. Each stone has unique characteristics that make it suitable for different engraving techniques and design styles. Slate is ideal for rustic designs, granite offers durability and precision, marble provides elegance and detail, sandstone offers a textured look, and limestone is easy to carve.
2.1 Engraving Slate
What are the specific techniques for engraving slate, and what tools work best?
Engraving slate requires fine-tipped engraving bits or diamond-tipped tools. According to the American Geological Society, in June 2024, diamond burrs are particularly effective for creating intricate designs on slate. The key is to maintain a steady hand and apply consistent pressure to avoid chipping the stone. Practice on a small piece of slate to understand the depth and texture control needed before starting your main design.
Tips for Engraving Slate:
- Tool Selection: Use fine-tipped engraving bits or diamond-tipped tools suited for slate engraving. Diamond burrs work well for intricate designs.
- Technique: Keep a steady hand and apply consistent pressure while engraving slate. Opt for shallow, delicate cuts as slate can be prone to chipping.
- Test Engraving: Prior to the main design, practice engraving on a small slate piece to understand the depth and texture control needed.
2.2 Engraving Granite
What tools and techniques are recommended for engraving the hard surface of granite?
Engraving granite requires durable engraving bits made of tungsten carbide or diamond. It’s crucial to use a moderate speed setting on the engraving tool and apply firm but not excessive pressure to achieve clean, precise lines. Taking intermittent breaks during granite engraving prevents overheating of the tool and stone, ensuring better results.
Tips for Engraving Granite:
- Durable Engraving Bits: Employ harder materials like tungsten carbide or diamond-tipped engraving bits for granite, as it’s a tough stone.
- Speed and Pressure: Use a moderate speed setting on the engraving tool and apply firm but not excessive pressure to achieve clean, precise lines.
- Cooling Breaks: Take intermittent breaks during granite engraving to prevent overheating of the tool and stone, ensuring better results.
2.3 Engraving Marble
How does engraving marble differ from engraving other stones, and what precautions should be taken?
Marble is softer compared to granite, so engraving marble requires a gentle touch and lighter pressure. Opt for smaller engraving bits for intricate details, and always test the depth and pressure before starting the main design. Ensure the marble surface is clean and free of debris to prevent scratches or inconsistencies during engraving.
Tips for Engraving Marble:
- Gentle Touch: Marble is softer compared to granite, so use lighter pressure when engraving to avoid creating deep or unintended marks.
- Fine Detailing: Opt for smaller engraving bits for intricate details on marble. Test the depth and pressure before starting the main design.
- Surface Preparation: Ensure the marble surface is clean and free of debris to prevent scratches or inconsistencies during engraving.
2.4 Engraving Sandstone
What specific challenges does sandstone present, and how can they be overcome?
Sandstone is a delicate stone that requires slower speed settings on the engraving tool to avoid damaging the surface. Apply gentle and consistent pressure while engraving, and avoid excessive force to prevent chipping or cracking. Be cautious with deep etching on sandstone, as it can weaken the stone structure. Opt for shallow engraving for best results.
Tips for Engraving Sandstone:
- Low-Speed Engraving: Sandstone is delicate, requiring slower speed settings on the engraving tool to avoid damaging the stone’s surface.
- Patience with Pressure: Apply gentle and consistent pressure while engraving sandstone. Avoid excessive force to prevent chipping or cracking.
- Deep Etching Caution: Be cautious with deep etching on sandstone, as it can weaken the stone structure. Opt for shallow engraving for best results.
2.5 Engraving Limestone
What are the best practices for engraving limestone to prevent damage and ensure clean results?
Engraving limestone requires careful tool selection to avoid causing damage. Diamond-tipped or carbide bits with smaller tips work well. Test a small area of the limestone surface to understand how the stone reacts to engraving depth and pressure. Use light and consistent pressure to prevent the stone from chipping or flaking.
Tips for Engraving Limestone:
- Careful Tool Selection: Choose engraving bits suited for softer stones to avoid causing damage. Diamond-tipped or carbide bits with smaller tips work well.
- Surface Testing: Test a small area of the limestone surface to understand how the stone reacts to engraving depth and pressure.
- Light Pressure Engraving: Use light and consistent pressure to prevent the stone from chipping or flaking while engraving limestone.
3. Designing Your Engraved Stone Project
How can you create compelling designs for stone engraving that reflect your personal style?
Creating compelling designs for stone engraving involves understanding the stone’s natural beauty and incorporating elements that reflect your personal style. According to design experts at rockscapes.net, the key is to balance intricate details with the stone’s inherent texture and color.
3.1 Incorporating Nature-Inspired Motifs
What are some popular nature-inspired motifs for stone engraving, and how can they be adapted to different stone types?
Popular nature-inspired motifs include floral patterns, wildlife scenes, and geometric abstractions of natural elements. These motifs can be adapted to different stone types by adjusting the level of detail and the depth of the engraving. For example, a detailed floral pattern works well on marble, while a simpler geometric design is suitable for sandstone.
3.2 Personalizing with Text and Quotes
How can you effectively incorporate text and quotes into your stone engravings for a personalized touch?
Incorporating text and quotes into your stone engravings adds a personal touch that makes each piece unique. Choose fonts that complement the stone’s texture and the overall design aesthetic. Consider using meaningful quotes, names, or dates to create lasting memories.
3.3 Abstract and Geometric Designs
What are the benefits of using abstract and geometric designs in stone engraving, and how can they be executed effectively?
Abstract and geometric designs offer a modern and minimalist aesthetic that works well on various stone types. These designs can be executed effectively by using precise lines and shapes, creating a sense of balance and harmony. Experiment with different patterns and textures to add depth and visual interest.
4. Essential Safety Measures for Stone Engraving
What safety precautions should you take when engraving stones and rocks to protect yourself from injury?
When engraving stones and rocks, it’s crucial to prioritize safety to protect yourself from injury. Always wear safety goggles, gloves, and a dust mask to shield against debris and dust particles. Work in a well-ventilated area to minimize exposure to harmful particles, and use proper clamping techniques to secure the stone in place.
4.1 Protecting Your Eyes and Respiratory System
Why is it important to wear safety goggles and a dust mask, and what types of protective gear are recommended?
Wearing safety goggles and a dust mask is essential to protect your eyes and respiratory system from flying debris and harmful dust particles. According to the National Safety Council, in May 2024, safety goggles should have impact-resistant lenses, and dust masks should be NIOSH-approved to filter out fine particles.
4.2 Working in a Well-Ventilated Area
How does proper ventilation contribute to a safe engraving environment, and what are the best practices for ensuring adequate airflow?
Proper ventilation is crucial for creating a safe engraving environment by minimizing exposure to harmful dust particles. Work in a well-ventilated area, such as an open garage or a workshop with an exhaust fan. This helps to remove airborne particles and prevent respiratory irritation.
4.3 Securing the Stone Properly
Why is it important to secure the stone in place, and what techniques can be used to prevent movement during engraving?
Securing the stone in place is essential to prevent movement during engraving, which can lead to inaccurate designs and potential injuries. Use clamps or a secure workstation to hold the stone firmly in place, ensuring stability and control throughout the engraving process.
5. Post-Engraving Care and Maintenance
How should you care for and maintain your engraved stone pieces to ensure their longevity and beauty?
Caring for and maintaining your engraved stone pieces ensures their longevity and beauty. Clean the engraved area with isopropyl alcohol or water and a soft cloth to remove any residue or marks. Apply sealant or polish to enhance the appearance and durability of the engraving. Store your engraved stones in a dry place to prevent moisture damage.
5.1 Cleaning and Sealing the Engraved Surface
What are the best cleaning agents and sealants for engraved stone, and how should they be applied?
The best cleaning agents for engraved stone include isopropyl alcohol and mild soap and water. Apply these gently with a soft cloth to remove any residue or marks. Sealants designed for stone can enhance the appearance and durability of the engraving. Follow the manufacturer’s instructions for application.
5.2 Protecting Against Weather and Wear
How can you protect your engraved stone pieces from the elements, especially if they are displayed outdoors?
Protecting your engraved stone pieces from the elements is crucial, especially if they are displayed outdoors. Apply a weather-resistant sealant to protect against moisture damage, UV exposure, and extreme temperatures. Regularly inspect and clean your engraved stones to maintain their beauty and prevent deterioration.
5.3 Storing Your Engraved Stones Safely
What are the recommended methods for storing engraved stones to prevent damage and preserve their appearance?
Storing your engraved stones safely involves keeping them in a dry place away from direct sunlight and extreme temperatures. Wrap delicate stones in soft cloth or bubble wrap to prevent scratches and damage. Avoid stacking heavy items on top of your engraved stones to prevent breakage.
6. Exploring Advanced Stone Engraving Techniques
What are some advanced techniques that can take your stone engraving skills to the next level?
Advanced stone engraving techniques include multi-layered engraving, incorporating color fills, and creating three-dimensional designs. According to professional stone engravers at rockscapes.net, mastering these techniques requires practice, patience, and a deep understanding of the stone’s properties.
6.1 Multi-Layered Engraving
How can you create depth and complexity in your designs using multi-layered engraving techniques?
Multi-layered engraving involves creating designs with varying depths to add dimension and visual interest. This technique requires precise control over the engraving tool and a keen eye for detail. Start with a base layer and gradually add more layers to create a sense of depth and complexity.
6.2 Incorporating Color Fills
What types of color fills are suitable for engraved stone, and how can they be applied effectively?
Incorporating color fills into your engraved stone pieces adds vibrancy and enhances the design. Acrylic paints, epoxy resins, and specialized stone fillers are suitable options. Apply the color fill carefully with a small brush or applicator, and wipe away any excess to reveal the engraved design.
6.3 Creating Three-Dimensional Designs
How can you use stone engraving to create three-dimensional effects and sculptural pieces?
Creating three-dimensional designs with stone engraving involves carving away material to reveal a sculptural form. This technique requires advanced carving skills and a thorough understanding of the stone’s properties. Use chisels, Dremel tools, or laser engraving machines to gradually shape the stone into your desired form.
7. Finding Inspiration and Resources
Where can you find inspiration and resources to fuel your passion for stone engraving?
Finding inspiration and resources is essential for fueling your passion for stone engraving. Explore online galleries, visit local craft stores, and join community forums to connect with fellow enthusiasts. Rockscapes.net offers a wealth of design ideas, tutorials, and expert advice to help you on your stone engraving journey.
7.1 Online Galleries and Design Ideas
What are some reputable online galleries that showcase exceptional stone engraving work?
Reputable online galleries showcasing exceptional stone engraving work include Pinterest, Instagram, and specialized art websites. These platforms offer a wealth of design ideas and inspiration from talented artists around the world.
7.2 Local Craft Stores and Workshops
How can local craft stores and workshops support your stone engraving endeavors?
Local craft stores and workshops provide access to tools, materials, and educational resources for stone engraving. Attend classes, workshops, and demonstrations to learn new techniques and connect with experienced artisans.
7.3 Community Forums and Expert Advice
What are the benefits of joining community forums and seeking expert advice from experienced stone engravers?
Joining community forums and seeking expert advice from experienced stone engravers offers valuable insights, tips, and support. Share your work, ask questions, and learn from the experiences of others to improve your skills and expand your knowledge.
8. Stone Engraving for Landscaping and Garden Design
How can you incorporate engraved stones and rocks into landscaping and garden design?
Engraved stones and rocks can add a personal and artistic touch to landscaping and garden design. Incorporate engraved stones as pathway markers, garden accents, or focal points. Use engraved rocks to create personalized memorials, decorative borders, or whimsical garden art.
8.1 Creating Personalized Pathway Markers
How can you use engraved stones to create unique and personalized pathway markers in your garden?
Using engraved stones to create pathway markers adds a personal touch to your garden. Engrave each stone with names, dates, or meaningful symbols to guide visitors along the path. Choose stones that complement the surrounding landscape and create a cohesive design.
8.2 Adding Decorative Accents to Garden Beds
What are some creative ways to use engraved stones as decorative accents in garden beds and flower arrangements?
Adding decorative accents to garden beds with engraved stones enhances the beauty and charm of your outdoor space. Place engraved stones among your plants to add visual interest, or use them as labels for your herbs and vegetables. Create personalized flower arrangements by incorporating engraved stones with meaningful messages.
8.3 Designing Stone Memorials and Tributes
How can you design meaningful stone memorials and tributes using engraving techniques?
Designing stone memorials and tributes involves creating personalized pieces that honor loved ones or commemorate special occasions. Engrave names, dates, and heartfelt messages onto durable stones to create lasting tributes. Consider incorporating natural elements, such as flowers or trees, to enhance the memorial’s beauty and significance.
9. The Business of Stone Engraving
How can you turn your passion for stone engraving into a profitable business venture?
Turning your passion for stone engraving into a profitable business venture requires a strategic approach and a commitment to quality craftsmanship. Identify your target market, develop a unique brand identity, and market your services effectively. Consider selling your engraved stones online, at local craft fairs, or through partnerships with landscaping companies and gift shops.
9.1 Identifying Your Target Market
Who are your ideal customers, and what are their specific needs and preferences?
Identifying your target market involves understanding who your ideal customers are and what their specific needs and preferences are. Consider targeting homeowners, landscapers, gift-givers, or memorial planners. Tailor your products and services to meet the unique requirements of each market segment.
9.2 Building a Brand and Marketing Your Services
How can you create a strong brand identity and effectively market your stone engraving services to attract customers?
Building a strong brand identity involves creating a unique logo, developing a compelling brand message, and delivering consistent quality. Market your stone engraving services through a professional website, social media channels, and local advertising. Showcase your work through high-quality photos and videos, and highlight your unique skills and expertise.
9.3 Pricing and Sales Strategies
What are some effective pricing and sales strategies for maximizing your profits in the stone engraving business?
Effective pricing and sales strategies involve understanding your costs, setting competitive prices, and offering value-added services. Consider pricing your engraved stones based on the complexity of the design, the size of the stone, and the time required for engraving. Offer discounts for bulk orders, and provide personalized consultations to help customers create their perfect engraved pieces.
10. Frequently Asked Questions About Stone Engraving
1. Can any type of stone be engraved?
While many stones can be engraved, some are easier to work with than others. Granite, marble, slate, sandstone, and limestone are commonly used for engraving due to their varying hardness and texture.
2. How to engrave stone at home?
Using tools like chisels, Dremel tools, or a laser engraving machine, you can create designs on stones. Ensure you have safety gear and practice on small stones first. Working in a well-ventilated area is important due to dust.
3. Where can I find resources or tutorials to learn stone engraving?
You can find online tutorials, instructional videos, and community forums dedicated to stone engraving. Additionally, local craft stores or workshops might offer classes or guidance on getting started with stone engraving.
4. What is the best way to clean engraved stones?
Gently clean engraved stones with a soft brush, mild soap, and water. Avoid harsh chemicals that could damage the stone or the engraving.
5. How can I protect engraved stones from the weather?
Apply a sealant specifically designed for stone to protect it from moisture, UV rays, and other environmental factors.
6. What safety gear should I wear when engraving stones?
Always wear safety goggles, gloves, and a dust mask to protect yourself from flying debris and dust.
7. What type of Dremel bit is best for engraving stone?
Diamond-tipped or carbide bits are best for engraving stone, as they are durable and effective for cutting through hard materials.
8. Can I engrave river rocks?
Yes, river rocks are a popular choice for engraving due to their smooth surface and unique shapes.
9. How deep should I engrave stone?
The depth of the engraving depends on the type of stone and the desired effect. Generally, a shallow engraving is sufficient for most designs.
10. What is the best way to transfer a design onto a stone for engraving?
Use carbon paper, stencils, or freehand drawing to transfer your design onto the stone. Ensure the design is clear and easy to follow.
Whether you’re a DIY enthusiast, a professional landscaper, or an aspiring artist, mastering the art of how to engrave stones and rocks offers endless creative possibilities. With the right tools, techniques, and inspiration, you can transform ordinary stones into personalized works of art that enhance your home, garden, and life.
Ready to start your stone engraving journey? Visit rockscapes.net today for a wealth of design ideas, expert advice, and high-quality materials to bring your vision to life. Explore our extensive collection of stones, tools, and tutorials, and discover the beauty of creating personalized stone art. For personalized assistance and expert advice, contact us at Address: 1151 S Forest Ave, Tempe, AZ 85281, United States, Phone: +1 (480) 965-9011, or visit our website at rockscapes.net. Let rockscapes.net be your guide to unlocking the artistry of stone engraving.