Are you struggling with rocky soil and dreaming of a pristine, rock-free landscape? Filtering rocks from soil is essential for various landscaping and gardening projects, and at rockscapes.net, we provide expert guidance and innovative solutions. This guide will explore effective methods for separating rocks from soil, transforming your outdoor space into a beautiful and functional environment. Discover the best techniques, tools, and DIY approaches for rock removal, soil sifting, and creating usable backfill.
1. Why is Filtering Rocks From Soil Important?
Filtering rocks from soil offers numerous benefits for landscaping, gardening, and construction projects. Removing rocks ensures healthy plant growth, prevents damage to equipment, and provides usable backfill.
- Improved Soil Quality: Removing rocks allows for better root development and nutrient absorption, leading to healthier and more productive plants.
- Protection of Equipment: Rocks can damage gardening tools, construction equipment, and irrigation systems. Filtering them out protects your investments and reduces maintenance costs.
- Usable Backfill: Clean, rock-free soil is ideal for backfilling trenches, planting trees, and creating a smooth, even surface for landscaping.
- Enhanced Aesthetics: A rock-free landscape looks more appealing and well-maintained, increasing the overall value and enjoyment of your property.
- Prevention of Drainage Issues: Rocks can impede proper water drainage, leading to waterlogged soil and potential plant diseases. Removing rocks ensures effective drainage and a healthier growing environment.
2. Understanding Your Soil and Rock Types
Before starting any rock filtering project, it’s crucial to understand the composition of your soil and the types of rocks present. Different soil types and rock sizes require different filtering methods.
- Soil Types:
- Sandy Soil: Well-draining but may lack nutrients.
- Clay Soil: Retains water but can become compacted.
- Silty Soil: Smooth and fertile but can be prone to erosion.
- Loamy Soil: A balanced mix of sand, silt, and clay, ideal for most plants.
- Rock Sizes:
- Gravel: Small, pebble-sized rocks.
- Cobbles: Medium-sized rocks, typically 2.5 to 10 inches in diameter.
- Boulders: Large rocks, exceeding 10 inches in diameter.
- Rock Types:
- Sedimentary Rocks: Formed from accumulated sediments, such as sandstone and limestone.
- Igneous Rocks: Formed from cooled magma or lava, such as granite and basalt.
- Metamorphic Rocks: Formed from existing rocks altered by heat and pressure, such as marble and slate.
Knowing the types of rocks and soil you’re dealing with will help you choose the most effective filtering methods. For instance, sandy soil might require a different approach than clay soil due to its drainage properties.
3. Assessing the Scope of Rock Removal
Evaluating the extent of rock contamination in your soil is essential for determining the most efficient removal strategy. Consider the following factors:
- Area Size: Determine the size of the area that needs rock removal. This will influence the amount of time, labor, and equipment required.
- Rock Density: Assess the concentration of rocks in the soil. Heavy rock concentrations may necessitate more intensive methods.
- Project Goals: Define your objectives for rock removal. Are you preparing a garden bed, creating a level surface, or improving drainage?
- Resource Availability: Consider your budget, available tools, and physical capabilities. This will help you choose methods that are feasible and sustainable.
- Environmental Impact: Evaluate the potential environmental consequences of rock removal. Minimize disturbance to the surrounding ecosystem and consider sustainable disposal options.
By thoroughly assessing the scope of rock removal, you can develop a targeted approach that maximizes efficiency and minimizes negative impacts.
4. Manual Rock Removal Techniques
For smaller areas or when dealing with larger rocks, manual rock removal is a practical option. This method involves physically picking rocks from the soil by hand.
- Hand Picking:
- Best For: Small areas, gardens, and removing large rocks.
- Process: Wear gloves and use a garden fork or shovel to loosen the soil. Pick out the rocks and place them in a wheelbarrow or container for disposal.
- Benefits: Cost-effective, precise, and minimal impact on the surrounding soil.
- Challenges: Labor-intensive and time-consuming for large areas.
- Rock Rakes:
- Best For: Gathering surface rocks and debris.
- Process: Use a rock rake to gather rocks into piles. Then, collect and dispose of the piles.
- Benefits: Efficient for surface rock removal and can cover larger areas more quickly than hand picking.
- Challenges: May not remove rocks buried deeper in the soil.
- Shovels and Garden Forks:
- Best For: Loosening soil and extracting rocks.
- Process: Use a shovel or garden fork to dig around rocks and lift them out of the soil.
- Benefits: Versatile tools that can be used for various gardening tasks in addition to rock removal.
- Challenges: Can be physically demanding, especially in compacted soil.
Manual rock removal is a great way to get a close look at your soil and ensure thorough rock removal, especially in areas where precision is needed.
5. Soil Sifting Methods
Soil sifting is a technique used to separate rocks and debris from soil using a screen or sieve. This method is ideal for creating fine, rock-free soil for gardening and landscaping.
-
Manual Soil Sifters:
- Best For: Small to medium-sized projects.
- Process: Build or purchase a soil sifter with a mesh screen. Shovel soil onto the screen and shake it to separate the rocks and debris.
- Benefits: Cost-effective, easy to use, and provides fine, rock-free soil.
- Challenges: Can be labor-intensive for large volumes of soil.
-
Rotary Soil Separators:
- Best For: Medium to large-sized projects.
- Process: These machines use a rotating drum with a mesh screen to separate rocks and debris from soil.
- Benefits: More efficient than manual sifters and can handle larger volumes of soil.
- Challenges: More expensive than manual sifters and require a power source.
-
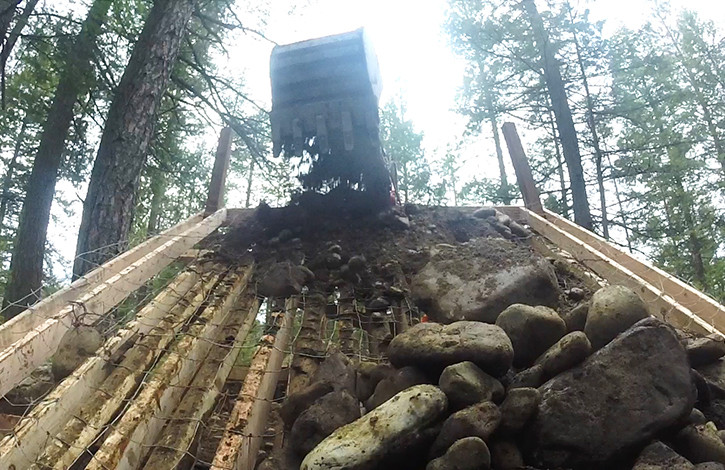
Homemade Grizzlies:
- Best For: DIY enthusiasts and those looking for a cost-effective solution.
- Process: Construct a frame with a sloped screen using wood and wire mesh or chain-link fencing. Prop it up and shovel soil onto the screen, allowing the rocks to roll down while the soil sifts through.
- Benefits: Economical, customizable, and effective for removing larger rocks.
- Challenges: Requires construction skills and may not be as efficient as commercial sifters.
 how to remove rocks from soil
-
Tips for Effective Soil Sifting
- Choose the right screen size: Select a mesh size that effectively separates the rocks from the soil.
- Work in dry conditions: Dry soil sifts more easily than wet soil.
- Use a sturdy sifter: Ensure your sifter is strong enough to handle the weight of the soil and rocks.
Soil sifting is an excellent way to create the perfect soil texture for your plants and landscaping projects.
6. Mechanical Rock Removal Equipment
For large-scale projects or areas with heavy rock concentrations, mechanical rock removal equipment can significantly increase efficiency.
- Rock Pickers:
- Best For: Large fields and agricultural applications.
- Process: These machines use a series of rotating tines or rakes to pick up rocks and deposit them into a hopper.
- Benefits: Highly efficient for removing rocks from large areas.
- Challenges: Expensive and may not be suitable for small or confined spaces.
- Screening Plants:
- Best For: Construction sites and large landscaping projects.
- Process: Screening plants use a series of screens to separate rocks, debris, and soil.
- Benefits: Can process large volumes of material quickly and efficiently.
- Challenges: Requires significant investment and space.
- Tractor-Mounted Rock Buckets:
- Best For: Moving and sorting large quantities of rocks.
- Process: These buckets attach to a tractor and have tines or slots that allow soil to sift through while retaining rocks.
- Benefits: Versatile and efficient for collecting and transporting rocks.
- Challenges: Requires a tractor and may not be suitable for delicate landscaping projects.
When using mechanical equipment, always prioritize safety and follow the manufacturer’s instructions to prevent accidents and ensure optimal performance.
7. DIY Rock Filtering Solutions
Creating your own rock filtering solutions can be a cost-effective and rewarding approach, especially for smaller projects.
- Homemade Soil Sifter:
- Materials: Wood, wire mesh, nails or screws.
- Construction: Build a wooden frame and attach wire mesh to the bottom. Ensure the mesh size is appropriate for the size of rocks you want to remove.
- Usage: Shovel soil onto the sifter and shake to separate rocks.
- Benefits: Inexpensive and customizable to your specific needs.
- Challenges: Requires basic carpentry skills.
- Rock Grizzly:
- Materials: Wood, chain-link fencing, metal bolts.
- Construction: Build a sloped frame with chain-link fencing as the screening surface. Reinforce the structure with metal bolts to withstand the weight of the rocks and soil.
- Usage: Prop the grizzly up and shovel soil onto the screen, allowing rocks to roll down while soil sifts through.
- Benefits: Effective for removing larger rocks and can be made from recycled materials.
- Challenges: Requires more advanced construction skills and sturdy materials.
- Milk Crate Sifter:
- Materials: Milk crate.
- Construction: No construction needed. Simply use the milk crate as is.
- Usage: Place the milk crate over a container and shovel soil into it, shaking to sift out rocks.
- Benefits: Simple, readily available, and requires no construction.
- Challenges: Suitable only for small amounts of soil.
DIY solutions allow you to tailor your rock filtering methods to your specific needs and resources.
8. Preparing the Soil After Rock Removal
After removing rocks from your soil, it’s essential to prepare the soil for planting or other landscaping purposes.
- Soil Amendment:
- Purpose: To improve soil structure, fertility, and drainage.
- Materials: Compost, aged manure, peat moss, and other organic matter.
- Process: Spread a layer of amendment over the soil and till it in thoroughly.
- Benefits: Enhances soil health and promotes plant growth.
- Soil Testing:
- Purpose: To determine the nutrient content and pH level of the soil.
- Process: Collect soil samples and send them to a testing lab.
- Benefits: Provides valuable information for tailoring your fertilization and amendment strategies.
- Fertilization:
- Purpose: To provide essential nutrients for plant growth.
- Materials: Balanced fertilizer, nitrogen fertilizer, phosphorus fertilizer, and potassium fertilizer.
- Process: Apply fertilizer according to the manufacturer’s instructions.
- Benefits: Ensures plants receive the nutrients they need to thrive.
- Leveling and Grading:
- Purpose: To create a smooth, even surface for planting or landscaping.
- Tools: Rakes, shovels, and levels.
- Process: Spread soil evenly and use a rake or shovel to create a level surface.
- Benefits: Improves aesthetics and prevents water pooling.
Proper soil preparation is crucial for ensuring the success of your landscaping and gardening projects.
9. Sustainable Rock Disposal and Reuse
Instead of simply discarding the rocks you remove from your soil, consider sustainable disposal and reuse options.
- Landscaping Features:
- Ideas: Rock gardens, retaining walls, pathways, and decorative borders.
- Benefits: Adds visual interest to your landscape and reduces waste.
- Considerations: Ensure the rocks are stable and won’t pose a safety hazard.
- Construction Materials:
- Uses: Fill material for construction projects, aggregate for concrete, and base material for roads.
- Benefits: Reduces the need for new materials and lowers construction costs.
- Considerations: Ensure the rocks meet the required specifications for the intended use.
- Donation or Sale:
- Options: Donate rocks to local organizations or sell them to landscaping companies or individuals.
- Benefits: Reduces waste and provides a potential source of income.
- Considerations: Ensure the rocks are clean and free of contaminants.
- Erosion Control:
- Applications: Use rocks to stabilize slopes, prevent soil erosion, and create drainage channels.
- Benefits: Protects soil and reduces environmental damage.
- Considerations: Place rocks strategically to maximize their effectiveness.
By adopting sustainable disposal and reuse practices, you can minimize your environmental impact and create valuable resources.
10. Maintaining Rock-Free Soil
Once you’ve successfully filtered rocks from your soil, it’s important to maintain its rock-free condition to prevent future problems.
-
Regular Inspections:
- Purpose: To identify and remove new rocks before they become a problem.
- Process: Periodically walk through your garden or landscape and remove any visible rocks.
- Benefits: Prevents rock accumulation and ensures ongoing soil quality.
-
Mulching:
- Purpose: To suppress weed growth and prevent soil erosion.
- Materials: Organic mulch (wood chips, straw, compost) or inorganic mulch (gravel, rocks).
- Process: Apply a layer of mulch over the soil surface.
- Benefits: Protects soil, conserves moisture, and reduces weed growth.
-
Erosion Control Measures:
- Techniques: Terracing, retaining walls, and ground cover plants.
- Purpose: To prevent soil erosion and rock exposure.
- Benefits: Maintains soil stability and prevents rock accumulation.
-
Careful Digging Practices:
- Techniques: Avoid deep digging unless necessary and use caution when excavating soil.
- Purpose: To minimize disturbance to the soil and prevent rocks from surfacing.
- Benefits: Preserves soil structure and reduces rock exposure.
By implementing these maintenance practices, you can ensure that your soil remains rock-free and healthy for years to come.
FAQ About Filtering Rocks from Soil
- How do I choose the right soil sifter for my needs?
The best soil sifter depends on the size of your project and your budget. Manual sifters are great for small gardens, while rotary separators are more efficient for larger areas. Consider DIY options like homemade grizzlies for cost-effective solutions. - What’s the best way to dispose of the rocks I remove from the soil?
Consider sustainable options like using rocks for landscaping features, donating them, or using them as construction materials. This reduces waste and can even provide a source of income. - Can I use rocks as mulch in my garden?
Yes, rocks can be used as inorganic mulch. They help retain moisture, suppress weed growth, and add visual appeal to your garden. Make sure to choose rocks that are appropriate for the plants you’re growing. - What type of soil amendment should I use after removing rocks?
The best soil amendment depends on your soil type. Compost and aged manure are great for improving soil structure and fertility. Soil testing can help you determine the specific nutrients your soil needs. - How can I prevent rocks from returning to my soil?
Regular inspections, mulching, erosion control measures, and careful digging practices can help prevent rocks from resurfacing. Maintaining a healthy soil structure is key to keeping your soil rock-free. - Is it better to remove rocks manually or use mechanical equipment?
Manual removal is suitable for small areas or when dealing with larger rocks. Mechanical equipment is more efficient for large-scale projects or areas with heavy rock concentrations. - How do I build a homemade rock grizzly?
Construct a sloped frame with chain-link fencing as the screening surface. Reinforce the structure with metal bolts to withstand the weight of the rocks and soil. This is a cost-effective DIY solution for removing larger rocks. - What are the benefits of filtering rocks from soil?
Filtering rocks improves soil quality, protects equipment, provides usable backfill, enhances aesthetics, and prevents drainage issues, leading to healthier plant growth and a more functional landscape. - What should I do if my soil is heavily compacted after removing rocks?
Aerate the soil using a garden fork or tiller to improve drainage and aeration. Incorporate organic matter like compost to loosen the soil and improve its structure. - Where can I find more resources and expert advice on rock removal and landscaping?
Visit rockscapes.net for a wealth of information, design ideas, and expert tips on creating beautiful and functional rock landscapes.
Transform Your Landscape with Rockscapes.net
Filtering rocks from soil can be a challenging but rewarding task. By understanding the importance of rock removal, assessing your soil type, and employing the right techniques, you can create a beautiful and functional landscape. For more inspiration, detailed guides, and expert advice, visit rockscapes.net.
Ready to transform your landscape and create stunning rock features? Contact us today or visit our location:
Address: 1151 S Forest Ave, Tempe, AZ 85281, United States
Phone: +1 (480) 965-9011
Website: rockscapes.net
Explore our website for design ideas, product information, and expert consultations to bring your dream landscape to life.
At rockscapes.net, we’re passionate about helping you create the perfect rock landscape. Whether you’re looking to build a rock garden, install a retaining wall, or simply improve the quality of your soil, we have the resources and expertise to help you succeed. Let us inspire you with our innovative designs and top-quality materials.