Finishing sheetrock, also known as drywall, is an art that transforms rough walls into smooth canvases ready for paint, and rockscapes.net is here to guide you through every step. By mastering the application of joint compound and perfecting sanding techniques, you’ll achieve seamless walls, enhancing your home’s aesthetic appeal. Let’s explore the world of drywall finishing, sheetrock repair, and wall preparation, ensuring your walls are flawless.
1. Understanding Sheetrock Finishing: The Foundation of Flawless Walls
Sheetrock finishing is the process of making the seams and screw holes in your drywall disappear, turning a bumpy surface into a smooth one. It’s more than just slapping some mud on the wall; it’s about finesse and patience. Think of it as creating a blank canvas for your decorating dreams.
What is Sheetrock?
Sheetrock, also known as drywall or gypsum board, is a construction material used for interior walls and ceilings. It’s made of a gypsum core sandwiched between two layers of paper. Finishing sheetrock involves covering the seams and fasteners with joint compound to create a smooth surface.
Why is Sheetrock Finishing Important?
Finishing sheetrock properly is crucial for several reasons:
- Aesthetics: A smooth, well-finished wall looks professional and enhances the overall appearance of your space.
- Durability: Proper finishing protects the edges and corners of the sheetrock, making them less susceptible to damage.
- Paint Adhesion: A smooth surface allows paint to adhere better, resulting in a longer-lasting and more vibrant finish.
- Hides Imperfections: Good finishing hides any imperfections in the sheetrock installation, creating a seamless look.
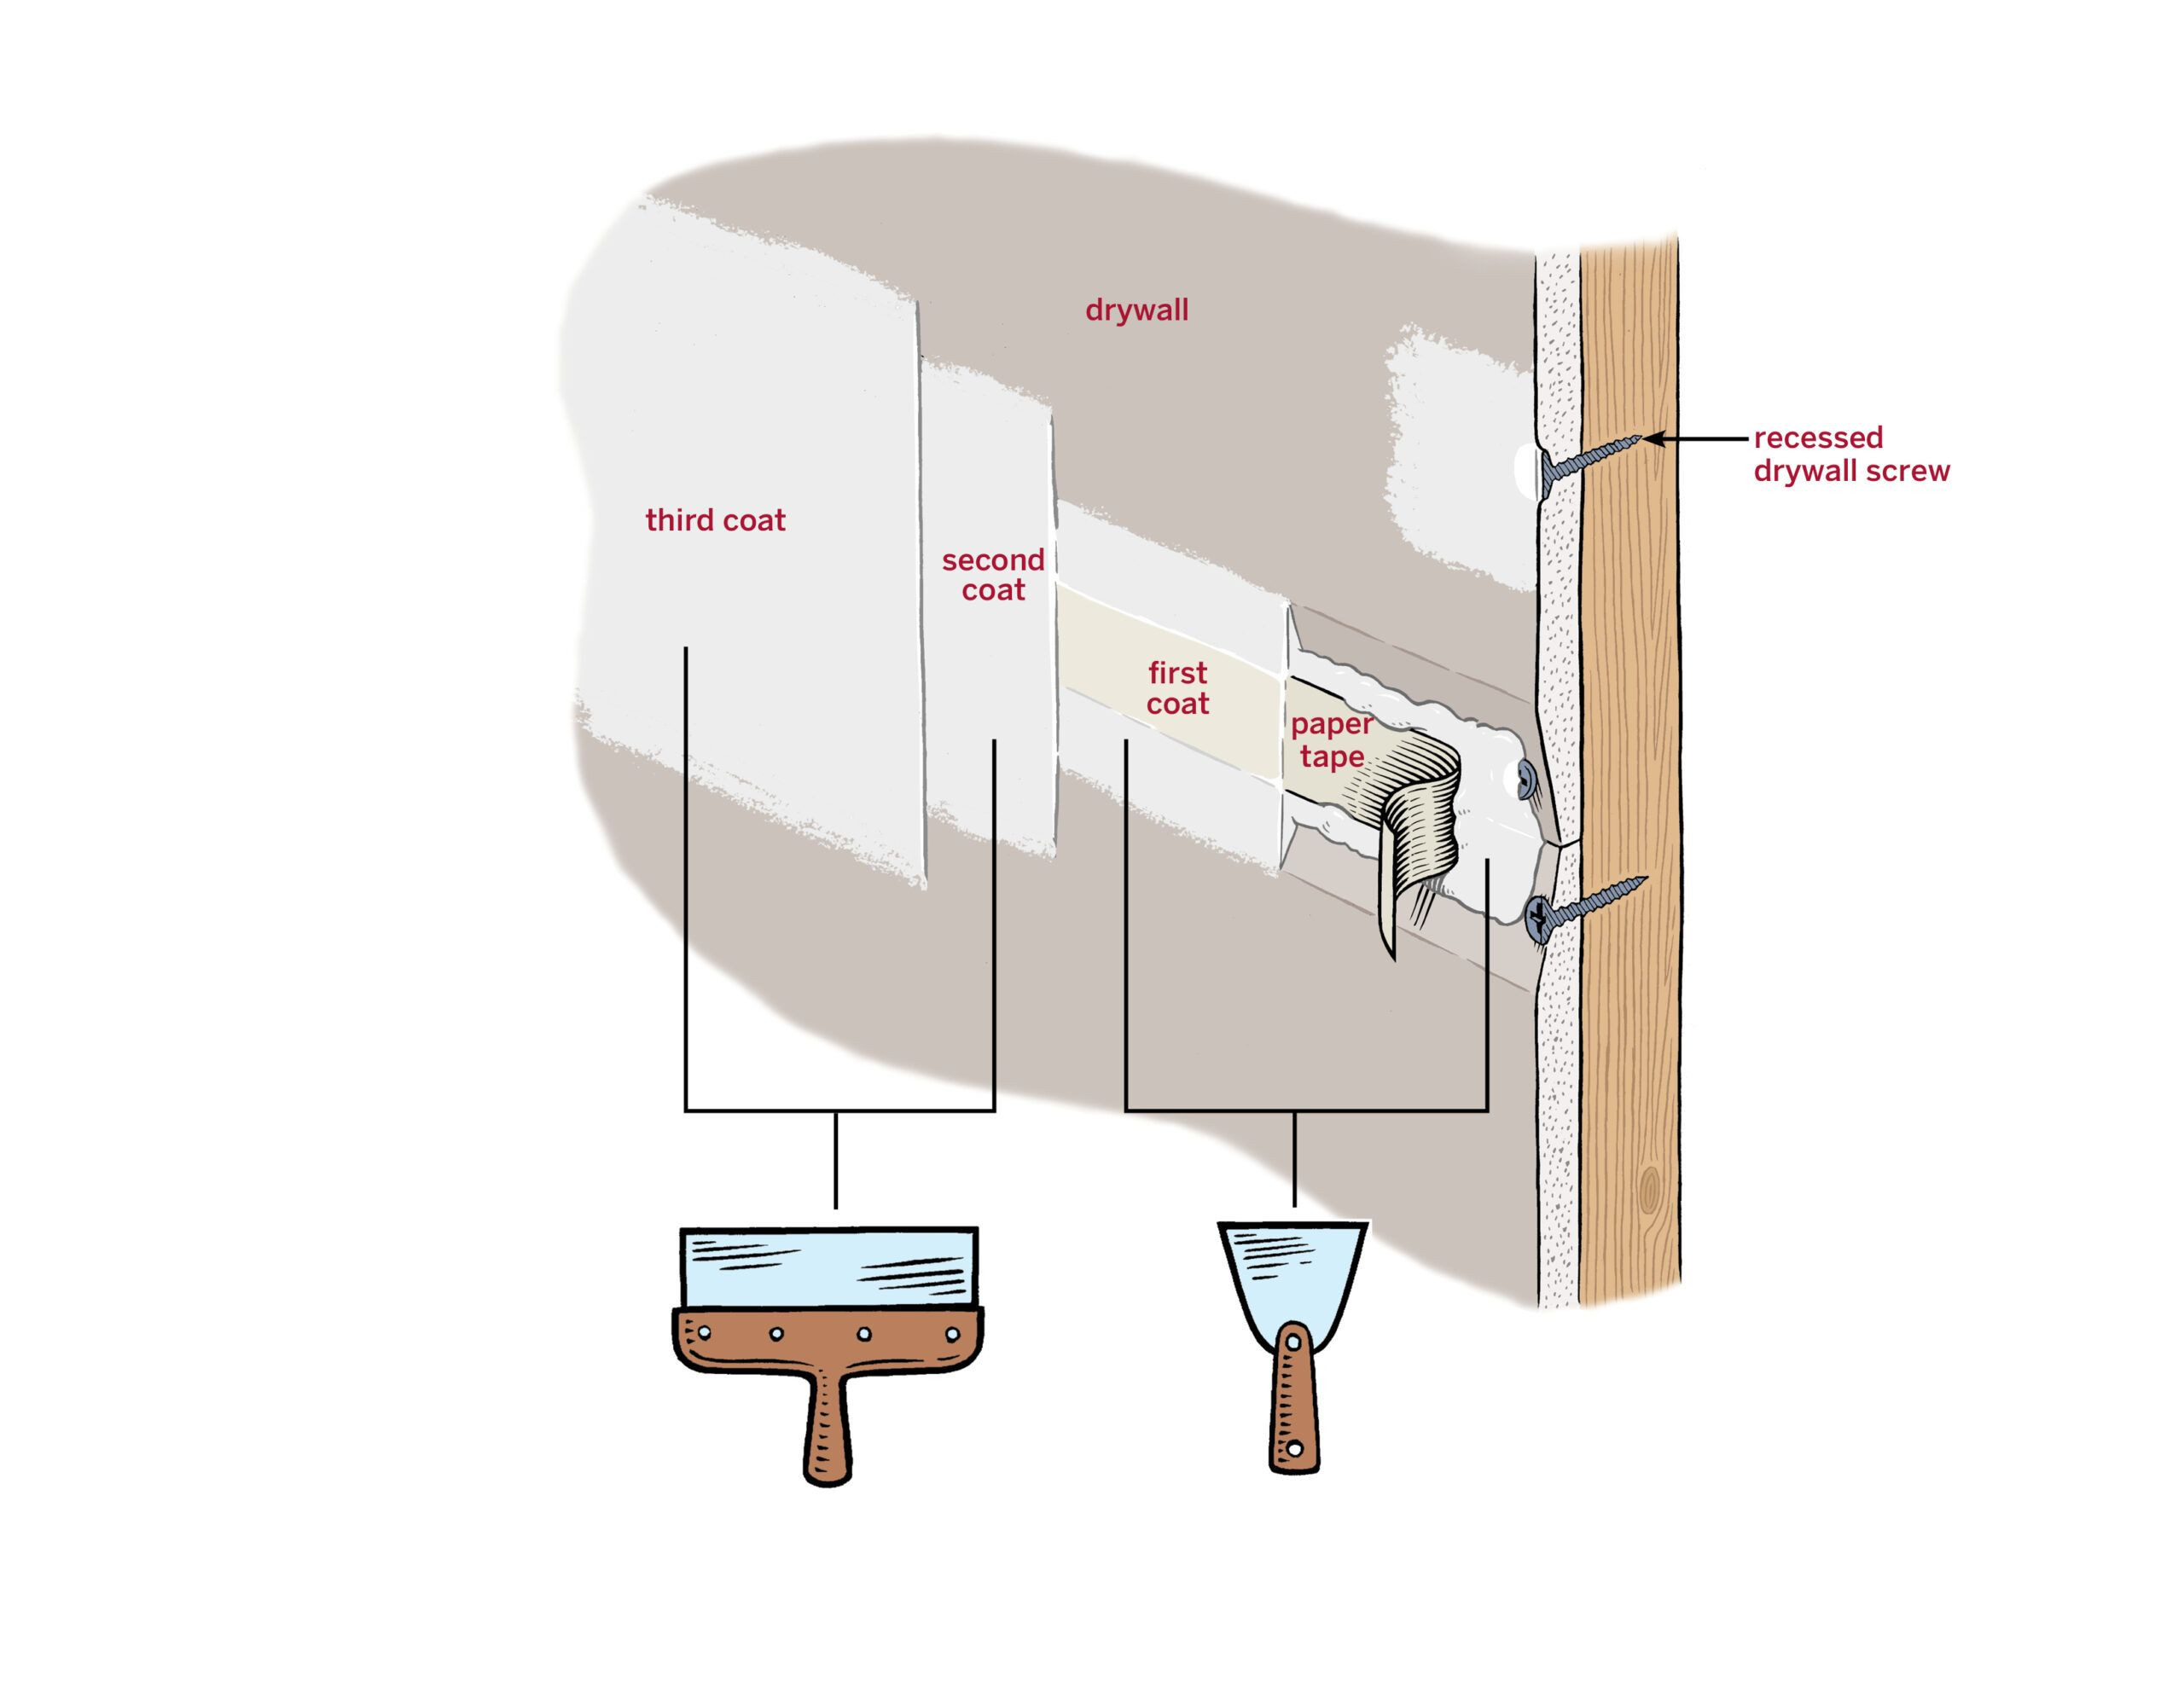
The Basic Steps of Sheetrock Finishing
- Taping: Applying paper or mesh tape over the joints between the sheetrock panels.
- Mudding: Applying several coats of joint compound (also called “mud”) over the tape and screw holes to create a smooth surface.
- Sanding: Sanding down the dried joint compound to blend it seamlessly with the surrounding wall.
- Priming: Applying a coat of primer to seal the surface and prepare it for paint.
 Close-up of a finished drywall seam, showing smooth texture and seamless blending.
2. Essential Tools and Materials: Setting Up Your Sheetrock Finishing Arsenal
Before diving in, gather the right tools and materials. Having everything on hand will make the process smoother and more efficient.
Must-Have Tools for Sheetrock Finishing
- Drywall Knives: Essential for applying joint compound. You’ll need a variety of sizes, typically ranging from 5-inch to 12-inch. A 6-inch knife is great for taping, while a 12-inch knife is ideal for feathering out the mud.
- Mud Pan or Hawk: Holds the joint compound while you work. A mud pan is a simple container, while a hawk is a flat, square tool with a handle that allows you to hold more compound at once.
- Taping Knife or Banjo: Makes taping seams faster and easier. A taping knife dispenses tape and compound simultaneously.
- Sanding Sponge or Pole Sander: Used to smooth out the dried joint compound. A sanding sponge is great for small areas and corners, while a pole sander allows you to reach high walls and ceilings without a ladder.
- Dust Mask and Safety Glasses: Protect yourself from drywall dust, which can irritate your lungs and eyes.
- Utility Knife: For cutting drywall tape and trimming any loose paper.
- Mixing Paddle: Attaches to a drill to mix the joint compound for a smooth consistency.
Essential Materials for Sheetrock Finishing
- Joint Compound (Mud): Comes in different types, including all-purpose, lightweight, and setting-type. All-purpose is suitable for most projects.
- Drywall Tape: Paper or mesh tape is used to reinforce the joints between sheetrock panels. Paper tape is stronger and creates a smoother finish.
- Primer: Seals the surface and prepares it for paint. Use a primer specifically designed for new drywall.
- Sandpaper: Comes in various grits, from coarse to fine. Use a medium-grit sandpaper for the initial sanding and a fine-grit for the final smoothing.
 A worker is using a taping knife to apply drywall tape to a seam, with a bucket of joint compound nearby.
3. Preparing Your Workspace: Setting the Stage for Success
Before you start slinging mud, take the time to prep your workspace. This will save you headaches and ensure a cleaner, more professional finish.
Protecting Your Surroundings
- Cover the Floor: Use drop cloths or plastic sheeting to protect your flooring from joint compound and sanding dust.
- Remove Obstacles: Clear the room of furniture and other items that could get in the way.
- Ventilation: Ensure the room is well-ventilated to help the joint compound dry faster and to reduce dust.
Preparing the Sheetrock
- Inspect the Sheetrock: Look for any loose screws, protruding nails, or damaged areas. Drive in any loose screws and patch any holes with joint compound.
- Clean the Surface: Wipe down the sheetrock with a damp sponge to remove any dust or debris.
- Bevel Cut Edges: This ensures the compound adheres effectively to the edges
Mixing Joint Compound
- Consistency is Key: The ideal consistency of joint compound is similar to that of pancake batter. If it’s too thick, it will be difficult to apply smoothly. If it’s too thin, it will run and drip.
- Add Water Gradually: If the joint compound is too thick, add small amounts of water at a time and mix thoroughly until you reach the desired consistency.
- Avoid Air Bubbles: When mixing, try to avoid creating air bubbles in the joint compound. This can cause imperfections in the finished surface.
4. The Five Levels of Sheetrock Finishing: Choosing the Right Finish for Your Project
Sheetrock finishing isn’t one-size-fits-all. There are five levels of finish, each suited for different purposes and aesthetic requirements. Knowing which level to use will help you achieve the desired result without overdoing it.
Understanding the Levels
- Level 0: No taping, finishing, or accessories. This is used for temporary construction or when the final decoration is yet to be determined.
- Level 1: Joints and interior angles are taped with joint compound. This is suitable for areas that will be concealed, such as above ceilings or in storage areas.
- Level 2: A thin coat of joint compound is applied over the tape and fasteners. This is common in garages, warehouses, or other areas where appearance is not a primary concern.
- Level 3: A second coat of joint compound is applied over all joints and fasteners. This is used when the surface will be covered with a textured finish or heavy-grade wall covering.
- Level 4: A third coat of compound is applied, followed by sanding. This is the standard for most residential and commercial spaces, suitable for most paints and light textures.
- Level 5: A thin skim coat of joint compound is applied over the entire surface. This is ideal for areas with severe lighting conditions or when preparing the surface for glossy paint.
Choosing the Right Level for Your Project
- Garage or Storage Area: Level 2 is usually sufficient.
- Living Room or Bedroom: Level 4 is the most common choice.
- Bathroom or Kitchen: Level 4 is recommended, but Level 5 might be better if you plan to use glossy paint.
- High-End Finishes: Level 5 is the way to go for a perfectly smooth, seamless look.
5. Step-by-Step Guide to Sheetrock Finishing: Mastering the Art of Mudding and Taping
Now it’s time to get your hands dirty. Follow these steps to achieve a professional-quality sheetrock finish.
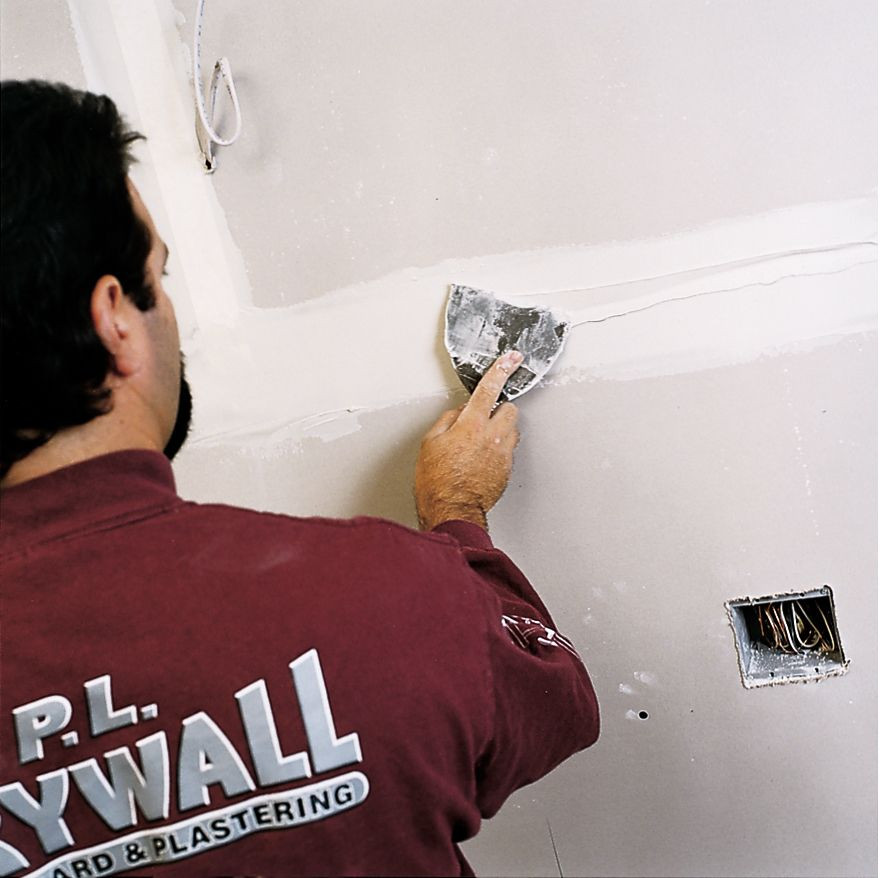
Step 1: Applying the First Coat of Joint Compound
- Load Your Knife: Use a 5-inch knife to scoop up some joint compound from your mud pan.
- Apply to Joints: Force the compound into the joints between the sheetrock panels, filling them completely.
- Smooth It Out: Hold the knife at a 25-degree angle and smooth out the compound in a single pass. The goal is to fill the joints and create a flat surface.
- Fill Screw Holes: Use the same technique to fill screw holes, making sure they are completely covered.
 A man is using a drywall knife to apply joint compound to a sheetrock seam.
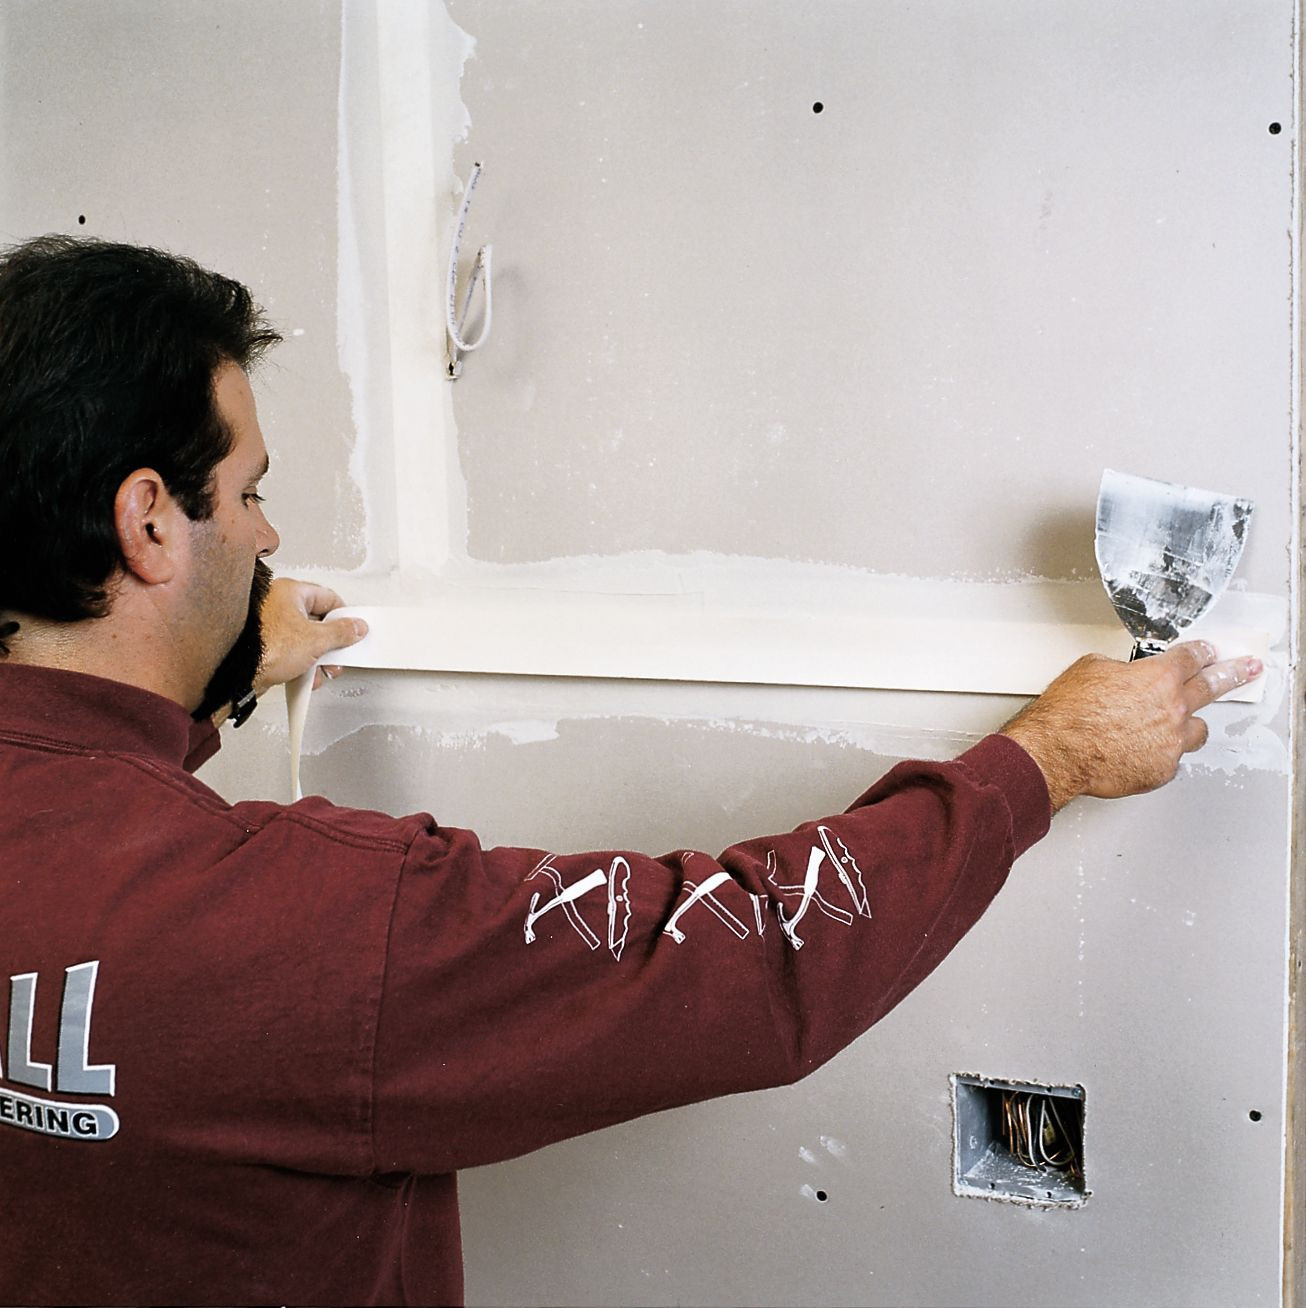
Step 2: Taping the Seams
- Apply Tape: Unroll about 3 feet of drywall tape and center it over the seam.
- Embed the Tape: Gently press the tape into the fresh compound with your fingers.
- Smooth the Tape: Use your 5-inch knife to smooth the tape, starting in the middle and working your way to the ends. Hold the knife at a 25-degree angle and apply firm, even pressure.
Step 3: Covering Screw Heads and Corner Beads
- Screw Heads: Apply a thin layer of compound over each screw head, ensuring they are completely covered.
- Corner Beads: Apply compound to both sides of the corner bead, then smooth it out with your knife, holding the blade against the sheetrock and the bead simultaneously.
Step 4: Sanding the First Coat
- Let It Dry: Allow the first coat of compound to dry completely, usually 24 hours.
- Sand Smooth: Use a sanding sponge or pole sander with medium-grit sandpaper to smooth out any imperfections.
- Be Careful: Avoid sanding too much, as this can damage the paper tape.
Step 5: Applying Second and Third Coats
- Wider Knife: Use a wider knife (10-12 inches) to apply the second and third coats.
- Feather the Edges: Feather the edges of the compound so that it blends seamlessly with the surrounding sheetrock. This involves applying less pressure as you move away from the center of the joint.
- Drying Time: Allow each coat to dry completely before sanding.
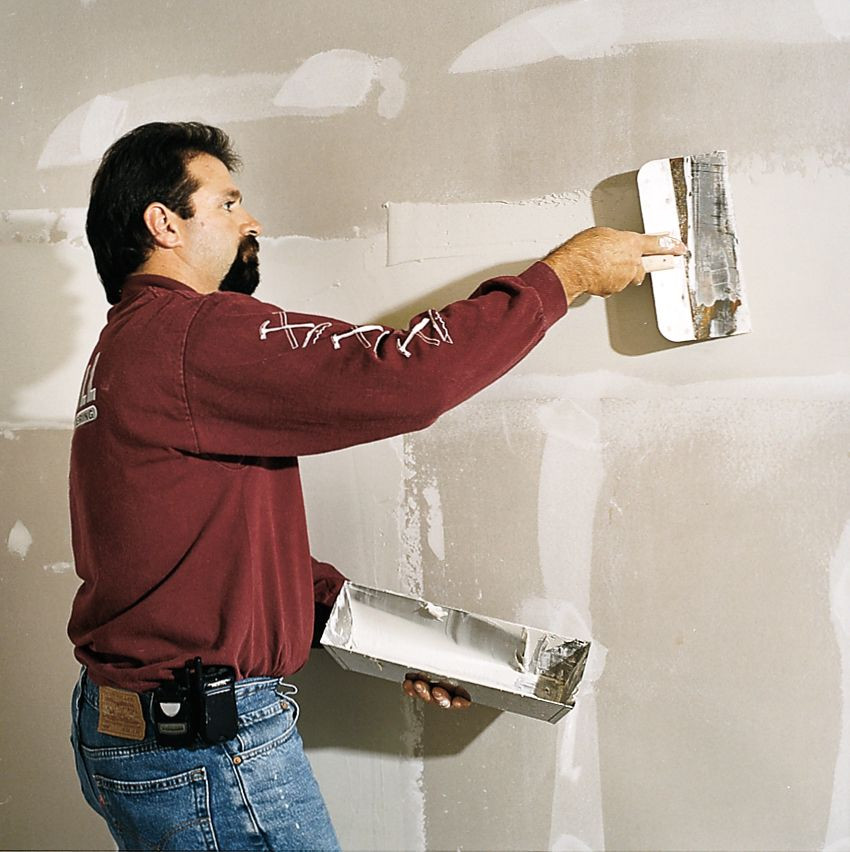 A man is using a wide drywall knife to apply joint compound to a wall, working from a mortar box.
Step 6: Sanding the Final Coat
- Fine-Grit Sandpaper: Use fine-grit sandpaper for the final sanding.
- Smooth Transitions: Focus on creating smooth transitions between the joint compound and the sheetrock surface.
- Check Your Work: Use a bright light to check for any imperfections.
6. Mastering Corners: Inside and Outside Sheetrock Finishing Techniques
Corners can be tricky, but with the right techniques, you can achieve crisp, clean lines.
Taping Inside Corners
- Apply Compound: Apply compound to both sides of the corner using your 5-inch knife.
- Crease the Tape: Cut a piece of tape the full length of the corner and crease it in half lengthwise.
- Embed the Tape: Gently push the creased tape into the corner with your knife.
- Smooth It Out: Starting in the middle, draw the knife along one side of the corner, smoothing the tape and squeezing out excess mud. Repeat on the other side.
Installing and Finishing Corner Beads
- Install Corner Beads: Nail the metal corner bead every 10 inches.
- Apply Compound: Using your 5-inch knife, apply compound to both sides of the bead.
- Smooth the Compound: Hold the blade against the sheetrock and the bead simultaneously, and run the knife down the corner, smoothing the compound in a single stroke.
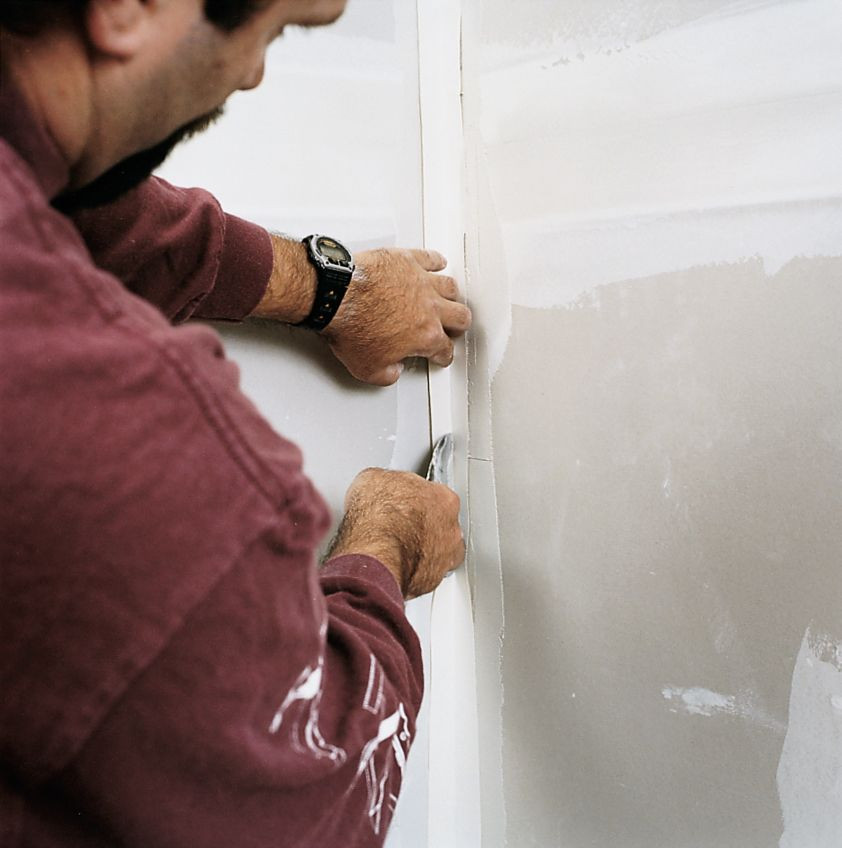 A man is using a drywall knife to apply creased tape to an inside corner where two drywall panels meet.
7. Achieving a Professional-Quality Finish: Tips and Tricks from the Pros
Want to take your sheetrock finishing to the next level? Here are some tips and tricks from the pros.
Avoiding Common Mistakes
- Too Much Compound: Applying too much compound leads to excessive sanding and potential damage to the sheetrock paper.
- Rushing the Drying Process: Always allow each coat to dry completely before sanding or applying the next coat.
- Over-Sanding: Over-sanding can damage the paper tape or create depressions in the surface.
Tricks of the Trade
- Hot Mud: Use a setting-type compound for the first coat, which dries through a chemical reaction rather than evaporation. This is known as “hot mud.”
- Damp Sponge: Use a damp sponge instead of sandpaper for the final smoothing, which creates less dust.
- Halogen Work Light: Use a halogen work light held at an angle to the wall to spot imperfections more easily.
8. Priming and Painting: The Final Touches for a Flawless Finish
Once you’ve completed the finishing process and the final sanding, it’s time to prepare the surface for paint or wallpaper.
Priming the Sheetrock
- Wipe Down the Walls: Use a damp cloth to remove any sanding dust.
- Apply Primer: Apply a coat of drywall primer to seal the surface and provide a uniform base for paint.
- Choose the Right Primer: Use a primer specifically designed for new drywall to help hide minor imperfections and aid in paint absorption.
Painting the Sheetrock
- Choose Your Paint: Select a high-quality paint that is appropriate for the room.
- Apply the Paint: Apply two coats of paint, allowing each coat to dry completely before applying the next.
- Enjoy Your Work: Step back and admire your smooth, professional-looking walls.
9. Troubleshooting Sheetrock Issues: Fixing Common Problems
Even with careful work, you may encounter some issues during the sheetrock finishing process. Here’s how to fix them.
Dealing with Bubbles and Blisters
- Cut It Out: Use a utility knife to cut out the affected area.
- Reapply Compound and Tape: Reapply fresh compound and tape, pressing out any air bubbles.
- Sand Smooth: Sand the area smooth after it dries.
Fixing Cracks and Imperfections
- Sand Down: Sand down the affected area.
- Apply Thin Coat: Apply a thin coat of compound and re-tape if necessary.
- Multiple Coats: Remember, multiple thin coats are better than one thick coat when fixing imperfections.
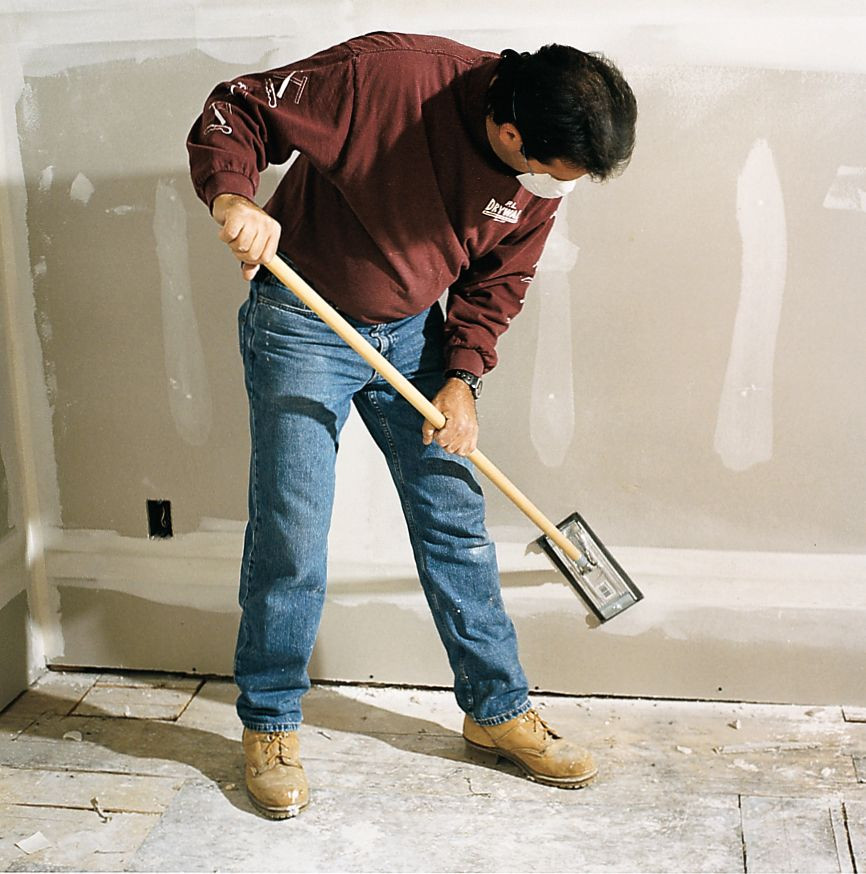 A man is using a swivel-head pole sander to sand a wall, preparing it for the final finish.
10. Why Choose Rockscapes.net for Your Landscaping and Home Improvement Needs?
At rockscapes.net, we understand the importance of creating beautiful and functional spaces. Whether you’re looking to enhance your outdoor landscape with natural stones or perfect your indoor walls with a flawless sheetrock finish, we’re here to help.
Comprehensive Information
We offer detailed guides and resources on various topics, including sheetrock finishing, landscaping with rocks, and more.
Expert Advice
Our team of experienced professionals is available to answer your questions and provide expert advice on your projects. Feel free to contact us at +1 (480) 965-9011 or visit our location at 1151 S Forest Ave, Tempe, AZ 85281, United States.
Quality Materials
We source only the highest quality materials for our projects, ensuring lasting beauty and durability.
Inspiration and Ideas
Explore our gallery of stunning landscape designs and home improvement projects for inspiration and ideas.
FAQ: Frequently Asked Questions About Sheetrock Finishing
Here are some common questions about sheetrock finishing:
1. What is the best type of joint compound to use?
All-purpose joint compound is suitable for most projects. Lightweight joint compound is easier to sand, while setting-type compound dries faster.
2. Should I use paper or mesh tape?
Paper tape is stronger and creates a smoother finish, but mesh tape is easier to use for beginners.
3. How many coats of joint compound do I need?
Typically, three coats of joint compound are needed for a Level 4 finish.
4. How long should I wait between coats?
Wait at least 24 hours between coats to allow the joint compound to dry completely.
5. How can I avoid creating too much dust when sanding?
Use a damp sponge instead of sandpaper for the final smoothing, or use a vacuum sander.
6. What is “hot mud”?
“Hot mud” is a setting-type joint compound that dries through a chemical reaction rather than evaporation.
7. How can I fix cracks in the joint compound?
Sand down the area, apply a thin coat of compound, and re-tape if necessary.
8. What is the best way to clean up drywall dust?
Use a vacuum with a HEPA filter to clean up drywall dust. Avoid sweeping, as this can stir up the dust and make it harder to remove.
9. Can I texture over finished sheetrock?
Yes, you can apply texture to finished sheetrock. Make sure the surface is clean and primed before applying the texture.
10. Is it worth hiring a professional to finish my sheetrock?
If you’re tackling a large project or feel unsure about your skills, hiring a professional can save you time and ensure a high-quality finish.
Sheetrock finishing is a skill that improves with practice, but with the right tools, materials, and techniques, you can achieve professional-looking walls in your home. Remember to take your time, apply thin coats, and allow proper drying time between each step. At rockscapes.net, we’re committed to providing you with the information and resources you need to create beautiful and functional spaces.
Ready to transform your walls from rough to radiant? Visit rockscapes.net today to explore our expert guides, find quality materials, and connect with experienced professionals who can help you achieve the perfect finish.