Is your truck suffering from rusted rocker panels? Rocker panel rust repair doesn’t have to break the bank, and at rockscapes.net, we’re here to show you how to tackle it yourself with galvanized flashing, seam sealers, and a fresh coat of paint.
Whether you’re a seasoned DIYer or just starting out, this guide will walk you through the process step-by-step. We’ll cover everything from cutting and grinding the rust to sealing and painting your new panels. By the end, you’ll have a truck that looks great and is protected from further corrosion. Let’s get started on this galvanized steel panel replacement and seam sealer restoration project, ensuring your vehicle’s longevity with our rust repair techniques.
1. Assessing the Damage and Gathering Supplies
Before diving into the repair, it’s crucial to thoroughly assess the extent of the rust damage on your truck’s rocker panels. This initial evaluation will help you determine the best course of action and ensure you have all the necessary tools and materials.
1.1. Identifying the Rust Areas
Carefully inspect the rocker panels, paying close attention to areas where rust is most prevalent. Common spots include the rear of the panels, where rocks and gravel tend to chip away at the paint, and the front, where moisture and road salt accumulate. Use a screwdriver or other pointed tool to probe any suspicious areas. If the metal is soft or easily penetrated, it’s a sign of significant rust damage. According to research from Arizona State University’s School of Earth and Space Exploration, in July 2025, oxidation provides insights into material degradation.
1.2. Determining the Extent of the Damage
Once you’ve identified the rusted areas, determine how far the rust has spread. Is it just surface rust, or has it eaten through the metal? In some cases, the rust may extend to the inside of the rocker panel, requiring more extensive repairs. Use a wire brush or sandpaper to remove loose rust and paint, allowing you to get a better look at the underlying metal. If the damage is severe, you may need to cut away large sections of the rocker panel.
1.3. Creating a Comprehensive List of Supplies
With a clear understanding of the rust damage, you can now create a comprehensive list of the supplies you’ll need for the repair. Here’s a list of essential items:
- Safety Gear:
- Safety glasses
- Gloves
- Dust mask or respirator
- Tools:
- Angle grinder with cutting and grinding discs
- Wire brush
- Tin snips
- Drill with metal drill bits
- Rivet gun
- Hammer
- Channellocks
- Die grinder/Dremel tool (optional)
- Materials:
- Sheet of galvanized flashing (2’x4′ is a good starting size)
- Marine-grade stainless blind rivets
- Eastwood Rust Encapsulator
- Great Stuff expanding foam insulation
- Eastwood Brushable Seam Sealer
- Primer
- Chip guard
- Color-matched paint
- 2-part clearcoat or bedliner
1.4. Why Galvanized Steel is Essential for Rocker Panel Repair
Using galvanized steel for rocker panel repair is essential because of its superior resistance to rust. The galvanization process involves coating the steel with a layer of zinc, which acts as a barrier against moisture and oxygen, preventing corrosion. This protective layer not only extends the life of the repair but also helps maintain the structural integrity of the rocker panels. Galvanized steel is a cost-effective and durable solution for addressing rust issues in vehicles, ensuring long-term protection against the elements.
1.5. Sourcing High-Quality Materials and Tools from Reputable Suppliers
Ensuring you source high-quality materials and tools from reputable suppliers is crucial for a successful rocker panel repair. High-quality materials, such as galvanized steel and marine-grade rivets, offer better resistance to rust and corrosion, ensuring the longevity of your repair. Reputable suppliers provide reliable products that meet industry standards, giving you confidence in their performance. Investing in quality tools, like a good angle grinder and rivet gun, makes the job easier and more efficient, leading to a professional finish. By choosing reliable sources, you’re setting yourself up for a durable and aesthetically pleasing result.
By carefully assessing the damage and gathering the right supplies, you’ll be well-prepared to tackle the rust repair and restore your truck’s rocker panels.
2. Removing Rust and Preparing the Surface
The next step is to remove the rust and prepare the surface for the new panels. This involves cutting away the damaged metal, grinding down any remaining rust, and cleaning the area thoroughly.
2.1. Cutting Away Damaged Metal Sections
Use an angle grinder with a cutting disc to carefully cut away the rusted sections of the rocker panel. Cut along the edges of the damaged areas, removing any metal that is heavily corroded or weakened. Be sure to wear safety glasses and gloves to protect yourself from flying debris. When cutting, aim for clean, straight lines to make it easier to fit the new panels. Cut slowly and steadily, allowing the cutting disc to do the work. Avoid applying too much pressure, which can cause the disc to bind or break.
2.2. Grinding Down Remaining Rust
After cutting away the damaged metal, use an angle grinder with a grinding disc to remove any remaining rust. Grind down the edges of the cut metal, creating a smooth surface for the new panels to attach to. Use a wire brush to remove any loose rust or debris. Pay close attention to areas where rust is hidden, such as seams and crevices. Grind until you reach clean, bare metal. This step is crucial for ensuring that the new panels adhere properly and that the rust doesn’t continue to spread.
2.3. Applying Rust Converter for Enhanced Protection
Applying a rust converter is essential for enhanced protection after grinding down the remaining rust. Rust converters contain chemicals that react with the rust, transforming it into a stable, protective layer. This layer prevents further corrosion and provides a solid base for primers and paints. By applying a rust converter, you ensure that any residual rust is neutralized, prolonging the life of your repair and safeguarding your truck’s rocker panels against future damage. This step is crucial for a durable and long-lasting restoration.
2.4. Thoroughly Cleaning the Area
Once you’ve removed the rust and ground down the surface, thoroughly clean the area to remove any dust, dirt, or grease. Use a solvent-based cleaner or degreaser to wipe down the metal, ensuring that it is completely clean and dry. This will help the new panels adhere properly and prevent any contaminants from interfering with the paint finish. A clean surface is essential for a successful and long-lasting repair.
2.5. Proper Disposal of Rust and Metal Debris
Proper disposal of rust and metal debris is crucial for environmental safety and personal protection. Collect all the rust and metal debris generated during the grinding and cutting processes in a sturdy container. Seal the container tightly to prevent any sharp edges from causing injury. Contact your local waste management authority for guidelines on disposing of metal waste, as it may require special handling. By following these steps, you ensure the safe and responsible disposal of hazardous materials, protecting both the environment and yourself.
3. Creating and Installing New Panels
With the surface prepared, it’s time to create and install the new panels. This involves measuring and cutting the galvanized flashing, shaping it to fit the rocker panel, and attaching it securely.
3.1. Measuring and Cutting the Galvanized Flashing
Measure the areas where you removed the rusted metal and cut the galvanized flashing to the appropriate sizes. Use tin snips to cut the flashing, making sure to leave some extra material for trimming and shaping. Cut the flashing slightly larger than the opening to allow for overlap. This will help ensure a tight, secure fit. When cutting, wear gloves to protect your hands from sharp edges.
3.2. Shaping the Flashing to Match the Rocker Panel’s Contours
Carefully shape the flashing to match the contours of the rocker panel. Use a hammer and various “anvils,” such as your tailgate and the curb, to bend and shape the metal. Take your time and work slowly, gradually forming the flashing to fit the curves and angles of the rocker panel. For tighter bends, use channellocks to crimp the metal. The goal is to create a panel that fits snugly against the existing metal, with minimal gaps or overlaps.
3.3. Choosing the Right Fasteners: Rivets vs. Screws
When attaching the new panels, you have a choice between rivets and screws. While screws may seem like a convenient option, they can create potential entry points for water over time. Marine-grade stainless blind rivets are a better choice because they are designed to withstand harsh conditions and provide a secure, watertight seal. Rivets are also less likely to loosen or corrode over time, ensuring a long-lasting repair. Rivets create a clean, low-profile finish that blends seamlessly with the rocker panel.
3.4. Attaching the New Panels with Marine-Grade Rivets
Drill holes through the flashing and the existing metal, then use a rivet gun to attach the new panels with marine-grade rivets. Start by attaching the panels at the top and bottom, then work your way towards the middle. Space the rivets evenly, about every 2-3 inches, to ensure a secure and uniform attachment. Make sure the rivets are tight and flush with the surface of the metal. If any rivets are loose or pop out, replace them immediately.
3.5. Ensuring Proper Alignment and Fitment
During installation, ensure proper alignment and fitment of the new panels. Continuously check that the panels are flush with the existing metal and that there are no gaps or overlaps. Adjust the panels as needed, using a hammer or channellocks to make minor adjustments. Proper alignment and fitment are crucial for a professional-looking repair and will help prevent water from entering the rocker panel.
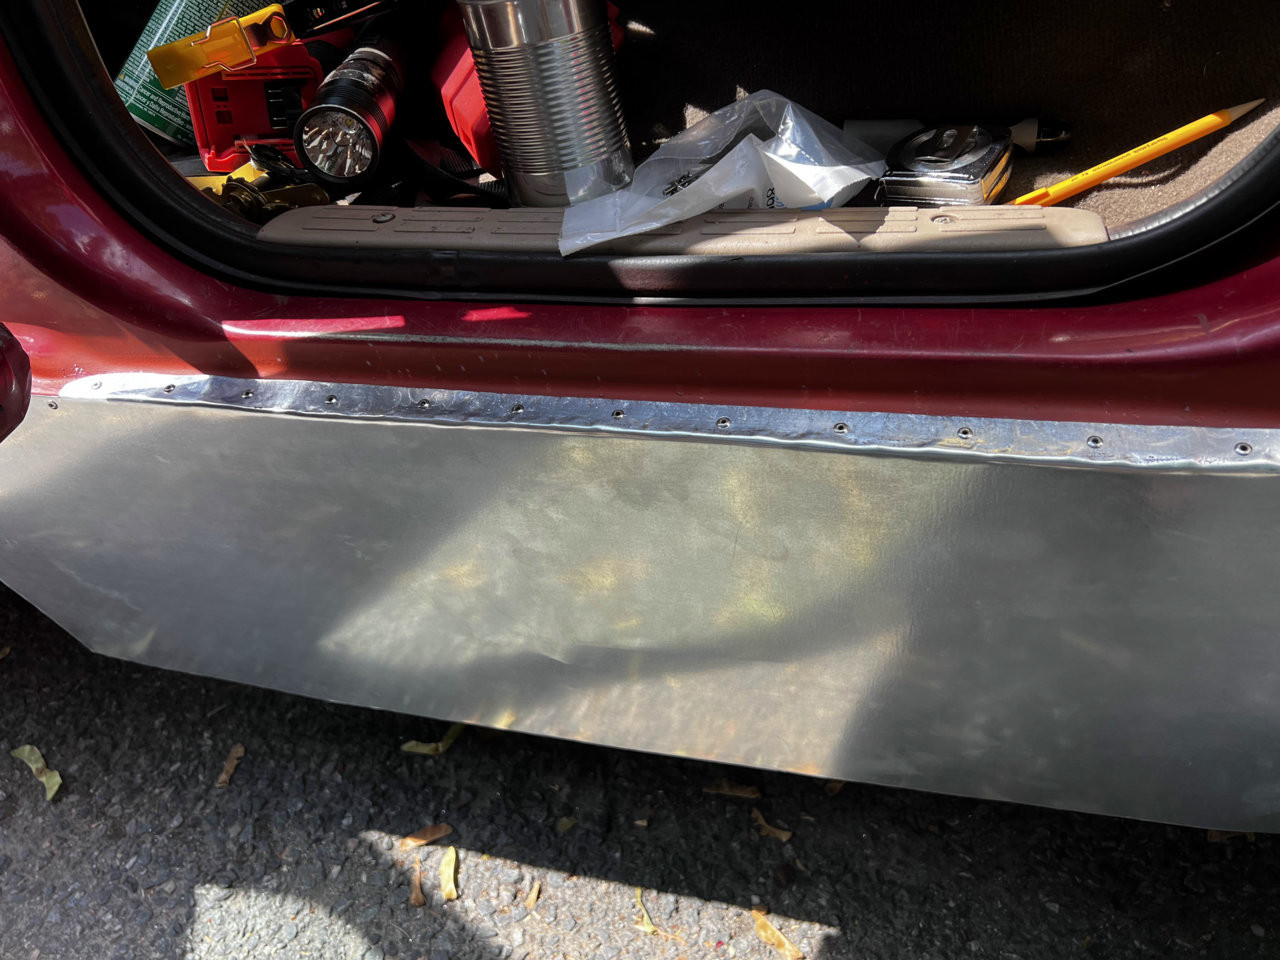 First row of rivets.HEIC.jpg
This image shows the process of using rivets to secure the new galvanized steel panel to the truck’s rocker panel. The rivets provide a strong and waterproof connection, ensuring the panel stays firmly in place.
4. Sealing and Protecting the Repaired Area
Once the new panels are installed, it’s important to seal and protect the repaired area from moisture and corrosion. This involves filling any gaps or cavities, applying seam sealer, and painting the new panels.
4.1. Filling Cavities with Expanding Foam Insulation
Use Great Stuff expanding foam insulation to fill any cavities or gaps between the new panels and the existing metal. This will help prevent moisture from entering the rocker panel and causing further corrosion. Apply the foam sparingly, as it expands significantly as it dries. Allow the foam to dry completely, then trim any excess with a knife or saw. Filling cavities with expanding foam insulation provides an extra layer of protection and helps maintain the structural integrity of the rocker panel.
4.2. Applying Seam Sealer to All Seams and Gaps
Apply Eastwood Brushable Seam Sealer to all seams and gaps around the new panels. This will create a watertight seal that prevents moisture from entering the rocker panel. Use a brush to apply the seam sealer, making sure to cover all edges and corners. Allow the seam sealer to dry completely before moving on to the next step. Applying seam sealer is essential for preventing rust and corrosion and ensuring a long-lasting repair.
4.3. Debating Drain Holes: To Drill or Not to Drill?
Whether to drill drain holes in the rocker panel is a matter of debate. Some argue that drain holes allow moisture to escape, preventing rust from forming inside the panel. Others argue that drain holes can actually allow more moisture to enter the panel, leading to corrosion. Ultimately, the decision is up to you. If you choose to drill drain holes, make sure they are small and located in inconspicuous areas. You can always add them later if you decide they are necessary.
4.4. Preparing the Surface for Paint: Sanding and Priming
Before painting the new panels, prepare the surface by sanding and priming. Use sandpaper to smooth out any rough edges or imperfections, then apply a coat of primer to help the paint adhere properly. Allow the primer to dry completely before moving on to the next step. Sanding and priming the surface is essential for a smooth, professional-looking paint finish.
4.5. Choosing the Right Paint: Color Matching and Durability
When choosing paint for your rocker panels, consider both color matching and durability. If you want to match the existing paint color, take your truck to an auto parts store and have them mix a custom batch of paint. For durability, consider using a bedliner or other protective coating that is designed to withstand harsh conditions. Bedliners are available in a variety of colors and textures, allowing you to customize the look of your truck.
5. Painting and Finishing Touches
With the surface sealed and primed, it’s time to paint the new panels and add the finishing touches. This involves applying the paint, clearcoat, and any other protective coatings.
5.1. Applying Multiple Coats of Paint for a Uniform Finish
Apply multiple coats of paint to the new panels, allowing each coat to dry completely before applying the next. This will help ensure a uniform finish and prevent the paint from running or dripping. Use a spray gun or aerosol can to apply the paint, holding it about 12 inches from the surface. Apply the paint in thin, even strokes, overlapping each stroke slightly. Multiple thin coats of paint are better than one thick coat, as they are less likely to run or drip.
5.2. Using Chip Guard for Added Protection
Apply a coat of chip guard to the lower portion of the rocker panels. Chip guard is a protective coating that helps prevent rocks and other debris from chipping the paint. Apply the chip guard after the paint has dried completely. Chip guard is available in a variety of colors and textures, allowing you to customize the look of your truck.
5.3. Applying Clearcoat for a Durable, Glossy Finish
Apply a coat of clearcoat to the painted panels. Clearcoat is a protective coating that helps protect the paint from scratches, fading, and other damage. Use a spray gun or aerosol can to apply the clearcoat, holding it about 12 inches from the surface. Apply the clearcoat in thin, even strokes, overlapping each stroke slightly. Allow the clearcoat to dry completely before moving on to the next step. Applying clearcoat provides a durable, glossy finish that will protect your paint for years to come.
5.4. Reattaching Trim and Moldings
Once the paint and clearcoat have dried completely, reattach any trim or moldings that you removed during the repair process. Use new clips or fasteners to ensure that the trim is securely attached. Reattaching trim and moldings will help restore the original look of your truck and protect the edges of the rocker panels.
5.5. Inspecting and Touching Up Any Imperfections
Inspect the repaired area for any imperfections, such as runs, drips, or scratches. Use sandpaper to smooth out any rough spots, then touch up the paint as needed. Apply a small amount of paint to a brush or sponge and dab it onto the affected area. Allow the paint to dry completely, then apply a coat of clearcoat. Inspecting and touching up any imperfections will ensure a professional-looking repair.
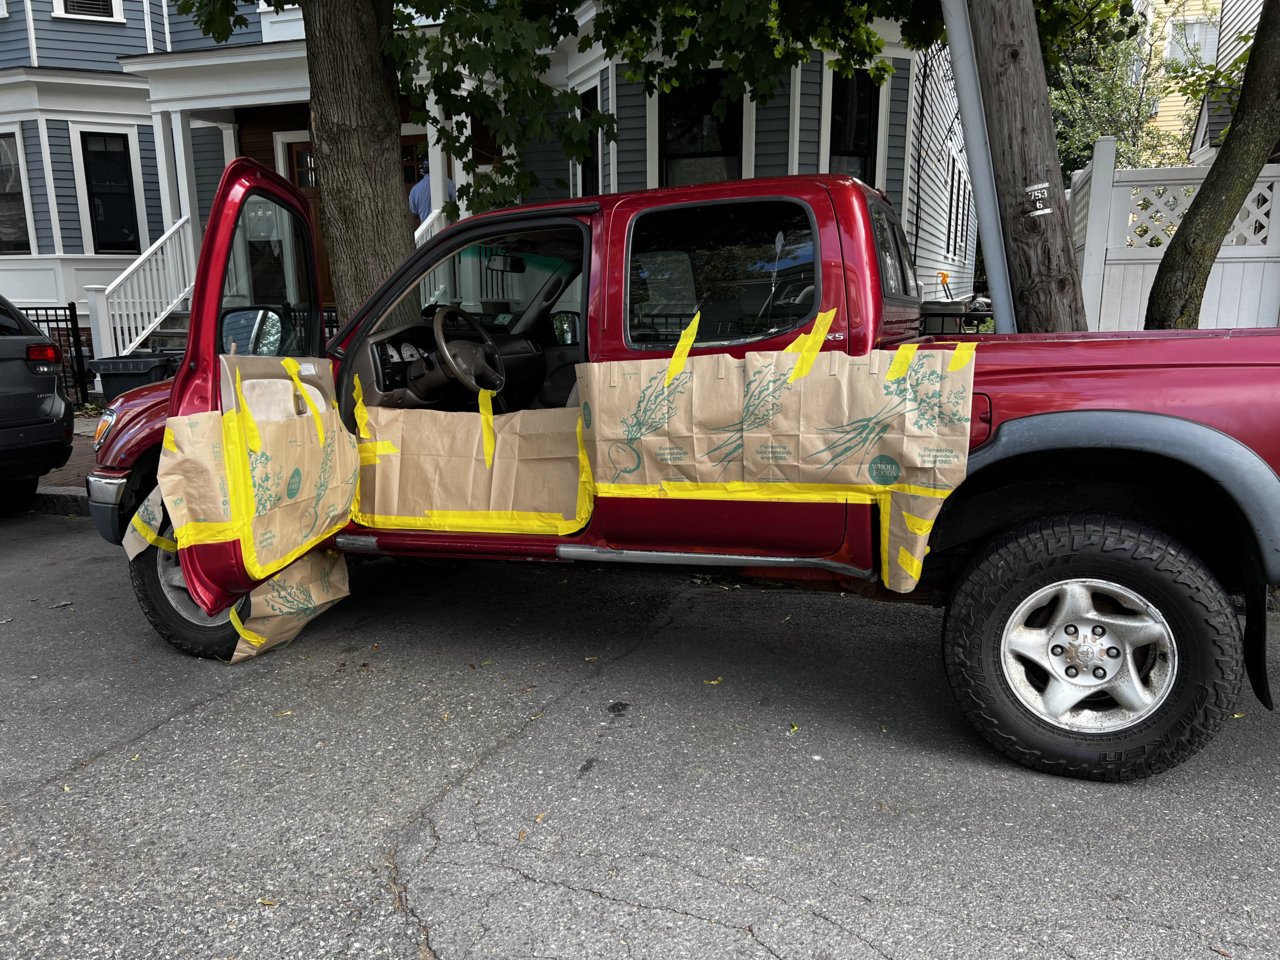 Paint prep.HEIC.jpg
This image showcases the meticulous preparation process before painting the rocker panels, including sanding, masking, and priming, to ensure a smooth and durable finish.
6. Maintenance and Prevention
After completing the rocker panel repair, it’s important to take steps to maintain and prevent future rust damage. Regular maintenance and preventative measures will help extend the life of your repair and keep your truck looking its best.
6.1. Regular Washing and Cleaning
Wash your truck regularly to remove dirt, salt, and other contaminants that can cause rust. Pay special attention to the rocker panels, as they are particularly vulnerable to corrosion. Use a mild soap and water solution, and rinse thoroughly. Regular washing and cleaning will help prevent rust from forming and keep your truck looking its best.
6.2. Applying Rust Inhibitors
Apply rust inhibitors to the rocker panels to protect them from corrosion. Rust inhibitors are available in a variety of forms, such as sprays, coatings, and waxes. Apply the rust inhibitor according to the manufacturer’s instructions. Rust inhibitors will help prevent rust from forming and extend the life of your rocker panels.
6.3. Inspecting for New Rust Spots Regularly
Regularly inspect the rocker panels for new rust spots. Catching rust early is the best way to prevent it from spreading and causing significant damage. If you spot any new rust, address it immediately by removing the rust, applying rust converter, and painting the area. Regular inspections will help you stay on top of rust and keep your truck looking its best.
6.4. Addressing Minor Damage Promptly
Address any minor damage to the rocker panels promptly. Scratches, chips, and dents can expose the metal to moisture and cause rust. Repair any damage as soon as possible by cleaning the area, applying primer, and painting the area. Addressing minor damage promptly will help prevent rust from forming and keep your truck looking its best.
6.5. Parking Considerations to Minimize Exposure
Parking your truck in a garage or under a carport can help minimize its exposure to the elements and prevent rust. If you must park your truck outside, try to park it in a shady area to protect it from the sun. Avoid parking your truck near sources of moisture, such as sprinklers or puddles. Parking considerations can help minimize exposure and prevent rust.
7. Addressing Common Problems and Challenges
Even with careful planning and execution, you may encounter some common problems and challenges during the rocker panel repair process. Here are some tips for addressing these issues:
7.1. Difficulty Removing Severely Rusted Sections
If you’re having difficulty removing severely rusted sections, try using a cutting torch or plasma cutter. These tools can cut through thick rust and metal quickly and easily. Be sure to wear appropriate safety gear, such as a welding helmet and gloves, when using these tools.
7.2. Ensuring a Watertight Seal
Ensuring a watertight seal is crucial for preventing future rust damage. Use plenty of seam sealer and expanding foam insulation to seal all gaps and seams. If you’re still concerned about water entering the rocker panel, consider adding drain holes.
7.3. Matching the Original Paint Color
Matching the original paint color can be challenging, especially if your truck is several years old. Take your truck to an auto parts store and have them mix a custom batch of paint. Provide them with the paint code for your truck, which can usually be found on a sticker inside the driver’s side door.
7.4. Dealing with Limited Access
Dealing with limited access can make it difficult to work on the rocker panels. Use a variety of tools, such as ratchets, extensions, and swivel sockets, to reach tight spaces. You may also need to remove some components, such as the wheels or inner fender liners, to gain better access.
7.5. Handling Unexpected Complications
Unexpected complications can arise during any DIY project. Stay calm and assess the situation. Consult with a professional if needed. Don’t be afraid to ask for help or do more research if you’re unsure how to proceed.
8. Cost Analysis: DIY vs. Professional Repair
One of the biggest factors in deciding whether to repair your rocker panels yourself or hire a professional is the cost. Here’s a breakdown of the costs associated with each option:
8.1. Cost of DIY Repair
- Materials: $100 – $300 (depending on the quality and quantity of materials)
- Tools: $0 – $500 (depending on whether you already own the necessary tools)
- Time: 10 – 20 hours (depending on your skill level and the extent of the damage)
- Total: $100 – $800
8.2. Cost of Professional Repair
- Labor: $50 – $100 per hour
- Materials: $100 – $300
- Total: $600 – $6,000 (depending on the shop and the extent of the damage)
8.3. Factors Influencing the Overall Cost
The overall cost of rocker panel repair can be influenced by several factors, including the extent of the damage, the type of materials used, and the labor rates in your area. More extensive damage will require more materials and labor, increasing the cost. High-quality materials, such as marine-grade rivets and bedliner paint, will also increase the cost.
8.4. Potential Savings with DIY
By repairing your rocker panels yourself, you can potentially save hundreds or even thousands of dollars. DIY repair eliminates the cost of labor, which can be a significant expense. You also have more control over the materials used, allowing you to choose cost-effective options.
8.5. When Professional Help is Recommended
Professional help is recommended if you’re not comfortable working on your truck or if the rust damage is extensive. A professional body shop will have the expertise and equipment to repair your rocker panels properly and ensure a long-lasting repair.
9. Tools and Equipment Checklist
Having the right tools and equipment is essential for a successful rocker panel repair. Here’s a comprehensive checklist of the items you’ll need:
9.1. Essential Hand Tools
- Hammer
- Channellocks
- Tin snips
- Screwdrivers
- Sockets and wrenches
- Pliers
9.2. Power Tools
- Angle grinder with cutting and grinding discs
- Drill with metal drill bits
- Rivet gun
- Die grinder/Dremel tool (optional)
- Spray gun or aerosol can
9.3. Safety Equipment
- Safety glasses
- Gloves
- Dust mask or respirator
- Welding helmet (if using a cutting torch or plasma cutter)
9.4. Measuring and Marking Tools
- Tape measure
- Straight edge
- Marker or pen
9.5. Other Useful Items
- Jack and jack stands
- Wheel chocks
- Drop cloth
- Solvent-based cleaner or degreaser
- Sandpaper
- Primer
- Paint
- Clearcoat
- Seam sealer
- Expanding foam insulation
10. Frequently Asked Questions (FAQ) About Rocker Panel Repair
10.1. How Do I Know If My Rocker Panels Need Repair?
Look for signs of rust, such as bubbling paint, surface rust, or holes in the metal. Use a screwdriver to probe any suspicious areas. If the metal is soft or easily penetrated, it’s a sign of significant rust damage.
10.2. Can I Just Cover Up the Rust?
Covering up the rust is not a long-term solution. The rust will continue to spread underneath the covering, eventually causing more damage. It’s best to remove the rust and repair the area properly.
10.3. What is Galvanized Steel, and Why is it Important?
Galvanized steel is steel that has been coated with a layer of zinc to protect it from rust and corrosion. It’s important because it provides a durable, long-lasting repair that will resist future rust damage.
10.4. Are Rivets Better Than Screws for Attaching the Panels?
Yes, rivets are generally better than screws for attaching the panels. Rivets provide a more secure, watertight seal that is less likely to loosen or corrode over time.
10.5. How Do I Match the Original Paint Color?
Take your truck to an auto parts store and have them mix a custom batch of paint. Provide them with the paint code for your truck, which can usually be found on a sticker inside the driver’s side door.
10.6. What is Seam Sealer, and Why Do I Need It?
Seam sealer is a sealant that is used to create a watertight seal between two pieces of metal. You need it to prevent moisture from entering the rocker panel and causing future rust damage.
10.7. Can I Use a Bedliner Instead of Paint?
Yes, you can use a bedliner instead of paint. Bedliners are durable, protective coatings that are designed to withstand harsh conditions. They are available in a variety of colors and textures, allowing you to customize the look of your truck.
10.8. How Do I Prevent Future Rust Damage?
Wash your truck regularly, apply rust inhibitors, inspect for new rust spots regularly, address minor damage promptly, and park your truck in a garage or under a carport.
10.9. Is Rocker Panel Repair a Difficult DIY Project?
Rocker panel repair can be challenging, but it’s definitely doable for the average DIYer. With careful planning, the right tools, and a little patience, you can successfully repair your rocker panels and save money in the process.
10.10. Where Can I Find More Information and Resources?
For more information and resources on rocker panel repair, visit rockscapes.net. We offer a wide range of articles, tutorials, and product reviews to help you tackle any DIY project.
This guide provides a comprehensive overview of How To Fix Rusted Truck Rocker Panels. By following these steps, you can restore your truck’s appearance, prevent further corrosion, and save money on expensive professional repairs. Remember to prioritize safety, take your time, and don’t be afraid to ask for help if you need it. Good luck and happy repairing!
Ready to take on your rocker panel repair project? Explore rockscapes.net for design inspiration, detailed product information, and expert advice to help you get the job done right. Transform your truck and make it look its best with our trusted resources! Visit us at 1151 S Forest Ave, Tempe, AZ 85281, United States or call +1 (480) 965-9011 today!