Creating a rock garden in Animal Crossing: New Horizons can be a challenging but rewarding project. Rockscapes.net is here to guide you through the process of strategically placing rocks on your island, offering creative landscaping ideas and tips for successfully managing your island’s resources. Learn how to get more landscaping rocks, decorative rocks, and garden rocks, ensuring your island’s unique rock features, landscape rock placement, and natural rock formations will amaze.
Table of Contents
- The Basics of Rocks in Animal Crossing
- Understanding Rock Spawn Mechanics
- Comprehensive Guide to Rock Placement
- Detailed Steps for Rock Garden Creation
- Troubleshooting Common Rock Placement Issues
- Creative Rock Garden Design Ideas
- Advanced Techniques for Rock Manipulation
- Maintaining and Protecting Your Rock Garden
- Leveraging Rockscapes.net for Rock Garden Inspiration
- Frequently Asked Questions About Rock Gardens
1. The Basics of Rocks in Animal Crossing
Rocks are essential resources in Animal Crossing: New Horizons. These geological features are distributed randomly across your island and each island has six rocks. Each day, hitting them with a shovel yields valuable materials like iron nuggets, stones, clay, and even Bells (the game’s currency). Rocks are a staple in Animal Crossing, essential for gathering resources and crafting tools, and a foundational element in creative island designs. Understanding their mechanics is key to optimizing resource collection and enhancing your island’s landscape.
1.1. What Rocks Offer
Each rock, when struck with a shovel, can dispense up to eight items. The type of item you receive is random but typically includes:
- Iron Nuggets: Used for crafting tools, furniture, and other essential items.
- Stones: A common material in various DIY recipes.
- Clay: Necessary for crafting items like pottery and some furniture.
- Bells: The game’s currency, which can be used to purchase items and services.
- Gold Nuggets: A rare material used in high-value DIY recipes.
1.2. The Importance of Resource Management
Efficiently gathering resources from rocks can significantly enhance your progress in the game. By understanding how to maximize your yield from each rock, you can ensure a steady supply of necessary materials, allowing you to craft essential items, build infrastructure, and customize your island to its fullest potential. Resource management is a cornerstone of successful island development in Animal Crossing: New Horizons.
1.3. Initial Rock Distribution
When you first start your island in Animal Crossing: New Horizons, the six rocks are scattered randomly across the landscape. Their initial placement is not strategic, but it provides a starting point for resource collection. As you develop your island, you may find that you want to move these rocks to more convenient or aesthetically pleasing locations. This is where understanding rock spawn mechanics becomes essential.
2. Understanding Rock Spawn Mechanics
The mechanics of how rocks spawn are crucial when aiming to control their placement. By understanding these mechanics, you can strategically manipulate the game to position rocks exactly where you want them. This involves knowing the rules that govern where rocks can and cannot appear, and using these rules to your advantage.
2.1. The 3×3 Grid Rule
Rocks can only spawn in locations that meet specific criteria. Picture a 3×3 grid where the center square is your desired rock spawn location. If any of the eight surrounding squares are blocked by an object, the rock will not spawn there. This rule is fundamental to controlling rock placement.
2.2. Blocking Factors
Several factors can prevent a rock from spawning in a particular location. These include:
- Furniture: Any piece of furniture placed on the ground will block a rock from spawning in an adjacent square.
- Trees: Trees and saplings also prevent rocks from spawning nearby.
- Cliff Sides: The edges of cliffs will block rock spawns.
- Fences: Fences serve as barriers and prevent rocks from spawning in adjacent squares.
- Buildings: Structures like your house, the museum, and shops will block rock spawns.
- Flowers: Rocks can spawn in open squares surrounded by flowers, but not on top of them.
- Custom Designs: Patterns or stone walkways placed on the ground will prevent rocks from spawning on those squares.
2.3. Manipulating Spawn Locations
To control where rocks spawn, you must manipulate the environment to limit the eligible spawn locations. By strategically placing blocking factors, you can force rocks to spawn only in the areas you have designated. This technique requires careful planning and execution but is essential for creating a rock garden or other custom rock arrangements.
3. Comprehensive Guide to Rock Placement
Achieving precise rock placement involves meticulous planning and strategic execution. This section provides a step-by-step guide to help you manipulate the game’s mechanics and position rocks exactly where you desire. It’s a painstaking process, but worth it in the end.
3.1. Initial Island Preparation
Before attempting to move your rocks, you need to prepare your island by clearing it of unnecessary obstructions. This involves:
- Removing Trees: Dig up and relocate any trees that might interfere with your desired rock placement.
- Picking Flowers: Pluck all flowers and weeds from the ground to eliminate potential spawn blockers.
- Moving Furniture: Store all outdoor furniture to ensure clear, unobstructed space.
- Clearing Pathways: Ensure that any pathways or custom designs are removed from areas where you want rocks to spawn.
3.2. Strategic Blocking
The key to controlling rock placement is to block all potential spawn locations except for the ones you want. Here’s how to do it:
- Custom Designs: Create a simple custom design (like a dot) and place it on every square of your island where you don’t want a rock to spawn. This is the most common method.
- Furniture Placement: Use furniture items to block off larger areas quickly. This can be more time-consuming but may be useful in specific areas.
- Combining Methods: Use a combination of custom designs and furniture to efficiently block off potential spawn locations.
3.3. Breaking Existing Rocks
To move your rocks, you must first break them. This is done by eating a piece of fruit and then hitting the rock with a shovel. Eating fruit temporarily gives you the power to uproot trees or break rocks with a single strike. Be careful, as breaking a rock is irreversible without waiting for it to respawn the next day.
3.4. Waiting for Respawn
After breaking a rock, it will respawn in a random eligible location on your island the next day. If you have strategically blocked off all locations except for your desired spot, the rock will spawn there. If it doesn’t, double-check your blocking to ensure you haven’t missed any potential spawn locations.
4. Detailed Steps for Rock Garden Creation
Creating a rock garden in Animal Crossing: New Horizons requires careful planning and precise execution. Here are detailed steps to guide you through the process:
4.1. Planning Your Rock Garden
Before you start moving rocks, plan the layout of your rock garden. Consider the following:
- Location: Choose a suitable spot on your island for your rock garden. This should be an area that complements your island’s overall design and is easily accessible.
- Size and Shape: Determine the size and shape of your rock garden. Consider how much space you want to dedicate to it and how you want the rocks to be arranged.
- Theme: Decide on a theme for your rock garden. This could be a Zen garden, a desert landscape, or a naturalistic rock formation.
- Materials: Gather any additional materials you want to include in your rock garden, such as sand, stone paths, plants, and decorative items.
4.2. Clearing and Blocking
Follow the steps outlined in Section 3 to clear your island of obstructions and strategically block off all potential spawn locations except for your desired rock garden area. This is the most time-consuming part of the process, so be patient and thorough.
4.3. Moving the Rocks
Break one rock each day and wait for it to respawn in your rock garden. Repeat this process until all six rocks are located in your desired area. This will take at least six days, assuming you have successfully blocked off all other spawn locations.
4.4. Landscaping
Once all the rocks are in place, you can start landscaping your rock garden. This involves:
- Adding Sand: Use the Island Designer app to add sand paths around the rocks. This will create a naturalistic look and help to define the boundaries of your rock garden.
- Placing Stone Paths: Add stone paths to create walkways and define specific areas within your rock garden.
- Planting Vegetation: Plant flowers, shrubs, and trees to add color and texture to your rock garden. Choose plants that complement your chosen theme and enhance the overall aesthetic.
- Decorative Items: Place decorative items such as lanterns, statues, and garden gnomes to add interest and personality to your rock garden.
4.5. Final Touches
Take a step back and assess your rock garden. Make any necessary adjustments to the layout, landscaping, and decorative elements. Ensure that the rock garden is visually appealing and harmonious with the rest of your island.
5. Troubleshooting Common Rock Placement Issues
Even with careful planning, you may encounter issues during the rock placement process. Here are some common problems and how to troubleshoot them:
5.1. Rocks Spawning in Unexpected Locations
If a rock spawns outside of your desired rock garden area, it means you have missed a potential spawn location. Carefully inspect your island and ensure that all areas outside the rock garden are properly blocked. Pay close attention to:
- Hidden Spots: Check behind buildings, cliffs, and trees for any overlooked areas.
- Flower Beds: Ensure that flowers are not creating open squares where rocks can spawn.
- Pathways: Double-check that all pathways and custom designs are properly placed to prevent rock spawns.
5.2. Rocks Not Spawning at All
If a rock doesn’t spawn after you break one, there may be an issue with your island’s spawn mechanics. Try the following:
- Check Date and Time: Ensure that your Nintendo Switch’s date and time are set correctly. Rocks only spawn once per day, so if the date is incorrect, it may affect the spawn rate.
- Clear Clutter: Make sure that there are no items blocking the potential spawn location. Even small items like shells or dropped leaves can sometimes interfere with rock spawns.
- Restart the Game: Sometimes, simply restarting the game can resolve spawn issues.
5.3. Difficulty Placing Custom Designs
Placing custom designs across your entire island can be tedious. Here are some tips to make the process easier:
- Use the Bulk Placement Tool: The Island Designer app has a tool that allows you to place custom designs in bulk. This can significantly speed up the process.
- Enlist Help: Ask friends to help you place custom designs on your island. The more people working on the task, the faster it will be completed.
- Break It Up: Don’t try to place all the custom designs in one sitting. Break the task into smaller, more manageable chunks.
6. Creative Rock Garden Design Ideas
A rock garden is a blank canvas for creativity. Here are some design ideas to inspire you:
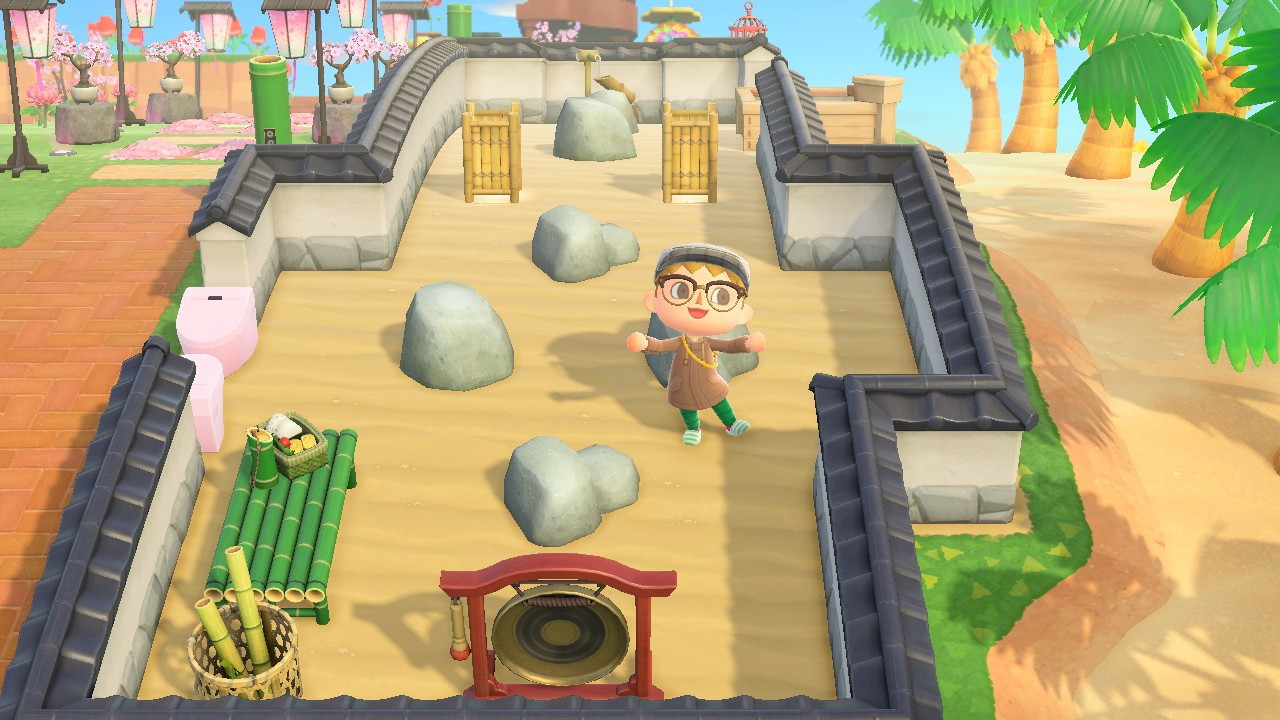
6.1. Zen Garden
Create a serene and peaceful Zen garden with carefully raked sand, smooth stones, and minimalist vegetation. Incorporate elements such as:
- Sand Patterns: Use the Island Designer app to create intricate sand patterns around the rocks.
- Bamboo Accents: Add bamboo fences, plants, and decorative items to enhance the Zen aesthetic.
- Water Features: Include a small pond or fountain to add a calming element to the garden.
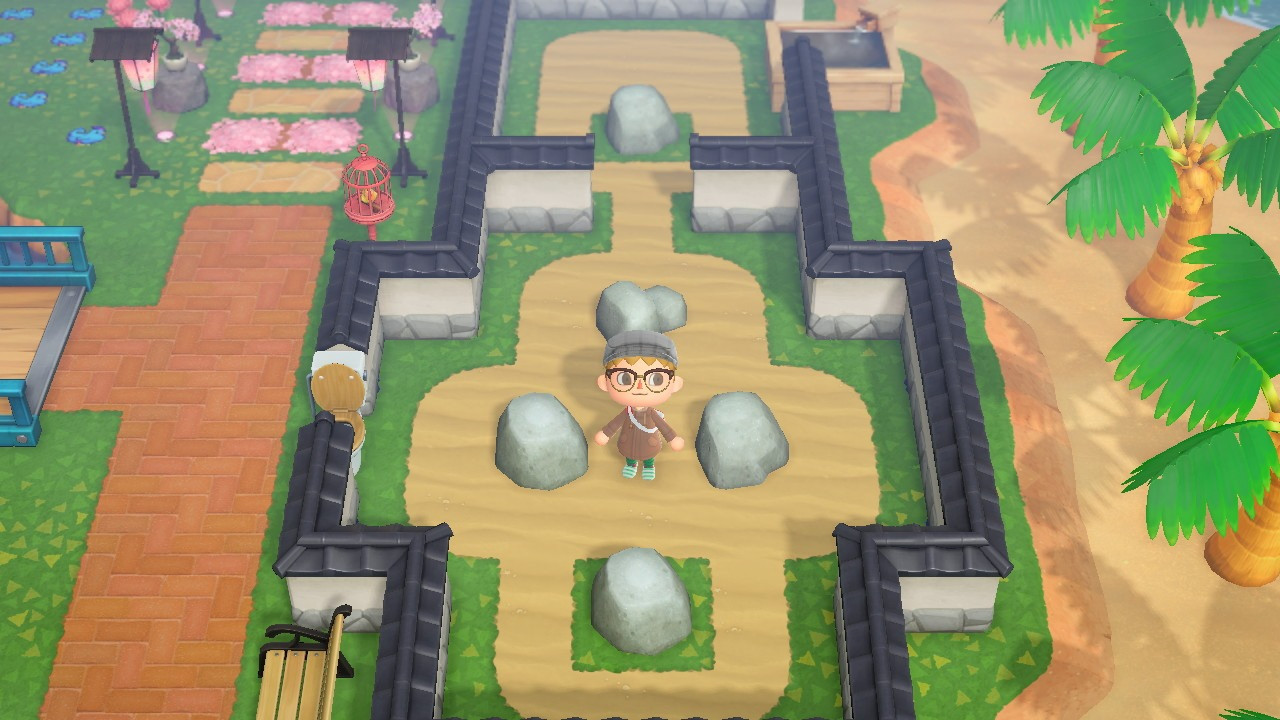 Zen garden with carefully raked sand
6.2. Desert Landscape
Recreate a desert landscape with cacti, succulents, and sandy terrain. Consider adding:
- Cactus Plants: Plant various types of cacti to add texture and visual interest.
- Sand Dunes: Use the Island Designer app to create small sand dunes around the rocks.
- Dry Riverbed: Add a dry riverbed with pebbles and stones to simulate a desert wash.
6.3. Natural Rock Formation
Mimic a natural rock formation with mossy stones, ferns, and wildflowers. Try these ideas:
- Mossy Rocks: Use the Island Designer app to add mossy textures to the rocks.
- Ferns and Wildflowers: Plant ferns and wildflowers to create a lush, naturalistic environment.
- Waterfalls: Incorporate a waterfall to add movement and visual appeal to the rock formation.
6.4. Modern Rock Garden
Design a contemporary rock garden with clean lines, geometric shapes, and minimalist plantings. Include:
- Geometric Paths: Use stone paths to create geometric patterns around the rocks.
- Sculptural Elements: Add modern sculptures to enhance the contemporary aesthetic.
- Monochromatic Palette: Use a monochromatic color palette to create a cohesive and sophisticated look.
7. Advanced Techniques for Rock Manipulation
Once you’ve mastered the basics of rock placement, you can explore advanced techniques to further customize your island’s landscape.
7.1. Time Travel
Time travel involves changing the date and time settings on your Nintendo Switch to manipulate the game’s events. While some players prefer not to use time travel, it can be a useful tool for speeding up the rock placement process.
- Moving Rocks Quickly: Use time travel to advance one day at a time, allowing you to break and respawn rocks more quickly.
- Correcting Mistakes: If you accidentally break a rock or make a mistake in your blocking, use time travel to go back and correct it.
7.2. Island Designer App Mastery
The Island Designer app is a powerful tool for terraforming and landscaping your island. Mastering its features can greatly enhance your rock garden design.
- Creating Cliffs and Waterfalls: Use the Island Designer app to create cliffs and waterfalls around your rock garden, adding depth and visual interest.
- Shaping Terrain: Use the app to shape the terrain around your rock garden, creating hills, valleys, and other naturalistic features.
- Custom Paths: Design custom paths to guide visitors through your rock garden and highlight specific features.
7.3. Collaboration with Other Players
Collaborating with other players can provide new ideas and inspiration for your rock garden design.
- Visiting Other Islands: Visit other players’ islands to see their rock gardens and landscaping techniques.
- Sharing Designs: Share your rock garden designs with other players and get feedback and suggestions.
- Trading Materials: Trade materials with other players to acquire rare plants, decorative items, and other resources for your rock garden.
8. Maintaining and Protecting Your Rock Garden
Once your rock garden is complete, it’s important to maintain and protect it from accidental damage.
8.1. Preventing Accidental Rock Breaking
Accidentally breaking a rock can undo weeks of hard work. Here are some tips to prevent this:
- Avoid Eating Fruit: Be careful not to eat fruit when you are near your rock garden. The temporary strength boost can lead to accidental rock breaking.
- Use Fences: Surround your rock garden with fences to create a physical barrier and prevent accidental entry.
- Designated Safe Zones: Create designated safe zones near your rock garden where you can safely eat fruit without risking accidental rock breaking.
8.2. Regular Maintenance
Regular maintenance is essential for keeping your rock garden looking its best. This includes:
- Weeding: Remove any weeds that pop up in your rock garden to keep it looking tidy.
- Watering Plants: Water your plants regularly to ensure they stay healthy and vibrant.
- Replacing Decorative Items: Replace any damaged or worn decorative items to maintain the overall aesthetic of your rock garden.
8.3. Seasonal Adjustments
Adjust your rock garden to reflect the changing seasons. This can involve:
- Changing Plants: Swap out seasonal plants to add variety and visual interest to your rock garden.
- Adding Seasonal Decorations: Add seasonal decorations such as pumpkins in the fall, snowflakes in the winter, and cherry blossoms in the spring.
- Adjusting Lighting: Adjust the lighting in your rock garden to create a different mood for each season.
 Rock garden with fall decorations
9. Leveraging Rockscapes.net for Rock Garden Inspiration
For more inspiration and resources for creating stunning rock gardens, visit Rockscapes.net. We offer a wide range of:
- Design Ideas: Browse our gallery of rock garden designs to find inspiration for your own island.
- Material Guides: Learn about different types of rocks, plants, and decorative items that you can use in your rock garden.
- Step-by-Step Tutorials: Follow our step-by-step tutorials to learn advanced rock placement and landscaping techniques.
- Community Forum: Connect with other Animal Crossing players in our community forum to share ideas, ask questions, and get feedback on your rock garden designs.
At Rockscapes.net, we are dedicated to helping you create the rock garden of your dreams.
10. Frequently Asked Questions About Rock Gardens
Here are some frequently asked questions about creating rock gardens in Animal Crossing: New Horizons:
10.1. How Long Does It Take to Create a Rock Garden?
Creating a rock garden can take anywhere from one to two weeks, depending on your planning, execution, and luck. The most time-consuming part is blocking off all potential spawn locations and waiting for the rocks to respawn in your desired area.
10.2. Can I Move Rocks After They Have Spawned?
No, once a rock has spawned, you cannot move it directly. You must break it and wait for it to respawn in a different location.
10.3. What Happens if I Accidentally Break a Rock?
If you accidentally break a rock, it will respawn in a random eligible location on your island the next day. This can disrupt your rock garden design, so it’s important to take precautions to prevent accidental rock breaking.
10.4. Can Rocks Spawn on Sand Paths?
No, rocks cannot spawn on sand paths. However, you can place sand paths around rocks to create a naturalistic look.
10.5. Do Rocks Respawn in the Same Location?
No, rocks will not respawn in the same location. They will always respawn in a different eligible location on your island.
10.6. Can I Use Time Travel to Speed Up the Rock Placement Process?
Yes, you can use time travel to advance one day at a time, allowing you to break and respawn rocks more quickly. However, some players prefer not to use time travel.
10.7. What Are the Best Materials to Use in a Rock Garden?
The best materials to use in a rock garden depend on your chosen theme and aesthetic. Some popular materials include sand, stone paths, bamboo accents, cacti, succulents, ferns, wildflowers, and decorative items.
10.8. How Do I Prevent Weeds from Growing in My Rock Garden?
To prevent weeds from growing in your rock garden, regularly remove any weeds that pop up. You can also use the Island Designer app to place custom designs or paths in areas where weeds are likely to grow.
10.9. Can I Visit Other Players’ Rock Gardens for Inspiration?
Yes, visiting other players’ islands is a great way to get inspiration for your rock garden design. You can also share your own designs and get feedback from other players.
10.10. Where Can I Find More Information and Resources for Creating Rock Gardens?
Visit Rockscapes.net for a wealth of information and resources for creating stunning rock gardens in Animal Crossing: New Horizons. We offer design ideas, material guides, step-by-step tutorials, and a community forum where you can connect with other players.
Creating a rock garden in Animal Crossing: New Horizons can be a challenging but rewarding project. By understanding rock spawn mechanics, planning your design carefully, and following the tips and techniques outlined in this guide, you can create a beautiful and unique rock garden that enhances your island’s landscape. For more inspiration and resources, be sure to visit Rockscapes.net.
Are you ready to transform your Animal Crossing island with a stunning rock garden? Visit Rockscapes.net today to explore our design gallery, learn about different rock types, and get expert advice from our landscaping professionals. Don’t wait – create the island of your dreams now! Visit our website or contact us at 1151 S Forest Ave, Tempe, AZ 85281, United States, or call +1 (480) 965-9011. Let rockscapes.net help you bring your vision to life.