Are you looking to create the perfect rock garden or optimize your resource gathering in Animal Crossing: New Horizons? rockscapes.net provides a comprehensive guide on how to strategically manage and manipulate rock placement on your island. Discover the secrets to creating the rock garden of your dreams with our expert tips and tricks, along with ways to enhance your landscaping.
1. Understanding Rock Mechanics in Animal Crossing: New Horizons
Understanding the basics of rock spawning in Animal Crossing: New Horizons is crucial. Each island begins with six rocks that randomly appear. According to game experts, these rocks are essential for gathering resources like iron, stone, and clay, which are vital for crafting and island development. These rocks are not just static decorations; they’re dynamic resource points that can be manipulated for island optimization.
- Initial Rock Placement: At the start of the game, rocks appear in random locations across the island.
- Resource Gathering: Hitting rocks with a shovel yields resources such as iron nuggets, stones, clay, and sometimes bells.
- Breaking Rocks: Eating fruit before hitting a rock will break it, causing it to respawn the next day in a new random location.
1.1. Controlling Rock Spawns: The Key to Rock Gardens
Controlling rock spawns is the key to creating dedicated rock gardens. Rocks will only appear in locations that meet specific criteria. According to research from Animal Crossing community experts, each potential rock location can be visualized as a 3×3 grid. If any of the eight surrounding squares are blocked by an object, the rock will not spawn there.
Obstacles that prevent rock spawns include:
- Furniture: Items placed on the ground.
- Trees: Planted trees in their growing state.
- Cliff Sides: Areas adjacent to cliffs.
- Fences: Placed fences.
- Custom Designs: Patterns or stone pathways placed on the ground.
The goal is to limit the available spawning locations to your desired rock garden area.
1.2. Preparing Your Island for Rock Manipulation
Preparing your island involves clearing obstacles and strategically placing obstructions to guide rock spawns. The process requires patience and meticulous planning. Begin by identifying the area you want to designate as your rock garden. According to landscape design experts, choosing a flat, easily accessible area is ideal for both aesthetics and functionality.
Steps to prepare your island:
- Clear the Area: Remove all existing rocks from your island by eating fruit and hitting them with a shovel.
- Block Unwanted Spawn Locations: Cover the rest of your island with custom designs, furniture, or other obstructions.
- Designate Rock Garden Spots: Leave only the desired locations within your rock garden open and unobstructed.
2. Step-by-Step Guide to Creating Your Rock Garden
Creating a rock garden in Animal Crossing: New Horizons is a detailed process that involves careful planning and execution. This step-by-step guide will walk you through each stage, ensuring you can achieve the rock garden of your dreams. From understanding the spawning mechanics to the final placement of your rocks, here’s what you need to know.
2.1. Initial Planning and Preparation
Before you start manipulating rock spawns, planning is essential. Decide where you want your rock garden to be and how you want it to look. According to landscape design principles, consider the layout and accessibility of the area. Is it close to your home, or does it serve as a decorative focal point on your island?
Choosing the Right Location
- Accessibility: Ensure the location is easily accessible for daily resource collection.
- Aesthetics: Consider the surrounding environment and how the rock garden will complement it.
- Size: Determine the size of your rock garden based on the desired arrangement of the rocks.
Clearing the Island
- Break All Existing Rocks: Eat fruit and hit each rock with a shovel until it breaks. This will remove all existing rocks from your island.
- Clear Obstructions: Remove any trees, flowers, weeds, and other items from the areas you don’t want rocks to spawn in.
2.2. Blocking Unwanted Spawn Locations
Blocking unwanted spawn locations is a crucial step in controlling where your rocks will appear. This involves covering your island with obstacles that prevent rocks from spawning in undesired areas.
Using Custom Designs
- Create a Simple Pattern: Design a simple, single-tile pattern that you can easily place across your island.
- Place Patterns Everywhere: Cover every square inch of your island with the custom pattern, except for the desired locations in your rock garden.
Alternative Blocking Methods
- Furniture: Place furniture items across the island. This can be time-consuming but also adds to the aesthetic.
- Flowers: Plant flowers densely in areas where you don’t want rocks to spawn.
- Fences: Use fences to block off large areas quickly.
2.3. Designating Rock Garden Spots
With the rest of your island blocked, you need to designate the exact spots where you want your rocks to spawn. These locations should be free of any obstructions and easily accessible.
Ensuring Clear Spawning Zones
- 3×3 Grid Rule: Remember that each rock needs a clear 3×3 grid around it to spawn. Ensure there are no items, patterns, or other obstructions within this grid.
- Accessibility: Make sure you can easily access each rock to hit it with a shovel.
Creating a Sand or Path Foundation
- Terraforming: Use the terraforming tool to lay down a layer of sand or stone paths in your rock garden area. This creates a visually appealing base for your rocks.
- Shape the Area: Design the shape of your rock garden to fit your aesthetic preferences.
2.4. The Waiting Game: Spawning Your Rocks
Once you’ve prepared your island and designated the rock garden spots, the waiting game begins. Each day, one rock will spawn in one of the designated locations.
Daily Checks
- Check Each Day: Log into Animal Crossing each day to see if a new rock has spawned.
- Patience is Key: It may take several days for all six rocks to spawn in your desired locations.
Troubleshooting Spawn Issues
- Missing Spots: If a rock doesn’t spawn in a designated location, double-check that the 3×3 grid around the spot is completely clear.
- Visual Obstructions: Sometimes, the game may perceive a visual obstruction that isn’t immediately obvious. Try removing any nearby items or patterns to see if this resolves the issue.
2.5. Final Touches and Decoration
With all six rocks in your rock garden, it’s time to add the final touches and decorate the area to your liking.
Landscaping Around the Rocks
- Add Plants: Plant flowers, shrubs, and trees around your rock garden to enhance its natural beauty.
- Create Paths: Use the path tool to create winding paths through your rock garden.
- Place Decorative Items: Add decorative items such as benches, statues, and lanterns to personalize the space.
Maintaining Your Rock Garden
- Prevent Accidental Breaks: Be careful not to accidentally break any rocks by eating fruit before hitting them.
- Regular Maintenance: Keep the area clean and tidy by removing weeds and other unwanted items.
3. Advanced Tips for Rock Garden Design and Optimization
Creating a rock garden in Animal Crossing: New Horizons can be further enhanced with advanced techniques that optimize both its aesthetic appeal and functionality. These tips, gathered from expert players and landscape design enthusiasts, will help you take your rock garden to the next level.
3.1. Incorporating Water Features
Water features can add a dynamic and soothing element to your rock garden. The sound of flowing water combined with the visual texture of rocks creates a serene environment.
Creating Ponds and Streams
- Terraforming: Use the terraforming tool to dig out ponds or streams within your rock garden.
- Placement: Position the water features strategically to complement the arrangement of your rocks.
- Customization: Add waterfalls or small cascades to enhance the visual and auditory experience.
Utilizing Water-Related Items
- Fountains: Place fountains near the rocks to create a focal point and add the sound of running water.
- Water Plants: Add water lilies, lotus plants, and other aquatic flora to the ponds or streams.
3.2. Enhancing with Lighting
Proper lighting can transform your rock garden, especially at night. Strategic placement of light sources can highlight the textures and shapes of the rocks, creating a magical ambiance.
Types of Lighting
- Lanterns: Use traditional lanterns to cast a warm, inviting glow.
- String Lights: Hang string lights above the rock garden to create a festive atmosphere.
- Spotlights: Place spotlights to accentuate specific rocks or water features.
Placement Strategies
- Highlight Key Features: Focus lighting on the most visually appealing rocks or decorative items.
- Create Shadows: Use lighting to create interesting shadows and add depth to the scene.
- Balance Brightness: Avoid using too much light, which can overwhelm the natural beauty of the rock garden.
3.3. Seasonal Decorations
Adapting your rock garden to reflect the changing seasons can keep it fresh and engaging throughout the year.
Spring
- Flowers: Plant an abundance of colorful flowers to celebrate the arrival of spring.
- Pastel Colors: Use pastel-colored decorations and items to evoke a sense of renewal.
Summer
- Tropical Plants: Incorporate tropical plants and items to create a summery vibe.
- Water Features: Emphasize water features to provide a cooling effect.
Autumn
- Fall Foliage: Add autumn-colored leaves and pumpkins for a seasonal touch.
- Warm Lighting: Use warm-toned lighting to create a cozy atmosphere.
Winter
- Snow Effects: Use the snow terrain paint to create a winter wonderland.
- Holiday Decorations: Add festive holiday decorations, such as Christmas lights and snowmen.
3.4. Optimizing Resource Collection
A well-designed rock garden not only looks beautiful but also makes resource collection more efficient.
Strategic Rock Placement
- Accessibility: Arrange the rocks in a way that allows you to easily hit each one with a shovel.
- Hole Placement: Dig holes behind you to prevent being pushed back while hitting the rocks.
Creating Collection Zones
- Designated Areas: Create designated areas around each rock where resources can fall without being lost.
- Fencing: Use low fences to contain the resources within the collection zones.
3.5. Customization with DIY Recipes
DIY recipes offer a wide range of customization options for your rock garden.
Crafting Unique Items
- Stone Lion-Dog: Craft stone lion-dogs to guard your rock garden.
- Zen-Style Stone: Create zen-style stones for a traditional Japanese touch.
Personalizing the Space
- Custom Designs: Use custom designs to create unique patterns on stones and pathways.
- Theme Integration: Integrate your rock garden with other themed areas on your island.
4. Common Mistakes to Avoid When Creating a Rock Garden
Creating a rock garden in Animal Crossing: New Horizons can be a rewarding experience, but it’s easy to make mistakes that can set you back. Based on experiences shared by seasoned players on rockscapes.net, avoiding these common pitfalls can save you time and frustration.
4.1. Not Clearing Enough Space
One of the most common mistakes is not clearing enough space around the desired rock spawn locations. Rocks require a 3×3 grid of unobstructed space to appear.
- Mistake: Leaving flowers, weeds, or small decorative items near the intended spawn points.
- Solution: Ensure a completely clear 3×3 grid around each spot. Remove even the smallest items that could potentially block the spawn.
4.2. Inconsistent Blocking
Inconsistent blocking of unwanted spawn locations can lead to rocks appearing in unexpected places.
- Mistake: Leaving gaps in custom designs or forgetting to cover every square inch of the island.
- Solution: Meticulously cover the entire island with custom designs, furniture, or other obstructions. Double-check for any missed spots.
4.3. Forgetting About Cliff Sides and Elevated Areas
Rocks can spawn near cliff sides and elevated areas if these spots are not properly blocked.
- Mistake: Neglecting to cover the areas around cliffs and elevated terrain.
- Solution: Extend your blocking efforts to include cliff sides and any raised areas on your island.
4.4. Accidental Rock Breaking
Accidentally breaking a rock can undo days of progress and force you to start the spawning process over.
- Mistake: Eating fruit and then accidentally hitting a rock with a shovel.
- Solution: Be extra cautious when near your rock garden after eating fruit. Consider creating a physical barrier, like a fence or toilet gate, to prevent accidental breaks.
4.5. Impatience and Time Skipping
While time skipping can speed up the process, it can also lead to confusion and errors if not done carefully.
- Mistake: Skipping too far ahead in time and losing track of which rocks have already spawned.
- Solution: If you choose to time skip, do it in small increments (one day at a time) and keep careful track of your progress.
4.6. Ignoring the Weather
Weather conditions can affect visibility and make it harder to spot potential spawn locations.
- Mistake: Working on your rock garden during heavy rain or snow, making it difficult to see small details.
- Solution: Choose clear weather days for the most precise blocking and spawn monitoring.
4.7. Neglecting Final Touches
Failing to add final touches and decorations can leave your rock garden looking unfinished and uninspired.
- Mistake: Leaving the rock garden bare and without any landscaping or decorative elements.
- Solution: Add plants, water features, lighting, and other decorative items to enhance the visual appeal of your rock garden.
4.8. Not Consulting Resources
Not consulting online resources and communities can lead to reinventing the wheel and missing out on valuable tips and tricks.
- Mistake: Trying to figure everything out on your own without seeking advice from experienced players.
- Solution: Visit rockscapes.net and other Animal Crossing communities to learn from others and get inspiration for your rock garden design.
5. The Benefits of Having a Rock Garden in Animal Crossing: New Horizons
Creating a rock garden in Animal Crossing: New Horizons offers numerous benefits, enhancing both the aesthetic appeal and functionality of your island. According to landscape design experts, a well-designed rock garden can transform your island into a serene and visually stunning space. Let’s explore the advantages in detail.
5.1. Aesthetic Enhancement
A rock garden adds a unique and natural aesthetic element to your island. The textures, shapes, and colors of the rocks create visual interest and complement various landscaping styles.
- Natural Beauty: Rocks bring a touch of nature to your island, creating a calming and serene atmosphere.
- Visual Appeal: The diverse shapes and sizes of rocks add visual interest and depth to your landscape.
- Customization: You can customize your rock garden with plants, water features, and lighting to match your personal style.
5.2. Efficient Resource Gathering
A rock garden centralizes all your island’s rocks in one convenient location, making resource gathering more efficient.
- Centralized Location: No more searching the entire island for rocks. They are all in one place.
- Time-Saving: Quickly gather resources each day without wasting time on a scavenger hunt.
- Easy Access: Design the rock garden for easy access and efficient resource collection.
5.3. Creative Expression
Creating a rock garden allows for creative expression and personalization of your island.
- Design Freedom: Design the layout, choose the surrounding elements, and customize the overall look.
- Themed Gardens: Create themed rock gardens, such as zen gardens, desert landscapes, or prehistoric displays.
- Unique Island Identity: A well-designed rock garden sets your island apart and reflects your unique style.
5.4. Increased Island Rating
A beautifully designed rock garden can contribute to a higher island rating, impressing both Isabelle and your visitors.
- Improved Scenery: Adds to the overall scenery score of your island.
- Visitor Appeal: Creates a memorable and visually appealing spot for visitors to enjoy.
- Five-Star Island: Helps you achieve and maintain a five-star island rating.
5.5. Therapeutic Benefits
Designing and maintaining a rock garden can be a relaxing and therapeutic activity.
- Stress Relief: The repetitive tasks of placing designs, breaking rocks, and decorating can be calming.
- Creative Outlet: Provides a creative outlet for expressing your artistic vision.
- Sense of Accomplishment: Completing a rock garden and seeing your vision come to life is highly rewarding.
5.6. Educational Opportunity
Creating a rock garden can be an educational experience, teaching you about landscape design, resource management, and game mechanics.
- Landscape Design: Learn about the principles of landscape design, such as balance, harmony, and contrast.
- Resource Management: Develop skills in managing resources and optimizing their collection.
- Game Mechanics: Gain a deeper understanding of the game’s mechanics and how to manipulate them to your advantage.
6. Finding Inspiration for Your Rock Garden Design
Finding inspiration is a crucial step in creating a unique and beautiful rock garden in Animal Crossing: New Horizons. Drawing ideas from various sources can help you develop a design that reflects your personal style and enhances your island’s aesthetic. Based on insights from design communities, here are several avenues to explore for rock garden inspiration.
6.1. Real-World Rock Gardens
Looking at real-world rock gardens can provide a wealth of ideas for your Animal Crossing design.
- Japanese Zen Gardens: These gardens emphasize simplicity, tranquility, and the beauty of natural elements.
- Alpine Gardens: Alpine gardens showcase a variety of rocks and hardy plants adapted to mountainous environments.
- Desert Landscapes: Desert landscapes feature arid plants, cacti, and unique rock formations.
6.2. Online Communities and Forums
Online communities and forums dedicated to Animal Crossing are excellent sources of inspiration.
- Rockscapes.net: Visit rockscapes.net for a wealth of ideas, tips, and inspiration for creating your rock garden.
- Reddit: Explore subreddits like r/AnimalCrossing and r/AC_NewHorizons for designs, tips, and community discussions.
- Twitter: Search for Animal Crossing rock garden designs using relevant hashtags to find inspiration and connect with other players.
6.3. In-Game Examples
Visiting other players’ islands in Animal Crossing can provide direct inspiration and practical ideas.
- Dream Addresses: Use dream addresses to visit a variety of islands and see how other players have designed their rock gardens.
- Island Tours: Participate in online island tours to get a firsthand look at different rock garden styles.
- Best Friend Visits: Visit the islands of your best friends and exchange design ideas.
6.4. Pinterest and Image Searches
Pinterest and image searches can help you discover a wide range of rock garden designs and landscaping ideas.
- Pinterest: Search for “Animal Crossing rock garden” or “ACNH rock garden” to find visual inspiration.
- Google Images: Use Google Images to explore various rock garden designs and landscaping techniques.
- Instagram: Browse Instagram for Animal Crossing rock garden inspiration using relevant hashtags.
6.5. Books and Magazines
Books and magazines on landscape design can provide valuable insights and inspiration for your rock garden.
- Landscape Design Books: Consult books on landscape design for principles, techniques, and design ideas.
- Gardening Magazines: Read gardening magazines for inspiration on plant selection, layout, and seasonal decorations.
- DIY Guides: Look for DIY guides on creating rock gardens and incorporating natural elements into your landscape.
6.6. Combining Different Elements
Experiment with combining different elements and styles to create a unique and personalized rock garden.
- Mix and Match: Combine elements from Japanese zen gardens, alpine gardens, and desert landscapes.
- Personal Touches: Add personal touches, such as favorite plants, DIY items, and themed decorations.
- Seasonal Adaptations: Adapt your rock garden to reflect the changing seasons, adding unique decorations and plants for each time of year.
7. Troubleshooting Common Rock Garden Problems
Even with careful planning, you may encounter problems while creating your rock garden in Animal Crossing: New Horizons. Troubleshooting these issues promptly can save you time and frustration. Here are solutions to common problems, based on advice from experienced players and design forums.
7.1. Rocks Not Spawning in Desired Locations
If rocks are not spawning in the designated spots, the most likely cause is an obstruction in the surrounding 3×3 grid.
- Problem: Rocks failing to spawn in the intended locations.
- Solution: Double-check each designated spot to ensure a completely clear 3×3 grid. Remove any flowers, weeds, small decorative items, or custom designs that could be blocking the spawn.
7.2. Inconsistent Spawn Patterns
Sometimes, rocks may spawn in unwanted locations despite your blocking efforts.
- Problem: Rocks appearing in areas that should be blocked off.
- Solution: Review your blocking strategy to ensure every square inch of the island is covered with custom designs, furniture, or other obstructions. Pay special attention to cliff sides and elevated areas.
7.3. Accidental Rock Breaking
Breaking a rock accidentally can be a significant setback, requiring you to start the spawning process over for that rock.
- Problem: Accidentally breaking a rock after eating fruit.
- Solution: Be extra cautious near your rock garden after eating fruit. Create a physical barrier, such as a fence or toilet gate, to prevent accidental breaks.
7.4. Time-Related Issues
Time skipping can sometimes cause unexpected issues with rock spawns.
- Problem: Rocks not spawning correctly after time skipping.
- Solution: If you time skip, do it in small increments (one day at a time) and keep careful track of your progress. If issues arise, try returning to the original date and allowing the game to sync naturally.
7.5. Visual Obstructions
Sometimes, the game may perceive a visual obstruction that is not immediately obvious.
- Problem: Rocks not spawning even though the 3×3 grid appears clear.
- Solution: Try removing any nearby items or patterns to see if this resolves the issue. The game may be detecting an obstruction that is not visually apparent.
7.6. Weather-Related Problems
Weather conditions can affect visibility and make it harder to monitor rock spawns.
- Problem: Difficulty monitoring rock spawns during heavy rain or snow.
- Solution: Choose clear weather days for the most precise blocking and spawn monitoring. If you must work during inclement weather, use lighting to improve visibility.
7.7. Limited Design Space
Sometimes, you may find that you have limited space for your rock garden design.
- Problem: Difficulty fitting all six rocks into the desired area.
- Solution: Consider adjusting the size and layout of your rock garden to maximize space. Use terraforming to create additional room if needed.
7.8. Feeling Overwhelmed
Creating a rock garden can be a time-consuming and challenging project, leading to feelings of overwhelm.
- Problem: Feeling overwhelmed by the complexity and time commitment of the project.
- Solution: Break the project into smaller, more manageable tasks. Set realistic goals and celebrate your progress along the way.
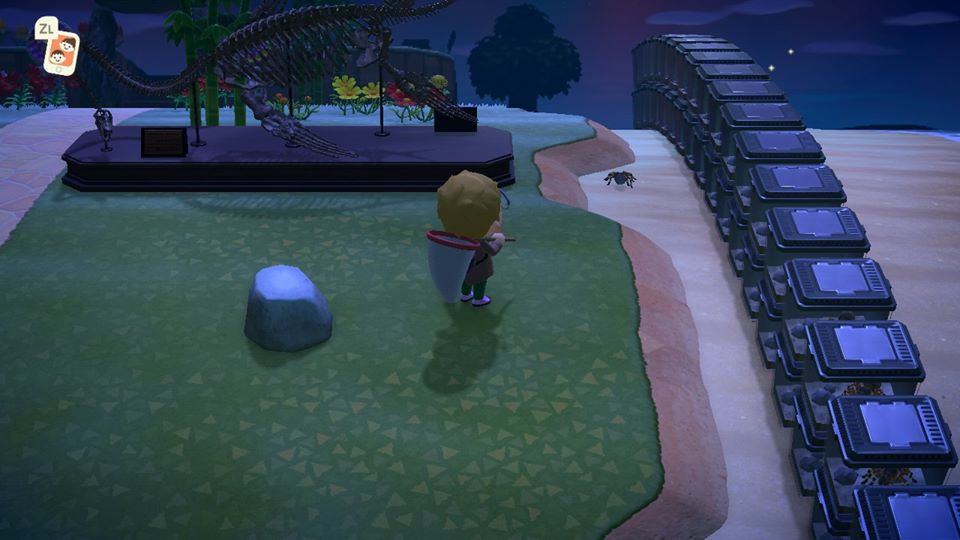 Animal Crossing rock in a town
8. The Future of Rock Gardens in Animal Crossing
As Animal Crossing: New Horizons continues to evolve with updates and expansions, the possibilities for rock gardens are likely to expand as well. Speculating on the future of rock gardens involves considering potential new features, customization options, and design trends. Drawing on insights from game analysts and community feedback, here are some potential developments.
8.1. New Rock Types and Textures
Future updates could introduce new rock types and textures, offering players more variety and customization options for their rock gardens.
- Potential Updates: Introducing new rock types like granite, sandstone, or volcanic rock could significantly enhance the visual diversity of rock gardens.
- Customization Options: Allowing players to customize the color, size, and texture of rocks would enable even greater personalization.
8.2. Enhanced Terraforming Tools
Improvements to the terraforming tools could make it easier to create intricate and dynamic rock garden designs.
- Precision Tools: Adding precision terraforming tools would allow for more detailed shaping of the landscape, enabling players to create complex rock formations and water features.
- Automated Features: Introducing automated features for creating symmetrical designs or natural-looking terrain could streamline the design process.
8.3. Expanded DIY Recipes
Expanding the range of DIY recipes related to rock gardens could offer new ways to decorate and enhance these spaces.
- New Items: Introducing new DIY recipes for items like stone lanterns, rock sculptures, and decorative stones would provide more options for customization.
- Seasonal Recipes: Adding seasonal DIY recipes would allow players to adapt their rock gardens to reflect the changing seasons.
8.4. Integration with Other Features
Integrating rock gardens with other game features, such as farming, fishing, or bug catching, could add new layers of gameplay and functionality.
- Farming: Allowing players to grow plants on or around rocks could create unique farming opportunities.
- Fishing: Incorporating fishing spots into rock gardens could add a new dimension to these spaces.
- Bug Catching: Attracting specific bugs to rock gardens could create new challenges and rewards.
8.5. Community Sharing and Collaboration
Enhancing community sharing and collaboration features could facilitate the exchange of design ideas and inspiration for rock gardens.
- Design Sharing: Allowing players to share their rock garden designs with others could foster creativity and collaboration.
- Collaboration Tools: Introducing collaboration tools would enable players to work together on rock garden designs, creating shared spaces.
8.6. Increased Realism and Naturalism
Future updates could focus on increasing the realism and naturalism of rock gardens, making them more visually stunning and immersive.
- Improved Graphics: Enhancing the game’s graphics could make rocks and plants look more realistic and detailed.
- Dynamic Effects: Introducing dynamic effects, such as wind, rain, and sunlight, could add a new level of realism to rock gardens.
8.7. Educational Elements
Incorporating educational elements into rock gardens could teach players about geology, botany, and landscape design.
- Informational Displays: Adding informational displays about different types of rocks and plants could educate players about the natural world.
- Interactive Tutorials: Introducing interactive tutorials on landscape design could help players develop their skills and knowledge.
 Chicken pattern in Animal Crossing
9. Expert Insights: Tips from Seasoned Animal Crossing Players
To provide you with the best advice on creating rock gardens in Animal Crossing: New Horizons, we’ve gathered insights and tips from seasoned players and design enthusiasts. These experts have spent countless hours perfecting their rock gardens and offer valuable advice to help you succeed.
9.1. Planning and Preparation Tips
Effective planning and preparation are essential for a successful rock garden project.
- Expert Tip: Start with a clear vision of your rock garden. Sketch out a design on paper or use digital tools to visualize the layout before you begin.
- Seasoned Player Advice: “Take your time with the planning phase. A well-thought-out design will save you time and frustration in the long run.”
9.2. Blocking and Spawning Strategies
Mastering the art of blocking unwanted spawn locations is crucial for controlling where your rocks appear.
- Expert Tip: Use a combination of custom designs, furniture, and other obstructions to ensure every square inch of the island is covered.
- Seasoned Player Advice: “Be meticulous with your blocking. Even small gaps can lead to rocks spawning in unwanted locations.”
9.3. Design and Customization Techniques
Enhance the aesthetic appeal of your rock garden with creative design and customization techniques.
- Expert Tip: Incorporate a variety of plants, water features, and lighting to create visual interest and depth.
- Seasoned Player Advice: “Don’t be afraid to experiment with different styles and themes. Let your creativity shine!”
9.4. Resource Management Tips
Efficient resource management can save you time and effort while creating your rock garden.
- Expert Tip: Use a designated storage area to keep your resources organized and easily accessible.
- Seasoned Player Advice: “Take advantage of daily tasks and challenges to gather resources quickly and efficiently.”
9.5. Troubleshooting Strategies
Knowing how to troubleshoot common problems can help you overcome challenges and stay on track.
- Expert Tip: When rocks fail to spawn in the desired locations, double-check the surrounding 3×3 grid for any obstructions.
- Seasoned Player Advice: “Stay patient and persistent. Creating a rock garden can be challenging, but the results are well worth the effort.”
9.6. Community Engagement Tips
Engaging with the Animal Crossing community can provide valuable support and inspiration.
- Expert Tip: Visit online forums and social media groups to share your designs, ask for advice, and connect with other players.
- Seasoned Player Advice: “Don’t be afraid to ask for help. The Animal Crossing community is incredibly supportive and welcoming.”
9.7. Long-Term Maintenance Tips
Maintaining your rock garden over time is essential for preserving its beauty and functionality.
- Expert Tip: Regularly clean up weeds, remove debris, and prune plants to keep your rock garden looking its best.
- Seasoned Player Advice: “Make small adjustments and improvements over time to keep your rock garden fresh and engaging.”
9.8. Adapting to Game Updates
Staying informed about game updates and adapting your rock garden accordingly can ensure its continued success.
- Expert Tip: Read the patch notes for each update to learn about new features, items, and mechanics that could affect your rock garden.
- Seasoned Player Advice: “Be flexible and adaptable. The game is constantly evolving, so be prepared to adjust your strategies as needed.”
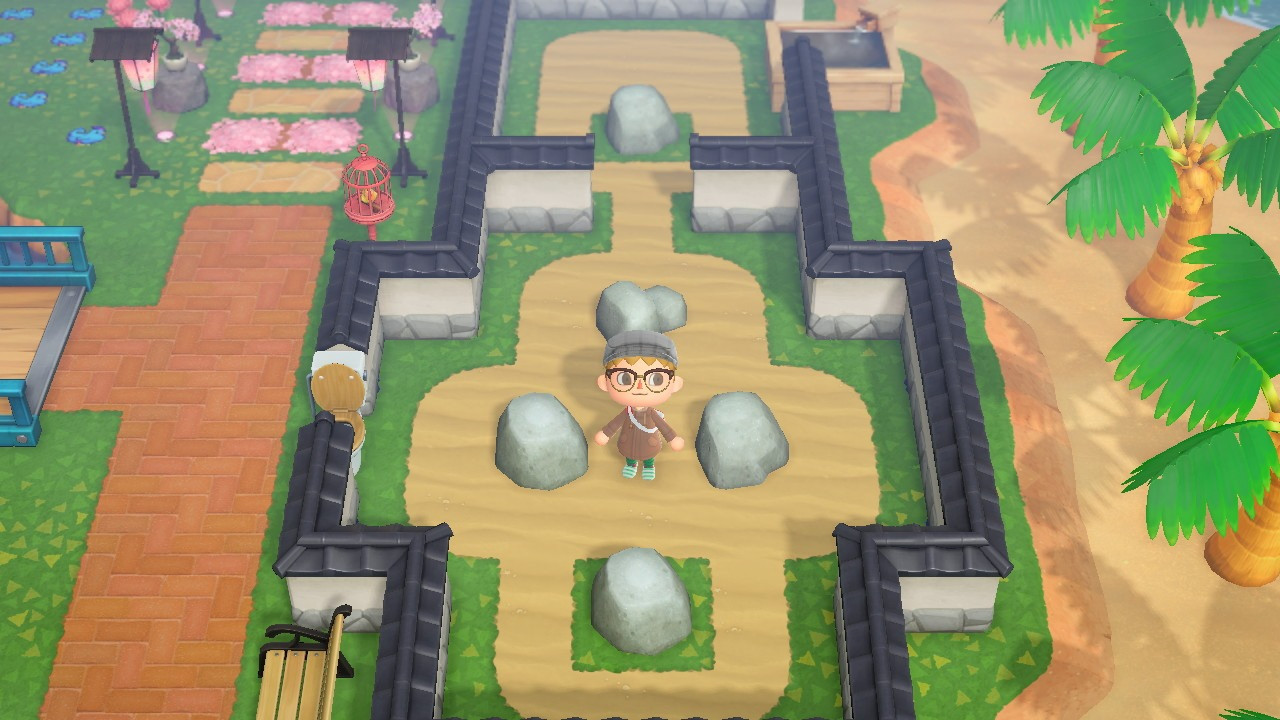 Rock garden progress in Animal Crossing
10. Frequently Asked Questions About Rock Gardens in Animal Crossing
Creating a rock garden in Animal Crossing: New Horizons often raises many questions. Here are some frequently asked questions, answered with insights from experienced players and design experts.
10.1. How Long Does It Take to Create a Rock Garden?
Creating a rock garden can take anywhere from one to two weeks, depending on your planning, preparation, and luck.
- Answer: The time required varies, but typically it takes 7-14 days to complete a rock garden.
- Details: The process involves clearing the island, blocking unwanted spawn locations, designating rock garden spots, and waiting for the rocks to spawn in the desired areas.
10.2. What Materials Do I Need to Create a Rock Garden?
The primary materials you need are custom designs, furniture, or other obstructions to block unwanted spawn locations.
- Answer: You’ll need custom designs, furniture, or other obstructions to block unwanted spawn locations, plus a shovel for breaking rocks.
- Details: Additionally, you may want to use the terraforming tool to shape the landscape and add decorative items to enhance the design.
10.3. How Do I Prevent Rocks from Spawning in Unwanted Locations?
The key is to cover every square inch of your island with custom designs, furniture, or other obstructions.
- Answer: Cover every square inch of your island with custom designs, furniture, or other obstructions.
- Details: Ensure there are no gaps in your blocking strategy, especially around cliff sides and elevated areas.
10.4. What If a Rock Spawns in the Wrong Place?
If a rock spawns in the wrong place, break it by eating fruit and hitting it with a shovel.
- Answer: Break it by eating fruit and hitting it with a shovel.
- Details: Then, review your blocking strategy to identify any gaps or inconsistencies that may have allowed the rock to spawn in the wrong place.
10.5. Can I Move Rocks After They Have Spawned?
No, you cannot move rocks after they have spawned.
- Answer: No, you cannot move rocks after they have spawned.
- Details: You can only break them and wait for them to respawn in a different location.
10.6. How Do I Create a Zen-Style Rock Garden?
To create a zen-style rock garden, focus on simplicity, tranquility, and the beauty of natural elements.
- Answer: Focus on simplicity, tranquility, and the beauty of natural elements.
- Details: Use sand or gravel as a base, arrange the rocks in a minimalist pattern, and add a few carefully selected plants and decorative items.
10.7. What Are the Best Plants to Use in a Rock Garden?
The best plants to use in a rock garden are those that complement the textures, shapes, and colors of the rocks.
- Answer: Plants that complement the textures, shapes, and colors of the rocks are best.
- Details: Consider using succulents, cacti, mosses, and small flowering plants.
10.8. How Do I Maintain My Rock Garden Over Time?
Regular maintenance is essential for preserving the beauty and functionality of your rock garden.
- Answer: Regularly clean up weeds, remove debris, and prune plants.
- Details: Make small adjustments and improvements over time to keep your rock garden fresh and engaging.
10.9. What If I Accidentally Break a Rock?
If you accidentally break a rock, don’t panic.
- Answer: Don’t panic; it will respawn in a new location the next day.
- Details: Just review your blocking strategy to ensure that the rock spawns in the desired area.
10.10. Can I Time Travel to Speed Up the Process?
Time traveling can speed up the process, but it can also lead to confusion and errors if not done carefully.
- Answer: Time traveling can speed up the process, but it can also lead to confusion and errors if not done carefully.
- Details: If you choose to time travel, do it in small increments and keep careful track of your progress.
Creating a rock garden in Animal Crossing: New Horizons is a rewarding but intensive project. By understanding the game mechanics, planning carefully, and seeking inspiration from various sources, you can create a unique and beautiful space that enhances your island’s charm and functionality. Remember to visit rockscapes.net for more ideas, tips, and resources to help you on your rock garden journey. If you need inspiration or customized guidance, contact us at Address: 1151 S Forest Ave, Tempe, AZ 85281, United States, Phone: +1 (480) 965-9011, or visit our website at rockscapes.net. Let us help you bring your dream rock garden to life!
