How to get to Turtle Rock in Link’s Awakening is a common question among players, and at rockscapes.net, we’re here to provide a comprehensive guide that will help you navigate every room, solve every puzzle, and beat every boss. This guide focuses on finding the entrance to Turtle Rock and navigating the dungeon, ensuring you acquire essential items like the Compass, Map, keys, and the Magic Rod. Discover the beauty of rock features in your landscape after conquering this challenge.
1. What Are The Prerequisites To Reach Turtle Rock?
You’ll need the Bow from Mabe Village. Purchasing the Bow from the shop in Mabe Village is essential.
1.1 Where Do I Find The Mabe Village Shop?
The Mabe Village shop is centrally located and easy to find once you enter the village.
1.2 How Much Does The Bow Cost?
The Bow typically costs 500 rupees.
2. How Do I Return To Tal Tal Heights And Rescue Marin?
Return to the shack at the top of Tal Tal Heights and use the Hookshot to rescue Marin. Go to the broken bridge to the left and Hookshot across to rescue Marin.
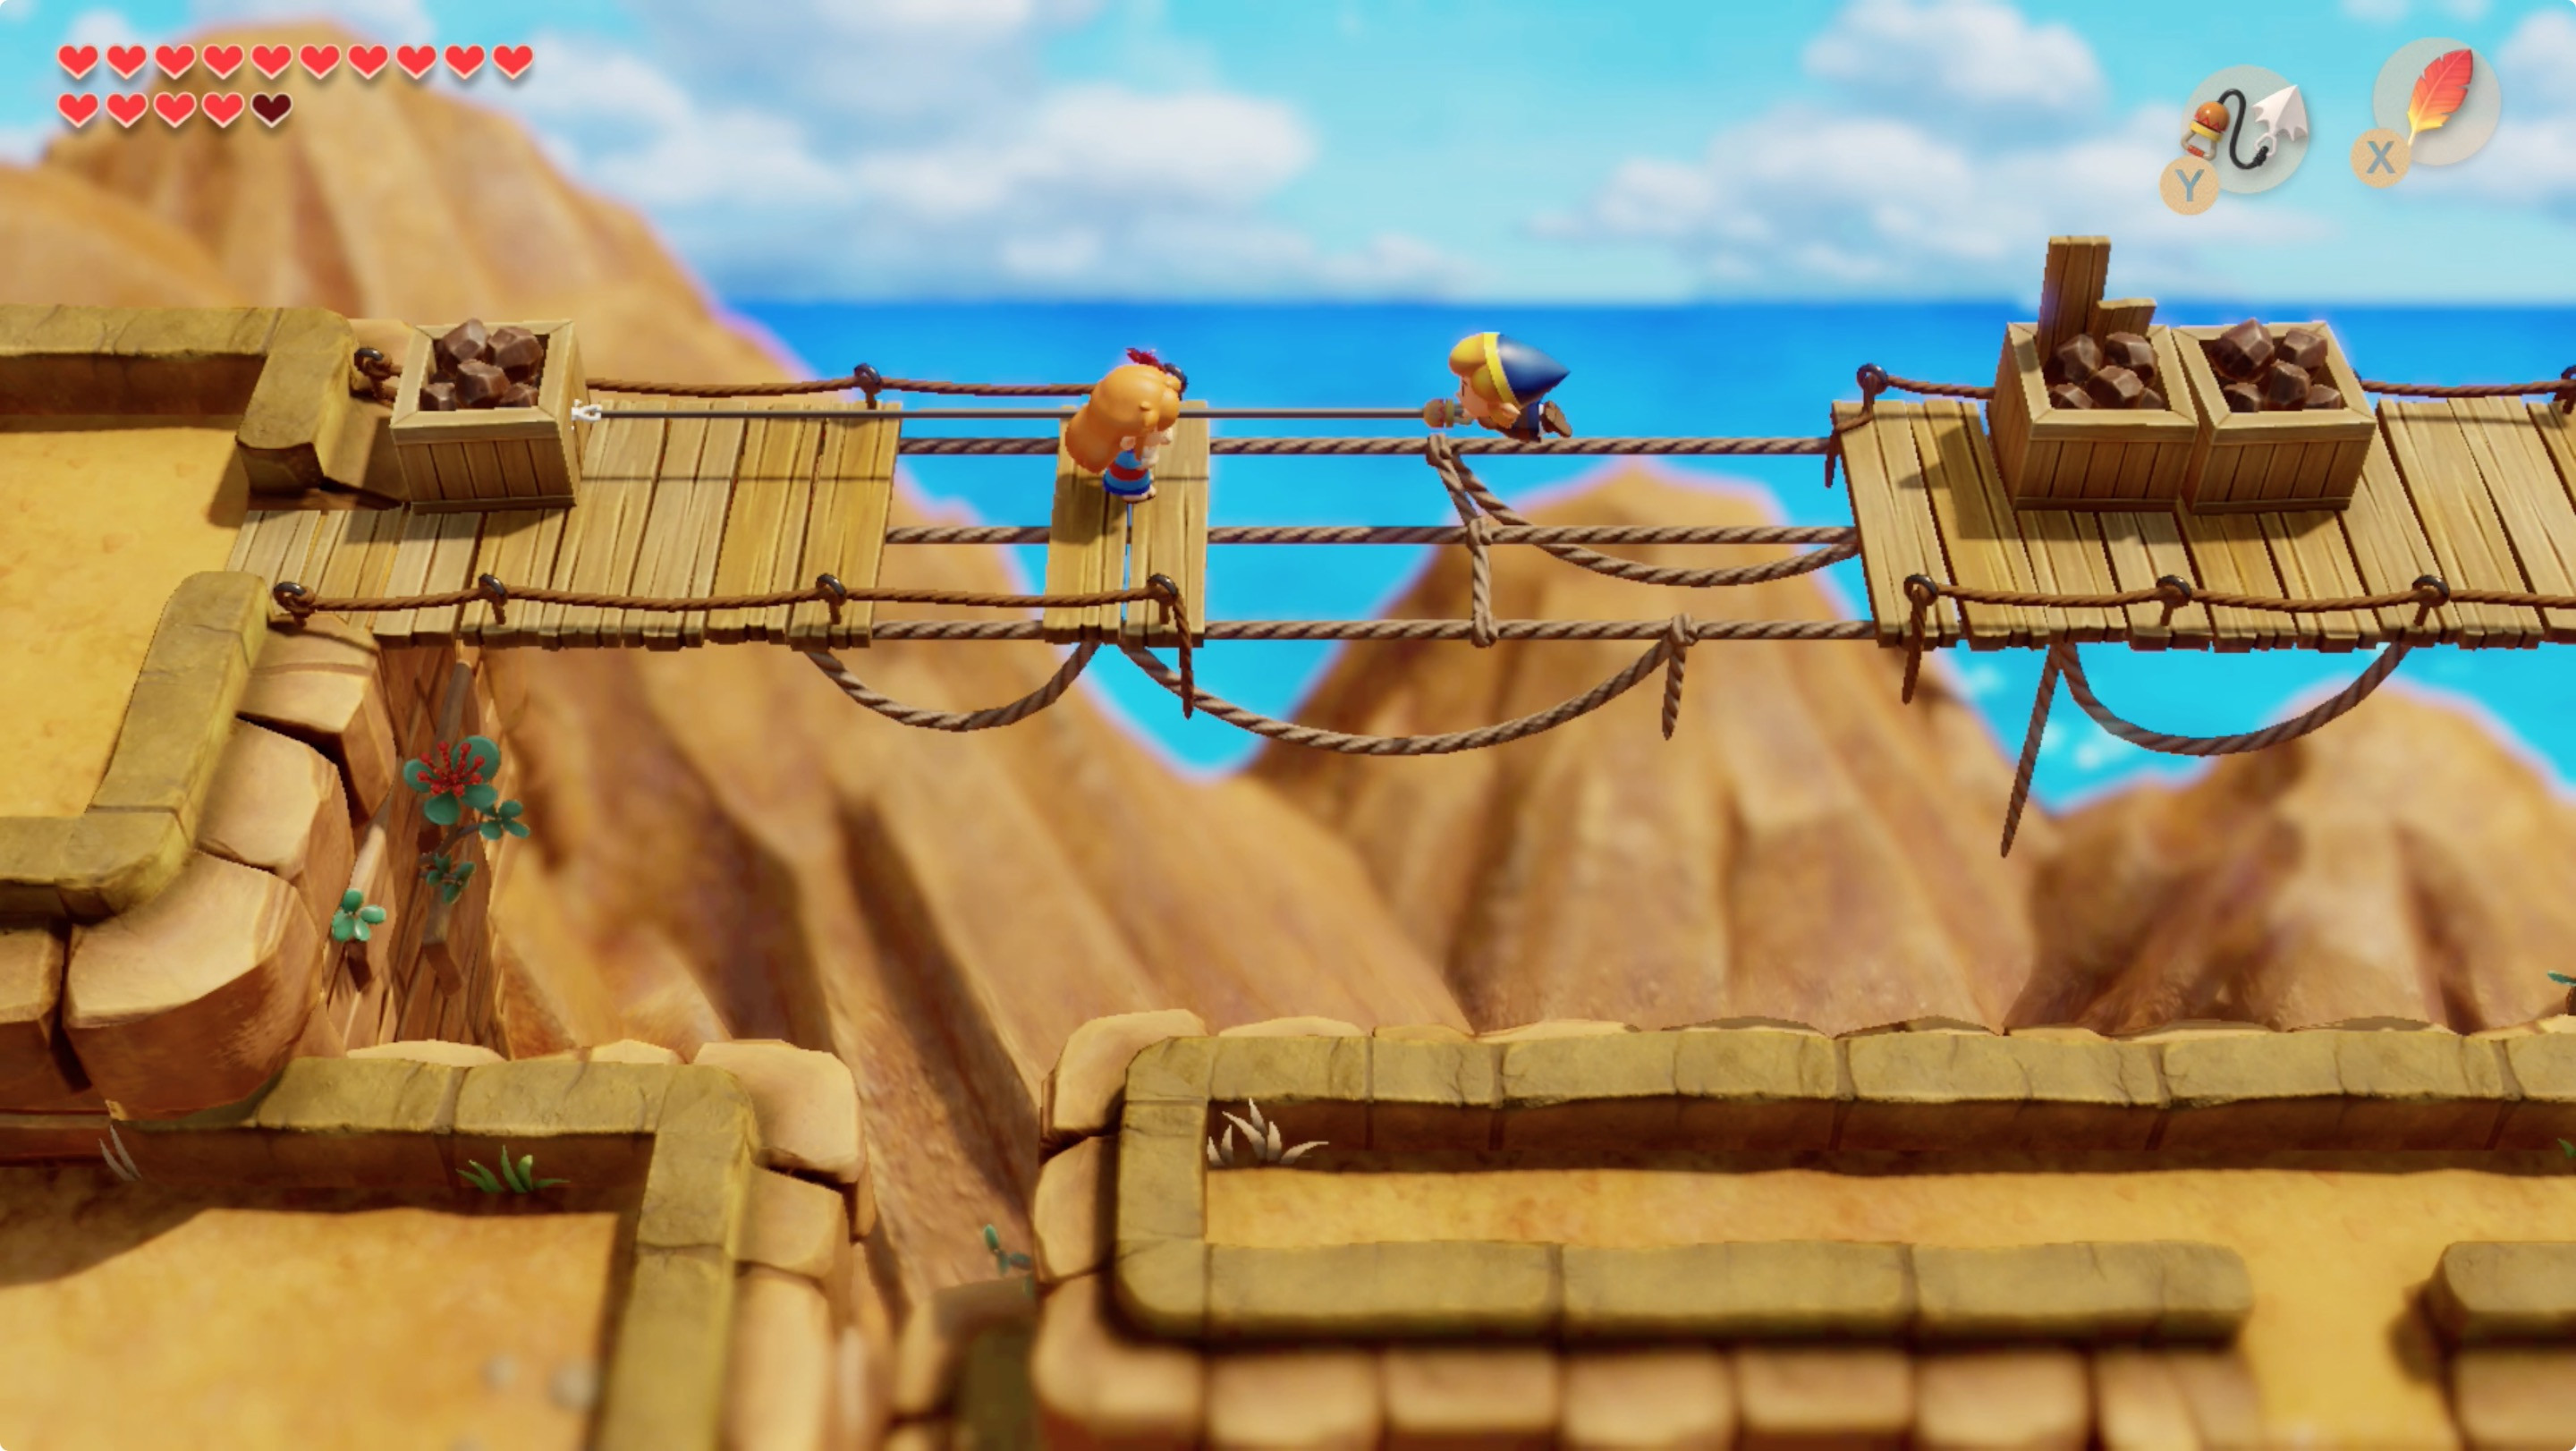 Rescuing Marin with the Hookshot
2.1 Where Is The Shack In Tal Tal Heights?
The shack is located at the top of Tal Tal Heights, where the Rooster has taken up residence.
2.2 Why Do I Need To Rescue Marin?
Rescuing Marin is a crucial step in the storyline and unlocks further progress.
3. How Can I Increase My Arrow Inventory?
Increase your arrow inventory by finding Li’l Devil after rescuing Marin. After Marin leaves, slash the bush on the platform, go down, and Hookshot through the tunnel.
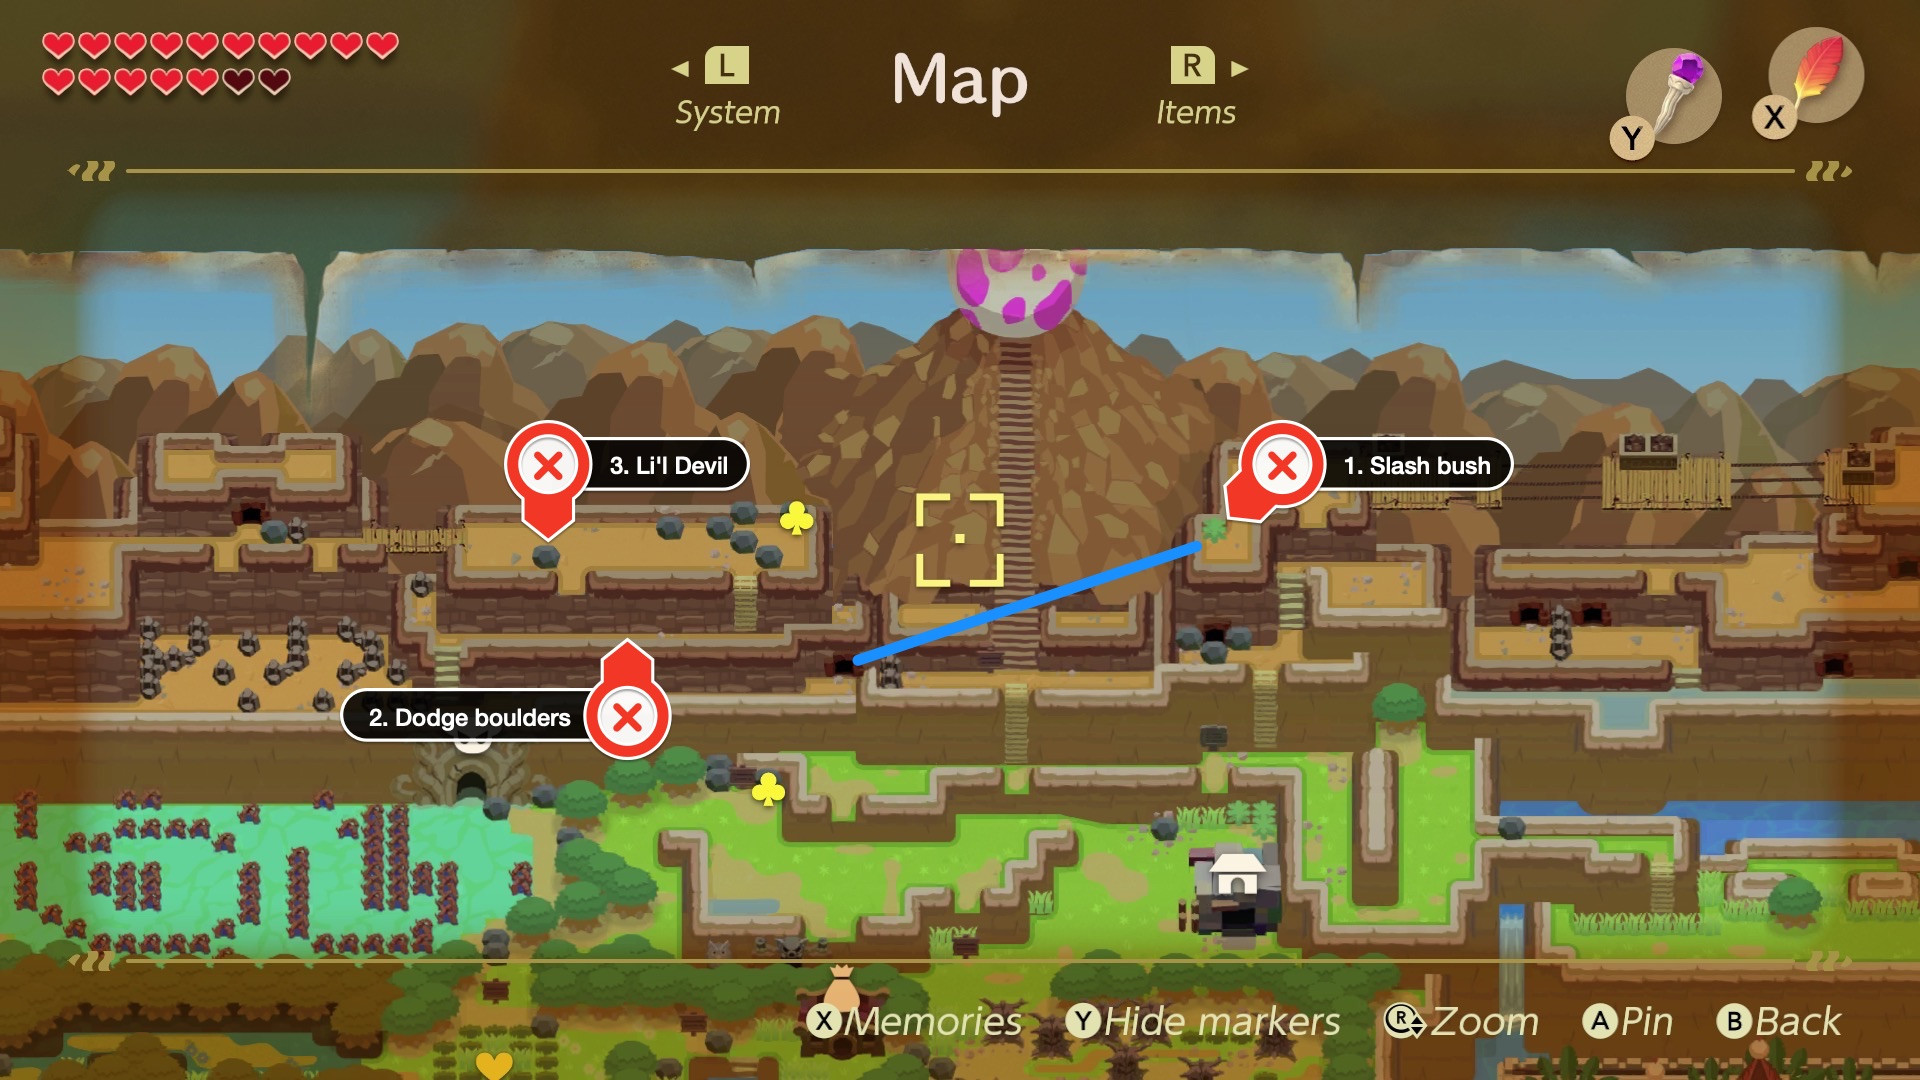 Path to Li'l Devil to increase arrow capacity
3.1 What Is The Path To Li’l Devil?
- After Marin leaves, slash the bush on the platform, go down, and Hookshot through the tunnel.
- Dodge the boulders and make your way up the mountain.
- At the top of the mountain: (a) Lift the boulders for a Secret Seashell. (b) Lift the boulder on the right side of the platform to find some stairs. (c) Use Magic Powder on the brazier, and Li’l Devil will curse you to carry more arrows.
3.2 What Does Li’l Devil Do?
Li’l Devil curses you to carry more arrows.
4. What Is The Path To Find The Turtle Rock Entrance?
Find the Turtle Rock entrance by heading west from Li’l Devil, dropping down south, and entering the cave.
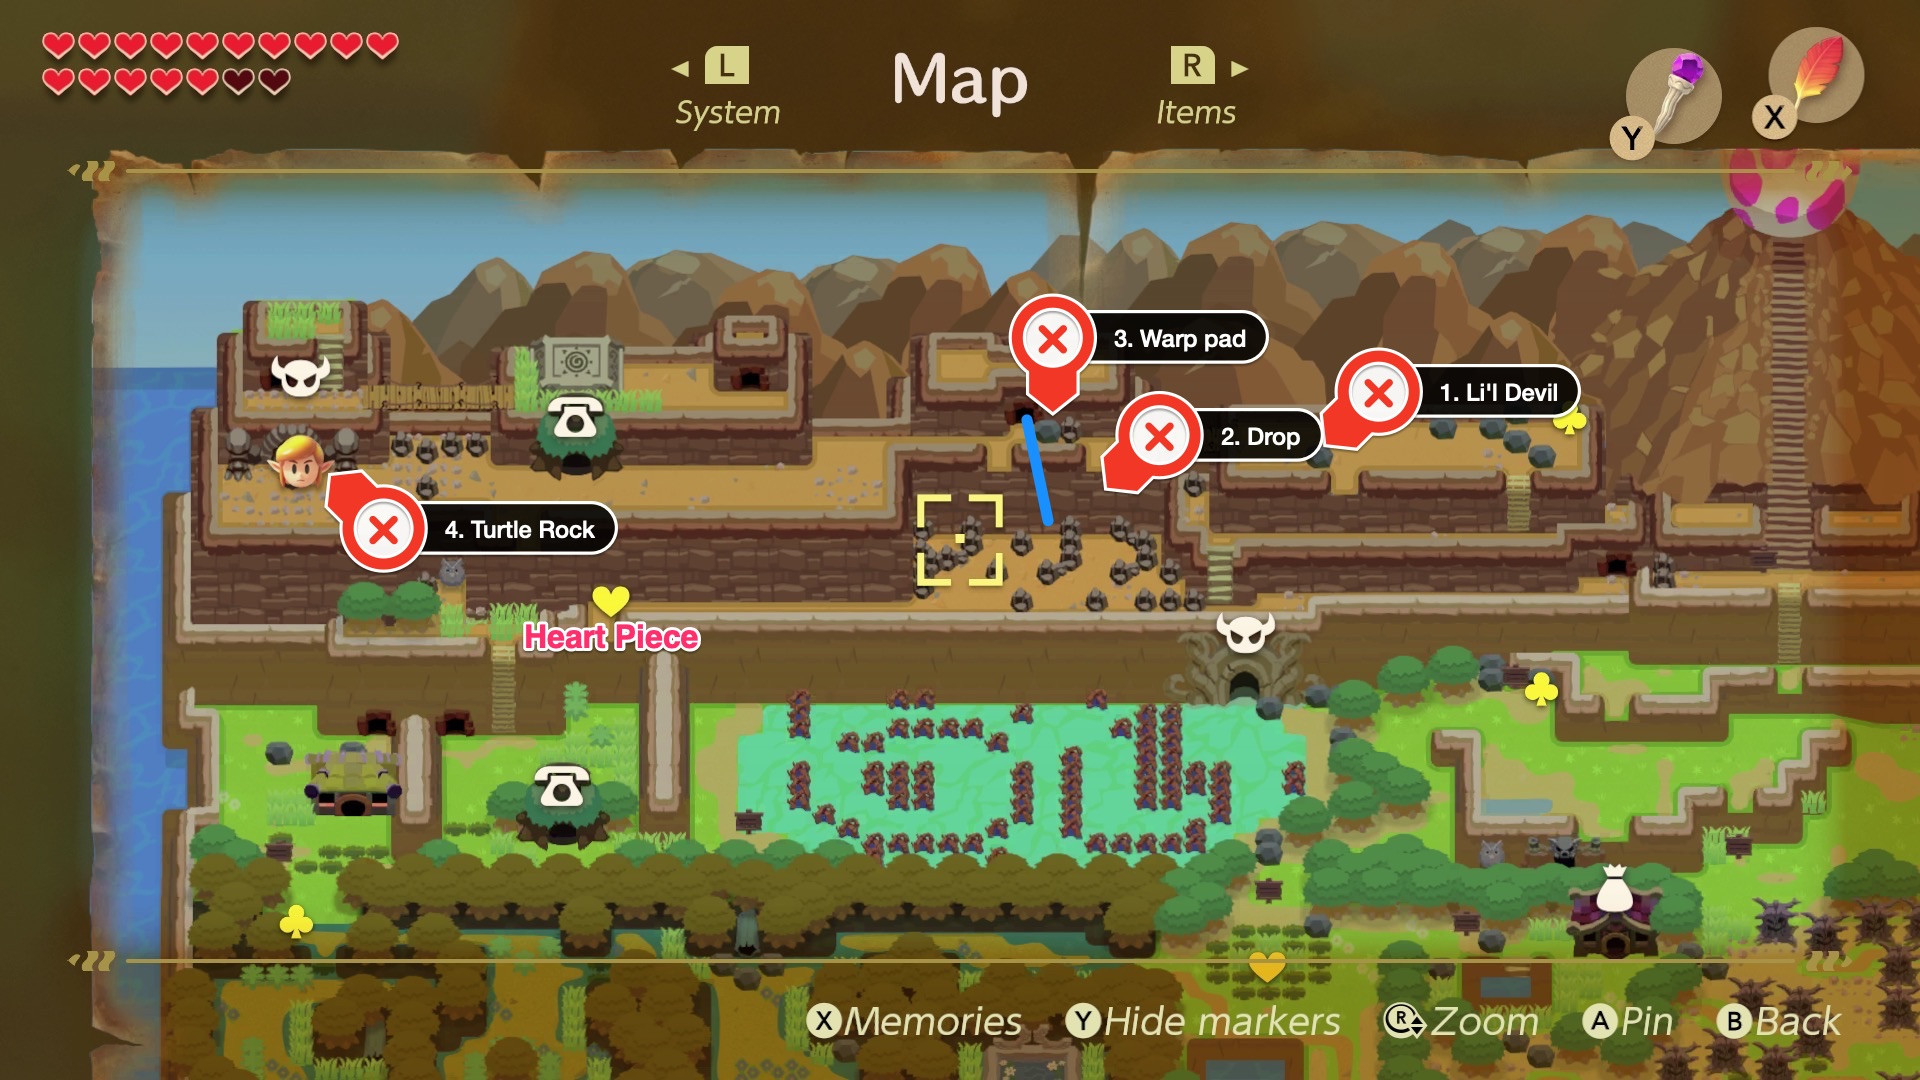 Path to the Turtle Rock entrance
4.1 Step-by-step Instructions To Reach The Entrance:
-
From Li’l Devil, continue west.
-
Drop down to the south, and in this area:
- Head all the way west across the ledge at the bottom to find a Heart Piece.
- Return to the stone-filled area and go inside the cave. Use your Mirror Shield to block the fire.
-
Exit the cave and lift the stone on the right to find the Western Tal Tal Heights warp pad.
-
Go all the way west to the Turtle Rock (that looks like a dragon) statue. Play Frog’s Song of Soul to awaken it.
4.2 What Should I Do After Exiting The Cave?
Lift the stone on the right to find the Western Tal Tal Heights warp pad.
4.3 How Do I Awaken Turtle Rock?
Play Frog’s Song of Soul to awaken it.
5. How Do I Defeat The Turtle Rock Entrance Boss?
Defeat the Turtle Rock entrance boss by using bombs and your sword to expose its head. Wait for the Turtle Rock to stop swaying. It’ll pause, and then shake. A second after it shakes, it lunges at you. Run out of the way, and it’ll crash into the wall and stun itself. Drop a bomb next to its head to crack the stone on its head.
 Entrance boss fight strategy
5.1 What Is The Strategy For This Fight?
- Wait for the Turtle Rock to stop swaying. It’ll pause, and then shake.
- A second after it shakes, it lunges at you. Run out of the way, and it’ll crash into the wall and stun itself.
- Drop a bomb next to its head to crack the stone on its head.
5.2 How Many Times Do I Need To Bomb It?
You’ll have to do that a few times until its head is exposed.
5.3 What Do I Do After Its Head Is Exposed?
Swing with your sword while it’s stunned until you win.
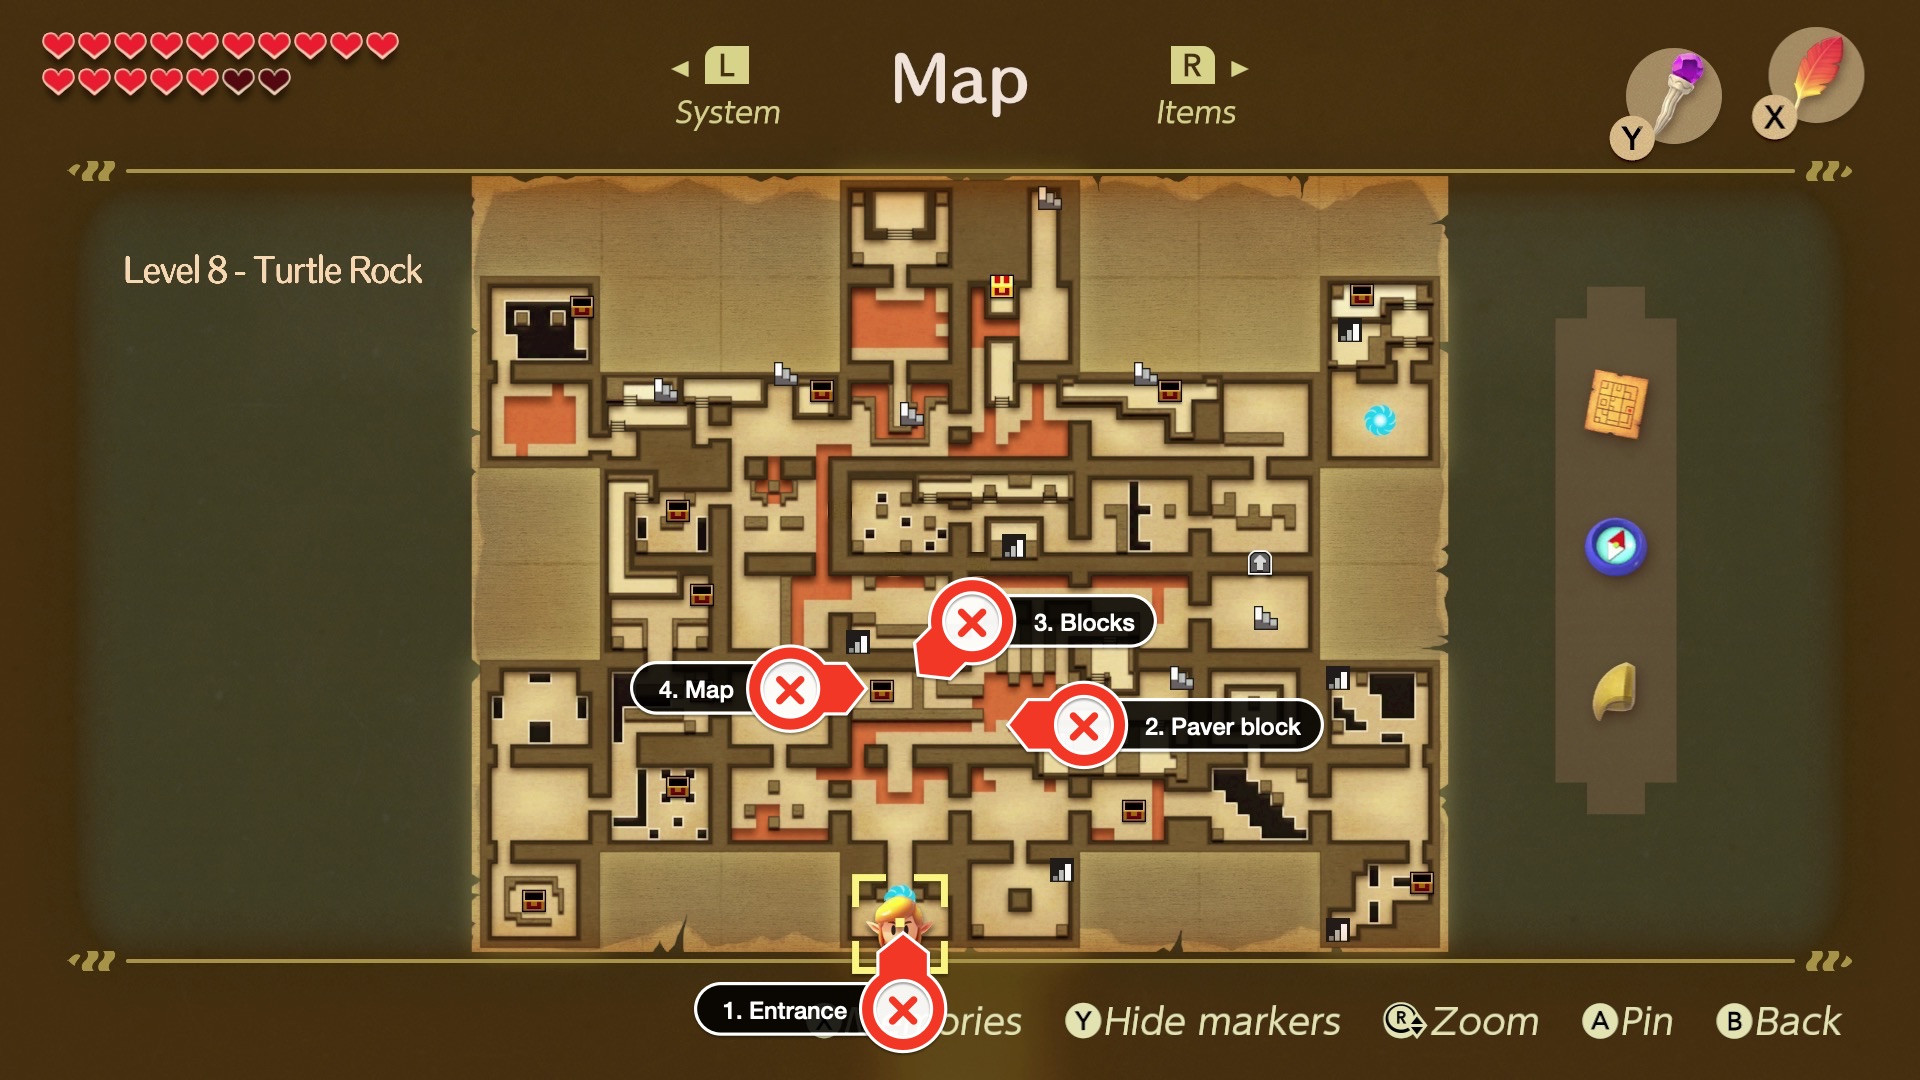
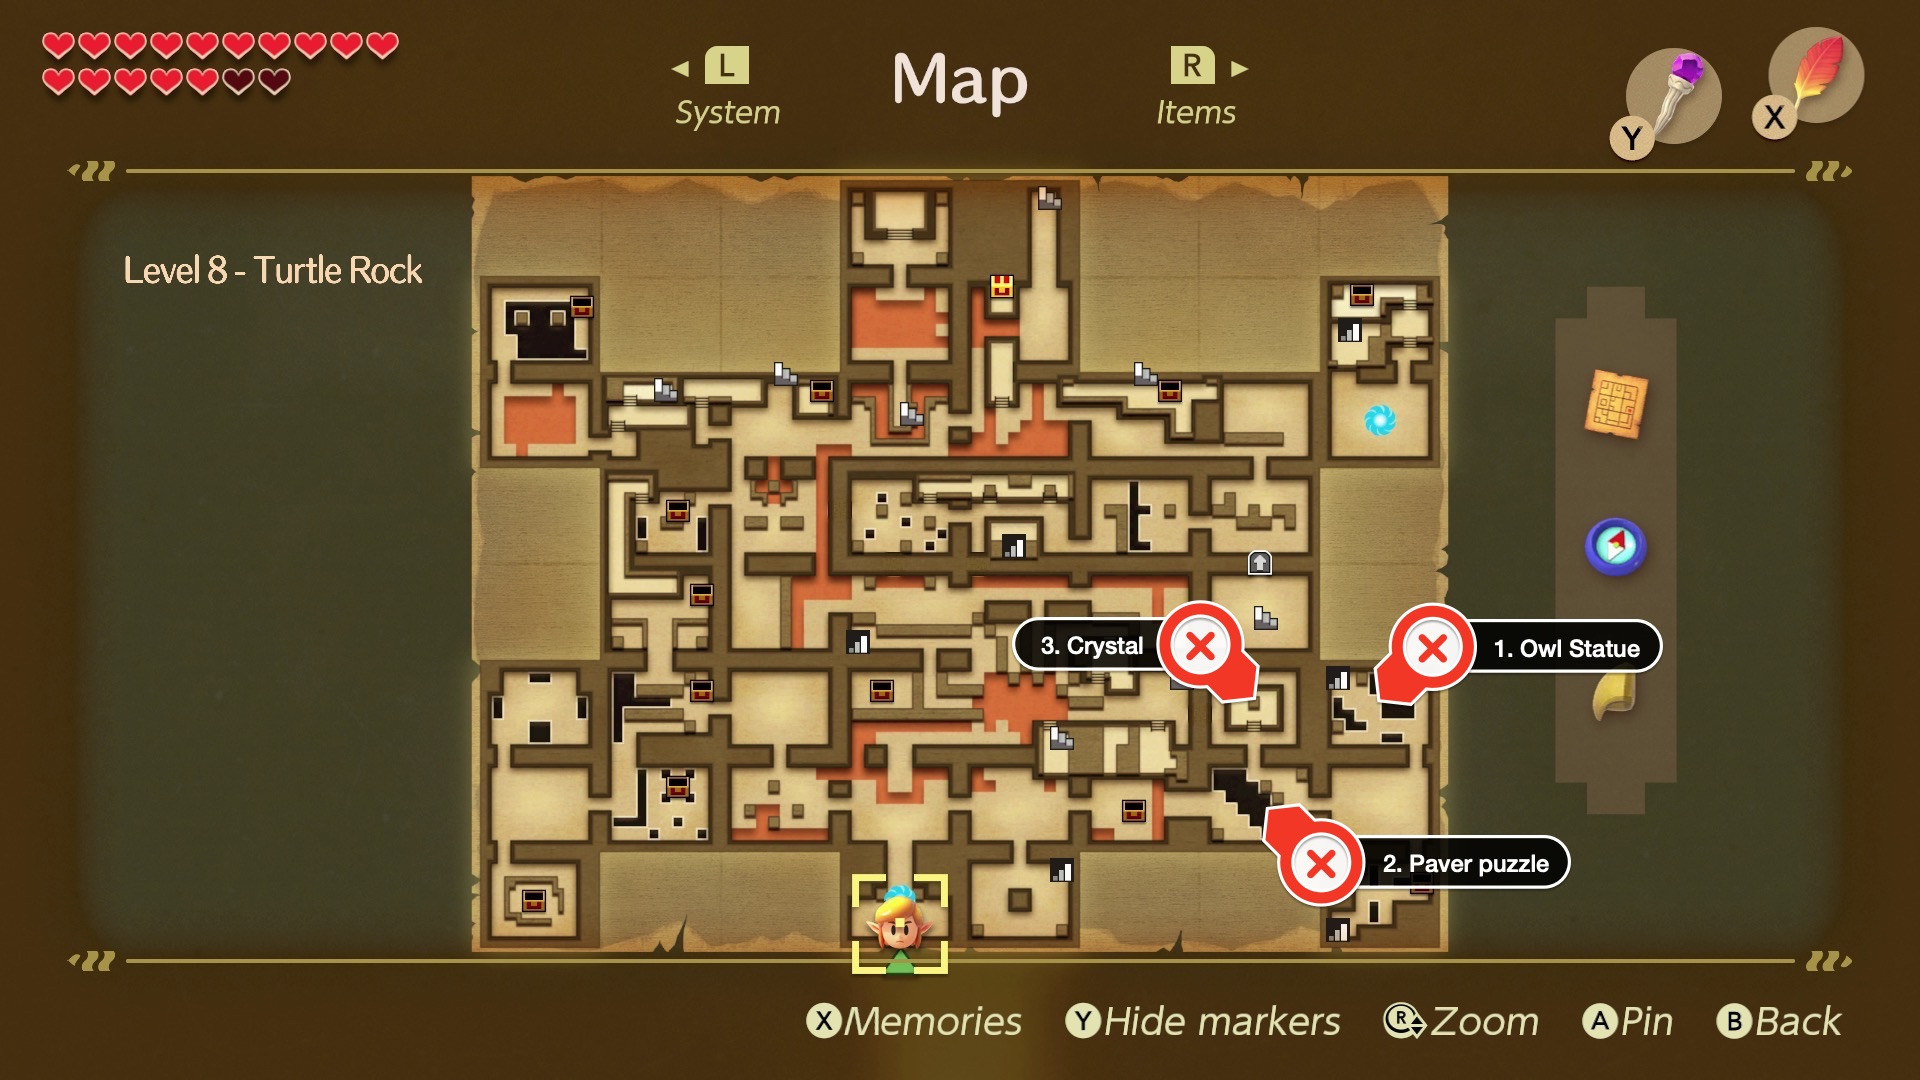
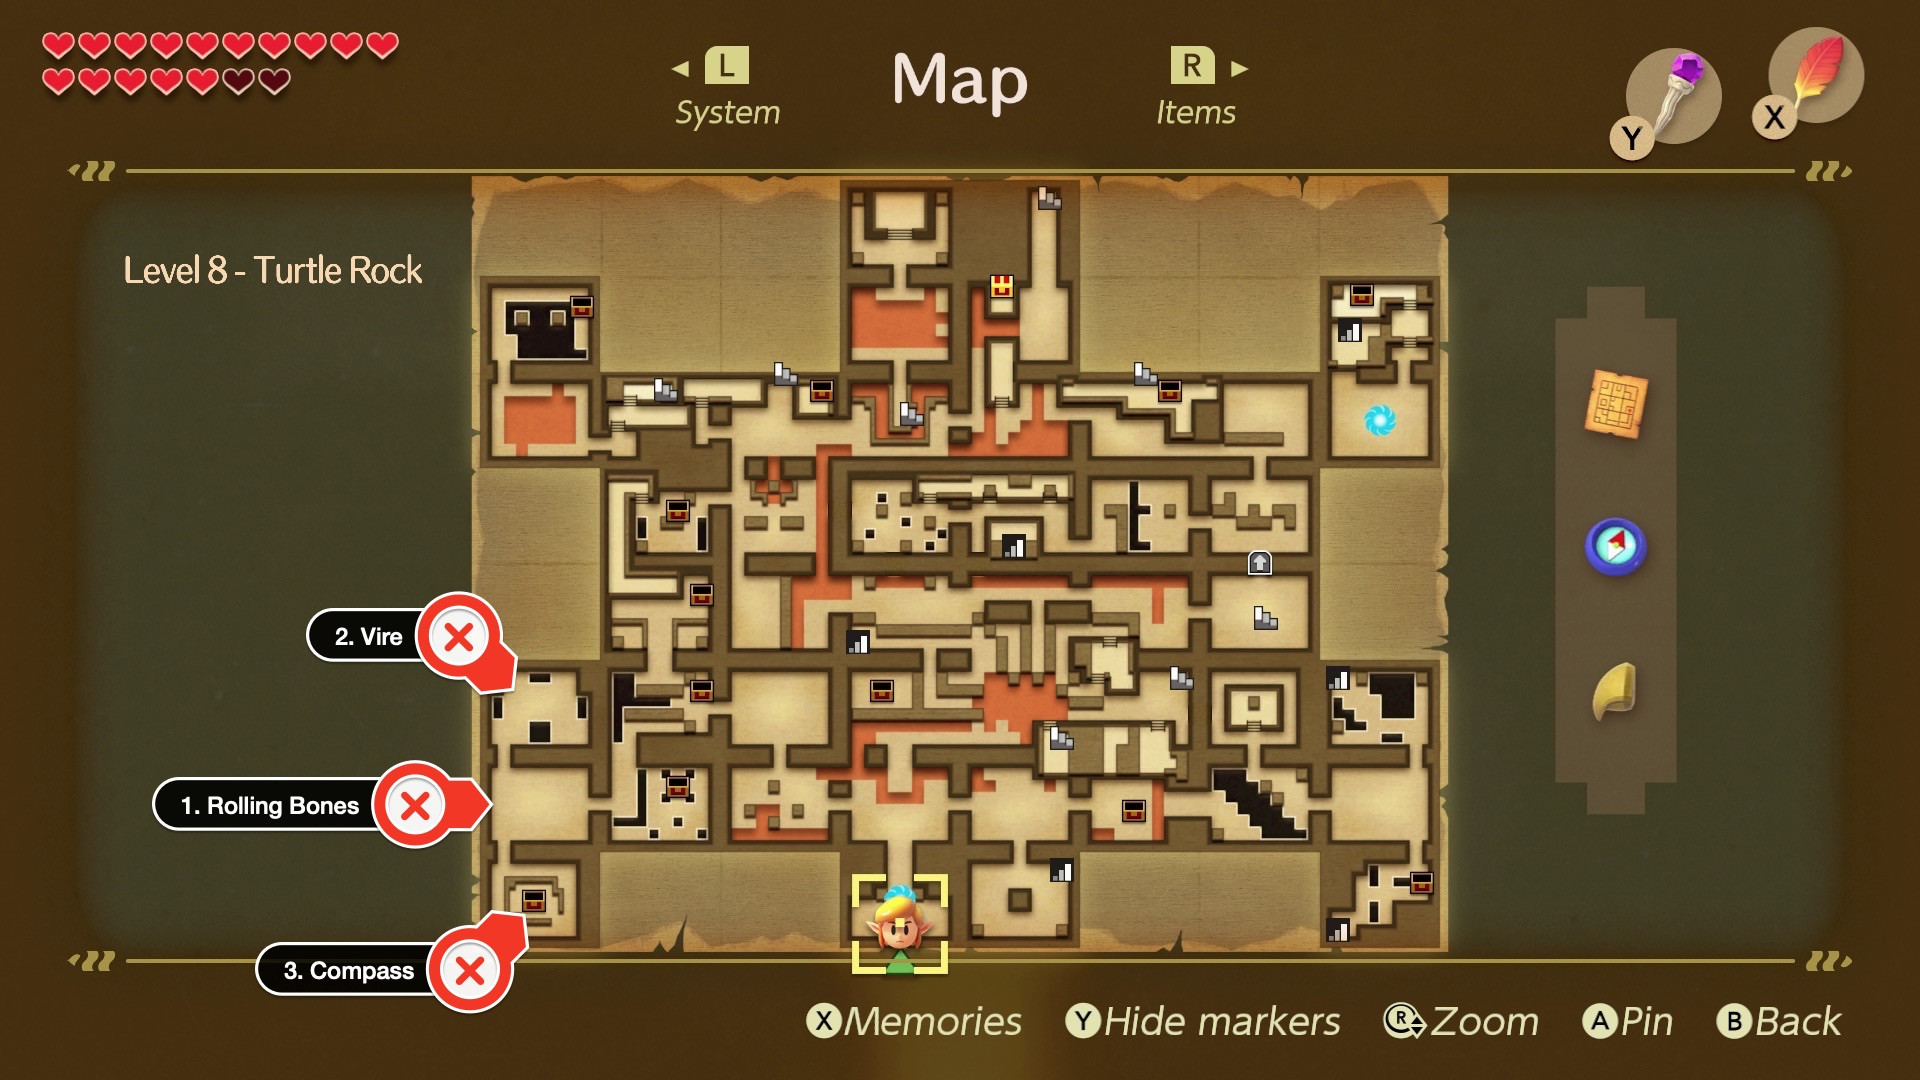
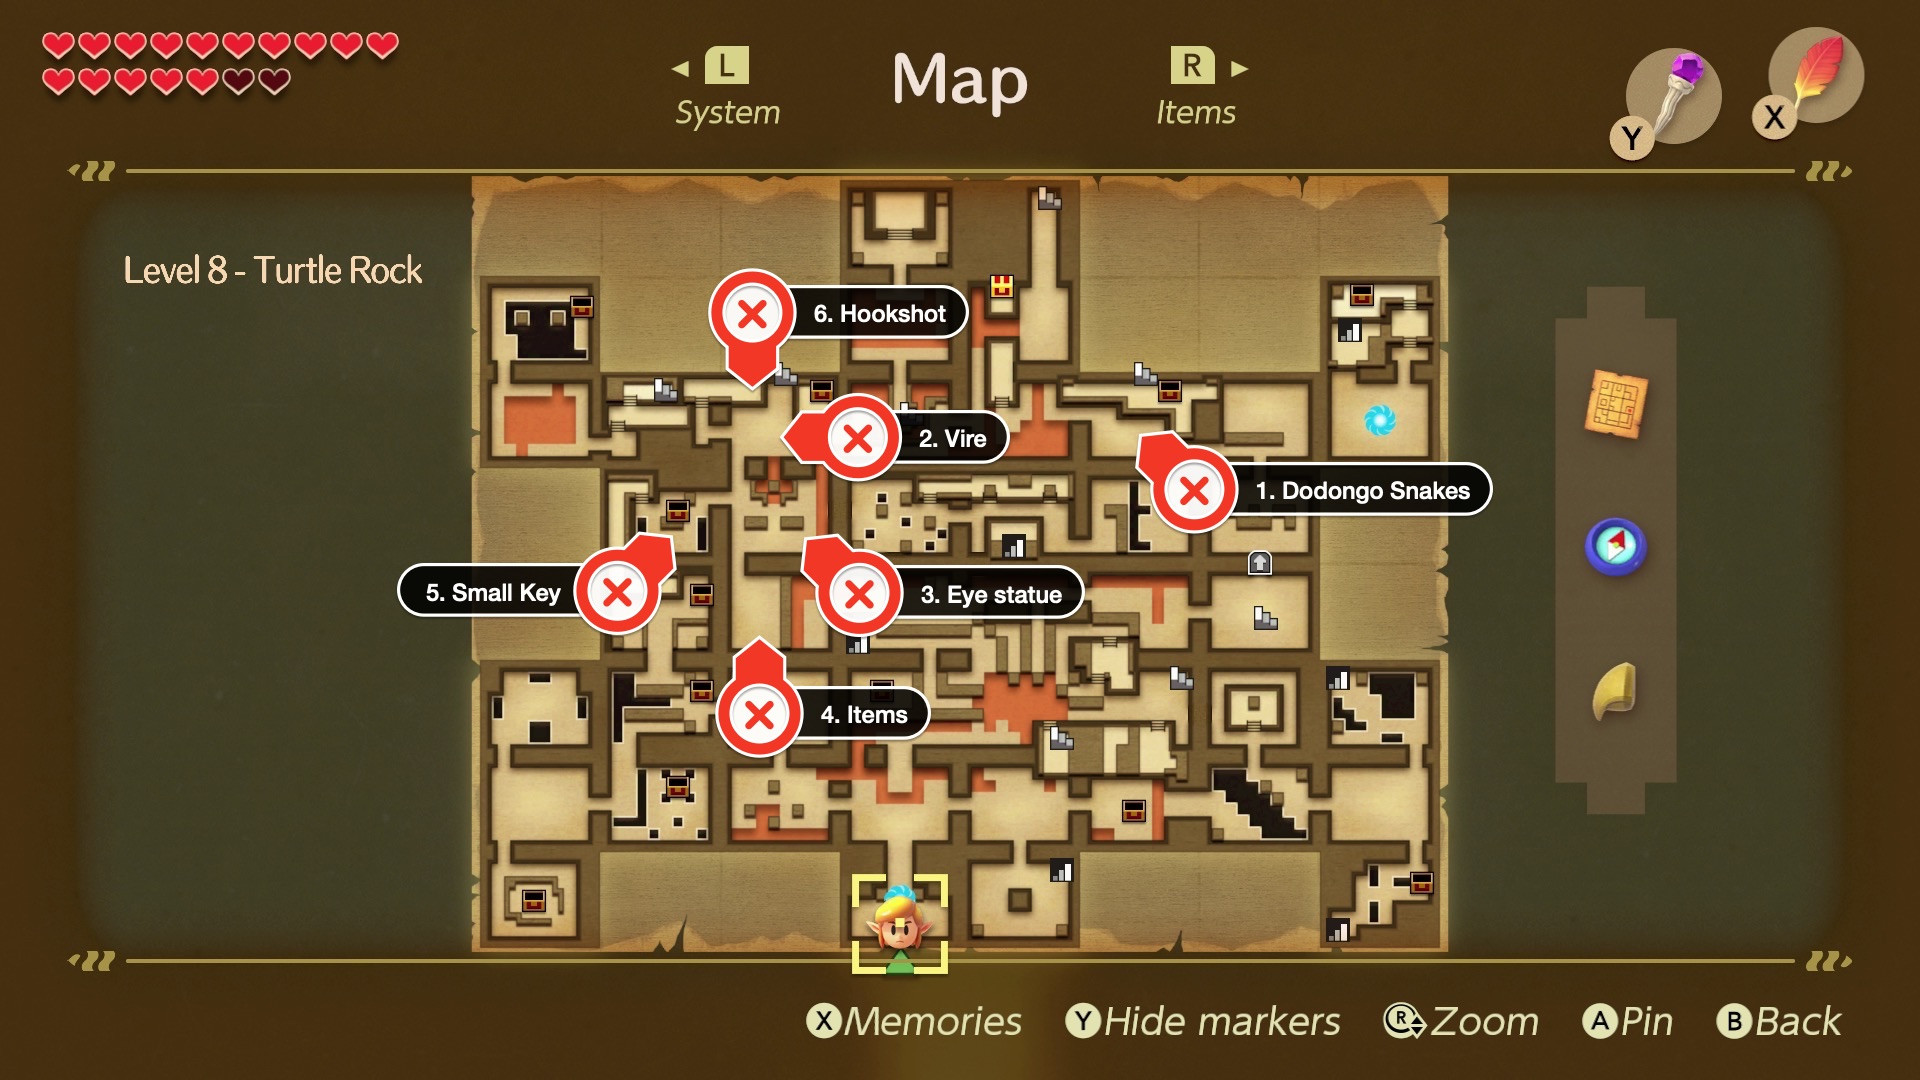
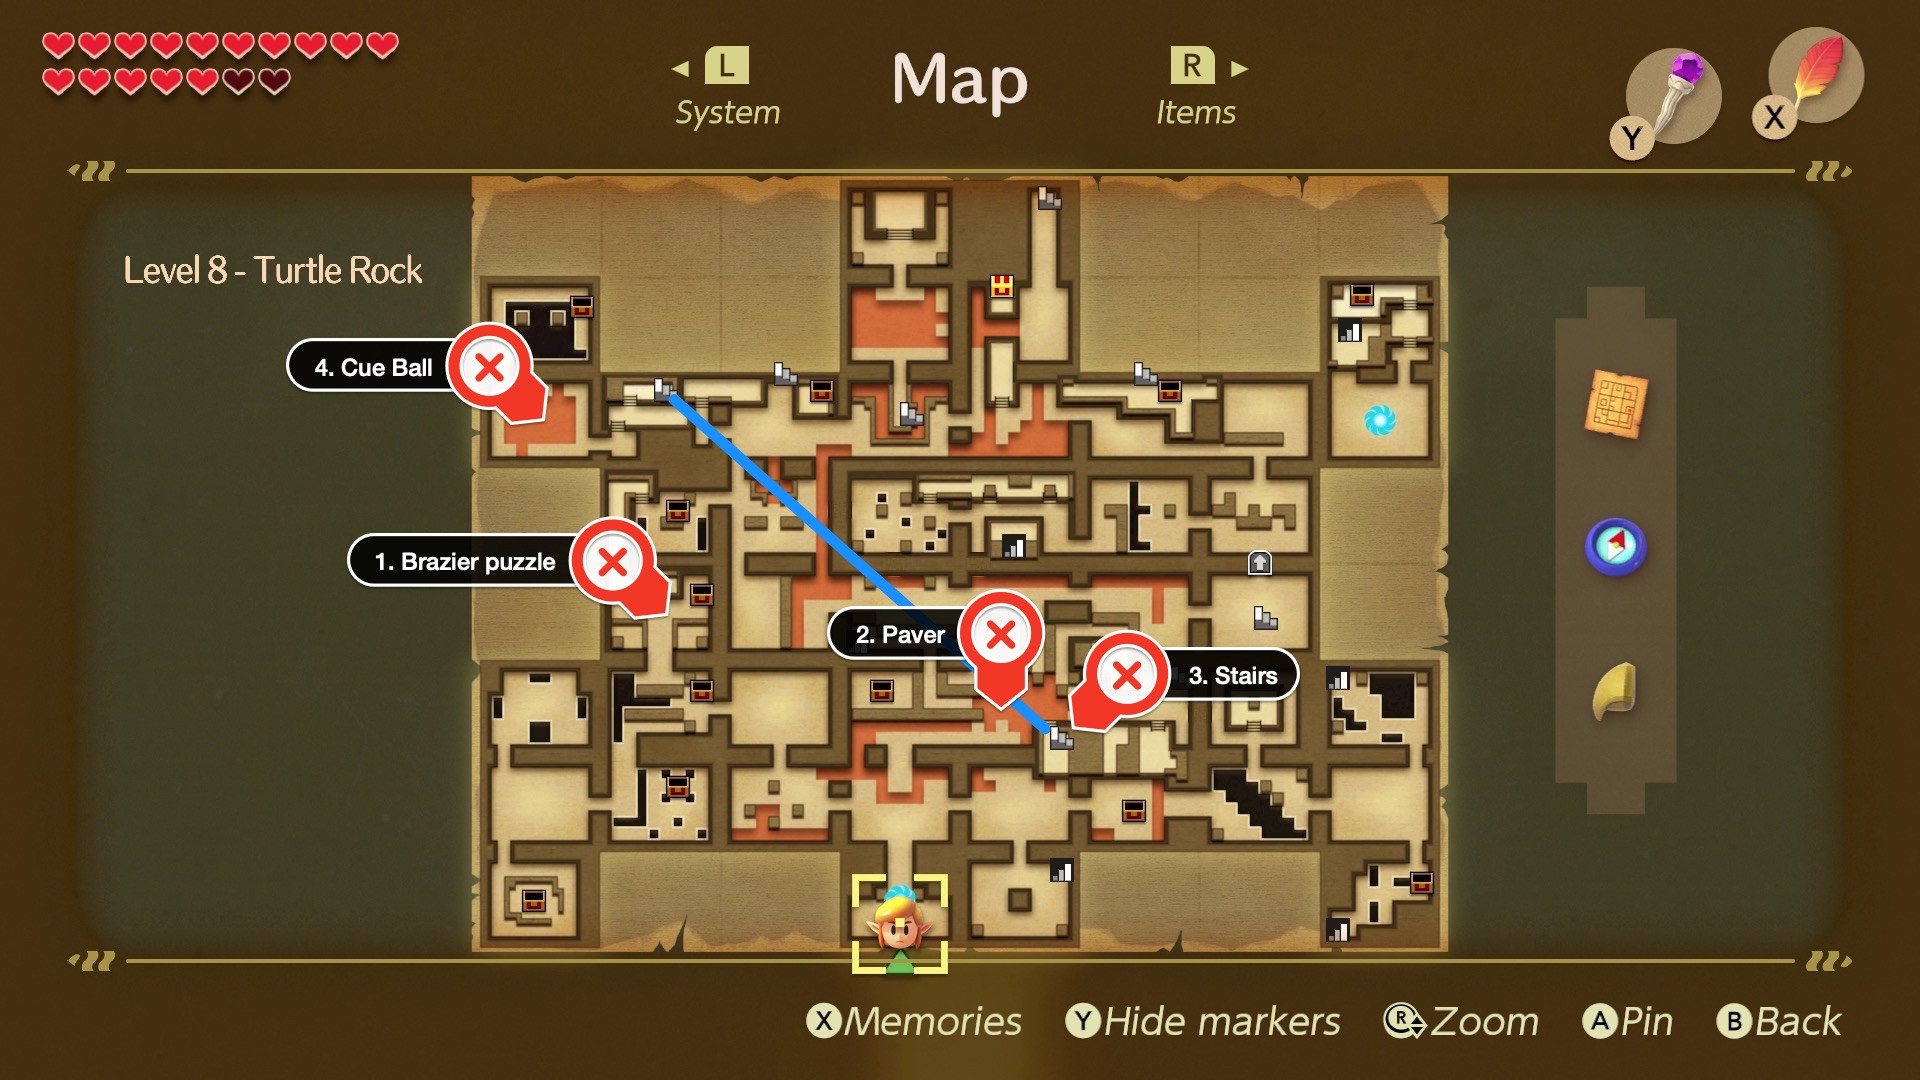
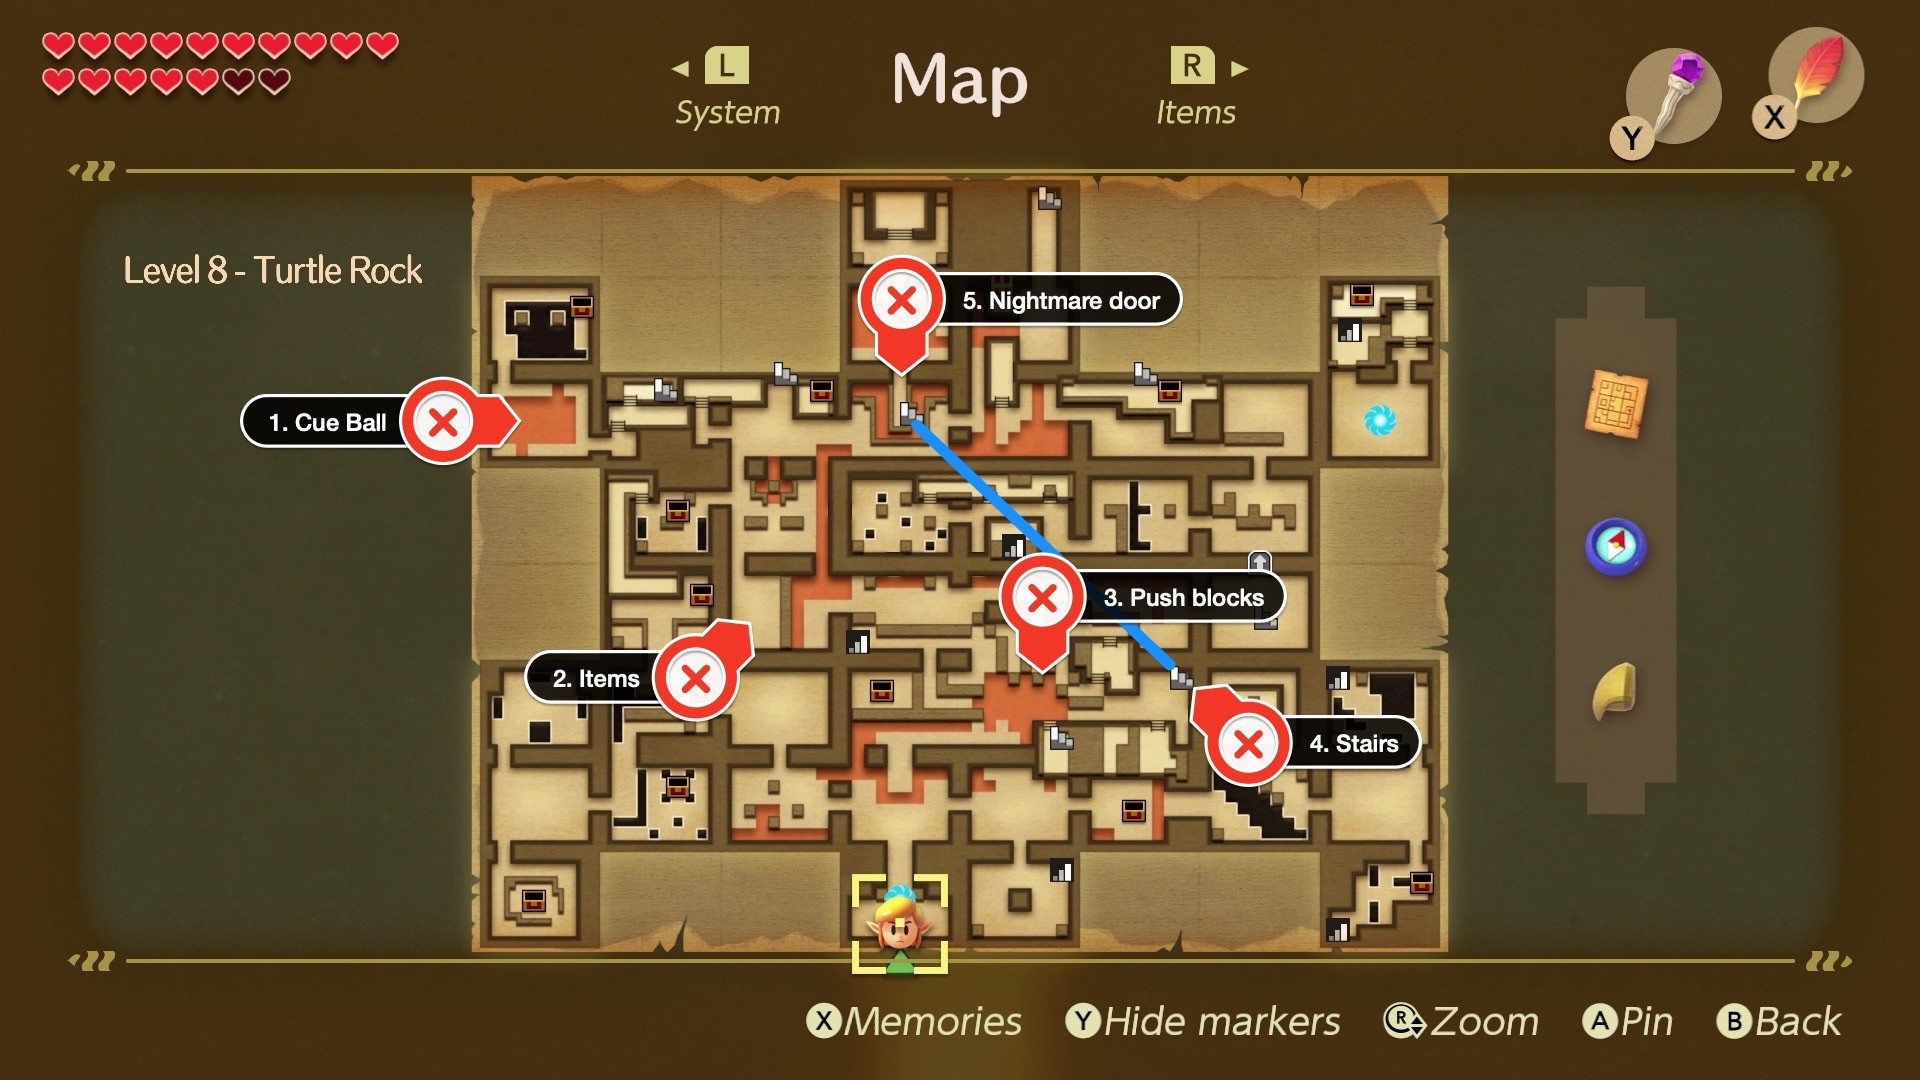
6. Where Are The Key Items And Boss Locations In Turtle Rock?
The map shows the locations of important items like the Compass, Stone Beak, and Map, as well as the Magic Rod. It also marks the boss fights and the side-scrolling tunnel entrances and exits.
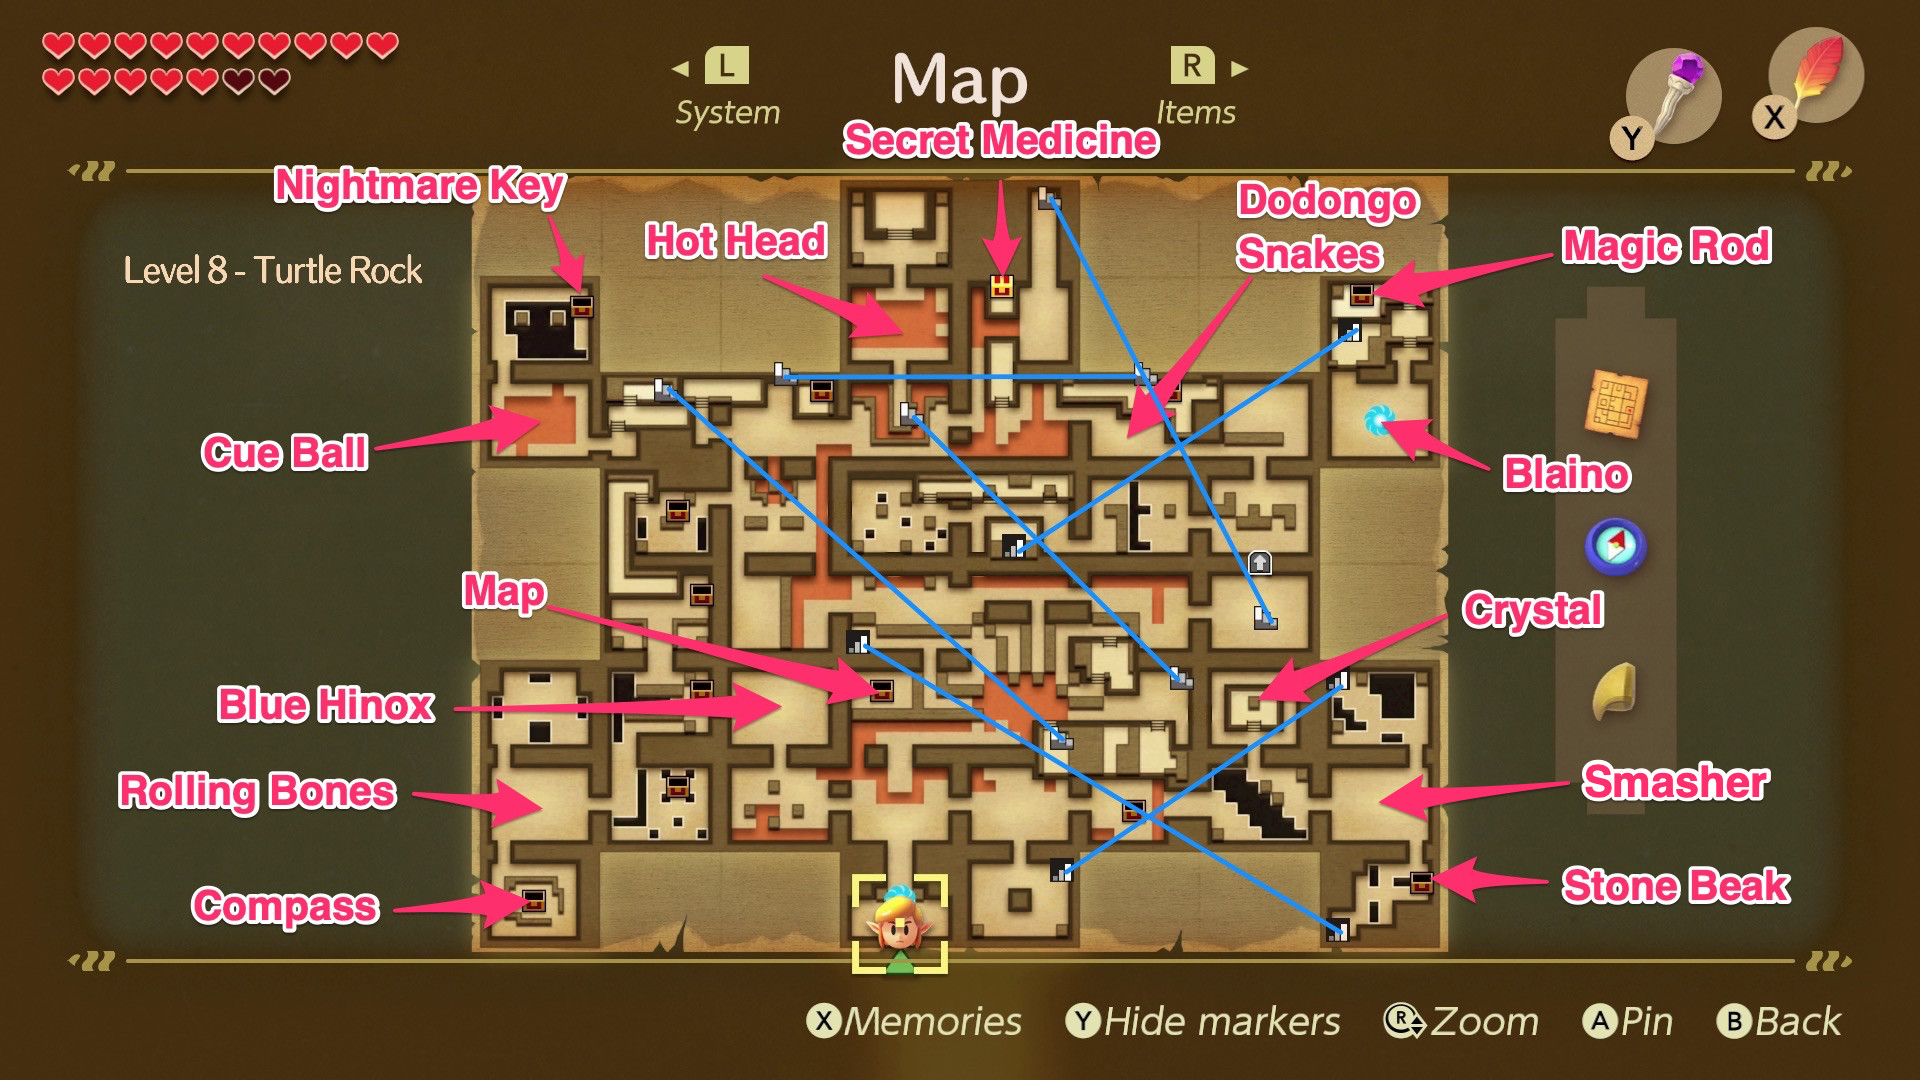 Turtle Rock dungeon item and boss locations map
6.1 What Items Are Marked On The Map?
The Compass, Stone Beak, and Map, as well as the Magic Rod.
6.2 What Else Is Marked On The Map?
The boss fights and the side-scrolling tunnel entrances and exits.
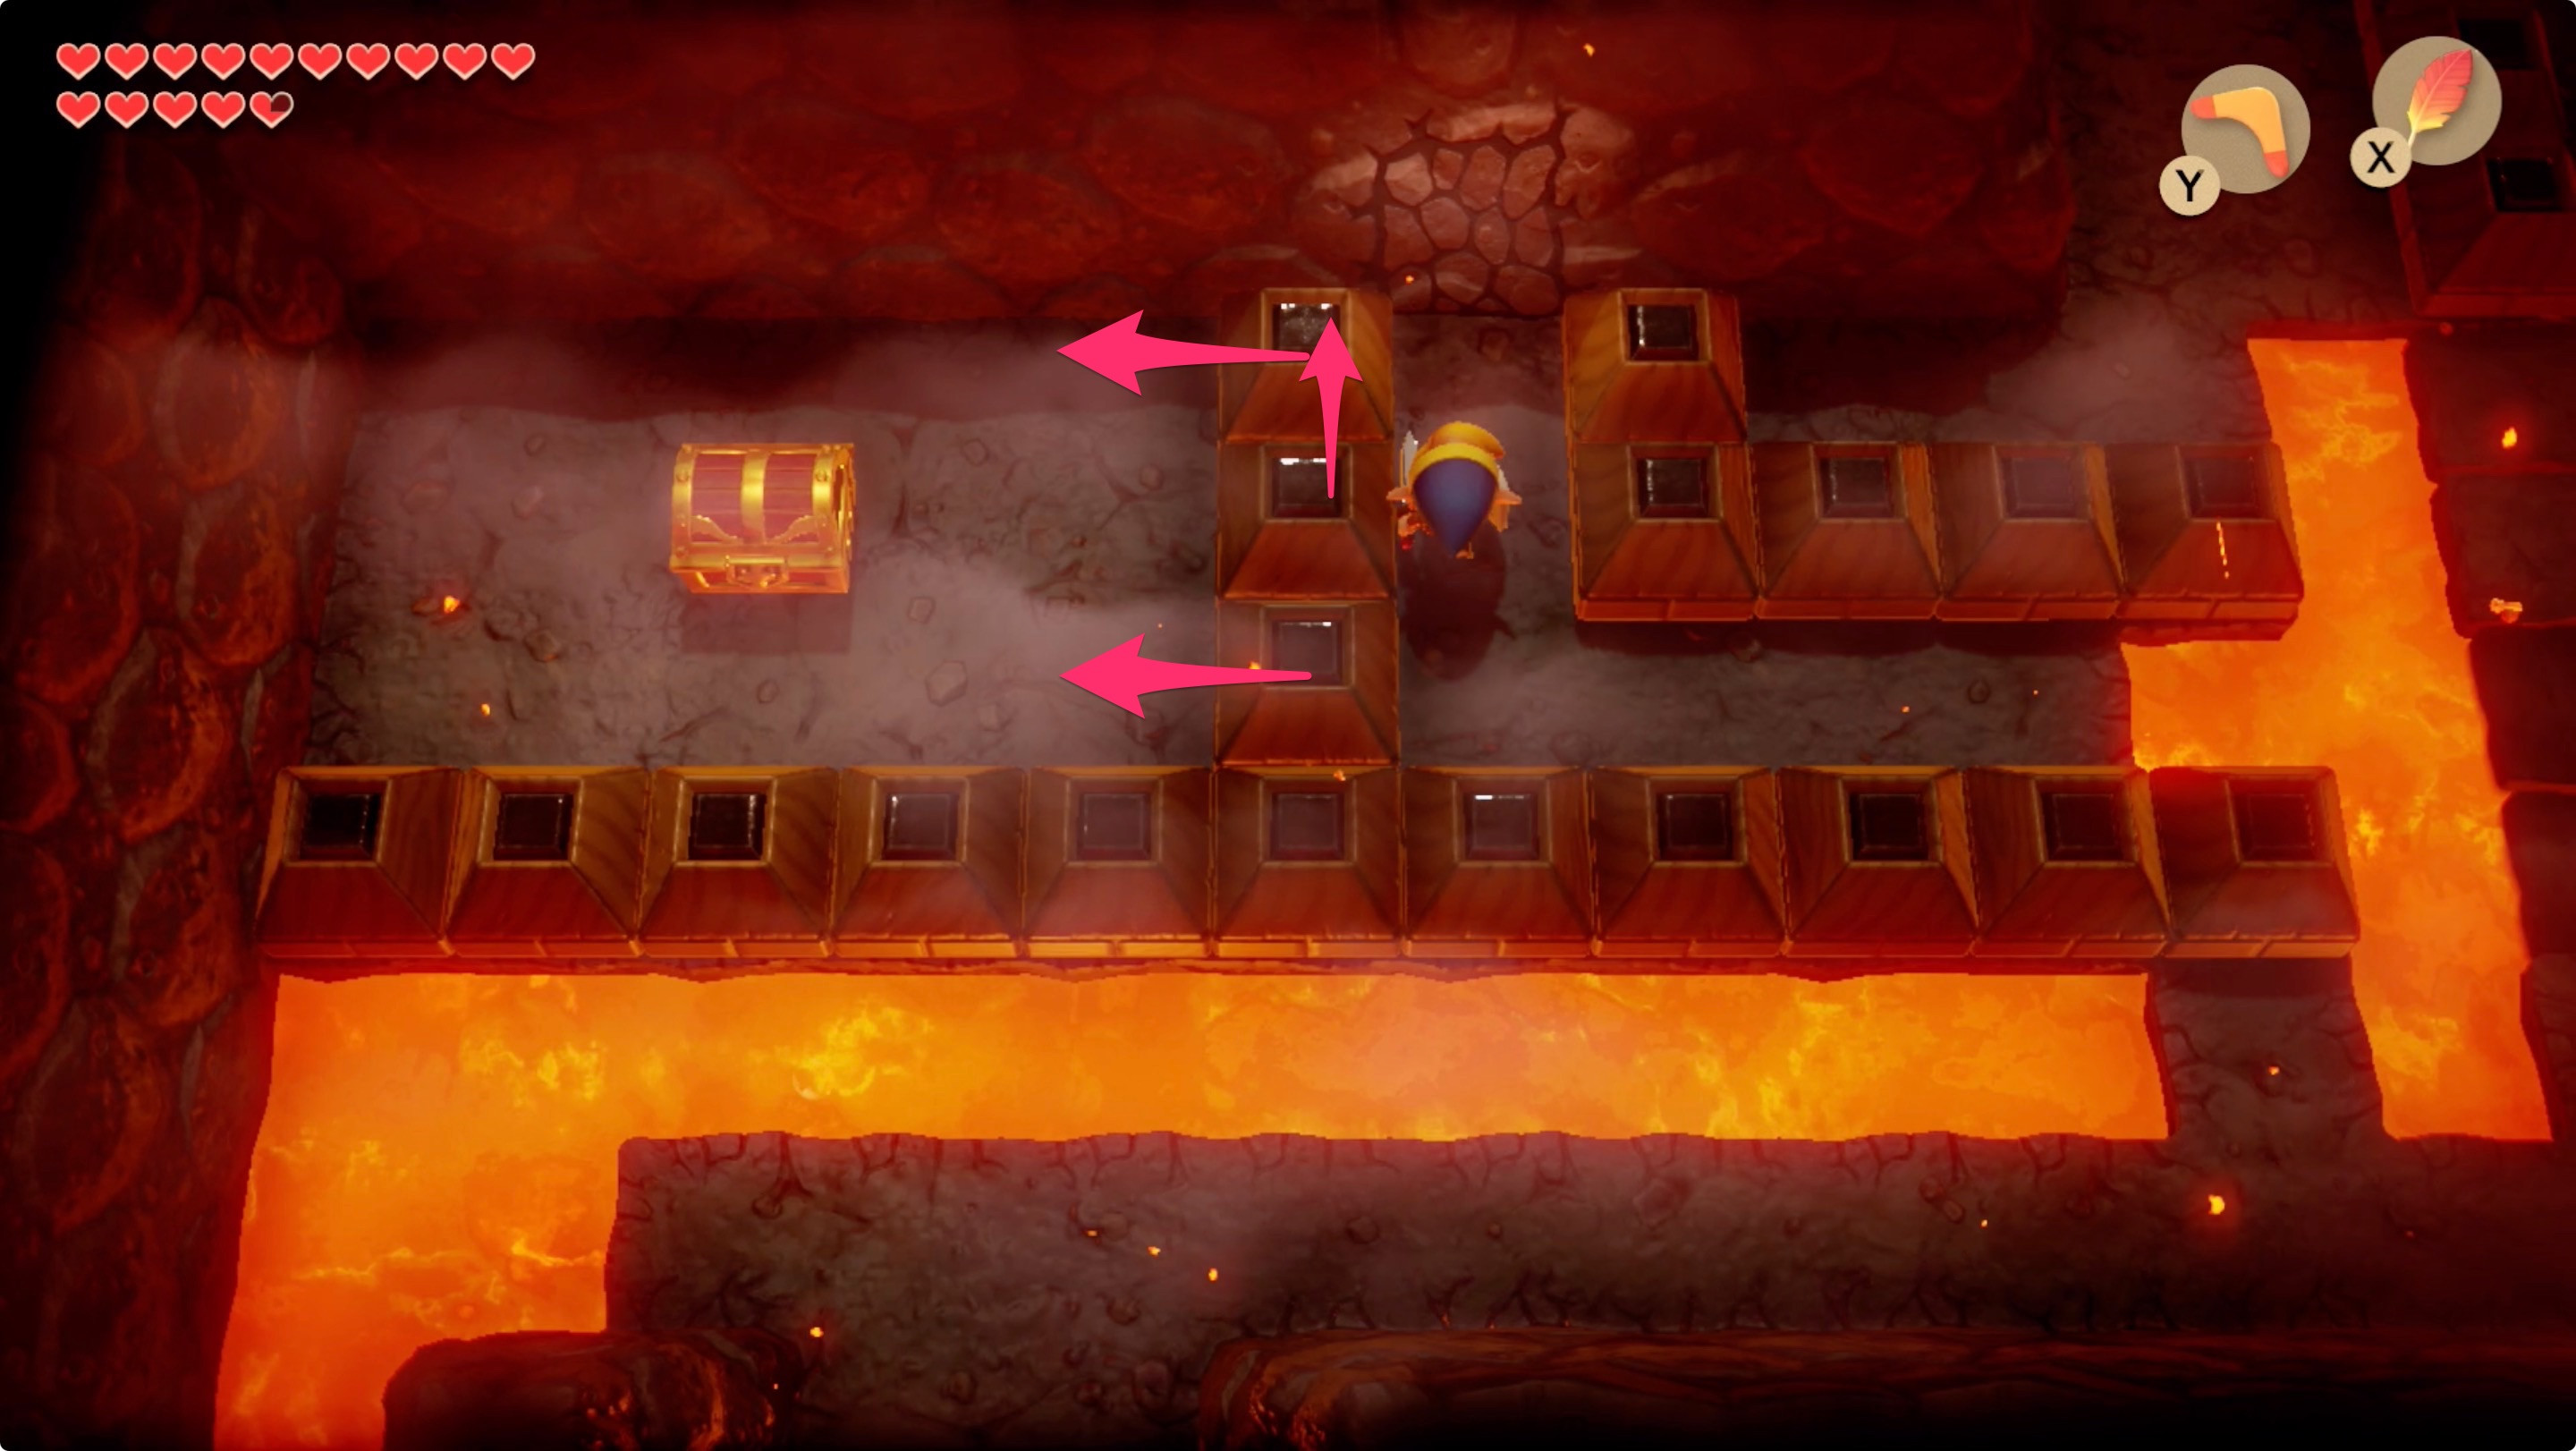
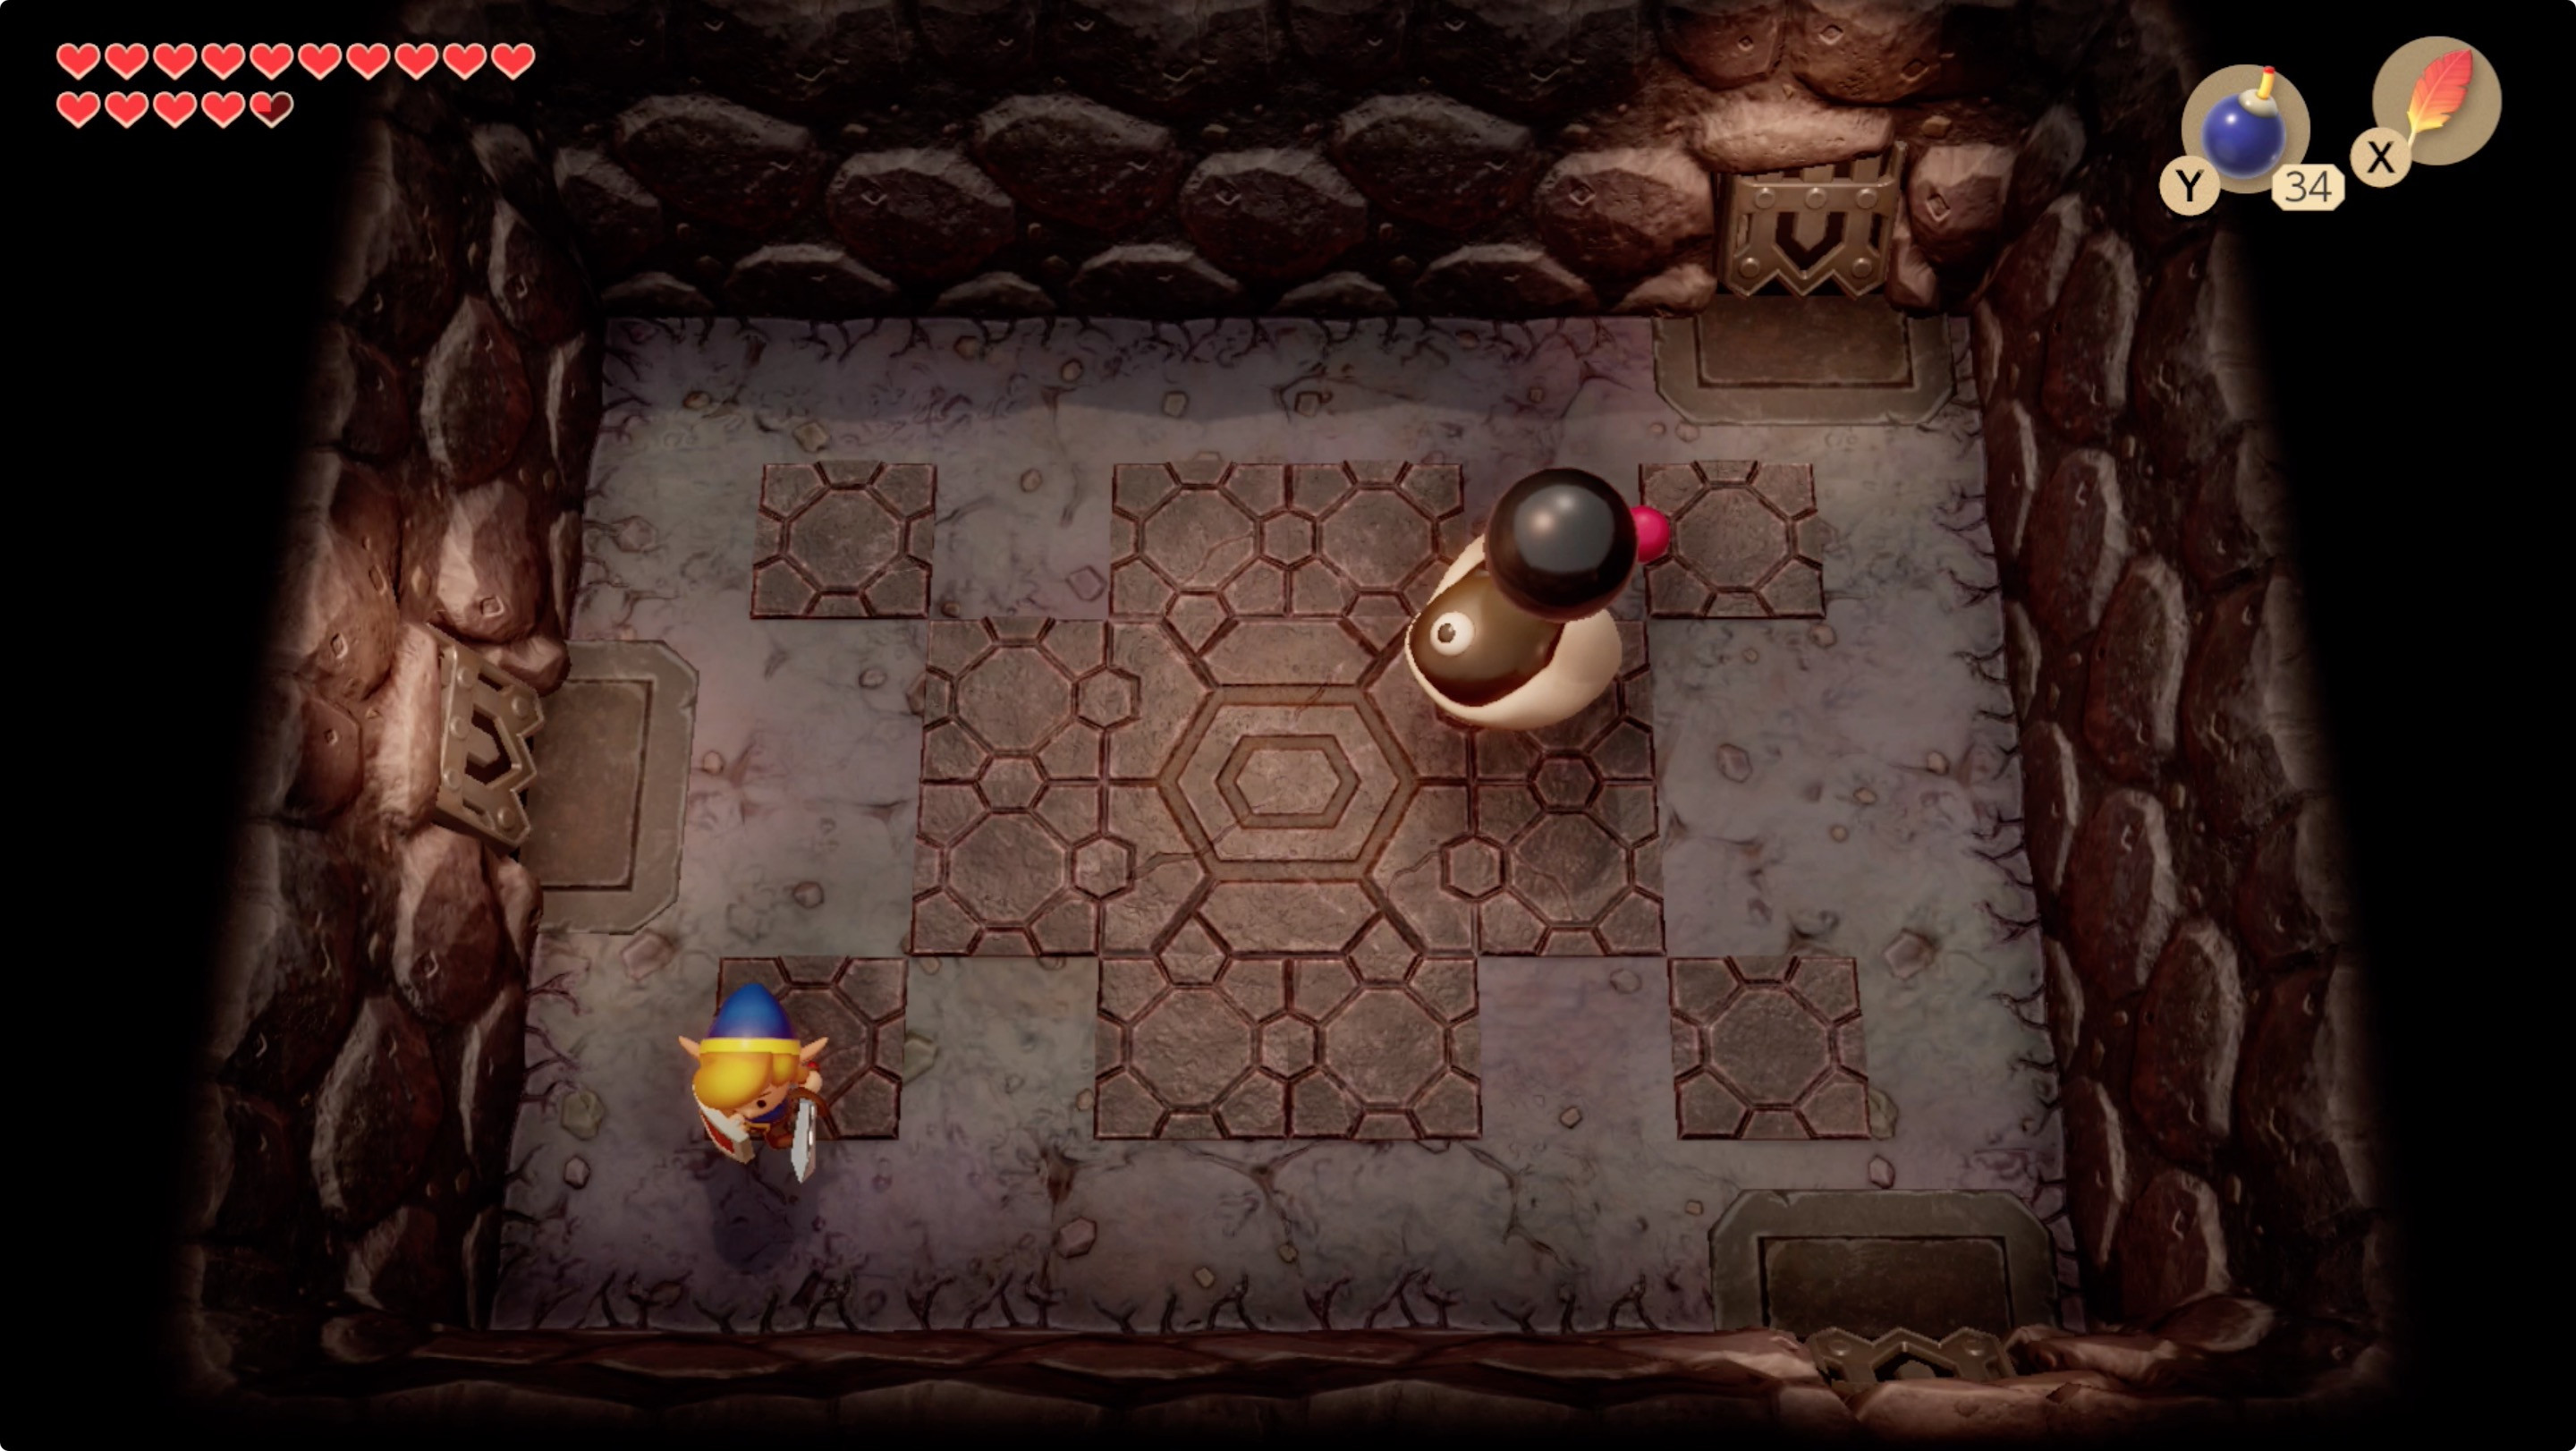
7. How Do I Find The Map In Turtle Rock?
Find the Map by heading north and east toward the planchette room. Shove the planchette-looking paver block to create a temporary walkway up.
 Path to the Map
 Paver stone puzzle for the Map
 Block solution for the Map
7.1 Step-by-step Instructions To Get The Map:
- From the entrance, head north and east toward the planchette room marked on the map. (Use the Boomerang to defeat the Vire, which is like a giant bat).
- Shove the planchette-looking paver block to create a temporary walkway up. It’s only one block wide, but that’s enough room to start a dash-jump to the left. (You can also control where it goes with the left thumbstick to make your jump easier — we’re going to get this hint from an Owl Statue in just a minute.)
- Shove the top and bottom blocks left, and then the middle block up.
- Open the chest for the Turtle Rock Map.
7.2 What Do I Do With The Paver Block?
Shove it to create a temporary walkway up.
7.3 How Do I Solve The Block Puzzle?
Shove the top and bottom blocks left, and then the middle block up.
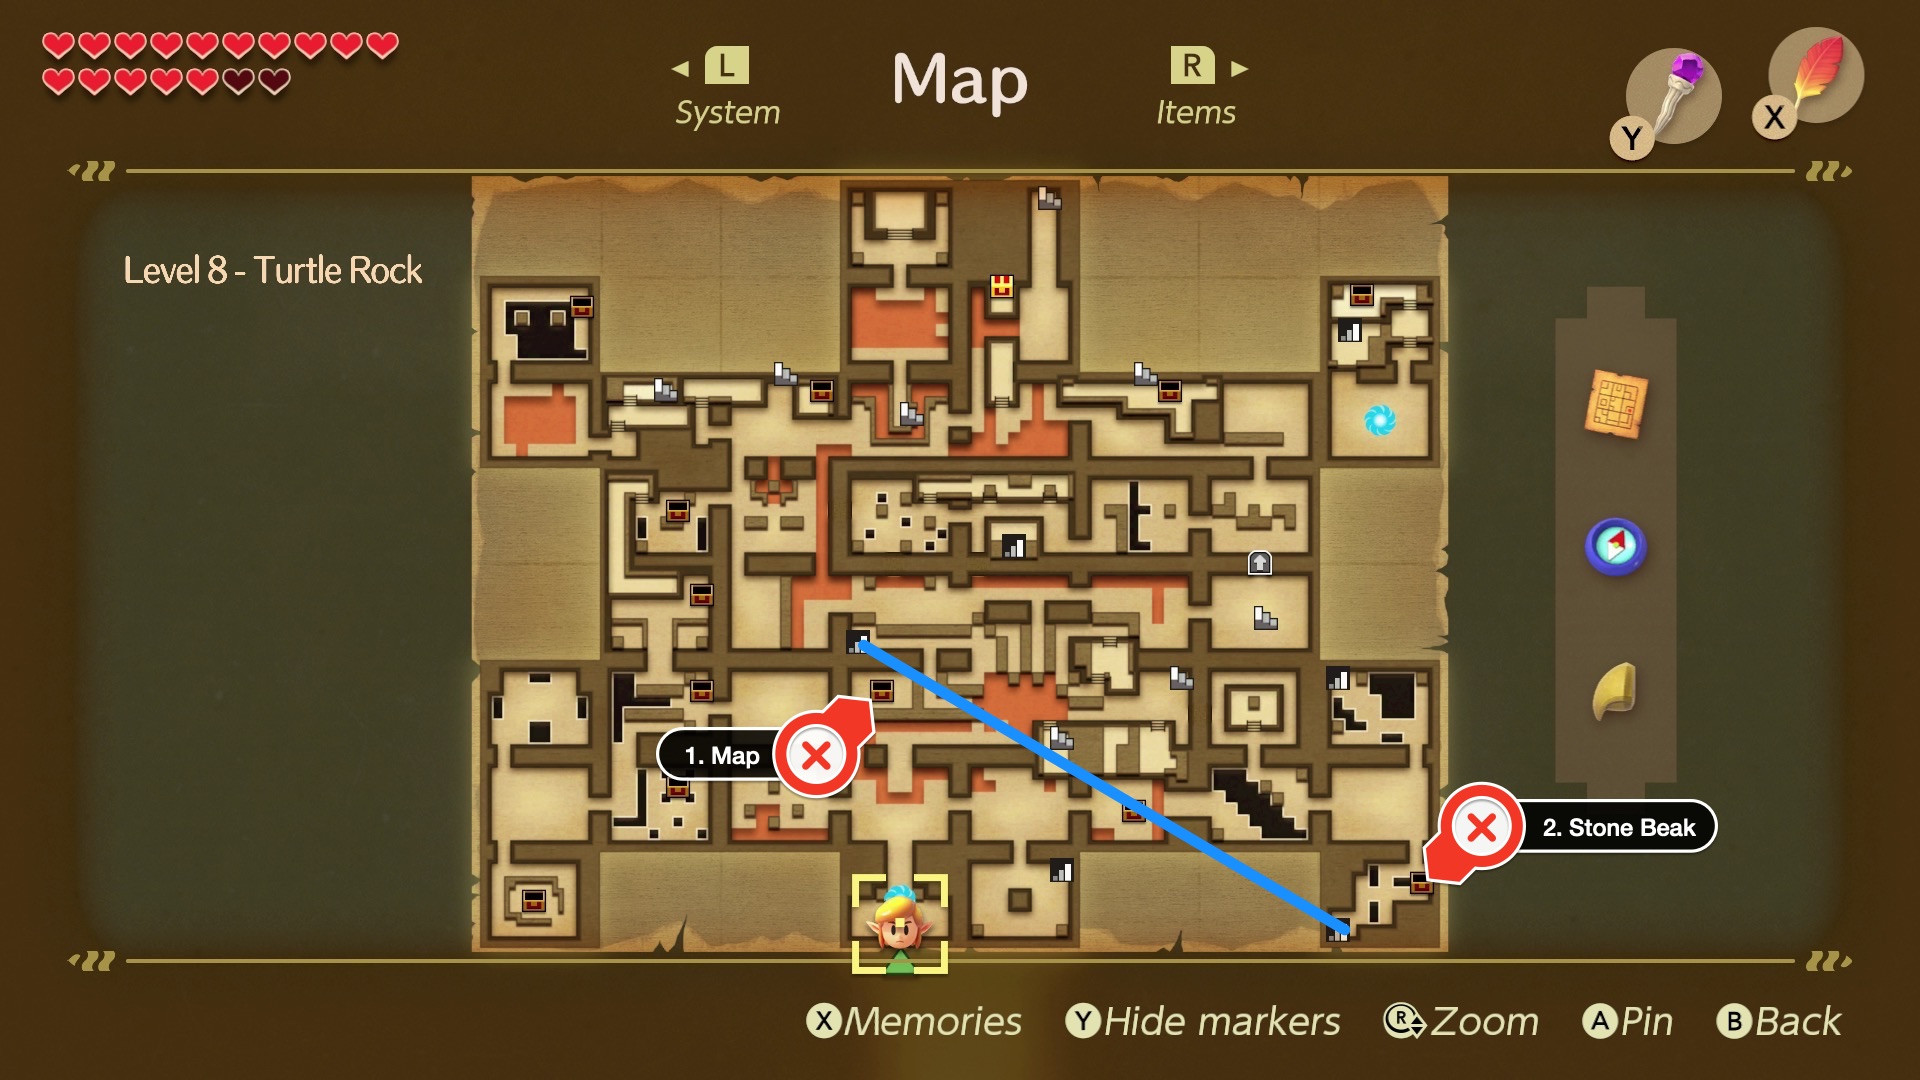
8. How Do I Find The Stone Beak?
Find the Stone Beak by bombing the wall at the top of the room where you got the map and heading left.
 Path to the Stone Beak
8.1 Step-by-step Instructions To Get The Stone Beak:
- Bomb the wall at the top of the room where you got the map, and then head left and down the stairs.
- After the side-scrolling area, clear the enemies and open the chest for the Stone Beak.
8.2 Where Do I Bomb The Wall?
Bomb the wall at the top of the room where you got the map.
8.3 What Do I Do After Bombing The Wall?
Head left and down the stairs.
9. How Do I Defeat The Smasher Mini-Boss?
Defeat the Smasher mini-boss by playing dodgeball with it.
 Smasher mini-boss fight
9.1 How Is This Fight The Same As The One In Face Shrine?
Just play dodgeball again.
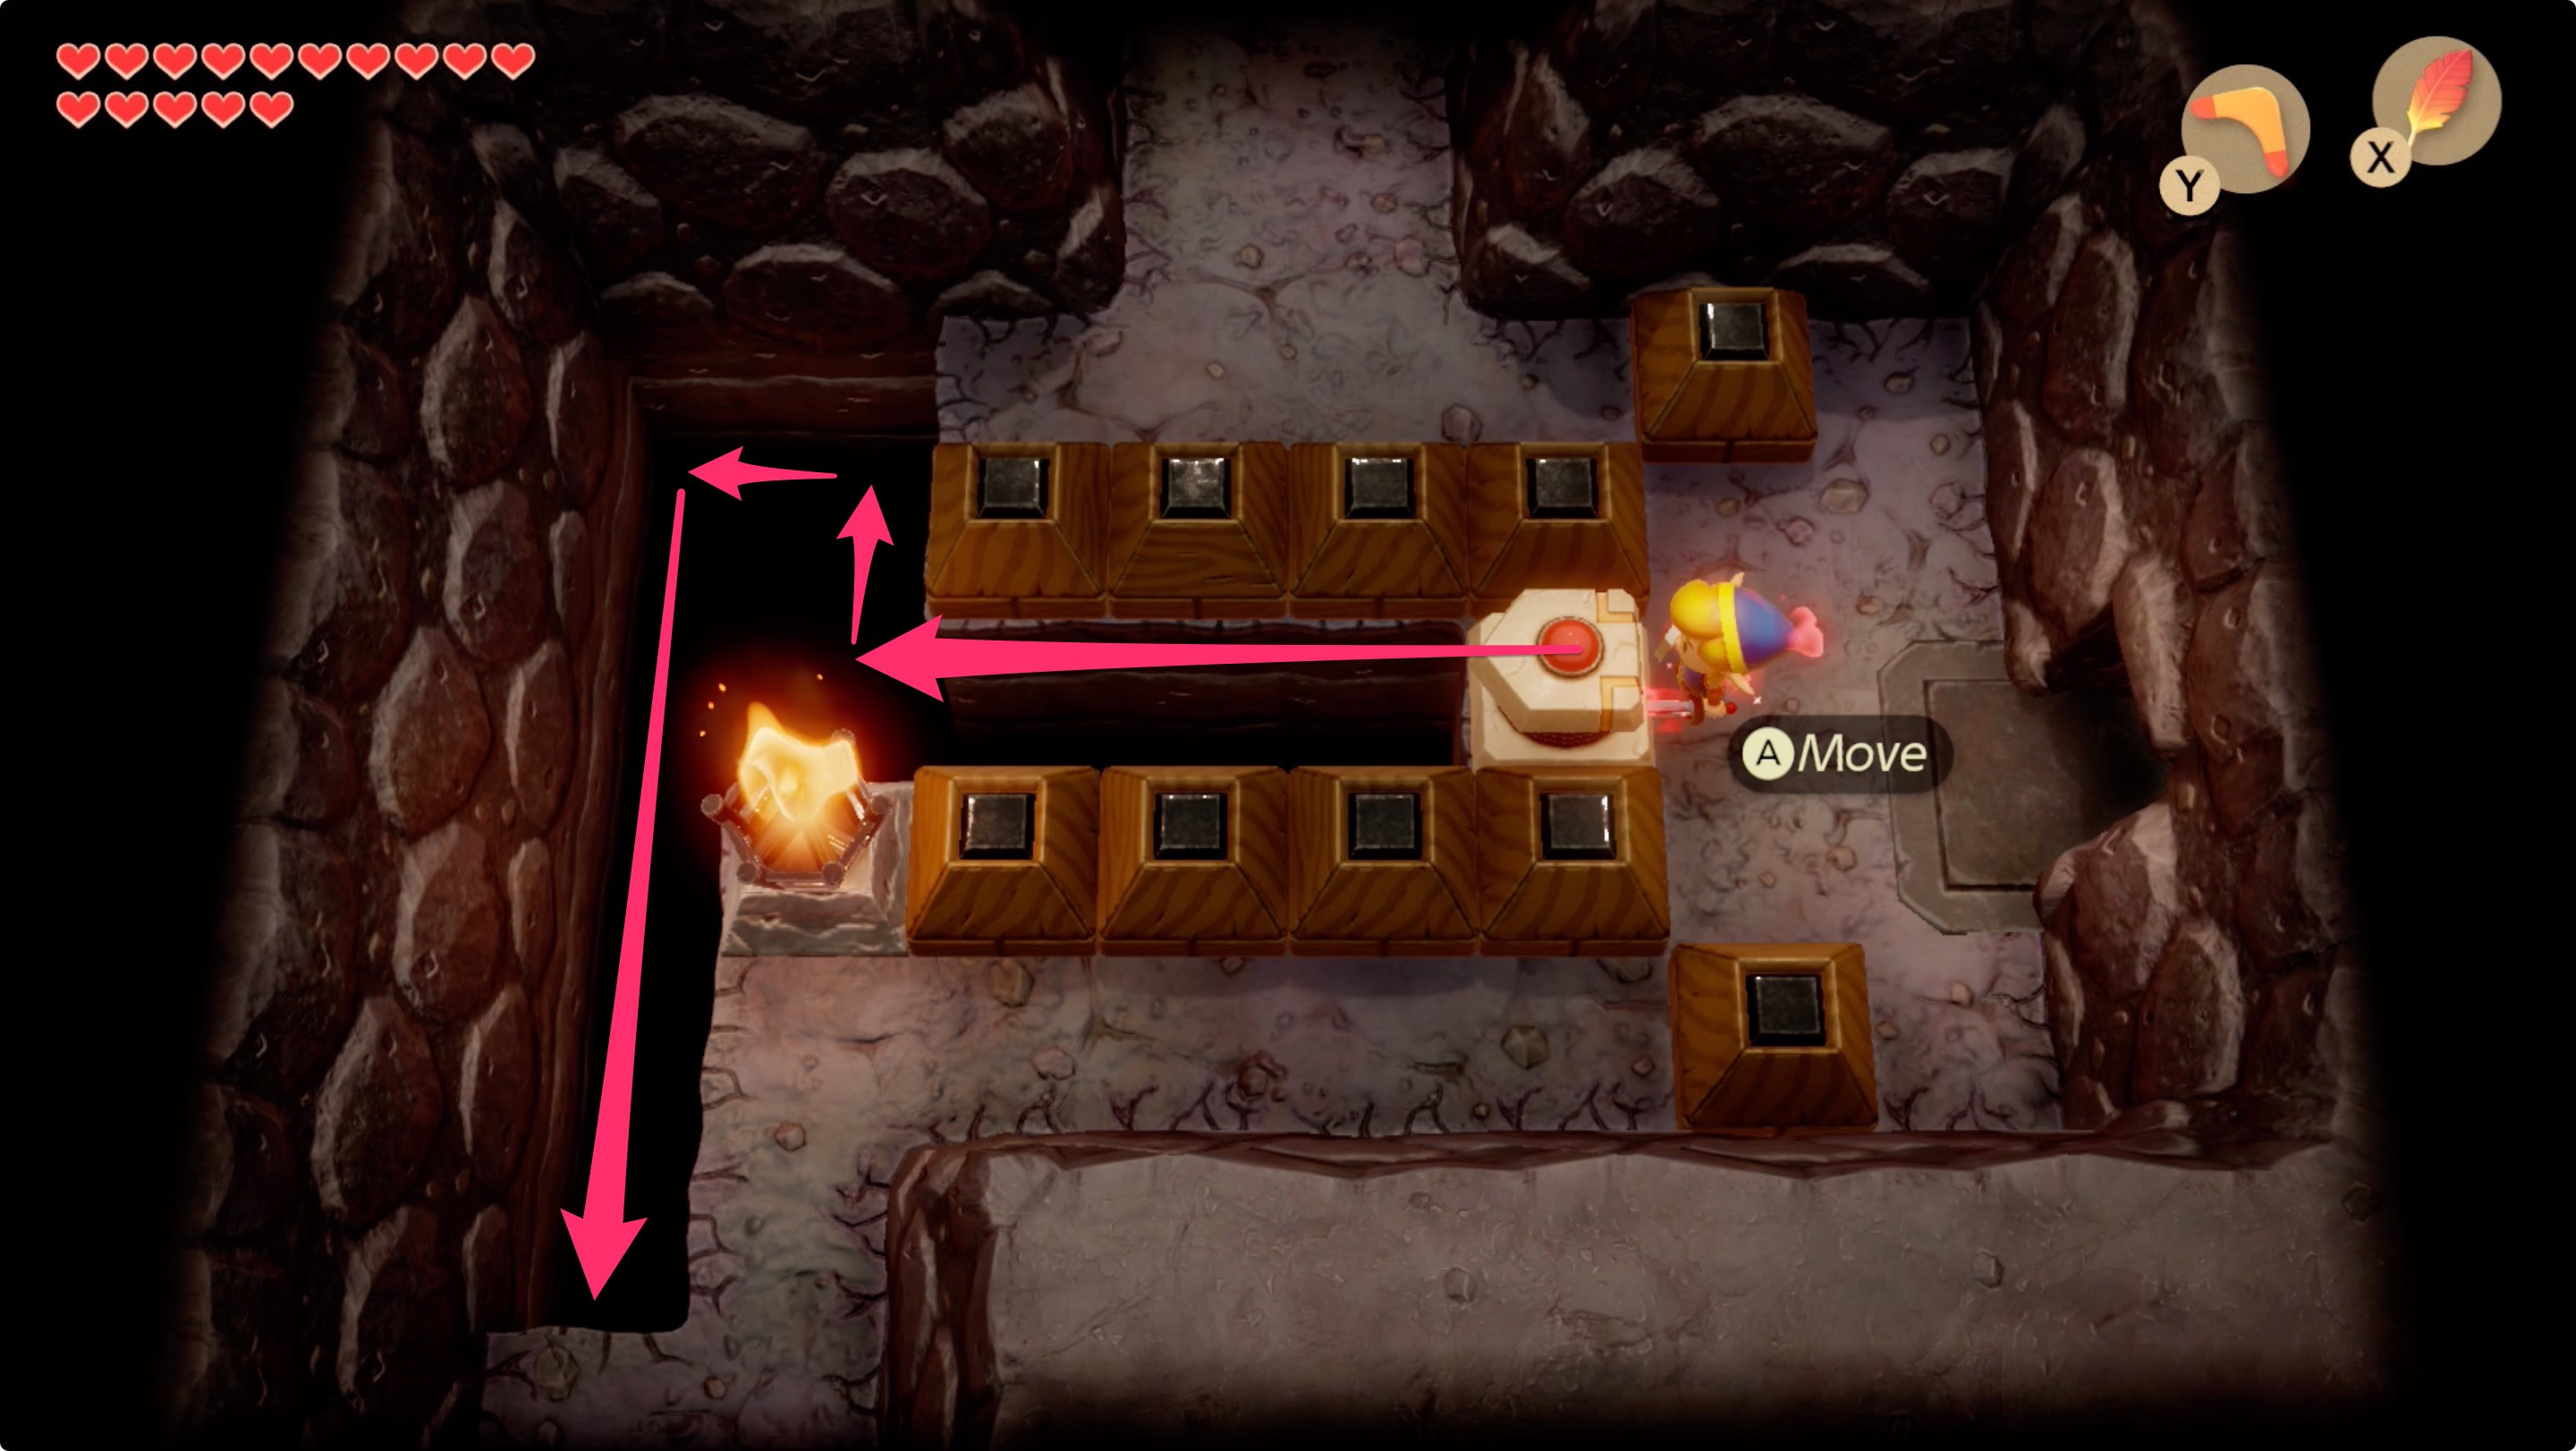
10. How Do I Find The Crystal And A Small Key?
Find the crystal and a Small Key by going north from the Smasher mini-boss fight and solving the paver planchette puzzle.
 Path to the crystal
 Paver puzzle solution near the crystal
10.1 Step-by-step Instructions To Get The Crystal And Small Key:
-
Go north from the Smasher mini-boss fight. The switch to unlock the door is under the pot. Talk to the Owl Statue who says to “Fill all the holes with the rock that rolls. This [left thumbstick] is the key!”
-
Go back south and then west. Use the paver planchette to fill in the gap.
- Push it left, and then follow the upper edge of the hole.
- In the top left, turn around and follow the bottom edge back down.
- Do a quick up-right-down when you reach the bottom right to finish it off.
-
Pick up your Small Key.
-
Before you leave, bomb the wall along the north side of the room. Go through and hit the crystal once to turn it orange.
10.2 What Does The Owl Statue Say?
The Owl Statue says to “Fill all the holes with the rock that rolls. This [left thumbstick] is the key!“
10.3 Why Do I Need To Hit The Crystal?
Hit the crystal once to turn it orange.
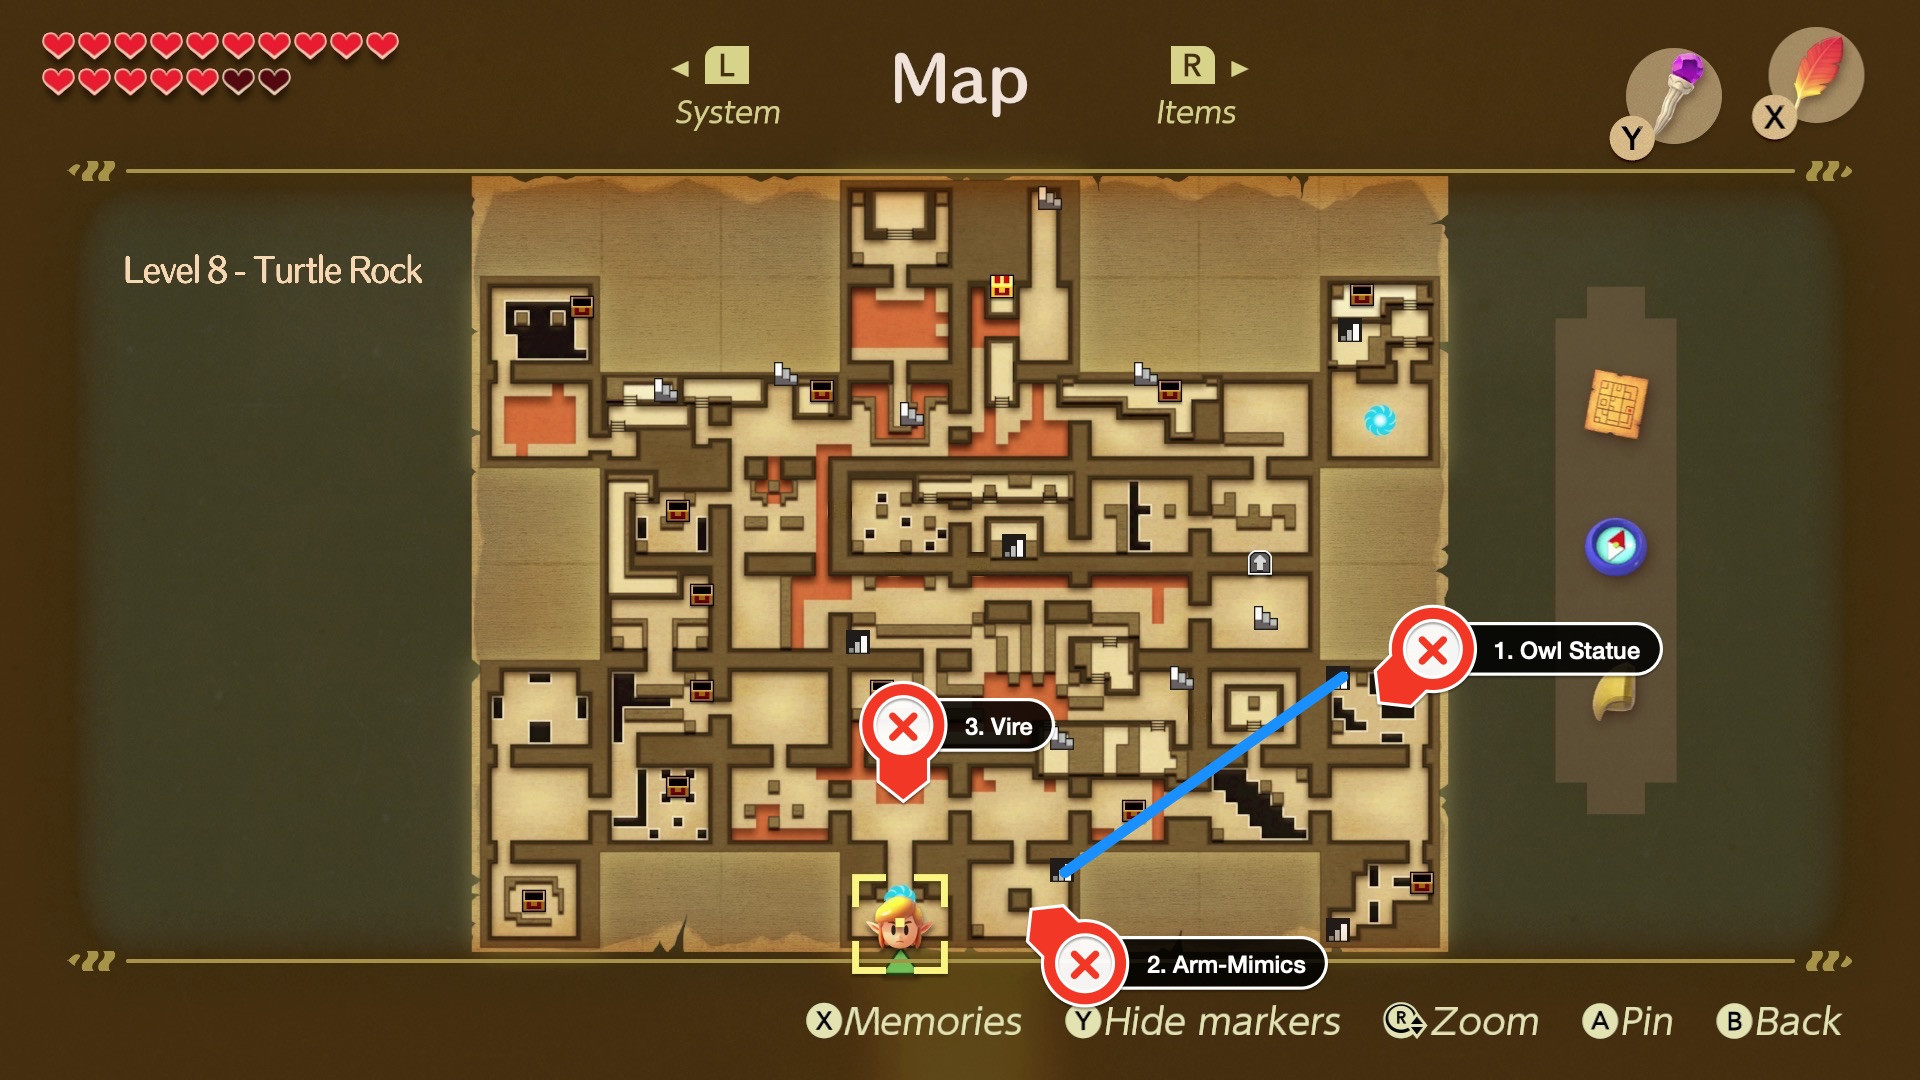
11. How Do I Return To The Vire (By The Entrance)?
Return to the Vire by taking the stairs in the Owl Statue room through the tunnel.
 Path back to the entrance
11.1 Step-by-step Instructions To Return:
- Take the stairs in the Owl Statue room through the tunnel.
- Dash through the two Arm-Mimics, head north. The switch to open the doors is under the top left pot.
- Go left to return to the Vire (above the entrance).
11.2 Where Is The Switch To Open The Doors?
The switch to open the doors is under the top left pot.
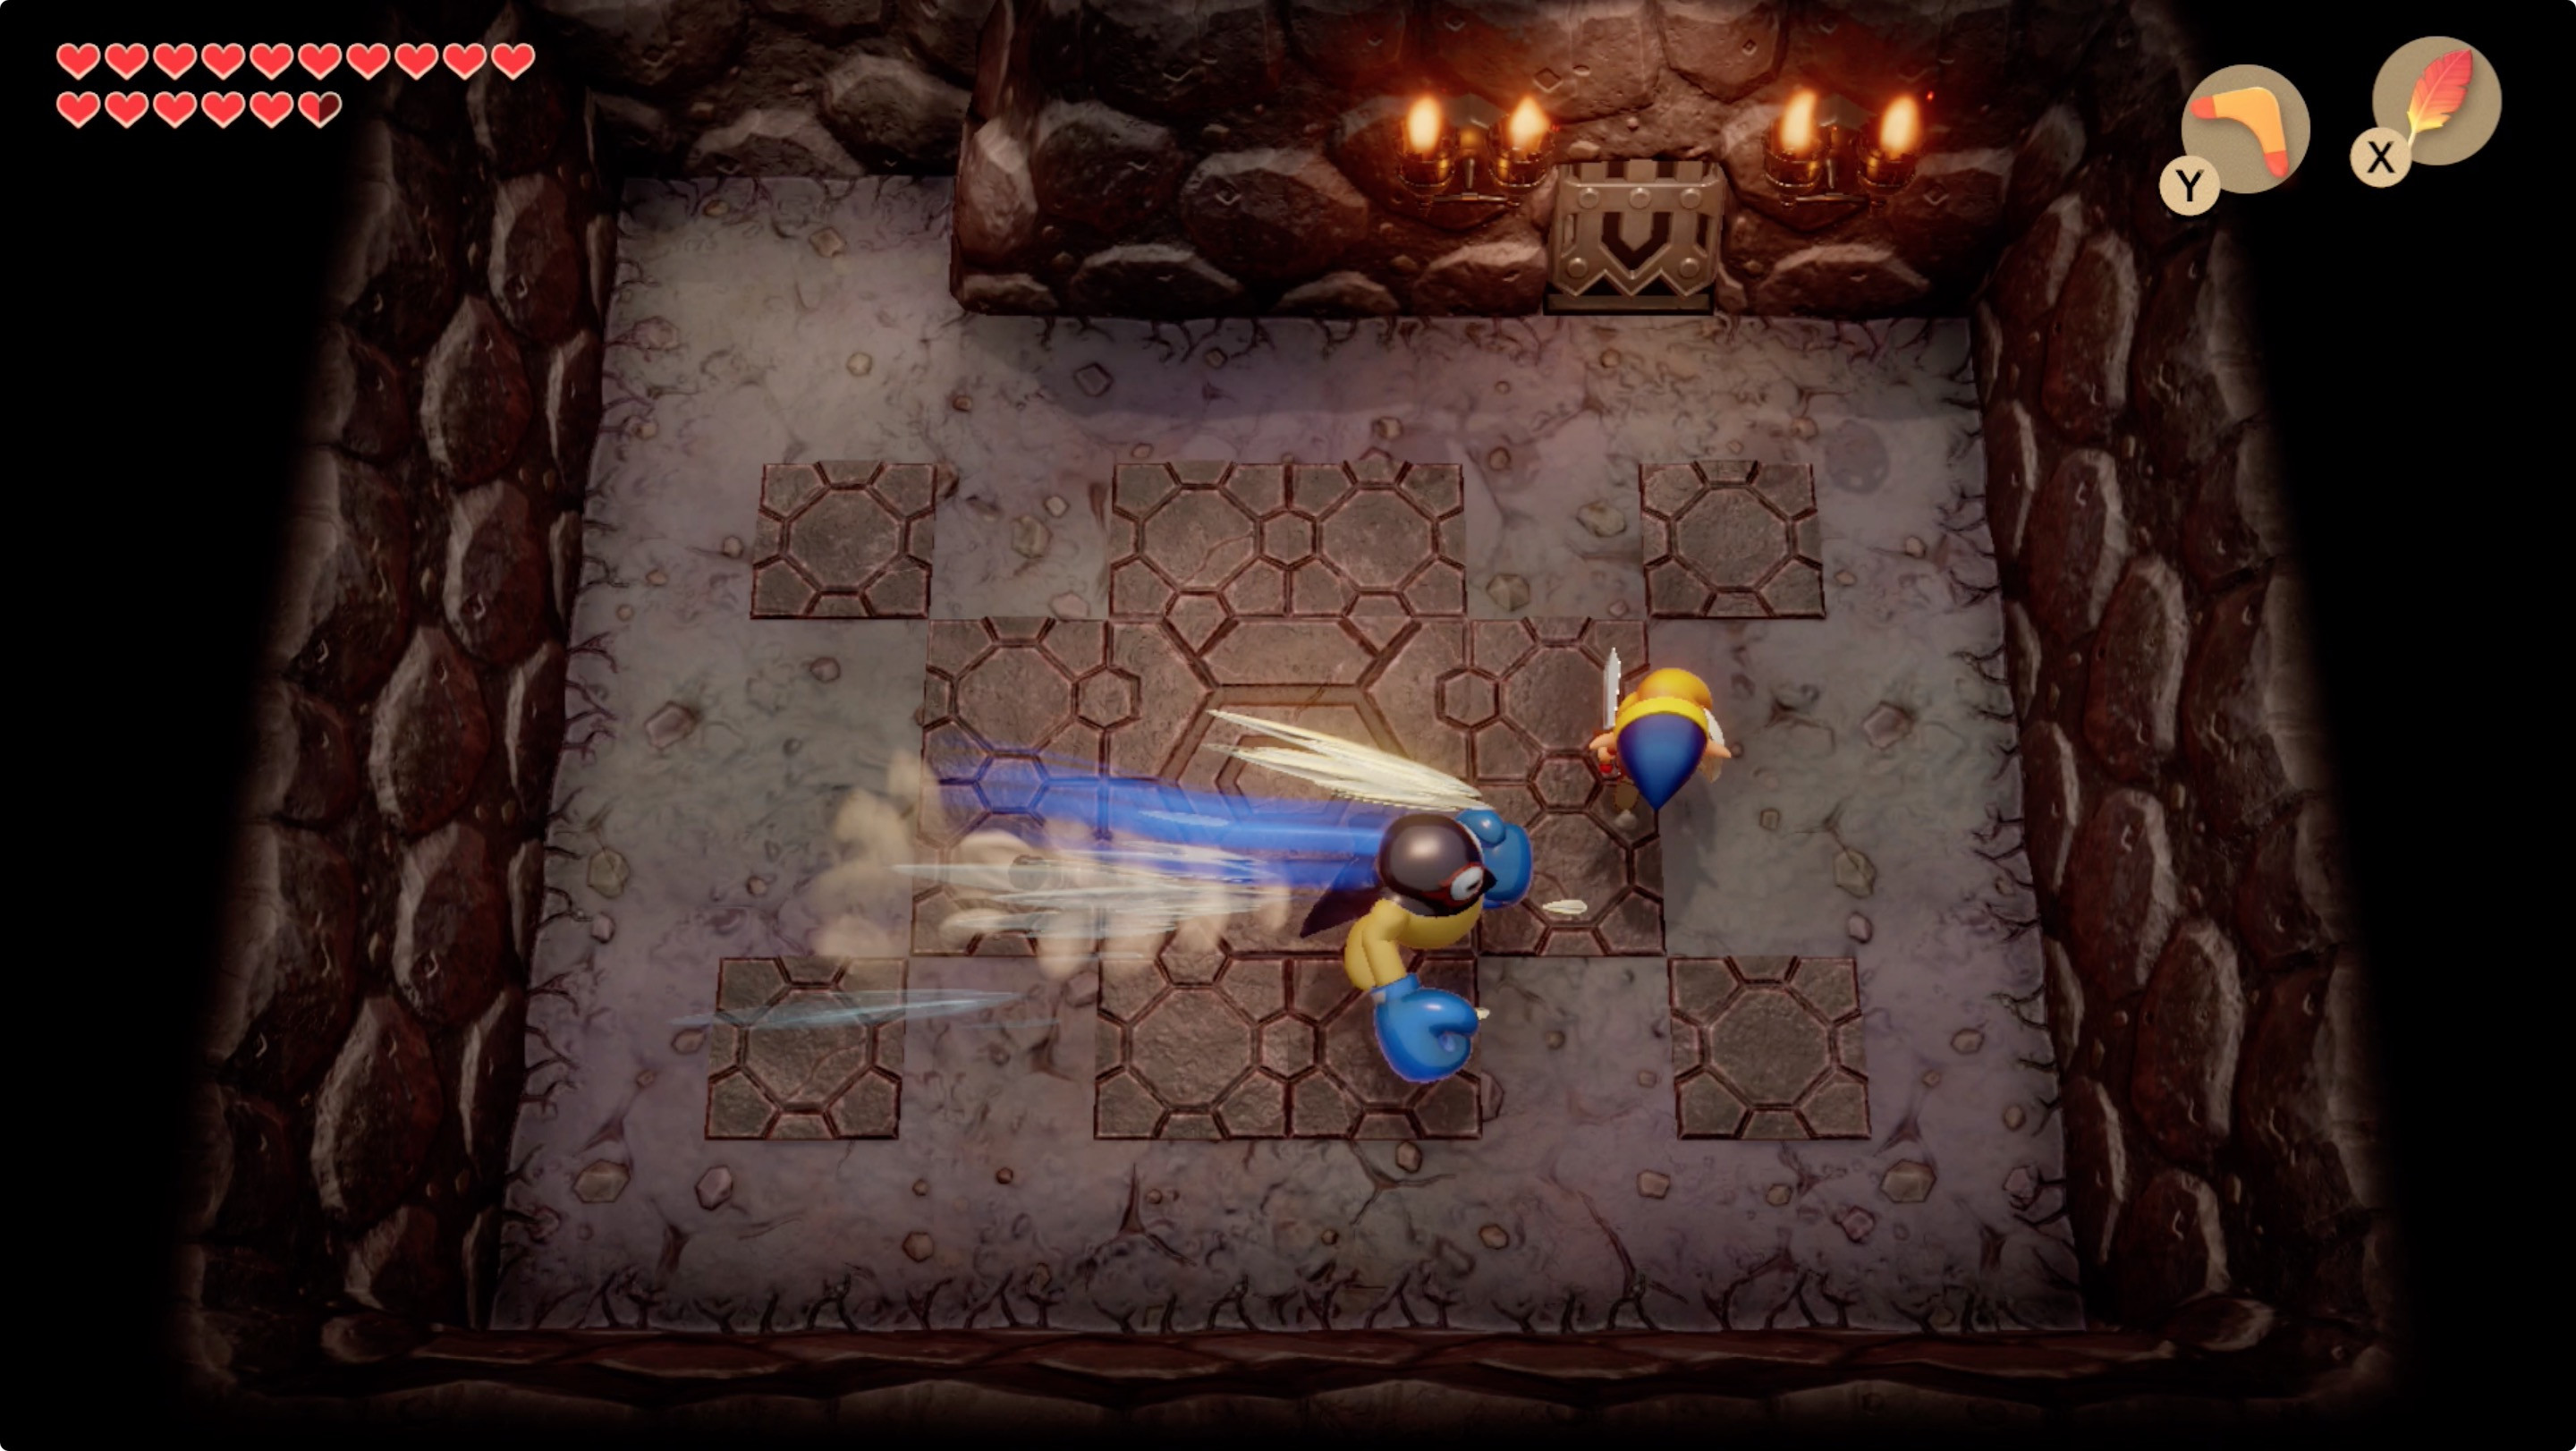
12. How Do I Defeat The Blue Hinox Mini-Boss?
Defeat the Blue Hinox by using your Boomerang and avoiding getting grabbed.
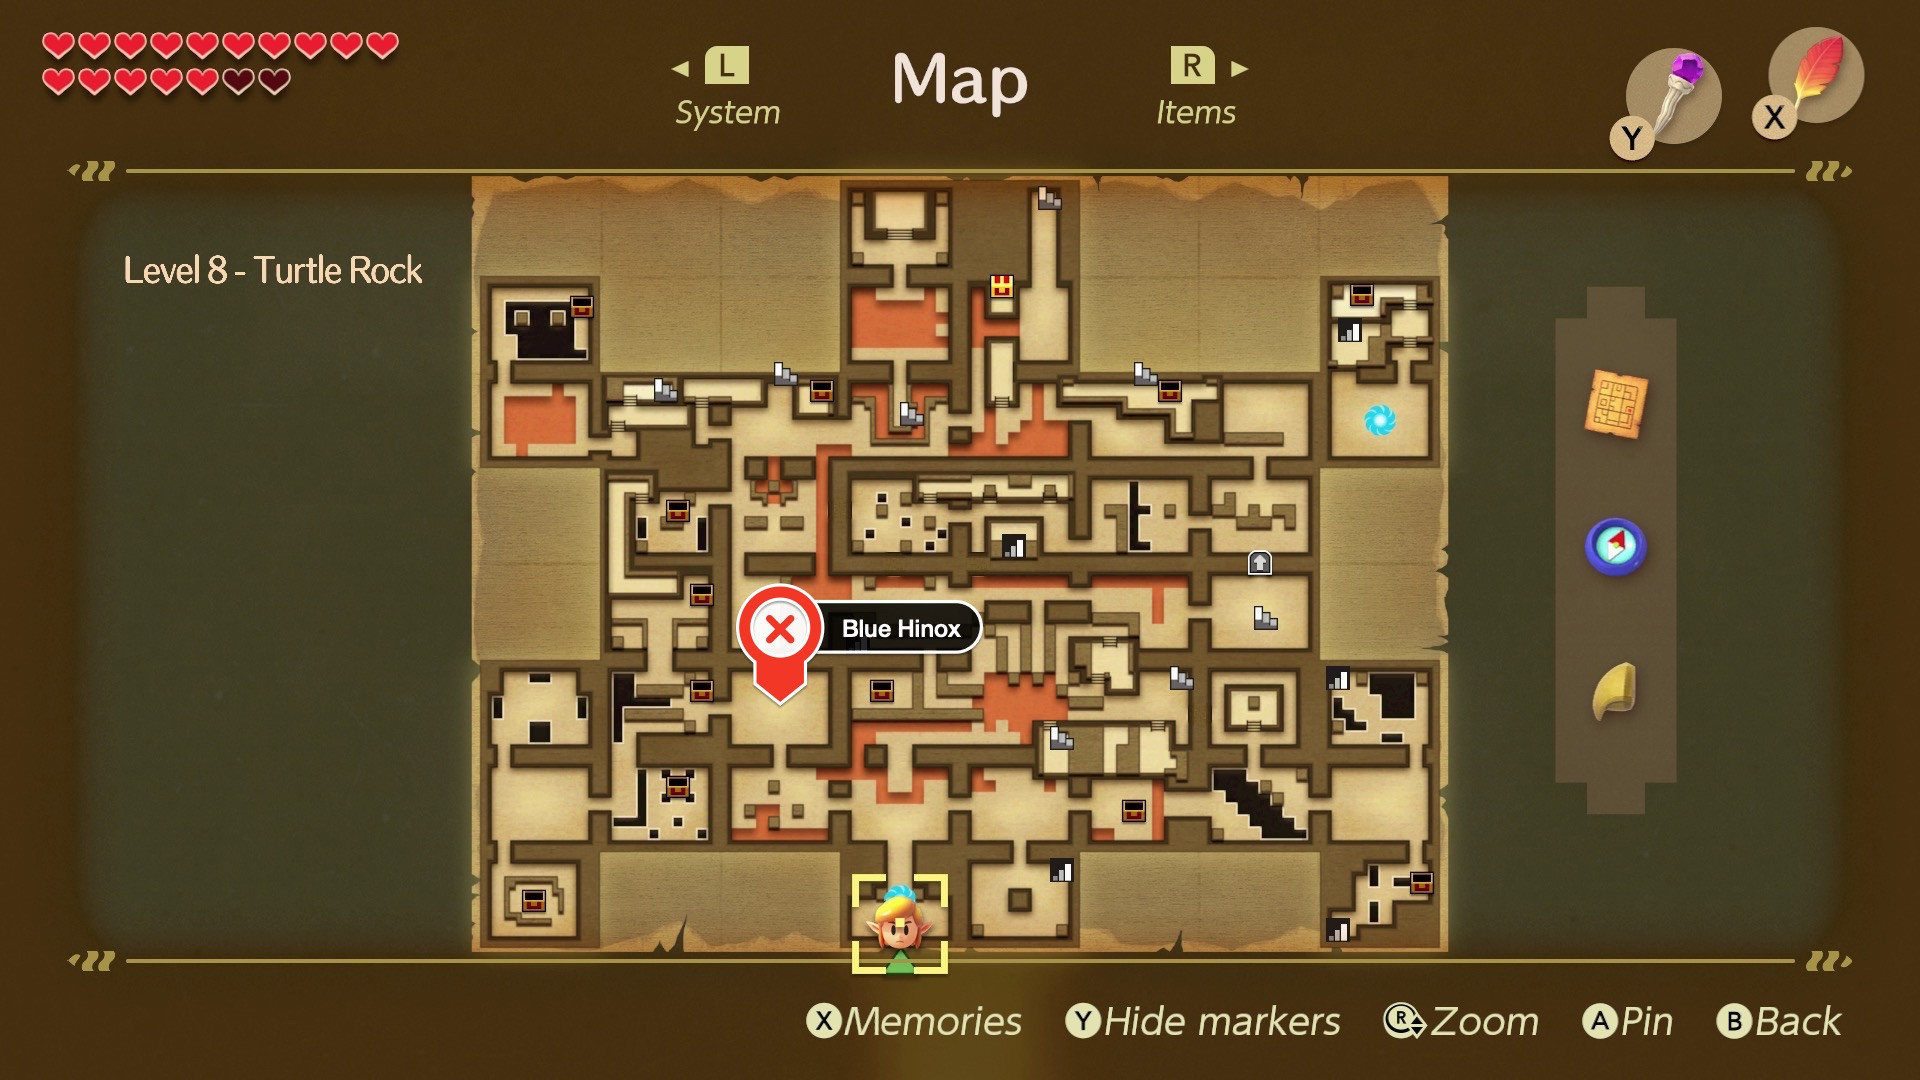 Blue Hinox mini-boss fight location
12.1 What Is The Strategy For This Fight?
Use your Boomerang and avoid getting grabbed.
12.2 How Is This Fight Similar To Previous Hinox Fights?
It’s the same way you’ve fought the previous two.
13. How Do I Gather Rupees On The Way To The Rolling Bones Mini-Boss Fight?
Gather rupees by solving the paver planchette puzzle after the Blue Hinox fight.
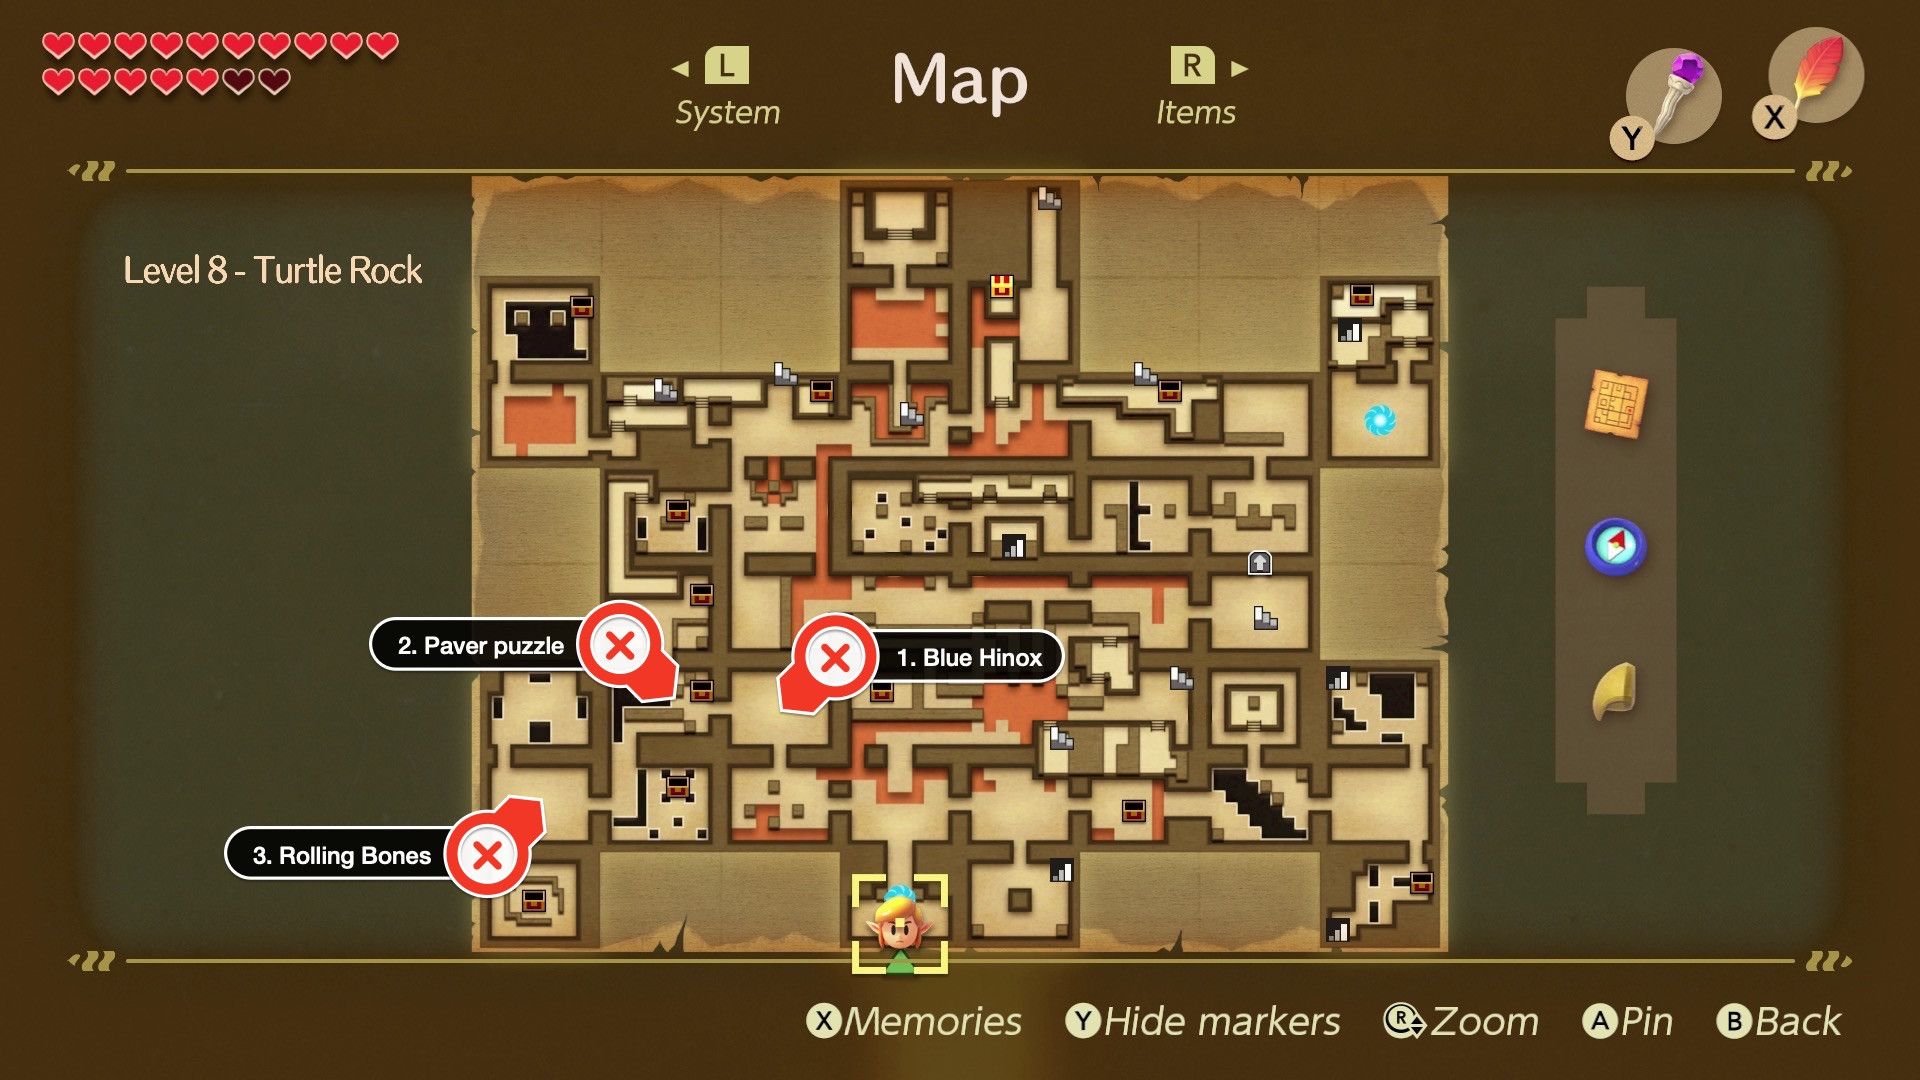 Path to Rolling Bones mini-boss fight
 Paver puzzle solution after the Blue Hinox
13.1 Step-by-step Instructions To Gather Rupees:
- From the Blue Hinox, go west.
- Shove the paver planchette left, and then use the left thumbstick to control it. Cover all the open space — go left, up, left, and down — to drop a chest with 20 rupees.
- Go south. Jump the gaps and open the chest for 50 rupees. Go left to the Rolling Bones mini-boss fight.
13.2 How Do I Solve The Paver Planchette Puzzle?
Cover all the open space — go left, up, left, and down — to drop a chest with 20 rupees.
13.3 Where Can I Find More Rupees?
Jump the gaps and open the chest for 50 rupees.
14. How Do I Defeat The Rolling Bones Mini-Boss?
Defeat Rolling Bones by jumping the spiked log and hitting him with a weapon.
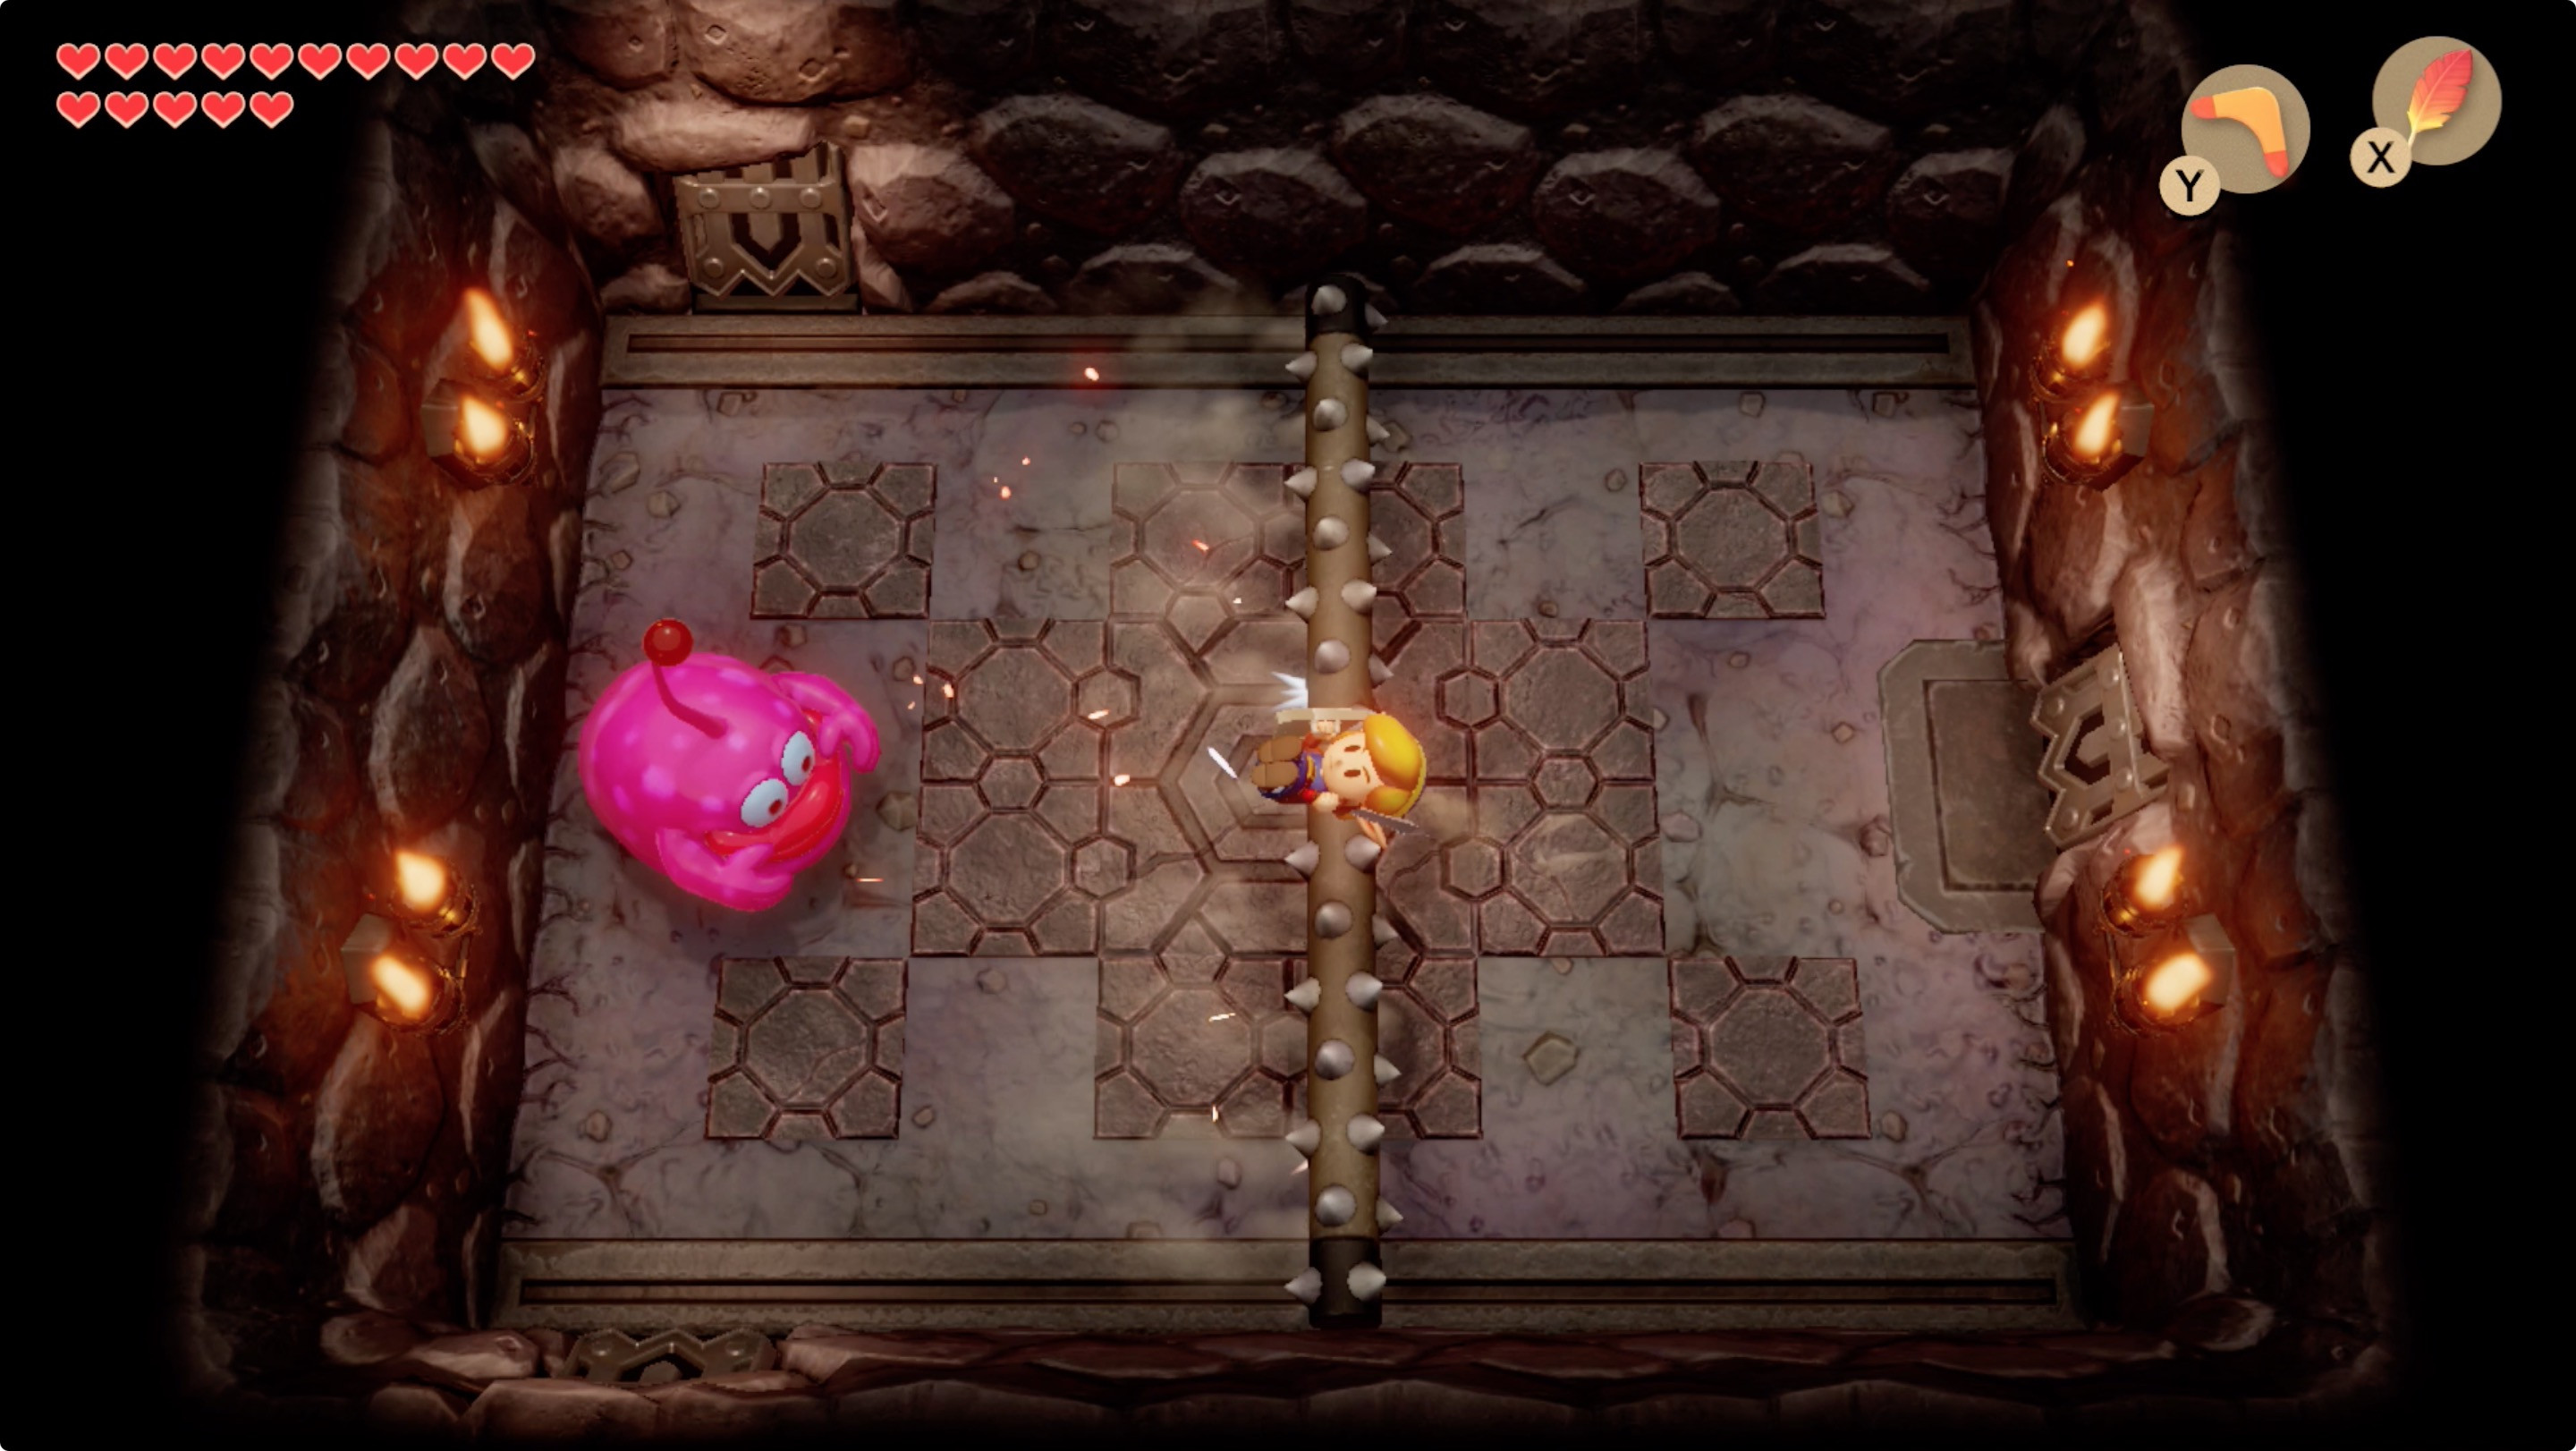 Rolling Bones mini-boss fight
14.1 What Is The Strategy For This Fight?
Jump the spiked log and hit him with a weapon.
14.2 How Is This Fight The Same As The First Time?
It’s the same as the first time you fought Rolling Bones.
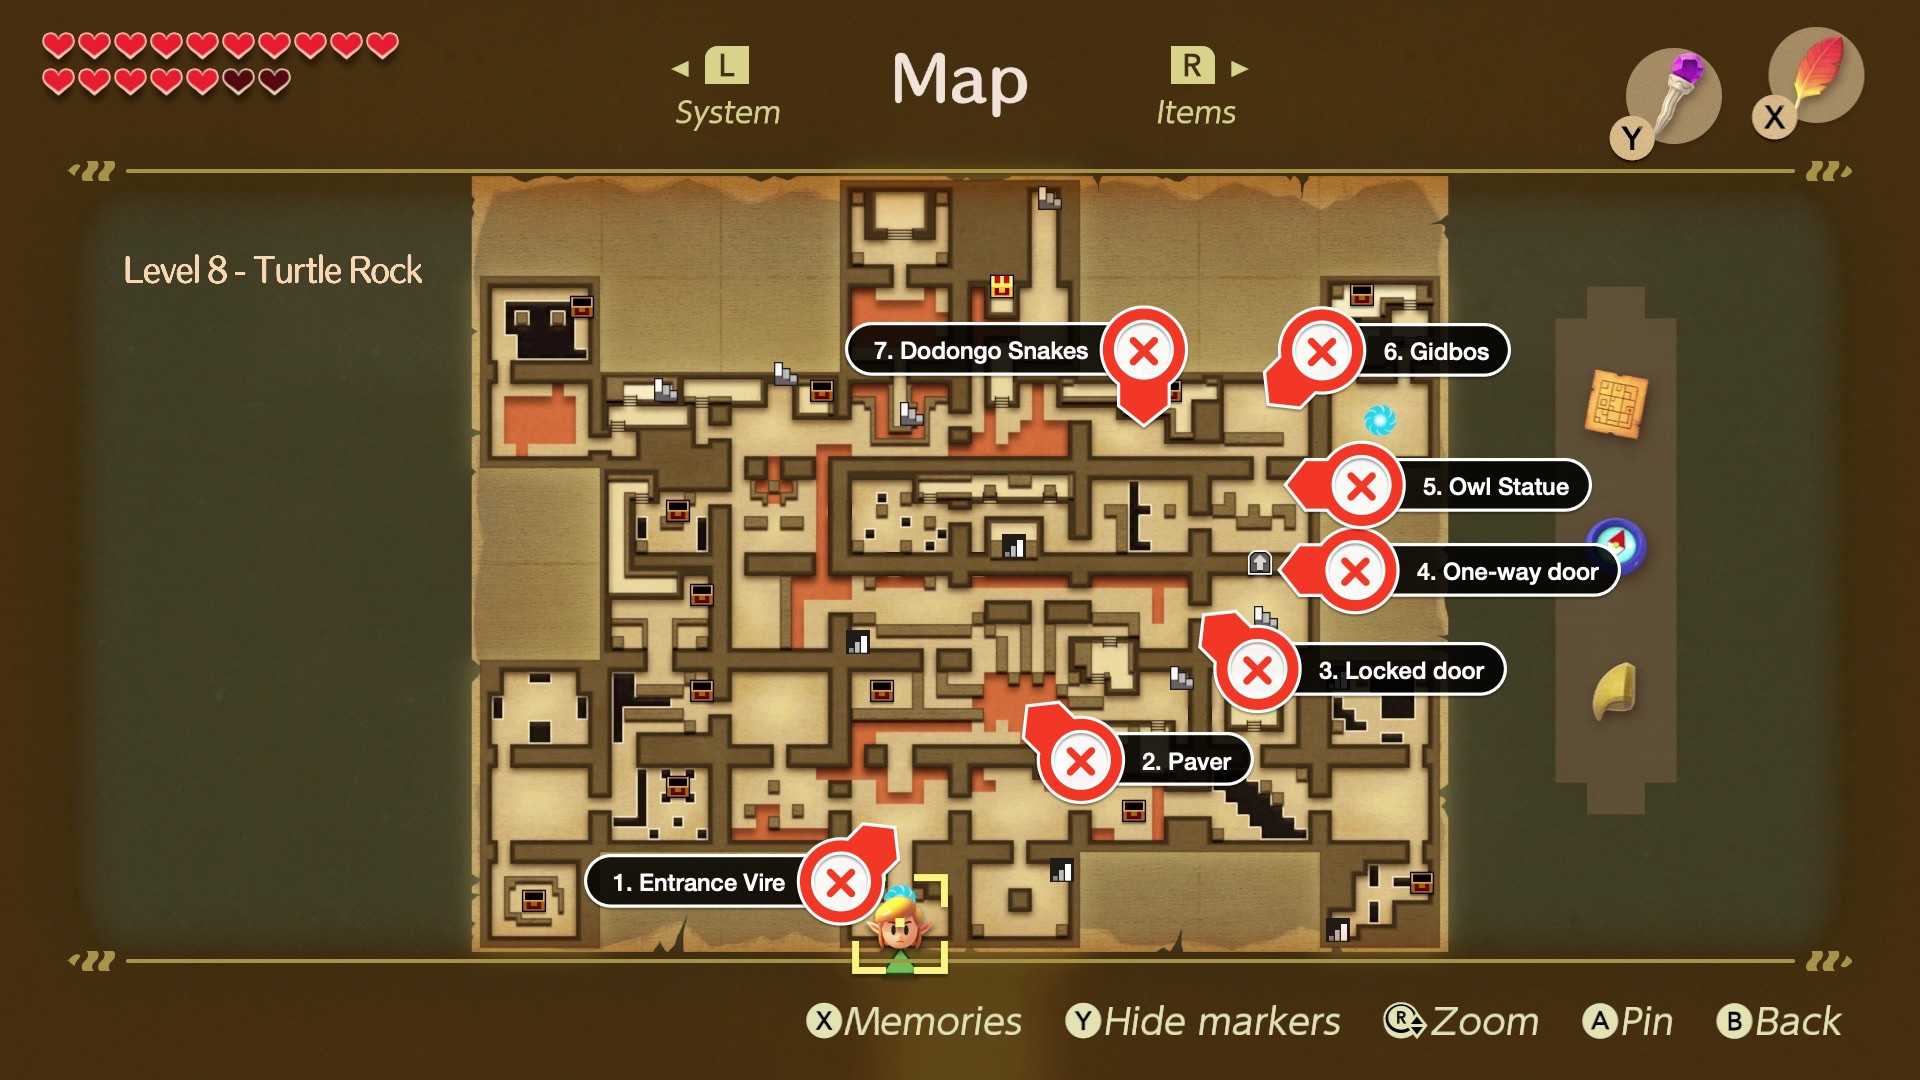
15. How Do I Find The Compass And A Small Key?
Find the Compass and a Small Key by going north from the Rolling Bones mini-boss fight and defeating the Vire.
 Path to the Compass
15.1 Step-by-step Instructions To Get The Compass And Small Key:
- From the Rolling Bones mini-boss fight, go north.
- Defeat the Vire with your Boomerang to drop a Small Key.
- Go down two rooms. Handle the Vacuum Mouth, and open the chest for the Compass.
15.2 How Do I Defeat The Vire?
Defeat the Vire with your Boomerang to drop a Small Key.
15.3 Where Is The Compass?
Open the chest for the Compass.
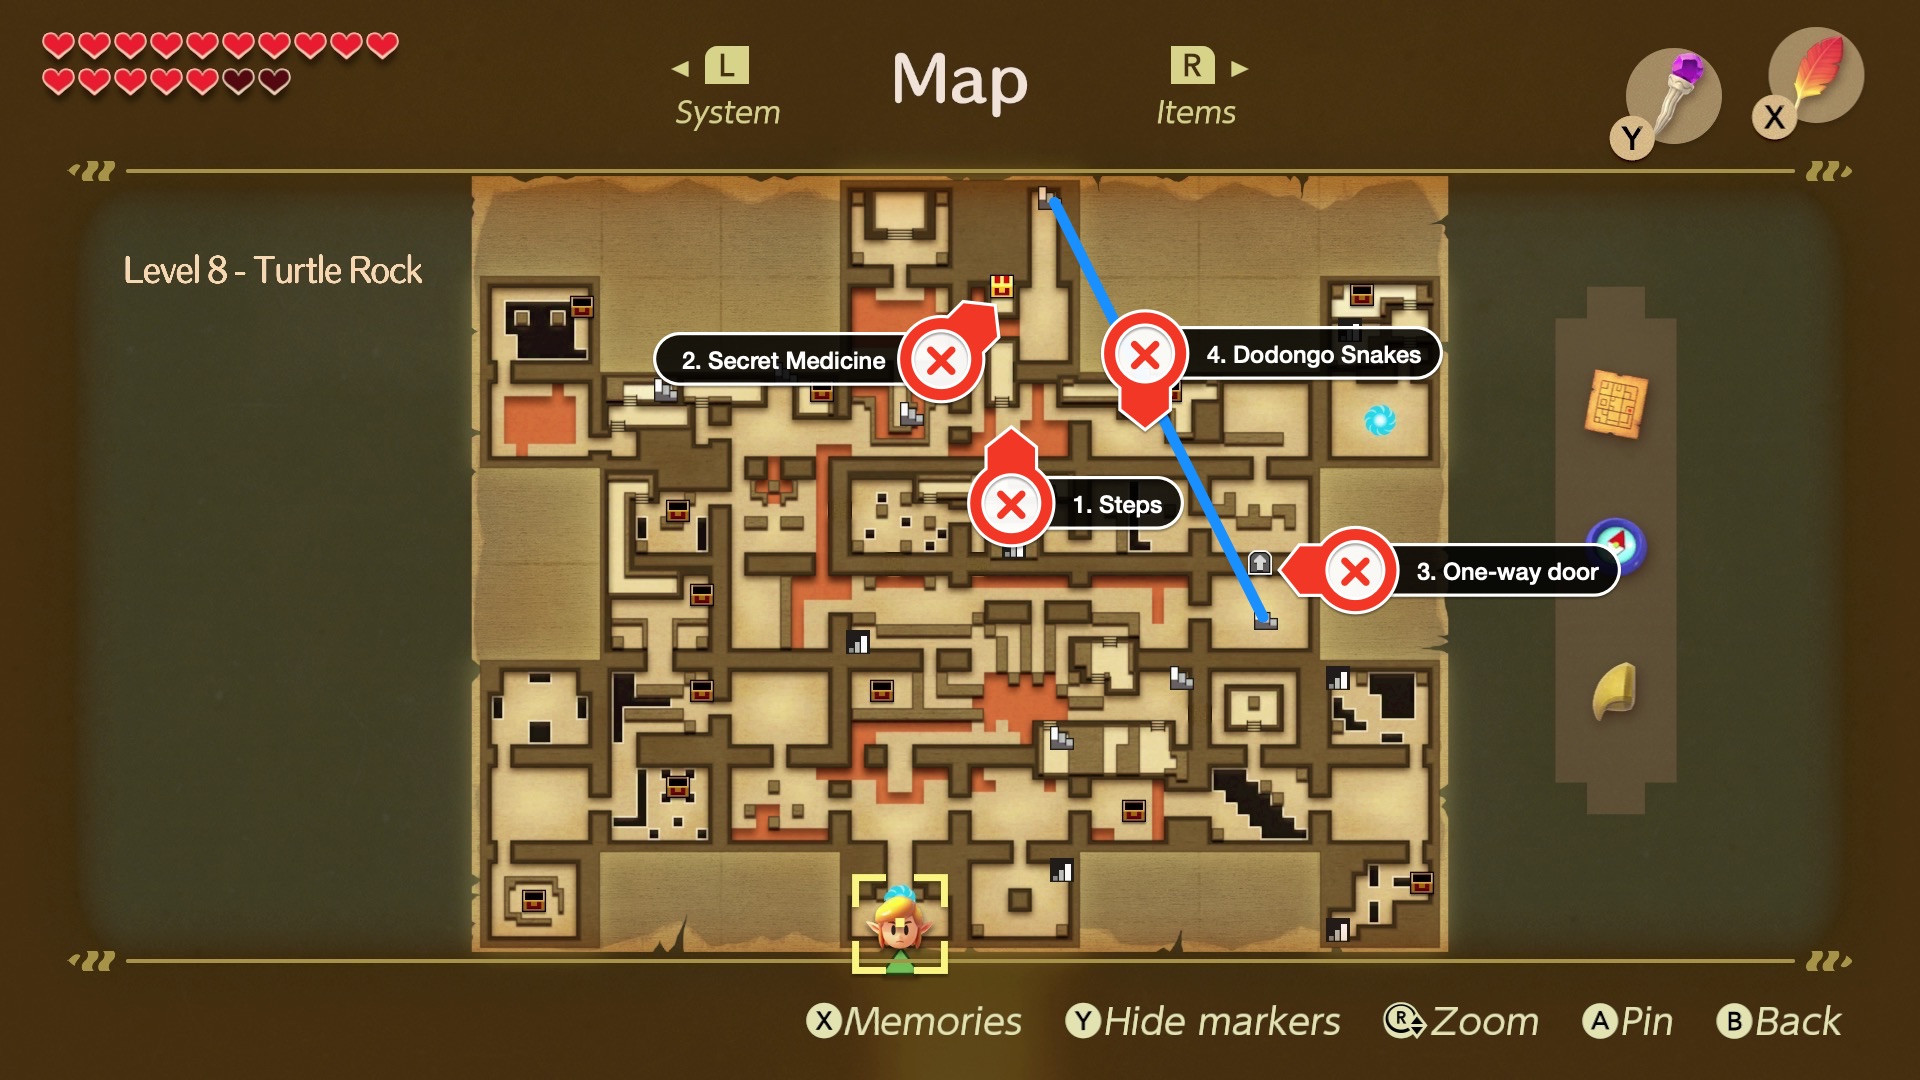
16. How Do I Find Another Small Key?
Find another Small Key by returning to the Vire room above the entrance and solving the paver puzzle.
 Path to another Small Key and the Dodongo Snakes
 Paver room path to the north
16.1 Step-by-step Instructions To Get Another Small Key:
- Return to the Vire room above the entrance, and go up again.
- This time, send the paver two squares to the right and then up to create a path that ends between the two blocks that jut out. Shove the right block to the right and follow the path up.
- Unlock the block and go east until you hit a locked door. Unlock it and go through.
- Go north through the one-way door.
- Talk to the Owl Statue to learn that “To defeat the monsters who hold the key, attack them from a higher place.”
- Go north. Keep moving while you take out the Gibdos (mummies), and collect your Small Key. Go left.
- Continue past the Dodongo Snakes (don’t bother fighting them — we’ll be back shortly).
16.2 What Does The Owl Statue Say This Time?
The Owl Statue says that “To defeat the monsters who hold the key, attack them from a higher place.”
16.3 What Should I Do About The Dodongo Snakes?
Continue past the Dodongo Snakes (don’t bother fighting them — we’ll be back shortly).
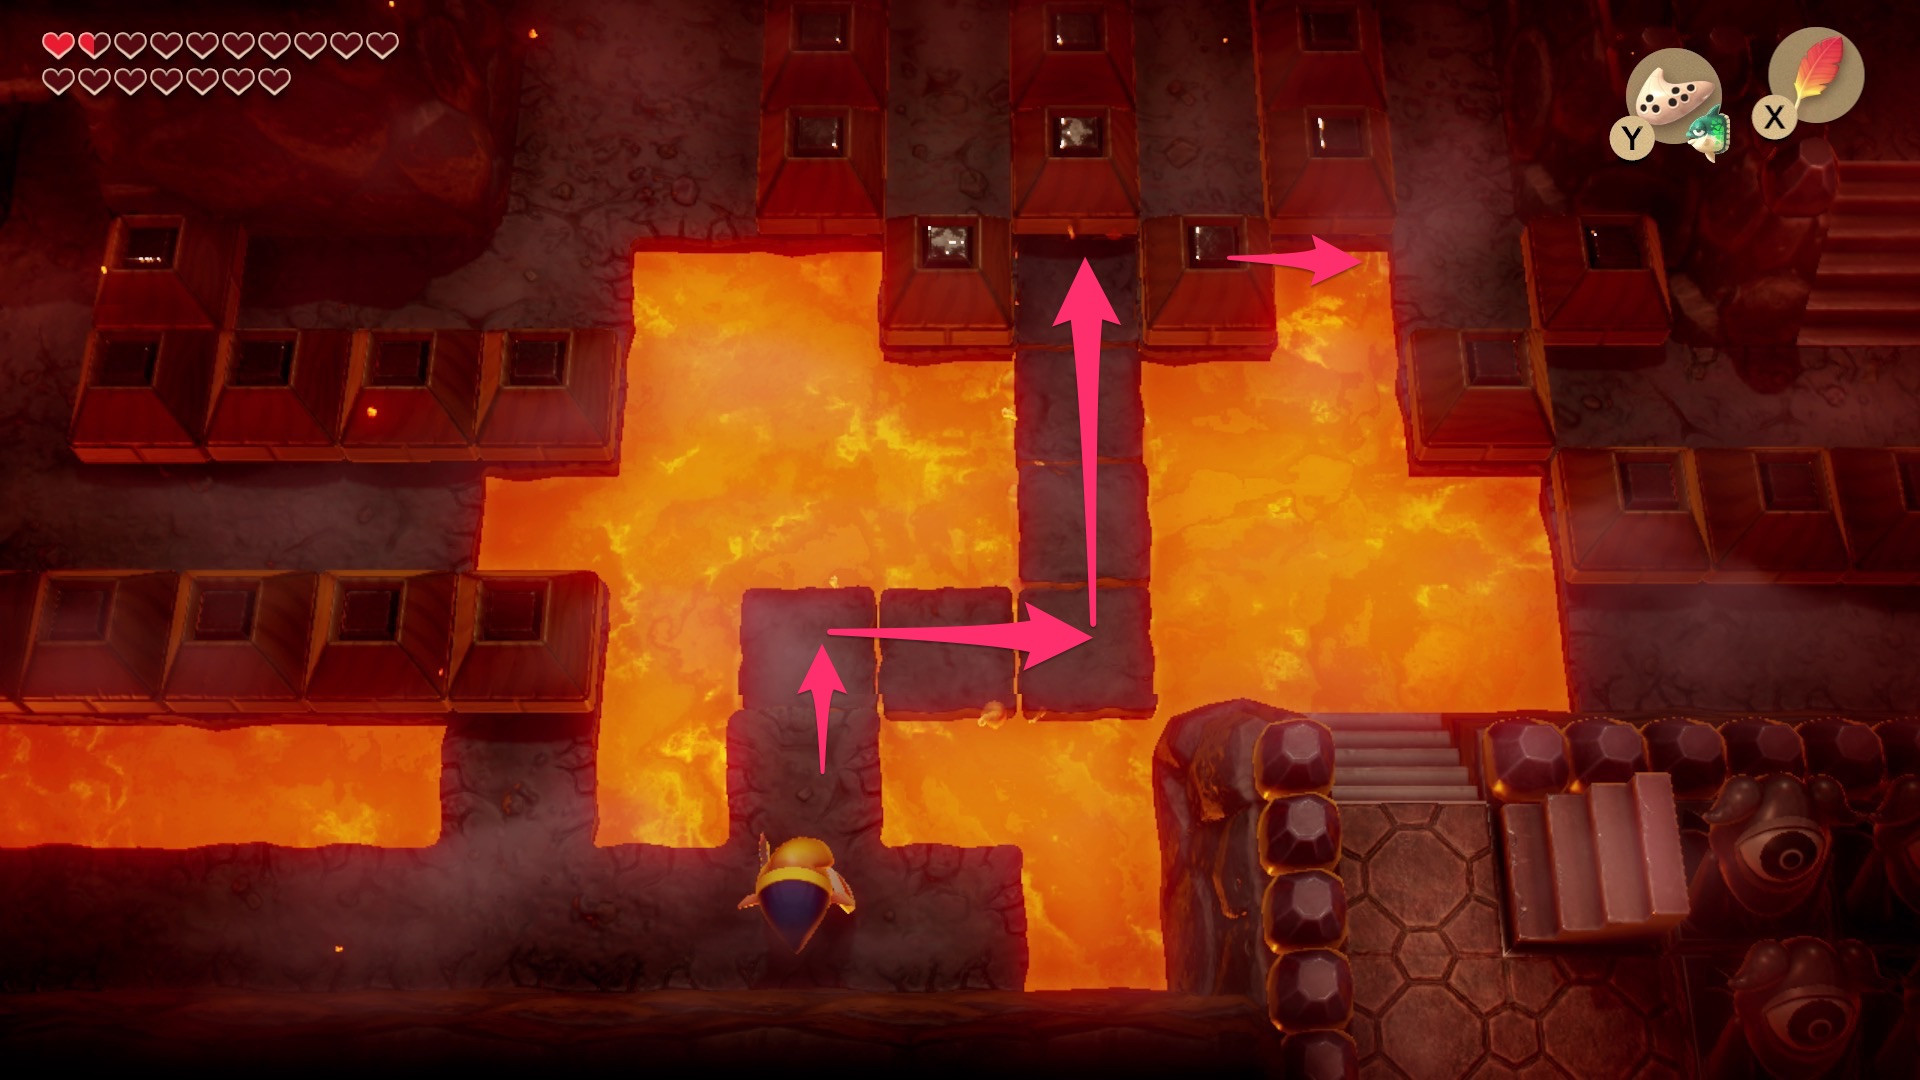
17. Where Can I Find Secret Medicine (Optional)?
Find Secret Medicine by going west from the Dodongo Snakes, jumping the lava, and climbing the stairs to the north.
 Secret Medicine location
17.1 Step-by-step Instructions To Get The Secret Medicine:
- From the Dodongo Snakes, go west, jump the lava, and climb the stairs to the north.
- Hookshot over to the chest for some Secret Medicine (if you need it). Drop off to the right to collect a bunch of items.
- Go north and through the tunnel. You’ll return to the room with the one-way door.
- Retrace your steps past the Dodongo Snakes (and skip them again).
17.2 How Do I Reach The Chest?
Hookshot over to the chest.
17.3 What Should I Do After Getting The Medicine?
Drop off to the right to collect a bunch of items.
18. How Do I Find The Eye Statue, Two Small Keys, And Stairs To The Roof?
Find the eye statue, two Small Keys, and stairs to the roof by going west from the Dodongo Snakes and shooting the eye statue with your bow.
 Path to the eye statue and the roof stairs
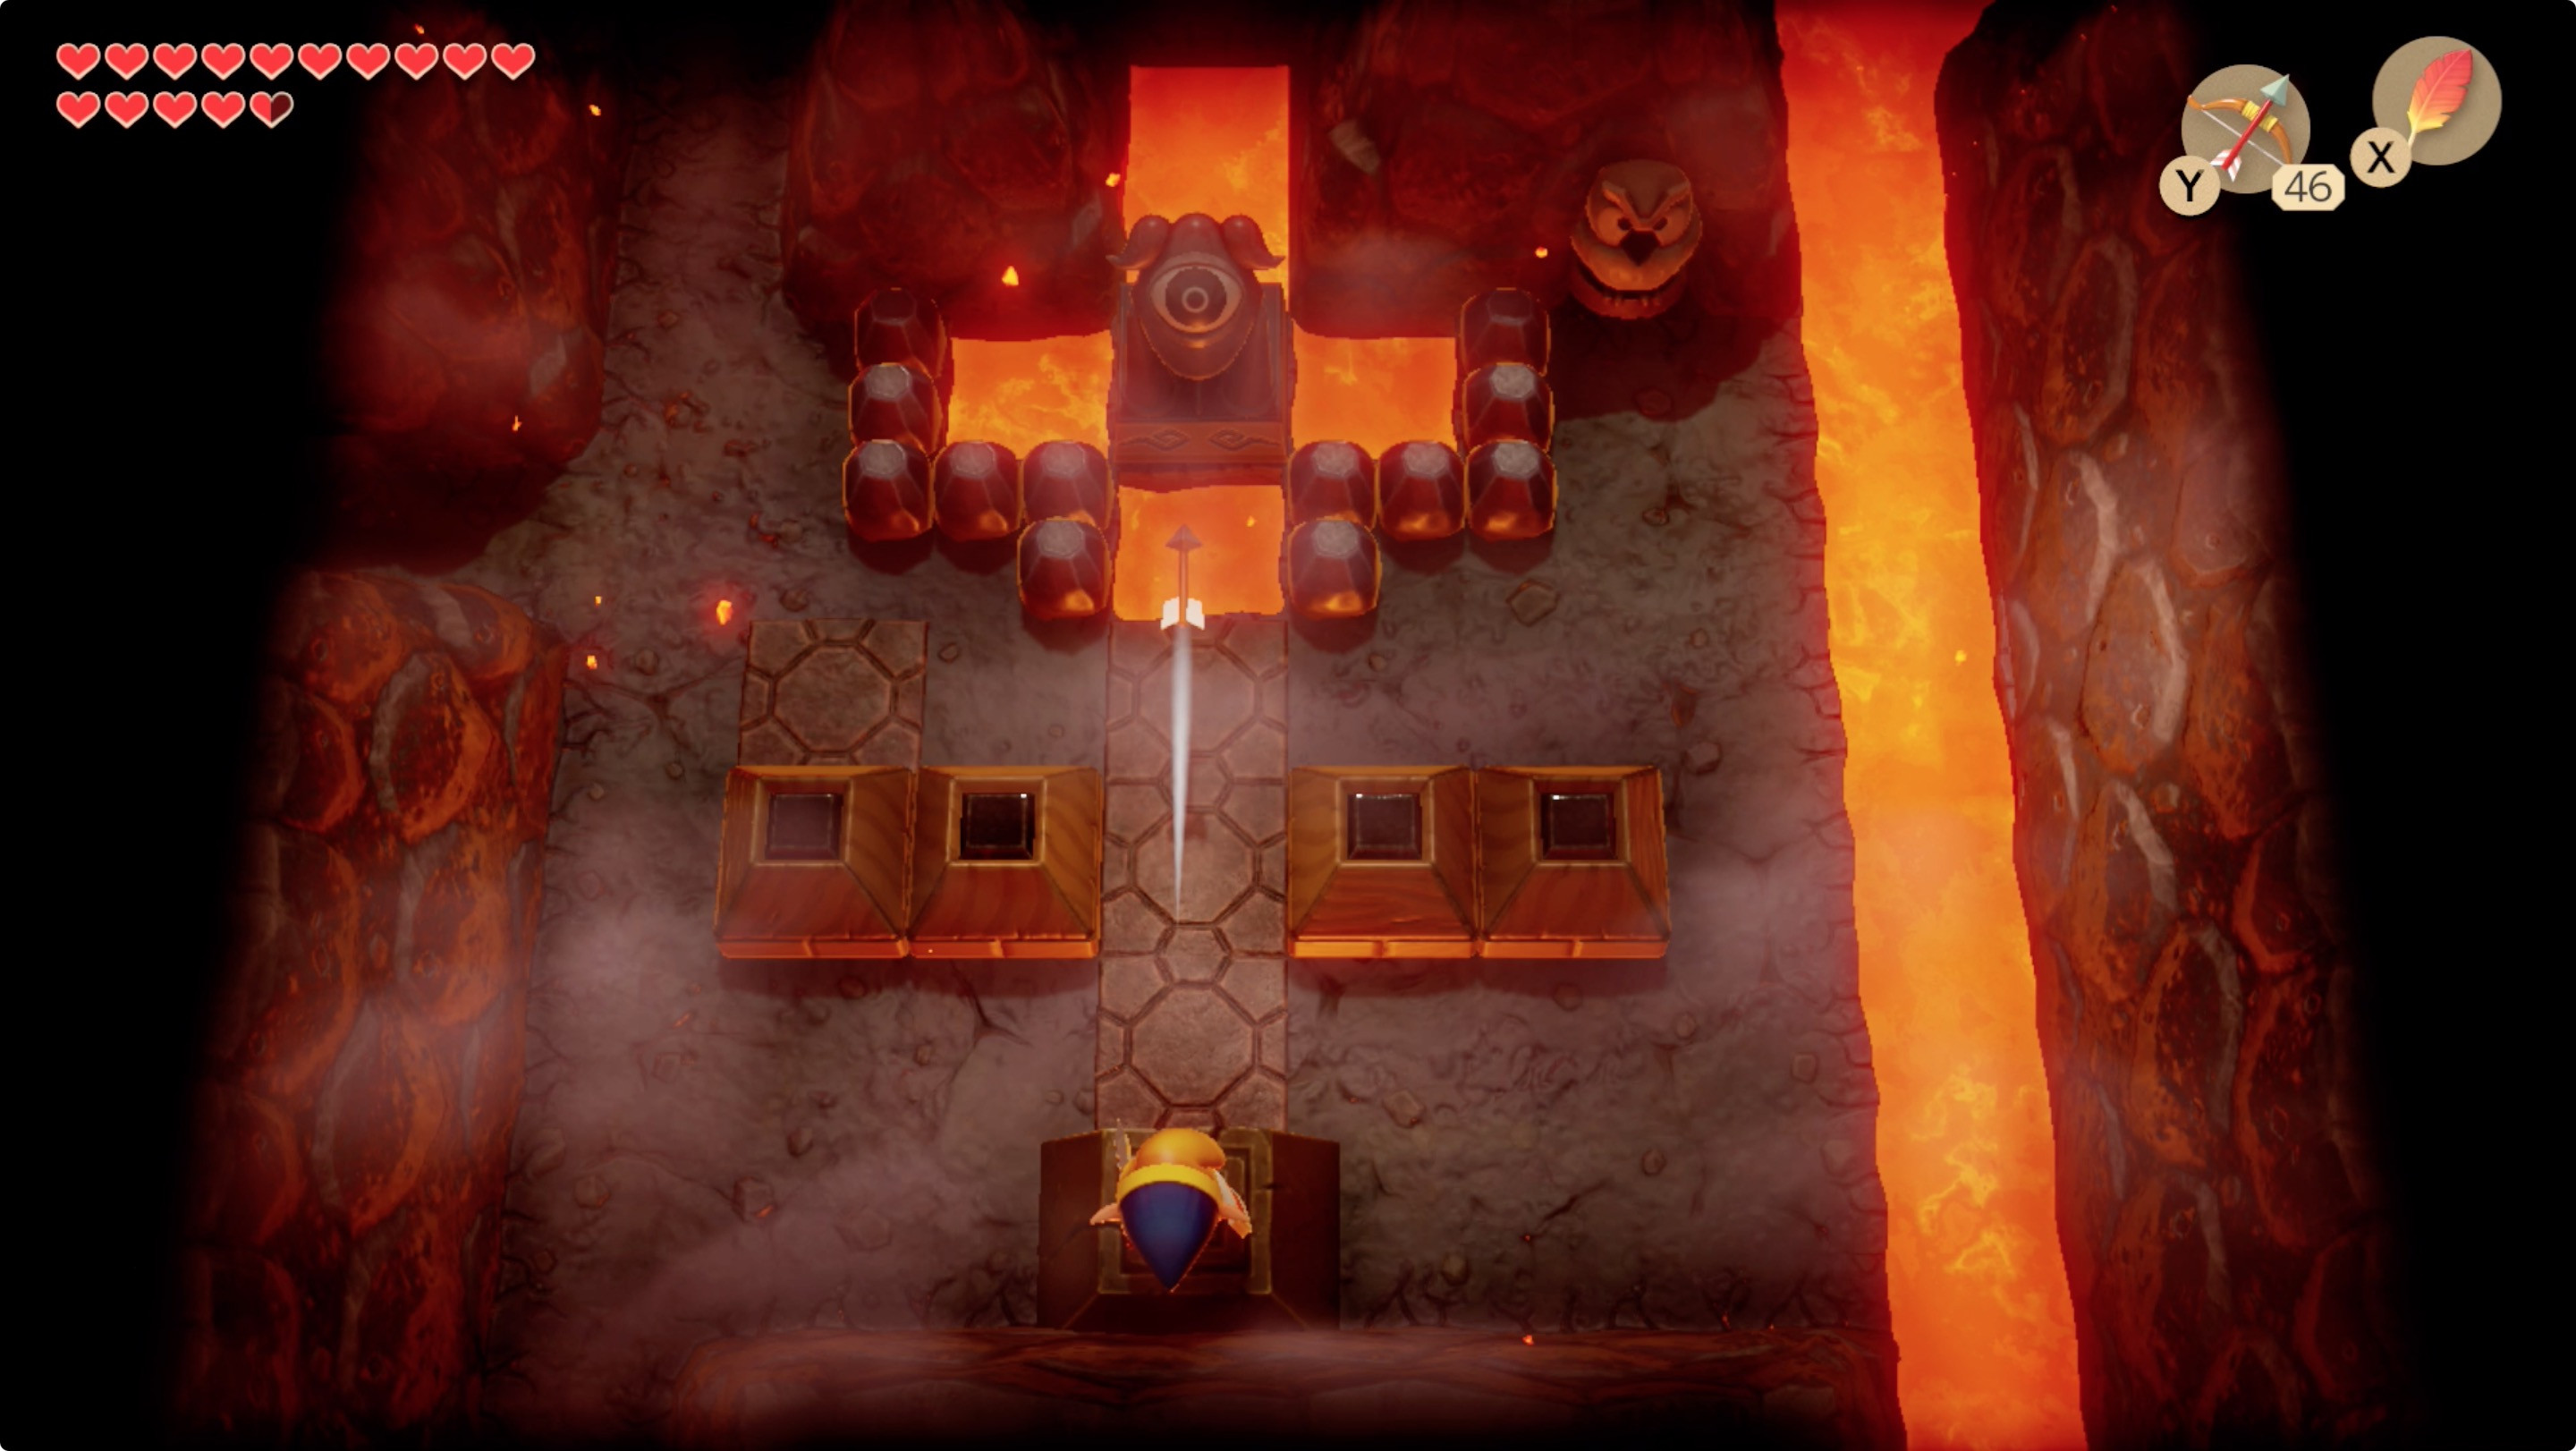 Stand on the platform and shoot the eye statue with your bow
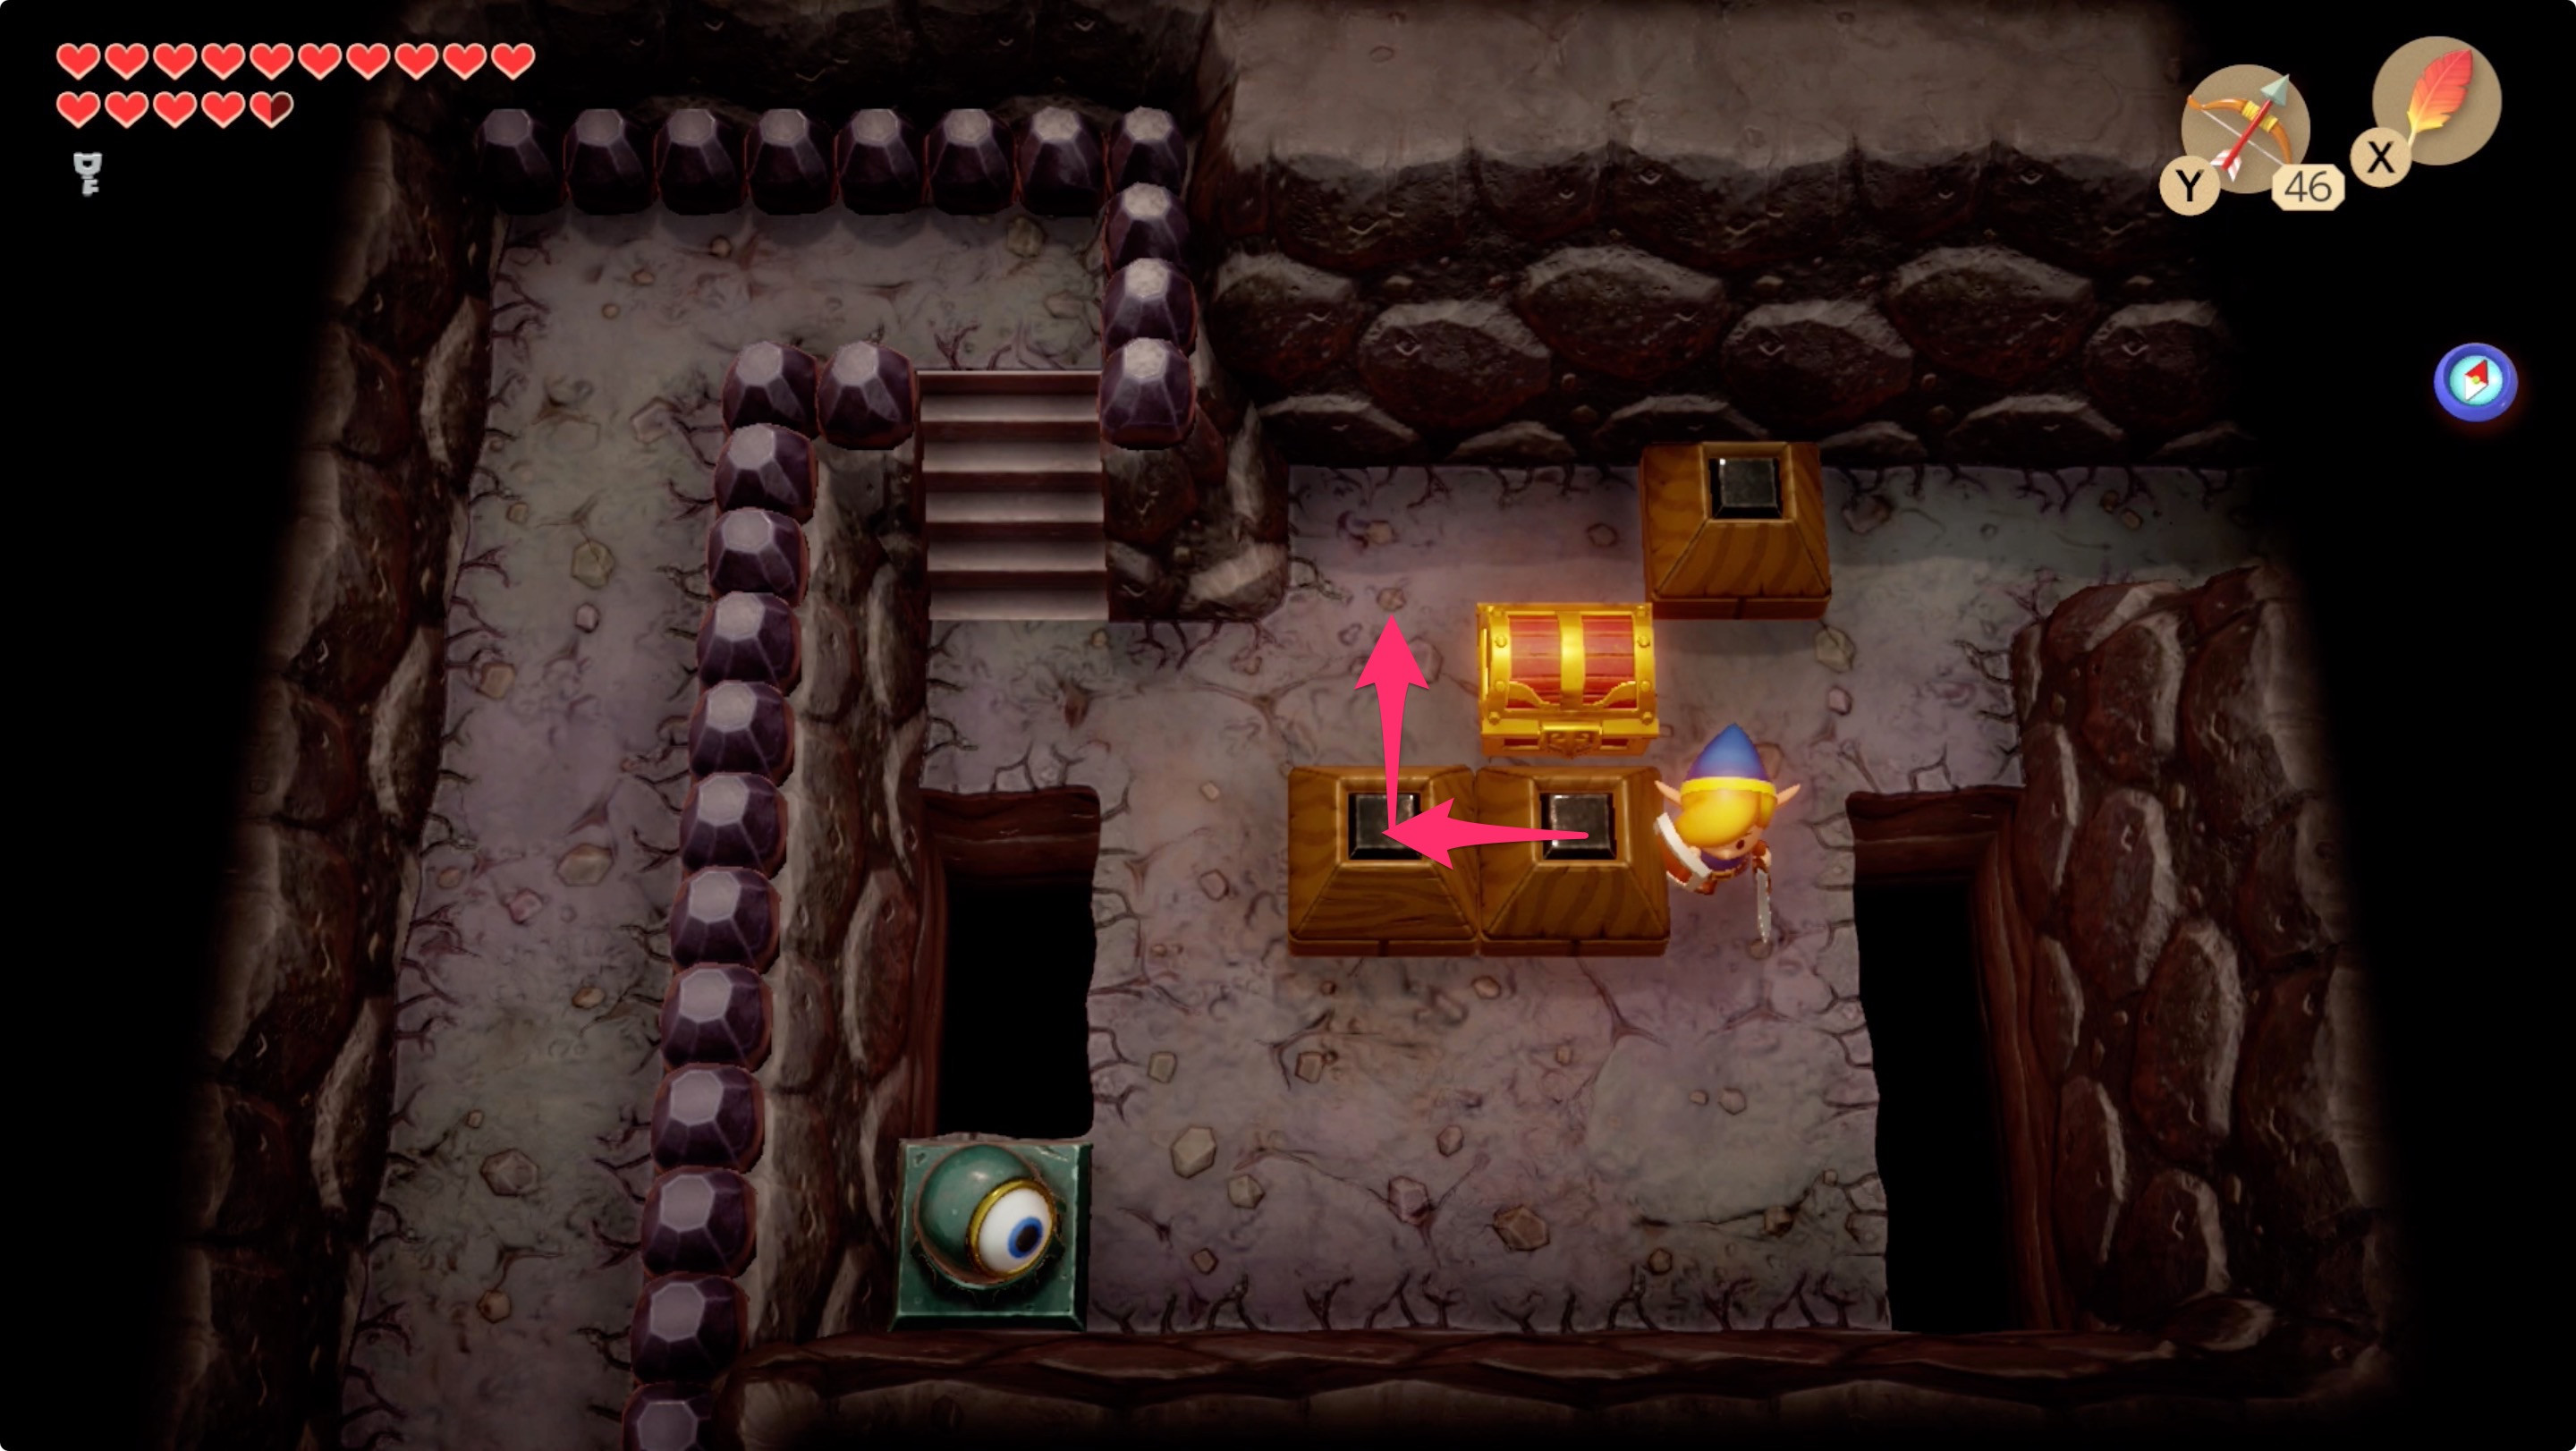 Shove the blocks to open the chest
18.1 Step-by-step Instructions To Reach The Roof Stairs:
-
From the Dodongo Snakes, go west and unlock the door on the left.
-
Go left west, and defeat the Vire.
-
Go south through the door in the bottom left corner of the Vire room.
- Talk to the Owl Statue to hear “If the statue looks strange, shoot it with the bow.”
- Stand on the platform in the center of the south wall of the room, and shoot your bow north.
- Pick up the Small Key.
-
Go down again for more items.
-
Go back up, and then left. Shove the two blocks — the left one up, and the right one right — to open the chest for a Small Key.
-
Back to the right, go up, and through the door on the left. Go up the stairs and Hookshot across to the chest for 50 rupees.
18.2 What Does The Owl Statue Say?
The Owl Statue says “If the statue looks strange, shoot it with the bow.”
18.3 How Do I Solve The Block Puzzle?
Shove the two blocks — the left one up, and the right one right — to open the chest for a Small Key.
19. How Do I Cross The Roof And Activate The Warp Pad?
Cross the roof and activate the warp pad by going up the stairs near the rupee chest and activating the warp pad on your way past.
 Path across the roof
19.1 Step-by-step Instructions To Cross The Roof:
- Go up the stairs right next to the rupee chest (at the end of the section above). Pick up the Heart Piece on the platform above you.
- Activate the Turtle Rock warp pad on your way past.
- Go back inside on the right.
19.2 Where Is The Heart Piece?
Pick up the Heart Piece on the platform above you.
19.3 Why Activate The Warp Pad?
Activate the Turtle Rock warp pad on your way past.
20. How Do I Defeat The Dodongo Snakes Mini-Boss?
Defeat the Dodongo Snakes by tossing bombs down in front of them so that they swallow them. You have to feed each of them three bombs.
 Dodongo Snakes mini-boss fight
20.1 What Is The Strategy For This Fight?
Toss bombs down in front of the Dodongo Snakes so that they swallow them.
20.2 How Many Bombs Do They Need?
You have to feed each of them three bombs.
21. How Do I Get To The Blaino Mini-Boss Fight?
Get to the Blaino mini-boss fight by returning to the Owl Statue that gave you a clue about the Dodongo Snakes and bombing the cracked wall.
 Path to Blaino
21.1 Step-by-step Instructions To Reach Blaino:
- From the Dodongo Snakes, return to the Owl Statue that gave you a clue about them.
- Bomb all the blocks to discover an arrow on the floor (or just look for the cracked wall on the left). Bomb the wall at the point of the arrow.
- Go west, unlock the block in the southwest corner, and keep going west for two more rooms.
- Climb the stairs, and unlock the block.
- Go east, and Hookshot down to the platform along the south wall. Unlock the block and go into the tunnel.
- At the other end of the tunnel, drop off the ledge to the south.
21.2 Where Do I Bomb The Wall?
Bomb the wall at the point of the arrow.
21.3 How Do I Get Across The Gap?
Hookshot down to the platform along the south wall.
22. How Do I Defeat The Blaino Mini-Boss?
Defeat Blaino by watching for him to wind up and charge at you, then getting out of the way and attacking him from behind.
 Blaino mini-boss fight
22.1 What Is The Strategy For This Fight?
Watch for him to wind up and charge at you, and then get out of the way. Let him get just past you, and then turn and attack him.
22.2 How Do I Block His Attacks?
Keep your shield up to block his jabs.
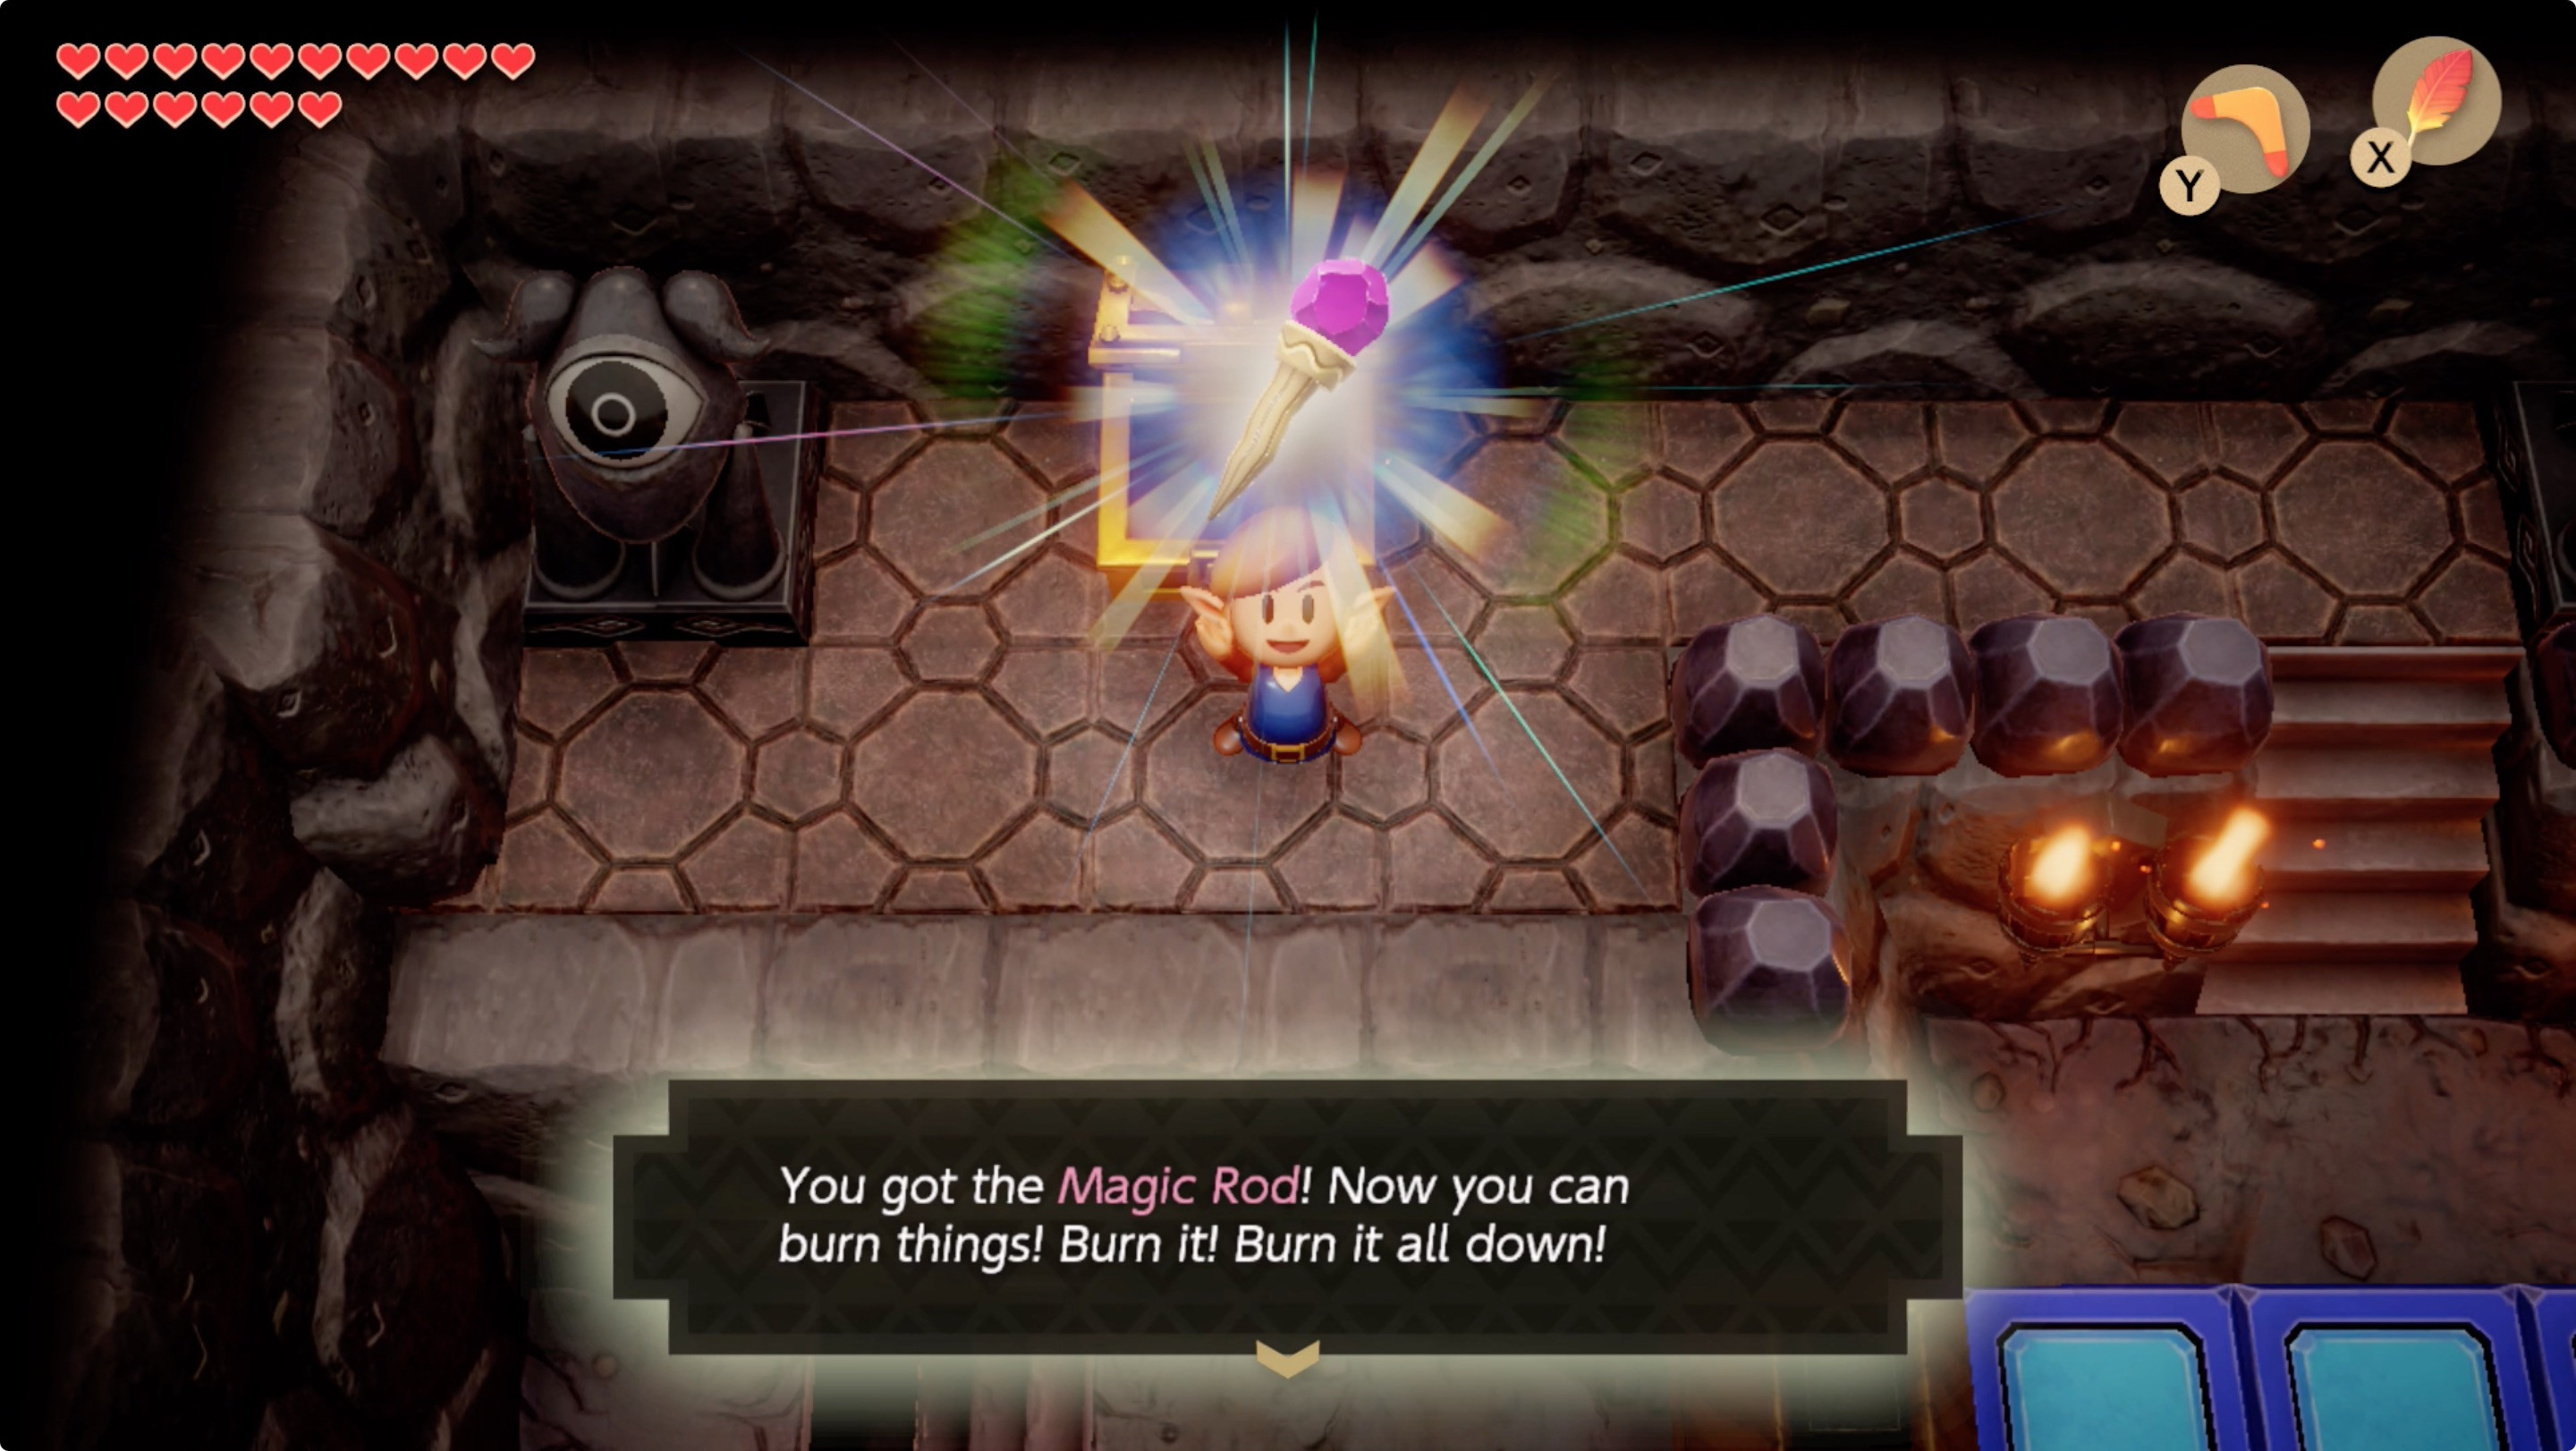
23. How Do I Get The Magic Rod?
Get the Magic Rod by going north from the Blaino mini-boss fight and opening the chest.
 Collect the Magic Rod
23.1 Where Is The Magic Rod?
Open the chest to collect the Magic Rod.
23.2 Why Did I Turn The Crystal Orange Earlier?
This is why we turned that crystal orange all the way back near the beginning.
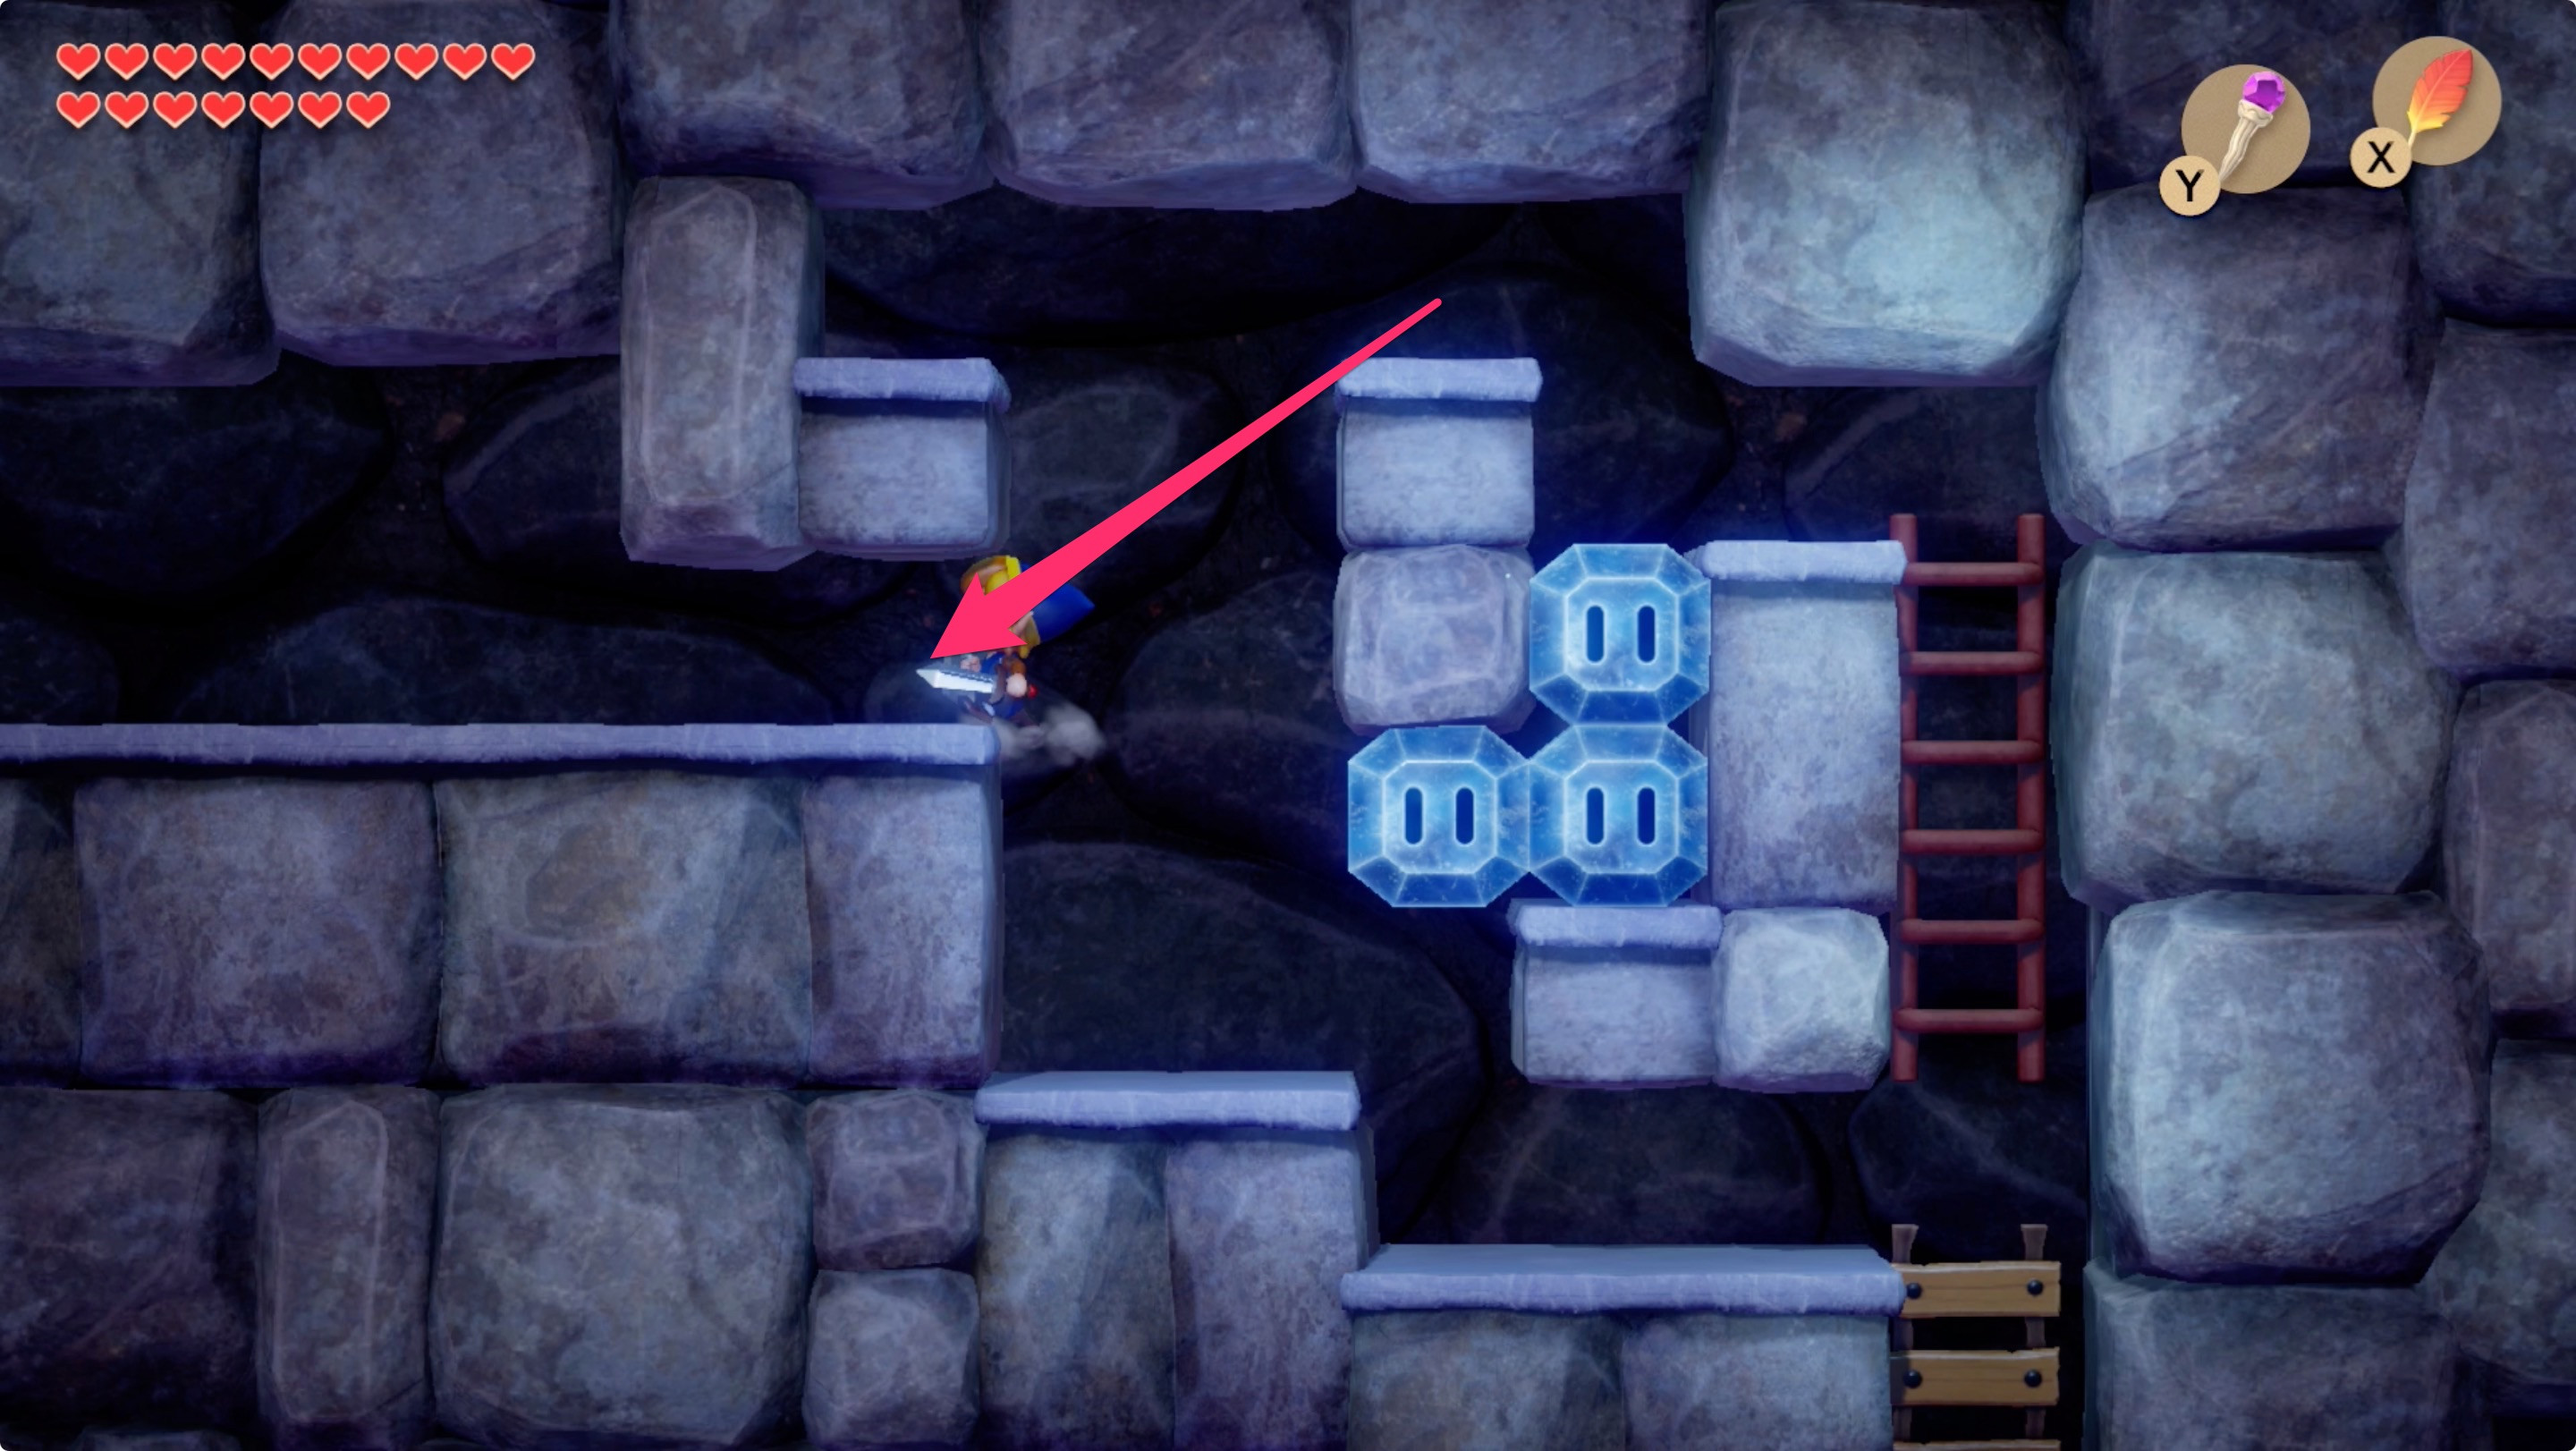
24. How Do I Navigate The Ice Tunnel And Find A Small Key?
Navigate the ice tunnel and find a Small Key by returning to the puzzle room near the entrance, lighting the braziers with the Magic Rod, and melting the ice blocks in the side-scrolling tunnel.
 Path to Cue Ball mini-boss fight
 Send the paver right to reach the stairs
 Ice tunnel 1
 Ice tunnel 2
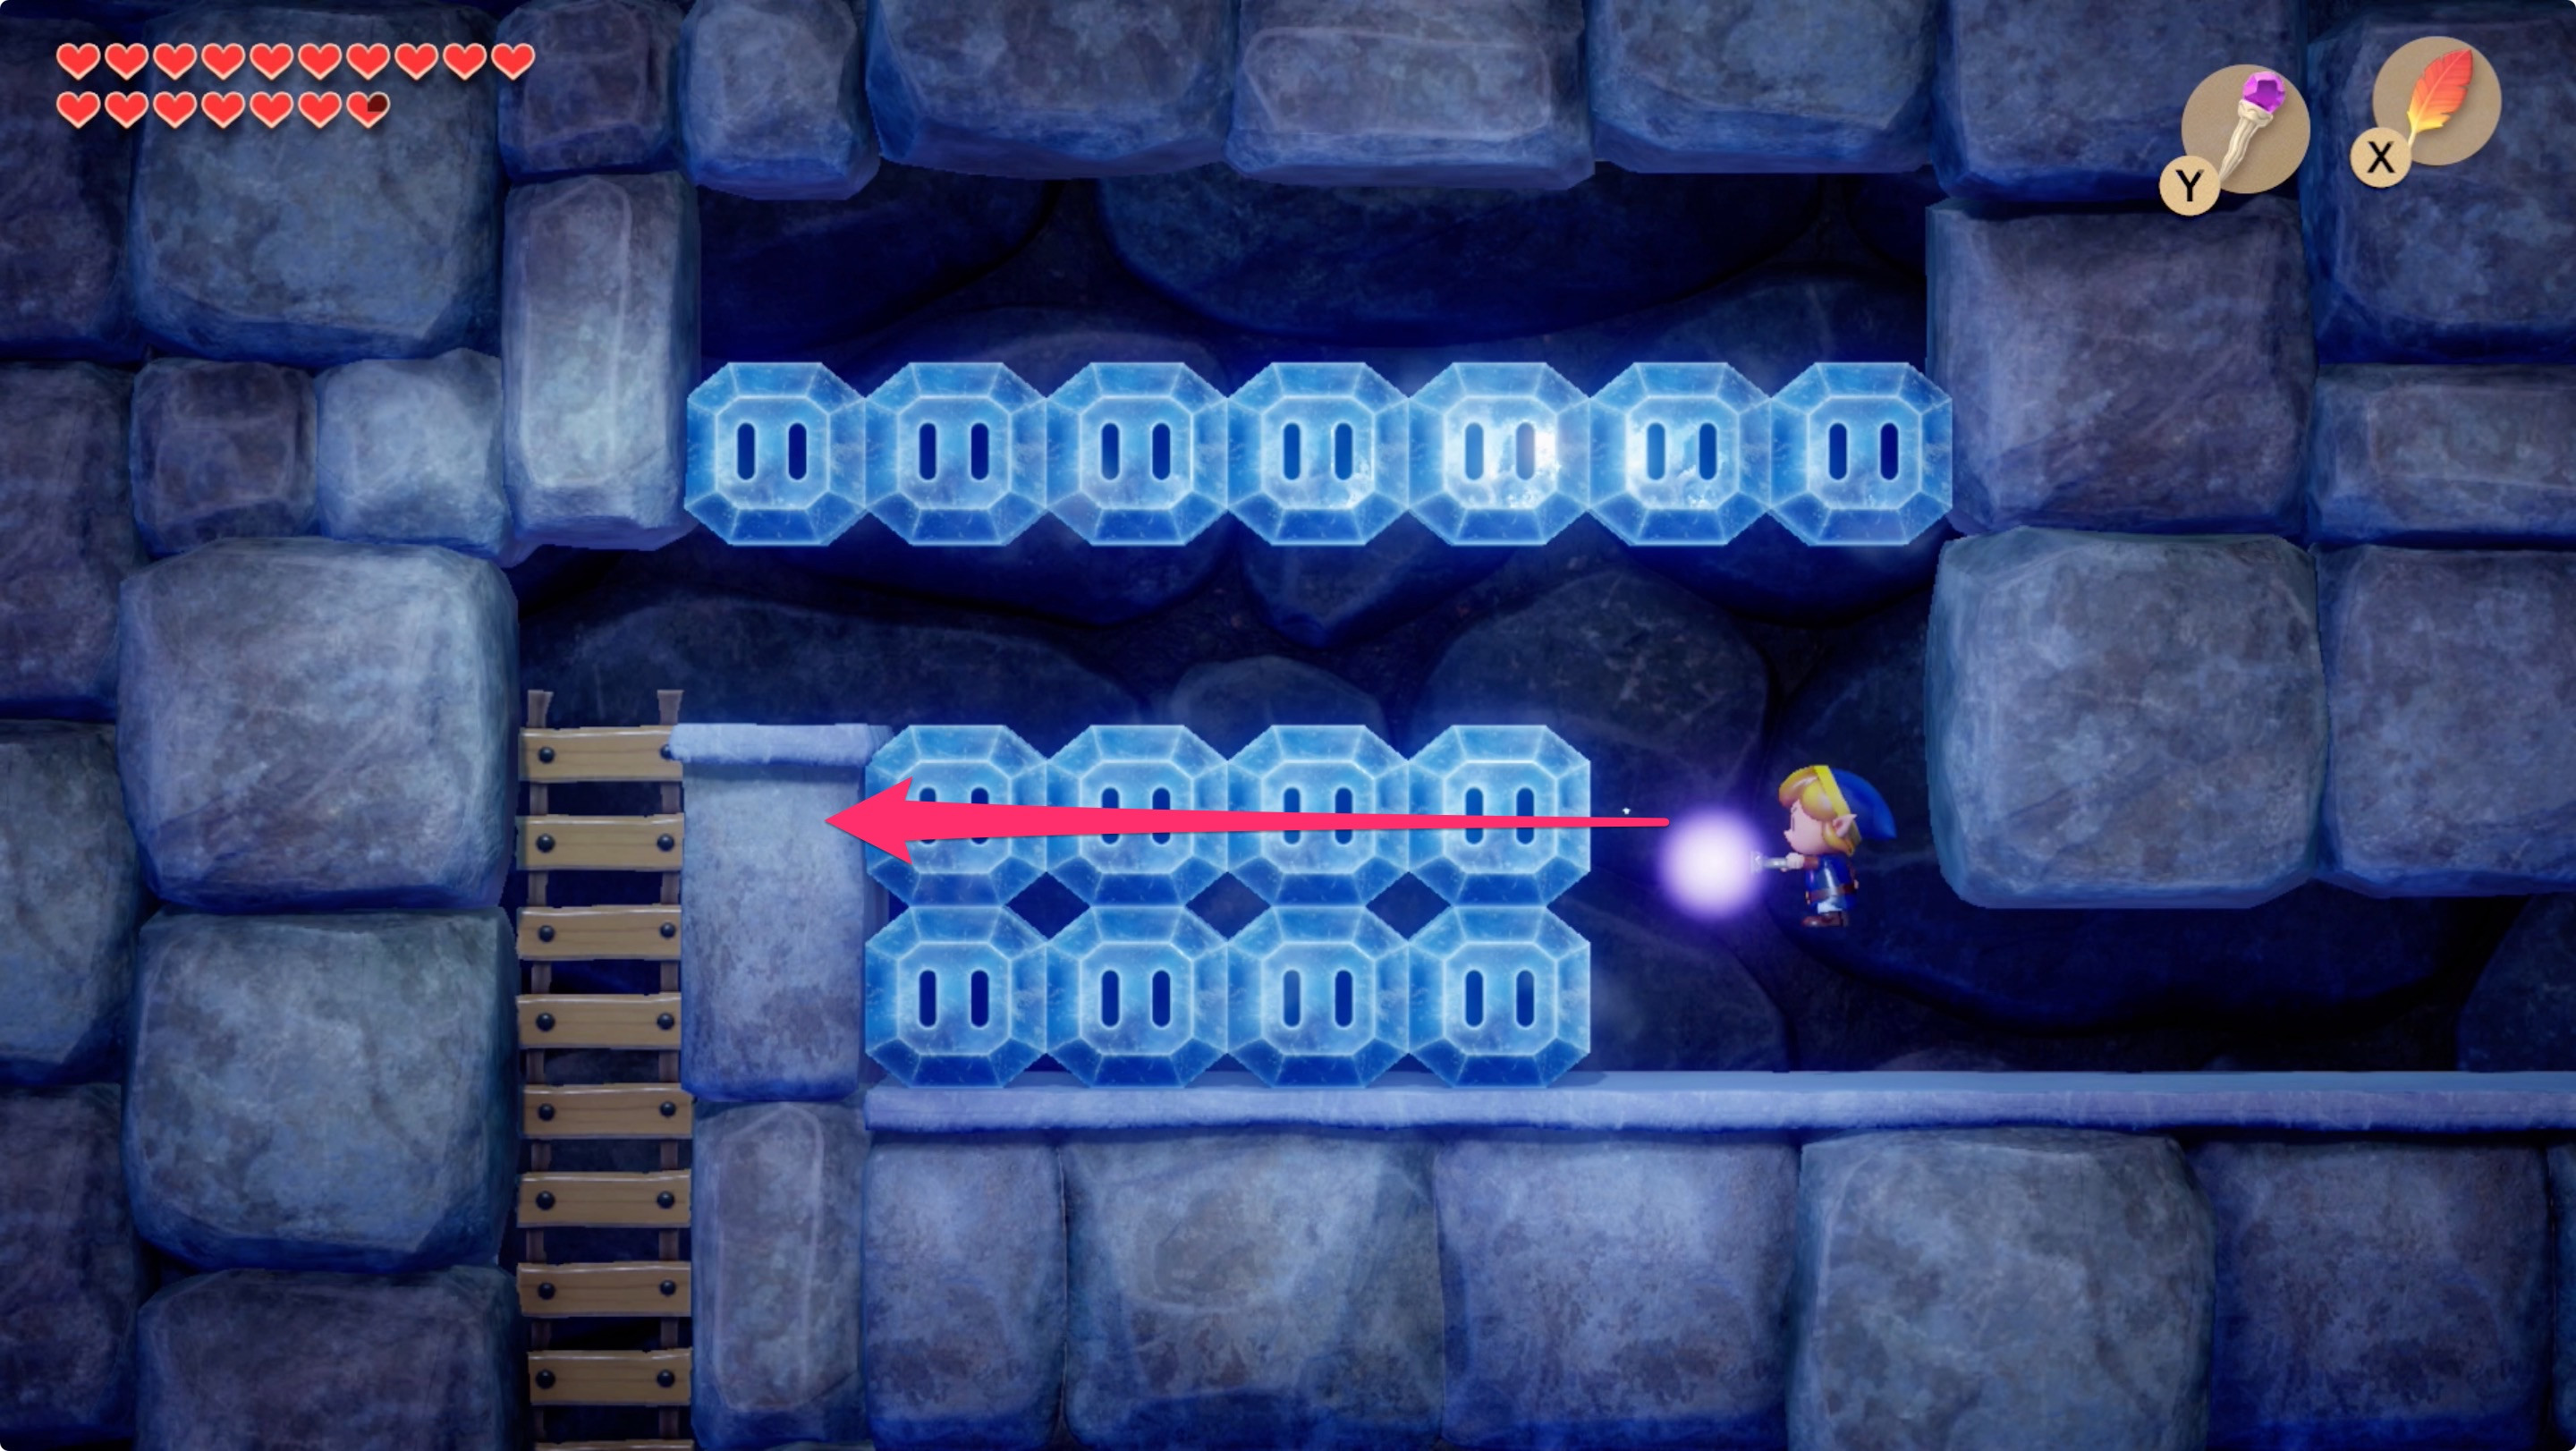
24.1 Step-by-step Instructions To Navigate The Ice Tunnel:
- From the entrance, go north and west to the last puzzle room you haven’t been able to solve yet. Use your Magic Rod to light the braziers and pick up your Small Key.
- Go back to the first paver planchette and send it directly to the right.
- Go up the stairs, and up the stairs again to enter a side-scroller tunnel. Use your Magic Rod to melt the ice blocks and go left through the tunnel.
- Unlock the door in the southwest to find Cue Ball.
24.2 How Do I Get The Small Key?
Use your Magic Rod to light the braziers and pick up your Small Key.
24.3 What Do I Do In The Side-Scrolling Tunnel?
Use your Magic Rod to melt the ice blocks and go left through the tunnel.
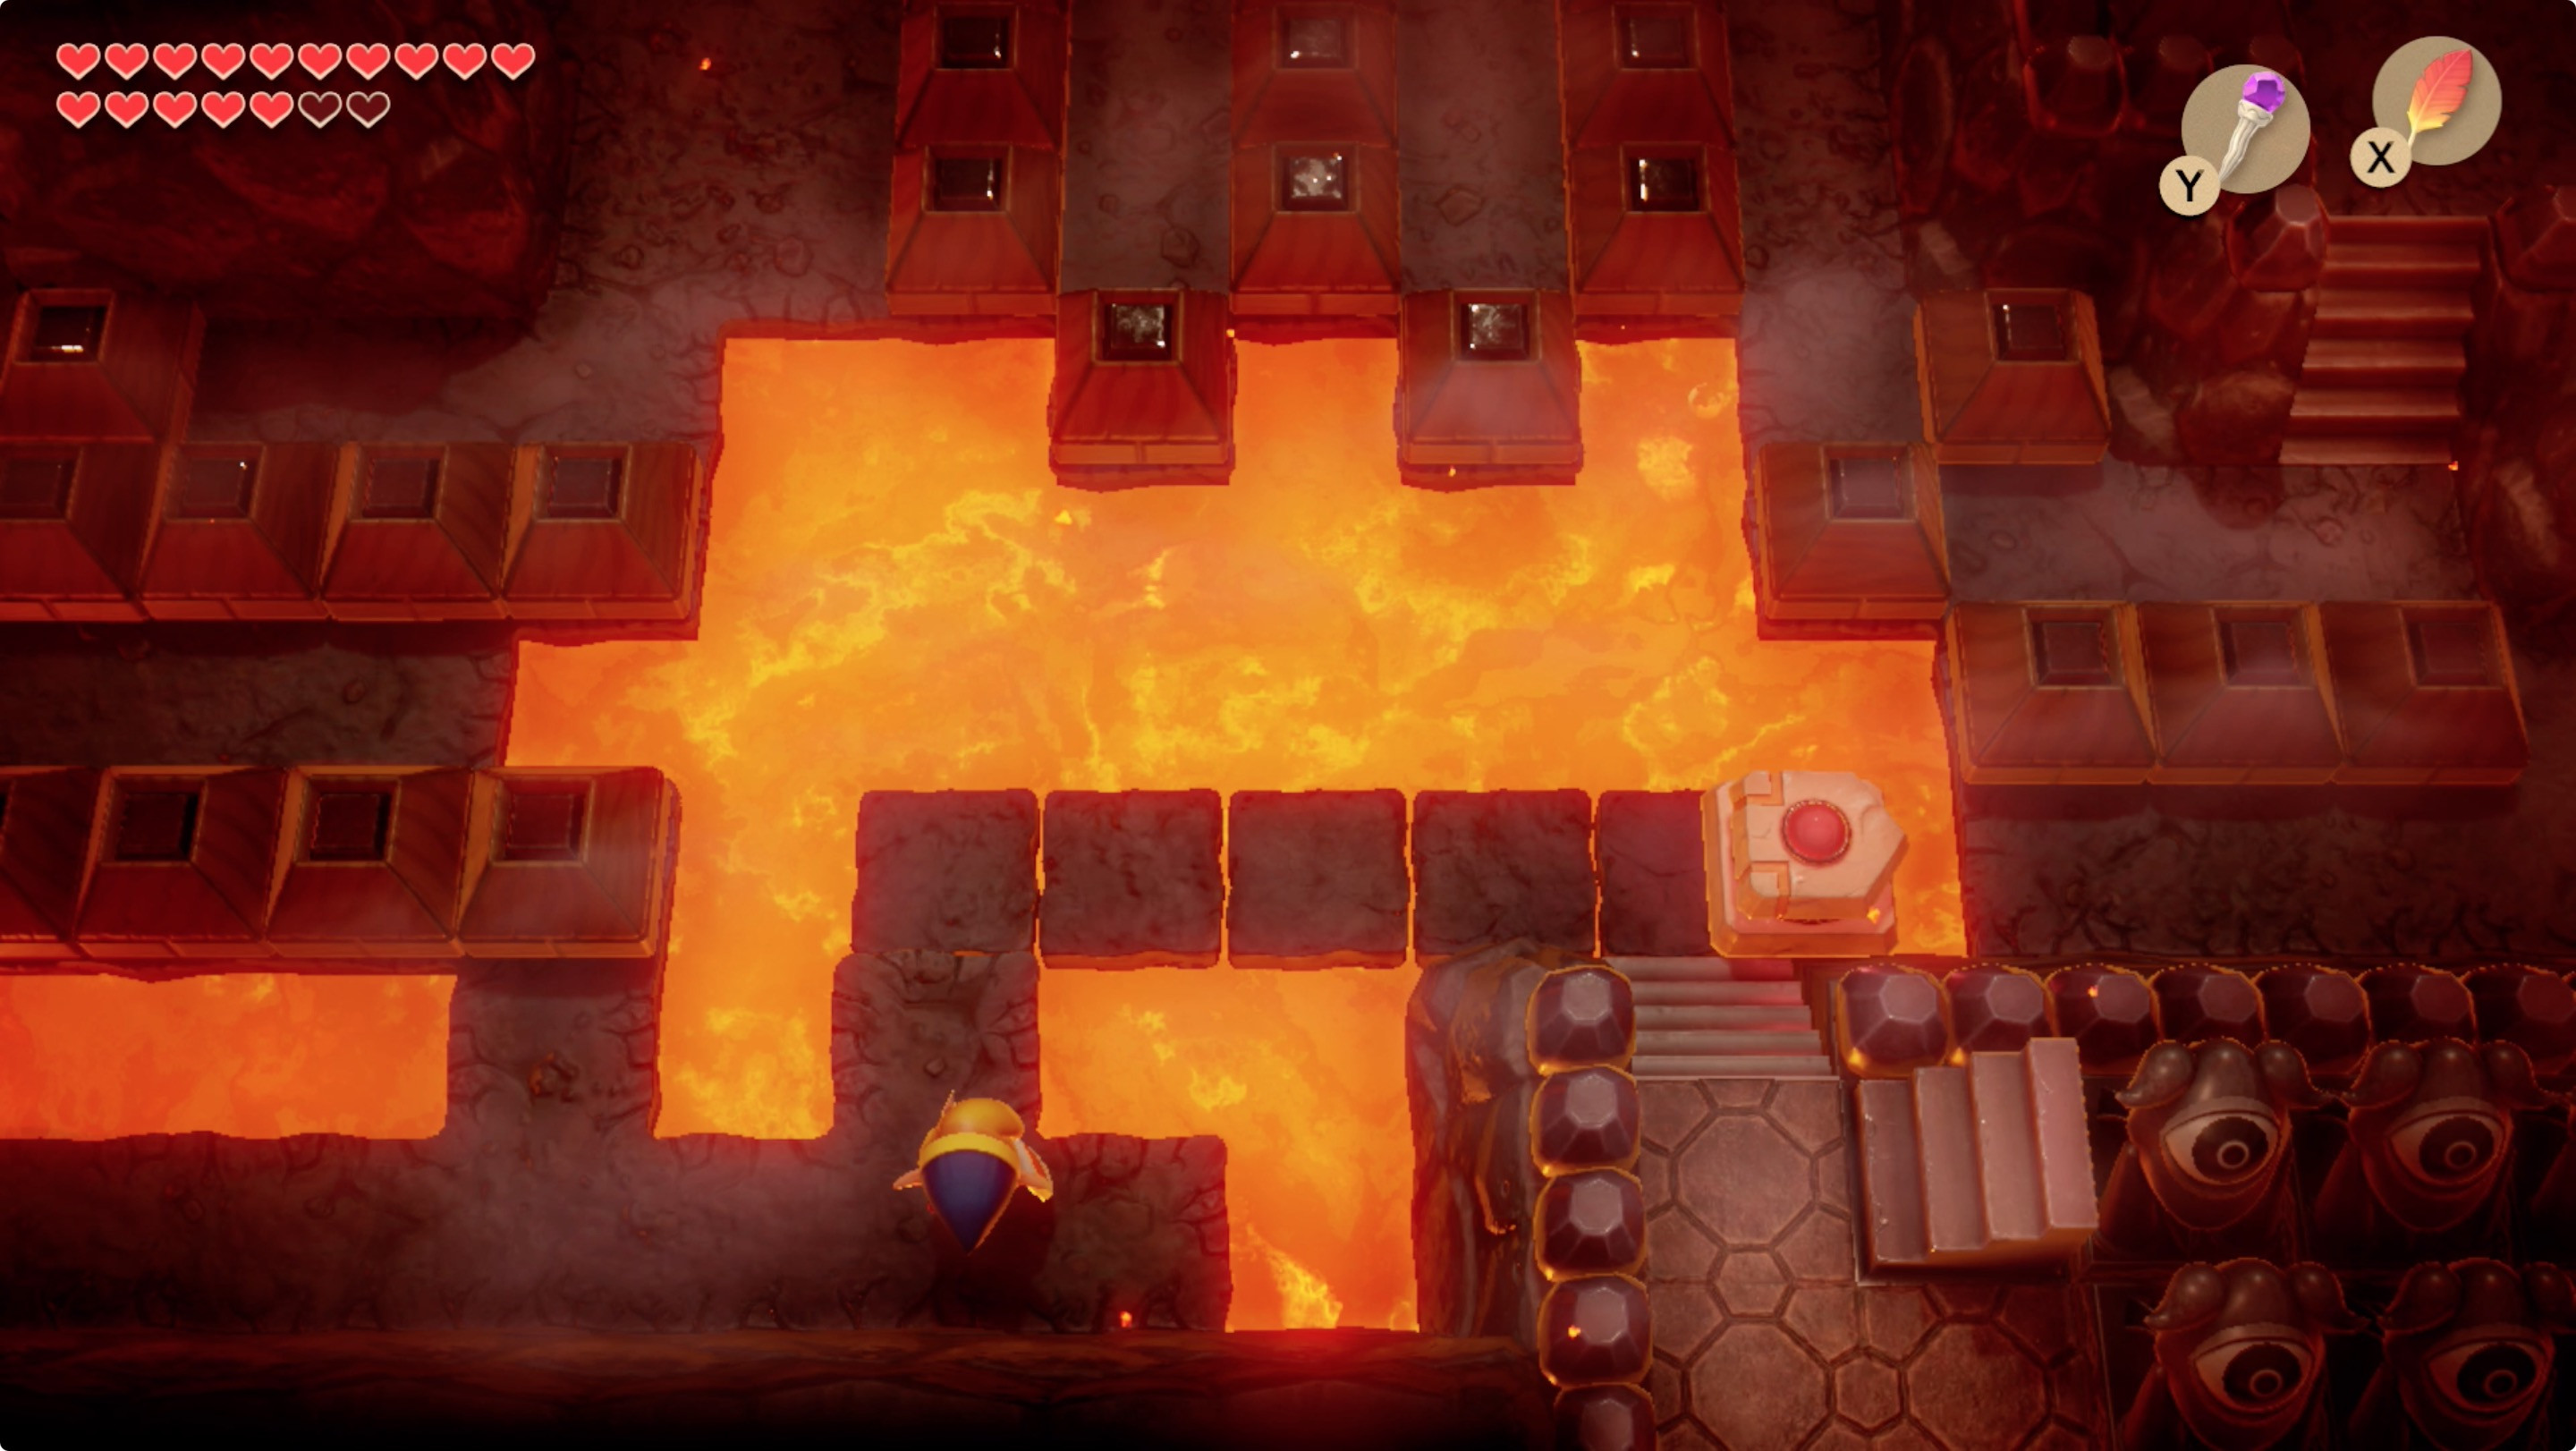
25. How Do I Defeat The Cue Ball Mini-Boss?
Defeat Cue Ball by jumping over it when it charges, then spinning around and throwing your Boomerang.
 Cue Ball mini-boss fight location
25.1 What Is The Strategy For This Fight?
When Cue Ball charges at you, jump over it, and spin around as soon as you land to throw your Boomerang.
25.2 What Makes This Fight Complicated?
This fight with Cue Ball is complicated by the lava on the floor, but you’ve got a Boomerang now.
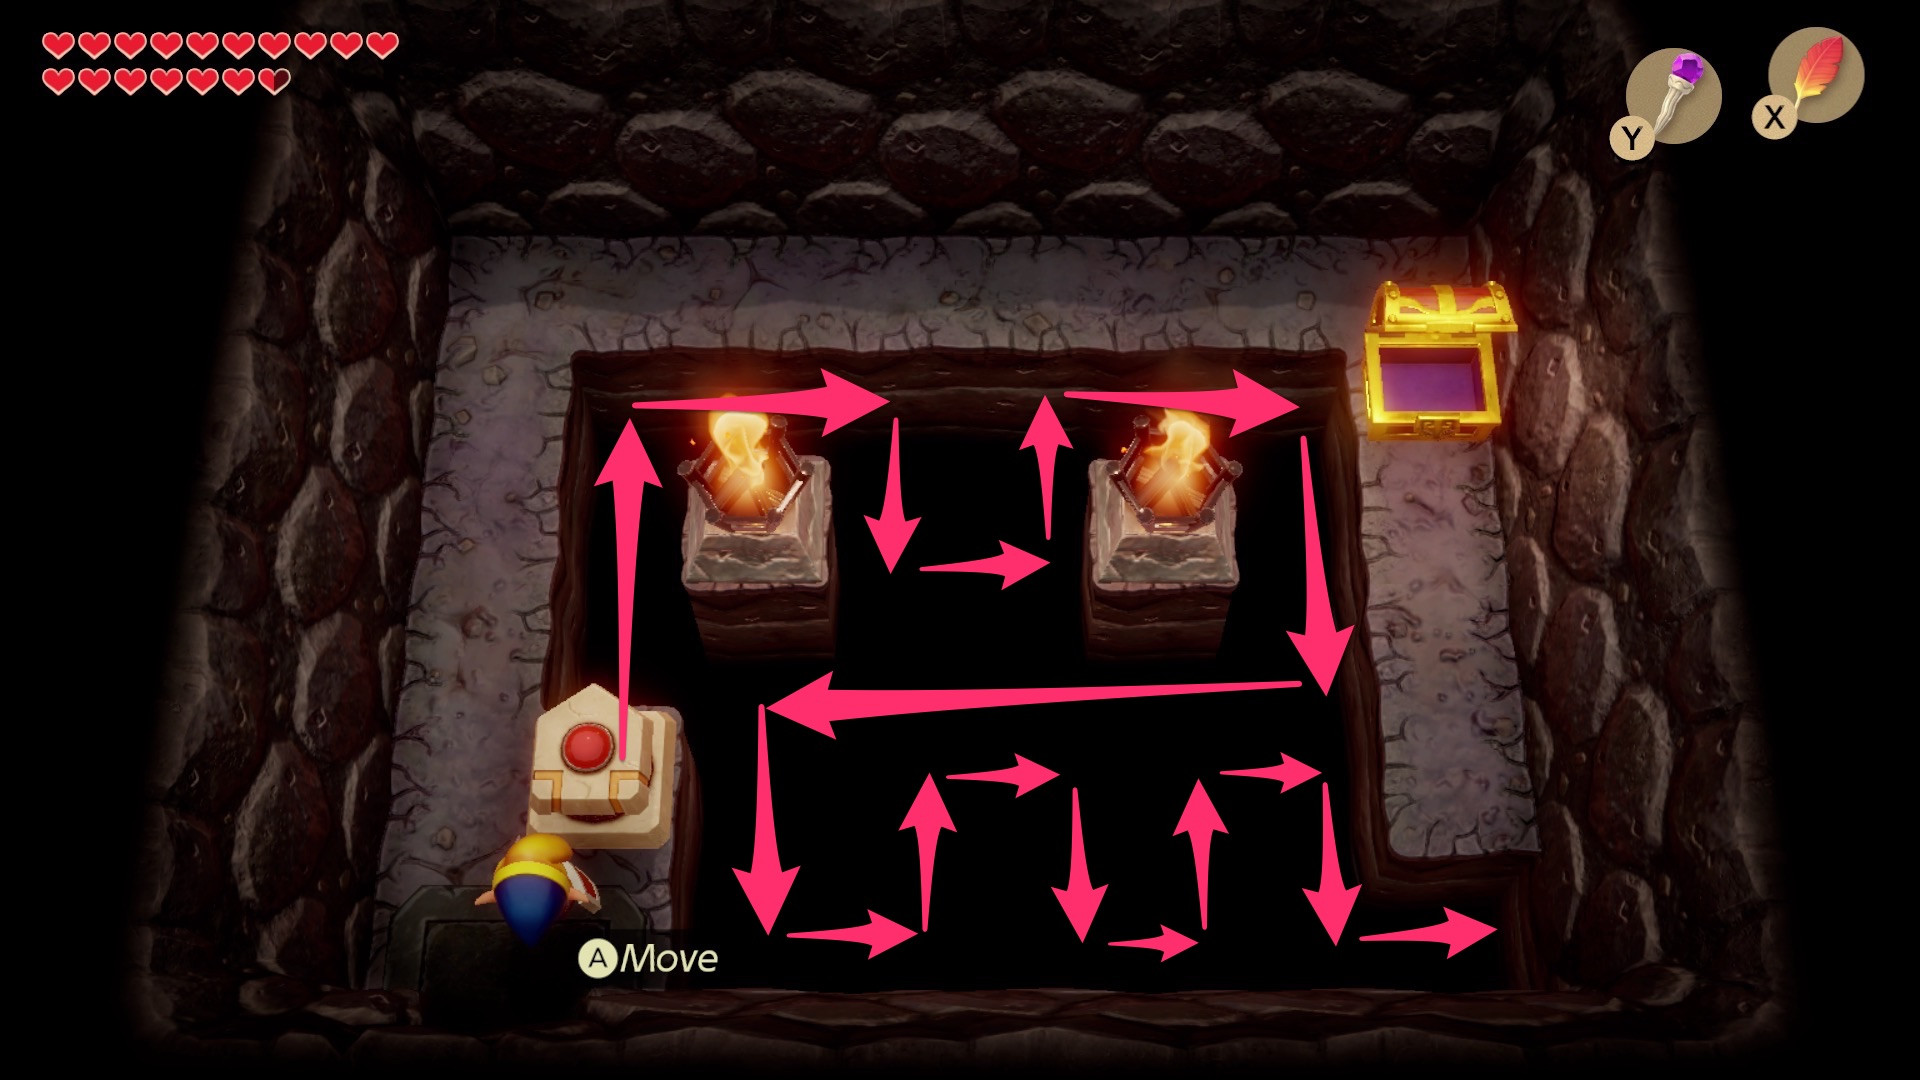
26. How Do I Get The Nightmare Key?
Get the Nightmare Key by paving over the entire floor in the room north of the Cue Ball fight.
 Nightmare Key paver puzzle
26.1 How Do I Solve The Paver Puzzle?
Pave over the entire floor — use the image above to help you.
27. How Do I Get To The Nightmare Door?
Get to the Nightmare Door by navigating through the narrow paths, shoving blocks into the lava, and melting ice blocks with the Magic Rod.
 Path to the Nightmare door
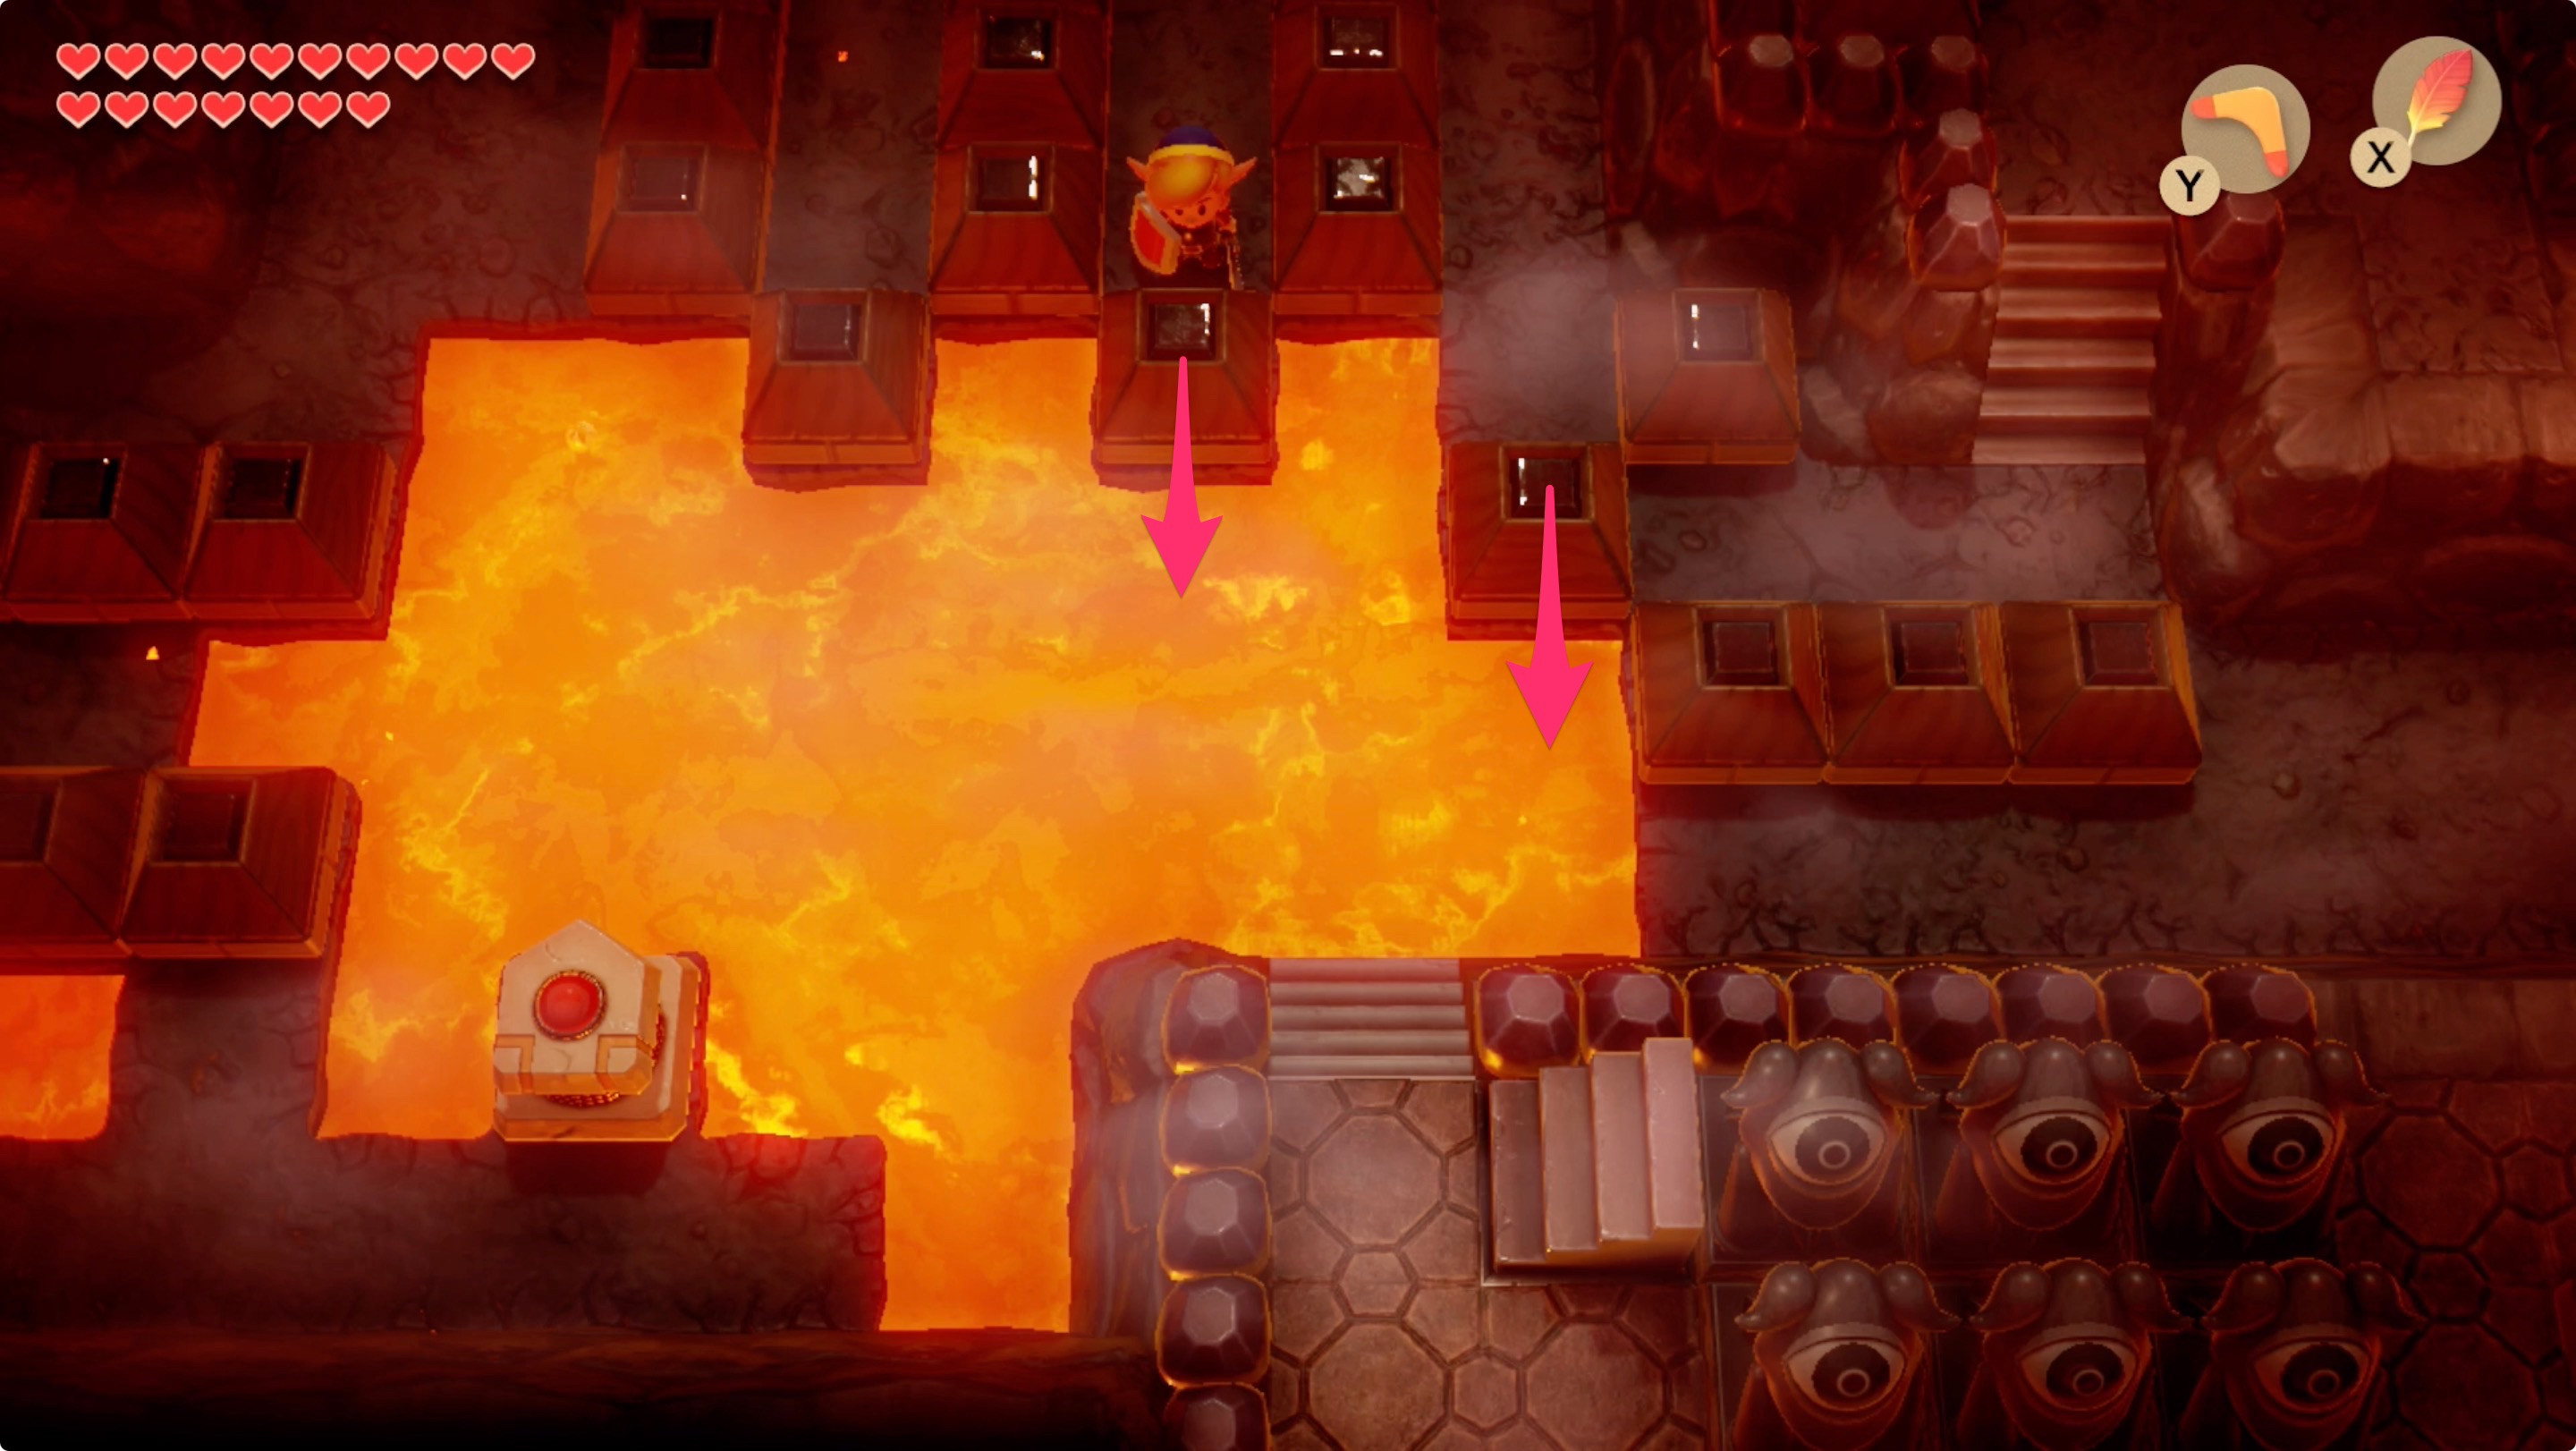 Path to the Nightmare door shove blocks in the paver room
 Nightmare door ice tunnel 1
27.1 Step-by-step Instructions To Reach The Nightmare Door:
-
From the Cue Ball boss fight room, go east twice, and then take the narrow path south twice.
-
Pick up the items, and shove a block into the lava. Jump the gap and go east.
-
In the middle of the room, take the narrow path south to return to the first paver room.
- Shove the blocks into the lava to open a path to the stairs in the northeast corner.
-
Go up the stairs and drop off the platform to the right, and then go up the stairs in the corner.
-
Take out the ice blocks with your Magic Rod and exit the tunnel.
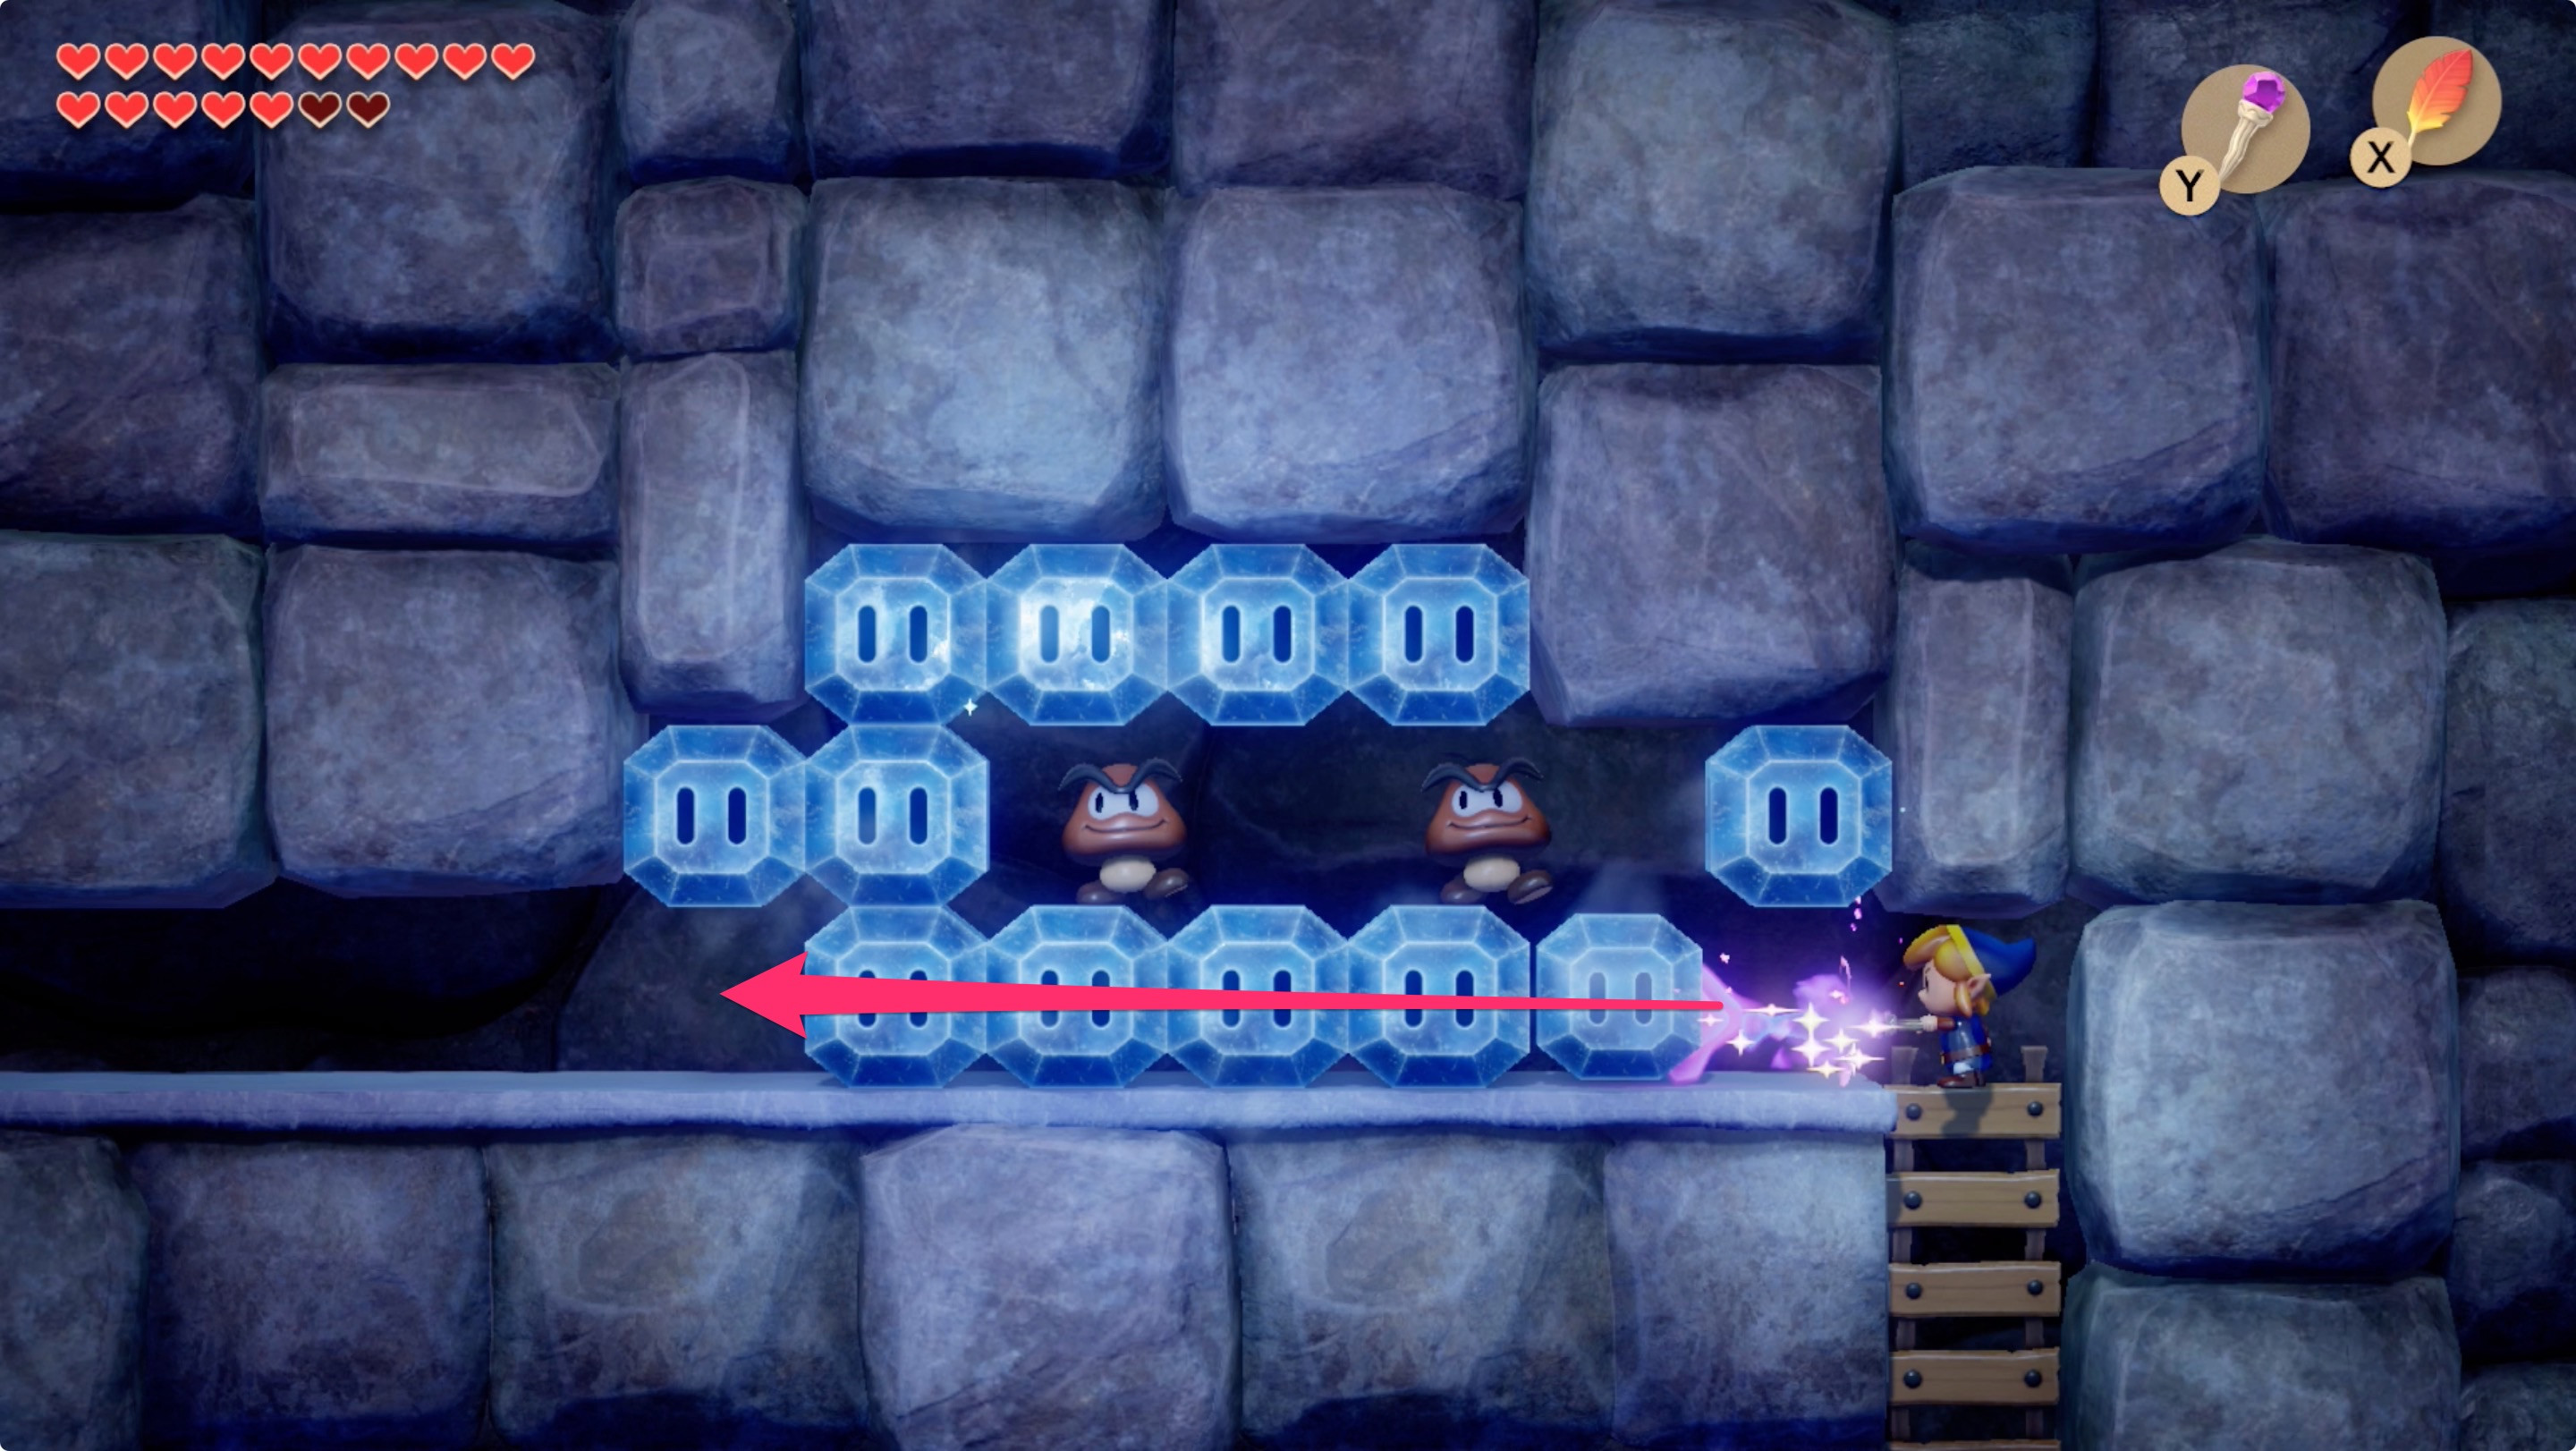
- On the right side, destroy most of the blocks, and jump to the ledge.
- On the left side, climb down the ladder, and destroy the bottom row of ice.
- Walk in two blocks and destroy the vertical row.
- Climb the ladder, and jump the gaps to the ladder out.
27.2 What Do I Do In The First Paver Room?
Shove the blocks into the lava to open a path to the stairs in the northeast corner.
27.3 How Do I Navigate The Ice Tunnel?
Take out the ice blocks with your Magic Rod and exit the tunnel.
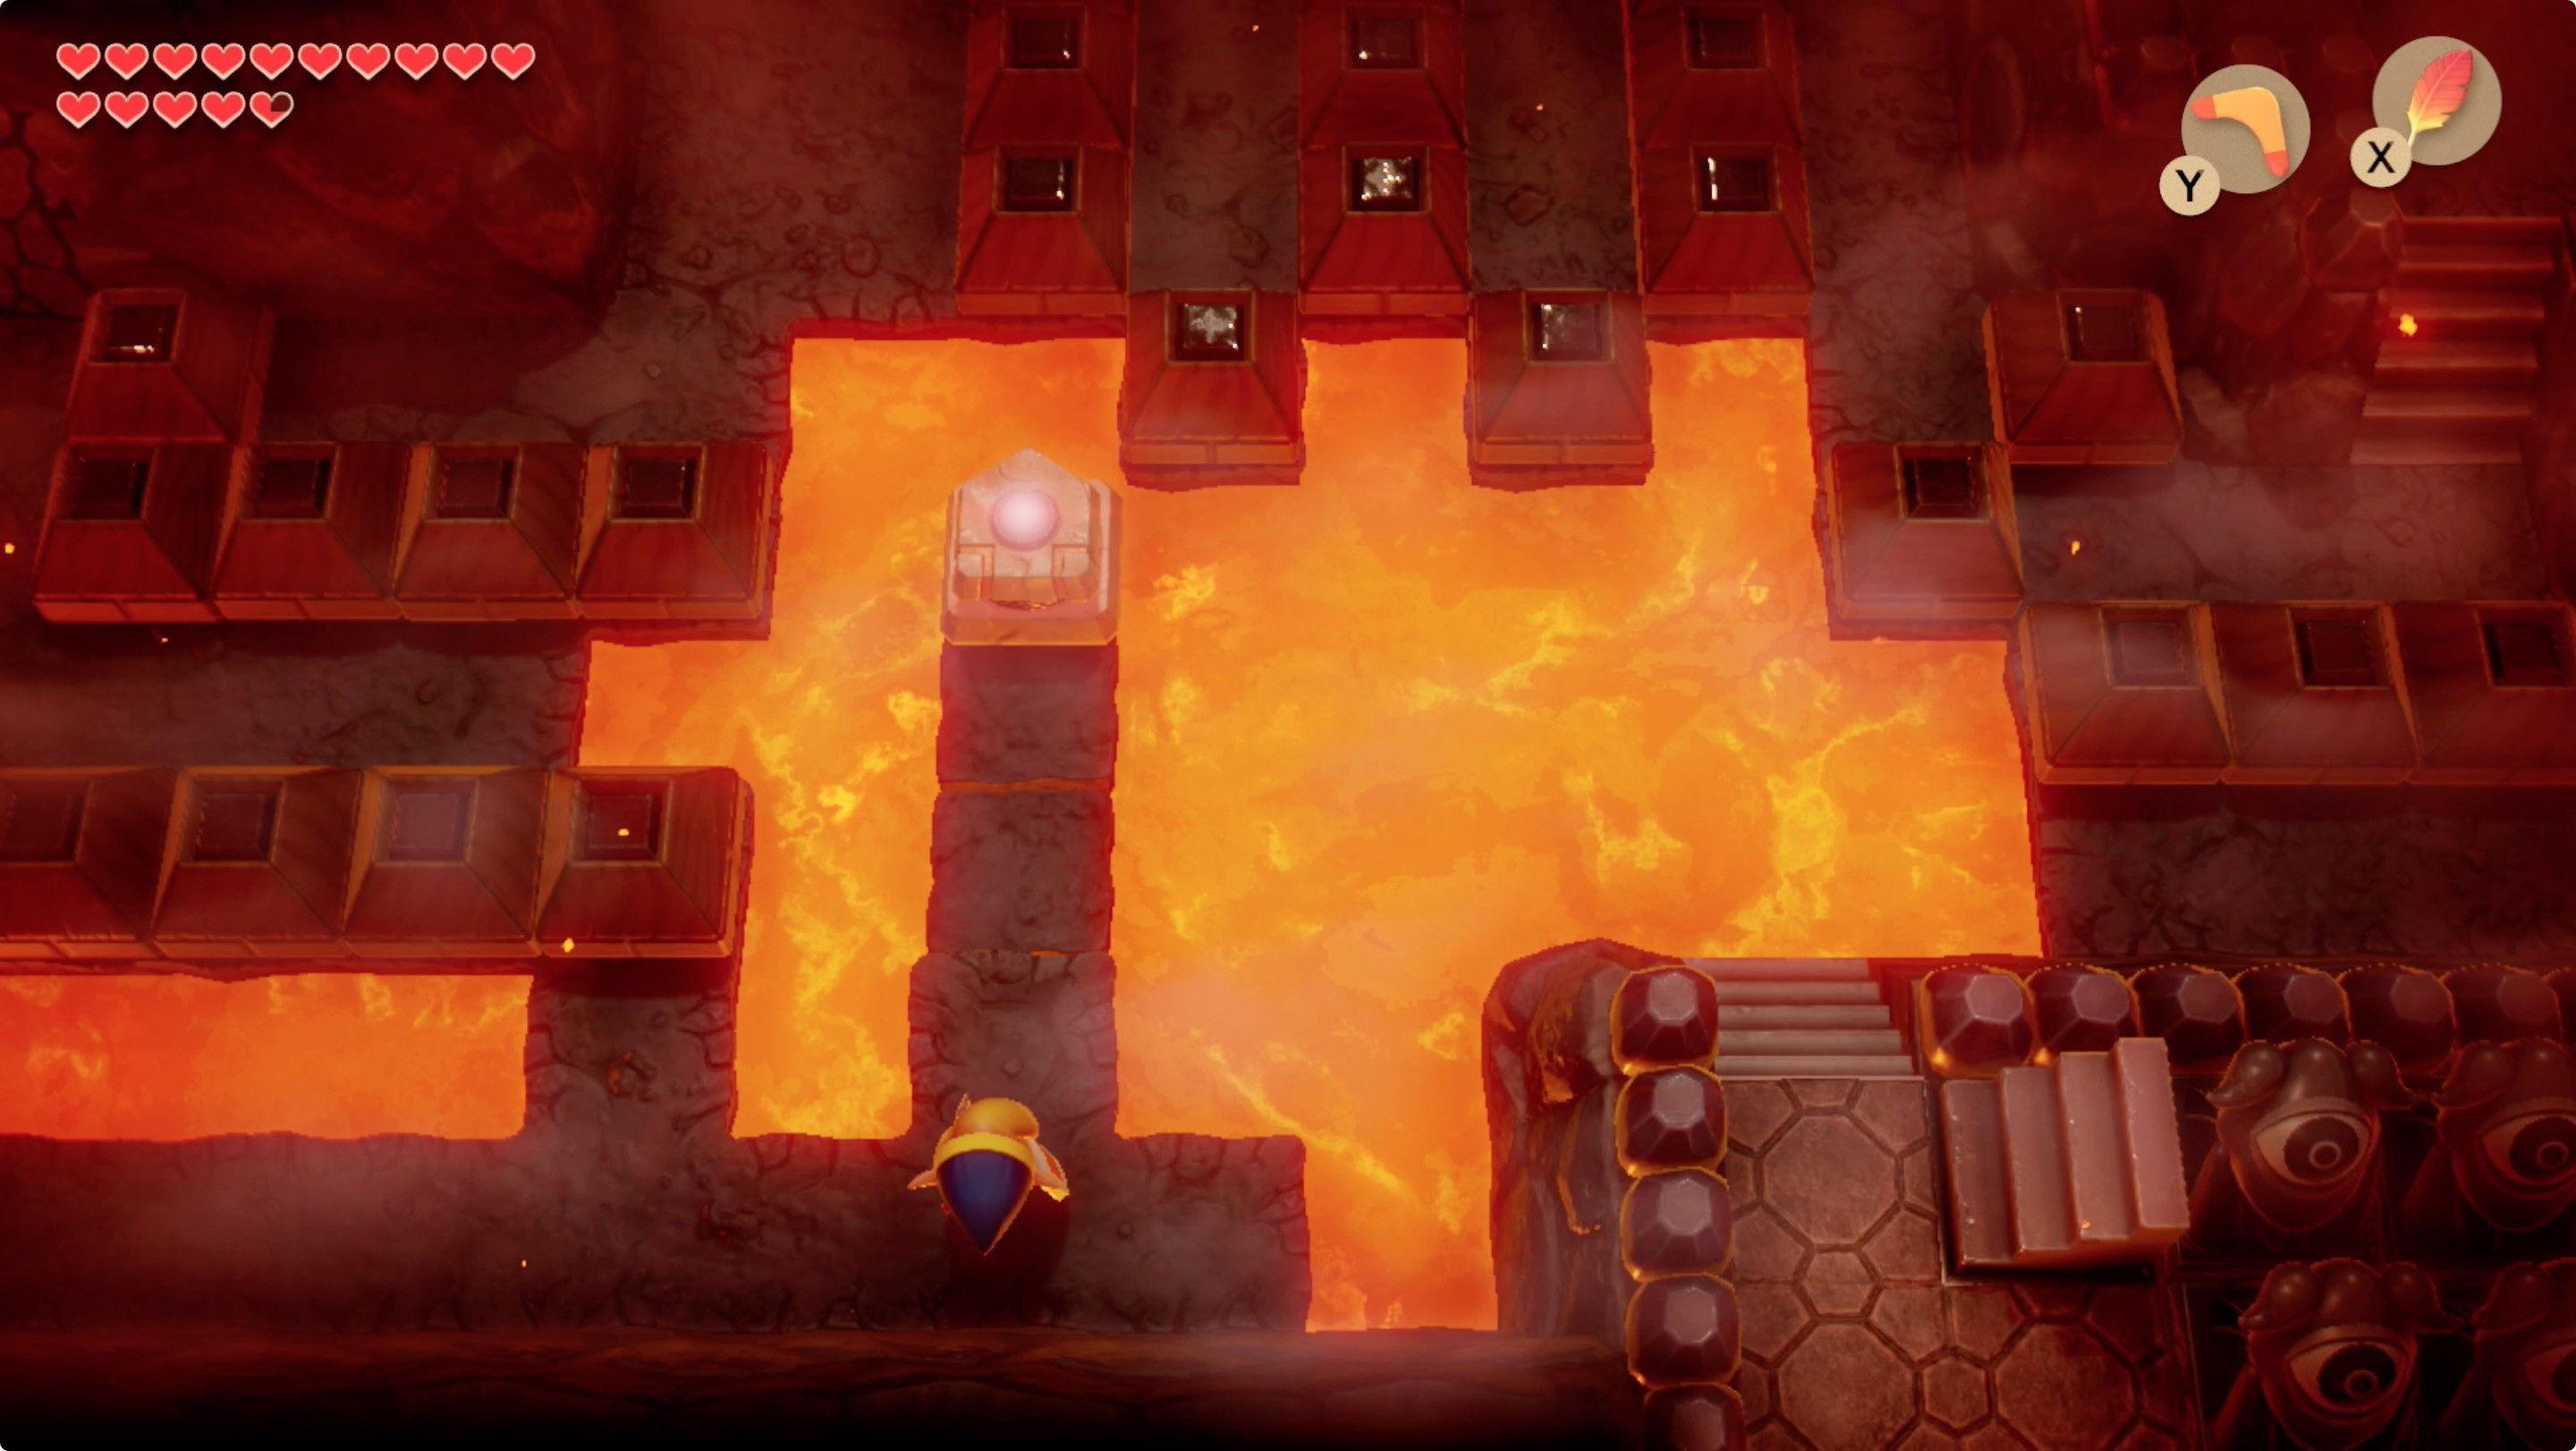
28. How Do I Defeat The Hot Head Boss?
Defeat Hot Head by standing in the center of the bottom wall with your shield raised and shooting it with your Magic Rod.
