Installing rock tile on a wall can dramatically enhance your space, bringing the beauty of the outdoors inside. This guide from rockscapes.net provides a comprehensive, step-by-step approach to achieving a professional-looking installation. Explore the stunning possibilities of stone veneer, natural stone, and stacked stone for your next project.
1. What Are the Benefits of Installing Rock Tile on Walls?
Installing rock tile on walls offers a multitude of aesthetic and practical benefits, making it a popular choice for homeowners looking to add character and value to their properties. Rock tile provides unique textures and colors that can complement any interior design style.
Here’s a closer look at the advantages:
-
Aesthetic Appeal: Rock tile introduces a natural, rustic charm that’s hard to replicate with other materials. The unique variations in color, texture, and shape of each tile create a visually appealing and dynamic surface.
-
Increased Home Value: The addition of natural stone elements is often seen as a luxury upgrade that can increase the market value of your home.
-
Durability: Rock tiles are incredibly durable and resistant to wear and tear. They can withstand impacts, scratches, and other forms of damage, making them ideal for high-traffic areas.
-
Low Maintenance: Once sealed, rock tiles require minimal maintenance. They are resistant to stains and can be easily cleaned with a damp cloth.
-
Versatility: Rock tiles can be used in various applications, including accent walls, fireplace surrounds, backsplashes, and even exterior facades.
-
Texture and Depth: Rock tiles add depth and texture to a wall, creating a focal point that draws the eye and enhances the overall ambiance of a room.
-
Natural Insulation: Stone has natural insulating properties, which can help regulate the temperature inside your home, reducing energy costs.
-
Soundproofing: Rock tiles can also help dampen sound, creating a quieter and more peaceful living environment.
-
Unique Design: With a wide variety of colors, shapes, and sizes available, rock tiles offer endless design possibilities, allowing you to create a truly unique and personalized space.
-
Eco-Friendly: Natural stone is an environmentally friendly material, especially when sourced locally.
By choosing rock tile for your walls, you’re not just selecting a building material; you’re investing in a timeless design element that will bring beauty and value to your home for years to come. Explore the extensive selection at rockscapes.net to find the perfect stone to match your vision.
2. What Types of Rock Tile Are Best for Walls?
Selecting the right type of rock tile is crucial for achieving the desired look and ensuring a long-lasting installation on your walls. The best choice depends on your aesthetic preferences, budget, and the specific requirements of your project.
Here’s a breakdown of popular options:
-
Natural Stone Veneer: This option offers the authentic look of natural stone without the added weight. It’s made from real stone that has been cut into thin pieces and adhered to a backing.
-
Manufactured Stone Veneer: Also known as faux stone, this is a lightweight alternative made from concrete or other materials. It mimics the appearance of natural stone and is often more affordable.
-
Stacked Stone: These tiles are composed of multiple pieces of stone adhered together to create a textured, layered look. They are available in both natural and manufactured options.
-
Ledgestone: Similar to stacked stone, ledgestone features long, narrow pieces of stone arranged horizontally. It’s a popular choice for creating a rustic, natural appearance.
-
Slate: Slate tiles offer a distinctive, layered texture and a range of colors from dark grays to earthy browns. They are durable and water-resistant, making them suitable for both interior and exterior applications.
-
Granite: Known for its durability and elegance, granite tile is an excellent choice for high-end projects. It’s available in various colors and patterns.
-
Quartzite: This metamorphic rock offers a unique crystalline structure and a high resistance to staining. It’s a great option for adding a touch of luxury to your walls.
-
River Rock: These smooth, rounded stones bring a natural, organic feel to any space. They are often used in mosaic patterns or as accents.
-
Travertine: Characterized by its porous surface and warm, earthy tones, travertine tile adds a touch of rustic elegance to walls.
Table: Comparison of Rock Tile Types
| Type | Material | Appearance | Pros | Cons | Best For |
|---|---|---|---|---|---|
| Natural Stone Veneer | Real Stone | Authentic, varied | Lightweight, adds value, durable | More expensive, requires sealing | Accent walls, fireplace surrounds |
| Manufactured Stone Veneer | Concrete/Other Materials | Mimics natural stone | Affordable, lightweight, easy to install | Less authentic look, can fade over time | DIY projects, cost-effective renovations |
| Stacked Stone | Natural/Manufactured Stone | Textured, layered | Adds depth, rustic look, no grout needed | Can be challenging to cut, may require more adhesive | Feature walls, modern interiors |
| Ledgestone | Natural/Manufactured Stone | Long, narrow pieces | Natural appearance, easy to install, no grout needed | Similar to stacked stone, requires careful layout | Rustic designs, fireplace surrounds |
| Slate | Natural Stone | Layered, dark grays to browns | Durable, water-resistant, unique texture | Can be brittle, requires sealing, limited color options | Interior and exterior walls, bathrooms |
| Granite | Natural Stone | Elegant, varied colors/patterns | Highly durable, easy to clean, adds luxury | Expensive, heavy, requires professional installation | High-end projects, accent walls |
| Quartzite | Natural Stone | Crystalline, stain-resistant | Luxurious, durable, low maintenance | Expensive, can be slippery when wet | Upscale interiors, feature walls |
| River Rock | Natural Stone | Smooth, rounded | Organic feel, unique patterns, adds texture | Difficult to clean, not suitable for all areas | Mosaic patterns, accent features |
| Travertine | Natural Stone | Porous, warm earthy tones | Rustic elegance, unique texture, good insulation | Porous, requires frequent sealing, can stain easily | Interior walls, rustic designs |
Regardless of the type you choose, sourcing your rock tile from a reputable supplier like rockscapes.net ensures quality and consistency. Visit their website to explore a wide range of options and find the perfect stone to bring your vision to life.
3. What Tools and Materials Do I Need to Install Rock Tile?
Proper preparation is key to a successful rock tile installation. Gathering the right tools and materials beforehand will streamline the process and ensure a professional-looking result.
Here’s a comprehensive checklist:
- Rock Tiles: Calculate the amount needed, adding extra for cuts and waste (typically 10-15%). Rockscapes.net can assist with accurate quantity estimations.
- Tile Adhesive: Choose an adhesive specifically designed for the type of rock tile you’re using. Options include thin-set mortar or a pre-mixed adhesive.
- Grout (Optional): If your tile installation requires grout, select a color that complements the stone. Stacked stone and ledgestone often do not require grout.
- Sealer: Apply a sealer to protect the rock tile from moisture and stains. Choose a sealer appropriate for the type of stone you’re using.
- Tile Saw: A wet tile saw is essential for making precise cuts.
- Trowel: Use a notched trowel to apply the adhesive evenly to the wall. The notch size will depend on the size and type of tile.
- Level: Ensure that your tiles are installed straight and level.
- Measuring Tape: Measure the area accurately to plan the layout and cuts.
- Pencil: Mark cut lines on the tiles.
- Spacers (Optional): Use tile spacers to maintain consistent spacing between tiles if grout is required.
- Rubber Mallet: Gently tap the tiles into place to ensure proper adhesion.
- Grout Float (If Grouting): Use a grout float to apply grout evenly into the joints.
- Grout Sponge (If Grouting): Clean excess grout from the tile surface with a damp grout sponge.
- Buckets: Use buckets for mixing mortar and cleaning sponges.
- Safety Glasses: Protect your eyes from debris when cutting tiles.
- Gloves: Protect your hands from adhesive and grout.
- Dust Mask: Wear a dust mask when mixing mortar or cutting tiles to avoid inhaling dust particles.
- Clean Rags: Keep clean rags on hand for wiping up spills and cleaning the tile surface.
- Seam Roller: Use a seam roller to smooth out the surface.
- Cement Boards: Use Cement boards in areas prone to water damage.
Table: Essential Tools and Materials for Rock Tile Installation
| Tool/Material | Purpose | Notes |
|---|---|---|
| Rock Tiles | Covering the wall surface | Calculate quantity accurately; rockscapes.net can assist |
| Tile Adhesive | Bonding tiles to the wall | Choose adhesive specific to the tile type |
| Grout | Filling spaces between tiles (optional) | Select color to complement stone; not needed for stacked/ledgestone |
| Sealer | Protecting tiles from moisture and stains | Choose sealer appropriate for the stone type |
| Tile Saw | Cutting tiles to fit | Wet tile saw recommended for precise cuts |
| Trowel | Applying adhesive evenly | Notched trowel; notch size depends on tile size |
| Level | Ensuring tiles are straight | Essential for a professional finish |
| Measuring Tape | Measuring the area | Accurate measurements are crucial for planning |
| Pencil | Marking cut lines | |
| Spacers | Maintaining consistent spacing (optional) | Use if grout is required |
| Rubber Mallet | Tapping tiles into place | Ensures proper adhesion |
| Grout Float | Applying grout (if grouting) | Use to evenly distribute grout into joints |
| Grout Sponge | Cleaning excess grout (if grouting) | Damp sponge for cleaning tile surface |
| Buckets | Mixing mortar and cleaning sponges | |
| Safety Glasses | Eye protection | Essential when cutting tiles |
| Gloves | Hand protection | Protects hands from adhesive and grout |
| Dust Mask | Respiratory protection | Wear when mixing mortar or cutting tiles |
| Clean Rags | Cleaning spills and tile surface | |
| Seam Roller | Smoothing out the surface | |
| Cement Boards | Water Damage Protection | In areas prone to water damage. |
With these tools and materials on hand, you’ll be well-prepared to tackle your rock tile installation project with confidence. For expert advice and high-quality supplies, visit rockscapes.net.
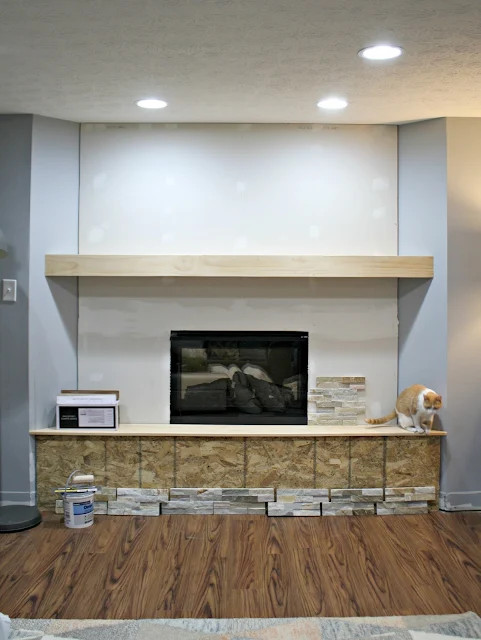
4. How to Prepare the Wall for Rock Tile Installation?
Proper wall preparation is paramount for a successful and long-lasting rock tile installation. A clean, level, and stable surface is essential to ensure that the tiles adhere correctly and the finished result looks professional.
Here’s a step-by-step guide to preparing your wall:
-
Clean the Surface: Start by thoroughly cleaning the wall to remove any dust, dirt, grease, or loose paint. Use a scraper to remove any flaking paint or wallpaper.
-
Repair Any Damage: Inspect the wall for cracks, holes, or other imperfections. Fill these with patching compound and allow it to dry completely before sanding smooth.
-
Ensure the Wall is Level: Use a level to check for any unevenness in the wall surface. If there are significant variations, you may need to apply a leveling compound to create a smooth, even base.
-
Prime the Wall: Apply a coat of primer to the wall to improve adhesion and prevent moisture absorption. Choose a primer that is compatible with both the wall material and the tile adhesive.
-
Consider Cement Board: In areas prone to moisture, such as bathrooms or kitchens, consider installing cement board over the existing wall surface. Cement board provides a waterproof and durable base for tile installation.
-
Plan Your Layout: Before you start installing the tiles, plan your layout carefully. Use a measuring tape and level to mark guidelines on the wall, indicating the placement of the first row of tiles. This will help ensure that your installation is straight and even.
-
Dry Fit the Tiles: Lay out the tiles on the floor in the pattern you intend to use on the wall. This will give you a visual representation of the finished result and allow you to make any necessary adjustments before you start applying adhesive.
-
Check for Moisture: Ensure the wall is dry before starting the installation. Moisture can interfere with the adhesion of the tile and lead to problems down the road.
Table: Wall Preparation Steps
| Step | Description | Why It’s Important |
|---|---|---|
| Clean the Surface | Remove dust, dirt, grease, and loose paint | Ensures proper adhesion of the tile adhesive |
| Repair Any Damage | Fill cracks and holes with patching compound | Creates a smooth, even surface for tile installation |
| Ensure Wall is Level | Use a level to check for unevenness and apply leveling compound if needed | Prevents tiles from appearing crooked and ensures a professional finish |
| Prime the Wall | Apply a coat of primer | Improves adhesion, prevents moisture absorption, and protects the wall from damage |
| Consider Cement Board | Install cement board in moisture-prone areas | Provides a waterproof and durable base for tile installation |
| Plan Your Layout | Mark guidelines on the wall | Ensures that the installation is straight, even, and visually appealing |
| Dry Fit the Tiles | Lay out the tiles on the floor in the desired pattern | Allows you to visualize the finished result and make any necessary adjustments before applying adhesive |
| Check for Moisture | Ensure the wall is dry | Prevents adhesion problems and potential damage from moisture |
By following these steps, you’ll create an ideal surface for your rock tile installation, ensuring a beautiful and long-lasting result. Rockscapes.net offers a variety of wall preparation products and expert advice to help you achieve the perfect foundation for your project.
 Wall prepared for rock tile installation
5. How to Cut Rock Tile for a Perfect Fit?
Cutting rock tile accurately is essential for achieving a seamless and professional-looking installation. Whether you’re working around corners, outlets, or other obstructions, precise cuts will ensure that your tiles fit perfectly and the finished result is visually appealing.
Here’s a guide to cutting rock tile effectively:
-
Measure and Mark: Use a measuring tape and pencil to accurately measure the area where the tile needs to be cut. Transfer these measurements to the tile, marking a clear cutting line.
-
Choose the Right Tool: For most rock tile, a wet tile saw is the best option. This tool uses a diamond-tipped blade and a constant stream of water to make clean, precise cuts without chipping or damaging the tile. For smaller cuts or shaping, you can use a tile nipper.
-
Use a Wet Tile Saw: Fill the water reservoir of the wet tile saw and turn it on, ensuring that the water is flowing properly. Slowly feed the tile into the blade, following your marked cutting line. Apply steady pressure, but don’t force the tile through the saw.
-
Make Gradual Cuts: For thicker or more delicate tiles, it’s best to make several shallow cuts rather than trying to cut all the way through in one pass. This will help prevent chipping or cracking.
-
Shape with Tile Nippers: For curved cuts or small adjustments, use tile nippers to carefully chip away small pieces of the tile until you achieve the desired shape.
-
Smooth the Edges: After cutting, use a rubbing stone or sandpaper to smooth any rough edges or sharp corners. This will not only improve the appearance of the tile but also make it safer to handle.
-
Dry-Fit Before Installing: Before applying adhesive, dry-fit the cut tile in its intended location to ensure that it fits properly. Make any necessary adjustments before proceeding with the installation.
Table: Tips for Cutting Rock Tile
| Tip | Description | Why It’s Important |
|---|---|---|
| Measure and Mark Accurately | Use precise measurements and clear cutting lines | Ensures that the tile fits properly in its intended location |
| Choose the Right Tool | Use a wet tile saw for most cuts; tile nippers for small adjustments | Prevents chipping and damage to the tile |
| Use a Wet Tile Saw Correctly | Feed the tile slowly into the blade with steady pressure | Creates clean, precise cuts |
| Make Gradual Cuts | For thicker tiles, make several shallow cuts rather than one deep cut | Prevents chipping and cracking |
| Shape with Tile Nippers | Carefully chip away small pieces of tile for curved cuts or small adjustments | Allows for precise shaping without damaging the tile |
| Smooth the Edges | Use a rubbing stone or sandpaper to smooth any rough edges or sharp corners | Improves the appearance of the tile and makes it safer to handle |
| Dry-Fit Before Installing | Ensure the cut tile fits properly before applying adhesive | Saves time and prevents mistakes |
With the right tools and techniques, cutting rock tile can be a straightforward process. Rockscapes.net offers a variety of high-quality tile saws and cutting tools to help you achieve professional results.
 Cutting rock tile with a wet saw
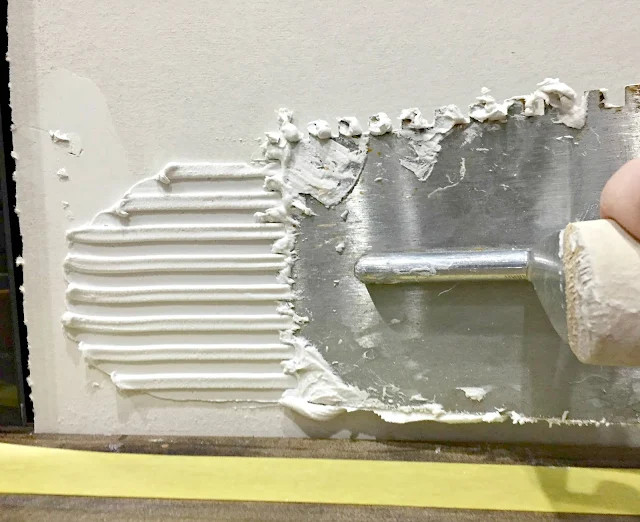
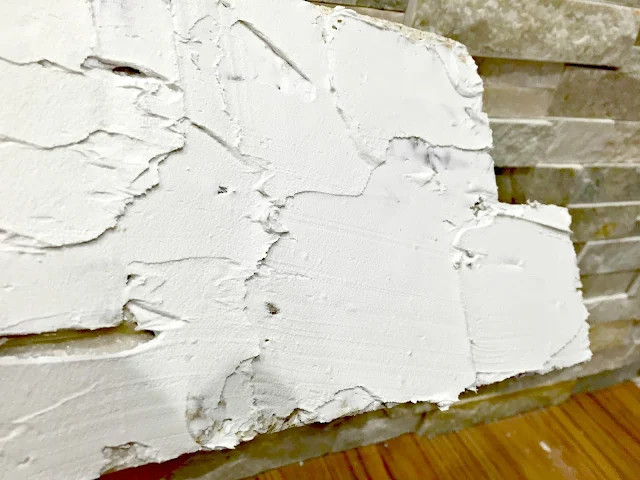
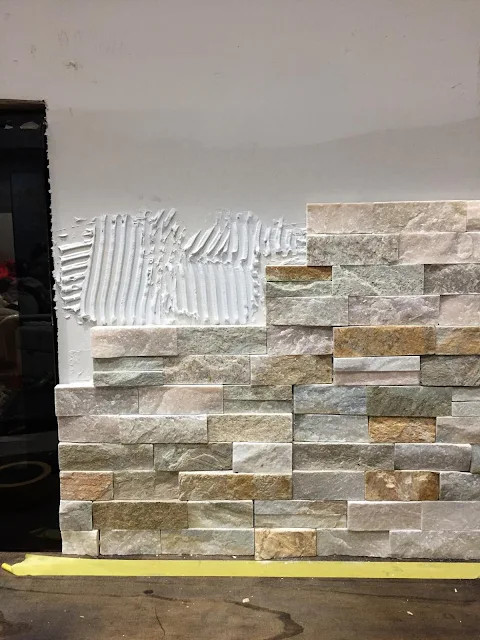
6. How to Apply Adhesive and Install Rock Tile on the Wall?
Applying adhesive and installing rock tile on the wall requires careful attention to detail to ensure a secure and visually appealing result.
Here’s a step-by-step guide:
-
Prepare the Adhesive: Mix the tile adhesive according to the manufacturer’s instructions. If using a pre-mixed adhesive, stir it thoroughly.
-
Apply Adhesive to the Wall: Use a notched trowel to apply the adhesive evenly to the wall. Hold the trowel at a 45-degree angle and apply enough pressure to create consistent ridges in the adhesive. Apply the adhesive to a small area at a time, as it can dry quickly.
-
Back butter the Tile: For larger or heavier tiles, it’s a good idea to back butter the tile by applying a thin layer of adhesive to the back of the tile. This will help ensure a strong bond.
-
Place the Tile: Carefully place the tile on the wall, aligning it with your layout lines. Press firmly to ensure good contact with the adhesive.
-
Use Spacers (If Needed): If your tile installation requires grout, use tile spacers to maintain consistent spacing between the tiles.
-
Check for Level: Use a level to check that the tile is straight and level. Make any necessary adjustments while the adhesive is still wet.
-
Tap into Place: Gently tap the tile with a rubber mallet to ensure proper adhesion.
-
Remove Excess Adhesive: Use a damp sponge to wipe away any excess adhesive that squeezes out between the tiles.
-
Repeat: Continue applying adhesive and installing tiles, working your way across the wall.
-
Allow to Dry: Allow the adhesive to dry completely according to the manufacturer’s instructions before proceeding with grouting or sealing.
Table: Steps for Applying Adhesive and Installing Rock Tile
| Step | Description | Why It’s Important |
|---|---|---|
| Prepare the Adhesive | Mix or stir the tile adhesive according to the manufacturer’s instructions | Ensures the adhesive has the correct consistency for bonding |
| Apply Adhesive to the Wall | Use a notched trowel to apply the adhesive evenly to the wall | Creates a consistent surface for the tile to adhere to |
| Back butter the Tile | Apply a thin layer of adhesive to the back of the tile (for larger tiles) | Improves the bond between the tile and the wall |
| Place the Tile | Carefully place the tile on the wall, aligning it with your layout lines | Ensures the tile is placed in the correct position |
| Use Spacers (If Needed) | Use tile spacers to maintain consistent spacing between the tiles (if grout is required) | Creates uniform grout lines |
| Check for Level | Use a level to check that the tile is straight and level | Prevents the tile from appearing crooked |
| Tap into Place | Gently tap the tile with a rubber mallet | Ensures proper adhesion |
| Remove Excess Adhesive | Use a damp sponge to wipe away any excess adhesive that squeezes out between the tiles | Prevents the adhesive from drying on the surface of the tile |
| Repeat | Continue applying adhesive and installing tiles, working your way across the wall | Completes the installation |
| Allow to Dry | Allow the adhesive to dry completely before proceeding with grouting or sealing | Secures the rock tiles to the walls |
By following these steps carefully, you can successfully apply adhesive and install rock tile on your wall, creating a stunning and durable feature. Rockscapes.net offers a variety of high-quality adhesives and tools to help you achieve professional results.
 Applying adhesive to rock tile
7. How to Grout and Seal Rock Tile (If Applicable)?
Grouting and sealing rock tile are important steps to protect your investment and enhance its appearance. Grouting fills the spaces between the tiles, providing structural support and preventing water damage. Sealing protects the tile from stains and moisture, ensuring its longevity.
Here’s a guide to grouting and sealing rock tile:
Grouting (If Applicable):
-
Prepare the Grout: Mix the grout according to the manufacturer’s instructions. Choose a grout color that complements the tile.
-
Apply the Grout: Use a grout float to apply the grout evenly over the tile surface, pressing it into the joints between the tiles. Hold the float at a 45-degree angle and work in diagonal strokes.
-
Remove Excess Grout: Use the edge of the grout float to scrape off any excess grout from the tile surface.
-
Clean the Tile: After allowing the grout to set for a few minutes, use a damp grout sponge to clean the tile surface. Rinse the sponge frequently and avoid using too much water, as this can weaken the grout.
-
Allow to Cure: Allow the grout to cure completely according to the manufacturer’s instructions before sealing.
Sealing:
-
Clean the Tile: Ensure that the tile surface is clean and dry before sealing.
-
Apply the Sealer: Apply a thin, even coat of sealer to the tile surface using a brush, roller, or sponge. Be sure to follow the manufacturer’s instructions for application.
-
Allow to Penetrate: Allow the sealer to penetrate the tile for the recommended amount of time.
-
Wipe Off Excess Sealer: Use a clean rag to wipe off any excess sealer from the tile surface.
-
Apply Additional Coats (If Needed): Apply additional coats of sealer as recommended by the manufacturer.
-
Allow to Cure: Allow the sealer to cure completely before exposing the tile to moisture or heavy traffic.
Table: Steps for Grouting and Sealing Rock Tile
| Step | Description | Why It’s Important |
|---|---|---|
| Grouting (If Applicable) | ||
| Prepare the Grout | Mix the grout according to the manufacturer’s instructions | Ensures the grout has the correct consistency for filling the joints |
| Apply the Grout | Use a grout float to apply the grout evenly over the tile surface, pressing it into the joints between the tiles | Fills the joints between the tiles, providing structural support and preventing water damage |
| Remove Excess Grout | Use the edge of the grout float to scrape off any excess grout from the tile surface | Prevents the grout from drying on the surface of the tile |
| Clean the Tile | After allowing the grout to set for a few minutes, use a damp grout sponge to clean the tile surface | Removes any remaining grout from the surface of the tile |
| Allow to Cure | Allow the grout to cure completely before sealing | Ensures the grout is fully hardened and able to withstand moisture and wear |
| Sealing | ||
| Clean the Tile | Ensure that the tile surface is clean and dry before sealing | Allows the sealer to penetrate the tile properly |
| Apply the Sealer | Apply a thin, even coat of sealer to the tile surface using a brush, roller, or sponge | Protects the tile from stains and moisture |
| Allow to Penetrate | Allow the sealer to penetrate the tile for the recommended amount of time | Ensures the sealer is fully absorbed into the tile |
| Wipe Off Excess Sealer | Use a clean rag to wipe off any excess sealer from the tile surface | Prevents the sealer from drying on the surface of the tile, which can create a hazy or uneven appearance |
| Apply Additional Coats | Apply additional coats of sealer as recommended by the manufacturer | Provides extra protection against stains and moisture |
| Allow to Cure | Allow the sealer to cure completely before exposing the tile to moisture or heavy traffic | Ensures the sealer is fully hardened and able to provide maximum protection |
By following these steps, you can properly grout and seal your rock tile, ensuring its beauty and longevity. Rockscapes.net offers a variety of high-quality grouts and sealers to help you achieve professional results.
 Grouting rock tile
8. How to Maintain and Clean Rock Tile on Walls?
Proper maintenance and cleaning are essential for preserving the beauty and longevity of rock tile on walls. Regular cleaning will prevent the buildup of dirt and grime, while proper maintenance will address any potential issues before they become major problems.
Here’s a guide to maintaining and cleaning rock tile:
Regular Cleaning:
-
Dust Regularly: Use a soft brush or vacuum with a brush attachment to dust the tile surface regularly. This will prevent the buildup of dirt and debris.
-
Wash with Mild Soap: Wash the tile surface with a mild soap and water solution. Avoid using harsh chemicals or abrasive cleaners, as these can damage the tile.
-
Rinse Thoroughly: Rinse the tile surface thoroughly with clean water to remove any soap residue.
-
Dry with a Soft Cloth: Dry the tile surface with a soft cloth to prevent water spots.
Maintenance:
-
Inspect Regularly: Inspect the tile surface regularly for any signs of damage, such as cracks, chips, or loose tiles.
-
Repair Damage Promptly: Repair any damage promptly to prevent it from worsening. Use a tile adhesive to reattach loose tiles and a patching compound to fill cracks or chips.
-
Reapply Sealer: Reapply sealer as needed to protect the tile from stains and moisture. The frequency of resealing will depend on the type of tile and the amount of traffic it receives.
-
Avoid Harsh Chemicals: Avoid using harsh chemicals or abrasive cleaners on the tile surface. These can damage the tile and void the warranty.
-
Protect from Scratches: Protect the tile surface from scratches by using mats or rugs in high-traffic areas.
Table: Rock Tile Maintenance and Cleaning Tips
| Task | Frequency | Description | Why It’s Important |
|---|---|---|---|
| Dusting | Regularly | Use a soft brush or vacuum with a brush attachment to dust the tile surface | Prevents the buildup of dirt and debris |
| Washing | As Needed | Wash the tile surface with a mild soap and water solution | Removes dirt, grime, and stains |
| Rinsing | After Washing | Rinse the tile surface thoroughly with clean water | Removes soap residue |
| Drying | After Rinsing | Dry the tile surface with a soft cloth | Prevents water spots |
| Inspection | Regularly | Inspect the tile surface for damage, such as cracks, chips, or loose tiles | Allows you to identify and address any potential problems before they become major issues |
| Repairing | As Needed | Repair any damage promptly using tile adhesive or patching compound | Prevents damage from worsening |
| Resealing | As Needed | Reapply sealer to protect the tile from stains and moisture | Maintains the tile’s protection against stains and moisture |
| Avoiding Harsh Chemicals | Always | Avoid using harsh chemicals or abrasive cleaners on the tile surface | Prevents damage to the tile |
| Protecting from Scratches | Always | Protect the tile surface from scratches by using mats or rugs in high-traffic areas | Prevents scratches and wear |
By following these maintenance and cleaning tips, you can keep your rock tile walls looking beautiful for years to come. rockscapes.net offers a variety of high-quality cleaning and maintenance products to help you care for your tile.
 Cleaning rock tile wall
9. What Are Common Mistakes to Avoid When Installing Rock Tile?
Installing rock tile can be a rewarding project, but it’s essential to be aware of common mistakes that can compromise the final result.
Here are some pitfalls to avoid:
-
Inadequate Preparation: Failing to properly clean and prepare the wall surface can lead to poor adhesion and tile failure.
-
Using the Wrong Adhesive: Using an adhesive that is not specifically designed for rock tile can result in a weak bond and tile slippage.
-
Incorrect Layout Planning: Neglecting to plan the layout carefully can result in uneven spacing, awkward cuts, and an overall unprofessional appearance.
-
Improper Cutting Techniques: Using the wrong cutting tools or techniques can lead to chipped edges, uneven cuts, and wasted material.
-
Insufficient Adhesive Coverage: Not applying enough adhesive to the back of the tile can result in a weak bond and tile failure.
-
Ignoring Level and Plumb: Failing to check for level and plumb can result in crooked tiles and an uneven surface.
-
Rushing the Job: Rushing through the installation process can lead to mistakes and a subpar result.
-
Neglecting Safety Precautions: Failing to wear safety glasses, gloves, and a dust mask can result in injuries and health problems.
-
Improper Grouting and Sealing: Using the wrong grout or sealer, or not applying them properly, can result in water damage and staining.
Table: Common Rock Tile Installation Mistakes
| Mistake | Consequence | How to Avoid |
|---|---|---|
| Inadequate Preparation | Poor adhesion, tile failure | Properly clean and prepare the wall surface before installation |
| Using the Wrong Adhesive | Weak bond, tile slippage | Use an adhesive specifically designed for rock tile |