Installing rock veneer siding can dramatically enhance your home’s aesthetic appeal and value. At rockscapes.net, we provide the expertise and resources needed to achieve a stunning, durable finish. Our guide will walk you through each step, ensuring a successful rock veneer installation. Discover how to transform your home with beautiful, lasting stone facades, boosting curb appeal and property value with natural stone veneer.
1. Understanding Rock Veneer Siding
What exactly is rock veneer siding, and why should you consider it for your home?
Rock veneer siding is a lightweight alternative to natural stone, offering the same aesthetic appeal at a more accessible price point. According to research from Arizona State University’s School of Earth and Space Exploration, the use of natural materials like rock veneer in home design can significantly increase property value by enhancing curb appeal. This material is versatile and can be applied to various surfaces, including masonry blocks, concrete walls, and plywood sheathing.
1.1. Types of Rock Veneer
What are the different types of rock veneer available?
Rock veneer comes in two primary types: manufactured and natural.
- Manufactured Stone Veneer: This type is made from a blend of concrete, aggregates, and pigments, molded to replicate the look of natural stone. It is lighter, more consistent in size and color, and generally more affordable.
- Natural Stone Veneer: This veneer is made from real stone that has been cut into thin pieces. It offers authentic texture and color variations but is heavier and more expensive.
1.2. Benefits of Rock Veneer Siding
Why choose rock veneer over other siding options?
Rock veneer siding offers several key advantages.
- Aesthetic Appeal: It provides the elegant look of natural stone, enhancing the visual appeal of any home.
- Cost-Effectiveness: Compared to full stone construction, rock veneer is more budget-friendly.
- Versatility: It can be used for both interior and exterior applications, allowing for design consistency throughout your property.
- Durability: Rock veneer is resistant to weather, pests, and fire, ensuring long-lasting performance.
- Increased Home Value: The addition of stone veneer can significantly boost your home’s market value by increasing curb appeal.
2. Planning Your Rock Veneer Project
Proper planning is crucial for a successful rock veneer installation. Here’s how to get started.
2.1. Checking Local Building Codes
Why is it important to check local building codes before starting?
Ensuring compliance with local building codes is essential for any construction project. These codes dictate the standards for wall assembly, moisture barriers, and other crucial elements. According to the International Code Council (ICC), adhering to local codes ensures the safety and longevity of your construction. Compliance protects your investment and ensures your home meets all regulatory requirements.
2.2. Assessing the Project Area
What do you need to consider when assessing the project area?
Before ordering materials, accurately measure the area where you plan to install the rock veneer. Consider the following:
- Surface Type: Determine whether you’re working with concrete, masonry, or wood. Each surface requires different preparation techniques.
- Moisture Levels: Check for any signs of moisture or water damage. Address these issues before installation to prevent future problems.
- Obstacles: Identify any obstacles such as windows, doors, or fixtures that will need to be worked around.
2.3. Calculating Material Quantities
How do you calculate the amount of rock veneer needed?
To calculate the quantity of rock veneer needed, follow these steps:
- Measure the width and height of the area to be covered.
- Multiply the width by the height to get the total square footage.
- Subtract the square footage of any areas that won’t be covered, such as windows and doors.
- Add 5% to 10% to the estimate to account for cuts and waste.
2.4. Designing the Layout
How do you plan the layout of your rock veneer?
Planning the layout is a creative step that allows you to achieve a desired aesthetic. Consider the following tips:
- Mix and Match: Combine stones of varying sizes, shapes, and colors for a natural look.
- Balance: Place large stones beside smaller ones and thick stones next to thinner ones to create visual interest.
- Pattern: Experiment with different patterns on the ground before adhering the stones to the wall.
3. Essential Materials and Tools
Gathering the right materials and tools is a critical step in preparing for your rock veneer installation. Having everything on hand will streamline the process and ensure a professional finish.
3.1. Comprehensive List of Materials
What materials do you need for a successful rock veneer installation?
Here’s a detailed list of essential materials:
| Material | Description | Purpose |
|---|---|---|
| Rock Veneer | Manufactured or natural stone veneer | Decorative facing for walls, columns, and fireplaces |
| Mortar | Quikrete Veneer Stone Mortar, Polymer Modified Mortar, or Natural Stone Veneer Mortar | Adhesive for attaching veneer to the wall |
| Waterproof Building Paper | Grade D waterproof paper | Moisture barrier between the wall sheathing and veneer |
| Metal Lath | Galvanized, self-furring, expanded metal lath (at least 2.5 pounds) | Provides a strong base for mortar adhesion |
| Galvanized Nails or Staples | Fasteners for attaching metal lath to the wall | Securing metal lath |
| Grout | For filling gaps between stones | Finishing the look and sealing joints |
| Cement Color (Optional) | Quikrete Liquid Cement Color | Adding color to the mortar to match or contrast with the stone color |
| Stone Cleaner/Sealer (Optional) | Protects and enhances the appearance of stone veneers. |
3.2. Necessary Tools for Installation
What tools are essential for installing rock veneer siding?
Here’s a list of tools you’ll need:
| Tool | Description | Purpose |
|---|---|---|
| Square Trowel | For applying mortar | Applying the mortar scratch coat and adhering stones |
| Chisel | For cutting and shaping stones | Adjusting stone size and shape for a better fit |
| Bucket | For mixing mortar | Mixing mortar to the correct consistency |
| Steel Bristle Brush or Metal Rake | For scratching the mortar coat | Creating a textured surface for better stone adhesion |
| Straight-Edge Tool | For ensuring surfaces are level | Maintaining alignment during installation |
| Whisk Brush | For removing excess mortar | Cleaning mortar droppings to prevent staining |
| Grout Bag | For filling gaps with mortar | Applying grout between stones |
| Jointing Tool | For smoothing mortar joints | Improving appearance and compressing mortar into joints |
| Pneumatic Staple Gun | For attaching metal lath (optional, but recommended for efficiency) | Fastening metal lath to the wall |
| Gloves | For hand protection | Protecting hands from mortar and sharp edges |
| Safety Glasses | For eye protection | Protecting eyes from debris and mortar splashes |
| Mason’s Hammer | For breaking and shaping stones (optional) | Adjusting stone size and shape |
| Wide-Mouth Nipper | For trimming stones (optional) | Fine-tuning stone shapes |
4. Preparing the Surface
Proper surface preparation is essential for ensuring the rock veneer adheres correctly and lasts for years.
4.1. Cleaning the Existing Surface
Why is it important to clean the surface before installation?
Start by cleaning the surface to remove any dirt, debris, or loose material. A clean surface ensures better adhesion of the mortar and veneer. Use a pressure washer or a scrub brush with a cleaning solution to thoroughly clean the wall.
4.2. Applying Waterproof Building Paper
How do you install waterproof building paper?
For exterior surfaces, apply two layers of Grade D waterproof building paper to protect against moisture. Overlap the vertical seams by 6 inches and the horizontal seams by 4 inches in a shingle fashion. Extend the paper 16 inches around all corners for comprehensive moisture protection.
 Installing waterproof building paper with overlapping seams for comprehensive coverage
4.3. Attaching Metal Lath
Why is metal lath necessary for stone veneer installation?
Install a galvanized expanded metal lath over the building paper to provide a strong base for the mortar. Use galvanized nails or staples every 6 inches vertically and horizontally, ensuring they penetrate the studs by at least 1 inch. The lath should extend 16 inches around all corners for added stability.
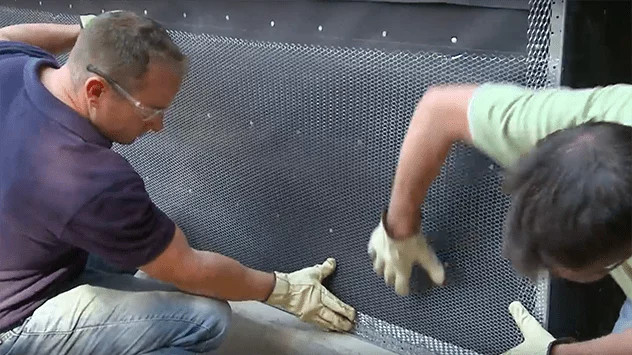 Installing waterproof building paper to protect against moisture and prepare for metal lath
5. Applying the Mortar Scratch Coat
The mortar scratch coat creates a textured surface that allows the veneer stones to adhere properly.
5.1. Mixing the Mortar
How do you mix mortar for stone veneer installation?
Mix Quikrete Veneer Stone Mortar by hand or machine, depending on the project size. Follow the manufacturer’s instructions for the correct water-to-mortar ratio to achieve a workable consistency.
5.2. Applying the Scratch Coat
How do you apply the mortar scratch coat to the wall?
Apply a half-inch coat of mortar to the wall using a square trowel. Scratch the surface horizontally with a steel bristle brush or metal rake to create a textured surface. Work in 5-foot sections, allowing the mortar to set before moving to other areas.
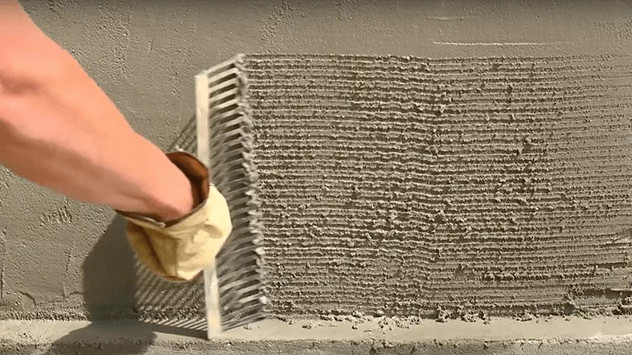 Applying mortar scratch coat horizontally to create a textured surface
5.3. Curing the Scratch Coat
Why is it important to let the scratch coat cure properly?
Allow the scratch coat to cure for at least 24 to 48 hours before proceeding with the veneer installation. This curing period ensures the mortar hardens and provides a stable base for the stones.
6. Attaching the Veneer Stones
With the scratch coat cured, it’s time to attach the veneer stones to the wall.
6.1. Preparing the Stones
How do you prepare the stones before attaching them?
Dampen the back of each stone veneer to improve mortar adhesion. This step helps prevent the stone from absorbing moisture from the mortar too quickly, ensuring a stronger bond.
6.2. Applying Mortar to the Stones
How much mortar should you apply to the back of each stone?
Apply a half-inch of mortar to the back of each stone. Use a trowel to create an even layer, ensuring full coverage for optimal adhesion.
6.3. Placing the Stones
What is the best technique for placing the stones on the wall?
Press the stones firmly onto the wall, rocking them back and forth until the mortar squeezes out around the edges. Position the stones so that the joints are no wider than half an inch. Mix stones of varying sizes, shapes, and colors for a natural look.
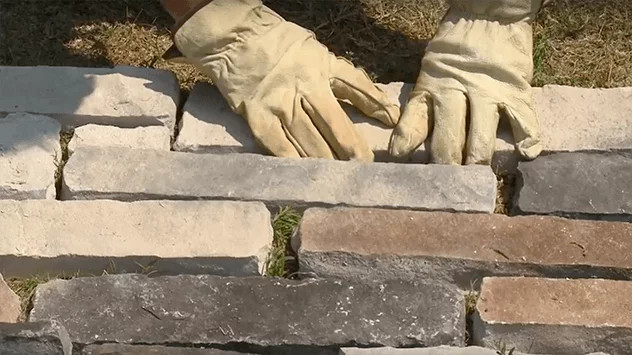 Installing stone veneer by pressing each stone firmly onto the wall with mortar
6.4. Cutting Stones for Fit
How do you cut stones to fit specific areas?
Use a mason’s hammer or wide-mouth nipper to cut stones to fit around corners, windows, or other obstacles. Score the stone with the hammer and then use the nipper to break it along the scored line.
7. Grouting and Finishing
Grouting the gaps between the stones gives the project a clean, finished look.
7.1. Filling Gaps with Mortar
How do you fill the gaps between the stones with mortar?
Use a grout bag to carefully fill the joints with Quikrete Veneer Stone Mortar. Focus on filling only the gaps, avoiding the stones’ surfaces. For a decorative touch, add Quikrete Liquid Cement Color to the gray mortar to match or contrast with the stone color.
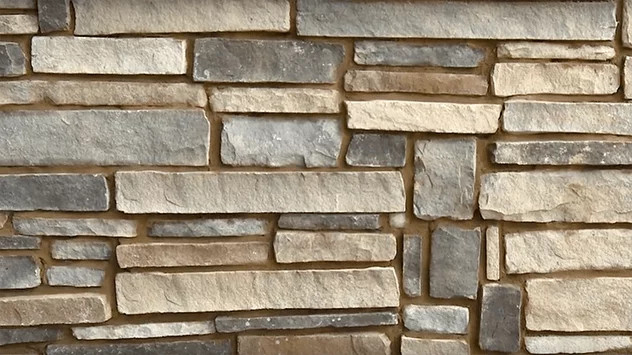 Finishing stone veneer siding with careful grouting between the stones
7.2. Tooling the Mortar Joints
What is the purpose of tooling the mortar joints?
Once the grouted joints are thumbprint hard, use a jointing tool to remove excess mortar and smooth the joints. This step improves the appearance and compresses the mortar tightly into the joints, enhancing durability.
7.3. Cleaning Excess Mortar
How do you clean excess mortar from the stone surfaces?
Allow the excess mortar to dry slightly, then use a dry whisk brush to remove any droppings from the stone surfaces. Be careful not to smear the mortar, as this can stain the stones.
8. Maintaining Your Rock Veneer Siding
Proper maintenance is essential for preserving the beauty and longevity of your rock veneer siding.
8.1. Regular Inspections
How often should you inspect your stone veneer siding?
Conduct annual inspections to check for any loose or damaged stones. Address any issues promptly to prevent further damage.
8.2. Cleaning and Sealing
What is the best way to clean and seal stone veneer siding?
Use a stone cleaner/sealer product yearly to protect the veneer from moisture and stains. Avoid pressure washing, as it can damage the mortar joints.
8.3. Repairing Mortar Joints
How do you repair damaged mortar joints?
Re-point mortar joints as needed to prevent moisture issues. Remove any loose or crumbling mortar and apply fresh mortar using a grout bag and jointing tool.
9. Tips for a Successful Installation
Keep these tips in mind for a smooth and successful rock veneer installation.
9.1. Working in Small Sections
Why is it beneficial to work in small sections?
Work in small sections to make mortar application and stone adherence easier. This approach allows you to manage the project more effectively and ensures a consistent finish.
9.2. Varying Stone Patterns
How does varying stone patterns enhance the look of the siding?
Vary stone sizes, textures, and colors for a natural look. This variation adds visual interest and mimics the appearance of natural stone formations.
9.3. Ensuring Proper Adhesion
What should you do to ensure the veneers have a rough backside to grip the mortar effectively?
Ensure veneers have a rough backside to grip the mortar effectively. If the back of the stone is too smooth, use a chisel to create a rougher surface.
9.4. Maintaining Mortar Joint Width
Why is it important to keep mortar joints less than half an inch wide?
Keep mortar joints less than half an inch wide for a clean and professional appearance. Wider joints can detract from the natural look of the stone.
9.5. Allowing Proper Curing Time
How much curing time is needed between each step?
Allow proper curing time between steps. This ensures that the mortar hardens correctly and provides a stable base for subsequent layers.
9.6. Thoroughly Brushing and Tooling Mortar Joints
What is the best way to brush and tool all mortar joints?
Thoroughly brush and tool all mortar joints to remove excess mortar and create a smooth, professional finish.
10. Enhancing Your Landscape with Rockscapes.net
At rockscapes.net, we are dedicated to providing you with the inspiration, information, and resources you need to create stunning rock landscapes. Whether you’re looking for design ideas, detailed product information, or expert advice, we have you covered.
10.1. Explore Design Ideas
Discover a wide range of design ideas to enhance your landscape.
- Rock Gardens: Create serene and beautiful rock gardens that showcase the natural beauty of stones and plants.
- Water Features: Incorporate water features such as fountains and ponds with stone accents for a tranquil outdoor space.
- Pathways and Walkways: Design durable and visually appealing pathways and walkways using natural stone.
10.2. Learn About Stone Types
Gain detailed insights into different types of stones.
- Granite: Known for its durability and variety of colors, granite is ideal for high-traffic areas.
- Slate: With its unique layered texture, slate adds a touch of elegance to any landscape.
- Fieldstone: Offering a rustic and natural look, fieldstone is perfect for creating a natural ambiance.
10.3. Get Expert Advice
Receive expert guidance for your landscaping projects.
- Installation Guides: Access step-by-step guides for installing various stone features.
- Maintenance Tips: Learn how to maintain and care for your stone landscapes to ensure they last for years.
- Design Consultations: Get personalized design consultations to bring your vision to life.
Transform your home with rock veneer siding and create a breathtaking landscape with rockscapes.net. Explore our website today for inspiration, product information, and expert advice. Contact us at Address: 1151 S Forest Ave, Tempe, AZ 85281, United States, Phone: +1 (480) 965-9011, or visit our Website: rockscapes.net to discover the endless possibilities of stone landscapes.
FAQ About How to Install Rock Veneer Siding
Have questions about installing rock veneer siding? Here are some frequently asked questions to help you.
1. What is the best stone veneer thickness for siding?
A thickness of 1 to 1.5 inches is ideal for stone veneer siding. According to the National Association of Home Builders (NAHB), thinner veneers may be more prone to damage, while thicker ones can be excessively heavy and more difficult to install.
2. How are stone veneers attached to siding?
Stone veneers are attached to walls using mortar, similar to tiles. The Mortar is applied to the back of each stone and pressed firmly onto a prepared surface, which usually includes a scratch coat over metal lath. Nailing is not recommended since it can crack the natural stone, according to the Mason Contractors Association of America (MCAA).
3. How long does stone veneer siding installation typically take?
Professional installation of stone veneer siding usually takes 2–3 days, depending on the project size and complexity. DIY projects can take longer, typically spreading across two weekends or more, depending on the homeowner’s experience and availability.
4. Do stone veneers add value to a home?
Yes, stone veneers can significantly increase a home’s curb appeal, which often translates to increased property value. According to a study by the National Association of Realtors (NAR), homes with stone veneer siding often see a higher resale value compared to those without.
5. What is the average cost of stone veneer siding installation?
The cost of stone veneer siding installation ranges from $11 to $18 per square foot, installed, according to Angi. The exact cost depends on several factors, including the type of veneer, the complexity of the installation, accessibility, labor costs, and regional variations.
6. Can stone veneer be installed on any type of wall?
Stone veneer can be installed on various wall types, including concrete, masonry, and wood-framed walls. However, each type requires specific preparation. Concrete and masonry walls need to be cleaned thoroughly, while wood-framed walls require the installation of waterproof building paper and metal lath.
7. How do I choose the right type of stone veneer for my home?
Choosing the right stone veneer depends on your aesthetic preferences, budget, and the architectural style of your home. Consider the color, texture, and size of the stones, as well as the overall look you want to achieve. Also, consider the maintenance requirements and durability of different stone types.
8. What are the common problems encountered during stone veneer installation?
Common problems include poor mortar adhesion, moisture issues, improper surface preparation, and incorrect stone placement. To avoid these, ensure the surface is properly prepared, use high-quality mortar, follow the manufacturer’s instructions, and take your time to ensure each stone is securely attached.
9. How do I maintain stone veneer siding to ensure longevity?
To maintain stone veneer siding, regularly inspect for cracks or loose stones, clean the surface with a mild detergent and a soft brush, and reseal the stone every few years to protect it from moisture. Avoid using harsh chemicals or pressure washing, as these can damage the stone and mortar.
10. Is it possible to DIY stone veneer siding installation, or should I hire a professional?
While it is possible to DIY stone veneer siding installation, it requires a significant amount of time, effort, and skill. If you are not experienced in masonry work or construction, it is generally recommended to hire a professional to ensure the job is done correctly and safely.