Keeping paint on rocks can be a challenge, especially when they’re exposed to the elements. This comprehensive guide from rockscapes.net provides everything you need to know about How To Keep Paint On Rocks, ensuring your beautiful creations last for years to come. Discover the best techniques, materials, and tips for sealing painted rocks and transforming your landscape with durable, vibrant rock art.
1. Why Does Paint Come Off Rocks?
Paint can come off rocks due to a variety of factors. The primary reason is the porous nature of rocks, which allows moisture and air to penetrate, disrupting the adhesion between the paint and the rock surface. Additionally, exposure to weather elements such as sunlight, rain, and temperature fluctuations can cause the paint to crack, peel, or fade. According to research from Arizona State University’s School of Earth and Space Exploration, extreme temperature variations can significantly impact the longevity of paint on natural surfaces like rocks. Using the wrong type of paint or sealer can also contribute to premature wear and tear.
- Porous Rock Surfaces: Natural rocks have microscopic pores that trap moisture, preventing paint from bonding effectively.
- Weather Exposure: Sunlight, rain, and temperature changes cause paint to degrade and lose adhesion.
- Incorrect Paint Type: Using paints not designed for outdoor use leads to cracking and peeling.
- Inadequate Sealing: Without a proper sealant, paint is vulnerable to environmental damage.
2. What Kind of Paint Stays on Rocks?
Choosing the right type of paint is crucial for ensuring long-lasting results. Acrylic paints are generally the best option for painting rocks because they are durable, water-resistant, and adhere well to porous surfaces. High-quality acrylic paints designed for outdoor use contain UV-resistant pigments that prevent fading and degradation from sunlight exposure. Additionally, consider using specialized rock paints that contain binding agents for enhanced adhesion and flexibility.
- Acrylic Paints: Known for their durability and water resistance, making them ideal for outdoor rock painting.
- UV-Resistant Paints: Contain pigments that resist fading and degradation from sunlight.
- Specialized Rock Paints: Formulated with binding agents for enhanced adhesion and flexibility.
- Latex Paints: Provide good coverage and durability, suitable for larger rock surfaces.
3. What Kind of Sealant Should I Use on Painted Rocks?
Selecting the right sealant is essential for protecting your painted rocks from the elements. Acrylic-based sealants are the most popular choice because they form a durable, water-resistant barrier that prevents moisture from penetrating the paint layer. Polyurethane sealants offer superior protection against UV damage and abrasion, making them suitable for rocks in high-traffic areas. Epoxy resins provide a hard, glossy finish that is highly resistant to chemicals and physical wear.
- Acrylic Sealants: Offer excellent water resistance and are easy to apply.
- Polyurethane Sealants: Provide superior UV protection and abrasion resistance.
- Epoxy Resins: Create a hard, glossy finish that is resistant to chemicals and wear.
- Spray Sealants: Convenient for even application and quick drying times.
- Brush-On Sealants: Allow for precise application and thorough coverage.
4. How to Prepare Rocks for Painting?
Proper preparation is key to ensuring that paint adheres well to rock surfaces. Start by cleaning the rocks thoroughly with soap and water to remove any dirt, debris, or loose particles. Use a scrub brush to dislodge stubborn stains or moss. Rinse the rocks thoroughly and allow them to dry completely before proceeding to the next step. For smoother paint application, consider applying a primer specifically designed for porous surfaces.
- Cleaning: Wash rocks with soap and water to remove dirt and debris.
- Scrubbing: Use a scrub brush to dislodge stubborn stains or moss.
- Rinsing: Rinse rocks thoroughly to remove soap residue.
- Drying: Allow rocks to dry completely before painting.
- Priming: Apply a primer for porous surfaces to improve paint adhesion.
5. What Are the Best Painting Techniques for Rocks?
Mastering the best painting techniques can significantly enhance the appearance and durability of your rock art. Apply thin, even coats of paint to prevent drips and ensure proper adhesion. Use high-quality brushes or paint pens for detailed work. Consider using stencils or masking tape to create clean lines and intricate designs. Allow each coat of paint to dry completely before applying the next.
- Thin Coats: Apply thin, even coats of paint to prevent drips and ensure proper adhesion.
- Quality Brushes: Use high-quality brushes or paint pens for detailed work.
- Stencils/Masking Tape: Employ stencils or masking tape for clean lines and intricate designs.
- Drying Time: Allow each coat of paint to dry completely before applying the next.
- Layering: Build up color intensity by layering multiple coats of paint.
6. How to Properly Seal Painted Rocks for Outdoor Use?
Properly sealing painted rocks is crucial for protecting them from the elements and ensuring their longevity. Apply several thin coats of sealant, allowing each coat to dry completely before applying the next. Use a spray sealant for even coverage or a brush-on sealant for more precise application. Ensure that you seal all surfaces of the rock, including the back and edges. According to experts at rockscapes.net, sealing painted rocks in a well-ventilated area is essential to avoid inhaling harmful fumes.
- Multiple Thin Coats: Apply several thin coats of sealant for optimal protection.
- Drying Time: Allow each coat of sealant to dry completely before applying the next.
- Spray vs. Brush-On: Choose a spray sealant for even coverage or a brush-on sealant for precise application.
- Seal All Surfaces: Ensure that you seal all surfaces of the rock, including the back and edges.
- Ventilation: Seal painted rocks in a well-ventilated area to avoid inhaling harmful fumes.
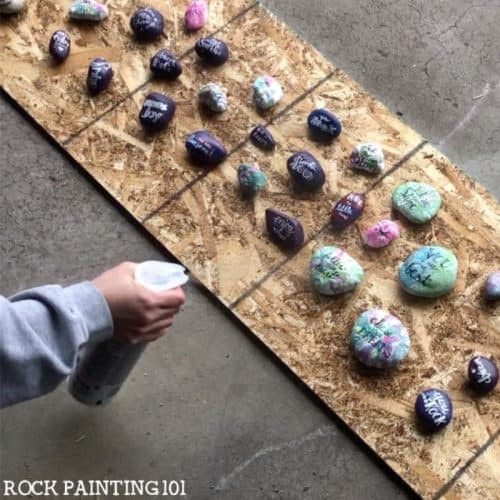
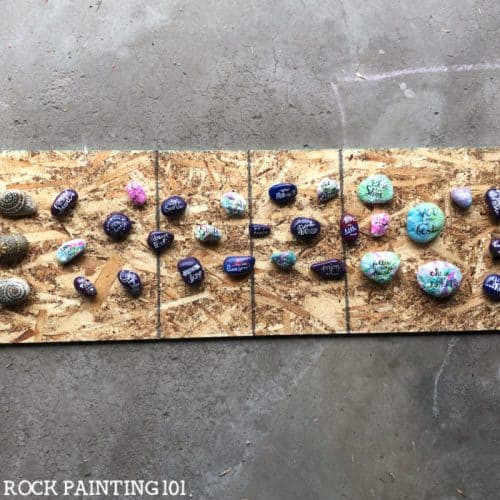 Spacing painted rocks for even sealant coverage, essential for weather protection
7. Common Mistakes to Avoid When Sealing Painted Rocks
Avoiding common mistakes can save you time and effort while ensuring the best possible results. One common mistake is holding the spray can too close to the rocks, which can cause uneven coats and drips. Another mistake is applying a heavy first coat, which can cause the paint to run or smear. Avoid letting the rocks dry in direct sunlight, as this can cause the sealant to crack or peel. Always seal the entire rock, not just the top surface. Never seal rocks on a windy day, as this can cause dust and debris to contaminate the finish.
- Holding Can Too Close: Maintain a distance of at least 8 inches when using spray sealants.
- Heavy First Coat: Apply a light mist coat first to prevent paint from running.
- Drying in Sunlight: Dry rocks in a well-ventilated, shaded area.
- Sealing Only the Top: Seal all surfaces of the rock for complete protection.
- Sealing on Windy Days: Avoid sealing rocks on windy days to prevent dust contamination.
8. What About Brush-On Sealers for Painted Rocks?
Brush-on sealers offer a different approach to protecting painted rocks, providing precision and control over the application process. These sealers are ideal for intricate designs and detailed artwork, allowing you to apply the sealant exactly where it’s needed. Choose a high-quality brush with soft bristles to avoid streaks or brush marks. Apply thin, even coats, allowing each coat to dry completely before applying the next.
- Precision Application: Brush-on sealers allow for precise application, ideal for detailed artwork.
- Quality Brushes: Use high-quality brushes with soft bristles to avoid streaks.
- Thin Coats: Apply thin, even coats, allowing each coat to dry completely.
- Coverage: Ensure thorough coverage, especially around edges and intricate details.
- Self-Leveling Formulas: Opt for self-leveling formulas to minimize brush marks.
9. How Do Weather Conditions Affect Painted Rocks?
Weather conditions play a significant role in the longevity of painted rocks. Sunlight can cause paint to fade and crack, while rain and moisture can lead to peeling and blistering. Temperature fluctuations can cause the rock to expand and contract, further compromising the adhesion of the paint. In areas with harsh winters, freezing temperatures can cause the paint to become brittle and prone to chipping. Proper sealing can mitigate these effects, but it’s essential to choose a sealant that is appropriate for your local climate.
- Sunlight: Causes paint to fade and crack over time.
- Rain and Moisture: Leads to peeling, blistering, and mold growth.
- Temperature Fluctuations: Causes expansion and contraction, compromising paint adhesion.
- Freezing Temperatures: Makes paint brittle and prone to chipping.
- Climate-Appropriate Sealants: Choose sealants designed for your specific climate conditions.
10. How to Choose the Right Colors for Outdoor Painted Rocks?
Choosing the right colors for outdoor painted rocks can enhance their visual appeal and longevity. Opt for pigments that are known for their lightfastness and resistance to fading. Earth tones, such as browns, greens, and grays, tend to hold up well in outdoor environments. Bright, vibrant colors may fade more quickly, but can be protected with UV-resistant sealants. Consider the surrounding landscape and choose colors that complement the natural environment.
- Lightfast Pigments: Choose pigments known for their resistance to fading.
- Earth Tones: Browns, greens, and grays tend to hold up well outdoors.
- UV-Resistant Sealants: Protect bright colors with UV-resistant sealants to prevent fading.
- Complementary Colors: Choose colors that complement the surrounding landscape.
- Color Testing: Test paint colors in an outdoor setting to assess their durability.
11. How Long Does Paint Last on Rocks?
The lifespan of paint on rocks depends on several factors, including the type of paint used, the quality of the sealant, and the environmental conditions. With proper preparation and sealing, high-quality acrylic paints can last for several years. Regular maintenance, such as cleaning and resealing, can further extend the lifespan of your rock art. According to landscaping experts, resealing painted rocks every 1-2 years can help maintain their vibrancy and protect them from the elements.
- Paint Type: High-quality acrylic paints offer the best longevity.
- Sealant Quality: A durable sealant protects paint from environmental damage.
- Environmental Conditions: Harsh weather can shorten the lifespan of painted rocks.
- Regular Maintenance: Cleaning and resealing can extend the lifespan of rock art.
- Resealing Frequency: Reseal painted rocks every 1-2 years for optimal protection.
12. Are There Any Eco-Friendly Options for Painting and Sealing Rocks?
For environmentally conscious individuals, there are several eco-friendly options for painting and sealing rocks. Water-based acrylic paints are low in VOCs (volatile organic compounds) and are safer for both the environment and your health. Natural sealants, such as beeswax or plant-based varnishes, offer a sustainable alternative to traditional chemical sealants. When disposing of paint and sealant containers, be sure to follow local regulations for proper recycling and disposal.
- Water-Based Acrylics: Low in VOCs and safer for the environment.
- Natural Sealants: Beeswax and plant-based varnishes offer sustainable alternatives.
- Recycling: Follow local regulations for proper recycling and disposal of containers.
- Non-Toxic Formulas: Choose non-toxic paints and sealants to minimize environmental impact.
- Sustainable Practices: Adopt sustainable practices throughout the painting and sealing process.
13. How to Store Painted Rocks Properly?
Proper storage can help protect painted rocks from damage and prolong their lifespan. Store painted rocks in a cool, dry place away from direct sunlight. If storing rocks outdoors, consider covering them with a tarp or placing them in a sheltered area. Avoid stacking rocks on top of each other, as this can cause scratches and abrasions.
- Cool, Dry Place: Store painted rocks in a cool, dry place to prevent moisture damage.
- Away from Sunlight: Protect rocks from direct sunlight to prevent fading.
- Outdoor Sheltering: Cover outdoor rocks with a tarp or place them in a sheltered area.
- Avoid Stacking: Prevent scratches and abrasions by avoiding stacking rocks.
- Protective Wrapping: Wrap individual rocks in soft cloth or paper for added protection.
14. How to Clean Painted Rocks Without Damaging the Paint?
Regular cleaning can help maintain the appearance of painted rocks without damaging the paint. Use a soft brush or cloth and mild soap and water to gently remove dirt and debris. Avoid using harsh chemicals or abrasive cleaners, as these can strip the paint or damage the sealant. Rinse the rocks thoroughly with clean water and allow them to dry completely before placing them back in your landscape.
- Soft Brush/Cloth: Use a soft brush or cloth to gently remove dirt.
- Mild Soap and Water: Clean rocks with mild soap and water.
- Avoid Harsh Chemicals: Refrain from using harsh chemicals or abrasive cleaners.
- Thorough Rinsing: Rinse rocks thoroughly with clean water.
- Complete Drying: Allow rocks to dry completely before replacing them.
15. What are Some Creative Ideas for Painting Rocks?
Painting rocks offers endless creative possibilities. Consider painting rocks with inspirational messages, whimsical characters, or colorful patterns. Use rocks to create miniature gardens, decorative accents, or unique garden markers. Get the whole family involved in the fun and create a collection of personalized rock art that reflects your unique style and personality.
- Inspirational Messages: Paint rocks with uplifting quotes or affirmations.
- Whimsical Characters: Create fun and playful rock characters for your garden.
- Colorful Patterns: Use geometric shapes and patterns to add visual interest.
- Miniature Gardens: Design miniature landscapes using painted rocks.
- Personalized Rock Art: Reflect your unique style with custom rock designs.
16. How to Involve Kids in Rock Painting Projects?
Rock painting is a fun and engaging activity that can be enjoyed by people of all ages. Set up a designated painting area with plenty of supplies, including rocks, paints, brushes, and sealants. Encourage kids to express their creativity and experiment with different colors and designs. Supervise children closely and ensure that they use non-toxic paints and sealants. Rockscapes.net offers a variety of kid-friendly rock painting ideas and tutorials to inspire your next family project.
- Designated Painting Area: Set up a safe and organized painting space.
- Abundant Supplies: Provide plenty of rocks, paints, brushes, and sealants.
- Creative Expression: Encourage kids to experiment with colors and designs.
- Close Supervision: Supervise children closely during the painting process.
- Non-Toxic Materials: Use non-toxic paints and sealants for kids’ safety.
 Essential rock painting supplies: paints, brushes, and sealants for creative projects
17. How to Incorporate Painted Rocks into Your Landscaping?
Painted rocks can add a unique and personal touch to your landscaping. Use painted rocks to create borders around flower beds, pathways, or water features. Place painted rocks strategically throughout your garden to add pops of color and visual interest. Consider using painted rocks to create themed gardens, such as fairy gardens or Zen gardens.
- Flower Bed Borders: Use painted rocks to create colorful borders around flower beds.
- Pathway Accents: Place painted rocks along pathways for added visual appeal.
- Water Feature Decoration: Incorporate painted rocks around water features for a whimsical touch.
- Themed Gardens: Create themed gardens using painted rocks, such as fairy gardens or Zen gardens.
- Strategic Placement: Position painted rocks strategically throughout your landscape to maximize their impact.
18. Are There Any Legal Considerations When Painting Rocks?
Before embarking on a rock painting project, it’s essential to be aware of any legal considerations. Check local regulations regarding the removal of rocks from public lands, as it may be prohibited in some areas. Avoid painting rocks on private property without the owner’s permission. Be mindful of environmental regulations and avoid using paints or sealants that could harm local ecosystems.
- Rock Removal Regulations: Check local regulations regarding rock removal from public lands.
- Private Property Permission: Obtain permission before painting rocks on private property.
- Environmental Regulations: Avoid using harmful paints or sealants that could damage ecosystems.
- Leave No Trace: Practice “Leave No Trace” principles when painting rocks in natural settings.
- Community Guidelines: Be aware of community guidelines and restrictions on public art projects.
19. What are the Benefits of Using Rocks in Landscaping?
Using rocks in landscaping offers numerous benefits. Rocks provide natural beauty and texture to outdoor spaces, creating a sense of harmony and tranquility. They require minimal maintenance and can help prevent soil erosion and weed growth. Rocks are also versatile and can be used in a variety of ways, from creating retaining walls to adding decorative accents.
- Natural Beauty: Rocks add natural beauty and texture to outdoor spaces.
- Low Maintenance: Rocks require minimal maintenance compared to other landscaping materials.
- Erosion Control: Rocks help prevent soil erosion and stabilize slopes.
- Weed Suppression: Rocks suppress weed growth by blocking sunlight and providing a barrier.
- Versatile Applications: Rocks can be used in a variety of landscaping projects, from retaining walls to decorative accents.
20. How to Find Inspiration for Your Rock Painting Projects?
Finding inspiration for your rock painting projects is easy with the wealth of resources available online and in your local community. Browse online galleries and social media platforms for ideas and inspiration. Visit local parks and gardens to observe natural rock formations and landscapes. Attend rock painting workshops and classes to learn new techniques and connect with other enthusiasts. Rockscapes.net offers a vast collection of rock painting ideas, tutorials, and inspiration to help you unleash your creativity.
- Online Galleries: Browse online galleries and social media platforms for ideas.
- Local Parks and Gardens: Visit local parks and gardens to observe natural rock formations.
- Workshops and Classes: Attend rock painting workshops and classes to learn new techniques.
- Rockscapes.net: Explore Rockscapes.net for a vast collection of ideas and tutorials.
- Community Inspiration: Connect with other rock painting enthusiasts for shared inspiration.
21. How to Repair Damaged Paint on Rocks?
Even with proper sealing, paint on rocks can sometimes become damaged due to wear and tear or environmental factors. Repairing damaged paint is a simple process that can restore the appearance of your rock art. Clean the damaged area with soap and water, then gently sand any rough edges. Apply a fresh coat of paint to match the existing color, allowing it to dry completely. Seal the repaired area with a thin coat of sealant to protect it from future damage.
- Clean the Area: Clean the damaged area with soap and water to remove dirt and debris.
- Sand Rough Edges: Gently sand any rough edges to create a smooth surface.
- Apply Fresh Paint: Apply a fresh coat of paint to match the existing color.
- Allow to Dry: Allow the paint to dry completely before proceeding.
- Seal the Repair: Seal the repaired area with a thin coat of sealant for protection.
22. What Are the Best Tools for Painting Rocks?
Having the right tools can make rock painting easier and more enjoyable. Invest in a set of high-quality acrylic paints in a variety of colors. Use a range of brushes in different sizes and shapes to achieve various effects. Consider using paint pens for detailed work and fine lines. Other useful tools include stencils, masking tape, sponges, and blending tools.
- High-Quality Paints: Invest in a set of high-quality acrylic paints.
- Variety of Brushes: Use brushes in different sizes and shapes for various effects.
- Paint Pens: Consider using paint pens for detailed work and fine lines.
- Stencils: Use stencils to create precise shapes and designs.
- Masking Tape: Employ masking tape for clean lines and sharp edges.
23. How Can Rockscapes.net Help You With Your Rock Painting Projects?
Rockscapes.net is your ultimate resource for all things rock painting. We offer a vast collection of ideas, tutorials, and inspiration to help you create stunning rock art. Our website features expert advice on selecting the right paints, sealants, and tools for your projects. We also provide detailed instructions on various painting techniques and sealing methods. Whether you’re a beginner or an experienced artist, Rockscapes.net has everything you need to unleash your creativity and transform your landscape with beautiful painted rocks.
- Vast Collection of Ideas: Explore a vast collection of rock painting ideas and inspiration.
- Detailed Tutorials: Follow step-by-step tutorials for various painting techniques and sealing methods.
- Expert Advice: Receive expert advice on selecting the right paints, sealants, and tools.
- Beginner-Friendly Resources: Access resources tailored for beginners and experienced artists alike.
- Community Support: Connect with a community of rock painting enthusiasts and share your creations.
24. How to Prepare Rocks for Sealing
Before sealing painted rocks, ensure they are completely dry. This usually means waiting at least overnight, but it depends on the type of paint used and the humidity levels. Clean the painted surface to remove any dust or debris that may have settled. A soft brush can be used for this purpose. Ensure that the rocks are placed on a non-stick surface, such as parchment paper or a silicone mat, to prevent them from sticking during the sealing process.
- Drying Time: Allow the painted rocks to dry completely before sealing.
- Surface Cleaning: Clean the painted surface to remove any dust or debris.
- Non-Stick Surface: Place the rocks on a non-stick surface to prevent sticking.
- Avoid Direct Sunlight: Keep the rocks out of direct sunlight during preparation.
- Check for Imperfections: Inspect the painted surface for any imperfections before sealing.
 Preparation for sealing painted rocks includes cleaning and ensuring dryness
25. What is the Ideal Environment for Sealing Painted Rocks?
The ideal environment for sealing painted rocks is a well-ventilated area with moderate temperature and low humidity. Avoid sealing rocks outdoors on windy days, as this can lead to uneven coverage and dust contamination. A garage or workshop with open windows is often a good choice. Wear a mask to protect yourself from inhaling sealant fumes. Ensure that the rocks are placed on a level surface to prevent drips and runs.
- Well-Ventilated Area: Seal painted rocks in a well-ventilated area to avoid inhaling fumes.
- Moderate Temperature: Maintain a moderate temperature to ensure proper drying.
- Low Humidity: Low humidity levels prevent moisture from affecting the sealant.
- Wind Protection: Avoid sealing rocks on windy days to prevent contamination.
- Level Surface: Ensure that the rocks are placed on a level surface to prevent drips.
26. How to Troubleshoot Common Sealing Problems
Even with careful preparation and application, sealing problems can sometimes occur. If the sealant is peeling, it may be due to improper drying or inadequate surface preparation. If the sealant is cloudy, it may be due to high humidity or applying too thick of a coat. If the sealant is sticky, it may be due to incomplete drying or using the wrong type of sealant. Consult the sealant manufacturer’s instructions for troubleshooting tips and solutions.
- Peeling Sealant: May be due to improper drying or inadequate surface preparation.
- Cloudy Sealant: May be due to high humidity or applying too thick of a coat.
- Sticky Sealant: May be due to incomplete drying or using the wrong type of sealant.
- Manufacturer’s Instructions: Consult the sealant manufacturer’s instructions for troubleshooting tips.
- Test Application: Perform a test application on a scrap rock before sealing the entire project.
27. How to Maintain Painted Rocks After Sealing
Once your painted rocks are sealed, regular maintenance can help prolong their lifespan and maintain their appearance. Clean the rocks periodically with a soft brush and mild soap and water to remove dirt and debris. Avoid using harsh chemicals or abrasive cleaners, as these can damage the sealant. Inspect the rocks regularly for signs of wear and tear, such as cracks or chips. Reseal the rocks every 1-2 years to provide continued protection from the elements.
- Periodic Cleaning: Clean the rocks periodically with a soft brush and mild soap and water.
- Avoid Harsh Chemicals: Refrain from using harsh chemicals or abrasive cleaners.
- Regular Inspection: Inspect the rocks regularly for signs of wear and tear.
- Resealing Frequency: Reseal the rocks every 1-2 years for continued protection.
- Gentle Handling: Handle the rocks gently to prevent scratches and chips.
28. What Are Some Advanced Techniques for Sealing Painted Rocks?
For those looking to take their sealing skills to the next level, there are several advanced techniques to explore. Consider using a two-part epoxy resin for a durable, high-gloss finish. Experiment with different application methods, such as pouring or brushing, to achieve unique effects. Use a heat gun or torch to remove air bubbles from epoxy resin coatings. Consult with experienced rock painters and sealant experts for tips and guidance.
- Two-Part Epoxy Resin: Use a two-part epoxy resin for a durable, high-gloss finish.
- Application Methods: Experiment with pouring or brushing to achieve unique effects.
- Heat Gun/Torch: Use a heat gun or torch to remove air bubbles from epoxy resin coatings.
- Expert Consultation: Consult with experienced rock painters and sealant experts for tips.
- Safety Precautions: Follow all safety precautions when working with advanced sealing techniques.
29. How Do Different Sealants React to Different Paints?
Different sealants can react differently to various types of paints. Some sealants may cause certain paints to bleed or run, while others may cause the paint to crack or peel. Always test a small, inconspicuous area of the painted rock before applying the sealant to the entire project. Consult the sealant and paint manufacturers’ instructions for compatibility information.
- Bleeding/Running: Some sealants may cause certain paints to bleed or run.
- Cracking/Peeling: Other sealants may cause the paint to crack or peel.
- Test Application: Always test a small, inconspicuous area before full application.
- Manufacturer’s Instructions: Consult the sealant and paint manufacturers’ instructions.
- Compatibility Charts: Look for compatibility charts to guide your sealant and paint choices.
30. What Are the Best Practices for Storing Sealants?
Proper storage of sealants is essential for maintaining their quality and effectiveness. Store sealants in a cool, dry place away from direct sunlight and extreme temperatures. Keep sealant containers tightly sealed to prevent evaporation and contamination. Follow the manufacturer’s instructions for specific storage recommendations.
- Cool, Dry Place: Store sealants in a cool, dry place.
- Away from Sunlight: Keep sealants away from direct sunlight.
- Tightly Sealed Containers: Keep sealant containers tightly sealed.
- Manufacturer’s Instructions: Follow the manufacturer’s instructions for storage.
- Expiration Dates: Check expiration dates and discard expired sealants.
31. FAQ About How to Keep Paint on Rocks
Here are some frequently asked questions about how to keep paint on rocks:
-
What is the best type of paint for rocks?
Acrylic paints are generally the best for rock painting due to their durability and water resistance.
-
How do I prepare rocks for painting?
Clean the rocks thoroughly with soap and water, scrub off any dirt or moss, and let them dry completely.
-
What kind of sealant should I use for painted rocks?
Acrylic-based sealants are a popular choice, providing a durable, water-resistant barrier.
-
How many coats of sealant should I apply?
Apply several thin coats, allowing each to dry completely before the next.
-
Can I use brush-on sealers for painted rocks?
Yes, brush-on sealers are great for detailed artwork, offering precision application.
-
How do weather conditions affect painted rocks?
Sunlight can cause fading, rain can lead to peeling, and temperature fluctuations can compromise paint adhesion.
-
Are there eco-friendly options for painting and sealing rocks?
Yes, water-based acrylic paints and natural sealants like beeswax are eco-friendly choices.
-
How long does paint last on rocks?
With proper preparation and sealing, high-quality acrylic paints can last for several years.
-
How can I involve kids in rock painting projects?
Set up a safe painting area, use non-toxic materials, and encourage creative expression.
-
Where can I find inspiration for rock painting projects?
Explore online galleries, visit local parks, and check out Rockscapes.net for ideas and tutorials.
Ready to transform your landscape with beautiful, durable painted rocks? Visit rockscapes.net today for inspiration, expert advice, and all the supplies you need to bring your creative vision to life. Don’t forget to check out our selection of high-quality paints and sealants, perfect for ensuring your rock art lasts for years to come. Contact us at Address: 1151 S Forest Ave, Tempe, AZ 85281, United States or Phone: +1 (480) 965-9011. Let rockscapes.net help you create a rockin’ landscape!