Labeling rocks is crucial for any serious collector or enthusiast, ensuring that your specimens are properly identified and their valuable information is preserved for years to come. This comprehensive guide, brought to you by rockscapes.net, will walk you through the essential steps of How To Label Rocks effectively, from assigning unique identifiers to creating informative display labels. Explore rockscapes.net for a wealth of inspiration and practical advice on rock identification and landscape design with rocks.
1. Why is Labeling Rocks Important?
Labeling rocks is crucial for any serious collector or enthusiast. There are many reasons why documenting, organizing, and properly labeling your rock collection is so important.
- Preserves Information: The primary reason to label rocks is to preserve their associated data. Without labels, crucial details about the rock’s origin, composition, and history can be lost over time.
- Aids Identification: Clear and accurate labels make identifying specimens easier, especially when dealing with similar-looking rocks. This helps avoid confusion and ensures that each rock is correctly categorized.
- Enhances Collection Value: A well-labeled collection demonstrates your dedication and expertise, increasing its value for both personal enjoyment and potential future sale or donation.
- Facilitates Research and Education: Labeled rocks can be valuable resources for educational purposes, allowing you to share your knowledge and inspire others to learn about geology.
- Prevents Loss of Data: Memories fade, and information stored only in your mind can be lost. Labeling ensures that the data associated with your rocks is preserved, even if you forget the details.
- Organization and Inventory: Labels enable you to organize your collection systematically, making it easier to manage, track, and inventory your specimens.
- Scientific Accuracy: For researchers and academics, accurate labeling is essential for maintaining the integrity of scientific studies and ensuring that findings are based on reliable data.
- Historical Context: Labels can record the history of a specimen, including its past ownership and any significant events associated with it. This adds a layer of historical context and interest to your collection.
- Compliance with Regulations: In some cases, labeling may be required to comply with legal or ethical guidelines, especially when dealing with protected or culturally significant rocks.
- Effective Communication: Clear labels allow you to effectively communicate information about your rocks to others, whether they are fellow collectors, researchers, or casual viewers.
2. Understanding Different Types of Rock Labels
When it comes to labeling your rock collection, there are various methods and materials you can use. Each type of label has its own advantages and disadvantages, so it’s important to choose the one that best suits your needs and preferences.
2.1. Direct Specimen Labels
Direct specimen labels are applied directly to the rock itself. There are some important things to remember before you use this option.
-
Paint Pens: These pens use either water-based or oil-based paint and are ideal for writing directly on the rock’s surface. Choose extra-fine tips for precise lettering.
- Pros: Durable, weather-resistant, and easy to apply.
- Cons: Can be difficult to remove, may not be suitable for delicate specimens.
-
Adhesive Labels: These labels have an adhesive backing that allows them to stick to the rock’s surface. They come in various sizes, shapes, and materials.
- Pros: Easy to apply, can be printed with detailed information, and are removable.
- Cons: May not be as durable as paint, can peel off over time, and may leave residue.
-
Engraving: This involves carving or etching information directly onto the rock’s surface using specialized tools.
- Pros: Permanent, weather-resistant, and adds a unique touch to the specimen.
- Cons: Requires specialized equipment, can damage delicate rocks, and is not easily reversible.
2.2. Indirect Specimen Labels
Indirect specimen labels can accompany the rocks, but are not physically attached to them. There are a few common types of this kind of rock label.
-
Display Labels: These labels are designed to be placed alongside the rock in a display case or exhibition. They typically include more detailed information about the specimen.
- Pros: Can provide extensive information, enhance the visual appeal of the display, and are easily updated.
- Cons: Require additional space, can be separated from the specimen, and may not be suitable for all collections.
-
Catalog Cards: These cards contain information about the rock and are stored in a separate catalog or database. Each card corresponds to a specific specimen.
- Pros: Allow for detailed record-keeping, easy to update, and can be cross-referenced with other data.
- Cons: Require a separate storage system, can be time-consuming to create and maintain, and may not be suitable for large collections.
-
Digital Records: These records store information about the rock in a digital format, such as a spreadsheet, database, or specialized software.
- Pros: Highly searchable, easy to update, and can store large amounts of data, including images and multimedia.
- Cons: Requires access to a computer or mobile device, can be vulnerable to data loss, and may not be suitable for all collectors.
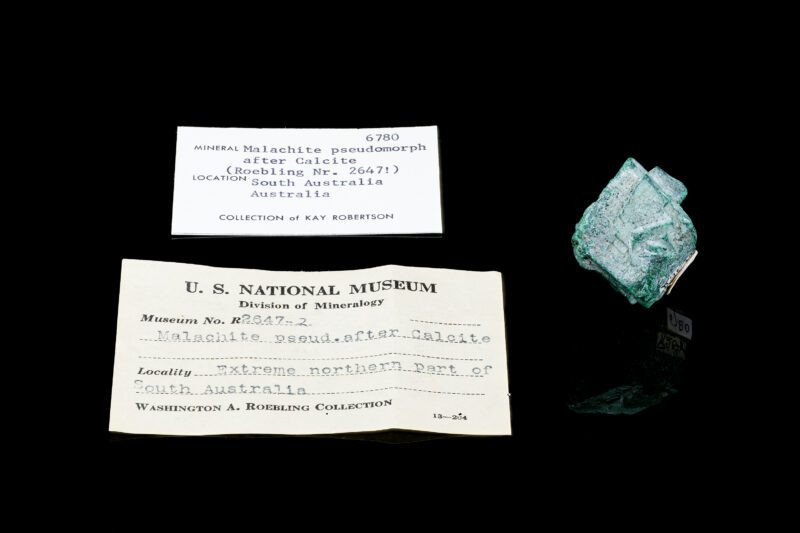
Two historical labels affixed to a malachite specimen. The painted label is from the Smithsonian National Museum of Natural History and the paper label is from Kay Robertson. Alt text: Historical specimen of malachite with painted and paper labels from the Smithsonian and Kay Robertson, showcasing traditional rock labeling methods.
2.3. Choosing the Right Label
When selecting a label, consider the following factors:
- Type of Rock: Delicate or porous rocks may not be suitable for direct labeling methods like paint pens or engraving.
- Collection Size: Large collections may benefit from digital records or catalog cards for efficient management.
- Display Needs: Display labels are ideal for showcasing rocks in a visually appealing and informative way.
- Budget: Some labeling methods require specialized equipment or materials, which can be costly.
- Personal Preference: Ultimately, the best labeling method is the one that you find easy to use and maintain.
3. Essential Information to Include on Rock Labels
To ensure that your rock labels are informative and useful, it’s important to include key details about each specimen. The information you include can vary depending on your collection’s purpose and your personal preferences, but here are some essential elements to consider:
- Unique Identifier: Assign each rock a unique number or code to link it to its corresponding record in your catalog or database. This is the most crucial piece of information, as it ties the physical specimen to its record.
- Mineral Name & Variety: Note the easily visible, dominant species, as well as any significant rare species. Include the scientific name of the mineral, as well as any common names or varieties.
- Locality: Include as much detail as possible regarding the place of origin, including country, state, county, or district, as well as the name and level of the mine, if known. Ideally, your notes would enable another collector to search for and locate the area of origination.
- Date Acquired: When did you first obtain this specimen? Record the date when you acquired the rock.
- Method of Acquisition: Was this specimen field-collected? Donated? Purchased? Specify how you obtained the rock, whether it was field-collected, purchased, donated, or traded.
- Source: If not collected in the field, where or who was this specimen acquired from? If you purchased or received the rock from someone, record the name of the seller or donor.
- Cost: What did you pay for this specimen? Note the price you paid for the rock, if applicable.
- Value: What is the specimen’s estimated value at the time of catalog entry? Estimate the current market value of the rock.
- Features: This is a helpful category for noting features such as twinning, pseudomorphs, associations with other minerals, etc. Note any unique physical characteristics or features of the rock, such as its color, texture, crystal structure, or any associated minerals.
- Dimensions & Weight: Noting the physical measurements and attributes of the specimen can be very useful in future identification, should your records be mislaid or confused. Record the size and weight of the rock.
- Provenance: Recording the history of a specimen is of paramount importance. This creates a record of the past ownership of the specimen, where the specimen has been, and preserves information for future collectors after yourself. Make sure to keep any label that came with a specimen. Document the rock’s history, including its past ownership and any significant events associated with it.
- Geological Formation: If known, record the geological formation or environment in which the rock was formed.
- Chemical Composition: If you have access to analytical data, include the chemical composition of the rock.
4. Step-by-Step Guide to Labeling Your Rocks
Labeling rocks might seem daunting, but following these steps will help you create a well-organized collection.
4.1. Gather Your Supplies
- Paint pens (extra-fine, water-based or oil-based)
- Adhesive labels (various sizes)
- Acid-free paper or cardstock
- Pens or markers (acid-free, archival quality)
- Computer and printer (optional)
- Labeling software or spreadsheet program (optional)
- Magnifying glass
- Cleaning supplies (soft brush, water, mild soap)
4.2. Clean the Rock
- Gently clean the surface of the rock with a soft brush, water, and mild soap to remove any dirt or debris.
- Allow the rock to dry completely before labeling.
4.3. Choose a Labeling Method
- Select the labeling method that best suits your rock type, collection size, and personal preference (direct specimen labels, indirect specimen labels, or digital records).
4.4. Assign a Unique Identifier
- Assign each rock a unique number or code. This identifier will be used to link the physical specimen to its corresponding record in your catalog or database.
- Consider using a simple numbering system (e.g., 001, 002, 003) or a more complex code that incorporates information about the rock’s origin or composition (e.g., AZ-GR-001 for a granite rock from Arizona).
4.5. Apply the Label
- If using a paint pen, carefully write the unique identifier directly on the rock’s surface. Choose a discreet location that won’t detract from the rock’s visual appeal.
- If using an adhesive label, print or write the unique identifier on the label and carefully apply it to the rock’s surface. Ensure the label is securely attached and won’t easily peel off.
- If creating a display label or catalog card, write or print the rock’s information on the label or card, including the unique identifier, mineral name, locality, and any other relevant details.
4.6. Create a Catalog or Database
- Create a catalog or database to store detailed information about each rock in your collection. This can be a simple spreadsheet, a specialized labeling software, or a digital document.
- Include all the essential information mentioned above, such as the unique identifier, mineral name, locality, date acquired, method of acquisition, and any other relevant details.
- Consider adding photos of each rock to your catalog or database to aid in identification and prevent confusion.
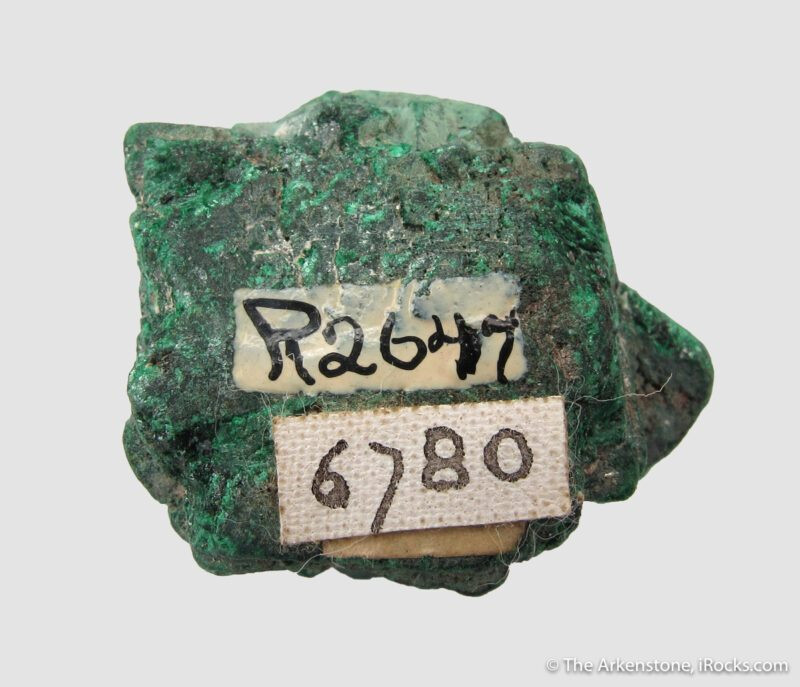
Collection labels matching the numerical identifiers affixed to the specimen (See above picture). Alt text: Collection labels paired with numerical identifiers on specimens, ensuring accurate documentation and organization for rock collectors.
4.7. Store and Display Your Collection
- Store your labeled rocks in a safe and organized manner. Consider using display cases, storage boxes, or shelves to protect your specimens from damage and make them easy to view.
- Arrange your rocks in a visually appealing way, grouping them by type, origin, or any other criteria that makes sense for your collection.
- Display your labeled rocks with pride, sharing your knowledge and passion with others.
5. Tips for Creating Effective Rock Labels
Creating informative and durable rock labels requires attention to detail and the use of appropriate materials and techniques. Here are some additional tips to help you create effective labels that will stand the test of time:
- Use Acid-Free Materials: When creating labels on paper or cardstock, always use acid-free materials to prevent the label from deteriorating over time. Acid-free paper and cardstock are designed to resist yellowing, fading, and becoming brittle.
- Choose Archival-Quality Inks: Use archival-quality pens and markers that are fade-resistant, waterproof, and non-bleeding. These inks will ensure that your writing remains clear and legible for many years.
- Protect Labels from Moisture: Moisture can damage labels and cause them to peel off or become illegible. Consider laminating your labels or using waterproof materials to protect them from humidity and water damage.
- Consider the Rock’s Texture: When applying labels directly to rocks, consider the texture of the rock’s surface. Rough or porous rocks may require a stronger adhesive or a more durable labeling method, such as engraving.
- Be Consistent: Maintain a consistent labeling style throughout your collection to ensure uniformity and easy readability. Use the same font, size, and formatting for all your labels.
- Keep Labels Concise: While it’s important to include essential information on your labels, avoid overcrowding them with unnecessary details. Keep your labels concise and easy to read at a glance.
- Use a Magnifying Glass: When writing small labels, use a magnifying glass to ensure that your writing is clear and legible. This will also help you avoid making mistakes.
- Test Your Labeling Method: Before labeling your entire collection, test your chosen labeling method on a few sample rocks to ensure that it is durable and effective.
- Update Your Labels Regularly: As you learn more about your rocks or acquire new specimens, update your labels accordingly. This will help you keep your collection organized and accurate.
- Document Your Labeling System: Keep a record of your labeling system, including the types of materials you use, the information you include on your labels, and any other relevant details. This will help you maintain consistency and ensure that your labels remain informative and useful for years to come.
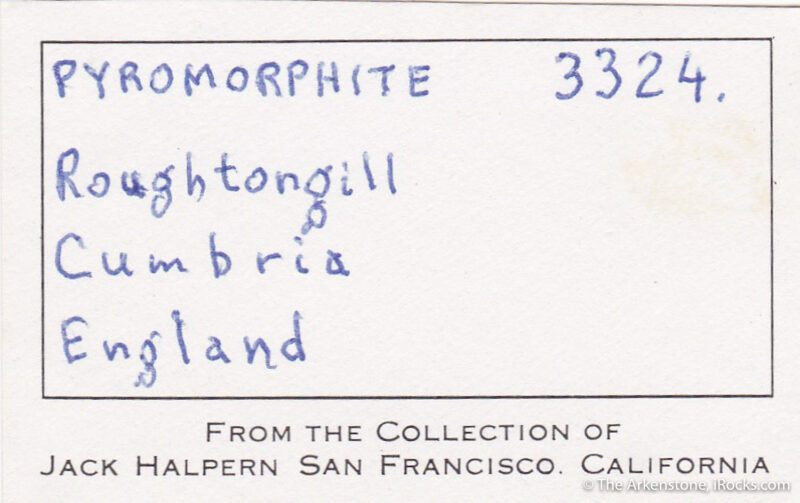
A collection label from Jack Halpern noting the mineral species, locality, and number identifier. Alt text: Collection label from Jack Halpern detailing mineral species, locality, and identifier number, showcasing essential information for rock collectors.
6. Digital Cataloging and Databases for Rock Collections
In today’s digital age, managing your rock collection with digital tools can greatly enhance organization, accessibility, and preservation of information. Digital cataloging and databases offer numerous advantages over traditional methods.
6.1. Benefits of Digital Cataloging
- Enhanced Organization: Digital databases allow you to organize your rock collection in a structured and searchable manner, making it easy to find specific specimens or groups of rocks.
- Increased Accessibility: Access your rock collection data from anywhere with an internet connection. Digital catalogs can be stored on cloud-based platforms, allowing you to view and update your collection from any device.
- Improved Data Preservation: Digital data is less susceptible to physical damage or loss compared to paper records. You can create backups of your digital catalog to ensure that your collection data is protected.
- Advanced Search Capabilities: Digital databases offer advanced search capabilities, allowing you to quickly find rocks based on various criteria such as mineral name, locality, date acquired, or any other attribute.
- Multimedia Integration: Incorporate images, videos, and other multimedia files into your digital catalog to create a more comprehensive and engaging record of your rock collection.
- Collaboration and Sharing: Easily share your rock collection data with other collectors, researchers, or educators. Digital catalogs can be shared online, allowing others to view and contribute to your collection data.
6.2. Popular Digital Cataloging Tools
- Spreadsheet Programs: Microsoft Excel and Google Sheets are versatile tools for creating basic digital catalogs. You can create columns for each attribute of your rocks, such as mineral name, locality, and date acquired.
- Database Software: Microsoft Access, FileMaker Pro, and other database software offer more advanced features for managing your rock collection data. These programs allow you to create custom forms, reports, and queries.
- Specialized Rock Collection Software: Several software programs are specifically designed for managing rock and mineral collections. These programs often include features such as automatic identification, image integration, and online data sharing. One such software is available at digitalrockhound.blogspot.com
- Cloud-Based Platforms: Cloud-based platforms such as Evernote and Google Drive allow you to store and access your rock collection data from anywhere with an internet connection. These platforms also offer collaboration features, allowing you to share your collection data with others.
6.3. Creating a Digital Catalog
- Choose a Cataloging Tool: Select the digital cataloging tool that best suits your needs and preferences. Consider factors such as ease of use, features, cost, and accessibility.
- Define Your Data Fields: Determine the attributes you want to record for each rock in your collection. These attributes may include mineral name, locality, date acquired, method of acquisition, size, weight, and any other relevant details.
- Create a Template: Create a template or form with the data fields you defined. This template will be used to record data for each rock in your collection.
- Enter Your Data: Enter the data for each rock in your collection into the template. Be as accurate and detailed as possible.
- Add Images: Add images of each rock to your digital catalog. This will help you visually identify your specimens and prevent confusion.
- Organize Your Data: Organize your data in a logical and consistent manner. Use folders, categories, or tags to group your rocks by type, origin, or any other criteria that makes sense for your collection.
- Back Up Your Data: Create regular backups of your digital catalog to protect your data from loss or corruption. Store your backups in a safe and secure location.
7. Advanced Labeling Techniques
For serious collectors and researchers, advanced labeling techniques can provide even more detailed and valuable information about your rock specimens.
7.1. Microscopic Labeling
- Purpose: Microscopic labeling involves creating labels that are small enough to be viewed under a microscope. This technique is useful for identifying and documenting microscopic features of rocks, such as mineral inclusions, crystal structures, or microfossils.
- Methods: Microscopic labels can be created using fine-tipped pens, micro-printing techniques, or laser etching. The labels are typically applied directly to the rock’s surface or to a thin section of the rock.
- Applications: Microscopic labeling is used in geological research, mineralogy, and paleontology to identify and document microscopic features of rocks.
7.2. Georeferencing
- Purpose: Georeferencing involves assigning geographic coordinates to rock specimens. This technique allows you to map the location where the rock was found and to analyze its spatial relationships with other geological features.
- Methods: Georeferencing can be done using GPS devices, online mapping tools, or GIS software. The geographic coordinates are typically recorded on the rock’s label or in the digital catalog.
- Applications: Georeferencing is used in geological mapping, environmental studies, and resource exploration to understand the distribution and characteristics of rocks in a specific area.
7.3. Spectroscopic Analysis
- Purpose: Spectroscopic analysis involves using analytical instruments to determine the chemical composition and mineralogical makeup of rocks. The results of these analyses can be recorded on the rock’s label or in the digital catalog.
- Methods: Spectroscopic analysis can be done using various techniques, such as X-ray diffraction (XRD), X-ray fluorescence (XRF), and Raman spectroscopy. The results of these analyses are typically presented in the form of spectra or chemical formulas.
- Applications: Spectroscopic analysis is used in geological research, mineral exploration, and materials science to identify and characterize the chemical and mineralogical properties of rocks. According to research from Arizona State University’s School of Earth and Space Exploration, in July 2025, spectroscopic analysis provides key insights into planetary geology and resource potential.
7.4. Isotopic Dating
- Purpose: Isotopic dating involves using radioactive isotopes to determine the age of rocks. This technique provides valuable information about the timing of geological events and the evolution of the Earth.
- Methods: Isotopic dating can be done using various methods, such as uranium-lead dating, potassium-argon dating, and carbon-14 dating. The results of these analyses are typically recorded on the rock’s label or in the digital catalog.
- Applications: Isotopic dating is used in geochronology, paleontology, and archaeology to determine the age of rocks, fossils, and artifacts.
8. Ethical Considerations for Labeling Rocks
When labeling rocks, it’s important to consider the ethical implications of your actions. Here are some ethical guidelines to follow:
- Respect Private Property: Always obtain permission before collecting rocks on private property. Respect the rights of landowners and avoid trespassing.
- Obey Local Regulations: Be aware of and comply with local regulations regarding rock collecting. Some areas may be protected or have restrictions on the types and quantities of rocks that can be collected.
- Minimize Environmental Impact: Collect rocks responsibly and minimize your impact on the environment. Avoid disturbing sensitive ecosystems or damaging geological formations.
- Avoid Collecting Rare or Endangered Specimens: Refrain from collecting rare or endangered rock specimens. These specimens may be protected by law or have significant scientific value.
- Document Your Collecting Activities: Keep a record of your collecting activities, including the date, location, and types of rocks collected. This information can be valuable for scientific research and conservation efforts.
- Share Your Knowledge: Share your knowledge about rocks and minerals with others. Educate others about the importance of responsible collecting and the ethical considerations involved.
- Be Transparent: Be transparent about the origin and history of your rocks. Provide accurate information about the location where the rock was found, the date it was collected, and any other relevant details.
- Respect Cultural Heritage: Be respectful of cultural heritage sites and avoid collecting rocks from areas that have historical or cultural significance.
- Avoid Commercial Exploitation: Avoid collecting rocks for commercial purposes without proper permits or authorization. Commercial exploitation of geological resources can have negative environmental and social impacts.
- Promote Responsible Collecting: Promote responsible rock collecting practices among other collectors. Encourage others to follow ethical guidelines and to respect the environment and cultural heritage.
9. Common Mistakes to Avoid When Labeling Rocks
Labeling rocks can be a rewarding and informative process, but it’s important to avoid common mistakes that can compromise the accuracy and longevity of your labels.
- Using Non-Archival Materials: Using non-archival materials, such as regular paper and ink, can cause your labels to deteriorate over time, making them illegible or even destroying them completely. Always use acid-free paper, archival-quality pens, and other materials that are designed to last for many years.
- Applying Labels to Dirty or Wet Rocks: Applying labels to dirty or wet rocks can prevent the adhesive from sticking properly, causing the label to peel off or become damaged. Always clean and dry your rocks thoroughly before applying labels.
- Writing Illegible Labels: Writing illegible labels can make it difficult to identify your rocks in the future, especially if your handwriting is not clear. Take your time and write neatly, using a fine-tipped pen and a magnifying glass if necessary.
- Including Incomplete Information: Including incomplete information on your labels can make it difficult to track down the origin, history, or other important details about your rocks. Be sure to include all the essential information, such as the mineral name, locality, date acquired, and method of acquisition.
- Using Inconsistent Labeling Systems: Using inconsistent labeling systems can create confusion and make it difficult to organize your rock collection. Establish a consistent labeling system and stick to it.
- Failing to Protect Labels from Moisture: Failing to protect labels from moisture can cause them to peel off, fade, or become illegible. Consider laminating your labels or using waterproof materials to protect them from humidity and water damage.
- Overcrowding Labels: Overcrowding labels with too much information can make them difficult to read and can detract from the visual appeal of your rocks. Keep your labels concise and easy to read at a glance.
- Using Labels That Are Too Large or Too Small: Using labels that are too large can overwhelm the rock and detract from its natural beauty, while using labels that are too small can make them difficult to read. Choose labels that are appropriately sized for your rocks.
- Failing to Update Labels: Failing to update labels as you learn more about your rocks or acquire new specimens can lead to inaccuracies and outdated information. Update your labels regularly to ensure that they remain accurate and informative.
- Not Backing Up Digital Catalogs: Not backing up digital catalogs can result in the loss of valuable data if your computer crashes or your files become corrupted. Create regular backups of your digital catalog and store them in a safe and secure location.
10. Frequently Asked Questions (FAQs) About How To Label Rocks
- Q1: What is the best way to label rocks?
- The best way to label rocks depends on the type of rock, collection size, and personal preferences. Direct specimen labels (paint pens, adhesive labels), indirect specimen labels (display labels, catalog cards), and digital records are all viable options.
- Q2: What information should I include on a rock label?
- At a minimum, include a unique identifier, mineral name, locality, date acquired, method of acquisition, and any other relevant details.
- Q3: What materials should I use to create rock labels?
- Use acid-free paper, archival-quality pens, and other materials that are designed to last for many years.
- Q4: How can I protect my rock labels from moisture?
- Consider laminating your labels or using waterproof materials to protect them from humidity and water damage.
- Q5: How can I organize my rock collection?
- Organize your rocks by type, origin, or any other criteria that makes sense for your collection. Use display cases, storage boxes, or shelves to protect your specimens from damage.
- Q6: What are the ethical considerations for labeling rocks?
- Respect private property, obey local regulations, minimize environmental impact, and avoid collecting rare or endangered specimens.
- Q7: How can I create a digital catalog of my rock collection?
- Use spreadsheet programs, database software, or specialized rock collection software to create a digital catalog. Include images of each rock to aid in identification.
- Q8: What are some common mistakes to avoid when labeling rocks?
- Avoid using non-archival materials, applying labels to dirty or wet rocks, writing illegible labels, and including incomplete information.
- Q9: How do I remove old labels from rocks?
- Gently scrape off the old label with a plastic scraper or use a solvent like acetone or mineral spirits to dissolve the adhesive. Be careful not to damage the rock.
- Q10: Can I use QR codes on my rock labels?
- Yes, QR codes can be used to link to digital information about the rock, such as its mineral composition, locality map, or historical data. This is a great way to provide more detailed information without cluttering the physical label.
Labeling your rocks is more than just sticking a piece of paper to a stone; it’s about preserving knowledge, enhancing your appreciation for the natural world, and creating a legacy for future generations to enjoy.
Ready to take your rock collection to the next level? Visit rockscapes.net today for inspiration, detailed information on rock types, and expert advice on creating stunning landscape designs with rocks. Let’s turn your passion for rocks into a beautifully organized and informative collection! Contact us at Address: 1151 S Forest Ave, Tempe, AZ 85281, United States or Phone: +1 (480) 965-9011.