Laying a rock driveway is a cost-effective and visually appealing way to enhance your property, and rockscapes.net is here to guide you through the entire process. This guide offers step-by-step instructions, material selection advice, and design inspiration to ensure your rock driveway is both durable and beautiful, creating a stunning landscape feature. Learn how to choose the right rocks, prepare the base, and maintain your new driveway with expert tips from rockscapes.net.
1. Understanding The Appeal Of A Rock Driveway
A rock driveway offers more than just a functional surface; it brings a unique aesthetic appeal and practical benefits to your property. They are visually appealing, durable, and permeable. Let’s explore why so many homeowners are choosing rock driveways:
- Aesthetic Versatility: Rock driveways can complement various architectural styles, from rustic to modern.
- Environmental Benefits: Permeable surfaces reduce runoff and help replenish groundwater.
- Cost-Effectiveness: Often more affordable than concrete or asphalt, especially in areas where rock is readily available.
- Low Maintenance: Requires less upkeep compared to paved driveways, with occasional raking and replenishment.
1.1. The Growing Popularity Of Rock Driveways
The popularity of rock driveways is on the rise due to their blend of aesthetic appeal, practicality, and environmental consciousness. As homeowners increasingly seek sustainable and visually interesting landscaping options, rock driveways have emerged as a favored choice.
1.2. Environmental And Economic Advantages
Rock driveways offer numerous environmental and economic advantages. Environmentally, their permeability reduces water runoff and helps recharge groundwater, decreasing the strain on local water systems. Economically, the initial cost of installing a rock driveway is often lower than that of asphalt or concrete, and the maintenance requirements are minimal, leading to long-term savings.
2. Planning Your Rock Driveway Project
Proper planning is crucial for a successful rock driveway installation. Carefully assess your needs and the site conditions to ensure the final result is both functional and aesthetically pleasing.
2.1. Assessing Your Needs And Preferences
Before starting, consider the following:
- Traffic Volume: How much daily use will the driveway endure?
- Vehicle Types: Will heavy vehicles like trucks or RVs use the driveway?
- Aesthetic Goals: What style of rock best complements your home and landscape?
2.2. Site Evaluation And Preparation
Evaluate the site for:
- Slope: Significant slopes may require additional stabilization.
- Drainage: Ensure proper water runoff to prevent erosion.
- Soil Type: Soil composition affects the base preparation needed.
2.3. Local Regulations And Permits
Check local building codes and regulations. Some areas may require permits for driveway installations, especially those affecting drainage or public right-of-ways.
3. Choosing The Right Type Of Rock
Selecting the right type of rock is essential for the longevity and appearance of your driveway. Different rocks offer varying levels of durability, aesthetic appeal, and cost.
3.1. Gravel
Gravel is a popular and cost-effective choice for driveways. It comes in various sizes and colors, providing a natural look and good drainage.
-
Pros: Affordable, easy to install, good drainage.
-
Cons: Can shift and create ruts, requires periodic replenishment.
-
Best For: High-traffic areas, cost-conscious homeowners.
Gravel driveway provides an affordable and effective solution for homeowners.
3.2. Crushed Stone
Crushed stone consists of angular pieces of rock that interlock, providing a more stable surface than gravel.
- Pros: More stable than gravel, good drainage, various sizes and colors.
- Cons: Can be rough on tires, slightly more expensive than gravel.
- Best For: Driveways needing extra stability, areas with moderate traffic.
3.3. River Rock
River rock offers a smooth, rounded appearance, adding a touch of elegance to driveways.
- Pros: Aesthetically pleasing, smooth surface.
- Cons: Can shift easily, not ideal for steep slopes, more expensive.
- Best For: Decorative driveways with minimal slope and low traffic.
3.4. Decomposed Granite
Decomposed granite (DG) is a fine, gravel-like material that packs down to create a firm, stable surface.
- Pros: Stable surface, natural look, permeable.
- Cons: Can erode in heavy rain, requires stabilization in sloped areas.
- Best For: Driveways needing a firm surface, areas with good drainage.
3.5. Other Options
- Lava Rock: Lightweight and porous, offering excellent drainage.
- Quartzite: Durable and visually striking with a sparkling appearance.
- Flagstone: Flat stones laid to create a paved look, offering a unique aesthetic.
4. Essential Tools And Materials
Gathering the right tools and materials ensures a smooth and efficient installation process.
4.1. Tools
- Shovels: For digging and moving materials.
- Rakes: For leveling and spreading rock.
- Wheelbarrow: For transporting materials.
- Tamper or Plate Compactor: For compacting the base.
- Measuring Tape: For accurate measurements.
- Level: For ensuring a flat surface.
- Landscape Fabric: For weed control.
- Gloves and Safety Glasses: For personal protection.
4.2. Materials
- Base Material (e.g., Crushed Stone): For creating a stable sub-base.
- Driveway Rock: Choose based on your needs and preferences.
- Edging Material (Optional): For containing the rock and adding a finished look.
- Weed Barrier Fabric: To prevent weed growth.
- Gravel Stabilizer Grids (Optional): For added stability, especially on slopes.
4.3. Calculating Material Quantities
Accurately calculate the amount of each material needed to avoid shortages or excess. Use online calculators or consult with suppliers to determine the required quantities based on the driveway’s dimensions and desired depth.
5. Step-By-Step Guide To Laying A Rock Driveway
Follow these steps for a successful rock driveway installation.
5.1. Step 1: Preparing The Site
- Clear the Area: Remove vegetation, topsoil, and any debris.
- Excavate: Dig down to a depth of at least 6-12 inches, depending on the soil type and traffic volume.
- Grade the Surface: Ensure a slight slope (1-2%) for water runoff.
5.2. Step 2: Installing The Sub-Base
- Lay the Base Material: Spread a layer of crushed stone or gravel to a depth of 4-8 inches.
- Compact the Base: Use a tamper or plate compactor to create a solid, stable foundation.
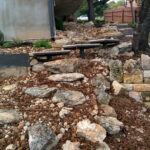
.jpg)
Compacting gravel to ensure the driveway base is sturdy and can withstand heavy loads.
5.3. Step 3: Adding The Weed Barrier
- Roll Out Landscape Fabric: Cover the compacted base with landscape fabric to prevent weed growth.
- Overlap Seams: Overlap the fabric seams by at least 12 inches to ensure complete coverage.
- Secure the Edges: Use landscape staples to secure the fabric to the ground.
5.4. Step 4: Laying The Rock
- Spread the Rock: Distribute the chosen rock evenly over the landscape fabric to a depth of 2-4 inches.
- Rake and Level: Use a rake to create a smooth, uniform surface.
- Compact Lightly: If desired, lightly compact the rock with a roller to help it settle.
5.5. Step 5: Adding Edging (Optional)
- Install Edging: Place edging material along the driveway’s borders to contain the rock and add a finished look.
- Secure Edging: Use stakes or concrete to secure the edging in place.
6. Advanced Techniques For Rock Driveway Installation
For added stability and longevity, consider these advanced techniques.
6.1. Using Gravel Stabilizer Grids
Gravel stabilizer grids provide a structured base that prevents rock from shifting and creating ruts.
- Installation: Lay the grids over the compacted base and fill with the chosen rock.
- Benefits: Enhanced stability, reduced maintenance, prevents erosion.
6.2. Incorporating Drainage Solutions
Proper drainage is essential to prevent water damage and erosion.
- French Drains: Install perforated pipes surrounded by gravel to redirect water away from the driveway.
- Swales: Create shallow, vegetated channels to capture and filter runoff.
6.3. Dealing With Slopes
Sloped driveways require special attention to prevent rock from sliding downhill.
- Terracing: Create level sections with retaining walls to reduce the slope.
- Gravel Stabilizer Grids: Use grids to provide extra stability on sloped areas.
7. Design Ideas And Inspiration
Transform your driveway into a stunning landscape feature with these design ideas.
7.1. Blending With The Landscape
Choose rocks that complement the natural surroundings and architectural style of your home.
- Rustic: Use natural gravel or river rock for a rugged, earthy look.
- Modern: Opt for crushed stone or decomposed granite for a clean, contemporary appearance.
- Coastal: Incorporate shells or light-colored rocks for a beachy vibe.
7.2. Creating Patterns And Borders
Add visual interest with creative patterns and borders.
- Contrasting Colors: Use different colored rocks to create geometric patterns.
- Edging with Boulders: Line the driveway with large boulders for a dramatic effect.
- Incorporating Plants: Add drought-tolerant plants along the edges for a touch of greenery.
7.3. Lighting Options
Enhance the beauty and safety of your driveway with lighting.
- Solar Lights: Install solar-powered lights along the driveway for an energy-efficient solution.
- Path Lighting: Use low-level path lights to illuminate the driveway’s edges.
- Spotlights: Highlight specific features, such as boulders or plants.
8. Maintenance And Care
Proper maintenance ensures your rock driveway remains beautiful and functional for years to come.
8.1. Regular Raking And Leveling
Periodically rake and level the rock to maintain a smooth, uniform surface.
- Frequency: Rake every few weeks or as needed to address ruts and unevenness.
- Technique: Use a sturdy rake to redistribute the rock evenly.
8.2. Weed Control
Prevent weed growth with regular maintenance.
- Hand Pulling: Remove weeds by hand to avoid damaging the landscape fabric.
- Herbicides: Use herbicides sparingly and choose products safe for the environment.
8.3. Replenishing Rock
Over time, rock may settle or be displaced. Replenish as needed to maintain the desired depth.
- Frequency: Replenish every 1-2 years, depending on traffic and weather conditions.
- Technique: Add new rock evenly over the existing surface, raking to blend.
8.4. Preventing Erosion
Address erosion issues promptly to prevent further damage.
- Check Drainage: Ensure proper water runoff to prevent pooling and erosion.
- Add Stabilizers: Use gravel stabilizer grids or edging to contain the rock and prevent movement.
9. Common Mistakes To Avoid
Steer clear of these common pitfalls to ensure a successful rock driveway installation.
9.1. Insufficient Base Preparation
A weak or poorly compacted base can lead to instability and premature failure.
- Solution: Invest time and effort in creating a solid, well-compacted sub-base.
9.2. Choosing The Wrong Rock Type
Selecting a rock type unsuitable for the site conditions or traffic volume can result in shifting and rutting.
- Solution: Choose a rock type that is durable, stable, and appropriate for the intended use.
9.3. Neglecting Drainage
Poor drainage can cause erosion and water damage.
- Solution: Incorporate drainage solutions, such as French drains or swales, to manage water runoff.
9.4. Skipping The Weed Barrier
Failing to install a weed barrier can lead to excessive weed growth and increased maintenance.
- Solution: Always install landscape fabric under the rock to prevent weeds.
10. Frequently Asked Questions (FAQs)
1. How much does it cost to install a rock driveway?
The cost varies depending on the type of rock, the size of the driveway, and the amount of preparation required. Generally, it ranges from $3 to $7 per square foot.
2. Is a rock driveway suitable for all climates?
Yes, but the type of rock and drainage solutions may need to be adjusted for specific climates.
3. Can I install a rock driveway myself?
Yes, with the right tools and preparation, a rock driveway can be a DIY project. However, for large or complex installations, professional help is recommended.
4. How long does a rock driveway last?
With proper maintenance, a rock driveway can last for many years. The lifespan depends on the type of rock, traffic volume, and climate conditions.
5. How do I prevent weeds from growing in my rock driveway?
Use landscape fabric under the rock and regularly remove any weeds that appear.
6. What is the best base material for a rock driveway?
Crushed stone or gravel is the best base material, providing a stable and well-draining foundation.
7. How often should I replenish the rock in my driveway?
Replenish every 1-2 years, or as needed to maintain the desired depth and appearance.
8. Can I use river rock on a sloped driveway?
River rock is not recommended for sloped driveways, as it can shift easily. Use gravel stabilizer grids or terracing for added stability.
9. How do I maintain a rock driveway in the winter?
Remove snow with a shovel or snow blower, being careful not to disturb the rock. Avoid using salt, as it can damage some types of rock.
10. What are the benefits of using gravel stabilizer grids?
Gravel stabilizer grids enhance stability, reduce maintenance, and prevent erosion, making them ideal for high-traffic and sloped areas.
11. Rockscapes.Net: Your Partner In Rock Driveway Excellence
At rockscapes.net, we understand the beauty and functionality of rock driveways. Our mission is to provide you with the highest quality materials, expert advice, and innovative solutions to create a stunning and durable driveway that enhances your property’s curb appeal.
11.1. Discover A Wide Range Of Rock Options
Explore our extensive selection of gravel, crushed stone, river rock, and decomposed granite to find the perfect match for your design vision. Each type of rock is carefully sourced and tested to ensure superior quality and longevity.
11.2. Expert Guidance And Consultation
Our team of experienced professionals is here to guide you through every step of the process, from initial planning to final installation. We offer personalized consultations to assess your specific needs, recommend the best materials, and provide detailed installation instructions.
11.3. Innovative Solutions For Lasting Durability
We offer a range of innovative solutions, including gravel stabilizer grids, drainage systems, and edging materials, to ensure your rock driveway stands the test of time. Our products are designed to enhance stability, prevent erosion, and minimize maintenance, so you can enjoy a beautiful and functional driveway for years to come.
11.4. Your Vision, Our Expertise
At rockscapes.net, we are committed to bringing your vision to life. Whether you’re seeking a rustic, natural look or a sleek, modern design, we have the expertise and resources to create a rock driveway that reflects your unique style and enhances your property’s value. Let us help you transform your driveway into a stunning landscape feature that you’ll be proud of for years to come.
12. Success Stories: Rock Driveways That Inspire
12.1. Project 1: The Rustic Retreat
Challenge: A homeowner in Arizona wanted to create a driveway that blended seamlessly with the natural desert landscape.
Solution: Rockscapes.net recommended a mix of locally sourced gravel and crushed stone in earthy tones. The driveway was designed with gentle curves and lined with native plants, creating a rustic and inviting entrance.
Result: The homeowner was thrilled with the result, which perfectly complemented the surrounding environment and enhanced the property’s curb appeal.
12.2. Project 2: The Modern Estate
Challenge: A homeowner in California wanted a sleek and contemporary driveway that would enhance the architectural style of their modern home.
Solution: Rockscapes.net suggested decomposed granite in a neutral color, stabilized with gravel grids. The driveway was designed with clean lines and incorporated a minimalist lighting scheme.
Result: The homeowner praised the driveway’s clean aesthetic and durability, noting that it perfectly complemented the modern design of their home.
12.3. Project 3: The Coastal Cottage
Challenge: A homeowner on the coast of Maine wanted a driveway that would capture the essence of a coastal cottage while withstanding harsh weather conditions.
Solution: Rockscapes.net recommended a mix of light-colored gravel and shells, stabilized with a permeable base. The driveway was designed with a gentle slope to allow for proper drainage and lined with coastal plants.
Result: The homeowner was delighted with the driveway’s charming coastal aesthetic and its ability to withstand the elements.
13. Call To Action
Ready to transform your driveway into a stunning landscape feature? Visit rockscapes.net today to explore our wide range of rock options, discover design ideas, and receive expert guidance. Contact our team at +1 (480) 965-9011 or visit our showroom at 1151 S Forest Ave, Tempe, AZ 85281, United States, to schedule a consultation and bring your rock driveway vision to life. Let us help you create a durable, beautiful, and sustainable driveway that enhances your property’s value and curb appeal.