Laying a rock walkway is a fantastic way to enhance your outdoor space, adding both beauty and functionality to your landscape and here at rockscapes.net we will help you to do just that. By following our comprehensive guide, you’ll discover how to create a stunning and durable pathway using various types of rocks and landscaping materials.
1. Understanding the Essentials of Rock Walkways
Rock walkways offer a natural, rustic charm that complements any garden or yard. A well-laid rock walkway not only enhances the aesthetic appeal of your landscape but also provides a durable and practical pathway.
1.1. What Is a Rock Walkway?
A rock walkway is a pathway constructed using natural stones, rocks, or pebbles to create a walking surface. These walkways can vary in design, from informal paths winding through gardens to more structured and formal entrances. According to Arizona State University’s School of Earth and Space Exploration, natural stone paths can significantly reduce soil erosion and improve water absorption in landscapes.
1.2. Why Choose a Rock Walkway?
- Aesthetic Appeal: Rock walkways bring a natural, timeless beauty to any landscape, blending seamlessly with the environment.
- Durability: Natural stones are incredibly durable and can withstand various weather conditions.
- Permeability: Rock walkways allow water to drain naturally, reducing runoff and preventing soil erosion.
- Customization: With a wide variety of stones available, you can create a unique design that reflects your personal style.
- Low Maintenance: Once installed, rock walkways require minimal upkeep.
1.3. Different Styles of Rock Walkways
- Flagstone Walkways: Use large, flat stones for a smooth, even surface, ideal for formal gardens.
- Gravel Paths: Offer a rustic, informal look, perfect for winding garden paths.
- Pebble Walkways: Create a textured surface with small, rounded stones, great for adding visual interest.
- Stepping Stone Paths: Use individual stones spaced apart, suitable for casual garden strolls.
- Dry-Stack Walkways: Involve stacking stones without mortar, creating a natural, rugged appearance.
2. Planning Your Rock Walkway Project
Effective planning is crucial for a successful rock walkway installation. Here’s how to start:
2.1. Assessing Your Landscape
- Evaluate the Soil: Check the soil type to determine if you need to amend it for better drainage.
- Consider the Climate: Choose stones that are suitable for your local climate to ensure longevity.
- Determine the Path’s Purpose: Decide whether the walkway will be for casual strolls or heavy foot traffic.
- Measure the Area: Accurately measure the length and width of the path to calculate the amount of materials needed.
2.2. Determining Your Budget
- Material Costs: Price different types of stones and other materials like gravel, sand, and landscape fabric.
- Tool Rentals: Factor in the cost of renting tools like a plate compactor or sod cutter.
- Labor Costs: If hiring professionals, get quotes from multiple contractors to find the best deal.
- Contingency Fund: Set aside a portion of your budget for unexpected expenses.
2.3. Choosing the Right Materials
- Types of Stones:
- Flagstone: Known for its flat, even surface and variety of colors.
- Gravel: Affordable and easy to install, available in different sizes and colors.
- Pebbles: Smooth and rounded, providing a comfortable walking surface.
- River Rock: Offers a natural, rustic look with varying sizes and shapes.
- Slate: Durable and elegant, with a distinctive layered appearance.
- Base Materials:
- Gravel Base: Provides a stable and well-draining foundation.
- Sand: Helps to level the surface and prevent stones from shifting.
- Landscape Fabric: Prevents weed growth and keeps the base materials separate from the soil.
- Edging Materials:
- Plastic Edging: Flexible and easy to install, ideal for curved paths.
- Metal Edging: Durable and provides a clean, modern look.
- Brick or Stone Edging: Adds a decorative touch and helps contain the walkway materials.
- Wood Edging: Offers a natural, rustic border.
 Assorted stones and gravel for landscaping
2.4. Creating a Design Layout
- Mark the Path: Use stakes and string or a garden hose to outline the path.
- Consider Curves and Turns: Incorporate gentle curves for a more natural look.
- Plan for Drainage: Ensure the path slopes slightly to allow water to run off.
- Visualize the End Result: Use design software or sketches to see how the path will look in your landscape.
3. Preparing the Site for Your Rock Walkway
Proper site preparation is essential for a long-lasting rock walkway.
3.1. Clearing the Area
- Remove Vegetation: Clear grass, weeds, and other plants from the path area.
- Excavate the Soil: Dig down to the required depth, usually 4-6 inches, depending on the base materials.
- Remove Obstacles: Clear any rocks, roots, or debris that could interfere with the walkway.
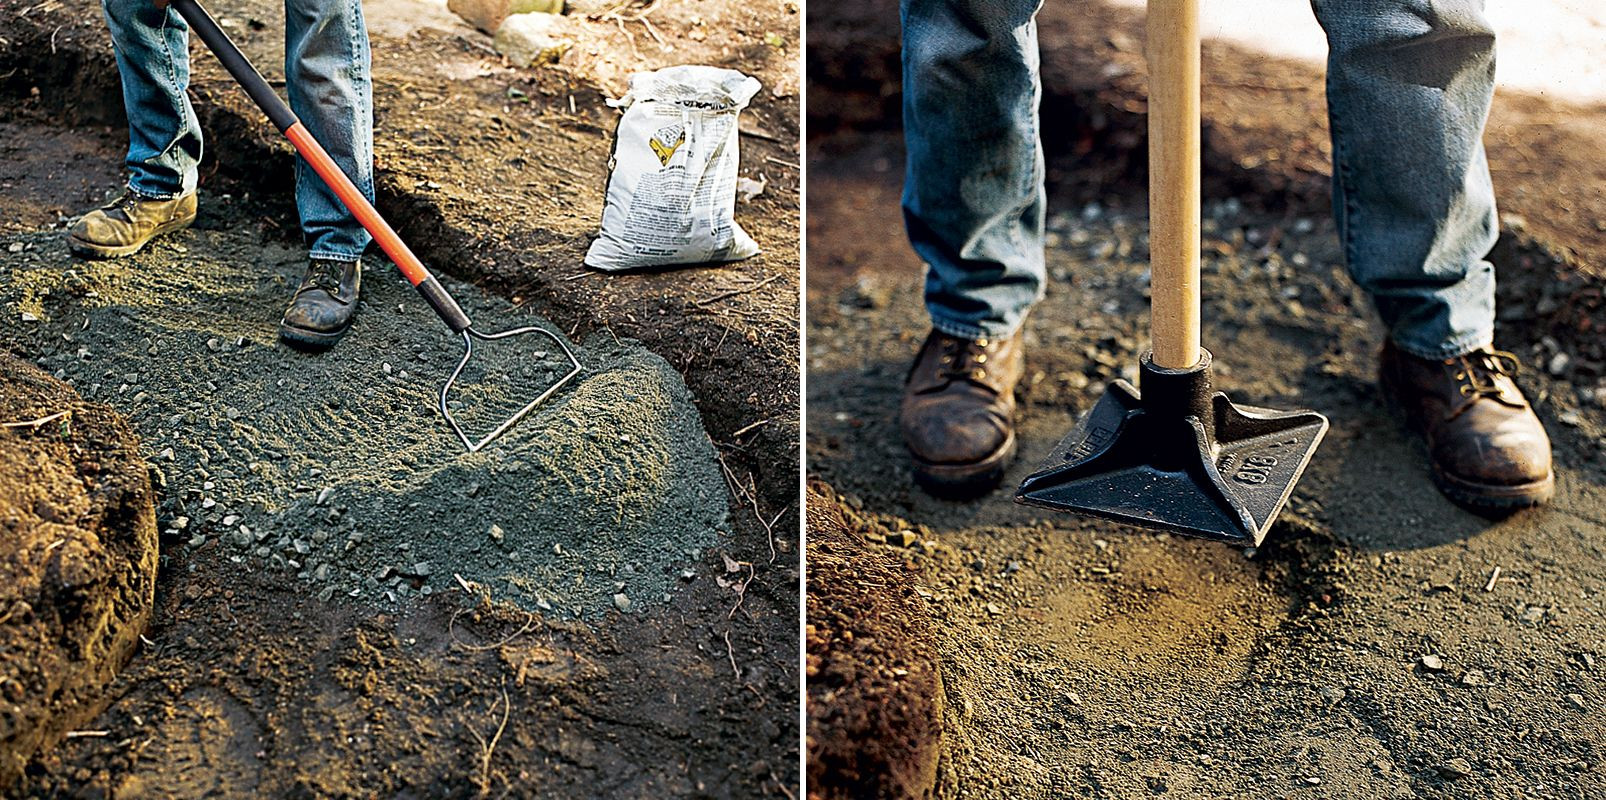
3.2. Grading and Leveling
- Slope for Drainage: Ensure a slight slope (about 2%) to allow water to run off the path.
- Level the Surface: Use a rake and shovel to create a smooth, even surface.
- Compact the Soil: Use a hand tamper or plate compactor to compact the soil for a stable base.
3.3. Installing Edging
- Position the Edging: Place the edging materials along the sides of the path, following the design layout.
- Secure the Edging: Use stakes or pins to hold the edging in place.
- Ensure Levelness: Check that the edging is level and adjust as needed.
3.4. Laying the Base Materials
- Landscape Fabric: Lay landscape fabric over the compacted soil to prevent weed growth.
- Gravel Base: Spread a layer of gravel over the fabric, usually 2-4 inches thick.
- Compact the Gravel: Use a hand tamper or plate compactor to compact the gravel base.
- Sand Layer: Add a layer of sand over the gravel, about 1 inch thick, to help level the surface.
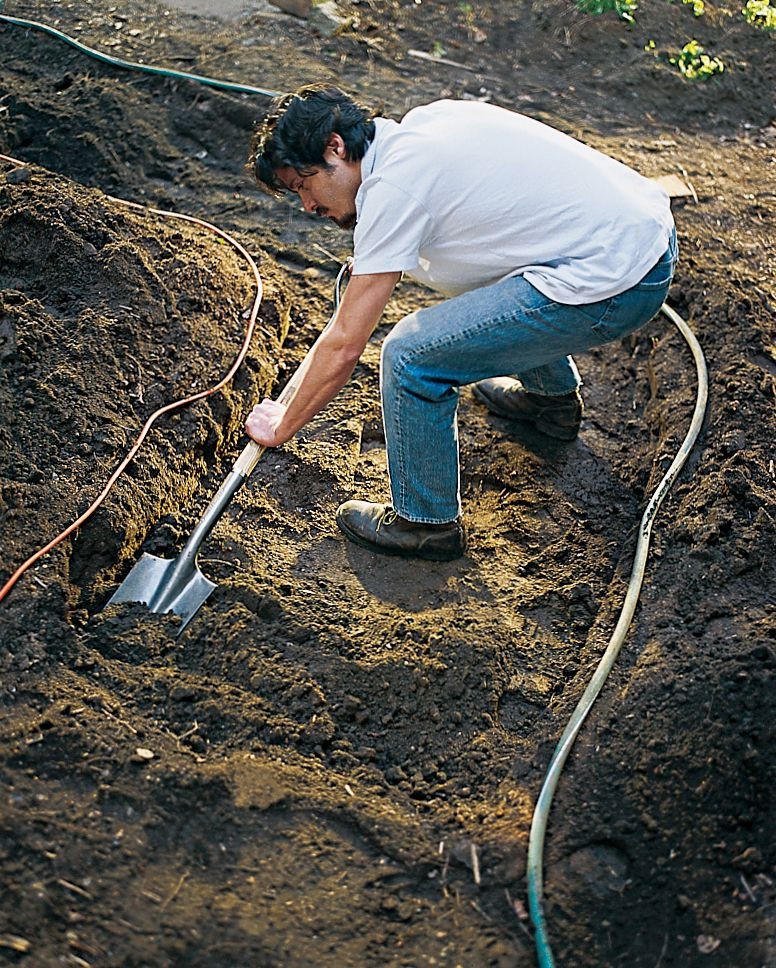 Digging a trench for a rock path
4. Laying the Rocks for Your Walkway
With the site prepared, it’s time to lay the rocks and create your walkway.
4.1. Arranging the Stones
- Start with the Largest Stones: Place the largest stones first, spacing them evenly along the path.
- Fill in the Gaps: Use smaller stones or pebbles to fill the gaps between the larger stones.
- Create a Pattern: Arrange the stones in a visually appealing pattern, whether formal or informal.
- Ensure Stability: Make sure each stone is stable and doesn’t rock or shift.
4.2. Setting Flagstones
- Position Each Stone: Carefully place each flagstone, ensuring it fits snugly into the sand layer.
- Level the Stones: Use a rubber mallet to tap the stones into place, ensuring they are level with each other.
- Check for Stability: Make sure each stone is stable and doesn’t rock or shift.
- Fill Joints with Sand: Sweep sand into the joints between the stones to lock them in place.
4.3. Creating Gravel Paths
- Pour the Gravel: Pour the gravel over the prepared base, spreading it evenly with a rake.
- Compact the Gravel: Use a hand tamper or plate compactor to compact the gravel surface.
- Add a Topping Layer: Add a thin layer of decorative gravel for a finished look.
- Maintain the Path: Rake the gravel periodically to keep it smooth and even.
4.4. Building Pebble Walkways
- Spread the Pebbles: Spread the pebbles over the prepared base, creating a layer that is 2-3 inches thick.
- Arrange the Pebbles: Arrange the pebbles by hand to create a smooth, even surface.
- Compact the Pebbles: Use a hand tamper to gently compact the pebbles into the sand layer.
- Add a Resin Binder: For extra stability, consider applying a resin binder to lock the pebbles in place.
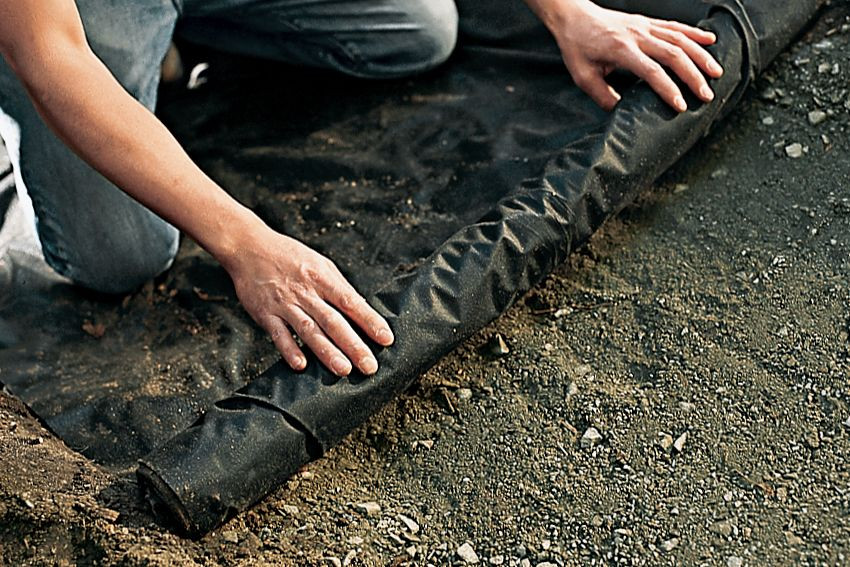 Laying down landscape fabric
5. Finishing Touches and Landscaping
Complete your rock walkway with these finishing touches.
5.1. Adding Borders and Accents
- Plant Flowers: Add colorful flowers along the path to enhance its visual appeal.
- Install Lighting: Install path lighting to improve safety and highlight the walkway at night.
- Add Decorative Stones: Place decorative stones or boulders along the path for added interest.
- Incorporate Water Features: Add a small water feature, such as a birdbath or fountain, near the path.
5.2. Incorporating Plants and Vegetation
- Choose Complementary Plants: Select plants that complement the style and color of the rocks.
- Consider Ground Cover: Use ground cover plants to soften the edges of the path and prevent soil erosion.
- Plant Strategically: Plant taller plants behind the path to create a backdrop and add depth to the landscape.
- Maintain Plants Regularly: Trim and prune plants to keep them from overgrowing the path.
5.3. Ensuring Proper Drainage
- Check for Standing Water: After rain, check for areas where water pools on the path.
- Adjust the Slope: If water is pooling, adjust the slope to improve drainage.
- Add a French Drain: In areas with poor drainage, consider installing a French drain to redirect water away from the path.
5.4. Adding Landscape Lighting
- Placement: Position the edging materials along the sides of the path, following the design layout.
- Low Voltage: Low-voltage lights are safer and easier to install than high-voltage options.
- Solar Lights: Solar lights are eco-friendly and require no wiring.
- Fixture Types: There are many options to choose from, including flood lights, spotlights and path lights.
6. Maintenance and Care for Your Rock Walkway
Proper maintenance will keep your rock walkway looking its best for years to come.
6.1. Regular Cleaning
- Sweep Regularly: Sweep the path regularly to remove leaves, dirt, and debris.
- Hose Down: Hose down the path occasionally to remove stubborn stains.
- Use a Mild Detergent: For tough stains, use a mild detergent and scrub with a brush.
- Avoid Harsh Chemicals: Avoid using harsh chemicals that could damage the stones or harm plants.
6.2. Weed Control
- Pull Weeds Regularly: Pull weeds by hand to prevent them from spreading.
- Apply a Weed Killer: Use a weed killer to control weeds in the joints between the stones.
- Use Landscape Fabric: Ensure the landscape fabric is properly installed to prevent weed growth from below.
6.3. Repairing Damage
- Replace Broken Stones: Replace any broken or cracked stones as soon as possible.
- Level Uneven Stones: Re-level any stones that have shifted or become uneven.
- Refill Joints: Refill the joints between the stones with sand or gravel as needed.
6.4. Seasonal Maintenance
- Spring: Clean the path, repair any damage, and apply a weed killer.
- Summer: Water plants regularly and trim any overgrowth.
- Fall: Remove leaves and debris, and prepare the path for winter.
- Winter: Protect the path from snow and ice, and avoid using salt or harsh de-icers.
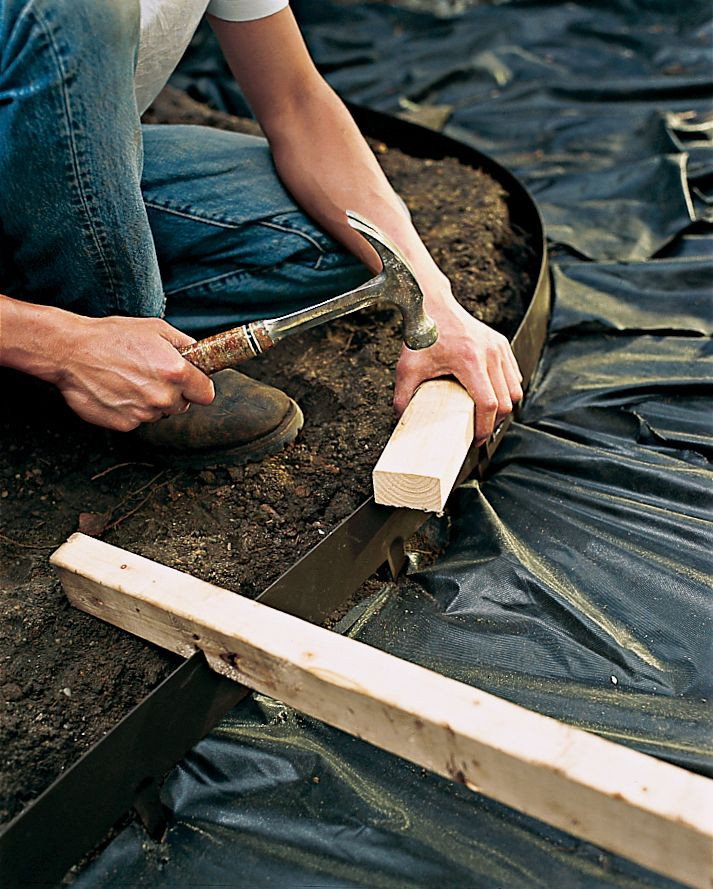 Installing edging around the path
7. Common Mistakes to Avoid When Laying a Rock Walkway
Avoid these common pitfalls to ensure a successful project.
7.1. Poor Planning
- Failing to Measure: Always measure the area accurately to determine the amount of materials needed.
- Ignoring the Soil: Assess the soil type and amend it as needed for proper drainage.
- Not Considering the Climate: Choose stones that are suitable for your local climate.
- Neglecting the Design: Plan the path layout carefully to ensure it complements your landscape.
7.2. Improper Site Preparation
- Skipping Excavation: Excavate the soil to the required depth to create a stable base.
- Ignoring Grading: Ensure a slight slope for proper drainage.
- Forgetting Landscape Fabric: Always use landscape fabric to prevent weed growth.
- Neglecting Compaction: Compact the soil and base materials for a stable foundation.
7.3. Incorrect Installation
- Using Unstable Stones: Ensure each stone is stable and doesn’t rock or shift.
- Leaving Gaps: Fill the gaps between the stones with smaller stones or pebbles.
- Not Leveling Stones: Level the stones to create a smooth, even surface.
- Ignoring Edging: Install edging to contain the walkway materials and prevent them from spreading.
7.4. Neglecting Maintenance
- Failing to Clean: Clean the path regularly to remove leaves, dirt, and debris.
- Ignoring Weeds: Control weeds to prevent them from overgrowing the path.
- Delaying Repairs: Repair any damage promptly to prevent it from worsening.
8. Rock Walkway Design Ideas and Inspiration
Get inspired with these creative rock walkway design ideas.
8.1. Rustic Garden Path
Use natural stones and gravel to create a winding path through a lush garden. Incorporate plants like ferns, hostas, and wildflowers to enhance the rustic look.
8.2. Formal Entrance Walkway
Use flagstones and brick edging to create a formal walkway leading to your front door. Add symmetrical plantings and elegant lighting fixtures for a sophisticated touch.
8.3. Zen Garden Pathway
Use pebbles and stepping stones to create a serene pathway in a Zen garden. Incorporate elements like bamboo, moss, and a small water feature for a calming atmosphere.
8.4. Cottage-Style Walkway
Use a mix of stones, gravel, and flowering plants to create a charming cottage-style walkway. Add elements like a picket fence, birdhouse, and vintage garden decor for a whimsical look.
8.5. Modern Rock Walkway
Use clean lines, geometric shapes, and minimalist plantings to create a modern rock walkway. Incorporate materials like slate, metal edging, and architectural grasses for a contemporary design.
9. The Benefits of Hiring a Professional
While DIY installation is possible, hiring a professional offers several advantages.
9.1. Expertise and Experience
Professionals have the knowledge and experience to handle complex installations and ensure a high-quality result. They can assess your landscape, recommend the best materials, and create a design that meets your needs and budget.
9.2. Time Savings
Installing a rock walkway can be time-consuming, especially for large or complex projects. Hiring a professional can save you time and allow you to focus on other tasks.
9.3. Quality Workmanship
Professionals have the tools and skills to ensure the walkway is installed correctly and will last for years to come. They can handle tasks like grading, leveling, compacting, and stone placement with precision and care.
9.4. Cost-Effectiveness
While hiring a professional may seem expensive, it can be cost-effective in the long run. Professionals can help you avoid costly mistakes, choose the right materials, and ensure the walkway is durable and requires minimal maintenance.
10. Frequently Asked Questions (FAQs) About Rock Walkways
10.1. What Is the Best Type of Stone for a Walkway?
The best type of stone depends on your style preferences, budget, and climate. Flagstone, slate, and river rock are popular choices for their durability and aesthetic appeal.
10.2. How Deep Should I Dig for a Rock Walkway?
Dig down 4-6 inches to create a stable base for the walkway. This depth allows for a layer of gravel, sand, and the stones themselves.
10.3. Do I Need Landscape Fabric Under a Rock Walkway?
Yes, landscape fabric is essential for preventing weed growth and keeping the base materials separate from the soil.
10.4. How Do I Prevent Weeds From Growing in My Rock Walkway?
Use landscape fabric, pull weeds regularly, and apply a weed killer as needed.
10.5. How Do I Maintain a Gravel Walkway?
Rake the gravel periodically to keep it smooth and even, and add more gravel as needed.
10.6. How Do I Level Uneven Stones in a Walkway?
Use a rubber mallet to tap the stones into place, and add sand underneath to level them.
10.7. Can I Install a Rock Walkway on a Slope?
Yes, but you’ll need to create terraces or steps to ensure safe and comfortable passage.
10.8. What Is the Best Edging Material for a Rock Walkway?
Plastic, metal, brick, and wood edging are all suitable options, depending on your style preferences and budget.
10.9. How Much Does It Cost to Install a Rock Walkway?
The cost varies depending on the size of the path, the type of stones used, and whether you hire a professional. Expect to pay anywhere from $5 to $20 per square foot.
10.10. Can I Use Recycled Materials for My Rock Walkway?
Yes, you can use recycled materials like reclaimed bricks, concrete, or broken stones to create a unique and eco-friendly walkway.
Crafting a rock walkway is more than just laying stones; it’s about creating a lasting feature that enhances your outdoor space. With the right planning, materials, and techniques, you can build a beautiful and functional pathway that complements your landscape and reflects your personal style.
Ready to transform your outdoor space with a stunning rock walkway? Visit rockscapes.net today for expert advice, high-quality materials, and inspiring design ideas. Let us help you create the landscape of your dreams. Contact us at Address: 1151 S Forest Ave, Tempe, AZ 85281, United States or Phone: +1 (480) 965-9011.