Are you looking to enhance your landscape with natural stone? Laying river rock tile is a fantastic way to add texture and visual interest to your outdoor spaces, and rockscapes.net is here to guide you. From patios to pathways, discover how to install river rock for a stunning and durable finish. Dive in to explore river rock design ideas, gather essential tips for successful installation, and learn how to maintain your river rock surfaces for long-lasting beauty.
1. Understanding River Rock Tile
What exactly are river rock tiles, and why should you consider using them in your landscape projects?
River rock tiles are decorative stones that have been rounded and smoothed by the natural movement of water over time. These stones, often sourced from riverbeds, are then arranged and adhered to a mesh backing to create easy-to-install tiles. Their appeal lies in their natural aesthetic, durability, and the unique texture they bring to any surface.
River rock tiles are a versatile choice for enhancing both interior and exterior spaces, bringing a touch of nature’s elegance to your home. Here’s why they are a popular option:
- Natural Appeal: Each tile boasts a unique combination of colors, shapes, and sizes, offering a natural, organic look that complements various design styles.
- Durability: River rocks are incredibly durable and resistant to wear and tear, making them suitable for high-traffic areas.
- Versatility: These tiles can be used in a variety of applications, from flooring and backsplashes to garden pathways and decorative walls.
- Texture: The textured surface of river rock provides a non-slip surface, making it an excellent choice for areas that may get wet.
2. Planning Your River Rock Tile Project
2.1. Defining Your Project Goals
Before diving into the installation process, take the time to clearly define your project goals. Understanding what you want to achieve will guide your decisions and ensure a successful outcome.
- Purpose: Determine the primary purpose of your river rock tile installation. Is it for a purely decorative feature, or will it serve a functional purpose like a walkway or patio?
- Style: Consider the overall style you want to achieve. Do you prefer a rustic, natural look, or a more modern, polished appearance?
- Budget: Set a realistic budget that includes the cost of materials, tools, and any professional assistance you might need.
- Timeline: Establish a timeline for completing the project, taking into account preparation, installation, and curing times.
2.2. Measuring the Area and Calculating Materials
Accurate measurements are crucial for estimating the amount of river rock tile you’ll need. Follow these steps to ensure you purchase the correct quantity:
- Measure: Use a measuring tape to determine the length and width of the area you plan to cover.
- Calculate: Multiply the length by the width to find the total square footage.
- Add Extra: Add an additional 10% to account for cuts, waste, and potential breakage during installation.
- Consult: If possible, consult with a professional at rockscapes.net to verify your measurements and material estimates.
2.3. Selecting the Right Type of River Rock
River rocks come in various sizes, colors, and textures. Choosing the right type is essential for achieving your desired aesthetic and functional goals.
- Size: Smaller pebbles are ideal for intricate patterns, while larger stones create a bolder, more rustic look.
- Color: Select colors that complement your existing landscape or interior décor. Neutral tones blend seamlessly, while vibrant hues can add a pop of color.
- Texture: Consider the texture of the rocks. Smoother stones are comfortable underfoot, making them suitable for walkways and patios. Rougher stones offer better grip but may be less comfortable for bare feet.
2.4. Understanding Regional Considerations (Arizona)
If you’re based in a region like Arizona, you need to consider specific environmental factors that can impact your river rock tile installation.
- Climate: Arizona’s extreme temperatures and arid climate can affect the durability of your mortar and the stability of the base. Ensure you use materials that are designed to withstand these conditions.
- Drainage: Proper drainage is crucial in Arizona to prevent water from pooling and damaging your installation. Incorporate drainage solutions like gravel beds and sloping surfaces.
- Local Stone: Consider using locally sourced river rocks, which are naturally adapted to the Arizona climate and blend seamlessly with the surrounding landscape.
Arizona State University’s School of Earth and Space Exploration recommends using locally sourced materials to reduce environmental impact and ensure compatibility with the regional climate.
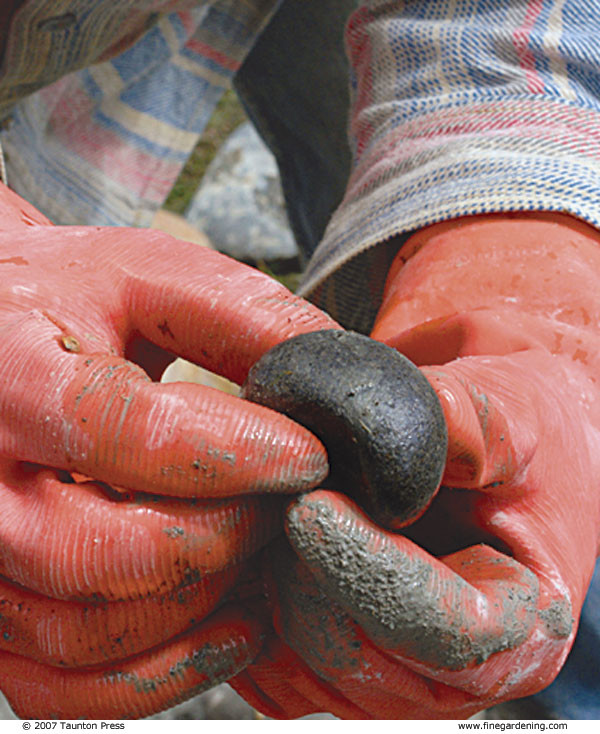 Close-up of river rock tiles showing varying colors and textures.
River rock tiles come in a variety of colors and textures, making them a versatile choice for various design aesthetics.
3. Essential Tools and Materials for River Rock Tile Installation
Having the right tools and materials on hand is crucial for a smooth and efficient river rock tile installation. Here’s a comprehensive list to help you prepare:
3.1. Tools
| Tool | Purpose |
|---|---|
| Measuring Tape | Accurately measure the area for tiling. |
| Level | Ensure the surface is even before and during installation. |
| Trowel | Apply mortar evenly onto the surface. |
| Rubber Mallet | Gently tap tiles into place without damaging them. |
| Tile Saw | Cut tiles to fit edges and corners precisely. |
| Grout Float | Apply grout smoothly and evenly between tiles. |
| Buckets | Mix mortar and grout. |
| Sponges | Clean excess mortar and grout from the tile surface. |
| Safety Glasses | Protect your eyes from dust and debris. |
| Work Gloves | Protect your hands from abrasion and chemical exposure. |
| Dust Mask or Respirator | Prevent inhalation of dust particles during mixing and cutting. |
3.2. Materials
| Material | Purpose |
|---|---|
| River Rock Tiles | The decorative stones arranged on a mesh backing for easy installation. |
| Mortar | Adheres the tiles to the subfloor or surface. |
| Grout | Fills the spaces between the tiles, providing stability and preventing water penetration. |
| Sealer | Protects the tiles and grout from stains and moisture, enhancing durability. |
| Backer Board (Cement Board) | Provides a stable, waterproof subfloor for tiling, especially in wet areas like bathrooms or outdoor spaces. |
| Crushed Gravel | Forms a solid base for outdoor installations, promoting drainage and preventing shifting. |
| Landscape Fabric | Placed beneath the gravel to prevent weed growth and soil erosion. |
3.3. Safety Gear
Safety should always be a top priority when undertaking any DIY project. Ensure you have the following safety gear:
- Safety Glasses: Protect your eyes from dust and debris when cutting tiles or mixing materials.
- Work Gloves: Protect your hands from abrasion and chemical exposure.
- Dust Mask or Respirator: Prevent inhalation of dust particles during mixing and cutting.
- Knee Pads: Provide comfort and support when working on your knees for extended periods.
4. Preparing the Surface for River Rock Tile
Proper surface preparation is essential for ensuring a long-lasting and visually appealing river rock tile installation. Follow these steps to prepare your surface effectively:
4.1. Cleaning and Leveling the Substrate
- Remove Debris: Clear the area of any existing debris, such as rocks, vegetation, or old materials.
- Clean Thoroughly: Use a broom or brush to sweep away any loose dirt or particles.
- Level the Surface: Use a level to identify any uneven areas. Fill low spots with compacted gravel or leveling compound.
- Compact the Base: For outdoor installations, use a plate compactor to ensure the base is firm and stable.
4.2. Applying a Cement Backer Board (If Applicable)
A cement backer board provides a stable, waterproof subfloor for tiling, especially in wet areas like bathrooms or outdoor spaces.
- Measure and Cut: Measure the area and cut the backer board to fit using a utility knife or circular saw.
- Apply Thin-Set Mortar: Spread a layer of thin-set mortar onto the subfloor using a notched trowel.
- Install Backer Board: Place the backer board onto the mortar, pressing firmly to ensure good adhesion.
- Secure with Screws: Use backer board screws to secure the board to the subfloor every 6-8 inches.
- Tape Seams: Tape the seams between the boards with backer board tape to prevent moisture penetration.
4.3. Creating a Proper Drainage System
Proper drainage is crucial for outdoor installations to prevent water from pooling and damaging your river rock tile.
- Slope the Surface: Ensure the surface has a slight slope (about 2%) to allow water to run off.
- Install a Gravel Bed: Create a gravel bed at least 4 inches deep beneath the tiles to promote drainage.
- Use Landscape Fabric: Place landscape fabric between the soil and gravel to prevent weed growth and soil erosion.
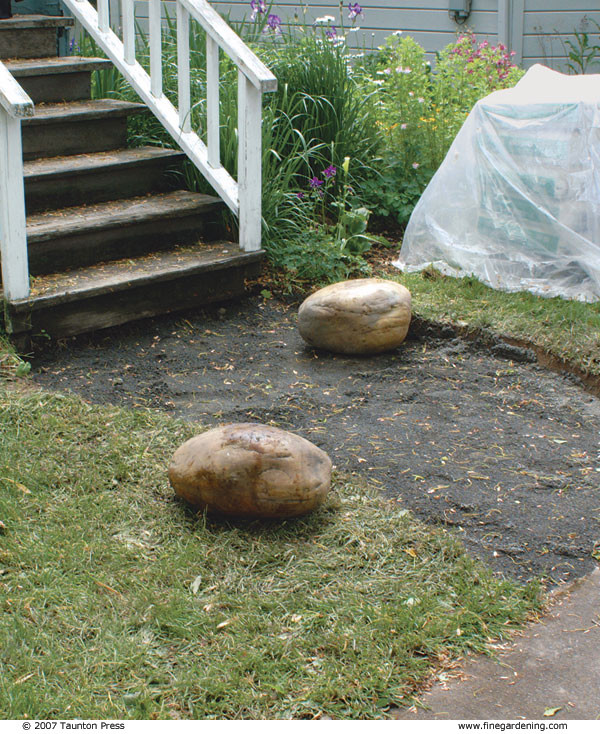 Dig a level base, then add well-tamped crushed gravel. The depth of the base depends on the climate.
Proper surface preparation, including a gravel base and landscape fabric, is crucial for outdoor river rock tile installations.
5. Laying River Rock Tile: A Step-by-Step Guide
With your surface properly prepared, you’re ready to begin laying your river rock tile. Follow these steps for a successful installation:
5.1. Mixing the Mortar
- Prepare the Mortar: In a clean bucket, mix the mortar according to the manufacturer’s instructions.
- Achieve Consistency: Stir the mixture until it reaches a smooth, pudding-like consistency.
- Let it Slake: Allow the mortar to slake (rest) for 5-10 minutes, then mix again before using.
5.2. Applying Mortar and Setting Tiles
- Apply Mortar: Using a notched trowel, spread a layer of mortar evenly over a small section of the prepared surface.
- Set the Tiles: Place the river rock tiles onto the mortar, pressing firmly to ensure good adhesion.
- Use Spacers: Use tile spacers to maintain consistent gaps between the tiles.
- Tap into Place: Gently tap the tiles with a rubber mallet to ensure they are level and properly seated in the mortar.
5.3. Cutting Tiles to Fit Edges and Corners
- Measure and Mark: Measure the area where you need to cut the tile and mark the cut line with a pencil.
- Use a Tile Saw: Use a wet tile saw to make precise cuts along the marked line.
- Smooth Edges: Smooth any rough edges with a tile file or sandpaper.
5.4. Ensuring Proper Spacing and Alignment
- Check Spacing: Regularly check the spacing between the tiles to ensure it is consistent.
- Adjust as Needed: Adjust the tiles as needed to maintain proper alignment.
- Use a Level: Use a level to ensure the tiles are even and flat.
5.5. Allowing the Mortar to Cure
- Curing Time: Allow the mortar to cure for at least 24-48 hours before proceeding to the next step.
- Protect the Surface: Protect the surface from foot traffic and moisture during the curing process.
- Check for Stability: After curing, check the tiles to ensure they are firmly adhered to the surface.
6. Grouting River Rock Tile
Grouting fills the spaces between the tiles, providing stability and preventing water penetration. Follow these steps to grout your river rock tile effectively:
6.1. Selecting the Right Type of Grout
- Consider the Environment: Choose a grout that is suitable for the environment in which the tiles are installed. For wet areas, use a waterproof grout.
- Match the Color: Select a grout color that complements the color of the river rock tiles.
- Opt for Durability: Opt for a durable grout that is resistant to cracking and staining.
6.2. Mixing and Applying the Grout
- Mix the Grout: In a clean bucket, mix the grout according to the manufacturer’s instructions.
- Achieve Consistency: Stir the mixture until it reaches a smooth, creamy consistency.
- Apply the Grout: Using a grout float, apply the grout to the tile surface, pressing it into the gaps between the tiles.
- Remove Excess: Use the grout float to remove any excess grout from the tile surface.
6.3. Cleaning and Polishing the Tile Surface
- Wipe with a Sponge: After allowing the grout to set for 15-30 minutes, wipe the tile surface with a damp sponge to remove any remaining grout residue.
- Rinse Thoroughly: Rinse the sponge frequently in clean water.
- Polish with a Cloth: Once the grout is dry, polish the tile surface with a clean, dry cloth to remove any remaining haze.
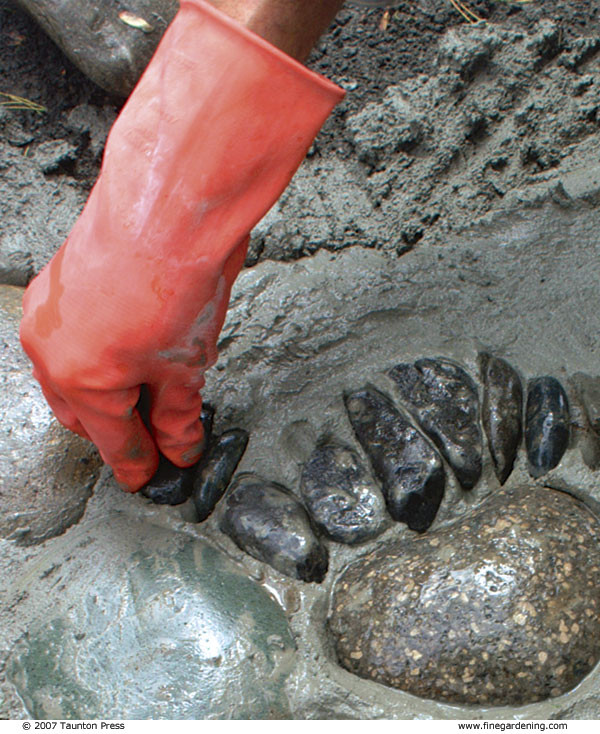 Close-up of author pressing small stones closely together into mortar, wearing gloves.
Proper grouting techniques ensure stability and prevent water penetration in river rock tile installations.
7. Sealing River Rock Tile
Sealing protects the tiles and grout from stains and moisture, enhancing durability and making them easier to clean. Follow these steps to seal your river rock tile effectively:
7.1. Choosing the Right Sealer
- Consider the Type of Stone: Choose a sealer that is specifically designed for natural stone.
- Opt for Penetrating Sealers: Opt for a penetrating sealer that soaks into the stone, providing long-lasting protection.
- Check for UV Resistance: If the tiles are installed outdoors, choose a sealer that is UV resistant.
7.2. Applying the Sealer
- Clean the Surface: Ensure the tile surface is clean and dry before applying the sealer.
- Apply Evenly: Apply the sealer evenly using a brush, roller, or sprayer.
- Allow to Penetrate: Allow the sealer to penetrate the stone for the recommended amount of time.
- Wipe Off Excess: Wipe off any excess sealer with a clean cloth.
7.3. Allowing the Sealer to Cure
- Curing Time: Allow the sealer to cure for at least 24-48 hours before exposing the tiles to moisture or foot traffic.
- Protect the Surface: Protect the surface from spills and stains during the curing process.
8. Design Ideas and Inspiration for River Rock Tile
River rock tiles offer endless design possibilities. Here are some ideas to inspire your next project:
8.1. Patios and Walkways
Create a natural and inviting outdoor space with river rock tile patios and walkways. Use different colors and sizes of stones to create unique patterns and designs.
8.2. Water Features and Ponds
Enhance water features and ponds with river rock tiles. The natural texture and appearance of the stones blend seamlessly with the aquatic environment.
8.3. Garden Accents and Edging
Use river rock tiles as garden accents and edging to add texture and visual interest to your landscape. Create borders around flower beds, trees, and shrubs.
8.4. Interior Walls and Backsplashes
Bring the beauty of nature indoors with river rock tile walls and backsplashes. Use them in bathrooms, kitchens, or living areas to create a unique and stylish look.
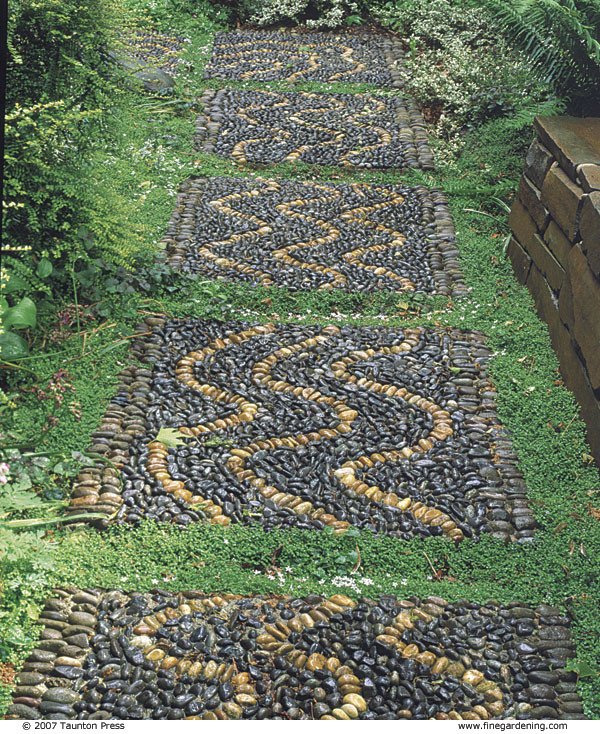 This walkway represents the river of life. It leads to the Persian carpet patio from lede photo above
River rock tiles can be used to create stunning walkways and garden paths, adding a touch of natural elegance to your landscape.
9. Maintenance and Care for River Rock Tile
Proper maintenance and care will keep your river rock tile looking beautiful for years to come. Follow these tips to maintain your river rock tile:
9.1. Regular Cleaning
- Sweep Regularly: Sweep the tiles regularly to remove dirt, dust, and debris.
- Wash with Mild Soap: Wash the tiles with a mild soap and water solution.
- Rinse Thoroughly: Rinse the tiles thoroughly with clean water.
9.2. Preventing Stains and Damage
- Seal Regularly: Reseal the tiles every 1-2 years to protect them from stains and moisture.
- Clean Spills Immediately: Clean up spills immediately to prevent staining.
- Avoid Harsh Chemicals: Avoid using harsh chemicals or abrasive cleaners, which can damage the tiles.
9.3. Repairing Cracks and Loose Stones
- Inspect Regularly: Inspect the tiles regularly for cracks and loose stones.
- Repair Cracks: Repair cracks with a flexible sealant or epoxy.
- Replace Loose Stones: Reattach loose stones with mortar or thin-set adhesive.
10. Common Mistakes to Avoid When Laying River Rock Tile
To ensure a successful river rock tile installation, it’s essential to avoid common mistakes that can compromise the project’s outcome. Here are some pitfalls to watch out for:
10.1. Inadequate Surface Preparation
- Problem: Neglecting to properly clean, level, and compact the substrate can lead to uneven tile surfaces, instability, and premature failure of the installation.
- Solution: Thoroughly prepare the surface by removing debris, leveling uneven areas, and compacting the base material. Ensure proper drainage to prevent water accumulation.
10.2. Using the Wrong Mortar or Grout
- Problem: Using inappropriate mortar or grout can result in poor adhesion, cracking, and water penetration, especially in outdoor or wet environments.
- Solution: Select mortar and grout specifically designed for natural stone and the intended application. Consider factors like water resistance, flexibility, and compatibility with the stone type.
10.3. Insufficient Curing Time
- Problem: Rushing the curing process can weaken the mortar and grout, leading to instability and potential damage to the tile surface.
- Solution: Allow the mortar and grout to cure for the recommended time period specified by the manufacturer. Protect the surface from foot traffic and moisture during curing.
10.4. Neglecting Expansion Joints
- Problem: Failing to incorporate expansion joints in large tile installations can cause cracking and buckling due to thermal expansion and contraction.
- Solution: Install expansion joints at regular intervals, particularly in outdoor applications exposed to temperature fluctuations. These joints allow for movement without compromising the integrity of the tile surface.
10.5. Improper Sealing
- Problem: Neglecting to seal the river rock tile or using an inappropriate sealer can leave the stone vulnerable to stains, moisture damage, and discoloration.
- Solution: Choose a high-quality sealer specifically designed for natural stone. Apply the sealer evenly and allow it to fully penetrate the stone before wiping off any excess. Reseal the tiles periodically as recommended by the manufacturer.
10.6. Uneven Tile Spacing
- Problem: Inconsistent tile spacing can detract from the overall appearance and create an unprofessional look.
- Solution: Use tile spacers to maintain uniform gaps between tiles. Regularly check the spacing and alignment during installation, making adjustments as needed.
10.7. Cutting Corners on Safety
- Problem: Ignoring safety precautions can lead to injuries and accidents during the installation process.
- Solution: Always wear safety glasses, work gloves, and a dust mask or respirator when cutting tiles, mixing materials, and working with chemicals. Use knee pads for comfort and support when working on your knees.
FAQ: Frequently Asked Questions About Laying River Rock Tile
1. What is the best type of mortar to use for river rock tile?
The best type of mortar for river rock tile is a high-quality, polymer-modified thin-set mortar. This type of mortar provides excellent adhesion and flexibility, which is important for accommodating the natural variations in river rock.
2. How do I cut river rock tile?
You can cut river rock tile using a wet tile saw with a diamond blade. This will provide clean, precise cuts without damaging the stones.
3. Do I need to seal river rock tile?
Yes, sealing river rock tile is highly recommended. Sealing helps to protect the stones and grout from stains, moisture, and UV damage, extending the life of your installation.
4. How often should I reseal river rock tile?
You should reseal river rock tile every 1-2 years, depending on the level of traffic and exposure to the elements.
5. Can I use river rock tile outdoors?
Yes, river rock tile is suitable for outdoor use, but it’s important to ensure proper drainage and use materials that are designed to withstand outdoor conditions.
6. How do I clean river rock tile?
You can clean river rock tile with a mild soap and water solution. Avoid using harsh chemicals or abrasive cleaners, which can damage the stones.
7. What is the best way to prepare the surface for river rock tile?
The best way to prepare the surface for river rock tile is to clean it thoroughly, level any uneven areas, and ensure proper drainage. For outdoor installations, use a gravel base and landscape fabric.
8. How do I prevent weeds from growing between river rock tiles?
To prevent weeds from growing between river rock tiles, use landscape fabric beneath the gravel base and apply a weed preventer as needed.
9. Can I install river rock tile over an existing concrete slab?
Yes, you can install river rock tile over an existing concrete slab, but make sure the slab is clean, level, and free of cracks.
10. What should I do if a river rock comes loose?
If a river rock comes loose, clean the area and reattach the stone with mortar or thin-set adhesive. Make sure to press it firmly into place and allow it to cure properly.
Ready to transform your space with the timeless beauty of river rock tile? Visit rockscapes.net today for inspiration, expert advice, and the finest selection of natural stones. Our team in Arizona is here to help you every step of the way. Contact us at 1151 S Forest Ave, Tempe, AZ 85281, United States. Phone: +1 (480) 965-9011 or visit our website rockscapes.net to explore the endless possibilities of river rock design.