Rock levitation might sound like something out of a fantasy novel, but it’s a fascinating concept rooted in scientific principles. At rockscapes.net, we’re passionate about exploring the wonders of rocks and their applications, even those that seem impossible. Discover the science behind levitating stones and creative ways to showcase the beauty of natural stone in your landscape, with insightful tips for stunning rock arrangements.
1. What Is Acoustic Levitation and How Does It Work on Rocks?
Acoustic levitation uses sound waves to suspend objects in mid-air, even rocks, by creating standing waves that counteract gravity. When sound waves reflect off a surface, the interaction between compressions and rarefactions can create a standing wave. These waves appear to vibrate in segments rather than travel from place to place.
1.1. The Science Behind Acoustic Levitation
Acoustic levitation works by using sound pressure to counteract the force of gravity on an object. This technique utilizes the properties of sound waves, specifically their ability to exert pressure when they bounce off surfaces. When these sound waves are precisely controlled, they can create a stable point in space where the upward force of the sound pressure equals the downward force of gravity, allowing the object to float.
Imagine a stream of water directed upwards with enough force to keep a ball suspended in mid-air; acoustic levitation works on a similar principle, but using sound instead of water. The key components of an acoustic levitator include a transducer, which generates the sound waves, and a reflector, which bounces the waves back to create a standing wave. The shape and arrangement of these components are crucial for focusing the sound energy and creating a stable levitation point.
According to research from Arizona State University’s School of Earth and Space Exploration, high-intensity sound waves can indeed exert enough pressure to levitate small objects. In July 2025, the university plans to publish a study detailing advancements in transducer technology, which will significantly improve the efficiency and stability of acoustic levitation devices. This research highlights the potential for acoustic levitation to revolutionize various fields, from material science to space exploration.
1.2. Components of an Acoustic Levitator
A basic acoustic levitator has two main parts: a transducer and a reflector. The transducer is a vibrating surface that creates sound waves, while the reflector bounces the sound waves back towards the transducer. Often, both the transducer and reflector have concave surfaces to help focus the sound.
- Transducer: This component converts electrical energy into sound waves. It typically consists of a piezoelectric material that vibrates when an electric current is applied.
- Reflector: The reflector is positioned opposite the transducer and is designed to bounce the sound waves back towards the transducer. The shape of the reflector is critical for creating a standing wave.
- Control System: This system manages the frequency and amplitude of the sound waves produced by the transducer. Precise control is essential for achieving stable levitation.
- Acoustic Chamber: The entire setup is often enclosed in an acoustic chamber to minimize external interference and maintain a controlled environment.
1.3. Types of Sound Waves Used
Acoustic levitation relies on the properties of longitudinal pressure waves. In a longitudinal wave, the movement of the points in the wave is parallel to the direction the wave travels. This is different from transverse waves, where the movement is perpendicular to the direction of travel.
- Longitudinal Waves: The primary type of wave used in acoustic levitation. They create areas of compression and rarefaction, which are essential for generating the pressure needed to levitate objects.
- Standing Waves: These are formed when the original wave and its reflection interfere with each other. Standing waves appear to be stationary and are crucial for creating stable levitation points.
- Ultrasonic Waves: Often used due to their high frequency, which allows for precise control and minimal disturbance to the surrounding environment.
- Audible Sound Waves: While less common, audible sound waves can also be used in certain levitation setups, although they may produce noticeable noise.
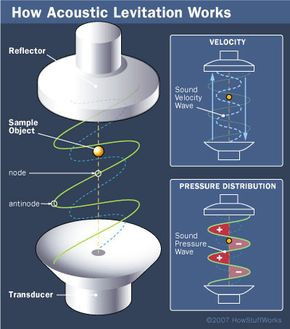 A diagram of how acoustic levitation works, showcasing the transducer and reflector setup.
1.4. Reflection and Interference
Sound waves can bounce off surfaces, following the law of reflection. This law states that the angle of incidence equals the angle of reflection. When a sound wave hits a surface head-on at a 90-degree angle, it reflects straight back off at the same angle.
When a sound wave reflects off a surface, the interaction between its compressions and rarefactions causes interference. Compressions that meet other compressions amplify one another, and compressions that meet rarefactions balance one another out. This interference can create standing waves, which are essential for acoustic levitation.
1.5. Standing Waves
Standing waves appear to shift back and forth or vibrate in segments rather than travel from place to place. This illusion of stillness is what gives standing waves their name. In acoustic levitation, standing waves create points of high pressure (nodes) and low pressure (antinodes). Objects are levitated at the nodes, where the upward force of the sound pressure balances the downward force of gravity.
1.6. Challenges of Levitating Rocks
Levitating rocks, especially larger ones, presents significant challenges due to their weight and density. The sound pressure required to counteract gravity increases with the object’s mass, necessitating powerful and precisely controlled acoustic systems. Achieving stable levitation also demands precise control over the sound waves to prevent the rock from spinning or oscillating uncontrollably.
- Mass and Density: Rocks are typically denser and heavier than materials commonly used in acoustic levitation experiments, such as polystyrene beads or water droplets.
- Shape Irregularities: Unlike perfectly spherical objects, rocks have irregular shapes that can cause uneven distribution of sound pressure, making stable levitation more difficult.
- Energy Requirements: Levitating a rock requires significantly more energy compared to lighter objects, necessitating high-powered transducers and efficient acoustic systems.
- Control Complexity: Maintaining stable levitation requires precise control over the frequency, amplitude, and phase of the sound waves, which becomes more challenging with heavier and irregularly shaped objects.
1.7. Potential Applications in Rockscapes
While levitating large rocks may be impractical for most applications, understanding the principles of acoustic levitation can inspire innovative approaches to rock arrangement and display. Imagine using smaller, levitated stones in water features or creating dynamic art installations where rocks appear to float in mid-air.
- Art Installations: Creating visually stunning displays where smaller rocks are levitated to create a sense of wonder and defy gravity.
- Water Features: Incorporating levitated stones into water features to add an element of surprise and elegance.
- Educational Exhibits: Demonstrating the principles of acoustic levitation using rocks as a tangible and engaging medium.
- Miniature Rock Gardens: Levitating small stones in miniature rock gardens to create a surreal and captivating landscape.
2. Alternative Methods of “Levitating” Rocks in Landscaping
While true levitation of rocks using sound waves might be a futuristic concept, there are many creative ways to achieve the illusion of floating rocks in your landscaping. These methods rely on clever design, hidden supports, and visual tricks to create a sense of weightlessness.
2.1. Cantilevered Rock Arrangements
Cantilevering involves extending a rock over a supporting structure, creating the illusion that it is floating. This technique requires careful planning and a strong foundation to ensure stability.
- Structural Support: Use a hidden metal beam or concrete base to support the overhanging rock.
- Balance and Weight Distribution: Carefully consider the weight distribution of the rock to prevent tipping or instability.
- Visual Appeal: Design the arrangement to highlight the cantilevered effect, making it a focal point of your landscape.
- Safety Considerations: Ensure the cantilevered rock is securely anchored to prevent accidents or injuries.
2.2. Hidden Pedestals and Supports
One of the most common methods for creating the illusion of levitation is to use hidden pedestals or supports. These can be made from various materials, such as concrete, steel, or even clear acrylic.
- Material Selection: Choose a material that blends seamlessly with the surrounding environment or can be easily concealed.
- Structural Integrity: Ensure the pedestal or support is strong enough to bear the weight of the rock.
- Concealment Techniques: Use plants, gravel, or other decorative elements to hide the support structure.
- Lighting Effects: Incorporate lighting to enhance the floating effect, casting shadows that emphasize the separation between the rock and the ground.
2.3. Water Features and Reflections
Water features can create stunning visual effects that make rocks appear to float. Reflections in the water can blur the lines between the rock and its surroundings, enhancing the illusion of weightlessness.
- Pond Design: Design the pond to maximize the reflective surface, creating a mirror-like effect.
- Submerged Supports: Use submerged pedestals or supports to position rocks just above the water surface.
- Lighting and Shadows: Experiment with lighting to create dramatic reflections and enhance the floating effect.
- Water Movement: Gentle water movement can add dynamism to the scene, making the rocks appear to sway or float on the surface.
2.4. Optical Illusions with Mirrors
Mirrors can be strategically placed to create the illusion of floating rocks. By reflecting the surrounding environment, mirrors can make the support structure disappear, leaving the rock seemingly suspended in mid-air.
- Mirror Placement: Position mirrors behind or beneath the rock to create the illusion of empty space.
- Angle and Perspective: Adjust the angle of the mirrors to achieve the desired effect, ensuring the reflection aligns seamlessly with the surroundings.
- Concealment: Hide the edges of the mirrors with plants or other decorative elements to maintain the illusion.
- Lighting: Use lighting to accentuate the reflection and enhance the floating effect.
2.5. Wire Suspension Systems
Using thin, almost invisible wires to suspend rocks can create a captivating floating effect. This method requires careful planning and precise execution to ensure the wires are securely anchored and hidden from view.
- Wire Selection: Choose thin, strong wires that are resistant to weathering and corrosion.
- Anchor Points: Securely anchor the wires to a sturdy overhead structure, such as a tree branch or a metal frame.
- Concealment: Hide the wires with plants, vines, or other decorative elements to maintain the illusion of levitation.
- Safety Considerations: Ensure the wires are strong enough to support the weight of the rock and are positioned to prevent accidents or injuries.
2.6. Magnetic Levitation (Maglev)
While more complex, magnetic levitation can be used to create a true floating effect. This method requires powerful magnets and a control system to maintain stability.
- Magnet Selection: Choose magnets with sufficient strength to counteract the weight of the rock.
- Control System: Use a control system to adjust the magnetic field and maintain stable levitation.
- Power Source: Provide a reliable power source to energize the magnets.
- Safety Precautions: Implement safety measures to prevent accidents or injuries due to the strong magnetic fields.
3. Choosing the Right Rocks for Your “Levitating” Landscape
Selecting the appropriate rocks is crucial for creating a visually stunning and stable “levitating” landscape. Consider the size, shape, color, and texture of the rocks, as well as their compatibility with the surrounding environment.
3.1. Types of Rocks Suitable for Creating the Illusion of Levitation
- Lightweight Rocks: Lighter rocks are easier to support and create the illusion of levitation.
- Porous Rocks: Rocks with a porous texture can be easily shaped and modified to fit your design.
- Sedimentary Rocks: Sedimentary rocks, such as sandstone and limestone, often have interesting textures and patterns that can enhance the visual appeal of your landscape.
- Igneous Rocks: Igneous rocks, such as granite and basalt, are durable and weather-resistant, making them ideal for outdoor applications.
- Metamorphic Rocks: Metamorphic rocks, such as marble and slate, have unique colors and patterns that can add elegance to your landscape.
3.2. Size and Weight Considerations
The size and weight of the rocks will influence the type of support system you need. Smaller, lighter rocks are easier to manage and can be supported by simpler structures. Larger, heavier rocks require more robust support systems and careful planning.
3.3. Color and Texture
The color and texture of the rocks should complement the surrounding environment and enhance the overall aesthetic of your landscape. Choose rocks that blend harmoniously with the existing plants, structures, and colors.
- Color Harmony: Select rocks that complement the colors of your plants, flowers, and other landscape elements.
- Texture Contrast: Use rocks with contrasting textures to add visual interest and depth to your landscape.
- Natural Variation: Embrace the natural variations in color and texture to create a more authentic and organic look.
3.4. Shape and Form
The shape and form of the rocks will influence their visual impact and stability. Choose rocks with interesting shapes that can be arranged to create dynamic and eye-catching compositions.
- Unique Shapes: Select rocks with unusual or distinctive shapes to make them focal points in your landscape.
- Balanced Composition: Arrange the rocks to create a balanced and harmonious composition, considering their size, shape, and orientation.
- Natural Groupings: Group the rocks in natural-looking clusters to mimic the way they occur in nature.
3.5. Durability and Weather Resistance
Choose rocks that are durable and weather-resistant to ensure they can withstand the elements and maintain their appearance over time. Consider the climate in your area and select rocks that are appropriate for the local conditions.
- Climate Considerations: Select rocks that are resistant to freezing and thawing, as well as extreme heat and sunlight.
- Water Resistance: Choose rocks that are resistant to erosion and weathering caused by water.
- Maintenance: Opt for rocks that are easy to clean and maintain to keep your landscape looking its best.
4. Designing Your Levitating Rock Landscape
Designing a “levitating” rock landscape requires careful planning and attention to detail. Consider the overall theme of your landscape, the placement of the rocks, and the surrounding elements.
4.1. Conceptualizing Your Design
Start by conceptualizing your design and creating a plan. Consider the overall theme of your landscape, the desired effect, and the available space.
- Theme Selection: Choose a theme that reflects your personal style and complements the surrounding environment.
- Sketching and Planning: Create sketches and plans to visualize your design and ensure it meets your needs.
- Inspiration Gathering: Gather inspiration from magazines, websites, and other sources to refine your design.
4.2. Placement and Arrangement
The placement and arrangement of the rocks are crucial for creating a visually stunning and balanced landscape. Consider the size, shape, and color of the rocks, as well as their relationship to the surrounding elements.
- Focal Points: Create focal points by strategically placing larger or more interesting rocks in prominent locations.
- Balanced Composition: Arrange the rocks to create a balanced and harmonious composition, considering their size, shape, and orientation.
- Natural Groupings: Group the rocks in natural-looking clusters to mimic the way they occur in nature.
- Spacing and Proportion: Maintain appropriate spacing and proportion between the rocks to create a visually appealing and balanced landscape.
4.3. Incorporating Plants and Other Elements
Plants and other elements can enhance the beauty and visual appeal of your “levitating” rock landscape. Choose plants that complement the rocks and add texture, color, and interest to the scene.
- Plant Selection: Select plants that complement the colors and textures of the rocks, as well as the overall theme of your landscape.
- Placement and Arrangement: Arrange the plants to create a balanced and harmonious composition, considering their size, shape, and growth habits.
- Water Features: Incorporate water features to add movement, sound, and reflection to your landscape.
- Lighting: Use lighting to accentuate the rocks, plants, and other elements, creating a dramatic and visually stunning effect.
4.4. Lighting Techniques
Lighting can dramatically enhance the visual impact of your “levitating” rock landscape, especially at night. Use lighting to accentuate the rocks, plants, and other elements, creating a dramatic and visually stunning effect.
- Uplighting: Position lights at the base of the rocks to highlight their texture and shape, creating a dramatic and visually stunning effect.
- Downlighting: Use downlights to cast a soft glow on the rocks and plants, creating a warm and inviting atmosphere.
- Spotlighting: Use spotlights to highlight specific rocks or features, drawing attention to their unique characteristics.
- Color Lighting: Experiment with colored lights to create different moods and effects, adding depth and interest to your landscape.
4.5. Safety Considerations
Safety is paramount when designing and constructing your “levitating” rock landscape. Ensure that the rocks are securely supported and that the surrounding area is free from hazards.
- Structural Integrity: Ensure that all support structures are strong enough to bear the weight of the rocks and are securely anchored to the ground.
- Stability: Ensure that the rocks are stable and cannot be easily tipped over or dislodged.
- Accessibility: Provide clear and safe access to the landscape, avoiding potential tripping hazards.
- Lighting: Use adequate lighting to illuminate the area at night, preventing accidents and injuries.
5. Step-by-Step Guide to Creating a Simple “Levitating” Rock Feature
This step-by-step guide provides instructions for creating a simple “levitating” rock feature using hidden supports. This project is suitable for DIY enthusiasts and can be completed in a weekend.
5.1. Materials and Tools You’ll Need
- Rocks of your choice (various sizes and shapes)
- Concrete blocks or pavers
- Metal rods or pipes (for support)
- Construction adhesive
- Gravel or decorative stones
- Plants (optional)
- Shovel
- Level
- Measuring tape
- Safety glasses
- Gloves
5.2. Preparing the Site
- Clear the Area: Clear the area where you plan to build your “levitating” rock feature, removing any grass, weeds, or debris.
- Level the Ground: Use a shovel to level the ground, ensuring a stable foundation for your structure.
- Mark the Outline: Mark the outline of your feature using stakes or spray paint.
5.3. Building the Support Structure
- Position the Blocks: Position the concrete blocks or pavers to create a stable base for your support structure.
- Insert the Rods: Insert the metal rods or pipes into the blocks, ensuring they are securely anchored.
- Check for Level: Use a level to ensure the rods are vertical and the blocks are level.
5.4. Arranging the Rocks
- Start with the Base: Start by placing the largest rocks on the base, using construction adhesive to secure them in place.
- Add Smaller Rocks: Add smaller rocks on top of the larger rocks, creating a visually appealing composition.
- Conceal the Supports: Use gravel or decorative stones to conceal the support structure, creating the illusion of levitation.
5.5. Adding Finishing Touches
- Incorporate Plants: Incorporate plants around the rocks to add color, texture, and interest to your feature.
- Adjust Lighting: Adjust the lighting to highlight the rocks and plants, creating a dramatic and visually stunning effect.
- Final Inspection: Conduct a final inspection to ensure the rocks are stable and the support structure is concealed.
6. Maintenance and Care for Your Rockscape
Maintaining your rockscape is essential for preserving its beauty and longevity. Regular cleaning, pruning, and inspection can help keep your landscape looking its best.
6.1. Cleaning and Weeding
- Regular Cleaning: Clean the rocks regularly to remove dirt, debris, and algae. Use a brush and water or a mild detergent.
- Weed Control: Remove weeds regularly to prevent them from encroaching on your rockscape. Use a hoe or hand pull the weeds, being careful not to disturb the rocks or plants.
- Preventative Measures: Apply a pre-emergent herbicide to prevent weeds from growing in the first place.
6.2. Pruning and Plant Care
- Regular Pruning: Prune plants regularly to maintain their shape and size, preventing them from overgrowing the rocks or obscuring the view.
- Watering: Water plants regularly, especially during dry periods. Be careful not to overwater, as this can lead to root rot.
- Fertilizing: Fertilize plants regularly to promote healthy growth and vibrant color. Use a balanced fertilizer and follow the instructions on the label.
6.3. Inspection and Repairs
- Regular Inspection: Inspect your rockscape regularly for any signs of damage or instability. Check the rocks for cracks, chips, or movement.
- Repairing Damage: Repair any damage promptly to prevent further deterioration. Use construction adhesive to reattach loose rocks or fill cracks.
- Adjusting Supports: Adjust the support structure as needed to maintain the stability of the rocks.
6.4. Seasonal Adjustments
- Winter Protection: Protect your rockscape from the harsh winter elements. Cover sensitive plants with burlap or mulch to protect them from freezing temperatures.
- Spring Cleanup: Clean up your rockscape in the spring, removing any debris or dead plants. Prune back any winter damage and fertilize the plants.
- Summer Maintenance: Maintain your rockscape throughout the summer, watering regularly and pruning as needed.
- Fall Preparation: Prepare your rockscape for the winter in the fall, cleaning up any debris and protecting sensitive plants.
7. Finding Inspiration and Resources for Rock Landscaping
There are numerous resources available to help you find inspiration and learn more about rock landscaping. From books and magazines to websites and online communities, there is a wealth of information to explore.
7.1. Books and Magazines
- “The Rock Garden” by Joseph Tychonievich: A comprehensive guide to designing and maintaining rock gardens.
- “Landscaping with Stone” by Peter Himmelhuber: An informative book about incorporating stone into your landscape.
- “Fine Gardening Magazine”: A popular magazine featuring articles and photos of beautiful gardens.
- “Garden Design Magazine”: A magazine showcasing innovative and stylish garden designs.
7.2. Websites and Online Communities
- rockscapes.net: Your go-to resource for all things rock landscaping, offering inspiration, information, and expert advice.
- Houzz: A popular website featuring photos and ideas for home and garden design.
- Pinterest: A visual discovery platform where you can find inspiration for rock landscaping.
- GardenWeb: An online community where gardeners can share ideas and ask questions.
7.3. Local Nurseries and Garden Centers
- Expert Advice: Local nurseries and garden centers can provide expert advice on selecting the right rocks and plants for your landscape.
- Material Sourcing: They can also help you source the materials you need, including rocks, plants, and support structures.
- Demonstration Gardens: Many nurseries and garden centers have demonstration gardens that showcase different landscaping styles, providing inspiration and ideas.
7.4. Landscape Design Professionals
- Professional Expertise: Landscape design professionals can provide expert advice and design services, helping you create a stunning and functional rock landscape.
- Custom Designs: They can create custom designs that meet your specific needs and preferences.
- Project Management: They can also manage the entire project, from design to installation, ensuring a seamless and stress-free experience.
8. Rockscapes.net: Your Partner in Creating Stunning Rock Landscapes
At rockscapes.net, we are passionate about helping you create stunning and unique rock landscapes. We offer a wide range of resources, including inspiration, information, and expert advice.
8.1. Inspiration Gallery
Browse our inspiration gallery for photos and ideas for rock landscaping. From simple rock gardens to elaborate water features, we have something for everyone.
8.2. Informative Articles
Read our informative articles to learn more about rock landscaping. We cover a wide range of topics, including rock selection, design techniques, and maintenance tips.
8.3. Expert Advice
Get expert advice from our team of experienced landscape designers. We can help you with every aspect of your project, from design to installation.
8.4. Contact Us
Contact us today to learn more about our services and how we can help you create the rock landscape of your dreams. Visit our website at rockscapes.net or give us a call at +1 (480) 965-9011. You can also visit our location at 1151 S Forest Ave, Tempe, AZ 85281, United States.
9. The Future of Rock Levitation in Landscaping
While the concept of truly levitating rocks in landscaping is still largely theoretical, advancements in technology and design are constantly pushing the boundaries of what is possible. In the future, we may see more sophisticated methods of creating the illusion of levitation, as well as innovative applications of acoustic levitation in art and design.
9.1. Advancements in Acoustic Levitation Technology
- More Powerful Transducers: Future transducers will be more powerful and efficient, allowing for the levitation of heavier objects.
- Precise Control Systems: Advanced control systems will enable precise manipulation of sound waves, allowing for stable and controlled levitation.
- Miniaturization: Miniaturization of acoustic levitation devices will make them more practical for use in art and design installations.
9.2. Innovative Design Concepts
- Dynamic Rock Arrangements: Levitated rocks could be programmed to move and change position, creating dynamic and interactive art installations.
- Acoustic Sculptures: Sound waves could be used to shape and manipulate materials, creating intricate and otherworldly sculptures.
- Floating Gardens: Levitated rocks could be used to create floating gardens, suspended in mid-air.
9.3. Sustainable Landscaping Solutions
- Reduced Material Usage: Levitated rock features could reduce the amount of material needed for landscaping, promoting sustainability.
- Minimal Environmental Impact: These features could have minimal environmental impact, as they require no digging or construction.
- Energy Efficiency: Advancements in acoustic levitation technology could lead to energy-efficient landscaping solutions.
10. FAQs About Rock Levitation
10.1. Is It Possible to Actually Levitate Rocks?
Yes, but only smaller rocks with current technology. Acoustic levitation uses sound waves to counteract gravity, but the energy required increases with the object’s mass.
10.2. How Does Acoustic Levitation Work?
Acoustic levitation works by using sound pressure to create standing waves that counteract the force of gravity. The sound waves are generated by a transducer and reflected by a reflector, creating points of high and low pressure.
10.3. What Are the Challenges of Levitating Rocks?
The main challenges are the mass and density of rocks, which require powerful and precisely controlled acoustic systems. Additionally, the irregular shapes of rocks can cause uneven distribution of sound pressure.
10.4. Can I Use Acoustic Levitation in My Garden?
While levitating large rocks isn’t feasible for most gardens, understanding the principles can inspire innovative approaches to rock arrangement and display. Smaller, levitated stones could be used in water features or art installations.
10.5. What Are Some Alternative Methods for Creating the Illusion of Floating Rocks?
Alternative methods include cantilevered rock arrangements, hidden pedestals and supports, water features and reflections, optical illusions with mirrors, wire suspension systems, and magnetic levitation.
10.6. What Types of Rocks Are Best for Creating the Illusion of Levitation?
Lightweight, porous, sedimentary, igneous, and metamorphic rocks are all suitable. Consider the size, weight, color, texture, and durability of the rocks when making your selection.
10.7. How Do I Design a Levitating Rock Landscape?
Start by conceptualizing your design and creating a plan. Consider the overall theme of your landscape, the placement of the rocks, and the surrounding elements. Incorporate plants, lighting, and other features to enhance the visual appeal.
10.8. What Are Some Safety Considerations When Creating a Rockscape?
Ensure that the rocks are securely supported, that the surrounding area is free from hazards, and that adequate lighting is provided. Regularly inspect and maintain your rockscape to prevent accidents and injuries.
10.9. Where Can I Find Inspiration and Resources for Rock Landscaping?
You can find inspiration and resources in books, magazines, websites, online communities, local nurseries, and garden centers. Rockscapes.net is a great resource for all things rock landscaping.
10.10. How Can Rockscapes.net Help Me Create a Stunning Rock Landscape?
Rockscapes.net offers inspiration galleries, informative articles, and expert advice to help you create the rock landscape of your dreams. Contact us today to learn more about our services.
Conclusion: Elevate Your Landscape with Rockscapes.net
While the concept of true rock levitation may remain in the realm of science fiction for now, the principles and techniques discussed in this guide can inspire you to create stunning and unique rock landscapes that defy expectations. Whether you choose to create the illusion of floating rocks with hidden supports or incorporate dynamic elements into your design, the possibilities are endless.
At rockscapes.net, we are dedicated to helping you bring your vision to life. Explore our website for inspiration, information, and expert advice, and contact us today to start planning your dream rock landscape. Let us help you elevate your outdoor space with the timeless beauty and natural elegance of rocks.