Making a crushed rock pathway is a fantastic way to enhance your landscape, offering a blend of functionality and aesthetic appeal. At rockscapes.net, we provide expert guidance on creating durable and attractive crushed rock pathways that will transform your outdoor space. Whether you’re aiming for a rustic, natural look or a more contemporary design, understanding the process and selecting the right materials are crucial for a successful project. Let’s explore how to build a stunning crushed stone path, including considerations for gravel walkways, crushed rock driveways, and landscape rock projects.
1. What Are The Benefits of Choosing a Crushed Rock Pathway?
Crushed rock pathways offer numerous advantages for homeowners looking to enhance their outdoor spaces. They are affordable, easy to install, and can be customized to fit various landscape designs.
Here are some key benefits:
- Affordability: Crushed rock is generally less expensive than other paving materials like concrete or pavers.
- Ease of Installation: With basic tools and minimal experience, you can create a beautiful pathway in a weekend.
- Permeability: Crushed rock allows water to drain easily, reducing runoff and preventing puddles.
- Customization: Available in various colors, sizes, and textures, crushed rock can complement any garden style.
- Low Maintenance: Once installed, crushed rock pathways require minimal upkeep, such as occasional raking and topping off.
- Natural Appearance: Crushed rock provides a natural, rustic look that blends seamlessly with outdoor environments.
Choosing crushed rock for your pathway not only enhances the aesthetic appeal of your landscape but also offers practical benefits that make it a cost-effective and sustainable option.
2. What Tools And Materials Do You Need to Build a Crushed Rock Pathway?
Preparing the right tools and materials is essential for a smooth and efficient crushed rock pathway installation. Here’s a detailed list to ensure you have everything you need:
| Tool/Material | Description |
|---|---|
| Square Shovel | For digging and moving soil. |
| Metal Rake | For smoothing and leveling the base and crushed rock layers. |
| Tamper | For compacting the soil and crushed stone base. |
| Utility Knife | For cutting landscape fabric. |
| Hammer | For securing edging materials. |
| Garden Hose | For marking the path and dampening the base. |
| Landscape Fabric | To prevent weed growth and stabilize the base. |
| Edging Material | To contain the crushed rock (steel, wood, brick, or plastic). |
| Crushed Stone Base | A mix of 3/4-inch stones and stone dust for a stable foundation. |
| Crushed Rock | The top layer material for the pathway, available in various types and colors. |
| Measuring Tape | For accurate measurements of the path dimensions. |
| Safety Glasses | To protect your eyes from debris. |
| Work Gloves | To protect your hands during the installation process. |
| Wheelbarrow (optional) | For transporting materials like crushed stone and soil. |
Having these tools and materials on hand will ensure that you can tackle the project efficiently and achieve a professional-looking result. Don’t forget to check local hardware stores or rockscapes.net for the best quality materials.
3. How Do You Plan And Design Your Crushed Rock Pathway?
Effective planning and design are crucial for creating a crushed rock pathway that not only looks great but also functions well. Consider the following steps:
- Determine the Path’s Purpose: Is it a walkway through a garden, a connection between two areas of your yard, or a decorative element? Knowing the primary use will influence the width and layout.
- Outline the Path: Use a garden hose, rope, or line-marking spray paint to mark the desired shape and location of the pathway. Experiment with curves and straight lines to see what best complements your landscape.
- Measure and Calculate: Measure the length and average width of the path to calculate the amount of crushed stone and base material needed. Add an extra 10-15% to account for compaction and spillage.
- Consider Drainage: Ensure the path has a slight slope to allow water to run off. Avoid low-lying areas where water can accumulate.
- Choose the Right Materials: Select crushed rock and base materials that match your landscape’s aesthetic and functional requirements. Options include granite, limestone, pea gravel, and decomposed granite.
- Plan for Edging: Decide on the type of edging material you’ll use (steel, wood, brick, etc.) and ensure it complements the crushed rock and surrounding landscape.
- Incorporate Landscaping: Plan for plants, lighting, and other decorative elements that will enhance the path’s visual appeal and create a cohesive outdoor space.
By carefully planning and designing your crushed rock pathway, you can create a beautiful and functional feature that adds value to your property. For inspiration and material selection, visit rockscapes.net.
4. What Are The Step-By-Step Instructions For Installing A Crushed Rock Pathway?
Follow these detailed, step-by-step instructions to install your crushed rock pathway effectively:
Step 1: Prepare the Area
- Mark the outline of the pathway using a garden hose or spray paint.
- Remove any grass, weeds, and debris from the area.
- Excavate the soil to a depth of 4-6 inches, depending on the desired path thickness and local climate.
Step 2: Form the Trench
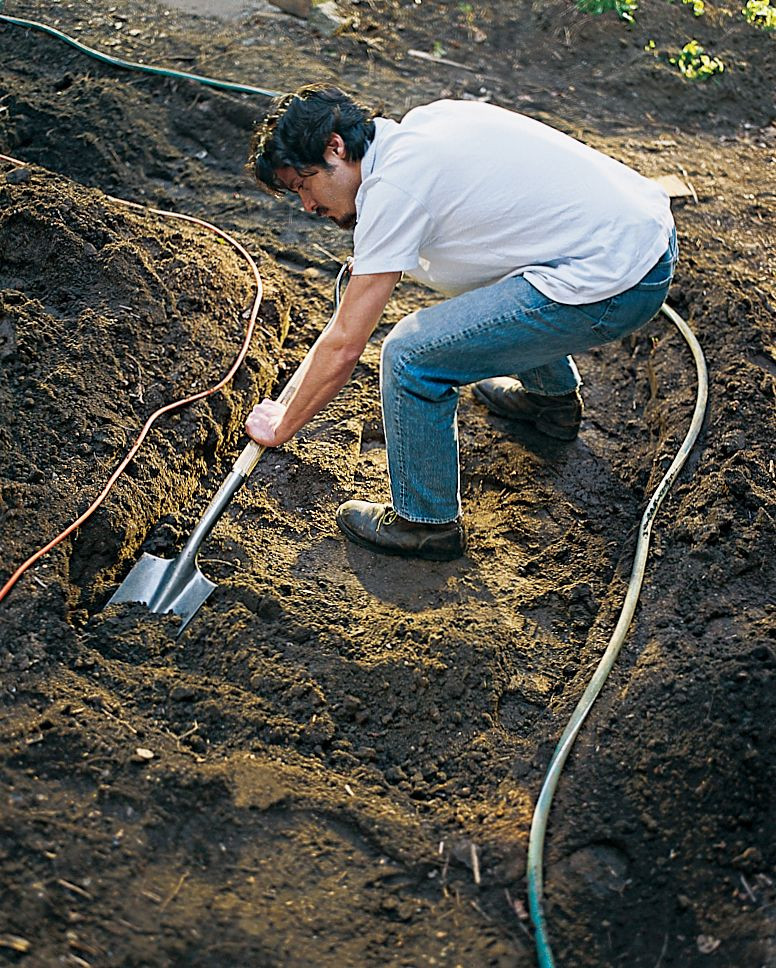 Digging a trench for a crushed rock pathway
- Use a square-edged spade to straighten the sides of the trench.
- Ensure the bottom of the trench is as even as possible.
- Check the depth of the trench with a measuring tape, making adjustments as needed.
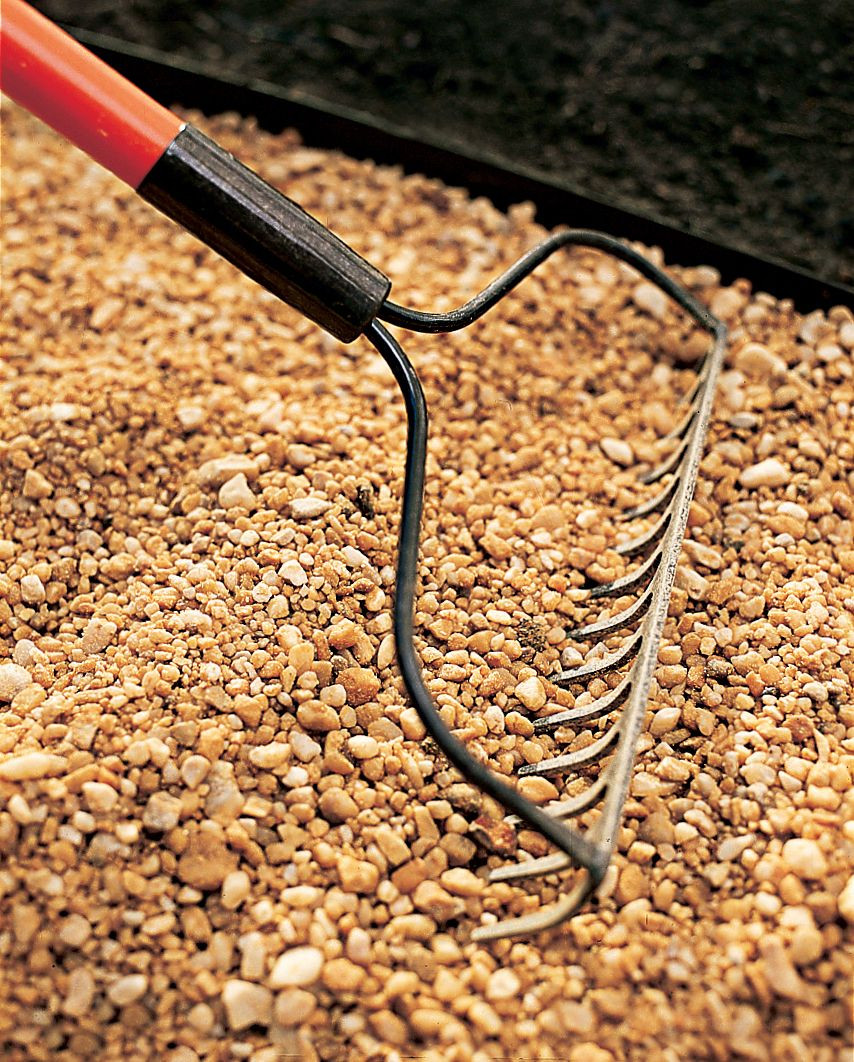
Step 3: Add and Compact Crushed Stone Base
 Adding and compacting crushed stone for pathway base
- Pour a 2-3 inch layer of crushed stone base (a mix of 3/4-inch stones and stone dust) into the trench.
- Rake the base material to level the surface.
- Dampen the stone pack by spraying it lightly with a garden hose.
- Use a hand tamper to compact the stone pack into a smooth, hard surface.
Step 4: Lay Down Landscape Fabric
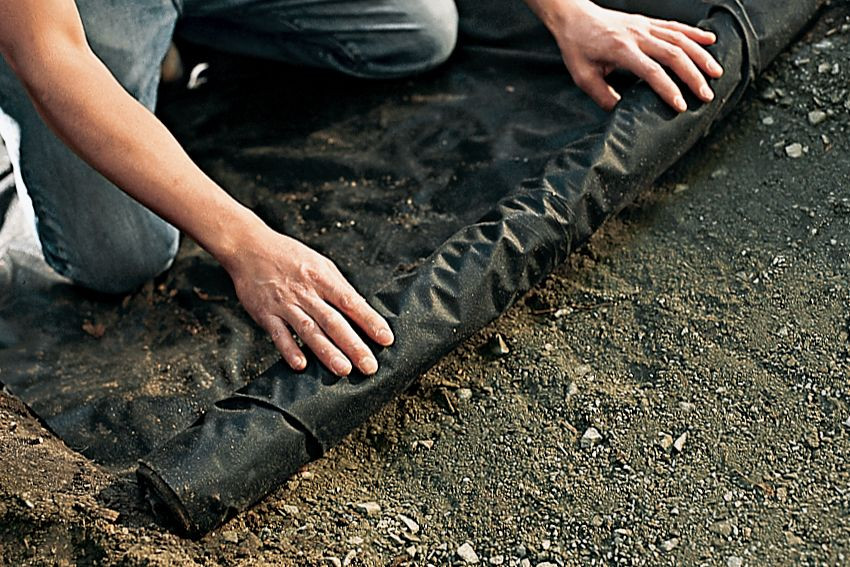 Installing landscape fabric on a crushed rock pathway
- Roll out a layer of landscape fabric over the compacted stone pack.
- Overlap the fabric at the cuts on the inside of curves and allow it to open up on the outside.
- Use spikes or pins to hold the fabric taut, preventing it from bunching up.
Step 5: Install Edging
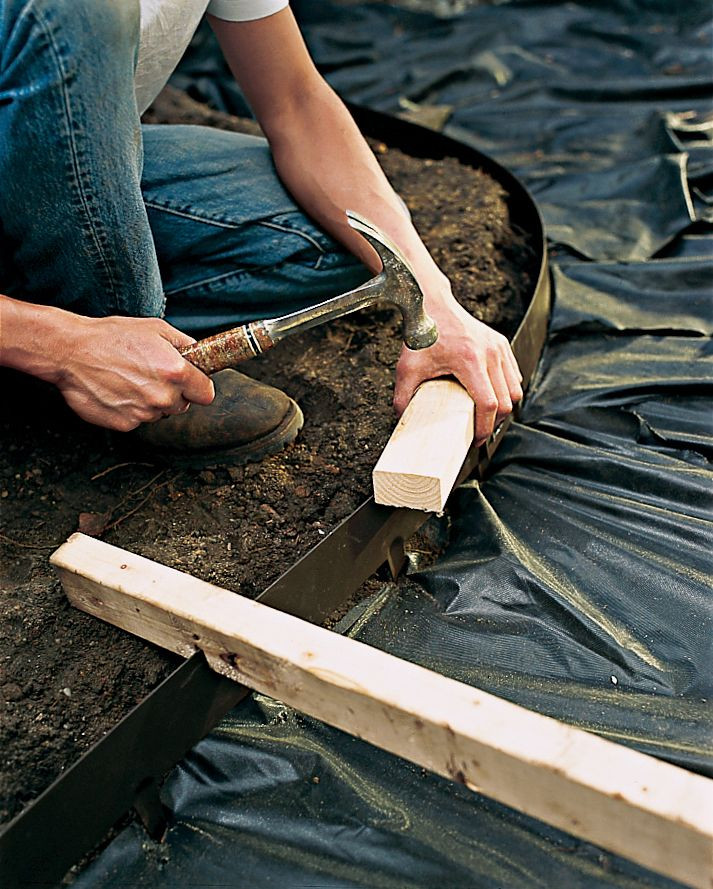 Installing edging on a crushed rock pathway
- Position the edging material (steel, wood, brick, or plastic) along the sides of the path.
- Secure the edging by tapping it into the ground with a hammer and wood block.
- Ensure the edging is straight and level, following the path’s outline.
Step 6: Fill With Crushed Rock
 Filling a crushed rock pathway with gravel
- Pour crushed rock into the pathway, filling it to about 1/2 inch below the top of the edging.
- Rake the crushed rock evenly, ensuring no landscape fabric is visible.
- Add more crushed rock as needed to achieve a uniform surface.
Step 7: Final Touches
- Compact the crushed rock with a hand tamper or roller for a stable surface.
- Sweep away any excess crushed rock from surrounding areas.
- Water the pathway lightly to help settle the materials.
By following these steps carefully, you can create a durable and attractive crushed rock pathway that enhances your landscape. For a wide selection of crushed rock and edging materials, visit rockscapes.net.
5. How Do You Choose The Right Type Of Crushed Rock For Your Pathway?
Selecting the right type of crushed rock is crucial for both the aesthetic appeal and functionality of your pathway. Consider these factors when making your choice:
-
Appearance:
- Color: Choose a color that complements your home and landscape. Options include gray granite, brown decomposed granite, and colorful gravel mixes.
- Texture: Decide whether you prefer a smooth, fine texture or a more rugged, coarse texture.
- Size: Smaller rocks (e.g., pea gravel) are easier to walk on, while larger rocks can provide a more rustic look.
-
Durability:
- Hardness: Select a rock type that is durable and resistant to weathering and wear. Granite and crushed limestone are excellent choices.
- Stability: Angular rocks tend to interlock and provide a more stable surface than rounded rocks.
-
Drainage:
- Permeability: Ensure the crushed rock allows for adequate drainage to prevent puddles and erosion.
- Base Material: Use a crushed stone base to promote drainage and prevent the top layer from sinking into the soil.
-
Cost:
- Budget: Prices vary depending on the type of rock and its availability in your area. Consider your budget when making your selection.
- Local Sourcing: Sourcing crushed rock locally can reduce transportation costs and support local businesses.
-
Maintenance:
- Ease of Maintenance: Some crushed rock types require more frequent raking and topping off than others.
- Weed Control: Use landscape fabric beneath the crushed rock to minimize weed growth.
Here are some popular types of crushed rock for pathways:
| Type of Crushed Rock | Description | Pros | Cons |
|---|---|---|---|
| Pea Gravel | Small, rounded stones, typically 1/4 to 3/8 inch in diameter. | Comfortable to walk on, affordable, good drainage. | Can shift easily, requires frequent raking. |
| Crushed Granite | Angular, crushed granite pieces, typically 3/8 to 1/2 inch in diameter. | Durable, stable, good drainage, available in various colors. | Can be more expensive than other options. |
| Decomposed Granite (DG) | Fine, gravel-like material made from weathered granite. | Natural look, easy to compact, relatively stable. | Can erode easily if not stabilized, may require frequent topping off. |
| Crushed Limestone | Angular, crushed limestone pieces, typically 1/2 to 3/4 inch in diameter. | Durable, affordable, good drainage. | Can be dusty, may change color over time. |
| Lava Rock | Porous, lightweight rock with a reddish-brown color. | Unique appearance, good drainage, lightweight. | Can be more expensive, may not be as durable as other options. |
By carefully considering these factors and exploring the options available at rockscapes.net, you can choose the perfect crushed rock to create a pathway that meets your needs and enhances your landscape.
6. How Can You Incorporate Edging To Enhance Your Crushed Rock Pathway?
Edging is a critical component of any crushed rock pathway, providing structure, stability, and visual appeal. Here are some ways to incorporate edging effectively:
-
Choose the Right Material:
- Steel Edging: Durable, flexible, and easy to install, steel edging provides a clean, modern look.
- Wood Edging: Offers a natural, rustic appearance. Use pressure-treated wood or cedar for longevity.
- Brick or Stone Edging: Provides a classic, elegant look. Can be set in mortar or dry-laid.
- Plastic Edging: Affordable and easy to install, but less durable than other options.
-
Install Edging Properly:
- Level the Ground: Ensure the ground is level before installing edging to prevent unevenness.
- Secure the Edging: Use stakes or pins to hold the edging in place.
- Backfill: Backfill along the backside of the edging to provide additional support.
-
Consider Design and Style:
- Match the Landscape: Choose an edging material that complements your home and landscape.
- Create a Border: Use edging to create a defined border between the pathway and surrounding areas.
- Add Visual Interest: Incorporate curves, angles, or decorative elements to enhance the path’s aesthetic appeal.
-
Maintain the Edging:
- Inspect Regularly: Check the edging periodically for damage or displacement.
- Repair or Replace: Repair or replace any damaged or worn-out sections of edging.
- Keep Clean: Keep the edging clean and free of debris to maintain its appearance.
Here are some edging ideas to consider:
- Steel Edging: Provides a sleek, modern look and is easy to bend for curved pathways.
- Wood Edging: Offers a natural, rustic appearance, especially when using reclaimed wood.
- Brick Edging: Adds a classic touch and can be arranged in various patterns.
- Stone Edging: Creates an elegant, durable border that blends seamlessly with natural landscapes.
- Concrete Edging: Provides a clean, contemporary look and can be custom-colored.
By incorporating edging thoughtfully, you can create a crushed rock pathway that is both functional and visually appealing. For a wide selection of edging materials and expert advice, visit rockscapes.net.
7. What Are Some Creative Design Ideas For Your Crushed Rock Pathway?
Unleash your creativity and transform your crushed rock pathway into a stunning landscape feature. Here are some design ideas to inspire you:
-
Curved Pathways:
- Create gentle curves and winding paths to add visual interest and a sense of exploration.
- Use flexible edging materials like steel or plastic to accommodate the curves.
-
Mix and Match Materials:
- Combine crushed rock with other materials like pavers, stepping stones, or wood planks for a unique look.
- Create patterns and textures by alternating different materials along the pathway.
-
Incorporate Lighting:
- Install path lights along the edges of the pathway to enhance visibility and create a warm, inviting ambiance.
- Use solar-powered lights for an eco-friendly and cost-effective lighting solution.
-
Add Plants and Landscaping:
- Border the pathway with flowering plants, shrubs, or ornamental grasses to soften the edges and add color and texture.
- Create planting beds along the pathway to incorporate a variety of plants and create a lush, vibrant landscape.
-
Create Focal Points:
- Add a focal point at the end of the pathway, such as a bench, statue, or water feature, to draw the eye and create a sense of destination.
- Use decorative rocks, boulders, or driftwood to create visual interest and add a natural touch.
-
Use Different Colors and Textures:
- Mix different colors and textures of crushed rock to create patterns and visual interest.
- Use contrasting colors to define the edges of the pathway and highlight its shape.
-
Incorporate Stepping Stones:
- Add stepping stones within the crushed rock pathway to provide a more stable and comfortable walking surface.
- Use natural stones like flagstone or slate for a rustic, organic look.
Here are some additional creative design ideas:
- Zen Garden Pathway: Create a minimalist pathway with carefully placed rocks and raked gravel for a serene, contemplative space.
- Cottage Garden Pathway: Design a whimsical pathway with overflowing flower beds, climbing vines, and charming garden ornaments.
- Desert Landscape Pathway: Use native desert plants, cacti, and succulents to create a drought-tolerant pathway that blends seamlessly with the arid environment.
- Woodland Pathway: Design a naturalistic pathway with meandering curves, moss-covered rocks, and shade-loving plants.
By incorporating these creative design ideas, you can transform your crushed rock pathway into a beautiful and functional landscape feature that reflects your personal style. For inspiration and material selection, visit rockscapes.net.
8. How Do You Maintain And Care For Your Crushed Rock Pathway?
Proper maintenance and care are essential for preserving the beauty and functionality of your crushed rock pathway. Follow these tips to keep your pathway in top condition:
-
Regular Raking:
- Rake the pathway regularly to redistribute the crushed rock and maintain an even surface.
- Remove any leaves, twigs, and debris that may accumulate on the pathway.
-
Weed Control:
- Pull weeds by hand or use an eco-friendly weed killer to prevent them from growing in the pathway.
- Apply a pre-emergent herbicide in the spring to prevent weed seeds from germinating.
-
Top Off Crushed Rock:
- Add crushed rock as needed to maintain the desired thickness of the pathway.
- Focus on high-traffic areas and areas where the crushed rock has settled or eroded.
-
Edging Maintenance:
- Inspect the edging regularly for damage or displacement.
- Repair or replace any damaged or worn-out sections of edging.
- Ensure the edging is securely in place to prevent the crushed rock from spilling onto surrounding areas.
-
Drainage Maintenance:
- Ensure the pathway has proper drainage to prevent puddles and erosion.
- Clear any debris from drainage areas to maintain proper water flow.
- Consider adding a French drain or other drainage solution if water tends to accumulate on the pathway.
-
Compaction Control:
- Loosen compacted areas with a rake or garden fork.
- Add fresh crushed rock to improve drainage and prevent the pathway from becoming too dense.
-
Preventative Measures:
- Avoid using heavy machinery or vehicles on the pathway to prevent damage and compaction.
- Protect the pathway from excessive wear and tear by using stepping stones or pavers in high-traffic areas.
Here are some additional maintenance tips:
- Use a leaf blower: Use a leaf blower to quickly and easily remove leaves and debris from the pathway.
- Apply a stabilizer: Apply a stabilizer to the crushed rock to prevent it from shifting and eroding.
- Clean with water: Rinse the pathway with water to remove dirt and grime.
- Reapply landscape fabric: If weeds persist, consider reapplying landscape fabric beneath the crushed rock.
By following these maintenance and care tips, you can keep your crushed rock pathway looking beautiful and functioning properly for years to come. For maintenance supplies and expert advice, visit rockscapes.net.
9. What Are The Cost Considerations For Building A Crushed Rock Pathway?
Building a crushed rock pathway is generally more affordable than other paving options, but it’s essential to consider all cost factors. Here’s a detailed breakdown:
-
Materials:
- Crushed Rock: The cost varies depending on the type, color, and availability in your area. Prices range from $30 to $100 per cubic yard.
- Crushed Stone Base: This is necessary for stability and drainage, costing around $20 to $60 per cubic yard.
- Edging: Prices depend on the material (steel, wood, brick, plastic) and range from $2 to $20 per linear foot.
- Landscape Fabric: This helps prevent weed growth and costs about $0.10 to $0.50 per square foot.
- Fasteners: Stakes, pins, or nails for securing edging can add $10 to $30 to the total cost.
-
Tools:
- Rental: If you don’t own tools like a shovel, rake, tamper, or wheelbarrow, renting them can cost $20 to $50 per day.
- Purchase: Buying these tools can range from $50 to $200, depending on the quality.
-
Labor:
- DIY: If you do the work yourself, labor costs are free, but factor in your time and effort.
- Professional Installation: Hiring a contractor can add $5 to $15 per square foot to the total cost.
-
Additional Costs:
- Delivery: Material delivery can cost $50 to $200, depending on the distance and quantity.
- Permits: Check local regulations for any required permits, which can range from $20 to $100.
- Landscaping: Adding plants, lighting, or other decorative elements can increase the overall cost.
Here’s a cost estimate for a 100-square-foot crushed rock pathway:
| Item | Cost (DIY) | Cost (Professional) |
|---|---|---|
| Crushed Rock | $50 – $150 | $50 – $150 |
| Crushed Stone Base | $30 – $90 | $30 – $90 |
| Edging | $20 – $200 | $20 – $200 |
| Landscape Fabric | $10 – $50 | $10 – $50 |
| Fasteners | $10 – $30 | $10 – $30 |
| Tool Rental/Purchase | $20 – $200 | $0 |
| Labor | $0 | $500 – $1500 |
| Delivery | $50 – $200 | $50 – $200 |
| Total | $190 – $920 | $670 – $2220 |
Tips for saving money:
- DIY Installation: Doing the work yourself can save on labor costs.
- Source Materials Locally: Look for local suppliers to reduce transportation costs.
- Compare Prices: Shop around for the best prices on materials.
- Use Recycled Materials: Consider using reclaimed bricks or timber for edging.
- Rent Tools: Rent tools instead of buying them if you don’t plan to use them frequently.
By carefully considering these cost factors and implementing cost-saving strategies, you can create a beautiful and affordable crushed rock pathway. For material selection and pricing, visit rockscapes.net.
10. What Are Some Common Problems And Solutions When Building A Crushed Rock Pathway?
Even with careful planning, you may encounter some common problems when building a crushed rock pathway. Here are some issues and their solutions:
-
Weed Growth:
- Problem: Weeds can grow through the crushed rock, detracting from the pathway’s appearance.
- Solution: Use landscape fabric beneath the crushed rock to prevent weed growth. Pull any weeds that do emerge by hand or use an eco-friendly weed killer.
-
Erosion and Shifting:
- Problem: Crushed rock can erode or shift, especially in high-traffic areas or on slopes.
- Solution: Use a crushed stone base to provide a stable foundation. Install edging to contain the crushed rock. Apply a stabilizer to prevent shifting and erosion.
-
Poor Drainage:
- Problem: Water can accumulate on the pathway, creating puddles and promoting erosion.
- Solution: Ensure the pathway has a slight slope to allow water to run off. Use a crushed stone base to promote drainage. Consider adding a French drain or other drainage solution if water tends to accumulate.
-
Uneven Surface:
- Problem: The surface of the pathway can become uneven over time due to compaction or shifting of the crushed rock.
- Solution: Rake the pathway regularly to redistribute the crushed rock and maintain an even surface. Add fresh crushed rock as needed to fill in low spots.
-
Edging Issues:
- Problem: Edging can become damaged, displaced, or ineffective at containing the crushed rock.
- Solution: Inspect the edging regularly for damage or displacement. Repair or replace any damaged or worn-out sections of edging. Ensure the edging is securely in place and properly installed.
-
Material Selection:
- Problem: Choosing the wrong type of crushed rock can result in a pathway that is not durable, stable, or aesthetically pleasing.
- Solution: Research different types of crushed rock and choose one that is appropriate for your needs and climate. Consider factors such as durability, drainage, appearance, and cost.
Here are some additional problems and solutions:
- Ants: Sprinkle diatomaceous earth on and around the pathway to control ant infestations.
- Muddy Areas: Improve drainage by adding more crushed stone base or installing a French drain.
- Compacted Soil: Loosen compacted soil with a garden fork before adding the crushed stone base.
- Fading Color: Refresh the appearance of the crushed rock by adding a new layer or applying a color enhancer.
By addressing these common problems and implementing the solutions described above, you can ensure that your crushed rock pathway remains beautiful and functional for years to come. For expert advice and high-quality materials, visit rockscapes.net.
Creating a crushed rock pathway is a rewarding project that can significantly enhance your outdoor space. With careful planning, the right materials, and proper installation techniques, you can build a durable and attractive pathway that adds value to your property. Remember to consider factors such as cost, maintenance, and design to create a pathway that meets your needs and reflects your personal style.
Ready to start your crushed rock pathway project? Visit rockscapes.net today for a wide selection of high-quality materials, expert advice, and inspiration. Let us help you transform your landscape into a beautiful and functional outdoor oasis. Contact us at 1151 S Forest Ave, Tempe, AZ 85281, United States, or call +1 (480) 965-9011 for personalized assistance.