Making a lapidary rock saw is an achievable project for hobbyists and professionals alike. This guide from rockscapes.net will cover everything from planning to construction, ensuring you can create a functional and efficient rock saw for your lapidary needs.
1. Why Build Your Own Lapidary Rock Saw?
Building your own lapidary rock saw offers numerous benefits. According to research from Arizona State University’s School of Earth and Space Exploration, in July 2025, DIY equipment provides cost savings and customization options.
- Cost-Effectiveness: Purchasing a commercial rock saw can be expensive, but building one yourself can significantly reduce costs.
- Customization: DIY projects allow you to tailor the saw to your specific needs, whether it’s the size, cutting capacity, or additional features.
- Skill Development: Constructing a rock saw enhances your mechanical skills and understanding of lapidary equipment.
- Personal Satisfaction: There’s a great sense of accomplishment in creating a tool that meets your exact requirements.
2. Understanding Lapidary Rock Saws
What exactly is a lapidary rock saw? A lapidary rock saw is a specialized tool used to cut rocks and minerals into slabs or trim pieces for various lapidary purposes such as jewelry making, polishing, and specimen preparation. Understanding the different types and their functions is crucial before starting your build.
2.1 Types of Rock Saws
There are several types of rock saws, each designed for specific tasks.
| Type of Saw | Description | Use Case |
|---|---|---|
| Slab Saws | Large saws with a broad blade for cutting large rocks into slabs. | Cutting large specimens into usable slabs for polishing and other applications. |
| Trim Saws | Smaller saws designed for trimming smaller pieces and refining shapes. | Trimming and shaping smaller rocks for jewelry making and detailed work. |
| Tile Saws | Can be repurposed for cutting rocks, typically smaller in size and less specialized. | Cutting smaller rocks and tiles with precision. |
| Wire Saws | Uses a thin wire to cut through rocks, allowing for intricate and precise cuts. | Cutting delicate and intricate shapes, ideal for valuable specimens. |
| Chop Saws | Features a blade that is manually pulled down and through the work. | Quickly cutting small to medium stones. |
2.2 Key Components of a Rock Saw
Understanding the essential components will help in the design and construction process.
- Blade: The cutting component, typically diamond-impregnated.
- Motor: Powers the blade, with horsepower varying based on saw size.
- Arbor: The shaft on which the blade is mounted.
- Coolant System: Uses water or oil to cool the blade and rock during cutting.
- Vise or Rock Holder: Secures the rock in place during cutting.
- Frame/Housing: Provides structural support and contains the coolant.
3. Planning Your DIY Rock Saw Project
How should you plan your DIY rock saw project? Planning is essential for a successful DIY rock saw. It involves defining your needs, creating a design, and sourcing materials.
3.1 Define Your Needs
Determine what you will primarily use the saw for. Do you need to cut large slabs or smaller trim pieces? This will influence the size and type of saw you build. Consider the size of rocks you plan to cut, the frequency of use, and the level of precision required.
3.2 Design Considerations
Create a detailed design or find existing plans online. Popular platforms like the RTH Forum Community offer inspiration and advice. Your design should include dimensions, materials, and a clear understanding of how each component will fit together. According to the American Society of Mechanical Engineers, a well-documented design is crucial for project success.
Consider these design elements:
- Saw Size: The blade diameter determines the maximum size of the rock you can cut.
- Motor Power: A more powerful motor is needed for larger blades and harder materials.
- Coolant System: Essential for cooling the blade and preventing dust.
- Safety Features: Include blade guards and emergency shut-off switches.
3.3 Material Selection
Choose high-quality materials for durability and performance. Here’s a list of common materials:
- Steel: For the frame and structural components.
- Diamond Blade: The cutting edge, available in various sizes and grit.
- Motor: An electric motor with sufficient horsepower.
- Pulleys and Belts: To transmit power from the motor to the blade.
- Bearings: For smooth rotation of the arbor.
- Water Pump: To circulate coolant.
- Piping and Tubing: For the coolant system.
- Sheet Metal or Plastic: For the housing and splash guards.
4. Essential Tools and Equipment
What tools and equipment are needed to construct a lapidary rock saw? Assembling the right tools is crucial for a smooth and safe construction process.
- Welder: For assembling the steel frame.
- Drill: For making holes and mounting components.
- Grinder: For smoothing edges and preparing surfaces.
- Saw (Metal Cutting): For cutting steel and other metal parts.
- Measuring Tools: Including tape measure, calipers, and squares.
- Safety Gear: Safety glasses, gloves, and ear protection.
5. Step-by-Step Construction Guide
How do you actually build the rock saw? Follow these steps to construct your lapidary rock saw.
5.1 Building the Frame
- Cut Steel: Cut the steel according to your design specifications. Use a metal-cutting saw for accurate cuts.
- Weld Frame: Assemble the frame by welding the steel pieces together. Ensure all joints are strong and square.
- Grind Welds: Grind down any rough welds for a smooth finish and to ensure proper fit of other components.
- Paint Frame: Apply a coat of rust-resistant paint to protect the steel frame.
5.2 Installing the Arbor and Blade
- Mount Bearings: Install bearings on the frame to support the arbor.
- Attach Arbor: Insert the arbor through the bearings.
- Mount Blade: Secure the diamond blade onto the arbor. Ensure it is properly aligned and tightened.
- Install Pulleys: Attach pulleys to the arbor and motor shaft.
5.3 Setting Up the Motor and Drive System
- Mount Motor: Securely mount the motor to the frame.
- Connect Belt: Connect the belt between the motor pulley and the arbor pulley.
- Tension Belt: Adjust the tension of the belt to ensure efficient power transmission without slippage.
- Test Alignment: Verify that the motor and arbor are properly aligned to prevent excessive wear on the belt and bearings.
5.4 Constructing the Coolant System
- Install Water Pump: Place the water pump in a reservoir.
- Plumb Tubing: Connect tubing from the pump to the blade area.
- Create Nozzle: Design a nozzle to direct coolant onto the blade and rock.
- Build Reservoir: Construct a reservoir to catch and recycle the coolant.
5.5 Building the Vise or Rock Holder
- Design Vise: Create a vise or rock holder that can securely hold the rock during cutting.
- Fabricate Vise: Build the vise using steel or other sturdy materials.
- Mount Vise: Attach the vise to the frame in a position that allows easy access and adjustment.
- Test Security: Ensure the vise can hold rocks of various sizes securely.
5.6 Creating the Housing and Safety Features
- Cut Housing Panels: Cut sheet metal or plastic to create the housing panels.
- Assemble Housing: Assemble the panels around the frame to contain splashes and debris.
- Install Blade Guard: Design and install a blade guard to prevent accidental contact with the blade.
- Add Safety Switch: Include an emergency shut-off switch within easy reach.
6. Advanced DIY Rock Saw Projects
Ready to take your project to the next level? Explore these advanced features:
| Feature | Description | Benefit |
|---|---|---|
| Automatic Feed | A system that automatically advances the rock into the blade at a controlled rate. | Reduces operator fatigue and ensures consistent cutting. |
| Variable Speed Control | Allows you to adjust the blade speed for different materials. | Optimizes cutting performance and reduces blade wear. |
| Digital Display | Provides real-time information on cutting speed, load, and other parameters. | Enhances precision and control. |
| Laser Guide | A laser beam that indicates the cutting path on the rock. | Improves accuracy and reduces waste. |
| Slurry Recycling System | A system that filters and reuses the coolant, reducing waste and environmental impact. | Environmentally friendly and cost-effective. |
7. Safety Precautions
What safety measures should you take when operating a lapidary rock saw? Safety is paramount when operating any power tool. Adhere to these precautions to prevent accidents.
- Wear Safety Gear: Always wear safety glasses, gloves, and ear protection.
- Inspect Equipment: Regularly inspect the saw for any signs of wear or damage.
- Use Proper Coolant: Use the correct type of coolant to prevent overheating and dust.
- Never Leave Unattended: Never leave the saw running unattended.
- Keep Work Area Clean: Keep the work area free of clutter and debris.
- Follow Instructions: Adhere to the manufacturer’s instructions for all components.
8. Maintenance and Care
How should you maintain your lapidary rock saw? Regular maintenance will prolong the life of your saw and ensure optimal performance.
- Clean Regularly: Clean the saw after each use to remove debris and coolant buildup.
- Lubricate Moving Parts: Lubricate bearings and other moving parts to reduce friction.
- Check Blade: Regularly inspect the blade for wear and replace as needed.
- Monitor Coolant: Keep the coolant clean and at the proper level.
- Tighten Fasteners: Check and tighten all bolts and screws to prevent loosening.
9. Rock Saw Builds Inspiration from RTH Forum
Looking for inspiration? Here are some incredible rock saw builds from members of the RTH Forum Community.
9.1 Jeff’s Homemade 18″ Slab Saw
Jeff (rsxcram), a long-time RTH Member, did an outstanding job on this 18″ slab saw. It’s hard to believe it’s homemade. Jeff purchased the original plans on eBay and meticulously built this powerful workhorse saw.
 Jeff's Homemade 18-inch Slab Saw showcasing meticulous craftsmanship and a robust design
9.2 Farmermac’s Homebuilt 10″ Trimsaw/Grinder
RTH member farmermac dazzled everyone with fancy CAD drawings and a build that did not disappoint. The trimsaw is complete, and we eagerly await the grinder side taking shape.
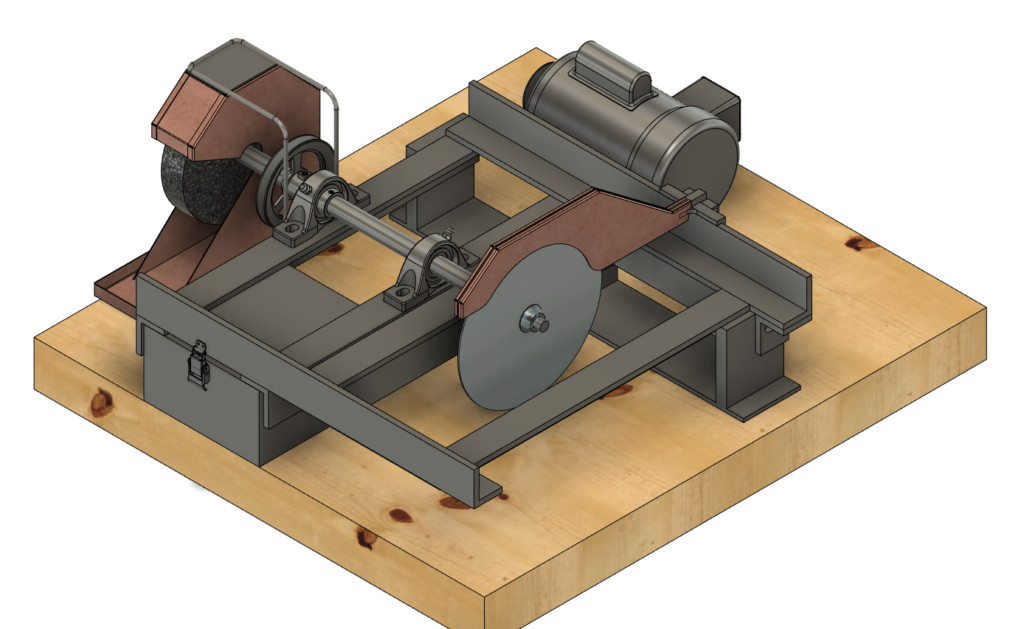 Farmermac's Homebuilt 10-inch Trimsaw and Grinder featuring intricate CAD drawings and precision engineering
9.3 Rockbottom’s Homemade Slab Saw
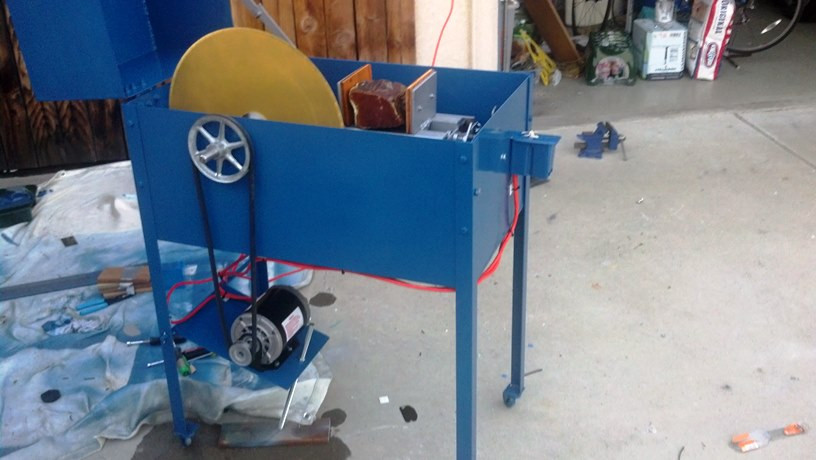
Rockbottom built this very professional-looking 20″ slab saw with the convenience and practicality of Covington’s workhorse rock saw in mind. The inclusion of a large viewing pane in the lid and a built-in de-misting system truly sets it apart.
 Rockbottom's Homemade Slab Saw highlighting a large viewing pane and a built-in de-misting system
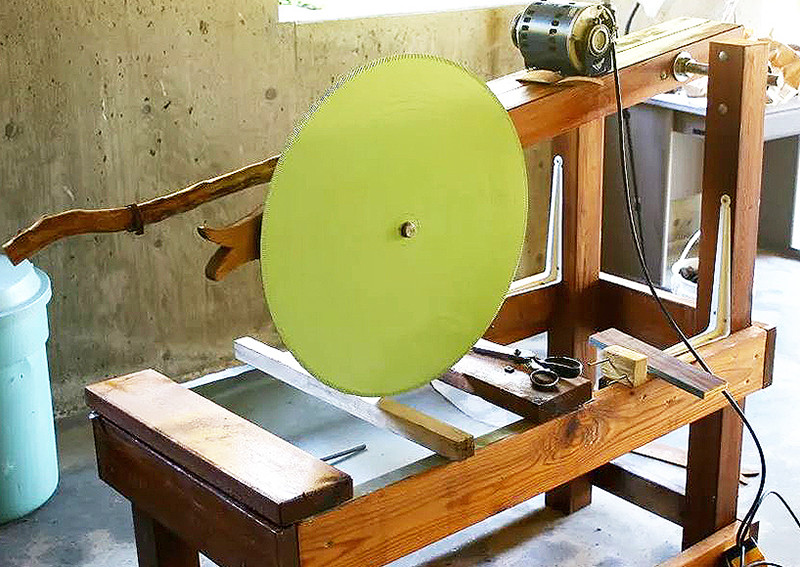
9.4 Mudshark’s Homemade Slab Saw
Built by RTH member mudshark, this slab saw turns rocks into mud and produces beautiful slabs for lapidary. Frugally pieced together from existing materials and flea market finds, the overall cost was under $450, a fraction of a saw this size on the open market.
 Mudshark's Homemade Slab Saw constructed from flea market finds and existing materials
9.5 Peruano’s Homemade 12″ Slab Saw
Long-time RTH Forum community member Tom (Peruano) received this home-built saw in rough condition. After cleaning, restoring, and input from the forum community, the saw revealed qualities indicating it was built by a master.
 Peruano's Homemade 12-inch Slab Saw showcasing restoration and community collaboration
9.6 Number21’s Rock Chop Saw Project
This build by member Brian (number21) is a drop saw where the blade is manually pulled down through the work. With a counter-balanced 1/3hp motor and an 8″ blade, this water-cooled saw is perfect for quickly cutting small to medium stones.
 Number21's Rock Chop Saw Project featuring a drop saw design for quick cuts
9.7 Jm’s Homemade Thunderegg Gravity Feed Saw
Built specifically for cutting thundereggs, this crafty build by member jm features a unique weighted gravity feed pull-down vice design. Jm happily cuts eggs at a cost of under $50 using parts he had around.
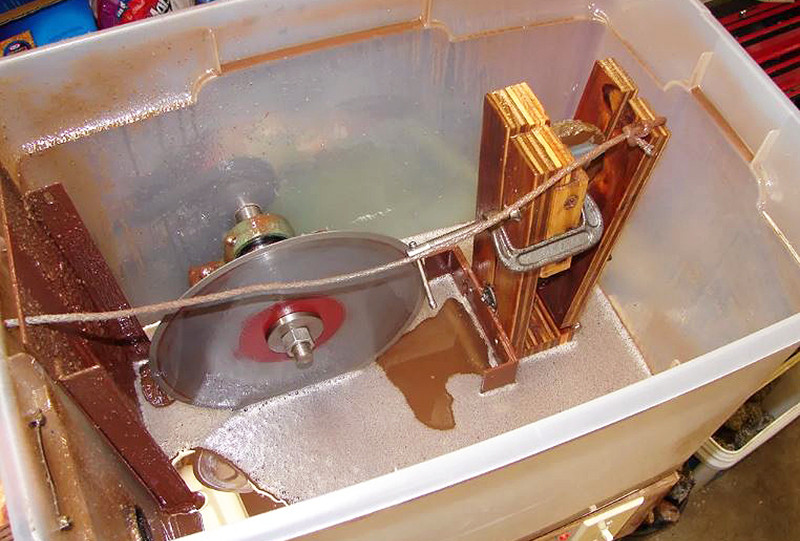 Jm's Homemade Thunderegg Gravity Feed Saw designed for cutting thundereggs
9.8 Rockbottom’s Homemade 7″ Trim Saw
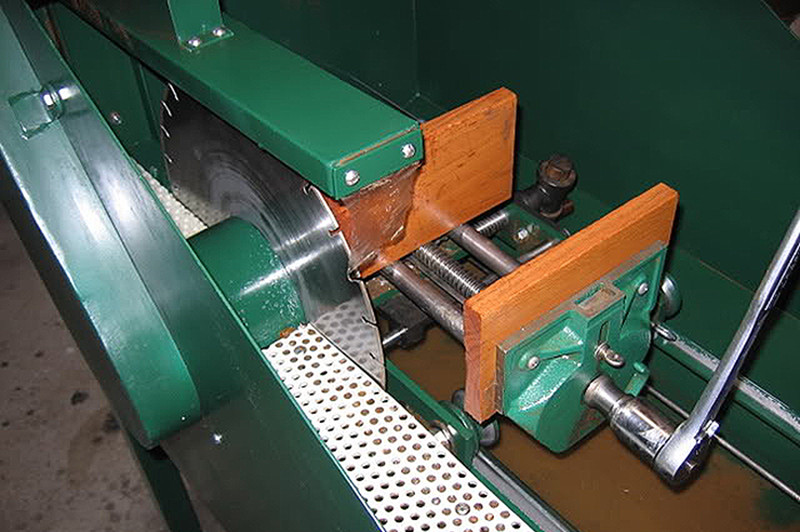
With his amazing 20″ slab saw already built, rockbottom turned his attention to building a 7″ benchtop trim saw. This workhorse features wonderful sheet metal work and a controlled drain for easily drying the blade after usage.
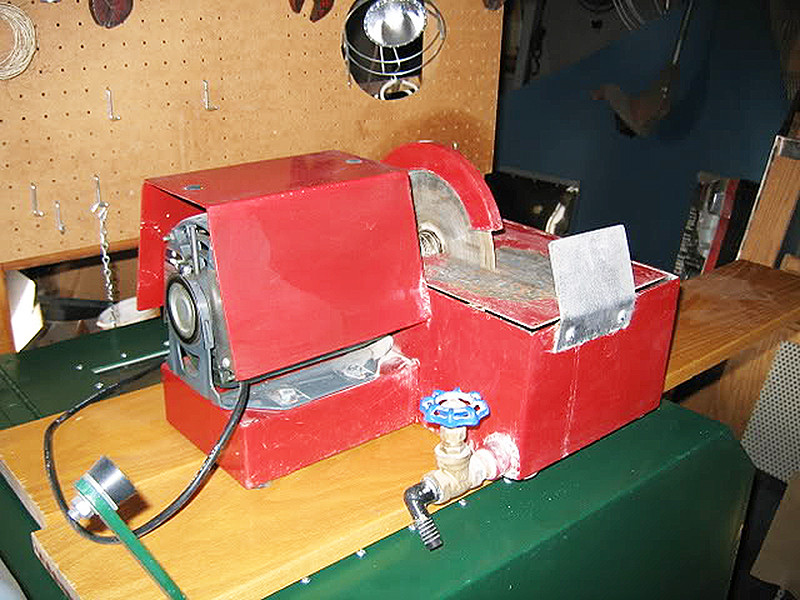 Rockbottom's Homemade 7-inch Trim Saw showcasing sheet metal work and a controlled drain
9.9 Bendsum’s Building a 14″ Saw
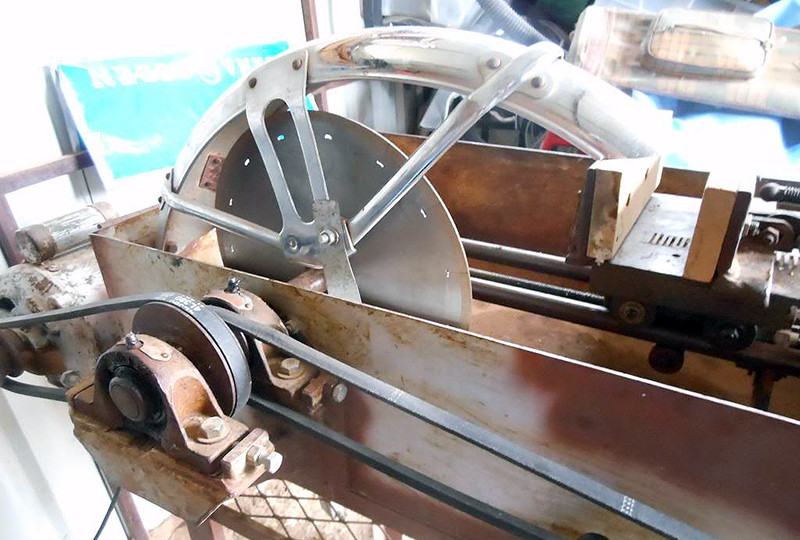
RTH member bendsum efficiently used fiberglass, bondo, and resin to create a leak-proof enclosure for this unique 14″ homemade rock saw. It features an overhead mechanical crank for moving the rock relative to the blade and a gravity feed design.
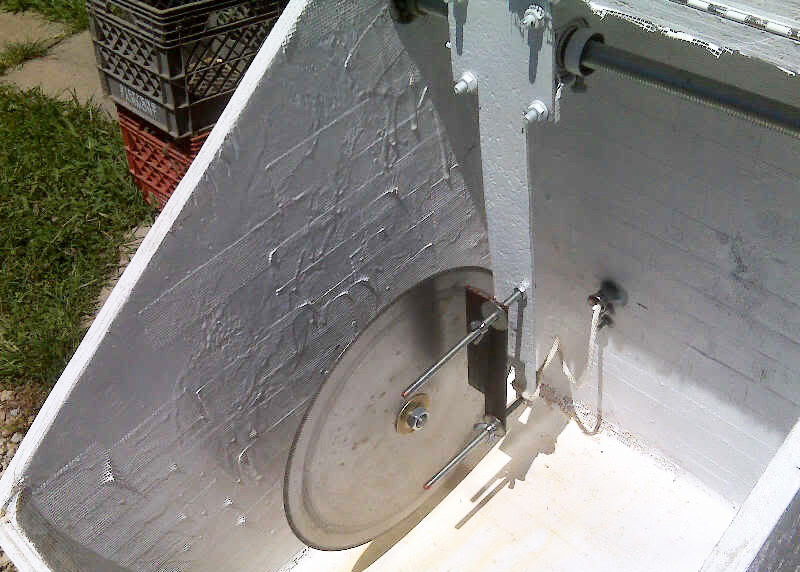 Bendsum's Building a 14-inch Saw featuring a fiberglass enclosure and overhead mechanical crank
9.10 Lakeandco’s Drop Saw, 24″ Slab Saw Project
This monster built by member DJ (lakeandco) takes the drop saw design to a new level. Inspired by number21’s chop saw build, DJ went all-in on this heavily built machine featuring a 24″ cutting blade.
 Lakeandco's Drop Saw, 24-inch Slab Saw Project highlighting a heavy-duty drop saw design
10. Frequently Asked Questions (FAQ)
- What is the best type of blade for a lapidary rock saw? Diamond blades are the most effective due to their hardness and ability to cut through various rock types.
- How important is the coolant system? The coolant system is crucial for cooling the blade, reducing dust, and preventing the rock from overheating, which can cause cracking.
- Can I use a tile saw as a rock saw? Yes, but tile saws are generally designed for softer materials and may not be suitable for very hard rocks.
- What size motor do I need for my rock saw? The motor size depends on the blade diameter and the type of rocks you plan to cut. A 1/2 to 1 horsepower motor is suitable for most small to medium-sized saws.
- How do I prevent my rock saw from rusting? Use rust-resistant paint on the frame and regularly clean and dry the saw after use.
- What safety features should I include in my DIY rock saw? Essential safety features include a blade guard, emergency shut-off switch, and proper grounding.
- How do I choose the right diamond blade grit? Coarse grit blades are used for initial cutting, while finer grits are used for smoothing and polishing.
- What is the best coolant to use in a rock saw? Water-based coolants are commonly used, but oil-based coolants can provide better lubrication and cooling for certain materials.
- How often should I change the coolant in my rock saw? Change the coolant regularly, depending on usage, to prevent buildup of debris and maintain optimal cooling.
- Can I automate the rock feeding process? Yes, you can add an automatic feed system using motors and controls, but this requires advanced mechanical skills.
Ready to start your DIY rock saw project? Visit rockscapes.net for more inspiration, detailed guides, and expert advice. Discover the beauty and versatility of rock landscaping and create stunning features for your home and garden. Contact us at 1151 S Forest Ave, Tempe, AZ 85281, United States or call +1 (480) 965-9011.