Making a rock photo holder offers a unique and natural way to display your cherished memories. At rockscapes.net, we guide you through crafting these charming holders, blending earthy aesthetics with personal touches for a heartwarming display. By combining natural stones with simple wirework, you can create distinctive photo displays that enhance any space.
1. What Is A Rock Photo Holder And Why Should I Make One?
A rock photo holder is a decorative item crafted from a rock that holds photos or other small items. They are popular because they are easy to make, inexpensive, and add a natural, rustic touch to home decor. According to research from Arizona State University’s School of Earth and Space Exploration, in July 2025, using natural elements in home decor can reduce stress and enhance well-being.
1. 1 What Makes Rock Photo Holders Appealing?
Rock photo holders are appealing for several reasons:
- Natural Aesthetic: They bring the beauty of the outdoors inside, complementing various decor styles from rustic to modern.
- Personalization: Each rock is unique, and you can paint or decorate it to match your personal taste.
- Simplicity: They are easy to make with minimal tools and materials.
- Cost-Effective: Rocks can be found in nature or purchased inexpensively at craft stores.
- Versatile: They can hold photos, notes, business cards, or even small pieces of art.
1. 2 Where Can Rock Photo Holders Be Used?
Rock photo holders can be used in many places:
- Home: On desks, shelves, mantels, or bedside tables.
- Office: To add a personal touch to workspaces and keep important notes visible.
- Events: As table markers or party favors at weddings, birthdays, or other celebrations.
- Gifts: They make thoughtful, handmade gifts for friends and family.
2. What Materials Do I Need To Make A Rock Photo Holder?
To make a rock photo holder, you will need a few basic materials. Gathering the right materials ensures the craft is both enjoyable and results in a durable, attractive product.
2. 1 Essential Materials For Rock Photo Holders
Here is a list of essential materials:
| Material | Description | Usage |
|---|---|---|
| Smooth Rocks | Choose rocks that are flat on at least one side for stability. River rocks are ideal. | Serves as the base of the photo holder. |
| Copper Wire | Use a gauge that is sturdy enough to hold a photo but flexible enough to bend easily. | Creates the loops to hold the photo. |
| Acrylic Paint | For adding color and designs to the rocks. | Decorates the rock to match your style. |
| Mod Podge | A sealant that protects the paint and adds a glossy finish. | Preserves the paint and gives the rock a polished look. |
| Needle Nose Pliers | Helpful for bending and shaping the wire. | Allows for precise shaping of the wire loops. |
| Paintbrushes | Various sizes for applying paint and details. | Used for applying paint and creating patterns on the rocks. |
| Optional Items | Glitter, beads, stickers, or other decorative items for further customization. | Adds extra flair and personalization to the photo holders. |
| Glue | To adhere decorative items, if used. | Ensures decorative items stay securely attached. |
| Wire Cutters | To cut the copper wire to the desired length. | Ensures the wire is the correct size for creating the photo holder loops and base wrap. |
2. 2 Where To Find These Materials?
You can find these materials at:
- Craft Stores: Stores like Michaels or Hobby Lobby offer a wide range of rocks, paints, wires, and Mod Podge.
- Hardware Stores: For copper wire and pliers.
- Online Retailers: Amazon and other online stores have a vast selection of craft supplies.
- Nature: If you live near a river or beach, you might find suitable rocks for free.
3. How Do I Prepare The Rocks For Making Photo Holders?
Preparing the rocks correctly is essential for achieving the best results in your photo holder project. Cleaning and properly drying the rocks ensures that paint and other decorations adhere well.
3. 1 Cleaning The Rocks
-
Gather Your Rocks: Collect smooth rocks, preferably river rocks, as they have a nice, even surface.
-
Rinse Thoroughly: Rinse the rocks under running water to remove any loose dirt, sand, or debris.
 Rocks being rinsed with water to prepare them for painting.
 -
Scrub If Necessary: If there is stubborn dirt, use a scrub brush or toothbrush to gently scrub the surface of the rocks.
-
Soak in Soapy Water: For rocks that are particularly dirty, soak them in a bucket of warm, soapy water for about 30 minutes. This helps to loosen any remaining grime.
-
Final Rinse: After soaking, rinse the rocks again under clean running water to remove all traces of soap.
3. 2 Drying The Rocks
- Air Dry: Place the cleaned rocks on a clean towel or wire rack to air dry. Ensure they are not touching each other to allow for even drying.
- Sun Dry (Optional): If the weather permits, you can dry the rocks in direct sunlight. Sunlight can help to speed up the drying process.
- Oven Dry (Quick Method): If you need the rocks to dry quickly, you can use an oven. Place the rocks on a baking sheet lined with parchment paper and bake at a low temperature (around 200°F or 93°C) for about 30-60 minutes. Check them periodically to ensure they don’t overheat or crack.
- Ensure Complete Dryness: Before proceeding with painting or decorating, ensure that the rocks are completely dry. Any moisture can interfere with the adhesion of paint and sealants.
4. What Are The Steps To Painting And Decorating The Rocks?
Painting and decorating the rocks allows you to customize your photo holders to match your personal style or the theme of your decor. This is where you can get creative and add your unique touch to the project.
4. 1 Applying The Base Coat
-
Choose Your Paint: Select acrylic paints in the colors you desire. Acrylics are ideal because they adhere well to rock surfaces and dry quickly.
-
Apply the First Coat: Using a paintbrush, apply a thin, even coat of paint to the entire surface of the rock. Make sure to cover all areas that you want to be colored.
 Applying a base coat of paint to a smooth rock.
 -
Allow to Dry: Let the first coat of paint dry completely. This usually takes about 20-30 minutes, depending on the thickness of the paint and the ambient temperature.
-
Apply Additional Coats: If necessary, apply additional coats of paint to achieve a solid, opaque color. Allow each coat to dry before applying the next. Two to three coats are usually sufficient.
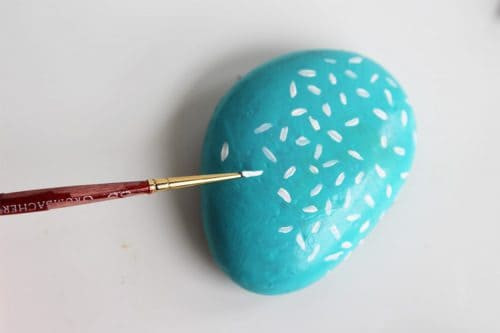
4. 2 Adding Patterns And Designs
- Gather Your Tools: Prepare small brushes, paint pens, stencils, and any other tools you plan to use for adding designs.
- Plan Your Design: Before you start painting, sketch out your design on paper or lightly on the rock with a pencil. This helps you visualize the final product and avoid mistakes.
- Paint Detailed Designs: Use small brushes or paint pens to carefully paint your chosen designs onto the rock. Consider patterns like polka dots, stripes, floral motifs, or geometric shapes.
- Use Stencils: If you’re using stencils, secure them to the rock with tape and apply paint with a stencil brush or sponge. Remove the stencil carefully to reveal the design.
- Add Special Effects: For added flair, use glitter paint, metallic paints, or glow-in-the-dark paint to create special effects.
- Allow to Dry: Let all the painted designs dry completely before moving on to the next step.
4. 3 Sealing The Paint
- Apply Mod Podge: Once the paint is completely dry, apply a layer of Mod Podge to seal and protect the paint. Mod Podge is a versatile sealant that provides a clear, glossy finish.
- Ensure Even Coverage: Use a soft brush to apply the Mod Podge evenly over the entire painted surface of the rock.
- Let It Dry: Allow the Mod Podge to dry completely. This usually takes about 1-2 hours. The Mod Podge will dry clear, leaving a smooth, protective finish.
- Apply Additional Coats (Optional): For extra protection, you can apply additional coats of Mod Podge, allowing each coat to dry before applying the next.
5. What Techniques Can Be Used For Bending And Attaching The Wire?
Bending and attaching the wire correctly is crucial for creating a functional and aesthetically pleasing photo holder. The wire needs to be shaped to hold the photo securely and attached firmly to the rock.
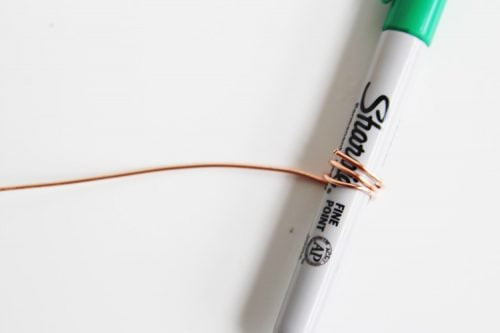
5. 1 Shaping The Wire Loops
-
Measure and Cut the Wire: Use wire cutters to cut a length of copper wire that is about 12-15 inches long. This should provide enough wire to create the loops and wrap around the rock.
-
Create the First Loop: Hold the wire about 2-3 inches from one end. Use needle-nose pliers to bend the wire into a small loop. The loop should be large enough to hold a photo but not so large that the photo will slip through easily.
-
Create the Second Loop: About 1/2 inch from the first loop, create another loop in the same manner. These two loops will hold the photo.
-
Adjust the Loops: Use the pliers to adjust the loops so they are aligned and evenly spaced. This will ensure that the photo sits straight.
 Shaping wire loops using needle-nose pliers.
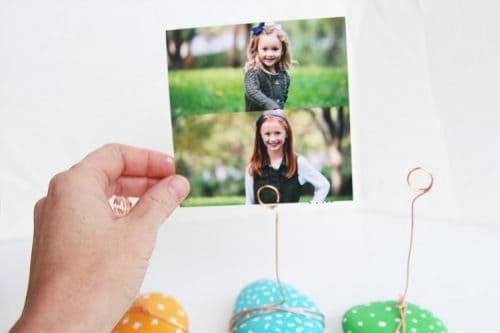
5. 2 Attaching The Wire To The Rock
- Position the Wire: Place the loops on top of the rock where you want the photo to be displayed. Make sure the rock is stable and the loops are facing upward.
- Wrap the Wire Around the Rock: Take the remaining length of wire and begin wrapping it tightly around the rock. Start at the base of the loops and wrap the wire around the rock several times to secure it in place.
- Secure the Ends: Use the pliers to tuck the end of the wire neatly under the wrapped wire. This will prevent the end from sticking out and scratching surfaces or fingers.
- Adjust for Stability: If the wire feels loose, use the pliers to tighten the wraps around the rock. The goal is to make the wire as secure as possible so that it doesn’t move or wobble.
6. How Can I Customize My Rock Photo Holder?
Customizing your rock photo holder allows you to add personal touches and create a unique piece of decor that reflects your individual style. There are many ways to customize your rock photo holders, from painting techniques to adding embellishments.
6. 1 Advanced Painting Techniques
- Ombre Effect: Create an ombre effect by blending different shades of paint on the rock. Start with a darker shade at the bottom and gradually blend it into a lighter shade at the top.
- Marbling: Achieve a marbled effect by swirling different colors of paint together. Drop small amounts of each color onto the rock and use a toothpick or brush to swirl them together gently.
- Metallic Accents: Add metallic accents using gold, silver, or copper paint. These can be used to highlight edges, create patterns, or add a touch of glamour to the rock.
- Dot Painting: Use dot painting techniques to create intricate designs with small dots of paint. This requires patience but can result in stunning, detailed patterns.
6. 2 Adding Embellishments
- Glitter: Apply glitter to the wet paint or Mod Podge for a sparkling effect. You can use fine glitter or chunky glitter, depending on the desired look.
- Beads and Sequins: Glue beads and sequins onto the rock to add texture and dimension. Use a strong adhesive to ensure they stay in place.
- Stickers: Use stickers to add fun and whimsical designs to the rock. Choose stickers that are waterproof and durable for long-lasting results.
- Natural Elements: Incorporate natural elements like small shells, pebbles, or dried flowers into your design. Glue them onto the rock to create a nature-inspired collage.
6. 3 Personalizing The Holder
- Monograms: Paint or stencil a monogram onto the rock to personalize it with your initials or the initials of the recipient.
- Dates: Add a date to commemorate a special event, such as a wedding, birthday, or anniversary.
- Quotes: Paint or write a meaningful quote onto the rock. This can be an inspirational message, a favorite saying, or a line from a poem.
- Themes: Customize the rock photo holder to match a specific theme, such as a holiday, season, or hobby. Use colors, patterns, and embellishments that reflect the theme.
7. What Are Some Creative Ideas For Rock Photo Holders?
Rock photo holders are incredibly versatile, and there are countless ways to design them. Here are some creative ideas to inspire your next project:
7. 1 Themed Photo Holders
- Beach Theme: Use seashells, sand, and blue paint to create a beach-themed photo holder.
- Garden Theme: Decorate the rock with floral patterns, green paint, and small artificial flowers.
- Holiday Theme: Create photo holders for different holidays, such as Christmas, Halloween, or Easter, using соответствующий colors and embellishments.
- Rustic Theme: Keep the rock natural and add simple wire loops for a rustic, understated look.
7. 2 Functional Photo Holders
- Business Card Holder: Create a rock photo holder specifically for displaying business cards on your desk.
- Memo Holder: Use a larger rock and stronger wire to hold memos, notes, or to-do lists.
- Table Number Holder: Make rock photo holders to use as table number holders at weddings or other events.
- Gift Card Holder: Design a rock photo holder to present gift cards in a creative and memorable way.
7. 3 Unique Design Ideas
- Glow-in-the-Dark: Use glow-in-the-dark paint to create a photo holder that illuminates in the dark.
- Mosaic: Create a mosaic pattern on the rock using small pieces of colored glass or tile.
- Decoupage: Use decoupage techniques to cover the rock with images from magazines, newspapers, or scrapbook paper.
8. What Safety Tips Should I Keep In Mind While Making Rock Photo Holders?
When working on DIY projects like rock photo holders, it’s important to prioritize safety. Here are some safety tips to keep in mind:
8. 1 General Safety Tips
- Work in a Well-Ventilated Area: When using paints, sealants, or adhesives, work in a well-ventilated area to avoid inhaling harmful fumes.
- Protect Your Hands: Wear gloves to protect your hands from paint, glue, and sharp edges.
- Supervise Children: If children are participating in the project, supervise them closely, especially when using sharp tools or hot glue.
- Clean Up: After completing the project, clean up your work area thoroughly. Dispose of any waste materials properly.
8. 2 Tool Safety
- Use Pliers Carefully: When using pliers to bend or cut wire, be careful not to pinch your fingers. Always use the pliers in a controlled manner.
- Wire Cutter Safety: When cutting wire, wear safety glasses to protect your eyes from flying pieces.
- Sharp Objects: Be cautious when using sharp objects such as knives or scissors for cutting materials.
8. 3 Material Safety
- Read Labels: Always read and follow the manufacturer’s instructions on paints, sealants, and adhesives.
- Non-Toxic Materials: Use non-toxic paints and sealants, especially if children are involved in the project.
- Avoid Allergens: If you have allergies to certain materials, such as latex or certain types of wood, avoid using them in your project.
- Hot Glue Safety: If using hot glue, be careful not to burn yourself. Use a low-temperature glue gun and avoid touching the hot glue directly.
9. How Can I Display And Maintain My Rock Photo Holders?
Once you’ve created your rock photo holders, displaying and maintaining them properly will help keep them looking their best. Here are some tips for displaying and maintaining your rock photo holders:
9. 1 Displaying Your Photo Holders
- Choose the Right Location: Select a location where your rock photo holders will be visible and complement the surrounding decor.
- Consider the Surface: Place the photo holders on a stable, flat surface to prevent them from tipping over.
- Group Them Together: Consider grouping several photo holders together to create a visually appealing display.
- Mix and Match: Mix and match different styles of photo holders to add variety and interest to your display.
- Rotate Photos: Rotate the photos in your holders regularly to keep the display fresh and interesting.
9. 2 Cleaning and Maintenance
- Dust Regularly: Dust the photo holders regularly with a soft cloth to keep them free from dirt and debris.
- Avoid Water: Avoid getting the photo holders wet, as water can damage the paint and adhesive.
- Spot Clean: If necessary, spot clean the photo holders with a damp cloth and mild soap.
- Protect from Sunlight: Protect the photo holders from direct sunlight, as prolonged exposure can cause the colors to fade.
- Check for Damage: Periodically check the photo holders for any signs of damage, such as loose wires or chipped paint.
- Repair as Needed: Repair any damage promptly to prevent it from worsening. Use glue to reattach loose wires or touch up chipped paint with a small brush.
10. What Are Some Common Mistakes To Avoid When Making Rock Photo Holders?
Making rock photo holders is a fun and rewarding project, but there are some common mistakes that can occur. Being aware of these pitfalls can help you avoid them and ensure that your photo holders turn out beautifully.
10. 1 Mistakes In Rock Selection
- Choosing Unstable Rocks: Selecting rocks that are not flat on at least one side can make the photo holder unstable and prone to tipping over.
- Using Dirty Rocks: Failing to clean the rocks thoroughly before painting can result in poor paint adhesion and an uneven finish.
- Selecting the Wrong Size: Choosing rocks that are too small or too large for the intended photos can make the photo holder look disproportionate.
10. 2 Mistakes In Painting And Decorating
- Applying Paint Too Thickly: Applying paint too thickly can cause it to crack or peel as it dries.
- Not Letting Paint Dry: Not allowing each coat of paint to dry completely before applying the next can result in a smudged or uneven finish.
- Using Incompatible Paints: Using paints that are not compatible with each other can cause the colors to bleed or the paint to flake off.
- Skipping Sealer: Omitting the sealer (such as Mod Podge) can leave the paint vulnerable to scratches and damage.
10. 3 Mistakes In Wire Attachment
- Using Wire That Is Too Thin: Using wire that is too thin can result in a flimsy photo holder that cannot support the weight of the photo.
- Not Securing the Wire: Failing to secure the wire tightly to the rock can cause the photo holder to wobble or fall apart.
- Leaving Sharp Ends: Leaving sharp ends of wire exposed can pose a safety hazard.
10. 4 General Oversight
- Rushing the Process: Rushing through the project can lead to mistakes and a less-than-satisfactory final product.
- Not Planning the Design: Starting the project without a clear plan for the design can result in a haphazard and uncoordinated look.
- Ignoring Safety Precautions: Neglecting to follow safety precautions can lead to injuries.
Ready to turn ordinary rocks into unique photo displays? Visit rockscapes.net for more inspiring ideas, a wide selection of decorative rocks, and expert tips on creating stunning landscape art. Transform your memories into natural masterpieces today!