How To Make A Rock Throwing Sling? You absolutely can, and it’s easier than you think! Rockscapes.net is here to guide you through crafting your own rock throwing sling. This age-old tool offers a blend of historical intrigue and practical skill-building. Plus, it’s a fun way to connect with primitive technology.
1. What is a Rock Throwing Sling and Why Should You Make One?
A rock throwing sling, also known as a shepherd’s sling, is a simple yet effective projectile weapon used for millennia. Its construction involves a pouch connected to two cords, allowing the user to launch projectiles with considerable force and accuracy. Beyond its historical significance, crafting a rock throwing sling provides a hands-on learning experience in ancient technology. You can experience the satisfaction of creating a functional tool with your own hands.
Slings offer several advantages such as:
- Portability: They’re lightweight and easy to carry.
- Accessibility: Materials are readily available and inexpensive.
- Power: They can launch projectiles with surprising force.
According to archaeological findings, slings were used for hunting and warfare, demonstrating their versatility and effectiveness.
2. Who is a Rock Throwing Sling For?
Rock throwing slings are not just for history buffs or survivalists. They appeal to a broad audience, including:
- Outdoor enthusiasts: Hikers, campers, and those interested in wilderness skills.
- History lovers: Anyone fascinated by ancient weapons and warfare.
- DIYers: Individuals who enjoy creating things with their own hands.
- Educators: Teachers looking for engaging ways to teach history or physics.
- Hobbyists: People seeking a unique and challenging skill to master.
Consider the satisfaction of mastering a skill used by ancient warriors and hunters. Whether you’re interested in historical reenactments or simply want a fun outdoor activity, a rock throwing sling offers something for everyone.
3. What Materials Do You Need to Craft a Rock Throwing Sling?
Crafting a rock throwing sling requires minimal materials, making it an accessible project for anyone. Here’s a list of what you’ll need:
| Material | Description |
|---|---|
| Paracord | Approximately 15 feet. Strong and durable, ideal for both the pouch and cords. |
| Scissors | For cutting the paracord to the desired length. |
| Lighter | To singe the ends of the paracord, preventing fraying. |
| Measuring tape | To ensure accurate measurements for the pouch and cords. |
| Leather or Fabric | (Optional) Can be used for the pouch instead of paracord. Choose a sturdy material that won’t tear easily. |
While paracord is a popular choice due to its strength and versatility, you can experiment with other materials like leather or sturdy fabrics for the pouch. The key is to choose materials that can withstand repeated use and provide a secure hold for your projectiles.
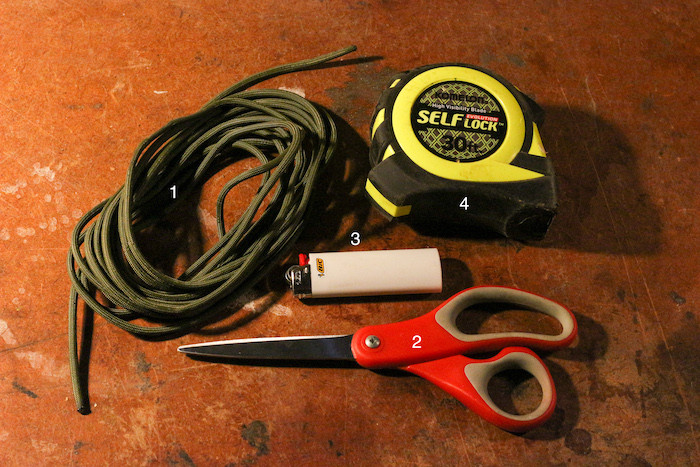 Paracord,measurement tape,scissor and a lighter for rock throwing sling.
Caption: Gather these basic supplies to start crafting your rock throwing sling.
4. Step-by-Step Guide: How To Make A Rock Throwing Sling with Paracord
Follow these steps to create your own rock throwing sling using paracord:
4.1. Step 1: Preparing the Paracord
Measure and cut a 15-foot length of paracord. Singe the ends with a lighter to prevent fraying. This step ensures a clean and manageable working material.
4.2. Step 2: Tying the Initial Knot
Tie a simple overhand knot about 30 inches from one end of the paracord. This knot marks the beginning of your sling pouch.
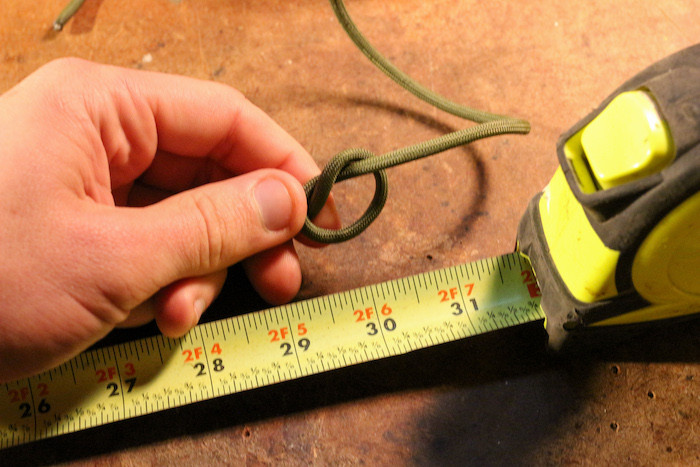 Tie a simple overhand knot about 30 inches from one end of your paracord.
Caption: Secure the starting point of your sling pouch with an overhand knot.
4.3. Step 3: Creating the First Loop
From your knot, make a loop that’s approximately 5 inches long. The loop’s length determines the size of your pouch, so adjust it based on the size of the projectiles you intend to use.
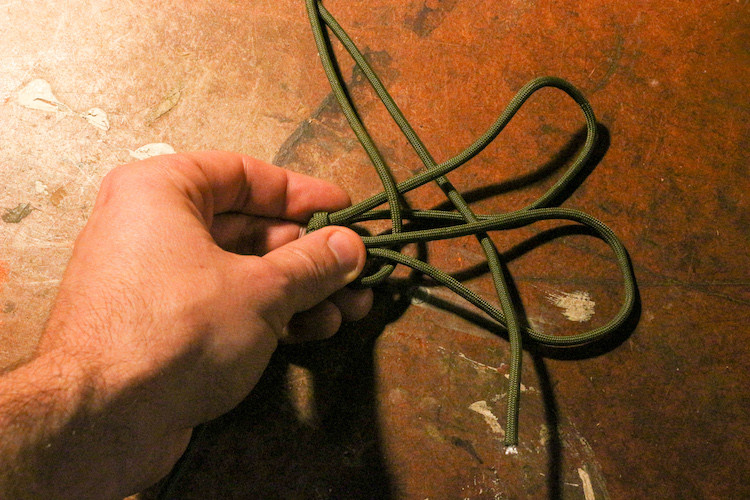
4.4. Step 4: Forming the Second Loop
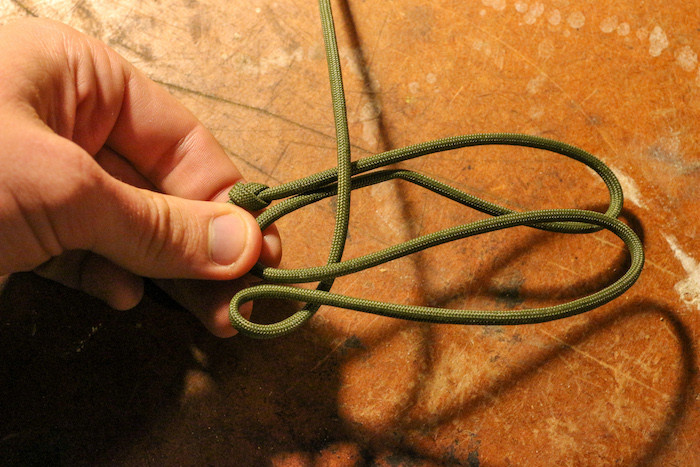
Create another loop of the same length directly “below” the first one. You should now have an “M” shape extending from your overhand knot.
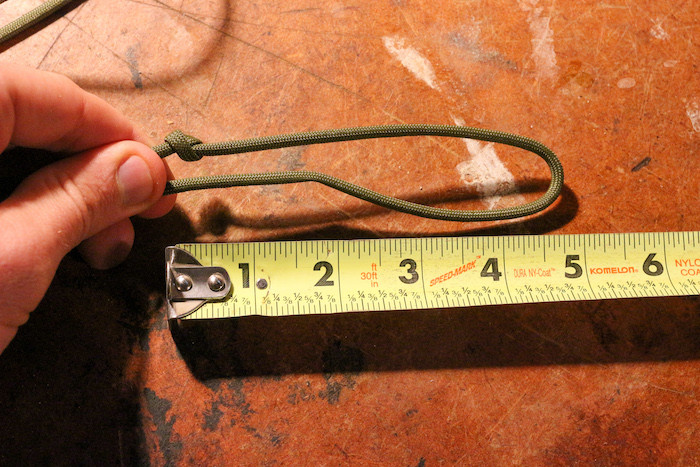 From your knot, make a loop that’s about 5 inches long.
Caption: Create the first loop to define the size of your sling’s pouch.
4.5. Step 5: Weaving the Pouch
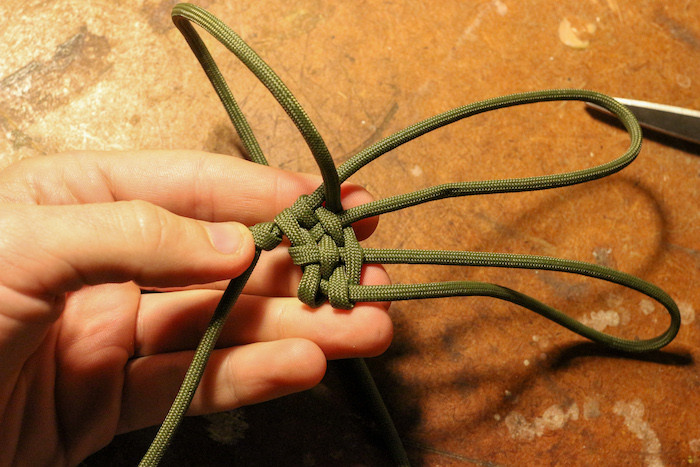
Hold the base of your loops and take the long end of the paracord. Bring it under the bottom loop and over the top loop. Pass the long end back through the loops, alternating your weave over and under each piece of paracord.
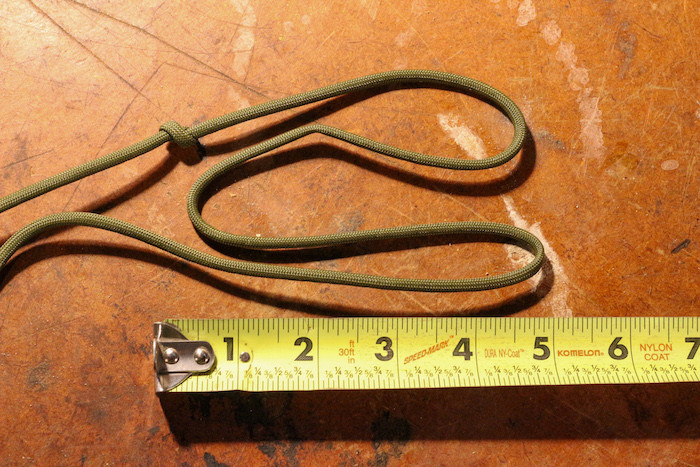 Make another loop of the same length, directly below,you should end up with an.
Caption: Form a second loop mirroring the first, creating an “M” shape.
4.6. Step 6: Continuing the Weave
Continue weaving back and forth, following the over-under method. If the paracord becomes tangled, take a moment to straighten the loops and maintain the weaving pattern.
 Hold onto the base of your loops, take the long end of your paracord and bring it under the bottom loop, and over the top loop.
Caption: Begin weaving the pouch by alternating the paracord over and under the loops.
4.7. Step 7: Tightening the Weave
After a few passes, pull your weaves tight against the original overhand knot. This ensures a secure and compact pouch.
 Take the long end and pass it back through the loops, alternating your weave over and under each piece of paracord as you go. Once you.
Caption: Continue weaving, ensuring the paracord remains untangled and the pattern is consistent.
4.8. Step 8: Completing the Pouch
Continue weaving until you can no longer pass your paracord through the loops. End your weave by passing the paracord through the hole in the center of the pouch.
 Making a few passes, pull your weaves tight against your original overhand knot. This will keep your pouch weave tight, and make it easier to hold everything together.
Caption: Tighten the weaves to create a secure and durable pouch.
4.9. Step 9: Creating the Finger Loop
Take one end of the paracord and make a loop using a scaffold knot. This loop will secure the sling to your finger during use.
4.10. Step 10: Tying the Release Knot
Take the other end of your paracord and tie a simple figure-eight knot. This knot provides a secure grip for releasing the projectile.
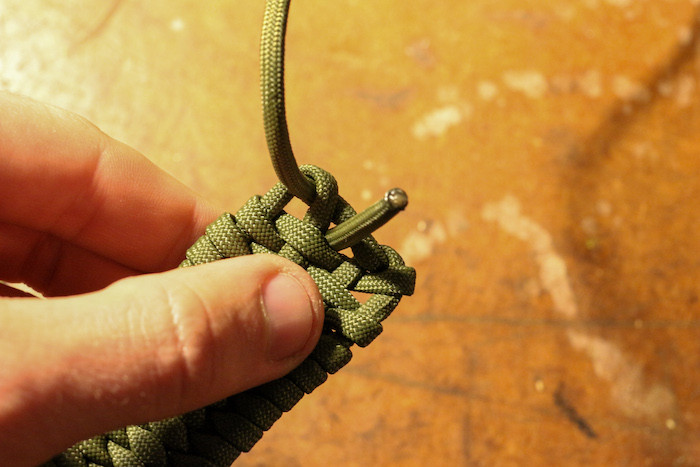 End your weave by passing the paracord through the hole in the center of the pouch.
Caption: Finish the pouch by passing the paracord through the center hole.
4.11. Step 11: Final Touches
Ensure all knots are secure and the pouch is tightly woven. Your rock throwing sling is now complete.
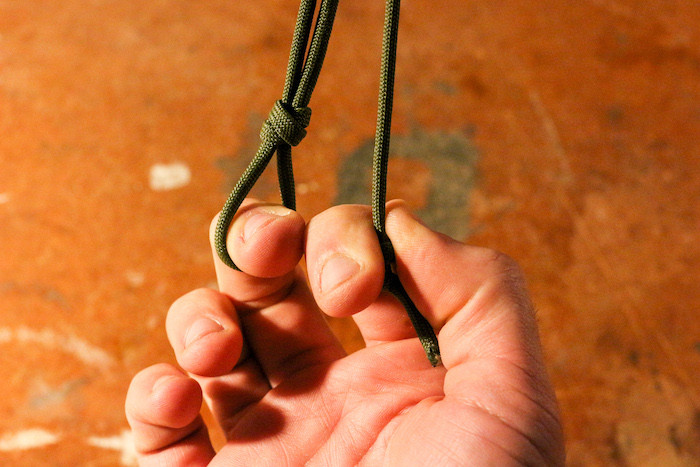 A man holding a paracord.
Caption: The completed rock throwing sling, ready for action.
5. Understanding the Mechanics of a Rock Throwing Sling
The effectiveness of a rock throwing sling lies in its simple yet ingenious mechanics. The pouch holds the projectile, while the two cords act as levers. Swinging the sling in a circular motion generates centrifugal force, which increases the projectile’s velocity. Releasing one of the cords at the precise moment allows the projectile to launch with significant speed and accuracy.
According to research from Arizona State University’s School of Earth and Space Exploration, the force generated by a sling can propel a projectile up to several hundred feet, depending on the user’s skill and the sling’s design.
6. Safety Tips for Using Your Rock Throwing Sling
- Choose an open area: Ensure there’s plenty of space around you and no people or animals in the vicinity.
- Use appropriate projectiles: Rocks or similarly weighted objects are ideal. Avoid sharp or fragile items.
- Practice in a safe environment: Start with soft targets and gradually increase the distance as you improve.
- Be aware of your surroundings: Pay attention to wind conditions and potential hazards.
- Never aim at people or animals: Slings can be dangerous if misused.
- Wear eye protection: This can help prevent injury from stray projectiles.
7. Different Types of Projectiles for Your Sling
While rocks are the most common projectile, you can experiment with other materials:
| Projectile | Description |
|---|---|
| Rocks | Readily available and come in various sizes and weights. Choose smooth, round rocks for optimal performance. |
| Clay balls | Can be easily molded and baked for a consistent shape and weight. |
| Lead shot | Provides a dense and heavy projectile for increased range and impact. Use with caution due to potential environmental concerns. |
| Marbles | Offer a smooth and aerodynamic projectile, suitable for target practice. |
| Golf balls | Heavier and denser alternatives to rocks, which have a more predictable flight path. |
Experiment with different projectiles to find what works best for your sling and your intended use.
8. Mastering the Art of Slinging: Techniques and Tips
- Practice your stance: A stable stance is crucial for accuracy.
- Perfect your swing: A smooth, consistent swing generates the most power.
- Time your release: Releasing the cord at the correct moment is key to hitting your target.
- Start slow: Focus on accuracy before increasing your swing speed.
- Watch videos: Online tutorials can provide valuable insights into slinging techniques.
- Seek guidance: If possible, learn from an experienced slinger.
Mastering the art of slinging takes time and practice, but the rewards are well worth the effort.
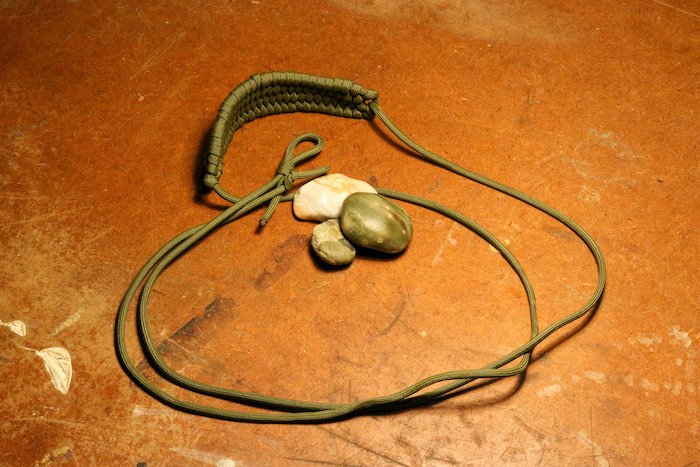 A rock sling and stones.
Caption: A completed sling with suitable projectiles.
9. Rock Throwing Slings in History and Culture
Rock throwing slings have a rich history, dating back to ancient times. They were used by various cultures for hunting, warfare, and even sport. The Bible mentions slings being used by soldiers and shepherds alike. In ancient Greece and Rome, slingers were valued members of the military.
According to historical records, skilled slingers could launch projectiles with incredible accuracy and force, making them a formidable presence on the battlefield. The sling’s simplicity and effectiveness have ensured its place in history and continue to fascinate people today.
10. Explore Rockscapes.net for More Stone and Landscape Inspiration
At Rockscapes.net, we understand the allure of natural materials and their ability to transform outdoor spaces. While you’re mastering the art of the rock throwing sling, we invite you to explore our website for inspiration on incorporating rocks and stones into your landscape.
10.1. Landscape Design Ideas
Discover a wealth of landscape design ideas, from rock gardens and pathways to retaining walls and water features. Our gallery showcases stunning examples of how rocks and stones can be used to create unique and inviting outdoor environments.
10.2. Stone Selection Guide
Navigate our comprehensive stone selection guide to find the perfect materials for your project. Learn about different types of rocks, their characteristics, and their best uses in landscaping.
10.3. Expert Advice and Tips
Benefit from our expert advice and tips on everything from stone installation to maintenance. Our team of experienced landscape professionals is here to help you create the outdoor space of your dreams.
10.4. Connect with Rockscapes.net
Ready to bring your landscape vision to life? Visit Rockscapes.net today.
11. How to Use a Rock Throwing Sling?
Now that you’ve got your ancient projectile hurler all set, it’s time to head outside, load up your pouch, and start slinging. Here are a few basic steps to get you started.
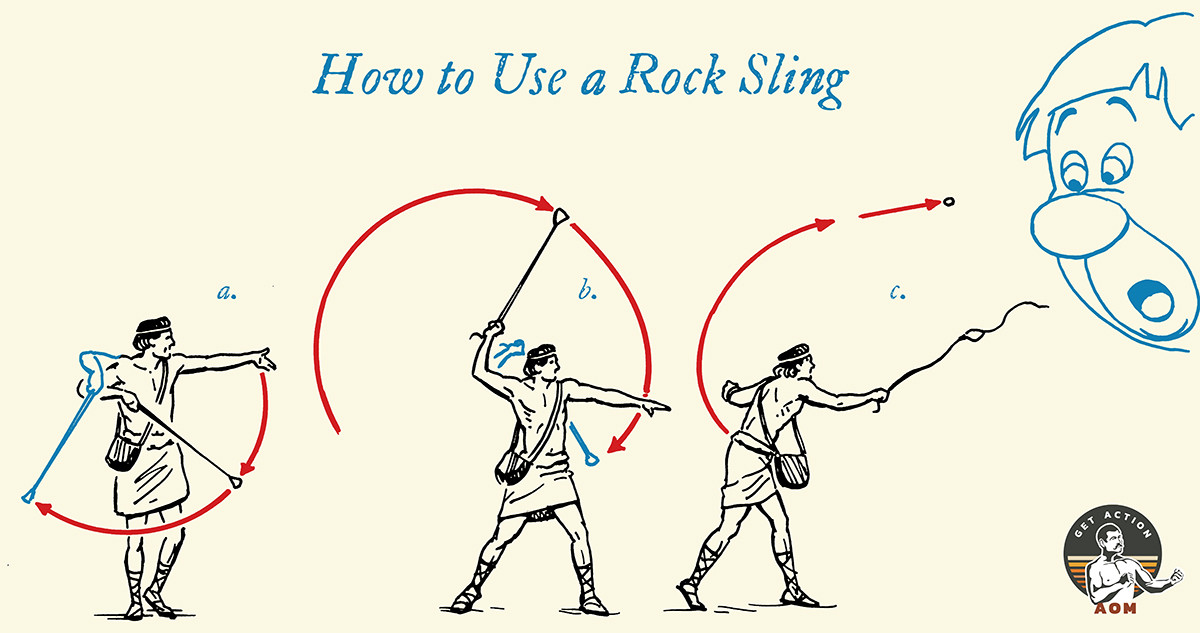 A comic of how to use rock sling.
Caption: How to use a rock throwing sling
- Load your pouch with a projectile. You may have to pinch the pouch shut for the first few uses until it begins to soften and break in.
- Put your middle finger through the paracord loop and then hold the knotted end between your thumb and forefinger.
- Begin swinging the sling in a circle next to your body, like a jump rope.
- Release the knotted end as the sling swings out in front of you, pointing your finger in the direction you want the projectile to go.
12. FAQ About Rock Throwing Slings
12.1. What is the ideal length for a rock throwing sling?
The ideal length varies depending on your arm length and throwing style, but a good starting point is around 3 to 4 feet.
12.2. What kind of rocks should I use for my sling?
Choose smooth, round rocks that are comfortable to hold and won’t damage the pouch.
12.3. How far can a rock throwing sling launch a projectile?
With practice, you can launch a projectile well over a thousand feet.
12.4. Is it legal to use a rock throwing sling?
Laws vary depending on your location, so check local regulations before using a sling.
12.5. How can I improve my accuracy with a rock throwing sling?
Practice regularly, focus on your stance and swing, and experiment with different release points.
12.6. Can I use a rock throwing sling for hunting?
In some areas, it may be legal to use a sling for hunting small game, but check local regulations first.
12.7. What is the best material for making a rock throwing sling pouch?
Paracord, leather, and sturdy fabrics are all good choices for the pouch.
12.8. How do I maintain my rock throwing sling?
Inspect your sling regularly for wear and tear, and replace any damaged components.
12.9. Are rock throwing slings dangerous?
Yes, slings can be dangerous if misused. Always follow safety guidelines and never aim at people or animals.
12.10. Where can I learn more about rock throwing slings?
Online resources, historical societies, and experienced slingers can provide valuable information.
13. Conclusion: Embrace the Ancient Art of Slinging
Crafting and using a rock throwing sling is a rewarding experience that connects you to the past while providing a fun and challenging activity. With the right materials, techniques, and a healthy dose of practice, you can master this ancient art and impress your friends with your slinging skills.
Remember to visit Rockscapes.net for inspiration and resources to enhance your outdoor spaces with the timeless beauty of rocks and stones. Let us help you transform your landscape into a stunning reflection of your personal style and appreciation for the natural world.
Address: 1151 S Forest Ave, Tempe, AZ 85281, United States.
Phone: +1 (480) 965-9011.
Website: rockscapes.net.
