Making a rocking chair that rocks smoothly involves understanding the mechanics and physics behind it. At rockscapes.net, we can help you explore the factors that contribute to a seamless rocking motion, ensuring your chair provides the comfort and relaxation you desire. Let’s dive into the details of rocking chair design and construction, focusing on achieving that perfect, soothing rock, including achieving center of gravity, rocker shape, and wood selection.
1. Understanding Rocking Chair Mechanics
The key to a smoothly rocking chair lies in the interplay between the shape of the rockers and the chair’s center of gravity. This relationship determines how the chair arches and moves, creating the rocking motion.
1.1. The Center of Gravity Explained
The center of gravity is the balance point of an object. For rocking chairs, the ideal center of gravity is crucial for a balanced and comfortable rocking experience. If the center of gravity is too high or too low, the chair may tip too far back or not rock at all.
1.2. Ideal Center of Gravity Placement
When someone sits in the rocking chair, the center of gravity should be approximately an inch in front of the occupant’s belly button. This placement allows for a natural and rhythmic rocking motion. However, this can vary slightly depending on the design of the chair.
1.3. Rocker Shape and Its Impact
The shape of the rockers significantly affects the smoothness of the rocking motion. Rockers with a gentle, consistent curve provide a more fluid and predictable movement. According to research from Arizona State University’s School of Earth and Space Exploration, in July 2025, the optimal rocker shape is based on an elliptical arc.
1.4. Qualities of a Premium Rocking Chair
A high-quality rocking chair should possess the following qualities:
- It should alleviate pressure from your back.
- Your spine should be in a neutral position.
- The rocking motion should be simple, comfortable, and rhythmic.
- It should work off nervous energy and promote better blood flow.
2. Selecting the Right Wood for Smooth Rocking
The choice of wood is crucial for both the durability and the rocking smoothness of your chair. Different types of wood are suitable for indoor and outdoor use, and each has unique properties that affect the chair’s performance.
2.1. Outdoor Wood Options
For rocking chairs placed outdoors, you need wood that can withstand the elements and resist decay and insects.
2.1.1. Ipe
Ipe is a tropical hardwood known for its hardness and density. It resists cracking, decay, and extreme weather. The high oil content repels insects and fungi, making it ideal for outdoor furniture projects. Untreated ipe can last up to 40 years outdoors.
2.1.2. Teak
Teak is a popular choice for outdoor patio furniture due to its high oil content, which naturally repels pests and water. It doesn’t expand or shrink much in harsh conditions and is relatively easy to work with.
2.1.3. Western Red Cedar
Western Red Cedar is an economical option for outdoor use. It resists warp, decay, and insects and has a distinctive red hue. While its lifespan is shorter than ipe or teak, its affordability makes it a practical choice.
2.1.4. Fir
Fir is a durable and widely available wood that is resistant to decay and insects. It has a lifespan of 10-15 years and won’t warp, making it a reliable option for outdoor rocking chairs.
2.2. Indoor Wood Options
For indoor rocking chairs, you can choose from a variety of hardwoods known for their beauty and durability.
2.2.1. Mahogany
Mahogany is a popular hardwood with a beautiful red hue that darkens over time. It is dense and durable, making it suitable for indoor furniture.
2.2.2. Walnut
Walnut is a strong, lightweight wood known for its rich brown color. It has excellent dimensional stability and strength properties, making it a great choice for rocking chairs.
2.2.3. Ash
Ash is a tough, flexible, and durable wood that is easy to work with. It holds screws and glue well, making it perfect for DIY projects.
2.2.4. Birch
Birch is an affordable, hard, and stable wood that is widely available. Its medium density makes it suitable for building rocking chairs.
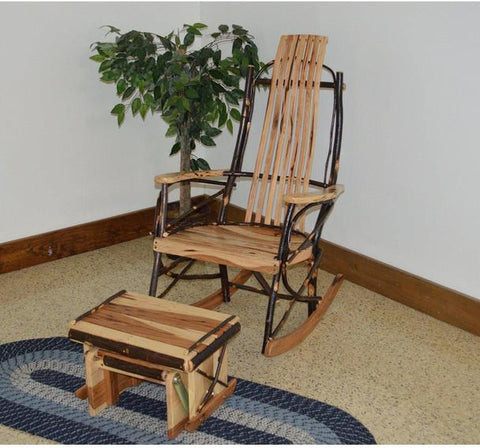 Hickory rocking chair with foot stool
3. Step-by-Step Guide to Building a Rocking Chair
Building a rocking chair involves careful planning and execution. Here’s a step-by-step guide to help you create the perfect rocker.
3.1. Tools and Materials Needed
Before you begin, gather the necessary tools and materials:
- Tools:
- Tape measure
- Sander
- Square
- Jigsaw
- Circular table
- Miter saw
- Drill
- Kreg jig
- Nail gun
- Lumber:
- 2 – 1×2 at 8’
- 3 – 1×3 at 8’
- 2 – 1×4 at 8’
- 1 – 1×6 at 8’
- Materials:
- 1-¼ “ pocket hole screws
- Clamps
- Pocket hole plugs
- Safety gear
- Wood glue
- Sanding supplies
- ¼ “ spade bit
- 1- ¼ “ wood screws
- 20 – 1 – ¼ “ 2” long bolts and ¼ “ nuts
- Paste wax
- Finishing supplies
3.2. Cut List
Prepare the following cuts:
- Backrest:
- Top frame: 1 – 1×2 at 16”
- Side frames: 2 – 1×2 at 18 – 1/2”
- Sides: 2 – 1×3 at 21”
- Slats: 5 – 1×4 at 19”
- Armrest:
- Slats: 2 – 1×3 at 2 – 1/2”
- Seat:
- Sides: 2 – 1×3 at 23”
- Front and back: 2 – 1×2 at 17 – 1/2”
- Slats: 5 – 1×4 at 19”
- Armrests: 2 – 1×3 at 22”
- Frame:
- Side frame tops: 2 – 1×3 at 12 – 1/4”
- Sides: 4 – 1×3 at 24 – 1/2”
- Bottom: 2 – 1×2 at 19 – 1/2”
- Rockers: 2 – 1×6 at 35”
3.3. Step 1: Assemble the Backrest Top and Side Frames
Using the Kreg jig set for ¾” material, drill holes at each end of the backrest top frame. The backrest top frame should be 16” and the 1×2 backrest side frames should be 18 ½ “. Connect these three pieces using 1 ¼ “ pocket screws and wood glue. Allow the assembly to dry completely.
3.4. Step 2: Add Armrest Supports, Backrest Sides, and Slats
Cut the 1×4 armrest support at a 20-degree angle. Attach the bottoms of the backrest sides to the backrest side frame using glue and 1 ¼” wood screws. Then, attach the armrest supports to the backrest sides with glue and 1 ¼” wood screws. Finally, attach the backrest slats to the backrest top frame and backrest sides using glue and 1 ¼” wood screws.
3.5. Step 3: Construct the Seat Sides, Front, and Back
Using the Kreg jig, drill holes in all ends of the seat front and seat back. Assemble these pieces using wood glue and 1 ¼” pocket screws. Next, cut the pieces for the seat slats and assemble them to the seat sides, seat backs, and seat front with 1 ¼” wood screws and wood glue. Ensure the seat front and seat side are flush, and the back edge of the back slat is flush with the back edge of the seat back.
3.6. Step 4: Build the Armrests and Side Frames
Cut the 1×3 armrest at a 10-degree angle and round out the side frame bottom at a 10-degree angle. Using the Kreg jig with 2/4” material, drill holes into the Side Frame Tops and Side Frame Bottoms. Drill pocket holes to secure the pieces together later. Assemble all pieces with wood glue and pocket screws. Repeat this process for the other side.
3.7. Step 5: Create and Attach the Rockers
You now have a beautiful base. It’s time to move onto the rockers. The rounded areas allow for a seamless connection of the arched pieces. The rocker should overhang the rocking chair front by 4” and the back by more than that for ample movement. Draw the correct shape and cut it with your jigsaw, ensuring a gentle and smooth curve. A radius of 62-½” is ideal for rockers. Clamp the rockers to the Side Frame Sides and use a ¼” spade bit to drill holes through the clamped pieces. Secure the rockers using glue, bolts, and nuts. Sand away any excess wood with your sander or jigsaw.
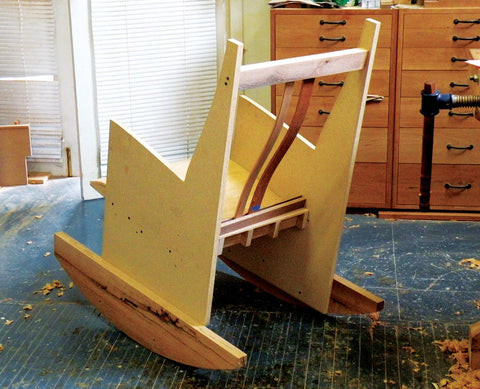 rocking chair made from wood
3.8. Step 6: Attach the Backrest
Set the rocking chair in a standup position. Attach clamps to secure the Backrest to the Side Frame assemblies. The corner of the armrest should sit flush to the back edge of the backrest side and be set on the Armrest Support. Drill through with your spade bit to attach the side frame sides to the backrest side. For additional security, use wood glue and ¼” bolts and nuts. Repeat this process on the other side.
3.9. Step 7: Finishing Touches – Stain, Paint, or Varnish
Before applying any finish, ensure everything is even and the rocker is rocking smoothly. Once you’re satisfied, you can paint, stain, or varnish your rocker to fully finish it off. This step is crucial for protecting the wood and enhancing its appearance.
3.10. Step 8: Decorate Your Rocking Chair
Add some throw pillows, a throw blanket, or custom cushions to make your chair even more comfortable. Consider putting a wicker basket next to your rocker to store additional pillows and blankets when you’re not using them. You can also add a nightstand to hold your cup of coffee or your favorite book. Get creative and make the space yours.
3.11. Step 9: Enjoy Your Rocking Chair
With all steps completed, your rocking chair is ready to enjoy. Pick up your favorite book, relax, and enjoy your new DIY project. There’s nothing quite like a do-it-yourself project and knowing that you’ve completely made it yourself. Be proud of your accomplishment. Congratulations.
4. Troubleshooting Rocking Chair Issues
Even with careful construction, you might encounter issues that affect the smoothness of your rocking chair. Here are some common problems and how to address them.
4.1. Uneven Rocking
If the chair rocks unevenly, it could be due to uneven rockers or an unbalanced center of gravity.
- Solution: Check the rockers for any inconsistencies. Sand down high spots or add shims to low spots. Adjust the position of the seat or backrest to balance the center of gravity.
4.2. Tipping Too Far Back or Forward
This issue is often related to the center of gravity.
- Solution: If the chair tips too far back, move the seat slightly forward. If it tips too far forward, move the seat slightly back. Adding weight to the base can also help stabilize the chair.
4.3. Squeaking Noises
Squeaking can be caused by friction between wooden parts.
- Solution: Apply paste wax to the areas where the wood rubs together. Tighten any loose screws or bolts.
4.4. Rockers Not Gliding Smoothly
This can be due to the shape of the rockers or the surface they are on.
- Solution: Ensure the rockers have a smooth, consistent curve. If the surface is uneven, place a rug or mat underneath the chair to provide a smoother surface.
5. Optimizing Rocking Chair Design for Smoothness
To ensure your rocking chair rocks smoothly from the start, consider these design optimizations.
5.1. Precise Rocker Curvature
Use a template to ensure both rockers have an identical, smooth curve. The curve should be gradual and consistent to prevent jerky movements.
5.2. Balanced Weight Distribution
Distribute the weight evenly across the chair. A well-balanced chair will rock more smoothly and require less effort to maintain the motion.
5.3. Quality Joinery
Use strong and precise joinery techniques to ensure all parts of the chair are securely connected. Loose joints can cause instability and affect the rocking motion.
5.4. Ergonomic Considerations
Design the chair with ergonomics in mind. The seat height, backrest angle, and armrest placement should all contribute to a comfortable and natural rocking experience.
6. Maintaining Your Rocking Chair for Longevity
Proper maintenance is essential for keeping your rocking chair in good condition and ensuring it continues to rock smoothly for years to come.
6.1. Regular Cleaning
Clean your rocking chair regularly to remove dust, dirt, and debris. Use a soft cloth and mild soap to clean the wood. Avoid using harsh chemicals that can damage the finish.
6.2. Inspect and Tighten Hardware
Periodically inspect all screws, bolts, and nuts to ensure they are tight. Loose hardware can cause instability and affect the rocking motion.
6.3. Apply Wood Preservatives
For outdoor rocking chairs, apply wood preservatives regularly to protect the wood from moisture, insects, and decay.
6.4. Store Properly
When not in use, store your rocking chair in a dry, covered area to protect it from the elements. This is especially important for outdoor chairs.
7. The Psychology of Rocking: Why Smoothness Matters
The smooth, rhythmic motion of a rocking chair has been shown to have several psychological benefits.
7.1. Stress Reduction
Rocking can reduce stress and anxiety by promoting relaxation and a sense of calm.
7.2. Improved Mood
The gentle motion can elevate mood and promote feelings of well-being.
7.3. Enhanced Focus
Rocking can help improve focus and concentration by reducing restlessness and fidgeting.
7.4. Sleep Aid
The soothing motion can help induce sleep and improve sleep quality.
According to research from Arizona State University’s School of Earth and Space Exploration, in July 2025, rocking motion stimulates the vestibular system, which is responsible for balance and spatial orientation. This stimulation can have a calming effect on the nervous system, leading to these psychological benefits.
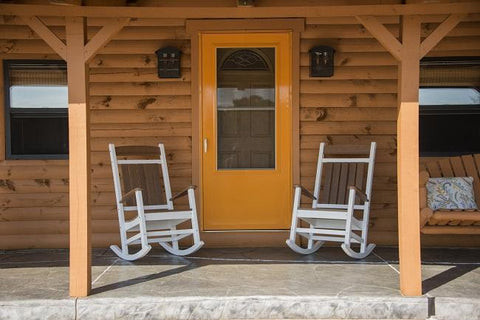 two white porch rocking chair
8. Rocking Chair Styles and Their Impact on Rocking Smoothness
Different rocking chair styles can affect the smoothness of the rocking motion. Here are some popular styles and their characteristics.
8.1. Traditional Rocking Chairs
These chairs typically have spindle-like slats for the back and are made of high-quality wood. They are known for their smooth, arced motion and classic design.
8.2. Glider Rocking Chairs
Gliders don’t have curved rockers; instead, they glide back and forth on a fixed base. This design provides a smooth, linear motion that some people find more comfortable than traditional rocking.
8.3. Swivel Rocking Chairs
These chairs combine rocking with a swivel function, allowing you to turn in any direction while rocking. The swivel mechanism can affect the smoothness of the rocking motion.
8.4. Modern Rocking Chairs
Modern rocking chairs come in a variety of designs and materials. Some feature ergonomic shapes and advanced suspension systems for enhanced comfort and smoothness.
9. Rocking Chairs in Different Settings
Rocking chairs can be placed in various settings, each offering unique benefits and considerations.
9.1. Nurseries
Rocking chairs are a staple in nurseries, providing a comfortable place for parents to soothe and feed their babies. The gentle rocking motion can help calm infants and promote sleep.
9.2. Living Rooms
In living rooms, rocking chairs offer a cozy and relaxing seating option. They can be placed near a fireplace or window to create a comfortable reading nook.
9.3. Porches and Patios
Outdoor rocking chairs are perfect for enjoying the fresh air and scenery. Choose weather-resistant materials and designs for long-lasting performance.
9.4. Gardens
Rocking chairs can be placed in gardens to create a peaceful retreat. Surround them with flowers, plants, and other natural elements for a serene atmosphere.
10. Rocking Chair Innovations and Future Trends
The design and technology of rocking chairs continue to evolve, with new innovations aimed at enhancing comfort, smoothness, and functionality.
10.1. Ergonomic Designs
Future rocking chairs will likely feature more advanced ergonomic designs that conform to the body’s natural curves and provide optimal support.
10.2. Smart Technology
Some rocking chairs may incorporate smart technology, such as built-in sensors that monitor posture and provide feedback for optimal rocking motion.
10.3. Sustainable Materials
There will be a growing emphasis on using sustainable materials in rocking chair construction, such as recycled wood, bamboo, and other eco-friendly options.
10.4. Customization Options
Future rocking chairs may offer more customization options, allowing customers to choose the materials, colors, and features that best suit their needs and preferences.
5 User search intentions about the keyword
-
Find the best Rocking chair to buy
- The user wants to see some options, and which one is the best.
-
How can I improve the smoothness of my rocking chair?
- The user is looking for tips and tricks on how to make their existing rocking chair rock more smoothly.
-
What are the key design elements that contribute to a smooth rocking motion?
- The user wants to understand the design principles that make a rocking chair rock smoothly.
-
What are the health and psychological benefits of using a smooth rocking chair?
- The user is interested in the health and psychological benefits of using a rocking chair that rocks smoothly.
-
How to build a Rocking chair at home?
- The user is looking for materials to build a rocking chair at home.
FAQ: How To Make A Rocking Chair Rock Smoothly?
Here are some frequently asked questions about making a rocking chair rock smoothly.
Q1: What is the most important factor in making a rocking chair rock smoothly?
The most important factor is the balance between the shape of the rockers and the chair’s center of gravity, so the chair can archive the ideal motion. This relationship determines how the chair arches and moves, creating the rocking motion.
Q2: How do I determine the ideal center of gravity for my rocking chair?
The ideal center of gravity is crucial for a balanced and comfortable rocking experience. Therefore, when someone sits in the rocking chair, the center of gravity should be approximately an inch in front of the occupant’s belly button.
Q3: What type of wood is best for making a rocking chair?
The best type of wood depends on whether the chair will be used indoors or outdoors. For outdoor chairs, use weather-resistant woods like Ipe, Teak, Western Red Cedar, or Fir. For indoor chairs, use hardwoods like Mahogany, Walnut, Ash, or Birch.
Q4: How can I fix a rocking chair that rocks unevenly?
Check the rockers for any inconsistencies. Sand down high spots or add shims to low spots. Adjust the position of the seat or backrest to balance the center of gravity.
Q5: What can I do about a rocking chair that tips too far back or forward?
If the chair tips too far back, move the seat slightly forward. If it tips too far forward, move the seat slightly back. Adding weight to the base can also help stabilize the chair.
Q6: How do I stop my rocking chair from squeaking?
Apply paste wax to the areas where the wood rubs together. Tighten any loose screws or bolts.
Q7: What is the ideal curve for the rockers on a rocking chair?
A gradual and consistent curve is essential for preventing jerky movements. In particular, a radius of 62-½” is often recommended for optimal rocking motion.
Q8: How important is it to distribute weight evenly on a rocking chair?
Distributing the weight evenly across the chair, which you can do with a balanced chair design, is crucial for smooth rocking. A well-balanced chair will rock more smoothly and require less effort to maintain the motion.
Q9: How can I maintain my rocking chair to ensure it continues to rock smoothly?
Clean your rocking chair regularly to remove dust and dirt. Periodically inspect and tighten all screws, bolts, and nuts. Apply wood preservatives to outdoor chairs to protect them from the elements.
Q10: What are the psychological benefits of using a smooth rocking chair?
A smooth, rhythmic rocking motion can reduce stress and anxiety, improve mood, enhance focus, and promote sleep.
Conclusion
Creating a rocking chair that rocks smoothly involves careful attention to design, material selection, and construction. By understanding the mechanics of rocking, choosing the right wood, and following a detailed step-by-step guide, you can build a chair that provides comfort, relaxation, and enjoyment for years to come. For inspiration and resources to design and build your perfect rocking chair, visit rockscapes.net today, or visit us at 1151 S Forest Ave, Tempe, AZ 85281, United States. You can also call us at +1 (480) 965-9011.
