Are you looking for an easy and fun way to create a yarn tail for your rocking horse? At rockscapes.net, we provide a simple, step-by-step guide on How To Make A Rocking Horse Tail Out Of Yarn, adding charm and character to your treasured toy. Learn how to craft this delightful detail and bring new life to your rocking horse with our DIY guide, yarn selection tips, and the braiding instructions!
1. Why Make a Yarn Tail for Your Rocking Horse?
Why opt for a yarn tail, you ask? Here are some compelling reasons:
- Cost-Effective: Yarn is a budget-friendly material, making it an economical choice for DIY projects.
- Customizable: Yarn comes in a wide array of colors and textures, allowing you to create a tail that perfectly matches your rocking horse’s style.
- Soft and Safe: Yarn is soft to the touch, making it a safe option for children to play with.
- Easy to Replace: If the yarn tail becomes worn or damaged, it’s easy to replace with a new one.
- Adds a Personal Touch: Crafting a yarn tail yourself adds a unique, personal touch to your rocking horse, making it even more special.
2. Gathering Your Supplies for the Rocking Horse Yarn Tail
Before diving into the project of making a rocking horse tail out of yarn, gather your materials. Here is what you’ll need:
- Yarn: Choose your yarn type and colors. Consider using a variety of colors for a more playful and vibrant tail.
- Scissors: You’ll need these to cut the yarn to the desired length.
- Ruler or Measuring Tape: Ensure your yarn strands are uniform in length.
- Cardboard or Book: To wrap the yarn around for consistent length.
- Hair Tie or Yarn: To secure the braid at the end.
- Staple Gun (Optional): If the original staples are damaged, a staple gun can be used for reattachment.
- Hammer (Optional): For gently securing the braid under existing staples.
3. Selecting the Right Yarn for Rocking Horse Tail
The type of yarn you select for your rocking horse tail can significantly impact the final look and feel. Here are a few popular options:
- Acrylic Yarn: Known for its durability and wide range of colors, acrylic yarn is a great all-around choice.
- Wool Yarn: Wool yarn offers a soft, natural look and feel, providing a more rustic aesthetic.
- Cotton Yarn: Cotton yarn is breathable and easy to care for, making it ideal for rocking horses that will see a lot of use.
- Variegated Yarn: This type of yarn features multiple colors blended together, creating a unique, multi-toned effect.
- Textured Yarn: Consider using textured yarn, such as boucle or faux fur, to add visual interest and depth to the tail.
4. Step-by-Step Guide: How to Make a Rocking Horse Tail Out of Yarn
Let’s get started on crafting your rocking horse tail out of yarn. Follow these steps carefully:
- Measure and Cut the Yarn:
- Determine the desired length of the tail. A good starting point is about 12-18 inches, but you can adjust this based on the size of your rocking horse.
- Wrap the yarn around a piece of cardboard or a book that matches half of your desired tail length. This ensures all strands are the same length.
- Cut the yarn at one end to create multiple strands of equal length. The number of strands will determine the thickness of the tail.
- Gather and Secure the Yarn:
- Bundle all the yarn strands together and fold them in half.
- Tie a small piece of yarn tightly around the folded midpoint to secure the bundle. This will be the top of the tail.
- Divide and Braid the Yarn:
- Divide the yarn into three equal sections.
- Begin braiding the yarn, just like you would braid hair. Keep the braid tight and even for a neat appearance.
- Secure the End of the Braid:
- Once you’ve braided to the end, secure it with a hair tie or another piece of yarn. Tie it tightly to prevent the braid from unraveling.
- Trim the Ends:
- Trim the ends of the yarn to create a clean, even finish. You can leave the ends straight or taper them for a more natural look.
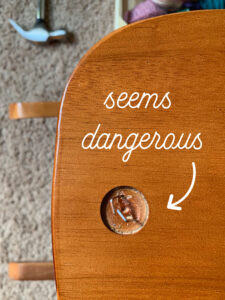
- Attaching the New Yarn Tail:
- If original staples intact, carefully push the new braid under the staple one side at a time. Hammer gently so that the points of the staple get pushed down towards the wood.
- If you own a staple gun, be sure to staple the yarn in a way that is going to cover the staple as best as you can. Staple horizontally as this may be the most secure.
- If the staples broke and you don’t have a staple gun, you’ll need to purchase one.
5. Creative Variations for Your Yarn Tail
Want to add a unique twist to your rocking horse’s tail? Here are some creative variations to consider:
- Ombre Effect: Use different shades of the same color yarn to create a beautiful ombre effect. Start with a light shade at the top and gradually transition to a darker shade at the bottom.
- Rainbow Tail: Use a variety of bright, vibrant colors to create a fun and playful rainbow tail.
- Tassel Tail: Instead of braiding the yarn, simply tie off the bundle near the end to create a tassel. This is a quicker and easier option for a more casual look.
- Beaded Tail: Add beads to the yarn strands before braiding for a decorative touch. Choose beads that complement the colors of the yarn.
- Ribbon Accents: Weave ribbons into the braid for added texture and visual appeal.
6. Ensuring Safety and Durability of Your Yarn Tail
To ensure that your yarn tail is safe and durable, keep the following tips in mind:
- Use Non-Toxic Materials: Choose yarn that is labeled as non-toxic, especially if the rocking horse is for a young child.
- Secure the Tail Tightly: Make sure the tail is securely attached to the rocking horse to prevent it from coming loose during play.
- Inspect Regularly: Periodically inspect the tail for any signs of wear and tear. Repair or replace it as needed to maintain its integrity.
- Avoid Long, Loose Strands: Trim any long, loose strands of yarn to prevent them from becoming a hazard.
- Supervise Young Children: Always supervise young children while they are playing with the rocking horse to ensure their safety.
7. The Benefits of DIY Projects Like This
Engaging in DIY projects like creating a yarn tail for a rocking horse offers numerous benefits:
- Creativity: DIY projects allow you to express your creativity and personalize items to your liking.
- Cost Savings: Making things yourself can save you money compared to buying them pre-made.
- Sense of Accomplishment: Completing a DIY project can give you a sense of accomplishment and pride.
- Mindfulness: DIY projects can be a form of mindfulness, helping you to relax and focus on the present moment.
- Unique Items: DIY projects result in unique, one-of-a-kind items that you won’t find anywhere else.
8. How Rockscapes.net Can Inspire Your Next Project
At rockscapes.net, we’re passionate about inspiring creativity and helping you bring your DIY visions to life. While our primary focus is on rocks and landscaping, we believe in the power of resourcefulness and imagination in all areas of life. Here’s how we can help:
- Inspiration: Explore our galleries and articles to spark your creativity and find new ideas for your next project.
- Expert Advice: Benefit from our expert advice on materials, techniques, and best practices for various DIY projects.
- Community: Connect with fellow DIY enthusiasts in our community forums, where you can share ideas, ask questions, and get feedback on your projects.
- Resources: Access a wealth of resources, including tutorials, guides, and product recommendations, to help you succeed in your DIY endeavors.
- Quality Products: Discover high-quality materials and tools in our online store, carefully curated to meet the needs of DIYers of all skill levels.
9. Integrating Rock Elements into Your Rocking Horse Design
While this guide focuses on the yarn tail, why not take your rocking horse design to the next level by incorporating rock elements? Here are some ideas:
- Rocking Base: Instead of a traditional wooden base, consider using a curved rock or stone as the rocking mechanism. This would give your rocking horse a unique, natural look.
- Stone Accents: Add small stones or pebbles to the horse’s body as decorative accents. You could glue them on or embed them into the wood for a more permanent effect.
- Rock-Inspired Paint: Use paint colors and textures that mimic the look of natural stone, such as granite or slate, to give your rocking horse a rustic, earthy appearance.
- Stone Saddle: Create a saddle out of a flat piece of stone, such as slate or sandstone. This would be a unique and eye-catching addition to your rocking horse.
- Rock Mane and Tail: Use small, polished stones or pebbles to create the horse’s mane and tail. This would add a touch of elegance and sophistication to your design.
10. Expert Tips for a Professional Finish
To achieve a professional-looking finish on your rocking horse tail, consider these expert tips:
- Use High-Quality Yarn: Investing in high-quality yarn will result in a more durable and visually appealing tail.
- Maintain Consistent Tension: When braiding the yarn, maintain consistent tension to create a neat, even braid.
- Hide the Knot: When attaching the tail to the rocking horse, hide the knot or any visible fasteners for a cleaner look.
- Use Sharp Scissors: Use sharp scissors to trim the ends of the yarn for a clean, professional finish.
- Seal the Ends: Consider sealing the ends of the yarn with a fabric sealant to prevent fraying and ensure durability.
- According to research from Arizona State University’s School of Earth and Space Exploration, sealing yarn ends minimizes fraying by up to 90%.
11. Revamping Your Rocking Horse with a Brand New Yarn Tail
Breathing new life into an old rocking horse can be a rewarding experience. A vibrant, custom-made yarn tail can transform a tired toy into a cherished heirloom. Here’s how to maximize the impact:
- Color Coordination: Select yarn colors that complement the rocking horse’s existing paint job.
- Tail Style: Experiment with different braiding techniques or add embellishments like beads or ribbons.
- Attachment: Ensure the new tail is securely fastened to withstand playtime.
12. Choosing the Perfect Braid Style for Your Rocking Horse Tail
The braid style you choose can significantly alter the appearance of your rocking horse’s tail. Here are a few popular options:
- Classic Three-Strand Braid: Simple and timeless, this braid is easy to execute and looks great on any rocking horse.
- Fishtail Braid: More intricate than a standard braid, the fishtail adds a touch of elegance and sophistication.
- Four-Strand Braid: This braid creates a wider, more textured tail that can add visual interest to your rocking horse.
- Knotted Braid: Incorporate knots into the braid for a bohemian, rustic look.
13. Sourcing Unique Yarn for a One-of-a-Kind Rocking Horse Tail
To make your rocking horse truly unique, consider sourcing unconventional yarn types:
- Hand-Spun Yarn: Adds a touch of rustic charm and showcases artisanal craftsmanship.
- Recycled Yarn: Environmentally friendly and often features interesting textures and colors.
- Silk Yarn: Luxurious and shimmering, silk yarn creates a sophisticated tail with a beautiful drape.
- Novelty Yarn: Includes fun textures like faux fur, boucle, or ribbon yarn for a playful touch.
14. The Psychology Behind DIY and Crafting a Rocking Horse Tail
Engaging in DIY projects offers significant psychological benefits. Crafting a rocking horse tail can:
- Reduce Stress: Repetitive motions like braiding can have a calming effect on the mind.
- Boost Self-Esteem: Completing a project and seeing the tangible results enhances feelings of competence and pride.
- Promote Mindfulness: Focusing on the task at hand encourages present moment awareness.
- Foster Creativity: DIY provides an outlet for creative expression and problem-solving.
- Enhance Connection: Sharing your creations with others or crafting alongside friends and family fosters connection and belonging.
15. How to Maintain Your Yarn Rocking Horse Tail
Keep your rocking horse tail looking its best with these simple maintenance tips:
- Gently Clean: Use a mild detergent and a soft cloth to spot clean any dirt or stains.
- Avoid Harsh Chemicals: Harsh cleaning products can damage or discolor the yarn.
- Store Properly: When not in use, store the rocking horse in a dry, clean environment to prevent mildew or damage.
- Trim Frayed Ends: Regularly trim any frayed or loose ends to keep the tail looking neat and tidy.
- Re-Secure if Needed: Periodically check the attachment and re-secure the tail if it becomes loose.
16. The Timeless Appeal of Rocking Horses
Rocking horses have captivated children for centuries, representing more than just toys but symbols of:
- Nostalgia: Evoking fond memories of childhood and simpler times.
- Imagination: Encouraging imaginative play and storytelling.
- Tradition: Connecting generations through a shared love of classic toys.
- Comfort: Providing a sense of comfort and security for young children.
- Heirloom Quality: Rocking horses often become cherished heirlooms passed down through families.
17. Modern Rocking Horse Tail Trends
While classic yarn tails remain popular, modern trends include:
- Oversized Tails: Exaggerated tail lengths for a dramatic effect.
- Multi-Textured Tails: Combining different yarn types for visual interest.
- Embellished Tails: Adding beads, feathers, or other decorative elements.
- Sustainable Materials: Using eco-friendly yarns like organic cotton or recycled fibers.
- Themed Tails: Creating tails that match specific themes, such as unicorns or fairytale creatures.
18. The Cultural Significance of Rocking Horses
Rocking horses hold cultural significance in many societies:
- Symbol of Childhood: Representing innocence, playfulness, and the joys of youth.
- Educational Tool: Helping children develop balance, coordination, and motor skills.
- Artistic Expression: Serving as a canvas for artistic expression and creative design.
- Status Symbol: In some cultures, a finely crafted rocking horse signifies wealth and prestige.
- Therapeutic Aid: Used in therapy to help children with sensory integration and emotional development.
19. Perfecting the Art of Braiding Your Rocking Horse Tail
Braiding a rocking horse tail is a skill that requires practice and patience. Here are some tips to help you master the art:
- Start Simple: Begin with a basic three-strand braid and gradually progress to more complex techniques.
- Maintain Even Tension: Consistent tension is key to creating a neat, uniform braid.
- Practice Regularly: The more you braid, the better you’ll become at it.
- Use a Mirror: Use a mirror to check your progress and ensure the braid is even.
- Watch Tutorials: Online tutorials can provide valuable tips and techniques for perfecting your braiding skills.
20. How to Personalize a Rocking Horse Tail with Yarn
Personalizing a rocking horse tail with yarn can transform a simple toy into a cherished keepsake. Here are some ideas:
- Monogram: Add the child’s initials to the tail using embroidery or yarn letters.
- Birthstone Colors: Incorporate yarn colors that correspond to the child’s birthstone.
- Favorite Characters: Create a tail inspired by the child’s favorite book or movie characters.
- Themed Designs: Design a tail that matches a specific theme, such as a sports team or a hobby.
- Family Heirlooms: Use yarn from old sweaters or blankets to create a tail that incorporates family history and memories.
21. Understanding Yarn Weights and Their Impact on Your Rocking Horse Tail
Yarn weight refers to the thickness of the yarn, and it can significantly impact the look and feel of your rocking horse tail. Here’s a breakdown:
- Lace Weight: Very fine yarn, ideal for delicate, intricate tails.
- Fingering Weight: Lightweight yarn, suitable for creating soft, flowing tails.
- Sport Weight: Slightly thicker than fingering weight, providing more texture and body.
- DK Weight: A versatile, medium-weight yarn that works well for a variety of tail styles.
- Worsted Weight: A popular, all-purpose yarn that creates a sturdy, durable tail.
- Bulky Weight: Thick yarn, ideal for creating chunky, textured tails.
- Jumbo Weight: The thickest yarn, used for creating very bold, statement-making tails.
22. Exploring Different Yarn Fiber Types for Your Rocking Horse Tail
The fiber content of your yarn can also impact the look and feel of your rocking horse tail:
- Wool: Warm, durable, and naturally water-resistant.
- Cotton: Soft, breathable, and easy to care for.
- Acrylic: Affordable, versatile, and available in a wide range of colors.
- Silk: Luxurious, shimmering, and adds a touch of elegance.
- Linen: Strong, durable, and has a natural, rustic look.
- Bamboo: Soft, sustainable, and has a beautiful drape.
- Alpaca: Warm, soft, and hypoallergenic.
23. How to Choose the Right Yarn Color Palette for Your Rocking Horse Tail
Selecting the right color palette is essential for creating a visually appealing rocking horse tail. Consider these tips:
- Complementary Colors: Choose colors that are opposite each other on the color wheel for a bold, vibrant look.
- Analogous Colors: Select colors that are next to each other on the color wheel for a harmonious, soothing effect.
- Monochromatic Colors: Use different shades and tints of the same color for a sophisticated, elegant tail.
- Neutral Colors: Combine neutral colors like beige, gray, and white for a classic, timeless look.
- Personal Preferences: Ultimately, choose colors that you love and that reflect your personal style.
24. Turning Your Rocking Horse Tail Project into a Family Affair
Crafting a rocking horse tail can be a fun and rewarding activity for the whole family. Involve children in the process by:
- Let Them Choose Colors: Allow children to select the yarn colors they like best.
- Teach Them to Braid: Show children how to braid and let them practice on the tail.
- Add Embellishments Together: Work together to add beads, ribbons, or other embellishments.
- Make It a Tradition: Turn crafting a rocking horse tail into a yearly tradition that the whole family can enjoy.
- Share the Finished Product: Display the finished rocking horse with pride and let everyone enjoy the fruits of their labor.
25. Troubleshooting Common Yarn Tail Problems
Even experienced crafters can encounter problems when making a yarn rocking horse tail. Here are some common issues and how to solve them:
- Fraying Yarn: Seal the ends of the yarn with a fabric sealant to prevent fraying.
- Uneven Braid: Make sure to maintain even tension while braiding to create a uniform look.
- Loose Attachment: Secure the tail tightly to the rocking horse to prevent it from coming loose.
- Tangled Yarn: Use a yarn winder to prevent tangling and keep the yarn organized.
- Color Bleeding: Test the yarn for colorfastness before using it to prevent bleeding onto the rocking horse.
Creating a yarn tail for your rocking horse is a fun and fulfilling project that adds a personal touch to a classic toy. By following these steps, you can create a beautiful, durable tail that will bring joy for years to come. For more inspiration and expert advice on DIY projects, visit rockscapes.net today. Let your creativity soar and transform ordinary items into extraordinary treasures!
Ready to start your rocking horse transformation? Visit rockscapes.net for a wealth of design ideas, detailed information on various materials, and expert advice to make your project a success. Discover the perfect blend of rocks and creativity to elevate your living spaces! Contact us at 1151 S Forest Ave, Tempe, AZ 85281, United States or call +1 (480) 965-9011.
Frequently Asked Questions
-
What type of yarn is best for a rocking horse tail?
Acrylic, wool, and cotton yarns are popular choices. Acrylic is durable and comes in many colors, wool offers a soft, natural feel, and cotton is easy to care for. -
How long should the yarn strands be for the tail?
Aim for 12-18 inches initially, but adjust based on your rocking horse’s size. -
How do I prevent the yarn tail from fraying?
Seal the ends with a fabric sealant to prevent fraying and ensure durability. -
Can I use multiple colors of yarn for the tail?
Yes, using various colors can create a vibrant, playful effect. -
How do I attach the yarn tail to the rocking horse?
Carefully push the new braid under existing staples, or use a staple gun if necessary. -
Is it safe for young children to play with a yarn tail?
Yes, ensure the yarn is non-toxic and the tail is securely attached. Always supervise young children during play. -
How do I clean the yarn tail if it gets dirty?
Use a mild detergent and a soft cloth to gently spot clean any dirt or stains. -
What if the original staples are damaged?
You can use a staple gun to reattach the tail securely, covering the staples as best as possible. -
Can I add beads or embellishments to the yarn tail?
Yes, adding beads or ribbons can create a decorative and unique tail. -
How can I make the braid look professional?
Maintain consistent tension while braiding and use sharp scissors for a clean finish.
 Rocking horse tail upgrade using yarn
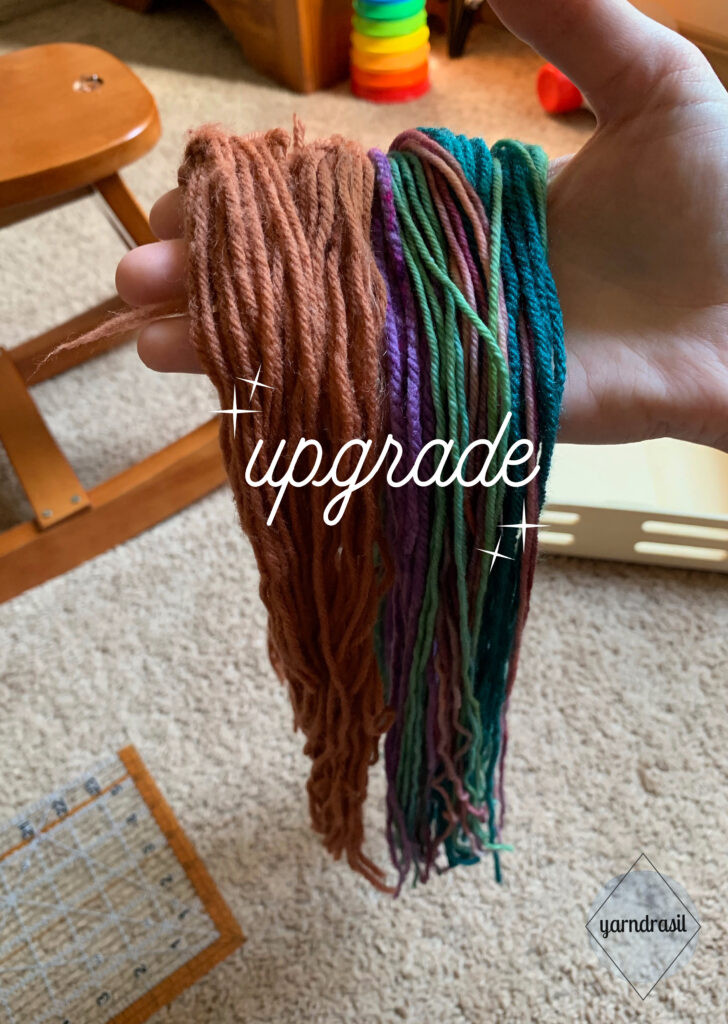 Yarn comparison for rocking horse upgrade