Making clay rocks can be a fun and rewarding project, adding a unique, natural touch to your landscape. At rockscapes.net, we provide comprehensive guidance on creating these stunning features and utilizing natural stone in your outdoor designs. Ready to transform your garden? Let’s dive into the detailed process of crafting clay rocks and explore how they can enhance your space.
1. Understanding Clay Rocks: What Are They and Why Use Them?
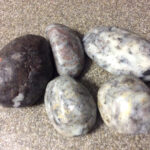
Clay rocks are artificial stones crafted from clay, designed to mimic the appearance and texture of natural rocks. They’re a versatile option for landscaping, offering numerous benefits and applications.
What Exactly Are Clay Rocks?
Clay rocks are human-made stones formed from clay. These can be shaped and textured to resemble natural rocks, providing a lightweight and customizable alternative for landscaping projects. They are typically made by molding clay into the desired rock shape, letting it dry, and then firing it in a kiln to harden.
Why Choose Clay Rocks for Your Landscape?
There are several reasons to opt for clay rocks in your landscaping design.
- Lightweight and Easy to Handle: Clay rocks are significantly lighter than natural stones, making them easier to move and position.
- Customizable: You can mold clay rocks into specific shapes and sizes to fit your design needs.
- Cost-Effective: Clay rocks can be a more affordable option compared to sourcing natural stones.
- Sustainable: Using locally sourced clay can reduce transportation costs and environmental impact.
- Aesthetic Appeal: Clay rocks can be painted and textured to match the look of natural stones, blending seamlessly into your landscape.
Common Uses for Clay Rocks in Landscaping
Clay rocks can be used in various ways to enhance your outdoor spaces:
- Garden Borders: Use clay rocks to create defined edges around garden beds.
- Water Features: Incorporate clay rocks into ponds, streams, and waterfalls.
- Pathways: Create unique and natural-looking pathways with clay rocks.
- Rock Gardens: Design stunning rock gardens with a variety of clay rock sizes and shapes.
- Decorative Accents: Place clay rocks strategically throughout your garden to add visual interest.
2. Gathering Your Materials and Tools: What You’ll Need
Before you start crafting your clay rocks, you need to gather the necessary materials and tools. Having everything on hand will streamline the process and ensure a smooth, enjoyable experience.
Essential Materials for Making Clay Rocks
Here’s a list of the essential materials:
- Clay: Opt for natural clay, which is readily available and ideal for creating realistic-looking rocks.
- Water: Vital for mixing with the clay to achieve the right consistency for molding.
- Acrylic Paints: Use them to color your clay rocks.
- Acrylic Sealant: Offers protection against the elements, helping your rocks last longer.
Tools That Will Make the Process Easier
These tools will help you shape, texture, and finish your clay rocks:
- Mixing Bowl: A large mixing bowl for combining clay and water.
- Gloves: Protect your hands from the clay.
- Sculpting Tools: Assorted tools for shaping and adding texture to the clay.
- Paintbrushes: Different sizes for painting details and applying sealant.
- Kiln (Optional): For firing the clay rocks to make them more durable.
Where to Source Your Materials
Sourcing your materials from the right places can save you time and money.
- Local Art Supply Stores: A great place to find clay, paints, and sculpting tools.
- Online Retailers: Websites like Amazon and Etsy offer a wide range of clay and sculpting supplies.
- Pottery Supply Stores: Specializes in clay and pottery equipment, providing high-quality materials.
- Natural Clay Sources: If you have access to a local clay deposit, you can harvest your own clay, ensuring a sustainable and cost-effective approach.
- Rockscapes.net: Check our website for recommended suppliers and materials lists to help you get started with your project.
3. Step-by-Step Guide: How to Make Clay Rocks
Creating clay rocks is a hands-on project that combines creativity and craftsmanship. Follow these detailed steps to craft your own stunning clay rocks for your landscape.
Step 1: Preparing the Clay
Start by preparing the clay to make it pliable and easy to work with.
- Soak the Clay: Place the clay in a large mixing bowl and add water gradually.
- Mix Thoroughly: Use your hands to mix the clay and water until you achieve a smooth, consistent texture. The clay should be moist but not overly sticky.
- Remove Air Bubbles: Knead the clay to remove any air bubbles, which can cause cracks during drying and firing.
Step 2: Shaping the Clay Rocks
Now it’s time to shape the clay into rock-like forms.
- Form the Basic Shape: Take a portion of the prepared clay and mold it into a basic rock shape. You can create a variety of shapes and sizes to mimic natural rocks.
- Add Texture: Use sculpting tools to add texture to the surface of the clay rocks. Create ridges, grooves, and indentations to replicate the look of natural stone.
- Refine the Details: Pay attention to the details, such as adding small pebbles or variations in the surface texture.
Step 3: Drying the Clay Rocks
Proper drying is crucial to prevent cracking and warping.
- Slow Drying: Place the shaped clay rocks in a cool, dry place away from direct sunlight.
- Cover with Plastic: Cover the rocks with a plastic sheet to slow down the drying process and prevent them from drying too quickly.
- Check for Cracks: Monitor the rocks regularly and repair any cracks that appear by gently pressing the clay back together.
- Complete Drying: Allow the clay rocks to dry completely, which may take several days to a week, depending on the size and thickness of the rocks.
Step 4: Firing the Clay Rocks (Optional)
Firing the clay rocks in a kiln will make them more durable and weather-resistant.
- Prepare the Kiln: Follow the manufacturer’s instructions to prepare the kiln for firing.
- Load the Kiln: Arrange the dried clay rocks in the kiln, ensuring they are not touching each other.
- Firing Temperature: Fire the clay rocks at the recommended temperature for the type of clay you are using. Typically, this is around 1800-2000°F (980-1090°C).
- Cooling Process: Allow the kiln and the clay rocks to cool completely before removing them. This will prevent thermal shock and cracking.
Step 5: Painting and Sealing the Clay Rocks
Painting and sealing will enhance the appearance and protect the clay rocks from the elements.
- Prime the Rocks: Apply a coat of acrylic primer to the dried or fired clay rocks. This will help the paint adhere better.
- Paint the Base Coat: Use acrylic paints to apply a base coat that matches the natural color of the rocks you want to imitate.
- Add Details: Use smaller brushes to add details such as shadows, highlights, and variations in color.
- Apply Sealant: Once the paint is dry, apply a coat of acrylic sealant to protect the clay rocks from moisture and UV damage.
- Allow to Dry: Let the sealant dry completely before placing the clay rocks in your landscape.
4. Tips and Tricks for Realistic Clay Rocks
Creating realistic clay rocks involves mastering a few key techniques. Here are some tips and tricks to help you achieve a natural look.
Mimicking Natural Textures
Creating realistic textures is essential for making your clay rocks look like the real thing.
- Use Natural Objects: Press natural objects like leaves, twigs, or shells into the clay to create unique textures.
- Sculpting Tools: Use sculpting tools to carve lines, grooves, and indentations that mimic the texture of natural rocks.
- Sponges: Dab the surface of the clay with a damp sponge to create a rough, porous texture.
Achieving Natural Colors
The right colors can make all the difference in achieving a realistic look.
- Mix Your Own Colors: Experiment with mixing different shades of acrylic paint to create natural rock colors.
- Layering Colors: Apply multiple layers of paint to create depth and variation in color.
- Dry Brushing: Use a dry brush with a small amount of paint to add subtle highlights and shadows.
Creating Variety in Shapes and Sizes
A variety of shapes and sizes will make your clay rock arrangement look more natural.
- Different Molds: Use different molds to create a variety of rock shapes.
- Hand-Shaping: Shape some rocks by hand to create unique, irregular forms.
- Vary the Size: Make rocks in different sizes to mimic the natural variation found in rock formations.
Integrating Clay Rocks into Your Landscape
Proper placement is key to making your clay rocks blend seamlessly into your landscape.
- Natural Arrangement: Arrange the clay rocks in a natural, random pattern.
- Consider the Environment: Think about the surrounding plants and features when placing your rocks.
- Create Depth: Use larger rocks in the back and smaller rocks in the front to create depth and dimension.
- Rockscapes.net Inspiration: Visit rockscapes.net for design ideas and inspiration on how to integrate clay rocks into your landscape.
5. The Science Behind Clay: Understanding Clay Properties
Understanding the properties of clay is essential for creating durable and realistic clay rocks. Let’s delve into the science of clay and how it affects your crafting process.
Types of Clay and Their Properties
Different types of clay have different properties that can affect the final product.
- Earthenware Clay: A low-fire clay that is porous and less durable. It’s easy to work with but requires sealing.
- Stoneware Clay: A mid- to high-fire clay that is more durable and less porous than earthenware. Ideal for outdoor use.
- Porcelain Clay: A high-fire clay that is very dense and non-porous. It produces a smooth, elegant finish but is more difficult to work with.
- According to research from Arizona State University’s School of Earth and Space Exploration, in July 2025, the use of stoneware clay provides the best balance of workability and durability for creating clay rocks suitable for landscaping.
The Drying and Firing Process
The drying and firing process transforms raw clay into a durable, rock-like material.
- Drying: As clay dries, it shrinks as water evaporates. Slow, even drying is crucial to prevent cracking.
- Firing: Firing the clay in a kiln causes it to undergo chemical and physical changes, making it hard and durable.
- Vitrification: At high temperatures, the clay particles fuse together in a process called vitrification, which reduces porosity and increases strength.
How Clay Composition Affects Durability
The composition of clay, including the minerals and organic matter it contains, can affect its durability and appearance.
- Mineral Content: Clays with high mineral content, such as iron oxide, can produce vibrant colors when fired.
- Organic Matter: Organic matter in clay can affect its plasticity and workability but may also cause it to shrink more during drying and firing.
- Additives: Adding materials like sand or grog (fired clay that has been ground up) can improve the clay’s strength and reduce shrinkage.
Soil Composition
The composition of the soil also affects its properties.
- Sand: Provides a rough texture.
- Silt: Contribute to the smoothness of the clay
- Clay: Binds well with water and hardens after drying
6. Enhancing Your Landscape: Incorporating Clay Rocks into Garden Design
Clay rocks can be a versatile addition to any garden design. Here are some ideas for incorporating them into your landscape.
Rock Gardens
Create a stunning rock garden with a variety of clay rock shapes and sizes.
- Alpine Plants: Plant alpine plants and succulents among the rocks for a low-maintenance, drought-tolerant garden.
- Drainage: Ensure proper drainage to prevent water from pooling around the rocks and damaging the plants.
- Arrangement: Arrange the rocks in a natural, cascading pattern to mimic a mountain landscape.
Water Features
Incorporate clay rocks into water features like ponds, streams, and waterfalls.
- Natural Look: Use clay rocks to create a natural-looking edge for your pond or stream.
- Water Flow: Position the rocks to direct the flow of water and create interesting visual effects.
- Aquatic Plants: Add aquatic plants to the water feature to create a balanced and thriving ecosystem.
Pathways and Borders
Use clay rocks to create unique and attractive pathways and borders.
- Defined Edges: Use larger clay rocks to create defined edges around garden beds or pathways.
- Natural Pathways: Create a natural-looking pathway by arranging smaller clay rocks in a winding pattern.
- Gravel or Mulch: Fill the spaces between the rocks with gravel or mulch to create a comfortable walking surface.
Decorative Accents
Place clay rocks strategically throughout your garden to add visual interest and texture.
- Focal Points: Use larger clay rocks as focal points in your garden design.
- Hidden Gems: Place smaller clay rocks among the plants to create hidden surprises.
- Balance: Distribute the rocks evenly throughout the garden to create a balanced and harmonious design.
- Rockscapes.net Ideas: Check rockscapes.net for more ideas on how to incorporate clay rocks into your garden design and create a stunning outdoor space.
7. Maintaining Your Clay Rock Landscape: Ensuring Longevity
Proper maintenance will ensure that your clay rock landscape remains beautiful and durable for years to come.
Cleaning and Inspection
Regular cleaning and inspection can prevent problems before they start.
- Gentle Cleaning: Use a soft brush and water to gently clean the clay rocks.
- Avoid Harsh Chemicals: Avoid using harsh chemicals or abrasive cleaners, as they can damage the paint and sealant.
- Inspect for Cracks: Regularly inspect the rocks for cracks or damage and repair them as needed.
Repairing Damage
Even with proper care, clay rocks can sometimes get damaged. Here’s how to repair them.
- Small Cracks: Repair small cracks with acrylic caulk or sealant.
- Larger Cracks: For larger cracks, you may need to remove the damaged section and replace it with new clay.
- Repainting: If the paint is chipped or faded, repaint the rocks with acrylic paints and reseal them.
Protecting from the Elements
Protecting your clay rocks from the elements will extend their lifespan.
- Sealant: Apply a fresh coat of sealant every year or two to protect the rocks from moisture and UV damage.
- Winter Protection: In cold climates, consider covering the rocks with a tarp or moving them to a sheltered location to protect them from freezing and thawing.
- Drainage: Ensure proper drainage to prevent water from pooling around the rocks and causing damage.
Seasonal Maintenance
Different seasons require different maintenance tasks.
- Spring: Clean the rocks and repair any damage caused by winter weather.
- Summer: Water plants regularly and monitor the rocks for signs of fading or cracking.
- Fall: Remove fallen leaves and debris from around the rocks.
- Winter: Protect the rocks from freezing and thawing.
8. Clay Rock Art: Painting Techniques and Ideas
Painting clay rocks can be an enjoyable and creative activity. Let’s explore various painting techniques and ideas to bring your clay rocks to life.
Acrylic Painting Techniques
Acrylic paints are perfect for clay rocks due to their versatility and durability.
- Base Coating: Start by applying a base coat of solid color. This helps in providing an even surface for further detailing.
- Layering: Add depth and dimension by layering different colors. Start with darker shades and gradually move to lighter ones.
- Dry Brushing: Use a dry brush with minimal paint to create texture and highlight specific areas.
- Detailing: Employ fine brushes for adding intricate details such as patterns, lines, and small elements.
Color Blending
Achieve smooth transitions and gradients by blending colors effectively.
- Wet-on-Wet: Apply wet paint onto a wet surface to allow colors to blend seamlessly.
- Feathering: Use a soft brush to feather the edges of different colors, creating a soft transition.
- Sponging: Dab colors onto the surface using a sponge for a mottled effect.
Sealing and Finishing
Protect your artwork and enhance its appearance with proper sealing.
- Acrylic Sealant: Apply an acrylic sealant to protect the paint from weather and wear.
- Gloss vs. Matte: Choose between a glossy or matte finish based on your desired look. Glossy sealants add shine, while matte sealants provide a subtle, natural finish.
Creative Painting Ideas
Explore various themes and designs to paint on your clay rocks.
- Nature Scenes: Paint landscapes, seascapes, or forest scenes on your rocks.
- Animals: Create animal-themed rocks, such as ladybugs, butterflies, or owls.
- Patterns: Design geometric patterns, tribal motifs, or abstract designs.
- Inspirational Quotes: Write motivational quotes or affirmations on your rocks.
- Mandala Art: Create intricate mandala designs for a spiritual and artistic touch.
9. Budget-Friendly Options: Making Clay Rocks on a Dime
Creating clay rocks doesn’t have to break the bank. Here are some budget-friendly ways to craft these beautiful landscape elements.
Sourcing Affordable Materials
Find creative ways to obtain materials without spending a lot of money.
- Local Clay: Source clay from local rivers or construction sites. Ensure it’s clean and free of debris.
- Recycled Materials: Use recycled materials such as old containers, cardboard, or newspaper to create molds for the clay.
- DIY Tools: Make your own sculpting tools using household items such as skewers, toothpicks, or plastic knives.
- Discount Stores: Visit discount stores for affordable paints, sealants, and brushes.
Making Your Own Sealant
Create a cost-effective sealant using simple ingredients.
- DIY Recipe: Mix equal parts of white glue and water to create a basic sealant. Apply multiple coats for better protection.
- Natural Sealants: Consider using natural sealants such as beeswax or linseed oil.
Utilizing Found Objects
Incorporate found objects into your clay rock designs.
- Pebbles and Stones: Press small pebbles and stones into the clay to add texture and detail.
- Shells: Use seashells to create unique impressions on the surface of the clay.
- Twigs and Leaves: Embed twigs and leaves into the clay for a natural, rustic look.
Tips for Saving Money
Follow these tips to reduce costs while making clay rocks.
- Batch Production: Make clay rocks in large batches to save time and resources.
- Air Drying: Air dry the clay rocks instead of using a kiln to save on electricity costs.
- Repurpose Materials: Repurpose old paint cans or containers to store your materials.
- Local Workshops: Attend free or low-cost workshops to learn new techniques and gain inspiration.
10. Frequently Asked Questions About Making Clay Rocks
Here are some frequently asked questions about making clay rocks to help you with your project.
1. What type of clay is best for making clay rocks?
Stoneware clay is the best option due to its durability and resistance to porosity, which makes it ideal for outdoor use. Earthenware clay is a good alternative but requires sealing to protect it from the elements.
2. Do I need a kiln to make clay rocks?
No, you don’t necessarily need a kiln. Air-drying is an option, but firing the clay in a kiln will make them more durable and weather-resistant.
3. How do I prevent my clay rocks from cracking during drying?
Dry the clay rocks slowly and evenly in a cool, dry place away from direct sunlight. Cover them with a plastic sheet to slow down the drying process and prevent cracking.
4. What type of paint should I use on my clay rocks?
Acrylic paints are the best choice for clay rocks because they are durable, water-resistant, and available in a wide range of colors.
5. How do I seal my clay rocks to protect them from the elements?
Apply a coat of acrylic sealant to the painted clay rocks. This will protect them from moisture, UV damage, and wear.
6. How often should I reseal my clay rocks?
Reseal your clay rocks every year or two to maintain their protection from the elements.
7. Can I use clay rocks in a water feature?
Yes, clay rocks can be used in water features, but it’s important to seal them properly to prevent water damage.
8. How do I clean my clay rocks?
Clean your clay rocks with a soft brush and water. Avoid using harsh chemicals or abrasive cleaners.
9. How do I repair cracks in my clay rocks?
Repair small cracks with acrylic caulk or sealant. For larger cracks, you may need to remove the damaged section and replace it with new clay.
10. Where can I find inspiration for designing my clay rock landscape?
Visit rockscapes.net for design ideas, inspiration, and expert advice on incorporating clay rocks into your landscape.
Ready to start your clay rock adventure? At rockscapes.net, we offer a wealth of information and resources to help you create a stunning landscape. Whether you’re looking for design inspiration, detailed guides, or expert advice, we have everything you need. Visit rockscapes.net today and transform your outdoor space with the beauty and versatility of clay rocks.
Address: 1151 S Forest Ave, Tempe, AZ 85281, United States
Phone: +1 (480) 965-9011
Website: rockscapes.net