Creating a realistic and functional habitat for your reptile doesn’t have to be daunting. How To Make Fake Rock Walls For Reptiles involves a blend of artistry and practical design, turning your terrarium into a stimulating environment that mimics their natural surroundings. At rockscapes.net, we are passionate about offering innovative solutions for reptile enthusiasts and landscape designers, we are committed to providing the resources and inspiration you need to create stunning reptile habitats. This guide provides you comprehensive instruction for building impressive, safe, and enriching fake rock walls to create customized reptile enclosures.
1. Understanding the Benefits of Fake Rock Walls for Reptiles
Why choose fake rock walls for your reptile enclosure? Fake rock walls offer numerous advantages over traditional terrarium setups.
-
Enhanced Habitat Enrichment: Fake rock walls add vertical space and complexity to the enclosure, encouraging natural climbing and exploration behaviors. This increased activity promotes physical and mental well-being for your reptile. According to research in the Journal of Applied Animal Welfare Science, enriched environments significantly reduce stress and improve the overall health of captive reptiles.
-
Precise Environmental Control: Integrate basking spots and hiding places at different heights, allowing reptiles to thermoregulate effectively. This ensures they can access optimal temperatures for digestion, immune function, and overall health. Studies from Arizona State University’s School of Life Sciences have shown that proper thermoregulation is crucial for reptile health and longevity.
-
Customizable Design: Create a unique and aesthetically pleasing environment that complements your home decor. With various textures, colors, and configurations, your terrarium becomes a living piece of art. Plus, the experts at rockscapes.net can help you customize it.
-
Lightweight and Durable: Constructed from materials like polystyrene and sealed with durable coatings, these walls are easy to handle and long-lasting, ensuring a safe and stable environment for your reptile.
-
Easy to Clean and Maintain: Unlike natural rock, fake rock walls are non-porous and easy to disinfect, preventing the buildup of harmful bacteria and parasites. Regular cleaning ensures a healthy environment for your reptile.
2. Essential Materials and Tools for Building Your Fake Rock Wall
Before you begin, gather all the necessary materials and tools to streamline the building process.
| Material | Description |
|---|---|
| Extruded Polystyrene (XPS) | Dense, closed-cell foam that’s ideal for carving rock shapes. It’s durable, moisture-resistant, and won’t disintegrate like regular polystyrene. |
| Kingspan Insulation Board | A rigid insulation board that’s excellent for creating backboards and adding texture. It’s more crumbly than XPS, making it easy to carve cracks and crevices. |
| “Sticks Like” Glue | A general-purpose adhesive that securely holds the foam pieces together. |
| Cocktail Sticks/BBQ Skewers | For reinforcing joints and adding extra strength to the structure. |
| Waterproof PVA Glue | Creates a durable, water-resistant base for adding texture and sealing the foam. |
| Toilet Tissue | Used with PVA glue to create a textured surface that mimics the look of natural rock. |
| Montana Gold Spray Paints | Non-toxic, weatherproof spray paints available in a wide range of colors. They provide excellent coverage and are ideal for creating realistic rock finishes. |
| Acrylic Paints | For dry brushing and adding highlights to the rock surface. |
| Yacht Varnish | A sealant for humid environments, providing extra waterproofing. |
| Tools | Description |
| Utility Knife/Hot Wire Cutter | For cutting and shaping the polystyrene foam. A hot wire cutter provides clean, precise cuts. |
| Rasps/Files | For refining the shape of the foam and creating texture. |
| Paintbrushes | Various sizes for applying PVA glue, acrylic paints, and dry brushing. |
| Spray Paint Nozzles | Different nozzles for varying the spray pattern and achieving different textures. |
| Sandpaper | For smoothing rough edges and creating a more natural look. |
| Safety Glasses | To protect your eyes from foam dust and paint fumes. |
| Dust Mask | To prevent inhalation of foam dust and paint fumes. |
| Gloves | To protect your hands from glue and paint. |
Address: 1151 S Forest Ave, Tempe, AZ 85281, United States.
Phone: +1 (480) 965-9011.
Website: rockscapes.net.
3. Designing Your Reptile’s Dream Rock Wall
Before you start building, plan your design carefully. Consider the specific needs and behaviors of your reptile.
3.1. Research Your Reptile’s Natural Habitat
Understanding the natural environment of your reptile is crucial for creating a realistic and functional rock wall. Research the type of rocks, terrain, and hiding places they would typically encounter in the wild. This will help you design a habitat that meets their specific needs. According to a study by the University of California, Davis, reptiles thrive when their captive environment closely mimics their natural habitat.
3.2. Sketch Your Ideas
Draw a rough sketch of your desired rock wall, including the placement of basking spots, hiding places, and climbing areas. Consider the overall dimensions of your terrarium and how the rock wall will integrate with the existing setup.
3.3. Prioritize Functionality
Ensure the design provides adequate space for your reptile to move, climb, and thermoregulate. Basking spots should be positioned at varying distances from the heat source to allow for precise temperature control. Hiding places should be dark, secure, and easily accessible.
3.4. Consider Aesthetics
Think about the overall look and feel you want to achieve. Do you prefer a naturalistic appearance with earthy tones and textures, or a more stylized design with vibrant colors and patterns? Consider the existing decor of your home and how the terrarium will complement it.
3.5. Safety First
Avoid creating small, inaccessible crevices where your reptile could get stuck. Test the design with a thin object or a small, flexible snake to identify any potential hazards. Ensure all materials are non-toxic and safe for your reptile.
4. Step-by-Step Guide to Building a Fake Rock Wall
Follow these detailed steps to construct a stunning and functional fake rock wall for your reptile.
4.1. Cutting and Shaping the Foam
- Prepare the Foam: Place the polystyrene foam on a flat, stable surface. Use a utility knife or hot wire cutter to cut the foam into the desired shapes and sizes. A hot wire cutter provides cleaner, more precise cuts.
- Carve the Rock Features: Use a rasp or file to carve out rock features such as crevices, ledges, and overhangs. Vary the depth and texture of the carvings to create a more natural look. Kingspan insulation board is ideal for creating backboards and adding texture, while extruded polystyrene is best for carving individual rock chunks and basking platforms.
- Create Basking Spots and Hiding Places: Incorporate raised platforms for basking spots and hollowed-out areas for hiding places. Ensure these features are appropriately sized for your reptile. Remember to make the crevices large enough to prevent your reptile from getting stuck.
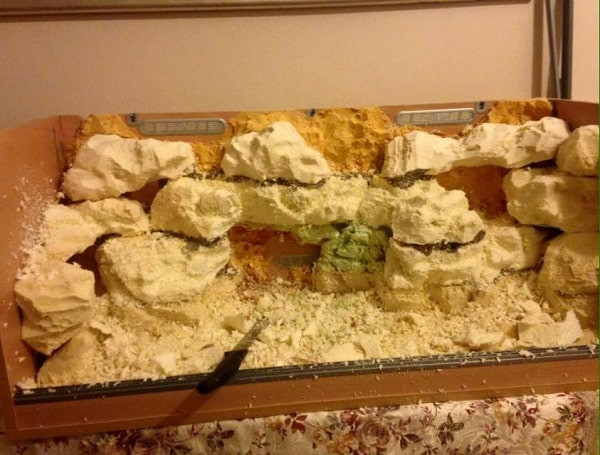 Carving polystyrene foam to create a fake rock wall
4.2. Assembling the Rock Wall
- Glue the Pieces Together: Apply “Sticks Like” glue to the edges of the foam pieces and press them together firmly. Use cocktail sticks or BBQ skewers to reinforce the joints for added strength.
- Build in Layers: Construct the rock wall in layers, starting with the base and working your way up. This allows you to create a more complex and realistic structure.
- Fill Gaps with Spray Foam: Use spray foam to fill in any gaps or uneven areas. Allow the foam to dry completely before trimming off the excess with a utility knife.
- Test for Safety: Before proceeding, test the structure with a thin object or a small, flexible snake to ensure there are no hazardous crevices or openings.
4.3. Sealing and Texturing the Rock Wall
- Apply PVA Glue: Mix outdoor waterproof PVA glue with water in a 50:50 ratio. Apply a generous coat of the mixture to the entire foam structure.
- Add Tissue Paper: Cover the wet PVA glue with ordinary toilet tissue. Layer the tissue in clumps to create a textured surface that mimics the look of natural rock.
- Daub with More PVA: Apply another coat of the PVA glue mixture over the tissue paper. Ensure the tissue is completely saturated.
- Layer for Strength: For added durability, especially for reptiles that scratch, repeat the tissue layering process several times. This will create a tough, scratch-resistant surface.
- Dry Thoroughly: Allow the PVA glue and tissue paper to dry completely for 24-36 hours. The structure should be firm and solid.
4.4. Painting and Finishing the Rock Wall
- Undercoat with Dark Colors: Begin by undercoating the entire rock wall with a dark color such as Montana Gold Anthracite. Ensure you cover every nook and cranny to prevent white foam from showing through.
- Layer with Base Coats: Overspray with a dark base coat that complements your desired rock color. Use neutral or cool colors for stark greys or sandy browns, or warm colors like Wine Red for a richer, warmer tone.
- Spray at an Angle: When applying the base coat, spray at an angle to avoid filling in the crevices and recesses. This will create depth and dimension.
- Layer with Multiple Colors: Use a variety of colors to create a realistic rock finish. Incorporate reds, oranges, greys, and greens in addition to browns.
- Highlight with Lighter Colors: Use lighter colors such as Dirty Apricot and Shock Orange to highlight specific areas of the rock wall. Spray these colors sparingly and from specific angles to create a natural look.
- Dry Brushing: Once the base coats are dry, use a dry brush to apply a light color such as Sand or Cream to the raised areas of the rock wall. This will highlight the texture and bring the rock face to life.
- Add Greenery (Optional): Incorporate artificial plants or moss to add a touch of greenery to the rock wall. This will enhance the naturalistic appearance of the terrarium.
- Seal for Humid Environments (Optional): For humid environments, seal the entire rock wall with yacht varnish for added waterproofing.
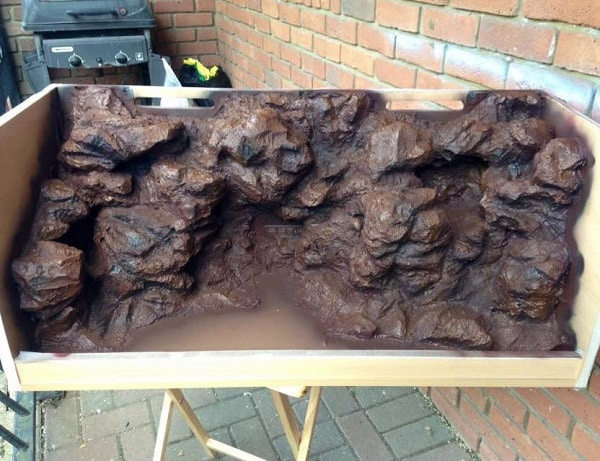 Using multiple paint colors to add depth and dimension to a fake rock wall
4.5. Installing the Rock Wall
- Allow for Ventilation: After painting, allow the rock wall to air out in a well-ventilated area for at least a week to dissipate any lingering paint fumes.
- Secure the Rock Wall: Place the rock wall inside the terrarium and secure it to the back or side walls using silicone sealant or other reptile-safe adhesive.
- Add Substrate: Add substrate to the terrarium floor, ensuring it is appropriate for your reptile species.
- Introduce Décor: Add any additional décor items such as branches, plants, or water dishes.
- Monitor Your Reptile: Observe your reptile’s behavior closely after introducing the new rock wall. Ensure they are able to navigate the environment safely and access all necessary resources.
4.6. Creating a Natural-Looking Background
- Spray the Ceiling and Sides: Spray the ceiling and sides of the terrarium above the rock wall with a light grey color to simulate the sky. Montana Gold “Wall” is an excellent choice.
- Extend the Rock: Use the same colors you used for the rock wall to “extend” the rock along the sides of the terrarium. This will create a seamless and natural-looking background.
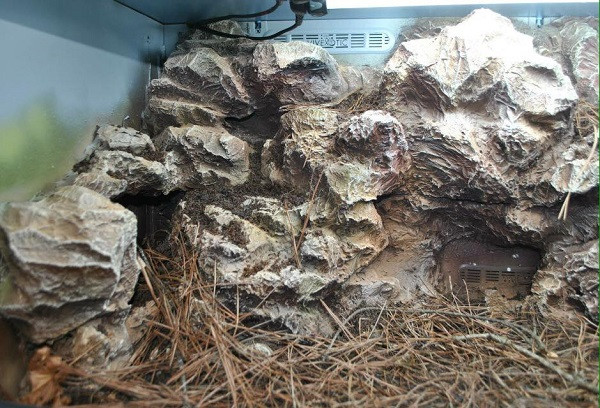 Spraying the background of a terrarium to create a natural-looking environment
5. Safety Tips and Considerations
- Use Non-Toxic Materials: Always use non-toxic materials that are safe for reptiles. Avoid using paints, glues, or sealants that contain harmful chemicals.
- Provide Adequate Ventilation: Ensure the terrarium has adequate ventilation to prevent the buildup of harmful fumes.
- Monitor Temperature and Humidity: Monitor the temperature and humidity levels inside the terrarium to ensure they are within the appropriate range for your reptile species.
- Regular Cleaning: Clean the rock wall regularly to prevent the buildup of bacteria and parasites. Use a reptile-safe disinfectant to clean the surface.
- Prevent Falls: Ensure the rock wall is securely attached to the terrarium walls to prevent it from falling and injuring your reptile.
- Avoid Sharp Edges: Smooth out any sharp edges or rough surfaces to prevent injuries to your reptile.
6. Inspiring Design Ideas for Your Reptile Rock Wall
- Desert Oasis: Create a desert-themed rock wall with sandy browns, reds, and oranges. Incorporate cacti, succulents, and other desert plants.
- Tropical Rainforest: Design a lush rainforest rock wall with vibrant greens, browns, and yellows. Add moss, vines, and other tropical plants.
- Rocky Outcrop: Mimic a natural rocky outcrop with greys, browns, and blacks. Incorporate crevices, ledges, and overhangs for climbing and hiding.
- Canyon Wall: Create a canyon-inspired rock wall with layered rock formations and earthy tones. Add small caves and tunnels for exploration.
- Arboreal Paradise: Design a rock wall that provides ample climbing opportunities for arboreal reptiles. Incorporate branches, vines, and platforms at varying heights.
7. Maintaining Your Reptile’s Rock Wall
- Regular Inspections: Inspect the rock wall regularly for any signs of damage or wear. Repair any cracks or chips promptly to prevent further deterioration.
- Cleaning: Clean the rock wall regularly with a reptile-safe disinfectant. Wipe down the surface with a damp cloth to remove any dirt or debris.
- Replace as Needed: Depending on the materials used, the rock wall may need to be replaced after several years. Monitor the condition of the rock wall and replace it when necessary.
8. Addressing Common Concerns and FAQs
8.1. What type of foam is best for making fake rock walls?
Extruded polystyrene (XPS) is the best choice due to its durability, moisture resistance, and ease of carving.
8.2. How do I make sure the rock wall is safe for my reptile?
Ensure all materials are non-toxic, avoid sharp edges, and test for small crevices where your reptile could get stuck.
8.3. How do I clean a fake rock wall?
Use a reptile-safe disinfectant and wipe down the surface with a damp cloth.
8.4. How long will a fake rock wall last?
With proper maintenance, a well-constructed fake rock wall can last for several years.
8.5. Can I use real rocks instead of fake ones?
Real rocks can be heavy and difficult to clean. They also pose a risk of falling and injuring your reptile. Fake rock walls are a safer and more practical alternative.
8.6. How do I prevent my reptile from scratching the rock wall?
Apply multiple layers of PVA glue and tissue paper to create a tough, scratch-resistant surface.
8.7. What type of paint should I use?
Use non-toxic, weatherproof spray paints such as Montana Gold.
8.8. How do I create a natural-looking finish?
Use a variety of colors, spray at an angle, and apply dry brushing techniques to create depth and dimension.
8.9. How do I attach the rock wall to the terrarium?
Use silicone sealant or other reptile-safe adhesive to secure the rock wall to the back or side walls of the terrarium.
8.10. Can I add plants to the rock wall?
Yes, you can add artificial plants or moss to enhance the naturalistic appearance of the terrarium.
9. Discover More at Rockscapes.net
Ready to start building your reptile’s dream rock wall? At rockscapes.net, we offer a wide range of resources, including detailed tutorials, inspiring design ideas, and expert advice. We can guide you through the process of selecting the right materials, planning your design, and building a safe and functional habitat for your reptile.
10. Call to Action
Transform your reptile’s habitat into a stunning and enriching environment. Visit rockscapes.net today to explore our collection of design ideas, browse our selection of high-quality materials, and connect with our team of experts. Create a space where your reptile can thrive!