Rock candy, also known as sugar crystals, is not only a delicious treat but also a fascinating science experiment that you can easily conduct at home, and rockscapes.net is here to guide you through every step. Watching the sugar crystals grow into beautiful formations is a rewarding experience. Get ready to explore the sweet side of science with this easy-to-follow guide, and uncover tips for candy making, sugar crystal formation, and delectable edible landscapes.
1. What is Rock Candy and Why Make it at Home?
Rock candy is crystallized sugar, often formed on a stick, that provides a sweet treat and an engaging science lesson. Making rock candy at home is an easy, fun, and educational activity. It allows you to customize flavors and colors, offering a unique candy-making experience. According to research from Arizona State University’s School of Earth and Space Exploration, crystal formation provides a simplified model to teach geological processes, and that makes it great for educational projects.
1.1 What Makes Rock Candy Special?
Rock candy’s unique crystalline structure sets it apart, and the process involves supersaturating water with sugar, allowing crystals to form as the solution cools. This not only makes for a delicious treat but also demonstrates principles of chemistry and physics. The result is a visually appealing and tasty confection.
1.2 What are the Educational Benefits of Making Rock Candy?
Making rock candy at home offers a hands-on way to understand scientific concepts such as saturation, crystallization, and the effects of temperature on solubility. It’s an excellent project for engaging children in STEM (Science, Technology, Engineering, and Mathematics) learning. The transformation from sugar solution to solid crystals can spark curiosity and foster a love for science.
1.3 Is Making Rock Candy a Fun Family Activity?
Involving the whole family in making rock candy promotes teamwork and shared learning experiences. From measuring ingredients to observing crystal growth, everyone can participate and enjoy the process. The anticipation of tasting the final product adds to the excitement and creates lasting memories.
2. What Supplies Do I Need To Make Rock Candy?
To create homemade rock candy, you’ll need a few essential supplies. These include sugar, water, skewers or sticks, clothespins, mason jars, a saucepan, and optional food coloring and flavorings. Having these items on hand will ensure a smooth and successful candy-making experience.
 Rock candy sticks in a vase
2.1 What Type of Sugar is Best for Rock Candy?
Granulated white sugar is the best choice for making rock candy because it dissolves easily and produces clear, well-formed crystals. Avoid using powdered or brown sugar, as they can affect the clarity and structure of the crystals. High-quality sugar will result in the best-looking and tasting rock candy.
2.2 Why Use Skewers or Sticks for Rock Candy?
Skewers or sticks provide a surface for the sugar crystals to grow on. They should be food-grade and able to withstand high temperatures. Wooden skewers work well but should be soaked in water beforehand to prevent burning. Alternatively, you can use candy sticks specifically designed for this purpose.
2.3 What is the Function of Clothespins in Making Rock Candy?
Clothespins are used to suspend the skewers in the mason jars, ensuring that the sticks don’t touch the bottom. This allows the crystals to form evenly around the stick. The clothespins should be clean and sturdy enough to hold the weight of the skewer and growing crystals.
2.4 Why are Mason Jars Needed for Growing Rock Candy Crystals?
Mason jars provide a clean and stable environment for the crystals to grow. They should be sterilized to prevent bacteria from interfering with the crystallization process. Clear glass jars allow you to easily monitor the growth of the crystals.
2.5 What are the Optional Ingredients for Rock Candy?
Food coloring and flavorings can be added to the sugar solution to customize the color and taste of your rock candy. Gel food coloring is recommended because it doesn’t add excess liquid to the mixture. You can use extracts such as vanilla, peppermint, or fruit flavors to create unique variations.
3. How to Prepare the Skewers for Crystal Growth?
Properly preparing the skewers is a crucial step in making rock candy. This involves trimming, soaking, and coating the skewers with sugar to create a base for crystal growth. Taking the time to prepare the skewers ensures that the crystals have a stable surface to adhere to.
 Skewers trimmed next to a pair of scissors
3.1 Why Trim the Sharp Ends of the Skewers?
Trimming the sharp ends of the skewers is important for safety, especially if children are involved in the process. This prevents accidental pokes and injuries. Use heavy scissors or a knife to carefully trim the tips, and smooth them with sandpaper if necessary.
3.2 What is the Purpose of Soaking the Skewers in Water?
Soaking the skewers in water for about an hour helps to saturate the wood, preventing them from absorbing too much sugar solution later on. This ensures that the sugar crystals form on the surface of the skewer rather than being absorbed into the wood. The soaked skewers also provide a slightly rough surface for the seed crystals to adhere to.
3.3 How Does Coating the Skewers in Sugar Help?
Coating the skewers in sugar creates seed crystals that act as a foundation for the rock candy to grow on. These seed crystals encourage the sugar molecules in the solution to attach and form larger crystals. This step is essential for successful crystal growth, and be sure to coat the skewers evenly.
4. What is the Best Way To Make Rock Candy Crystal Solution?
Creating the right crystal solution is vital for growing perfect rock candy. This involves dissolving sugar in water, heating the mixture, and adding optional colorings and flavorings. Precision in this step ensures that the solution is supersaturated, which is necessary for crystal formation.
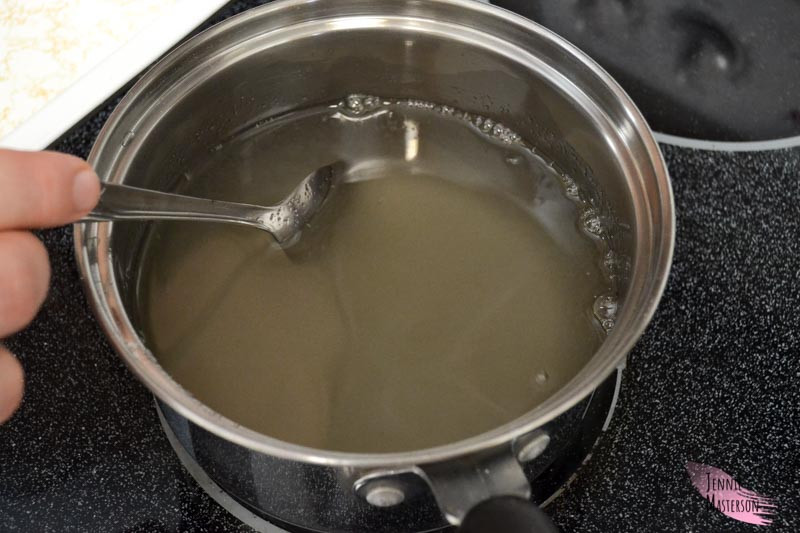 Stirring the sugar and water in a pan
4.1 What is the Ideal Ratio of Water to Sugar for Rock Candy?
The ideal ratio of water to sugar for rock candy is approximately 1 ½ cups of water to 4 cups of sugar. This ratio creates a supersaturated solution, which is essential for crystal growth. Adding too much water will prevent the crystals from forming properly.
4.2 How Do I Heat the Sugar and Water Mixture?
Heat the water in a saucepan over medium heat until it starts to boil. Once boiling, remove it from the heat and gradually add the sugar, stirring constantly until it dissolves. Be patient and ensure that each addition of sugar is fully dissolved before adding more.
4.3 How Do I Know When the Sugar Solution is Ready?
The sugar solution is ready when all the sugar has dissolved and the mixture is clear. Continue adding sugar until it stops dissolving, which indicates that the solution is supersaturated. The solution may take a long time to clear near the end of the process.
4.4 What Should I Do if the Sugar Solution Caramelizes?
Sometimes, the sugar solution may caramelize slightly, turning a little brown. This is generally not a significant problem and won’t drastically affect the crystals. However, avoid overheating the solution to minimize caramelization.
4.5 When Should I Add Food Coloring and Flavoring?
Add food coloring and flavoring to the sugar solution after it has been removed from the heat and all the sugar has dissolved. This prevents the flavors from evaporating and the colors from fading. Add a few drops at a time until you achieve the desired color and flavor intensity.
5. How To Grow Rock Candy Crystals Successfully?
Growing rock candy crystals requires patience and a stable environment. This involves carefully pouring the crystal solution into mason jars, suspending the prepared skewers, and allowing the crystals to grow undisturbed over several days. Following these steps will result in beautiful, large crystals.
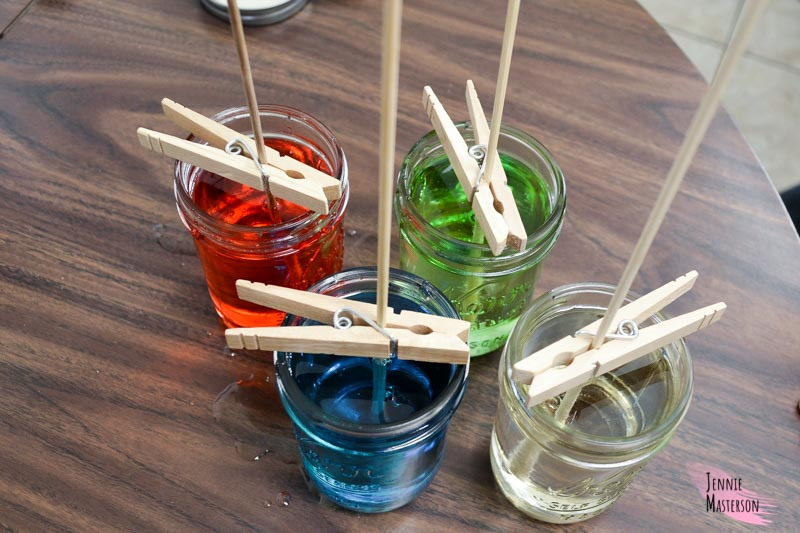
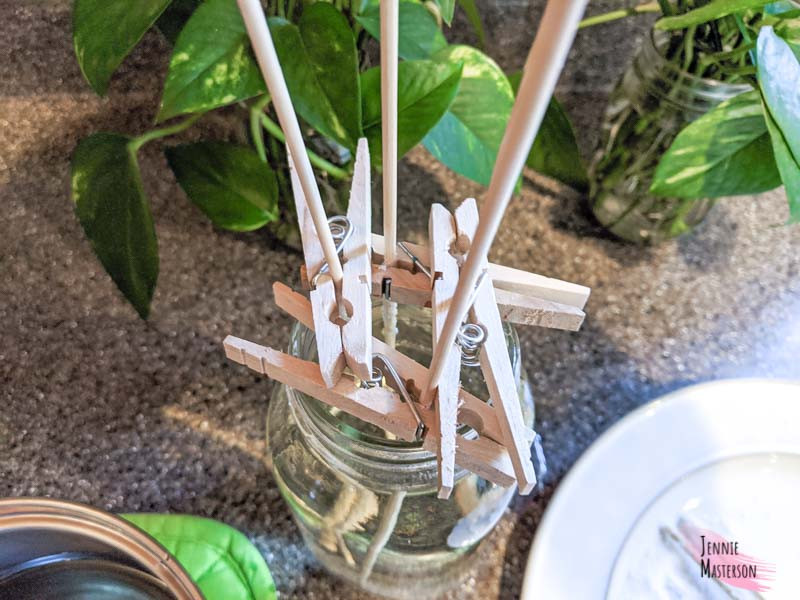 Showing the pattern of the clothes pins at the top of the jar
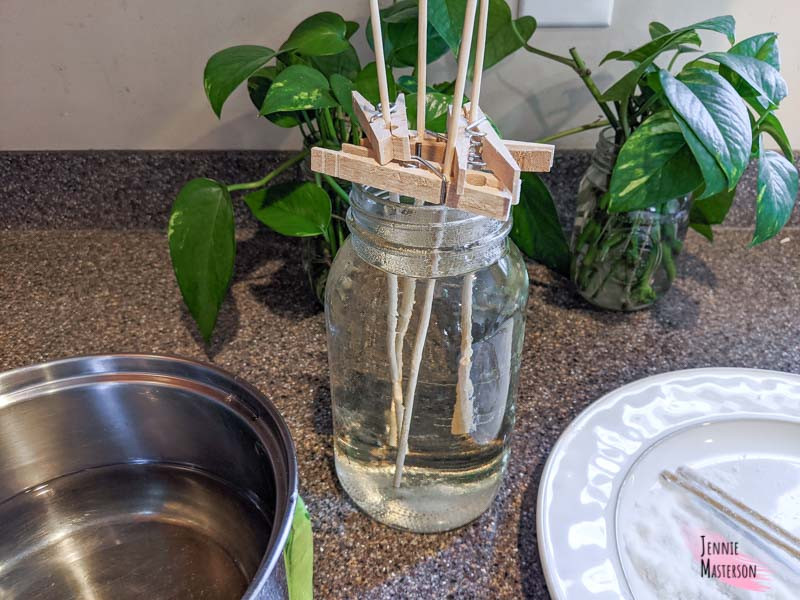 Mason jar filled with rock candy solution. Skewers have been placed inside
5.1 What is the Best Way to Pour the Crystal Solution into the Jars?
Carefully pour the hot crystal solution into the sterilized mason jars, leaving some space at the top. Be extremely cautious, as the solution will be very hot. Use a ladle or measuring cup to avoid spills and ensure even distribution.
5.2 How Do I Suspend the Skewers in the Jars?
Clip the clothespins onto the skewers and position them so that the skewers hang in the solution, about 1 inch from the bottom of the jar. This prevents the skewers from touching the bottom and allows crystals to form evenly around the stick. Ensure the clothespins are securely attached.
5.3 What Should I Do if Seed Crystals Fall Off the Stick?
It’s normal for some seed crystals to fall off the stick when placing the skewers in the solution. This won’t significantly affect the crystal growth. The remaining seed crystals will still provide a base for the rock candy to form.
5.4 How Long Does it Take for Rock Candy Crystals to Grow?
Rock candy crystals typically take about a week to grow to a substantial size. However, you can wait as long as you like, as the longer you leave them in the solution, the larger the crystals will become. Check the progress daily, but avoid moving the jars to prevent disrupting the crystal growth.
5.5 What is the Ideal Environment for Crystal Growth?
The ideal environment for crystal growth is a cool, stable, and undisturbed location. Avoid placing the jars in direct sunlight or near drafts, as temperature fluctuations can interfere with the crystallization process. A pantry or cupboard works well.
6. How To Remove and Dry Rock Candy?
Removing and drying the rock candy is the final step in the process. This involves carefully taking the crystals out of the solution and allowing them to dry on a solid surface. Proper drying prevents the crystals from sticking together and ensures they are ready to eat.
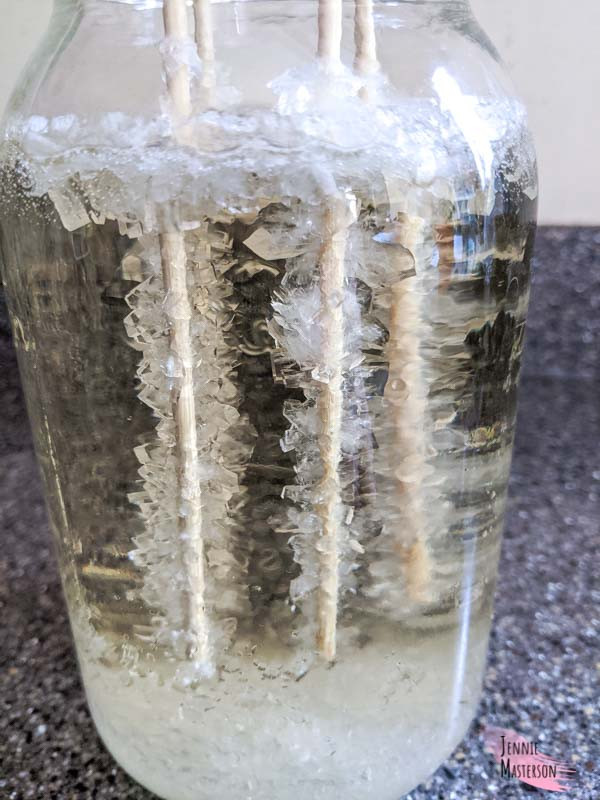 Rock candy growing in the mason jar
6.1 How Do I Remove the Rock Candy from the Jars?
Carefully remove the skewers from the jars, allowing any excess solution to drip back into the jar. Be gentle to avoid breaking the crystals. If the crystals are stuck to the sides of the jar, you can gently loosen them with a knife or spatula.
6.2 What is the Best Way to Dry Rock Candy?
Place the rock candy sticks on a plate or another solid surface to dry. Avoid using paper towels, as the crystals may stick to them. Allow the rock candy to dry completely, which may take several hours or overnight.
6.3 What Should I Do if the Rock Candy is Sticky?
The rock candy will be sticky when it is first removed from the solution. This is normal, and the stickiness will dissipate as it dries. Ensure that the rock candy is completely dry before storing it to prevent it from sticking together.
6.4 How Do I Store Homemade Rock Candy?
Store homemade rock candy in an airtight container at room temperature. This prevents the crystals from absorbing moisture and becoming sticky. Properly stored rock candy can last for several weeks.
7. Can I Make Different Colors and Flavors of Rock Candy at the Same Time?
Yes, you can make different colors and flavors of rock candy simultaneously by using separate mason jars for each variation. This allows you to experiment with different combinations and create a variety of unique rock candy treats.
 four mason jars filled with rock candy solution and have skewers placed in them
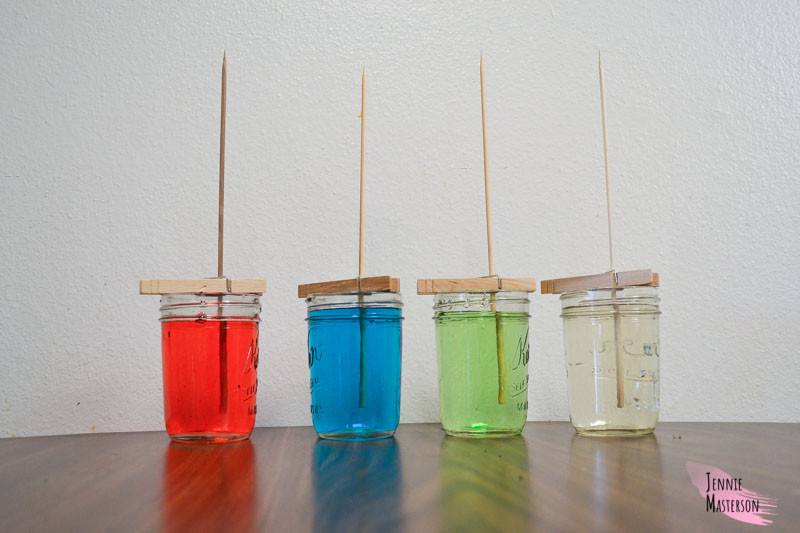 four mason jars filled with the sugar crystal solution
7.1 What Types of Flavor Extracts Work Well in Rock Candy?
Many different types of flavor extracts work well in rock candy, including vanilla, peppermint, lemon, and strawberry. Experiment with different extracts to find your favorite combinations. Use high-quality extracts for the best flavor results.
7.2 How Do I Achieve Vibrant Colors in Rock Candy?
To achieve vibrant colors in rock candy, use gel food coloring. Gel coloring is more concentrated than liquid coloring, so it won’t add excess liquid to the solution. Add a few drops at a time until you achieve the desired color intensity.
7.3 Can I Add Edible Glitter to Rock Candy?
Yes, you can add edible glitter to rock candy for a sparkly effect. Add the glitter to the sugar solution after it has been removed from the heat and all the sugar has dissolved. Stir gently to distribute the glitter evenly throughout the solution.
8. How To Troubleshoot Common Rock Candy Problems?
Making rock candy can sometimes present challenges. Understanding common problems and their solutions can help ensure a successful candy-making experience. Addressing issues like crystal formation and cloudy solutions can be easily managed with the right knowledge.
8.1 Why Are My Crystals Not Forming?
If your crystals are not forming, it could be due to several reasons. The sugar solution may not be supersaturated, the skewers may not have enough seed crystals, or the environment may be too unstable. Ensure that you have used the correct ratio of water to sugar, properly prepared the skewers, and placed the jars in a stable location.
8.2 Why is My Rock Candy Cloudy?
Cloudy rock candy can be caused by impurities in the sugar or water, or by not dissolving the sugar completely. Use high-quality sugar and filtered water, and ensure that all the sugar is fully dissolved before proceeding. Strain the solution through a cheesecloth to remove any impurities.
8.3 What Should I Do if My Crystals are Too Small?
If your crystals are too small, it could be because they haven’t had enough time to grow. Allow the crystals to grow for a longer period, up to two weeks or more. Ensure that the environment is stable and undisturbed to promote larger crystal growth.
8.4 Why is My Rock Candy Sticking to the Jar?
Rock candy can stick to the jar if it is not removed carefully or if the solution is too concentrated. Gently loosen the crystals with a knife or spatula before removing them. Avoid scraping the sides of the jar, as this can damage the crystals.
9. What are Some Creative Uses for Homemade Rock Candy?
Homemade rock candy can be used in a variety of creative ways, from garnishing desserts to adding a sweet touch to beverages. Its unique crystalline structure makes it a visually appealing addition to any treat.
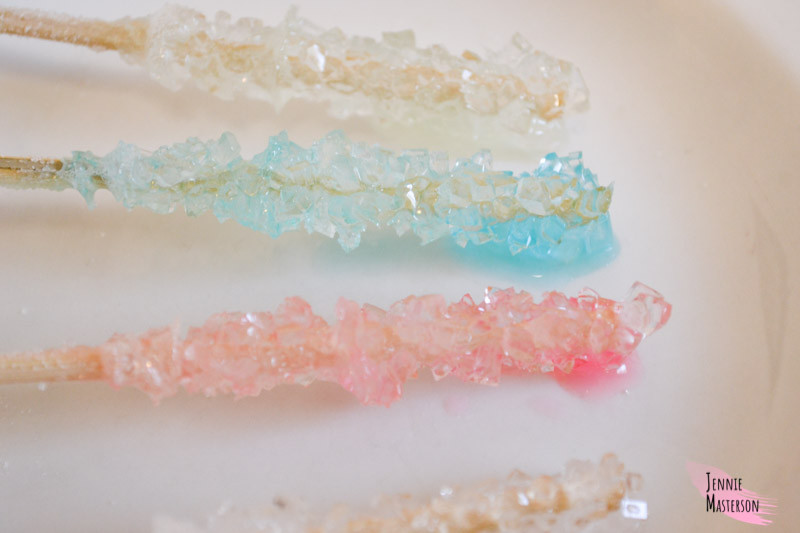 colored rock candy
9.1 Can I Use Rock Candy to Garnish Desserts?
Yes, rock candy can be used to garnish desserts such as cakes, cupcakes, and cookies. Its crystalline structure adds a touch of elegance and sweetness to any dessert. Use different colors and flavors to complement the dessert’s theme.
9.2 How Can I Incorporate Rock Candy into Beverages?
Rock candy can be incorporated into beverages such as tea, coffee, and cocktails. Use rock candy sticks as stirrers to add a subtle sweetness and visual appeal. Different flavors of rock candy can complement different types of beverages.
9.3 Can I Use Rock Candy in Party Favors?
Yes, rock candy makes an excellent addition to party favors. Package individual rock candy sticks in cellophane bags with ribbons for a sweet and memorable treat. Customize the colors and flavors to match the party’s theme.
9.4 Is Rock Candy Suitable for Edible Landscaping?
While primarily a treat, the concept of rock candy can inspire edible landscaping ideas. Consider integrating elements like colorful fruits, herbs, and edible flowers to create a visually appealing and tasty landscape. This blends the beauty of rockscapes with the sweetness of rock candy.
10. Where Can I Find More Inspiration for Rock Candy Projects?
For more inspiration and resources on rock candy and related projects, rockscapes.net offers a wealth of information. Explore our site for creative ideas, detailed guides, and expert tips to elevate your candy-making skills.
10.1 What Resources Does Rockscapes.net Offer for Candy Making?
Rockscapes.net provides a variety of resources for candy making, including step-by-step tutorials, ingredient guides, and troubleshooting tips. Our articles are designed to help both beginners and experienced candy makers create delicious and visually stunning treats.
10.2 How Can Rockscapes.net Help with Edible Landscaping Ideas?
Rockscapes.net offers inspiration and guidance for creating beautiful and functional edible landscapes. Discover how to incorporate edible plants, fruits, and herbs into your garden design to create a space that is both aesthetically pleasing and productive.
10.3 Where Can I Find Expert Advice on Rock Candy and Landscaping Projects?
Rockscapes.net features expert advice from experienced candy makers and landscaping professionals. Our team provides valuable insights and tips to help you succeed in your projects. Whether you’re making rock candy or designing an edible landscape, we have the resources you need.
10.4 How Can I Contact Rockscapes.net for Further Assistance?
For further assistance and inquiries, you can contact Rockscapes.net via email or phone. Our customer support team is available to answer your questions and provide personalized assistance. We are dedicated to helping you create amazing rock candy and landscaping projects. Our Address: 1151 S Forest Ave, Tempe, AZ 85281, United States and Phone: +1 (480) 965-9011.
Crafting your own rock candy is more than just making a sweet treat; it’s about engaging in a fun, educational, and creative process. The vibrant colors, unique flavors, and fascinating crystal formations make rock candy a delightful experience for all ages. So gather your supplies, follow these tips, and start creating your own sweet masterpieces with rockscapes.net.
FAQ About Making Rock Candy
1. Is it really easy to make rock candy at home?
Yes, making rock candy at home is a straightforward process. With simple ingredients like sugar and water, and following the right steps, you can easily create your own sweet treat.
2. What makes rock candy a good science experiment?
Rock candy demonstrates the scientific principles of saturation and crystallization. Watching the sugar molecules form crystals is a hands-on way to understand these concepts.
3. Can I customize the flavors and colors of my rock candy?
Absolutely, you can add various food colorings and flavor extracts to personalize your rock candy. Experiment with different combinations to create unique and tasty treats.
4. How long does it take for rock candy crystals to grow?
Rock candy crystals typically take about a week to grow. The longer you leave them in the sugar solution, the larger the crystals will become.
5. What is the best way to store homemade rock candy?
Store homemade rock candy in an airtight container at room temperature to prevent it from absorbing moisture and becoming sticky.
6. What should I do if my rock candy doesn’t form crystals?
Ensure that your sugar solution is supersaturated, and that the skewers are properly coated with seed crystals. Also, maintain a stable and undisturbed environment for crystal growth.
7. Can I use different types of sugar to make rock candy?
Granulated white sugar is the best choice for making rock candy. Other types of sugar may not dissolve as easily or produce clear crystals.
8. How can I prevent my rock candy from sticking to the jar?
Gently loosen the crystals with a knife or spatula before removing them from the jar. Avoid scraping the sides to prevent damage.
9. Are there any safety precautions I should take when making rock candy?
Be cautious when handling the hot sugar solution to avoid burns. Trim the sharp ends of the skewers to prevent injuries.
10. Where can I find more creative ideas for using rock candy?
Visit rockscapes.net for inspiration, detailed guides, and expert tips on making and using rock candy in various creative projects.