Moving a heavy rock can seem daunting, but with the right techniques and tools, it’s entirely manageable. At rockscapes.net, we provide expert advice and innovative solutions for all your landscaping needs. Discover how to move heavy rocks efficiently and safely, enhancing your landscape design with ease.
1. Understanding the Challenge of Moving Heavy Rocks
Moving heavy rocks presents several challenges, demanding careful planning and the right techniques to ensure both safety and efficiency. These challenges range from the physical strain on the individual to the potential damage to the surrounding landscape.
1.1. Assessing the Rock’s Size and Weight
Before attempting to move a heavy rock, accurately assessing its size and weight is paramount. This initial evaluation guides the selection of appropriate tools and techniques, preventing potential injuries and property damage.
How to Assess Rock Size and Weight:
- Visual Estimation: Begin by visually estimating the dimensions of the rock – length, width, and height. This provides a rough idea of its volume.
- Density Consideration: Different types of rocks have varying densities. For instance, granite is denser than sandstone. Understanding the type of rock helps in estimating its weight more accurately. Consult resources like the Geological Society of America for density information.
- Leverage and Estimation: If possible, try to gently pry the rock with a lever to get a sense of its weight. This method, combined with visual estimation, can provide a more informed guess.
- Professional Consultation: For very large or unusually shaped rocks, consider consulting a landscaping professional or a geologist. They can offer expert assessment and advice. Contact us at rockscapes.net for professional guidance.
By thoroughly assessing the rock’s size and weight, you can avoid underestimating the task’s complexity and prepare accordingly with the right equipment and safety measures.
1.2. Identifying Potential Hazards
Before you even touch the rock, take a good look around. What could go wrong? Identifying potential hazards is a crucial step in ensuring a safe rock-moving process. By carefully assessing the environment and the rock itself, you can mitigate risks and prevent accidents.
Environmental Hazards:
- Uneven Terrain: Slopes, depressions, and unstable ground can increase the risk of slips and falls.
- Obstacles: Trees, shrubs, and other landscape features can obstruct movement and create tripping hazards.
- Underground Utilities: Buried pipes or cables can be damaged during the moving process, leading to costly repairs and potential injuries.
Rock-Related Hazards:
- Instability: Rocks with irregular shapes or weak points may shift or break unexpectedly.
- Sharp Edges: Jagged edges can cause cuts and abrasions.
- Surface Conditions: Wet or slippery surfaces can make the rock difficult to grip and control.
Mitigation Strategies:
- Clear the Area: Remove any obstacles and level the ground as much as possible.
- Wear Protective Gear: Gloves, sturdy boots, and eye protection are essential for preventing injuries.
- Use Proper Lifting Techniques: Lift with your legs, not your back, and avoid twisting motions.
- Get Help: Don’t hesitate to ask for assistance from others or consult with professionals at rockscapes.net for advice.
1.3. Planning the Moving Route
Planning the moving route is like creating a roadmap for your rock. This step involves carefully selecting the path from the rock’s current location to its destination, ensuring a smooth and safe transition.
Key Considerations:
- Distance: The shorter the route, the less energy and time you’ll expend.
- Terrain: Opt for a path that is as level and smooth as possible, avoiding steep inclines or uneven surfaces.
- Obstacles: Identify and plan to navigate around any obstacles such as trees, shrubs, fences, or structures.
- Surface Type: Consider the type of surface you’ll be moving the rock across. Grass, soil, gravel, or pavement each present different challenges.
Tools for Route Planning:
- Measuring Tape: Use a measuring tape to accurately assess distances and dimensions.
- Surveying Tools: For complex terrains, consider using surveying tools to map out the most efficient route.
- Visual Aids: Create a sketch or diagram of the route to help visualize the process and identify potential problem areas.
Tips for a Smooth Move:
- Clear the Path: Before you start moving the rock, clear the route of any debris, obstacles, or hazards.
- Prepare the Surface: If necessary, prepare the surface by adding gravel, sand, or plywood to create a smoother path.
- Communicate: If you’re working with others, communicate clearly and coordinate your movements to avoid collisions or accidents.
2. Essential Tools and Equipment
Having the right tools and equipment can make all the difference when moving heavy rocks, turning a potentially back-breaking task into a manageable project.
2.1. Levers and Pry Bars
Levers and pry bars are essential tools for moving heavy rocks, providing the mechanical advantage needed to lift, shift, and maneuver them with relative ease. These tools come in various sizes and shapes, each designed for specific tasks and rock sizes.
How Levers and Pry Bars Work:
- Leverage: Levers and pry bars work on the principle of leverage, allowing you to amplify your force by applying it over a longer distance.
- Pivot Point: By placing a pivot point (or fulcrum) under the lever, you can create a mechanical advantage that makes it easier to lift or move heavy objects.
Types of Levers and Pry Bars:
- Pry Bars: These are typically made of hardened steel and have a flat, angled end for prying and lifting.
- Rock Bars: These are longer and heavier than pry bars, designed for moving larger rocks.
- Wonder Bars: These versatile tools have a flat blade on one end and a curved claw on the other, making them useful for a variety of tasks.
How to Use Levers and Pry Bars:
- Position the Tool: Insert the tip of the lever or pry bar under the rock, as close to the center of gravity as possible.
- Place the Fulcrum: Place a sturdy object, such as a rock or piece of wood, under the lever to act as a fulcrum.
- Apply Force: Push down on the lever, using your body weight to generate force.
- Adjust and Repeat: As the rock lifts, adjust the position of the lever and fulcrum as needed, repeating the process until the rock is in the desired position.
2.2. Dollies and Rock Carts
Dollies and rock carts are indispensable tools for moving heavy rocks, providing a stable and efficient way to transport them across various terrains. These wheeled platforms are designed to bear significant weight and reduce the strain on your body.
Types of Dollies and Rock Carts:
- Furniture Dollies: These small, four-wheeled platforms are ideal for moving rocks over smooth surfaces like concrete or asphalt.
- Appliance Dollies: These heavy-duty dollies have straps to secure the rock and are suitable for moving rocks up or down stairs.
- Rock Carts: Specifically designed for moving rocks, these carts have large, inflatable tires that can handle rough terrain.
How to Use Dollies and Rock Carts:
- Position the Dolly: Place the dolly or rock cart next to the rock, ensuring it is stable and level.
- Load the Rock: Use levers or pry bars to carefully lift the rock onto the dolly, making sure it is centered and balanced.
- Secure the Load: If necessary, use straps or ropes to secure the rock to the dolly, preventing it from shifting or falling off during transport.
- Move the Rock: Push or pull the dolly, guiding it along the planned route. Use caution when navigating obstacles or uneven terrain.
2.3. Rollers and Pipes
Rollers and pipes offer a simple yet effective method for moving heavy rocks, utilizing the principle of continuous movement to reduce friction and effort. This technique is particularly useful for moving rocks over long distances or across uneven terrain.
How Rollers and Pipes Work:
- Reduced Friction: By placing the rock on top of rollers or pipes, you minimize the contact between the rock and the ground, reducing friction and making it easier to move.
- Continuous Movement: As you push or pull the rock, the rollers or pipes move along with it, providing continuous support and preventing the rock from dragging or getting stuck.
Types of Rollers and Pipes:
- Steel Pipes: These are the most common type of rollers, available in various diameters and lengths.
- PVC Pipes: These lightweight pipes are suitable for moving smaller rocks over smooth surfaces.
- Wooden Rollers: These can be made from logs or planks and are ideal for rustic or natural settings.
How to Use Rollers and Pipes:
- Prepare the Surface: Clear the path of any debris or obstacles, ensuring a smooth and level surface for the rollers.
- Place the Rollers: Position the rollers or pipes parallel to each other, spacing them evenly apart.
- Load the Rock: Use levers or pry bars to carefully lift the rock onto the rollers, making sure it is balanced and stable.
- Move the Rock: Push or pull the rock, guiding it along the path. As the rock moves, retrieve the rollers from behind and place them in front, repeating the process until the rock reaches its destination.
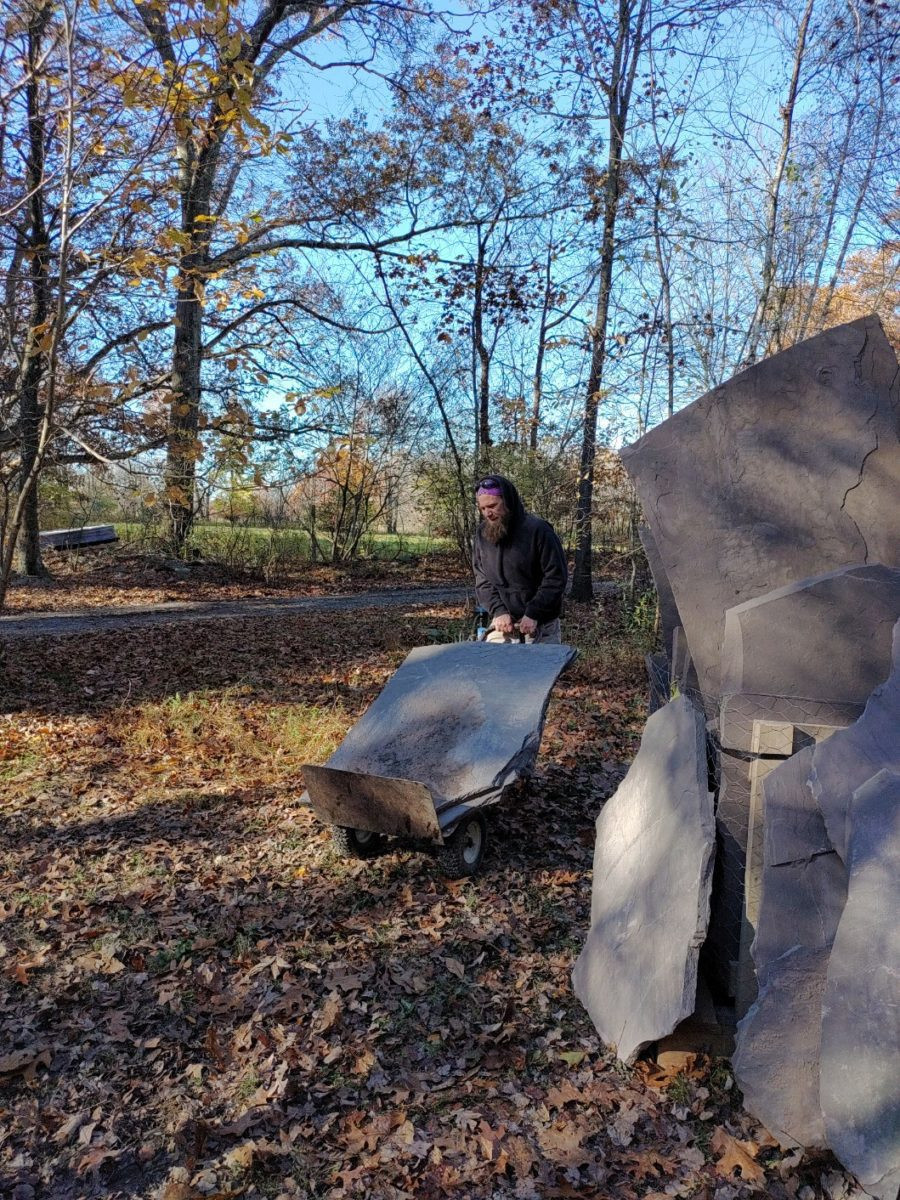 Moving flagstone with a dolly, showcasing the ease of transport
2.4. Winches and Come-Alongs
Winches and come-alongs are powerful tools for moving heavy rocks, providing the mechanical advantage needed to pull, lift, and position them with precision. These tools are particularly useful for moving rocks uphill, over obstacles, or into tight spaces.
How Winches and Come-Alongs Work:
- Mechanical Advantage: Winches and come-alongs use a system of gears or pulleys to multiply your force, allowing you to move rocks that would otherwise be impossible to budge.
- Controlled Movement: These tools provide precise control over the rock’s movement, allowing you to position it exactly where you want it.
Types of Winches and Come-Alongs:
- Hand Winches: These manually operated winches are ideal for smaller rocks and shorter distances.
- Electric Winches: These powered winches provide more pulling power and are suitable for larger rocks and longer distances.
- Come-Alongs: These ratchet-style winches are versatile and easy to use, making them a popular choice for DIYers.
How to Use Winches and Come-Alongs:
- Anchor the Winch: Securely anchor the winch to a sturdy object, such as a tree, a post, or another rock.
- Attach the Cable: Attach the winch cable to the rock, using a chain, a strap, or a hook.
- Operate the Winch: Slowly and steadily operate the winch, pulling the rock along the desired path.
- Adjust as Needed: As the rock moves, adjust the position of the winch and the cable as needed, ensuring a smooth and controlled movement.
2.5. Protective Gear
Moving heavy rocks can be a hazardous task, and protecting yourself from injury is paramount. Investing in the right protective gear is essential for ensuring your safety and well-being.
Essential Protective Gear:
- Gloves: Sturdy work gloves will protect your hands from cuts, abrasions, and blisters.
- Safety Glasses: Safety glasses or goggles will shield your eyes from dust, debris, and flying objects.
- Steel-Toed Boots: Steel-toed boots will protect your feet from crushing injuries if a rock falls or rolls onto them.
- Back Support: A back support or lifting belt can help prevent back strain and injuries when lifting heavy rocks.
- Helmet: A hard hat or helmet can protect your head from falling rocks or other objects.
Tips for Using Protective Gear:
- Choose the Right Gear: Select protective gear that is appropriate for the task at hand, ensuring it fits properly and provides adequate protection.
- Inspect Your Gear: Before each use, inspect your protective gear for any signs of damage or wear. Replace any worn or damaged items immediately.
- Use Your Gear Consistently: Make it a habit to wear your protective gear every time you move heavy rocks, even if it’s just for a few minutes.
- Stay Aware of Your Surroundings: Be aware of your surroundings and take extra precautions to avoid accidents and injuries.
3. Step-by-Step Guide to Moving a Heavy Rock
Moving a heavy rock requires a systematic approach to ensure safety and efficiency. Follow these steps for a successful rock-moving experience.
3.1. Preparing the Site
Before you even think about touching that rock, take some time to get the site ready. This involves clearing the area, leveling the ground, and protecting the surrounding landscape.
Clearing the Area:
- Remove Obstacles: Clear the path of any obstacles such as trees, shrubs, fences, or structures.
- Clear Debris: Remove any debris such as rocks, branches, or trash that could get in your way.
- Identify Hazards: Look for any potential hazards such as underground utilities, uneven terrain, or unstable slopes.
Leveling the Ground:
- Fill Depressions: Fill any depressions or holes with soil or gravel to create a level surface.
- Remove Bumps: Remove any bumps or ridges to create a smooth path.
- Compact the Soil: Compact the soil to prevent it from shifting or settling during the move.
Protecting the Landscape:
- Lay Down Plywood: Lay down sheets of plywood or other protective materials to protect the grass, plants, and other landscape features from damage.
- Use Mulch: Use mulch or other organic materials to cushion the ground and prevent erosion.
- Water the Area: Water the area before and after the move to help keep the soil moist and prevent dust.
3.2. Lifting the Rock
Lifting a heavy rock is a crucial step that requires careful technique and the right tools to minimize strain and prevent injuries.
Using Levers and Pry Bars:
- Position the Lever: Insert the tip of the lever or pry bar under the rock, as close to the center of gravity as possible.
- Place the Fulcrum: Place a sturdy object, such as a rock or piece of wood, under the lever to act as a fulcrum.
- Apply Force: Push down on the lever, using your body weight to generate force.
- Adjust and Repeat: As the rock lifts, adjust the position of the lever and fulcrum as needed, repeating the process until the rock is high enough to work with.
Lifting Techniques:
- Lift with Your Legs: Bend your knees and keep your back straight, using your leg muscles to lift the rock.
- Keep the Rock Close: Keep the rock as close to your body as possible to reduce strain on your back.
- Avoid Twisting: Avoid twisting your body while lifting or carrying the rock.
- Get Help: If the rock is too heavy to lift safely on your own, ask for assistance from others or consult with professionals at rockscapes.net for advice.
3.3. Moving the Rock
Moving the rock from its original location to its final destination requires careful planning and execution. Depending on the size and weight of the rock, as well as the terrain, you can use various methods to move it safely and efficiently.
Using Rollers:
- Place the Rollers: Position the rollers or pipes parallel to each other, spacing them evenly apart.
- Load the Rock: Use levers or pry bars to carefully lift the rock onto the rollers, making sure it is balanced and stable.
- Move the Rock: Push or pull the rock, guiding it along the path. As the rock moves, retrieve the rollers from behind and place them in front, repeating the process until the rock reaches its destination.
Using a Dolly:
- Position the Dolly: Place the dolly next to the rock, ensuring it is stable and level.
- Load the Rock: Use levers or pry bars to carefully lift the rock onto the dolly, making sure it is centered and balanced.
- Secure the Load: If necessary, use straps or ropes to secure the rock to the dolly, preventing it from shifting or falling off during transport.
- Move the Rock: Push or pull the dolly, guiding it along the planned route. Use caution when navigating obstacles or uneven terrain.
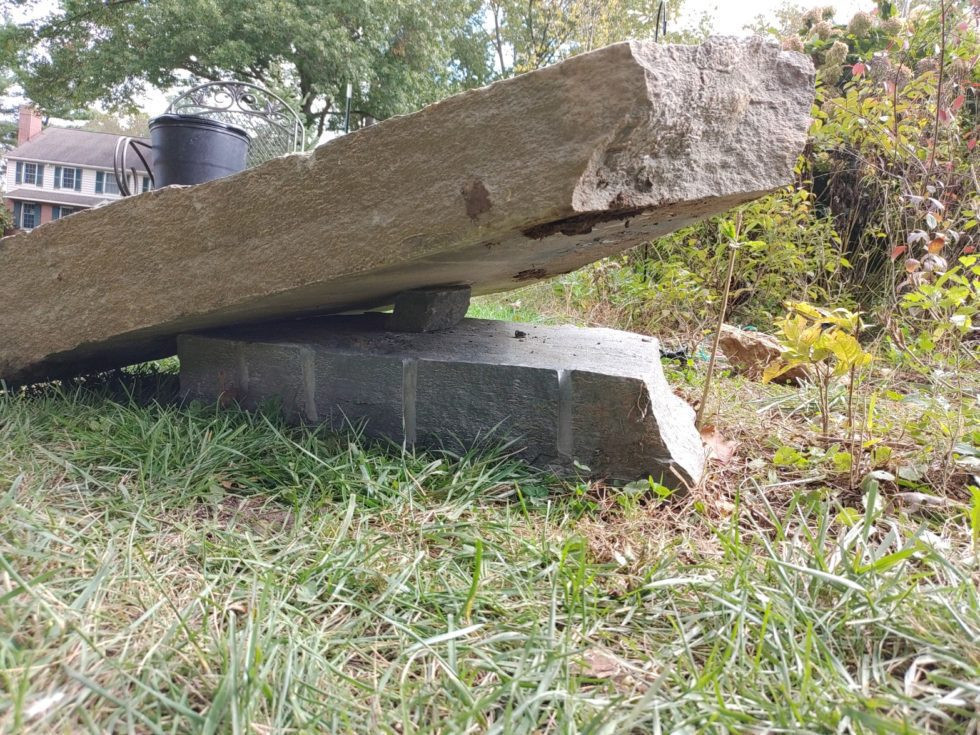 Pivot point strategy for moving heavy stones, an ingenious method
3.4. Positioning the Rock
Positioning the rock precisely in its final location is the last step in the moving process. This requires careful maneuvering and attention to detail to ensure the rock is stable, secure, and aesthetically pleasing.
Using Levers and Pry Bars:
- Fine Adjustments: Use levers and pry bars to make fine adjustments to the rock’s position, ensuring it is aligned correctly and at the desired angle.
- Check for Stability: Once the rock is in position, check for stability by gently pushing and pulling on it. If it wobbles or shifts, make further adjustments until it is secure.
- Fill Gaps: Fill any gaps or spaces around the rock with soil, gravel, or other materials to provide additional support and prevent it from settling.
Aesthetic Considerations:
- Orientation: Consider the rock’s orientation and how it will look from different angles.
- Relationship to Surroundings: Think about how the rock relates to the surrounding landscape and other features in the area.
- Natural Look: Aim for a natural and organic look, avoiding any unnatural or forced placements.
4. Safety Tips and Precautions
Moving heavy rocks can be dangerous if proper safety precautions are not taken. Follow these safety tips to protect yourself and others from injury.
4.1. Proper Lifting Techniques
Using proper lifting techniques is essential for preventing back strain and other injuries when moving heavy rocks.
Key Principles:
- Bend Your Knees: Bend your knees and keep your back straight, using your leg muscles to lift the rock.
- Keep the Rock Close: Keep the rock as close to your body as possible to reduce strain on your back.
- Avoid Twisting: Avoid twisting your body while lifting or carrying the rock.
- Get Help: If the rock is too heavy to lift safely on your own, ask for assistance from others or consult with professionals at rockscapes.net for advice.
4.2. Using Equipment Safely
Using equipment safely is crucial for preventing accidents and injuries when moving heavy rocks.
General Guidelines:
- Read the Manual: Before using any equipment, read the manufacturer’s manual carefully and follow all instructions.
- Inspect the Equipment: Before each use, inspect the equipment for any signs of damage or wear. Replace any worn or damaged items immediately.
- Use the Right Equipment: Use the right equipment for the task at hand, ensuring it is properly sized and rated for the weight of the rock.
- Wear Protective Gear: Always wear appropriate protective gear, such as gloves, safety glasses, and steel-toed boots.
4.3. Staying Aware of Your Surroundings
Staying aware of your surroundings is essential for preventing accidents and injuries when moving heavy rocks.
Key Practices:
- Identify Hazards: Look for any potential hazards such as underground utilities, uneven terrain, or unstable slopes.
- Clear the Area: Clear the area of any obstacles such as trees, shrubs, or debris.
- Communicate: If you’re working with others, communicate clearly and coordinate your movements to avoid collisions or accidents.
- Take Breaks: Take frequent breaks to rest and rehydrate, especially on hot days.
- Stay Alert: Avoid distractions and stay focused on the task at hand.
5. Alternative Methods for Moving Rocks
While the previous methods are effective, there are alternative approaches you can consider for moving rocks, depending on the specific circumstances and available resources.
5.1. The “Rock and Roll” Technique
The “rock and roll” technique is a simple yet effective method for moving rocks over short distances, especially on relatively flat terrain.
How It Works:
- Clear the Path: Clear the path of any obstacles or debris.
- Position Yourself: Stand behind the rock, facing the direction you want to move it.
- Grip the Rock: Grip the rock firmly with your hands, using gloves for protection.
- Rock and Roll: Rock the rock back and forth, gradually moving it forward with each movement.
- Repeat: Repeat the process until the rock reaches its destination.
5.2. Using Water as a Lubricant
Water can be used as a lubricant to reduce friction and make it easier to slide rocks over certain surfaces.
How It Works:
- Wet the Surface: Wet the surface over which you’ll be moving the rock with water.
- Position the Rock: Position the rock on the wet surface.
- Apply Force: Apply force to the rock, pushing or pulling it along the wet surface.
- Reapply Water: Reapply water as needed to maintain the lubrication.
5.3. Enlisting Professional Help
When all else fails, or if you’re dealing with a particularly large or difficult rock, enlisting professional help is always an option.
Benefits of Professional Help:
- Expertise: Professionals have the knowledge, skills, and experience to move rocks safely and efficiently.
- Equipment: Professionals have access to specialized equipment, such as cranes, forklifts, and excavators, that can make the job easier.
- Insurance: Professionals are insured, protecting you from liability in case of accidents or damage.
- Time Savings: Professionals can complete the job much faster than you could on your own, saving you time and effort.
6. Environmentally Friendly Practices
When moving rocks, it’s important to consider the environmental impact and take steps to minimize any negative effects.
6.1. Minimizing Soil Disturbance
Soil disturbance can lead to erosion, loss of nutrients, and damage to plant roots. To minimize soil disturbance:
- Plan Your Route: Plan your route carefully to avoid sensitive areas, such as wetlands, streams, or areas with fragile vegetation.
- Use Protective Materials: Use plywood, mulch, or other protective materials to cushion the ground and prevent erosion.
- Compact the Soil: Compact the soil after the move to prevent it from settling or eroding.
6.2. Protecting Vegetation
Vegetation provides habitat for wildlife, helps prevent erosion, and adds beauty to the landscape. To protect vegetation:
- Avoid Damaging Plants: Avoid damaging plants or their roots during the moving process.
- Use Protective Barriers: Use protective barriers, such as fences or screens, to shield plants from damage.
- Replace Damaged Plants: If any plants are damaged during the move, replace them as soon as possible.
6.3. Responsible Disposal of Unwanted Rocks
If you have unwanted rocks that you need to dispose of, do so responsibly:
- Recycle: If possible, recycle the rocks by using them in another landscaping project or donating them to a local organization.
- Landfill: If recycling is not an option, dispose of the rocks at a licensed landfill.
- Avoid Illegal Dumping: Never dump rocks illegally, as this can damage the environment and result in fines.
7. Inspiring Landscape Design Ideas with Rocks
Now that you know how to move heavy rocks, let’s explore some inspiring landscape design ideas that incorporate these natural elements.
7.1. Rock Gardens
Rock gardens are a classic landscape design feature that showcases the beauty and variety of rocks.
Key Elements:
- Variety of Rocks: Use a variety of rocks in different sizes, shapes, and colors to create visual interest.
- Well-Draining Soil: Plant the rocks in well-draining soil to prevent root rot.
- Drought-Tolerant Plants: Choose drought-tolerant plants that can thrive in rocky conditions, such as succulents, cacti, and alpine plants.
- Natural Arrangement: Arrange the rocks in a natural and organic way, avoiding any unnatural or forced placements.
7.2. Stone Pathways
Stone pathways add a touch of elegance and functionality to any landscape.
Design Options:
- Flagstone: Use flagstone to create a smooth and level pathway.
- Stepping Stones: Use stepping stones to create a more rustic and informal pathway.
- Gravel: Use gravel to create a low-maintenance and affordable pathway.
- Combination: Combine different types of stones to create a unique and visually appealing pathway.
7.3. Water Features
Rocks can be used to create stunning water features, such as waterfalls, ponds, and streams.
Design Considerations:
- Natural Look: Aim for a natural and organic look, using rocks to create a realistic and appealing water feature.
- Water Source: Choose a reliable water source, such as a pump or a natural spring.
- Liner: Use a liner to prevent water from leaking into the surrounding soil.
- Plants: Add aquatic plants to create a thriving and balanced ecosystem.
8. Frequently Asked Questions (FAQs)
1. What is the best way to move a heavy rock by myself?
The best way to move a heavy rock by yourself involves using levers, rollers, and a dolly if possible. Start by using a lever to lift the rock onto rollers, then gradually move it along a prepared path. A dolly can be used for smoother surfaces.
2. How can I estimate the weight of a large rock?
Estimate the weight of a large rock by measuring its dimensions (length, width, height) and estimating its volume. Then, consider the type of rock; denser rocks like granite will weigh more than lighter rocks like sandstone.
3. What safety precautions should I take when moving heavy rocks?
Always wear protective gear such as gloves, safety glasses, and steel-toed boots. Use proper lifting techniques, bending your knees and keeping your back straight. Clear the area of obstacles and ensure you have enough help if needed.
4. Is it better to push or pull a heavy rock on rollers?
It’s generally better to pull a heavy rock on rollers, as this allows you to maintain better control and balance. Use a rope or chain to pull from a safe distance.
5. How do I prevent damage to my lawn when moving rocks?
Protect your lawn by laying down sheets of plywood or heavy tarps along the moving path. This will distribute the weight and prevent damage to the grass and soil.
6. What type of dolly is best for moving rocks?
A heavy-duty appliance dolly with straps is best for moving rocks, as it provides stability and can handle rough terrain. Ensure the dolly is rated for the weight of the rock you’re moving.
7. Can I use a wheelbarrow to move rocks?
A wheelbarrow can be used for smaller rocks, but it’s not suitable for moving very heavy ones. Overloading a wheelbarrow can be dangerous and cause damage to the wheelbarrow itself.
8. What should I do if I encounter underground utilities while moving a rock?
If you encounter underground utilities, stop immediately and contact your local utility company. Do not attempt to move the rock further without professional assistance.
9. How can I make a rock more stable in its final position?
Ensure the rock is stable by digging a shallow base for it to sit in and using smaller rocks or gravel to fill any gaps around the base. This will prevent wobbling and shifting.
10. When should I hire a professional to move rocks?
Hire a professional when the rock is too large or heavy to move safely on your own, if you lack the necessary equipment, or if you are concerned about potential damage to your property or injury.
9. Conclusion
Moving a heavy rock doesn’t have to be an insurmountable task. By following these steps, using the right tools, and prioritizing safety, you can successfully move rocks and create stunning landscape features. Remember to visit rockscapes.net for more inspiration, detailed guides, and expert advice on all your landscaping needs.
Ready to transform your landscape with beautiful, strategically placed rocks? Contact us at rockscapes.net today to explore our wide selection of natural stones and get personalized guidance from our experienced team. Let us help you bring your vision to life with the timeless beauty of rockscapes.
Address: 1151 S Forest Ave, Tempe, AZ 85281, United States. Phone: +1 (480) 965-9011. Website: rockscapes.net.
