Painting a mandala on a rock is an achievable and rewarding art form; rockscapes.net offers a comprehensive guide to help you create stunning mandala rock art. Let’s explore tips, techniques, and inspiration for designing intricate dot patterns and transforming ordinary stones into beautiful works of art, enhancing your rock painting ideas and DIY rock painting projects.
1. What Are Mandala Rocks And Why Paint Them?
Mandala rocks are stones decorated with intricate, repetitive patterns radiating from a central point. Painting mandalas on rocks offers relaxation, creativity, and unique decorative items; research from Arizona State University’s School of Art indicates that engaging in repetitive art forms like mandala painting can reduce stress and enhance mindfulness.
1.1. Therapeutic Benefits of Mandala Rock Painting
Painting mandala rocks offers several therapeutic benefits:
- Stress Reduction: The repetitive nature of dot painting can calm the mind.
- Enhanced Focus: Concentrating on intricate patterns improves focus and concentration.
- Mindfulness: The process promotes being present and mindful.
- Creativity Boost: Designing unique mandalas encourages creative expression.
1.2. Decorative Uses of Mandala Rocks
Mandala rocks can be used in numerous decorative ways:
- Garden Art: Adds a unique and artistic touch to gardens.
- Home Decor: Decorative accents for shelves, desks, or coffee tables.
- Gifts: Personalized and thoughtful handmade gifts.
- Paperweights: Functional and beautiful additions to desks.
- Meditation Aids: Used as focal points during meditation practices.
2. What Materials Are Needed To Paint A Mandala On A Rock?
To start painting mandalas on rocks, you’ll need a few essential materials: rocks, acrylic paints, dotting tools, sealant, and design templates. Using high-quality materials ensures your mandala rock art looks professional and lasts long.
2.1. Essential Supplies for Mandala Rock Art
Here’s a list of essential supplies:
| Supply | Description |
|---|---|
| Rocks | Smooth, flat rocks provide the best surface for painting. |
| Acrylic Paints | Versatile and vibrant, perfect for creating detailed dot work. |
| Dotting Tools | Sets of various sizes to create different dot sizes and patterns. |
| Paintbrushes | For base coats and blending colors. |
| Sealant | Protects the finished design from the elements and wear. |
| Design Templates | Optional guides to help with spacing and pattern consistency. |
| Palette | Something to put the paints on. |
| Pencil | For sketching out the design on the rock. |
2.2. Choosing The Right Rocks
Selecting the right rocks is crucial for a successful mandala painting project:
- Smooth Surface: Opt for rocks with a smooth, non-porous surface to ensure the paint adheres well.
- Flat Shape: A flat surface makes it easier to create intricate designs.
- Size: Choose a size that is comfortable to work with; larger rocks provide more space for complex patterns.
- Color: Lighter-colored rocks make the colors pop, while darker rocks can create a dramatic contrast.
2.3. Selecting The Best Acrylic Paints
Acrylic paints are ideal for mandala rock painting due to their versatility and vibrant colors:
- Quality: High-quality acrylic paints provide better coverage and color intensity.
- Consistency: Look for paints with a smooth consistency for easy dotting.
- Color Range: A variety of colors allows for intricate and eye-catching designs.
- Brands: Popular brands include Arteza, FolkArt, and Liquitex.
2.4. The Importance of Dotting Tools
Dotting tools are essential for creating precise and uniform dots:
- Variety of Sizes: A set with various sizes allows for different dot sizes and effects.
- Material: Metal or plastic dotting tools are durable and easy to clean.
- Alternatives: Toothpicks, skewers, or the ends of paintbrushes can be used as alternatives.
3. How To Prepare Rocks For Painting Mandala Art?
Preparing rocks properly ensures the best surface for painting your mandala design. This involves cleaning, priming, and applying a base coat. Proper preparation enhances paint adhesion and the overall look of your finished artwork.
3.1. Cleaning and Priming Rocks
Follow these steps to clean and prime your rocks:
- Wash the Rocks: Use soap and water to remove dirt and debris.
- Dry Thoroughly: Ensure the rocks are completely dry before proceeding.
- Prime (Optional): Apply a primer to create a smooth surface for the paint to adhere to. Gesso is a popular choice.
3.2. Applying A Base Coat
A base coat provides a consistent background color, making your mandala design stand out:
- Choose a Color: Select a base coat color that complements your design.
- Apply Evenly: Use a paintbrush or sponge to apply an even coat of paint.
- Let Dry: Allow the base coat to dry completely before starting your mandala design.
- Apply Second Coat: Apply a second coat for better coverage.
4. How To Design Your Mandala Pattern?
Designing your mandala pattern is a creative process that involves planning and inspiration. You can start with simple patterns and gradually move to more complex designs.
4.1. Finding Inspiration for Mandala Designs
Look for inspiration in various sources:
- Nature: Use natural elements like flowers, leaves, and geometric patterns.
- Online Resources: Explore mandala designs on Pinterest, Instagram, and rockscapes.net.
- Books: Mandala coloring books offer a variety of patterns to inspire your designs.
- Cultural Art: Draw inspiration from traditional mandala art from different cultures.
4.2. Sketching Your Design
Sketching your design helps you visualize the final result and plan the dot placement:
- Start with a Center Point: Mark the center of your rock with a pencil.
- Draw Basic Shapes: Sketch circles, triangles, or squares around the center point.
- Plan Dot Placement: Outline where you want to place your dots, considering size and spacing.
- Erase and Refine: Adjust the design as needed until you are satisfied with the layout.
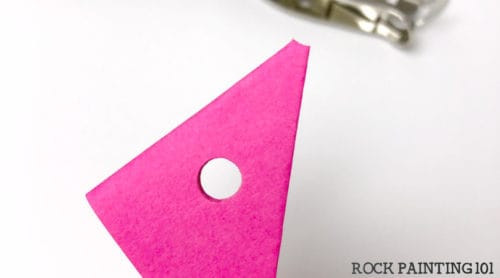
4.3. Using Templates and Tools for Precision
Templates and tools can help you achieve precise and symmetrical designs:
- Paper Templates: Create paper templates with pre-drawn circles and markings.
- Stencils: Use stencils to create uniform shapes and patterns.
- Compass: A compass helps create perfect circles for your design.
- Rulers: Rulers ensure straight lines and even spacing.
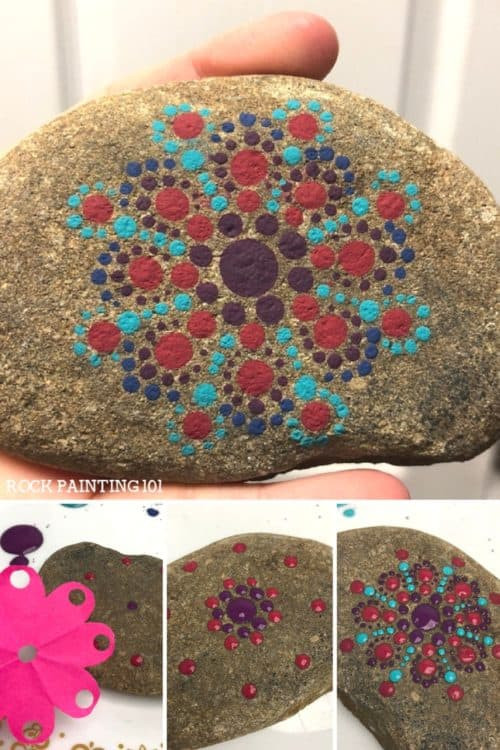
5. Step-By-Step Guide To Painting A Mandala On A Rock
Painting a mandala on a rock involves several steps: creating the center point, adding layers of dots, incorporating different colors, and refining the design. Patience and attention to detail are key to achieving a stunning result.
5.1. Creating The Center Point
The center point is the focal point of your mandala design:
- Choose a Color: Select a color for your center point.
- Apply a Large Dot: Use a large dotting tool to create a prominent dot in the center of the rock.
- Let Dry: Allow the center point to dry completely before adding surrounding dots.
5.2. Adding Layers of Dots
Adding layers of dots creates depth and intricacy in your mandala design:
- Start with the Inner Circle: Create a circle of dots around the center point, using a smaller dotting tool.
- Vary Dot Sizes: Use different-sized dotting tools to create variation in your dot patterns.
- Maintain Consistent Spacing: Ensure the dots are evenly spaced for a symmetrical look.
- Add Multiple Layers: Continue adding layers of dots, gradually expanding outward from the center.
5.3. Incorporating Different Colors
Using different colors enhances the visual appeal of your mandala:
- Plan Your Color Scheme: Choose a color scheme that complements your design.
- Alternate Colors: Alternate colors in each layer to create visual interest.
- Blend Colors: Use a small brush to blend colors for a gradient effect.
- Add Accents: Use metallic or glitter paints for added sparkle and dimension.
5.4. Refining Your Design
Refining your design involves adding final touches and correcting any mistakes:
- Check for Symmetry: Ensure your design is symmetrical and balanced.
- Add Small Details: Add tiny dots or lines to fill in gaps and enhance the design.
- Correct Mistakes: Use a damp cotton swab to carefully remove any mistakes.
- Step Back and Evaluate: Take a step back to evaluate your design and make any necessary adjustments.
 Mandala painted rocks in a variety of colors and dot sizes, perfect for beginners.
6. How To Use Dotting Tools For Mandala Art?
Mastering the use of dotting tools is essential for creating precise and beautiful mandala art. Different techniques and tips can help you achieve professional-looking results.
6.1. Techniques For Creating Different Dot Sizes
Here are some techniques for creating different dot sizes:
- Vary Pressure: Apply more pressure for larger dots and less pressure for smaller dots.
- Use Different Sized Tools: Switch between different-sized dotting tools to create varied dot sizes.
- Adjust Paint Quantity: Use more paint on the tool for larger dots and less paint for smaller dots.
- Practice: Practice on paper or a scrap rock to get a feel for the different techniques.
6.2. Tips For Achieving Uniform Dots
Achieving uniform dots requires consistency and technique:
- Use Consistent Pressure: Apply the same amount of pressure for each dot to ensure uniformity.
- Maintain a Steady Hand: Keep your hand steady to prevent wobbles and uneven dots.
- Clean Your Tools: Regularly clean your dotting tools to prevent paint buildup.
- Use a Grid: Use a grid or template to help with dot placement and spacing.
6.3. Cleaning and Maintaining Your Dotting Tools
Proper cleaning and maintenance ensure your dotting tools last longer and perform well:
- Wipe After Each Use: Wipe your dotting tools with a damp cloth after each use to remove excess paint.
- Soak in Water: Soak the tools in warm, soapy water to remove stubborn paint.
- Use a Brush: Use a small brush to scrub away any remaining paint.
- Dry Thoroughly: Ensure the tools are completely dry before storing them.
7. Advanced Techniques For Mandala Rock Painting
Once you’ve mastered the basics, you can explore advanced techniques to create more intricate and stunning mandala designs.
7.1. Creating Gradient Effects
Gradient effects add depth and dimension to your mandala:
- Choose Two Colors: Select two colors that blend well together.
- Apply Base Color: Apply a base color to the area where you want the gradient.
- Add Second Color: Use a small brush to apply the second color, blending it into the base color.
- Blend with a Sponge: Use a sponge or blending tool to create a smooth transition between the two colors.
7.2. Incorporating Swirls and Lines
Swirls and lines add movement and dynamism to your mandala design:
- Use a Fine Brush: Use a fine-tipped brush to create delicate swirls and lines.
- Plan Your Placement: Plan the placement of your swirls and lines to complement your dot patterns.
- Practice: Practice creating swirls and lines on paper before applying them to your rock.
- Use a Light Touch: Use a light touch to create flowing and graceful lines.
7.3. Adding Texture and Dimension
Adding texture and dimension makes your mandala more visually interesting:
- Use Textured Paints: Use paints with a textured finish, such as glitter or metallic paints.
- Apply Dimensional Accents: Use dimensional paints or embellishments to add raised elements to your design.
- Create Layered Effects: Layer different colors and textures to create depth and dimension.
- Experiment: Experiment with different techniques to find what works best for you.
8. How To Seal and Protect Your Mandala Rock Art?
Sealing your mandala rock art protects it from the elements and ensures its longevity. Choosing the right sealant and applying it correctly is crucial.
8.1. Choosing The Right Sealant
Consider these factors when choosing a sealant:
- Type: Acrylic sealants, polyurethane sealants, and epoxy resins are popular choices.
- Finish: Sealants are available in matte, gloss, and satin finishes.
- UV Protection: Choose a sealant with UV protection to prevent fading.
- Water Resistance: Ensure the sealant is water-resistant to protect against moisture.
8.2. Applying Sealant Properly
Follow these steps to apply sealant correctly:
- Clean the Rock: Ensure the rock is clean and dry before applying sealant.
- Apply Evenly: Apply an even coat of sealant using a brush or spray.
- Let Dry: Allow the sealant to dry completely before applying a second coat.
- Apply Second Coat: Apply a second coat for added protection.
8.3. Tips For Long-Lasting Protection
Follow these tips to ensure your mandala rock art lasts longer:
- Store Indoors: Store your mandala rocks indoors to protect them from the elements.
- Avoid Direct Sunlight: Avoid placing your mandala rocks in direct sunlight to prevent fading.
- Clean Regularly: Clean your mandala rocks regularly with a soft cloth to remove dust and dirt.
- Reapply Sealant: Reapply sealant every few years to maintain protection.
9. Common Mistakes To Avoid In Mandala Rock Painting
Avoiding common mistakes can help you achieve better results in your mandala rock painting projects.
9.1. Using Low-Quality Materials
Using low-quality materials can compromise the look and longevity of your artwork:
- Invest in High-Quality Paints: High-quality paints provide better coverage and color intensity.
- Choose Durable Dotting Tools: Durable dotting tools ensure precise and consistent dot placement.
- Select a Good Sealant: A good sealant protects your artwork from the elements and wear.
9.2. Rushing The Process
Rushing the process can lead to mistakes and a less polished final product:
- Take Your Time: Allow yourself plenty of time to complete each step of the process.
- Be Patient: Be patient and focus on each detail of your design.
- Avoid Distractions: Avoid distractions to maintain focus and concentration.
9.3. Neglecting Preparation
Neglecting proper preparation can affect the adhesion and appearance of your paint:
- Clean Your Rocks: Clean your rocks thoroughly to remove dirt and debris.
- Apply a Base Coat: Apply a base coat to create a smooth and consistent surface.
- Allow to Dry: Allow each layer of paint to dry completely before proceeding.
10. Mandala Rock Painting Ideas and Inspiration
Explore various ideas and inspirations to create unique and eye-catching mandala rock art.
10.1. Simple Mandala Designs For Beginners
Here are some simple mandala designs perfect for beginners:
- Basic Dot Patterns: Start with simple dot patterns, such as circles and lines.
- Floral Mandalas: Create floral mandalas using simple flower shapes and dot patterns.
- Geometric Mandalas: Design geometric mandalas using basic shapes like triangles and squares.
- Monochromatic Mandalas: Create monochromatic mandalas using different shades of a single color.
10.2. Complex Mandala Designs For Advanced Artists
Challenge yourself with these complex mandala designs:
- Intricate Dot Work: Incorporate intricate dot work with varying dot sizes and patterns.
- Layered Designs: Create layered designs with multiple colors and textures.
- Nature-Inspired Mandalas: Design nature-inspired mandalas with detailed depictions of flowers, leaves, and animals.
- Abstract Mandalas: Create abstract mandalas with free-flowing lines and shapes.
10.3. Seasonal and Themed Mandala Rocks
Create seasonal and themed mandala rocks for special occasions:
- Holiday Mandalas: Design holiday-themed mandalas for Christmas, Halloween, or Easter.
- Seasonal Mandalas: Create seasonal mandalas inspired by spring, summer, autumn, or winter.
- Nature-Themed Mandalas: Design nature-themed mandalas inspired by the ocean, forest, or desert.
- Personalized Mandalas: Create personalized mandalas with names, initials, or special messages.
 A variety of mandala rocks, each with a unique seasonal theme and color scheme.
11. Selling Your Mandala Rock Art
If you enjoy creating mandala rock art, you can turn your hobby into a business by selling your creations.
11.1. Where To Sell Your Mandala Rocks
Consider these options for selling your mandala rocks:
- Online Marketplaces: Sell your mandala rocks on Etsy, Amazon, or eBay.
- Craft Fairs: Participate in local craft fairs and markets.
- Local Shops: Partner with local shops and boutiques to sell your artwork.
- Social Media: Use social media platforms like Instagram and Facebook to promote your artwork.
11.2. Pricing Strategies For Mandala Art
Use these strategies to price your mandala art:
- Consider Materials: Calculate the cost of materials, including rocks, paints, and sealants.
- Factor in Time: Estimate the amount of time you spend creating each piece.
- Research Market Prices: Research the prices of similar mandala art pieces.
- Set a Profit Margin: Add a profit margin to cover your expenses and generate income.
11.3. Marketing Your Mandala Rock Business
Market your mandala rock business effectively with these tips:
- Create a Brand: Develop a unique brand identity for your business.
- Use High-Quality Photos: Use high-quality photos to showcase your artwork.
- Engage on Social Media: Engage with your audience on social media platforms.
- Offer Custom Orders: Offer custom orders to cater to individual customer preferences.
12. FAQ: How To Paint a Mandala On A Rock
12.1. What kind of paint is best for painting rocks?
Acrylic paint is generally considered the best for painting rocks due to its versatility, durability, and wide range of colors.
12.2. Do I need to seal my painted rocks?
Yes, sealing your painted rocks is recommended to protect the paint from the elements and ensure the design lasts longer.
12.3. What kind of sealant should I use?
Acrylic sealants, polyurethane sealants, and epoxy resins are popular choices for sealing painted rocks, each offering different levels of protection and finish.
12.4. How do I prevent my painted rocks from fading?
To prevent fading, use high-quality paints with UV protection and apply a sealant that also offers UV protection.
12.5. How do I clean my painted rocks?
Clean your painted rocks with a soft cloth to remove dust and dirt, and avoid using harsh chemicals or abrasive cleaners.
12.6. Can I use Mod Podge to seal my painted rocks?
Mod Podge can be used to seal painted rocks, but it may not provide as much protection as a dedicated sealant, especially for outdoor use.
12.7. What are dotting tools and why are they used?
Dotting tools are instruments with rounded ends used to create uniform dots of varying sizes, essential for mandala art and intricate dot patterns.
12.8. Can I sell my painted rocks?
Yes, you can sell your painted rocks through online marketplaces, craft fairs, local shops, or social media platforms.
12.9. How do I price my painted rocks for sale?
Price your painted rocks by considering the cost of materials, time spent creating each piece, market prices for similar items, and setting a profit margin.
12.10. How do I make my painted rocks waterproof?
To make your painted rocks waterproof, use a sealant specifically designed for outdoor use and apply multiple coats for added protection.
Conclusion: Unleash Your Creativity with Mandala Rock Painting
Creating mandala rock art is a fulfilling and creative activity that offers therapeutic benefits and beautiful decorative items. By following these tips and techniques from rockscapes.net, you can create stunning mandala designs and transform ordinary rocks into unique works of art.
Ready to start your mandala rock painting journey? Visit rockscapes.net for more inspiration, detailed guides, and expert advice on creating beautiful and lasting rock art. Discover the joy of transforming ordinary stones into extraordinary masterpieces. Contact us at 1151 S Forest Ave, Tempe, AZ 85281, United States, or call +1 (480) 965-9011. Explore the world of rock art and let your creativity shine!