Painting frogs on rocks is a delightful way to add a touch of whimsy and nature-inspired art to your garden or indoor spaces. Rockscapes.net is here to guide you through the process, ensuring you create charming amphibian masterpieces that bring joy and color to your surroundings.
1. Why Paint Frogs on Rocks? A Lily Pad of Reasons
Painting frogs on rocks is more than just a fun craft; it’s a way to connect with nature, express creativity, and add unique decor to your space.
- A Touch of Whimsy: Frogs bring a playful, lighthearted feel to any setting.
- Connection to Nature: Painting natural elements fosters appreciation for the environment.
- Personalized Decor: Hand-painted rocks are unique and reflect your personal style.
- Therapeutic Activity: Rock painting can be a relaxing and mindful activity.
- Engaging Project: It’s a fantastic activity for all ages, perfect for families and groups.
- Outdoor Charm: Adds character to gardens, patios, and outdoor landscapes.
- Indoor Accent: Can be used as paperweights, shelf decor, or desk accessories.
- Gifts from the Heart: Hand-painted rocks make thoughtful, personalized gifts.
- Educational: A creative way to learn about frogs and their habitats.
- Sustainable Art: Uses natural materials and reduces waste.
2. Gathering Your Lily Pad: Essential Supplies
Before you hop into painting, gather your supplies for a smooth and enjoyable experience.
2.1. Rock Selection: The Perfect Canvas
Choosing the right rock is the first step in creating a stunning frog rock.
- Shape: Opt for smooth, oval, or rounded rocks that resemble a frog’s body.
- Size: Choose a size that fits your design, typically 3-5 inches in diameter.
- Surface: Ensure the rock has a smooth surface to allow for easy painting and detail work.
- Texture: Avoid overly porous rocks as they can absorb paint unevenly.
- Color: Light-colored rocks work best as they provide a good base for vibrant colors.
2.2. Paints: Choosing the Right Hues
Selecting the right paints is crucial for creating vibrant and durable frog rocks.
- Acrylic Paints: Ideal for rock painting due to their durability, water resistance, and wide range of colors.
- Paint Pens: Fine-tipped paint pens are perfect for detailed work, outlines, and adding intricate designs.
- Primer: A base coat can help the paint adhere better, especially on porous rocks.
- Sealer: A clear acrylic sealer protects the paint from the elements and prevents chipping.
2.3. Brushes: The Artist’s Tool
Having the right brushes will help you achieve the desired level of detail and precision.
- Detail Brushes: Fine-tipped brushes are essential for painting small details like eyes, spots, and patterns.
- Flat Brushes: Use flat brushes for base coats and filling in larger areas.
- Round Brushes: Round brushes are versatile and can be used for a variety of techniques.
2.4. Additional Supplies: Ensuring a Smooth Process
These additional supplies will make your rock painting experience more organized and enjoyable.
- Water Container: For rinsing brushes and diluting paints.
- Palette: A surface for holding and mixing paints.
- Paper Towels: For cleaning brushes and wiping up spills.
- Pencils: For sketching your design onto the rock.
- Eraser: For correcting any mistakes in your sketch.
- Work Surface: Cover your work area with newspaper or a mat to protect it from paint.
3. Hopping into Action: Step-by-Step Painting Guide
Follow these steps to create your own adorable frog rock, ensuring each stroke brings your amphibian friend to life.
3.1. Preparing the Rock: A Clean Canvas
Start by cleaning the rock to ensure a smooth and even painting surface.
- Wash the Rock: Rinse the rock with soap and water to remove any dirt or debris.
- Dry Thoroughly: Allow the rock to dry completely before painting.
- Prime (Optional): Apply a layer of primer to create a smooth base for your paint.
3.2. Sketching the Design: Outlining Your Frog
Use a pencil to lightly sketch the outline of your frog onto the rock.
- Basic Shape: Start with an oval or rounded shape for the body.
- Head: Add a smaller circle or oval for the head.
- Legs: Sketch the legs extending from the body, positioning them in a natural frog-like pose.
- Eyes: Draw two small circles for the eyes on top of the head.
- Details: Add any additional details like spots, patterns, or a smile.
3.3. Base Coat: Setting the Stage
Apply the base coat to the entire frog shape, providing a foundation for the details.
- Choose a Color: Select a base color for your frog, such as green, brown, or a vibrant shade of your choice.
- Apply Evenly: Use a flat brush to apply the base coat evenly, covering the entire sketched area.
- Allow to Dry: Let the base coat dry completely before moving on to the next step.
3.4. Adding Details: Bringing Your Frog to Life
Use fine-tipped brushes and paint pens to add intricate details to your frog.
- Eyes: Paint the eyes with white, then add black pupils and small white highlights for a lifelike effect.
- Spots and Patterns: Add spots, stripes, or other patterns to the body using different colors.
- Mouth: Paint a smile or a detailed mouth using a fine-tipped brush or paint pen.
- Legs and Feet: Define the legs and feet with shading and details, creating a three-dimensional look.
3.5. Shading and Highlighting: Adding Depth
Use shading and highlighting techniques to add depth and dimension to your frog.
- Shading: Apply darker shades of green or brown to the edges of the body and legs to create shadows.
- Highlighting: Use lighter shades to highlight the top of the body, eyes, and other prominent areas.
- Blend: Blend the shading and highlighting seamlessly to create a natural look.
3.6. Final Touches: Perfecting Your Masterpiece
Add any final touches to perfect your frog rock.
- Outlining: Use a fine-tipped black paint pen to outline the frog, making the details stand out.
- Adjustments: Make any necessary adjustments to the colors, details, or shading.
- Clean Up: Remove any stray paint marks or smudges.
3.7. Sealing: Protecting Your Art
Protect your painted frog rock with a clear acrylic sealer.
- Apply Evenly: Spray a thin, even coat of sealer over the entire rock.
- Allow to Dry: Let the sealer dry completely before handling the rock.
- Multiple Coats: Apply multiple coats for added protection, allowing each coat to dry before applying the next.
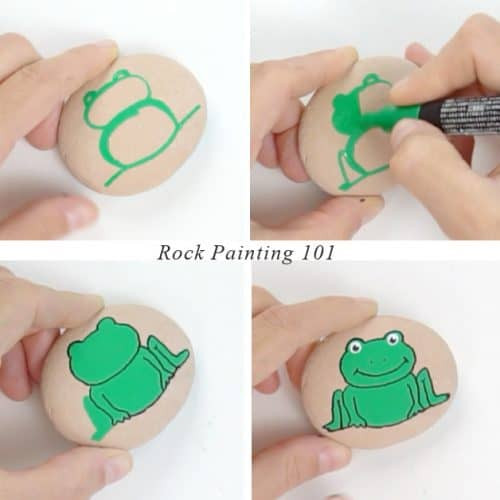 Frog rock painting process
4. Croaking with Creativity: Design Ideas and Inspiration
Explore various design ideas to create unique and captivating frog rocks.
4.1. Realistic Frogs: Capturing Nature’s Beauty
Paint realistic frog species to showcase their natural beauty and detail.
- Green Tree Frog: Depict the vibrant green color and smooth skin of the green tree frog.
- Poison Dart Frog: Recreate the bright colors and intricate patterns of the poison dart frog.
- Bullfrog: Capture the large size and distinctive features of the bullfrog.
- Detailed Skin Texture: Use fine brushes to create a realistic skin texture with bumps and ridges.
- Natural Colors: Stick to natural colors and shades to maintain authenticity.
4.2. Cartoon Frogs: Adding a Touch of Fun
Create cartoon-style frogs with exaggerated features and playful expressions.
- Large Eyes: Draw large, expressive eyes to give your frog a friendly appearance.
- Bright Colors: Use vibrant colors and bold outlines for a fun, cartoonish look.
- Exaggerated Features: Emphasize features like long legs, big smiles, and funny hats.
- Simple Shapes: Use simple shapes and lines for an easy-to-paint design.
- Playful Poses: Pose your frog in playful positions, like jumping, waving, or sitting on a lily pad.
4.3. Patterned Frogs: Abstract Designs
Experiment with abstract patterns and designs to create unique and artistic frog rocks.
- Geometric Patterns: Use geometric shapes like circles, squares, and triangles to create interesting designs.
- Floral Patterns: Add floral elements and vines to create a whimsical and nature-inspired look.
- Tribal Patterns: Incorporate tribal patterns and motifs for a unique and cultural design.
- Color Combinations: Experiment with different color combinations to create eye-catching patterns.
- Abstract Shapes: Use abstract shapes and lines to create a modern and artistic frog design.
4.4. Themed Frogs: Matching Your Decor
Create frog rocks that match your home decor or a specific theme.
- Garden Theme: Paint frogs sitting on lily pads, surrounded by flowers and greenery.
- Beach Theme: Create frogs with beach-themed accessories like sunglasses, hats, and beach balls.
- Holiday Theme: Paint frogs with holiday-themed decorations, like Santa hats, Easter eggs, or Halloween costumes.
- Rustic Theme: Use natural colors and textures to create a rustic and earthy frog design.
- Elegant Theme: Incorporate elegant patterns and colors, like gold and silver, for a sophisticated look.
5. Amphibian Abodes: Displaying Your Frog Rocks
Showcase your painted frog rocks in creative and eye-catching ways.
5.1. Garden Display: Natural Habitat
Place your frog rocks in your garden to create a whimsical and natural display.
- Among Plants: Place the rocks among plants and flowers to blend with the natural surroundings.
- Near Water Features: Position the rocks near ponds, fountains, or bird baths to enhance the amphibian theme.
- Rock Gardens: Incorporate the painted rocks into rock gardens for added interest and color.
- Pathways: Use the rocks as decorative elements along garden pathways.
- Grouping: Group several painted frog rocks together to create a focal point.
5.2. Indoor Decor: Bringing Nature Inside
Use your frog rocks as decorative accents inside your home.
- Shelves: Display the rocks on shelves, mantels, or windowsills.
- Desks: Use the rocks as paperweights or desk accessories.
- Table Centerpieces: Create unique table centerpieces with the painted rocks.
- Planters: Place the rocks in planters among your houseplants.
- Collections: Start a collection of painted rocks and display them together.
5.3. Gifts: Sharing the Joy
Give your painted frog rocks as thoughtful and personalized gifts.
- Birthdays: Surprise friends and family with a unique and handmade gift.
- Holidays: Create holiday-themed frog rocks as festive presents.
- Thank You Gifts: Show your appreciation with a personalized painted rock.
- Special Occasions: Give the rocks as gifts for weddings, anniversaries, or housewarmings.
- Personalized Messages: Add personalized messages or names to make the gifts even more special.
6. Tips for Success: Creating Ribbit-ing Results
Follow these tips to ensure your frog rock painting projects are a success.
- Use High-Quality Materials: Invest in high-quality paints, brushes, and sealers for the best results.
- Practice: Practice your designs on paper before painting on the rocks.
- Patience: Take your time and allow each layer of paint to dry completely before adding the next.
- Experiment: Don’t be afraid to experiment with different colors, patterns, and techniques.
- Protect Your Work Area: Cover your work surface to protect it from paint spills and splatters.
- Clean Your Brushes: Clean your brushes thoroughly after each use to keep them in good condition.
- Proper Sealing: Ensure proper sealing to protect your painted rocks from the elements.
- Inspiration: Find inspiration from nature, art, and other rock painting projects.
- Have Fun: Enjoy the process and let your creativity flow.
- Rockscapes.net: Visit Rockscapes.net for more ideas, inspiration, and supplies for your rock painting projects.
7. The Science Behind the Stone: Geological Considerations
Understanding the geological aspects of the rocks you paint can enhance your appreciation and the durability of your artwork. According to research from Arizona State University’s School of Earth and Space Exploration, rocks vary in porosity and mineral composition, which affects how well they hold paint.
- Porosity: Rocks like sandstone are highly porous and may require more primer to prevent paint absorption.
- Mineral Composition: Rocks with high quartz content are durable and resistant to weathering, making them ideal for outdoor displays.
- Surface Texture: Smooth rocks like river stones provide an excellent surface for detailed painting.
- Geological Formation: Understanding how a rock was formed can inform your artistic choices, allowing you to highlight its natural features.
8. Frequently Asked Questions (FAQs)
8.1. What Type Of Paint Is Best For Painting Rocks?
Acrylic paints are the best choice for painting rocks due to their durability, water resistance, and wide range of colors; they adhere well to the rock surface and provide vibrant, long-lasting results. To ensure longevity, apply a primer before painting and seal the finished artwork with a clear acrylic sealer.
8.2. How Do I Prepare Rocks For Painting?
To prepare rocks for painting, wash them with soap and water to remove any dirt, debris, or loose particles and allow them to dry completely before starting your project; for porous rocks, consider applying a primer to create a smooth base that helps the paint adhere better. This ensures a clean surface that enhances the vibrancy and durability of your painted designs.
8.3. Can I Use Paint Pens On Rocks?
Yes, you can use paint pens on rocks, especially for detailed work and fine lines, because paint pens with fine tips provide precision and control, making them ideal for adding intricate patterns, outlines, and small details to your rock paintings; be sure to choose paint pens with acrylic-based ink for best results and durability.
8.4. How Do I Seal Painted Rocks?
To seal painted rocks, apply a clear acrylic sealer evenly over the entire surface and allow it to dry completely to protect the paint from the elements and prevent chipping; multiple coats of sealer can be applied for added protection, ensuring that each coat dries before the next is applied.
8.5. What If I Make A Mistake While Painting?
If you make a mistake while painting, allow the paint to dry completely and then gently sand down the area with fine-grit sandpaper or use a damp cloth to wipe away the mistake; once the surface is smooth and clean, you can repaint the area with the correct color or design.
8.6. How Do I Prevent My Painted Rocks From Fading?
To prevent your painted rocks from fading, use high-quality, UV-resistant paints and sealers to protect the colors from sun exposure; additionally, consider placing your painted rocks in shaded areas to minimize direct sunlight, which can cause colors to fade over time.
8.7. Is It Safe To Paint Rocks With Children?
Yes, it is safe to paint rocks with children as long as you use non-toxic, water-based paints and provide proper supervision; ensure that children do not ingest the paint and that they wash their hands thoroughly after painting, and choose a well-ventilated area to avoid inhaling paint fumes.
8.8. Can I Sell My Painted Rocks?
Yes, you can sell your painted rocks at craft fairs, markets, or online platforms because many people appreciate handmade art and unique decorative items; ensure that your designs are original or that you have the rights to use any copyrighted images, and price your rocks competitively based on the time, materials, and skill involved.
8.9. How Do I Clean Painted Rocks?
To clean painted rocks, gently wipe them with a damp cloth to remove any dirt or debris and avoid using harsh chemicals or abrasive cleaners, as these can damage the paint and sealer; for outdoor rocks, periodically reseal them to maintain their protection and vibrancy.
8.10. Where Can I Find Inspiration For Rock Painting Designs?
You can find inspiration for rock painting designs from nature, art books, online resources, and social media platforms and explore different themes, patterns, and color combinations to spark your creativity; also, consider visiting Rockscapes.net for a wide range of ideas, tutorials, and inspiration for your rock painting projects.
9. Hop on Over to Rockscapes.net!
Ready to start painting your own adorable frog rocks? Visit Rockscapes.net for a wealth of inspiration, high-quality supplies, and expert advice. Whether you’re looking for unique design ideas, the perfect paints and brushes, or guidance on sealing and displaying your creations, Rockscapes.net has everything you need to bring your artistic vision to life.
Rockscapes.net: Your Gateway to Creative Landscaping
At Rockscapes.net, we offer more than just inspiration; we provide the resources and expertise to transform your outdoor spaces into stunning landscapes. Explore our extensive collection of natural stones, from granite and slate to river rocks and flagstone, each carefully selected for its unique beauty and durability.
Address: 1151 S Forest Ave, Tempe, AZ 85281, United States
Phone: +1 (480) 965-9011
Website: rockscapes.net
Discover the perfect stones to complement your frog rock creations and elevate your garden’s aesthetic. Our team of experts is ready to assist you with design ideas, material selection, and installation tips, ensuring your landscape reflects your personal style and vision.
10. Final Thoughts: Embrace the Art of Rock Painting
Painting frogs on rocks is a rewarding and enjoyable activity that combines creativity, nature, and personalization. Whether you’re creating charming garden accents, unique indoor decor, or heartfelt gifts, the possibilities are endless. With the right supplies, a bit of inspiration, and the expert guidance from rockscapes.net, you can transform ordinary stones into extraordinary works of art. So grab your brushes, gather your rocks, and let your imagination leap into action. Your very own delightful frog rock masterpieces await!