Polishing rocks by hand enhances the natural beauty of your stones, transforming them into gleaming treasures, and at rockscapes.net, we’ll show you how. This guide explores the art of manual rock polishing, detailing methods for achieving a professional finish, whether you’re a hobbyist or a seasoned rockhound. By mastering techniques like sanding, buffing, and using polishing compounds, you will uncover the best way to improve the appearance and luster of your stones, as well as explore rock finishing, stone buffing, and lapidary techniques.
Table of Contents
- Why Hand Polish Rocks?
- Essential Tools and Materials for Hand Polishing
- Step-by-Step Guide: How to Polish Rocks by Hand
- Advanced Hand Polishing Techniques
- Using a Dremel for Rock Polishing
- Rock Tumbling vs. Hand Polishing: Which Method is Right for You?
- Tips for Achieving a Professional Finish
- Maintaining Your Polished Rocks
- Troubleshooting Common Polishing Problems
- Frequently Asked Questions (FAQs)
1. Why Hand Polish Rocks?
Is hand polishing rocks a worthwhile endeavor? Absolutely! Hand polishing rocks is an accessible and rewarding activity suitable for rock enthusiasts of all ages. It offers a hands-on connection with nature, transforming rough stones into polished gems with minimal equipment and cost. Soft stones, such as amber and turquoise, respond exceptionally well to hand polishing, which helps keep them from getting ruined in a tumbler.
Hand polishing provides several unique benefits:
- Accessibility: Requires minimal materials and setup, making it perfect for beginners and those with limited space.
- Control: Allows for precise shaping and polishing, which is essential for delicate or valuable specimens.
- Therapeutic: Offers a relaxing and meditative experience as you focus on the rhythmic motion of polishing.
- Preservation: Gentle enough for fragile stones that might be damaged in a tumbler.
- Cost-Effective: Reduces the need for expensive machinery.
- Educational: Deepens your understanding of mineral properties and lapidary techniques.
Consider hand polishing if you’re seeking a tactile, controlled, and mindful approach to enhancing the beauty of your rocks.
2. Essential Tools and Materials for Hand Polishing
What do you need to hand polish rocks? To begin hand polishing rocks effectively, gather these essential tools and materials:
- Rocks: Select softer stones like turquoise, amber, or obsidian for easier hand polishing.
- Cleaning Supplies: A bucket, warm water, mild soap, and a toothbrush for removing dirt and debris.
- Sandpaper: A range of grits, starting with 220 for shaping and moving to 500 and 1200 for refining and polishing.
- Polishing Cloth: Thick denim or a similar material for buffing.
- Polishing Compound: Toothpaste works well; alternatively, use commercial rock polishing compounds.
- Water Source: A bowl or running water to keep the rocks and sandpaper wet.
- Mineral Oil or Rock Polish: To enhance the shine after polishing.
- Dremel (Optional): For faster shaping and polishing, especially for harder stones.
- Safety Gear (If using a Dremel): Safety glasses, gloves, and a dust mask.
Having these materials on hand will ensure a smooth and efficient hand polishing experience, helping you achieve professional-looking results.
 Tools for Hand Polishing Rocks
3. Step-by-Step Guide: How to Polish Rocks by Hand
How do you actually polish rocks by hand? Follow these detailed steps to transform your rough stones into gleaming gems:
Step 1: Cleaning the Rocks
Start by cleaning the rock to remove any dirt or debris. According to research from Arizona State University’s School of Earth and Space Exploration, cleaning the rocks thoroughly enhances the polishing process. Fill a small bucket with warm, soapy water and use a toothbrush to scrub the stones. Rinse them thoroughly with clean water.
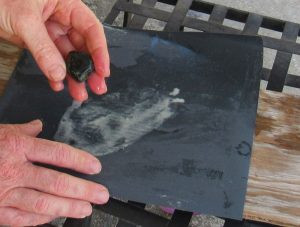
Step 2: Shaping with 220-Grit Sandpaper
Round the corners and shape the rock using 220-grit sandpaper. Wet the sandpaper and place it on a flat surface. Wet the rock and rub it against the sandpaper to smooth the edges. Continuously wet the rock to remove particles and achieve the desired shape.
Step 3: Refining with 500-Grit Sandpaper
Refine the shape and remove heavy scratches using 500-grit sandpaper. Keep the rock wet to improve the sanding process and remove significant scratches.
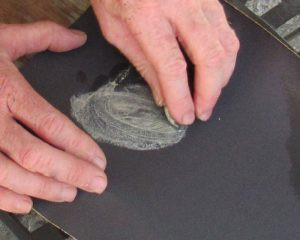
Step 4: Polishing with 1200-Grit Sandpaper
Remove light scratches and start polishing with 1200-grit sandpaper. This extra-fine sandpaper buffs out tiny scratches, allowing the shine to emerge. Keep the rock wet and rinse it often.
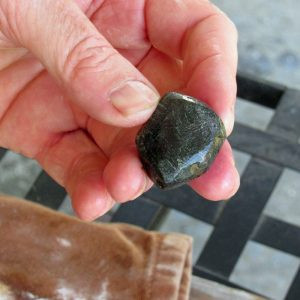
 Checking Polishing Progress
Step 5: Buffing with Toothpaste
Dampen a thick cloth, such as denim, and add a dab of toothpaste. Work the stone through the toothpaste on the fabric to create a beautiful luster. Apply more toothpaste as needed until the desired shine is achieved.
Step 6: Final Polish
Rinse off the toothpaste and coat the polished stone with mineral oil or commercial rock polish to enhance the luster. Once dry, your rock is ready to display.
4. Advanced Hand Polishing Techniques
What are some advanced techniques to enhance your hand-polishing results? To take your hand polishing skills to the next level, consider these advanced techniques:
- Using a Rock Hammer: To start, if the rocks are large, then a rock hammer would be needed to trim them down. According to the Gemological Institute of America, pre-shaping rocks with a rock hammer can significantly reduce the time spent on sanding.
- Pre-Soaking: Pre-soaking rocks in water for several hours before polishing can help soften the surface, making it easier to work with.
- Using a Variety of Polishing Compounds: Experiment with different polishing compounds, such as cerium oxide or diamond paste, to achieve unique finishes and enhance the shine on various types of stones.
- Creating a Polishing Lap: Build a simple polishing lap by attaching a piece of leather or felt to a flat surface. Apply polishing compound and use the lap to achieve an ultra-smooth finish.
- Applying Heat: Gently heating the rock with a heat gun or hairdryer before applying the final polish can help open the pores of the stone, allowing the polish to penetrate deeper and create a more lasting shine.
- Using Ultrasonic Cleaners: An ultrasonic cleaner will clean out all the residue left from sanding/polishing in every nook and cranny of the stone.
By incorporating these advanced techniques into your hand polishing process, you can achieve professional-quality results and bring out the full beauty of your rocks.
5. Using a Dremel for Rock Polishing
Can a Dremel enhance rock polishing? Yes, a Dremel is a versatile tool that can significantly speed up the rock polishing process, especially for shaping and smoothing hard stones with intricate crevices.
 Smoothing Amber with Sandpaper
How to Use a Dremel for Rock Polishing
- Safety First: Always wear safety glasses, gloves, and a dust mask to protect yourself from flying debris and dust particles.
- Select the Right Attachment: Choose Dremel attachments with varying grits for grinding, smoothing, and polishing. Diamond-coated bits are ideal for harder stones, while polishing wheels work well for softer materials.
- Start with Coarse Grits: Begin with a coarse grit attachment to shape the rock and remove any rough edges. Apply light pressure and move the Dremel in smooth, even strokes.
- Progress to Finer Grits: Gradually switch to finer grit attachments to remove scratches and refine the surface.
- Polishing: Use a polishing wheel with a polishing compound like cerium oxide or diamond paste to achieve a high-gloss finish.
- Cool the Rock: Regularly dip the rock in water to prevent overheating, which can cause damage or cracking.
Tips for Effective Dremel Polishing
- Use Low Speeds: Start with low speeds to maintain control and prevent the Dremel from skipping or bouncing.
- Apply Light Pressure: Let the Dremel do the work. Applying too much pressure can damage the rock or wear out the attachments.
- Work in Small Sections: Focus on small areas at a time to ensure even polishing and avoid over-grinding.
- Keep Attachments Clean: Clean the attachments regularly with a brush or compressed air to remove any buildup of rock particles.
By following these guidelines, you can safely and effectively use a Dremel to polish rocks and achieve stunning results.
6. Rock Tumbling vs. Hand Polishing: Which Method is Right for You?
When should you tumble versus hand polish? The choice between rock tumbling and hand polishing depends on your goals, the type of stones you’re working with, and the amount of time and effort you’re willing to invest.
Rock Tumbling
- Pros:
- Less labor-intensive, as the machine does most of the work.
- Ideal for polishing large quantities of rocks simultaneously.
- Suitable for harder stones that require extensive grinding.
- Cons:
- Time-consuming, often taking several days to several weeks.
- Less control over the final shape and finish.
- Can damage delicate or fragile stones.
- Requires specialized equipment (rock tumbler, grit, etc.).
Hand Polishing
- Pros:
- Provides greater control over the shaping and polishing process.
- Ideal for softer stones and delicate specimens.
- Faster turnaround for smaller projects.
- Requires minimal equipment and setup.
- Cons:
- More labor-intensive.
- Not suitable for polishing large quantities of rocks.
- Can be challenging for very hard stones.
According to experts at rockscapes.net, hand polishing is best for those who enjoy a hands-on approach and want to achieve precise results, while rock tumbling is more suitable for those seeking a low-maintenance method for polishing larger quantities of rocks.
7. Tips for Achieving a Professional Finish
What are the secrets to getting a professional-looking finish? Achieving a professional finish when hand polishing rocks requires attention to detail and the right techniques. Here are some tips to help you achieve stunning results:
- Start with Clean Rocks: Ensure your rocks are thoroughly cleaned before you begin polishing. Remove any dirt, debris, or residue that could interfere with the polishing process.
- Use Quality Sandpaper: Invest in high-quality sandpaper in a range of grits. Opt for silicon carbide sandpaper, which is durable and effective for shaping and smoothing rocks.
- Keep the Sandpaper Wet: Wet sanding helps to remove rock particles and prevents the sandpaper from clogging. Keep the sandpaper moist throughout the process by dipping it in water or using a spray bottle.
- Apply Even Pressure: Use consistent and even pressure when sanding and polishing. Avoid pressing too hard, which can create uneven surfaces and scratches.
- Work in Stages: Progress through the grits in stages, gradually moving from coarser grits to finer grits. This will help to remove scratches and refine the surface.
- Rinse Frequently: Rinse the rock and sandpaper frequently to remove rock particles and prevent them from being dragged across the surface, causing scratches.
- Use a Polishing Compound: Apply a polishing compound like cerium oxide or diamond paste to a soft cloth or polishing pad. Buff the rock in a circular motion to create a high-gloss finish.
- Inspect Carefully: Regularly inspect the rock for any remaining scratches or imperfections. Repeat the polishing process as needed until you achieve the desired finish.
- Final Rinse and Dry: Give the polished rock a final rinse with clean water and dry it with a soft cloth.
By following these tips, you can achieve a professional finish and bring out the full beauty of your rocks.
 Polished Stone After Four Rounds
8. Maintaining Your Polished Rocks
How do you keep your rocks looking their best? Proper maintenance is essential to keep your polished rocks looking their best. Here are some tips to help you maintain their shine and prevent damage:
- Dust Regularly: Dust your polished rocks regularly with a soft cloth to remove any buildup of dirt or debris.
- Avoid Harsh Chemicals: Avoid using harsh chemicals or abrasive cleaners, as they can damage the polished surface.
- Protect from Scratches: Store your polished rocks in a way that prevents them from scratching against each other or other objects. Use soft pouches or display them on padded surfaces.
- Apply a Protective Coating: Consider applying a thin layer of wax or sealant to protect the polished surface from scratches and wear.
- Re-Polish as Needed: Over time, the polished surface may become dull or scratched. Re-polish your rocks as needed to restore their shine.
- Handle with Care: Handle your polished rocks with care to avoid dropping or bumping them, which can cause chips or cracks.
- Store Properly: Store your polished rocks in a cool, dry place away from direct sunlight and extreme temperatures.
By following these maintenance tips, you can keep your polished rocks looking beautiful for years to come.
9. Troubleshooting Common Polishing Problems
What should you do if something goes wrong? Even with the best techniques, you might encounter some common problems when polishing rocks. Here are some troubleshooting tips to help you overcome these challenges:
-
Problem: Scratches persist after polishing.
- Solution: Go back to a coarser grit sandpaper and repeat the sanding process. Ensure you are using quality sandpaper and applying even pressure.
-
Problem: The rock is not getting shiny.
- Solution: Ensure you are using a polishing compound and a soft cloth or polishing pad. Experiment with different polishing compounds to find one that works well for your rock type.
-
Problem: The rock is cracking or chipping.
- Solution: Avoid applying too much pressure when sanding or polishing. Work in stages and allow the rock to cool down periodically.
-
Problem: The sandpaper is clogging.
- Solution: Keep the sandpaper wet and rinse it frequently to remove rock particles. Use a brush to clean the sandpaper if necessary.
-
Problem: The polishing compound is leaving a residue.
- Solution: Rinse the rock thoroughly with clean water after polishing. Use a soft cloth to remove any remaining residue.
-
Problem: Uneven polishing.
- Solution: Pay attention to the surface of the rock to identify any areas that need more attention. Rotate the rock frequently to ensure even polishing.
By addressing these common problems with the right troubleshooting techniques, you can overcome challenges and achieve the polished finish you desire.
10. Frequently Asked Questions (FAQs)
What types of rocks are best for hand polishing?
Softer stones like turquoise, amber, obsidian, and soapstone are ideal for hand polishing due to their lower hardness.
How long does it take to hand polish a rock?
The time varies depending on the rock’s hardness and size, but it typically takes several hours to achieve a good polish.
Can I use regular sandpaper for polishing rocks?
Yes, but silicon carbide sandpaper is recommended for its durability and effectiveness.
What is the best polishing compound for rocks?
Cerium oxide, diamond paste, and even toothpaste can be effective polishing compounds for rocks.
Do I need to wear safety gear when hand polishing rocks?
While not always necessary, safety glasses, gloves, and a dust mask are recommended, especially when using power tools like a Dremel.
How do I clean polished rocks?
Use a soft cloth to dust them regularly and avoid harsh chemicals or abrasive cleaners.
Can I polish rocks with a Dremel?
Yes, a Dremel with the appropriate attachments can speed up the polishing process, especially for harder stones.
What is the difference between hand polishing and rock tumbling?
Hand polishing offers more control and is suitable for delicate stones, while rock tumbling is less labor-intensive and ideal for larger quantities of harder stones.
How do I prevent scratches when polishing rocks?
Use quality sandpaper, keep the sandpaper wet, apply even pressure, and progress through the grits in stages.
How do I maintain the shine on polished rocks?
Dust regularly, avoid harsh chemicals, protect from scratches, and re-polish as needed.
Ready to transform your rough stones into gleaming gems? Visit rockscapes.net for more expert tips, a wide selection of stones, and all the supplies you need to start your hand polishing journey. Explore our design ideas, learn about different types of rocks, and get advice from our team of experts. Contact us today at 1151 S Forest Ave, Tempe, AZ 85281, United States, Phone: +1 (480) 965-9011, or visit our website at rockscapes.net. Let us help you bring the beauty of natural stone into your life!