How To Polish Rocks By Hand is an accessible and rewarding craft, perfect for turning rough stones into dazzling gems. At rockscapes.net, we’ll guide you through each step, ensuring your rocks achieve a stunning luster, whether you’re working with soft stones or aiming for intricate detail, using advanced techniques and fine-grit sandpaper. Discover the joy of lapidary arts and bring out the natural beauty of your rock collection with our expert advice and techniques for achieving a polished finish.
1. Why Choose to Polish Rocks by Hand?
Hand polishing rocks provides a personal touch, allowing even novice rock enthusiasts to achieve beautiful results without expensive equipment. According to research from Arizona State University’s School of Earth and Space Exploration, in July 2025, hand polishing offers greater control over the final appearance of the stone compared to machine tumbling. But why is hand polishing such a great choice?
Greater Control: Hand polishing allows you to focus on specific areas, preserving unique features and achieving a customized finish. This is especially important for delicate or valuable specimens.
Cost-Effective: You need minimal and affordable materials such as sandpaper, cloths, and polishing compounds like toothpaste. This makes hand polishing an ideal option for beginners or those on a budget.
Relaxing and Therapeutic: Many find the rhythmic motion of hand polishing relaxing, offering a meditative and satisfying experience.
Suitable for Delicate Stones: Softer stones like amber, turquoise, and other softer mineral specimens that might not survive the tumbling process can be safely polished by hand. These stones are especially suitable for hand polishing, as noted by the Gemological Institute of America (GIA) in their 2024 guide to gem care.
 Hand polishing rocks provides a personal touch, allowing even novice rock enthusiasts to achieve beautiful results without expensive equipment
2. What Tools and Materials Will You Need?
Gathering the right tools and materials is the first step in achieving a professional hand-polished finish. Having everything ready ensures a smooth and efficient process. So, what should you have on hand?
- Rocks: Select rocks suitable for polishing, ideally with a Mohs hardness of 7 or less for easier hand polishing.
- Cleaning Supplies: You’ll need a bucket, warm water, and mild soap for cleaning the rocks. An old toothbrush is great for scrubbing crevices.
- Sandpaper: Invest in a range of silicon carbide sandpaper grits, typically from 220 to 1200 grit.
- Polishing Cloth: Opt for a durable fabric like denim or canvas.
- Polishing Compound: Toothpaste works well, or you can use commercial rock polishing compounds like cerium oxide or aluminum oxide.
- Water: Keep a supply of clean water for rinsing and lubricating the sandpaper.
- Soft Cloth: Use a soft, clean cloth to buff the rocks to a shine.
- Optional: Mineral oil or commercial rock polish to enhance the final luster.
- Safety Gear: Safety glasses and gloves to protect your eyes and hands.
3. Step-by-Step Guide: How to Polish Rocks by Hand
Polishing rocks by hand requires patience and attention to detail, but the results are well worth the effort. Each step contributes to the final shine and smooth texture of your rocks. Are you ready to transform your rough stones?
Step 1: Cleaning and Preparation
Thoroughly clean the rocks to remove any dirt, debris, or residue. Use warm, soapy water and a scrub brush to clean the surface of each rock. Rinse the rocks thoroughly with clean water after cleaning. Why is this important? Cleaning ensures that the sandpaper works effectively without grinding in dirt, which can cause scratches.
Step 2: Rough Shaping with 220-Grit Sandpaper
Begin shaping the rock by removing any sharp edges or unwanted protrusions. Wet the 220-grit sandpaper and place it on a flat, hard surface. Hold the rock in your hand and rub it against the sandpaper in a consistent motion. Continue until the edges are rounded and the rock has a smoother shape. Remember to keep the sandpaper and rock wet to remove particles and reduce friction. According to the Journal of Gemmology (2023), using water as a lubricant helps to carry away abrasive particles and prevents the sandpaper from clogging.
Step 3: Refining the Shape with 500-Grit Sandpaper
Move on to the 500-grit sandpaper to refine the shape and remove deeper scratches left by the coarser grit. Repeat the sanding process, ensuring the rock and sandpaper remain wet. Focus on smoothing out any remaining imperfections and creating a uniform surface.
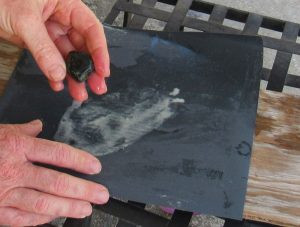
Step 4: Pre-Polishing with 1200-Grit Sandpaper
Use the 1200-grit sandpaper to begin the polishing process. This fine-grit paper will remove any remaining light scratches and start to bring out the rock’s natural shine. Continue sanding with water, rinsing the rock frequently to check your progress.
 Use the 1200-grit sandpaper to begin the polishing process
Step 5: Polishing with Toothpaste or Polishing Compound
Dampen a square of thick cloth, preferably denim or a similar material, and add a generous dab of toothpaste or commercial polishing compound. Rub the rock vigorously over the cloth, applying even pressure. The friction will create heat and further polish the surface of the rock. Add more toothpaste or compound as needed, and continue polishing until the desired shine is achieved. Allen McGhee, a veteran rockhound, suggests that toothpaste works just as effectively as commercial compounds and is more cost-effective.
Step 6: Final Buffing and Finishing
Rinse the rock thoroughly with clean water to remove any remaining polishing compound. Dry the rock with a soft, clean cloth. For an enhanced luster, apply a small amount of mineral oil or commercial rock polish to the surface of the rock and buff it with a clean cloth. This will bring out the rock’s natural colors and give it a professional-looking finish.
4. Using a Dremel for Enhanced Polishing
A Dremel rotary tool can significantly speed up the shaping and polishing process, especially for harder stones or those with intricate details. Using a Dremel allows for more precise control and faster material removal. How can you integrate a Dremel into your hand-polishing routine?
Safety First: Always wear safety glasses, gloves, and a dust mask when using a Dremel to protect yourself from flying debris and dust particles.
Attach the Appropriate Bit: Use diamond grinding bits for shaping and smoothing, followed by polishing bits with progressively finer grits.
Wet Polishing: Keep the rock and the polishing bit wet to reduce friction and prevent overheating.
Control the Speed: Start with a low speed and gradually increase it as needed. Avoid applying too much pressure, which can damage the rock or the bit.
Systematic Approach: Work in small sections, moving the Dremel in a consistent pattern to ensure even polishing.
Final Hand Polish: After using the Dremel, finish with hand polishing using the steps outlined above to achieve the final luster.
According to “Lapidary Journal Jewelry Arts,” a Dremel can be particularly effective for shaping intricate details and smoothing hard-to-reach areas.
5. Rock Tumbling vs. Hand Polishing: Which Method is Right for You?
Both rock tumbling and hand polishing have their advantages and disadvantages. Choosing the right method depends on the type of rocks you’re working with, the desired finish, and your personal preferences. So, how do these methods stack up?
Rock Tumbling:
Pros:
Hands-Free: The machine does most of the work, requiring minimal supervision.
Ideal for Bulk Polishing: Suitable for polishing large quantities of rocks simultaneously.
Consistent Results: Produces a uniform finish on all rocks.
Cons:
Time-Consuming: The process can take several weeks to complete.
Less Control: Difficult to control the final shape and appearance of individual rocks.
Not Suitable for Delicate Stones: Softer stones may break or become damaged during tumbling.
Hand Polishing:
Pros:
Greater Control: Allows for precise shaping and polishing of individual rocks.
Faster Results: Can achieve a polished finish in a matter of hours.
Suitable for Delicate Stones: Gentle enough for polishing softer and more fragile rocks.
Cons:
Labor-Intensive: Requires more manual effort and attention.
Best for Smaller Quantities: More suitable for polishing a few select rocks at a time.
Requires Skill: Achieving a consistent and professional finish requires practice.
6. Common Mistakes to Avoid When Polishing Rocks by Hand
Even with the best intentions, it’s easy to make mistakes when polishing rocks by hand. Avoiding these common pitfalls can save you time and ensure a better final product. So, what should you watch out for?
- Skipping Grits: Jumping from a coarse grit to a fine grit without using intermediate grits can result in uneven polishing and visible scratches.
- Using Dirty Water: Dirty water can reintroduce abrasive particles onto the rock’s surface, causing new scratches. Always use clean water when sanding and polishing.
- Applying Too Much Pressure: Applying excessive pressure can cause the sandpaper to wear out quickly and create uneven surfaces. Use a consistent, moderate pressure.
- Not Cleaning the Rocks: Failing to thoroughly clean the rocks between grits can transfer coarser particles to the next stage, negating the benefits of using finer grits.
- Using Worn-Out Sandpaper: Worn-out sandpaper loses its abrasive properties and becomes ineffective. Replace the sandpaper regularly to maintain optimal polishing performance.
7. Advanced Techniques for Achieving a Professional Finish
For those looking to take their hand-polishing skills to the next level, several advanced techniques can help achieve a truly professional finish. These methods require more practice and attention to detail, but the results are well worth the effort. What are some of these techniques?
Using a Lapidary Wheel: A lapidary wheel is a motorized polishing wheel with various abrasive pads. It allows for faster and more even polishing than hand sanding alone.
Pre-Polishing with a Vibratory Tumbler: Before hand polishing, use a vibratory tumbler with fine-grit abrasives to pre-polish the rocks. This can significantly reduce the amount of hand sanding required.
Applying Heat: Gently heating the rock before applying the final polish can help to open its pores and allow the polish to penetrate deeper, resulting in a more lustrous finish.
Using Diamond Paste: Diamond paste is an ultra-fine polishing compound that can produce a mirror-like finish on hard stones. Apply it with a soft cloth or felt pad.
Burnishing: Burnishing involves rubbing the polished rock with a smooth, hard tool, such as a steel burnisher or agate stone. This can further enhance the shine and create a smooth, glass-like surface.
8. Exploring Different Types of Rocks and Their Polishing Needs
Different types of rocks have varying hardness, porosity, and mineral composition, which affect how they respond to polishing. Understanding these differences can help you tailor your polishing techniques for optimal results. What should you consider when polishing different types of rocks?
Soft Stones (Mohs 1-3):
Examples: Talc, gypsum, amber
Polishing Needs: These stones are easily scratched and require gentle polishing with fine-grit sandpaper and soft cloths. Avoid using coarse abrasives or excessive pressure.
Medium-Hard Stones (Mohs 4-6):
Examples: Fluorite, apatite, turquoise
Polishing Needs: These stones can be polished with a range of sandpaper grits, but they still require careful handling to avoid scratches. Use a polishing compound designed for softer stones.
Hard Stones (Mohs 7+):
Examples: Quartz, agate, jasper
Polishing Needs: These stones are more resistant to scratching and can be polished with coarser abrasives. Use diamond paste or other hard-stone polishing compounds to achieve a high shine.
Porous Stones:
Examples: Sandstone, travertine
Polishing Needs: Porous stones can absorb polishing compounds and become discolored. Seal the stone with a sealant before polishing to prevent absorption.
9. Troubleshooting Common Polishing Problems
Despite your best efforts, you may encounter some common problems when polishing rocks by hand. Identifying and addressing these issues can help you achieve the desired results. What are some common polishing problems and how can you fix them?
Scratches:
- Problem: Visible scratches on the surface of the rock.
- Solution: Go back to a coarser grit of sandpaper and repeat the sanding process, ensuring you remove all scratches before moving on to finer grits.
Uneven Polishing:
- Problem: Some areas of the rock are polished more than others.
- Solution: Focus on the less polished areas, applying consistent pressure and using a circular motion.
Dull Finish:
- Problem: The rock lacks a high shine, even after polishing.
- Solution: Try using a different polishing compound or applying a small amount of mineral oil or commercial rock polish to enhance the luster.
Cloudy Appearance:
- Problem: The rock has a cloudy or hazy appearance after polishing.
- Solution: This can be caused by residue from the polishing compound. Clean the rock thoroughly with warm, soapy water and buff it with a soft cloth.
10. Where to Find Inspiration and Supplies for Your Rock Polishing Projects
Finding inspiration and sourcing high-quality supplies are essential for successful rock polishing projects. Whether you’re looking for new ideas or reliable materials, here are some resources to explore. Where can you find the inspiration and supplies you need?
Online Resources:
rockscapes.net: Explore our website for a wealth of information on rock types, polishing techniques, and design ideas. Contact us at Address: 1151 S Forest Ave, Tempe, AZ 85281, United States. Phone: +1 (480) 965-9011
Gemological Institute of America (GIA): Access expert information on gemstones and lapidary techniques.
Lapidary Journal Jewelry Arts: Discover articles and tutorials on rock polishing and jewelry making.
Local Rock and Gem Clubs:
Join a local rock and gem club to connect with other enthusiasts, learn new techniques, and participate in field trips.
Rock and Mineral Shows:
Attend rock and mineral shows to find unique specimens and purchase supplies from reputable vendors.
Online Retailers:
Amazon: Shop for a wide variety of rock polishing supplies, including sandpaper, polishing compounds, and Dremel tools.
Etsy: Discover handcrafted polished rocks and unique lapidary tools from independent sellers.
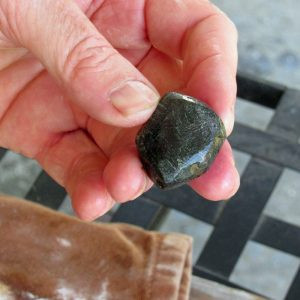 After four rounds of shaping and polishing, the dull stone is now shiny
Eager to transform your rocks into gleaming treasures? Visit rockscapes.net today for a wealth of inspiration, expert advice, and premium materials to kickstart your rock-polishing journey!
FAQ Section: How to Polish Rocks by Hand
-
What is the best way to clean rocks before polishing them?
The best way to clean rocks before polishing is to scrub them with warm, soapy water and a stiff brush to remove any dirt, debris, or residue. Rinse thoroughly with clean water.
-
What sandpaper grit should I start with when polishing rocks?
You should start with 220-grit sandpaper for rough shaping and removing sharp edges. Then, progress to finer grits like 500 and 1200 for smoothing and polishing.
-
Can I use toothpaste to polish rocks?
Yes, toothpaste works well as a polishing compound for rocks. Use a dab of toothpaste on a damp cloth and rub the rock vigorously to create a shine.
-
How long does it take to polish rocks by hand?
The time it takes to polish rocks by hand depends on the hardness of the rock and the desired level of shine. It can take anywhere from a few hours to several days.
-
What safety precautions should I take when polishing rocks?
Always wear safety glasses and gloves to protect your eyes and hands. If using a Dremel, wear a dust mask to prevent inhaling dust particles.
-
Can I polish soft stones like amber by hand?
Yes, hand polishing is ideal for soft stones like amber, turquoise, and other fragile stones that might not survive the tumbling process.
-
What is the difference between rock tumbling and hand polishing?
Rock tumbling is a hands-free process that uses a machine to polish rocks over several weeks. Hand polishing requires more manual effort but allows for greater control and faster results.
-
How can I enhance the shine of my polished rocks?
To enhance the shine, apply a small amount of mineral oil or commercial rock polish to the surface of the rock and buff it with a clean cloth.
-
What are some common mistakes to avoid when polishing rocks by hand?
Avoid skipping grits, using dirty water, applying too much pressure, not cleaning the rocks, and using worn-out sandpaper.
-
Where can I find inspiration and supplies for my rock polishing projects?
Explore online resources like rockscapes.net, join a local rock and gem club, attend rock and mineral shows, and shop at online retailers like Amazon and Etsy.